Send an Email with Amazon SES
Introduction
Implementation
Verify your email address
Before you can send an email using Amazon SES, you must prove that you own the sender's email address by verifying the address (or the domain of the address) with Amazon SES. If you are a new user of Amazon SES, you must also verify the recipient's address, because your account is in a test environment called the Amazon SES sandbox. You can later apply to move out of the sandbox and lift the recipient address limitation.
In this tutorial, you will send an email to and from the same email address.
1. Open the Amazon SES console
Navigate to the Amazon SES console, at https://console.aws.amazon.com/ses.
On the Amazon SES home page, choose Get started.

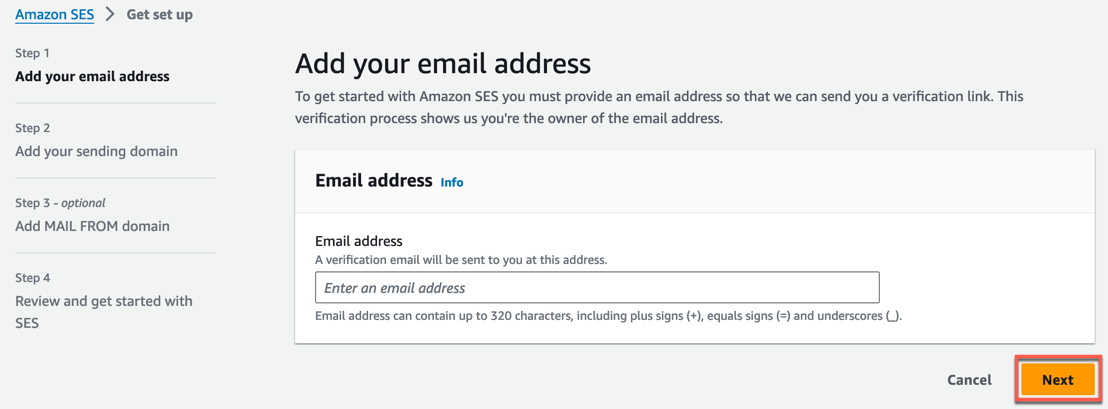
2. Enter an email address
Enter your email address, and choose Next.
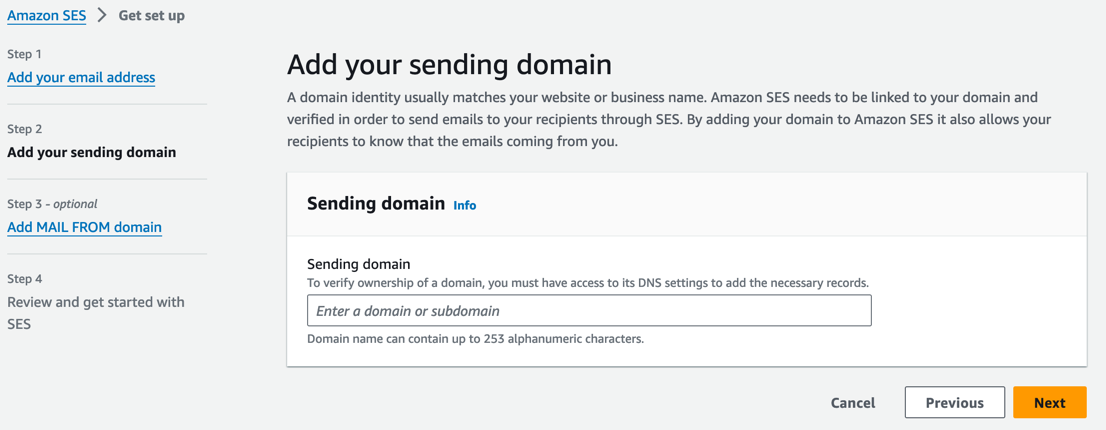
3. Enter a sending domain
Enter your sending domain, and choose Next.
If your domain is www.example.com, enter example.com as your domain. Don't include the "www." part, because the domain verification process won't succeed if you do.
Note: For your initial domain, it is recommended that you verify a valid domain that displays identifiable information about your organization to establish your reputation with AWS as a trusted email sender.
4. Keep MAIL FROM defaults
Leave default selections for Add MAIL FROM domain - optional, and choose Next.

5. Review configuration
Review your inputs, and choose Get started.

6. Verify the email in your inbox.
Sign in to the email client you use to receive email for the email address you entered in the previous step.
In your email client, open the message from Amazon Web Services asking you to confirm that you own the email address. Select the link in the message.

7. Check the verification status in the SES console
Navigate back to the Amazon SES console, and confirm that the status of the email address in the Amazon SES console is verified.

Verify your domain
Before applying for production access, you must first verify your domain.
1. Open setup page
On the Get set up page, in the Verify sending domain section, choose Get DNS records.

2. Get DNS records
From the Publish DNS records table, copy records that appear in this section to be published (added) to your DNS provider.
Alternatively, you can choose Download .csv record set to save a copy of the records to your computer.

3. Add DNS records
Log into your domain’s DNS or web hosting provider, and then add the records containing the values that you copied or saved previously.
Note: Different providers have different procedures for updating DNS records. See the DNS/Hosting provider table following these procedures.
4. Check verification status
Navigate back to the Amazon SES console, and refresh the set up page. Confirm that the status of the domain in the Amazon SES console is verified.

Send an email
Now that you have verified an email address and domain, you can send an email. With Amazon SES, you can send an email in three ways: using the console, using the Simple Mail Transfer Protocol (SMTP) interface, or using the API.
This tutorial shows how to use the simplest method, the console. After you get started with Amazon SES, you will want to send your emails using the SMTP interface or the API, because you can access those programmatically.
With Amazon SES, you can send formatted email or raw email. If you choose formatted email, Amazon SES formats the email for you. If you choose raw email, you must manually format the email, which gives you more control over the email headers and how the message displays. In this tutorial, we use raw format so that we can demonstrate how to send an email formatted in HTML.
1. Open setup page
Navigate back to the Get setup page, in the Send test email section, choose Send test email.

2. Start test email
On the Send test email page, make the following changes:
For Email format, choose Raw.
For From-address, leave default input.
For Scenario, choose Custom.
For Custom recipient, enter the email address you previously verified.
For Message, copy and paste the following message into the provided text box:
Subject: Amazon SES TestMIME-Version: 1.0Content-Type: text/html<!DOCTYPE html><html><body><h1>You have successfully sent an email using Amazon SES!</h1><p>For more information about Amazon SES, see the <a href="http://docs.aws.amazon.com/ses/latest/DeveloperGuide/Welcome.html">Amazon SES Developer Guide</a>.</p></body></html>
3. Send test email
Choose Send test email.
4. Check email delivery
Sign in to the email client of the address you sent the email to. You will find the message that you sent. If you cannot find it, check the spam folder.
Congratulations
Congratulations! You have verified an email address and sent an email using the Amazon SES console.
Next steps
You can continue your journey with AWS by following the next steps:
- Set up a process to handle bounces and complaints.
- Activate the Virtual Deliverability Manager to ensure your account is setup for optimal email deliverability and engagement.
- Apply for a production access. If granted, this will move your account out of the sandbox, remove the restriction on recipient addresses, and increase your sending limits.
- Decide whether you will send your bulk email using the Amazon SES SMTP interface or API. You can use the API either directly or through an AWS SDK.
- Follow deliverability best practices to maximize the number of emails that reach your recipients’ inboxes.
Did you find what you were looking for today?
Let us know so we can improve the quality of the content on our pages