AWS Security Blog
How to migrate your Amazon EC2 Oracle Transparent Data Encryption database encryption keystore to AWS CloudHSM
July 30, 2025: This post has been republished to migrate the Amazon EC2 Oracle Transparent Data Encryption database encryption keystore to AWS CloudHSM using AWS CloudHSM Client SDK 5.
Encrypting databases is crucial for protecting sensitive data, helping you to be aligned with security regulations and safeguarding against data loss. Oracle Transparent Data Encryption (TDE) is a feature that you can use to encrypt data at rest within an Oracle database. TDE uses envelope encryption. Envelope encryption is when the encryption key used to encrypt the tables of your database is encrypted by a primary key that resides either in a software keystore or on a hardware keystore, such as a hardware security module (HSM). This primary key is non-exportable by design to protect the confidentiality and integrity of your database operation. This gives you a more granular encryption scheme on your data. Hence, TDE for Oracle is a common use case for HSM devices such as AWS CloudHSM.
Oracle TDE supports keystores to securely store the TDE primary encryption keys. You can use either the TDE wallet (software keystore) or external key managers such as an HSM device. In this solution, we show you how to migrate a TDE keystore for an Oracle 19c database installed on Amazon Elastic Compute Cloud (Amazon EC2) from a software-based TDE wallet to AWS CloudHSM.
Using an external key manager, such as CloudHSM, offers several benefits over keeping keys on the Oracle wallet on the host:
- Enhanced security: CloudHSM provides FIPS 140 validated hardware security, keeping the encryption key in a tamper-resistant module.
- Centralized key management: CloudHSM supports centralized management of encryption keys, making it straightforward to rotate, back up, and audit keys.
- Compliance: Your regulatory requirements may include encryption, and using CloudHSM can help you meet these compliance needs.
When you move from one type of keystore to another, new TDE primary keys are created inside the new keystore. To make sure that you have access to backups that rely on your past encryption keys, consider leaving the keystore running for your normal recovery window period or copying existing keys to the new keystore with exact key labels. Being able to access prior primary keys will help avoid data re-encryption.
You can use TDE to encrypt data online or offline. Encrypting TDE tablespace online minimizes disruption to database operations; however, it requires twice the storage space as the tablespace being encrypted, because the encryption process happens on a copy of the original tablespace.
Solution overview
In this solution, you migrate a TDE keystore for an Oracle 19c database from a software-based TDE wallet to CloudHSM, using the steps shown in Figure 1. Start by moving the current encryption keystore, which is your original TDE wallet, to a software wallet. This is done by replacing the PKCS#11 provider of your original HSM with the CloudHSM PKCS#11 software library (steps 1–2), next you reverse migrate to a local wallet (steps 3–5). The third step is to switch the encryption wallet for your database to your CloudHSM cluster (steps 6 and 7). After this process is complete, your database will automatically re-encrypt the data keys using the new primary key.
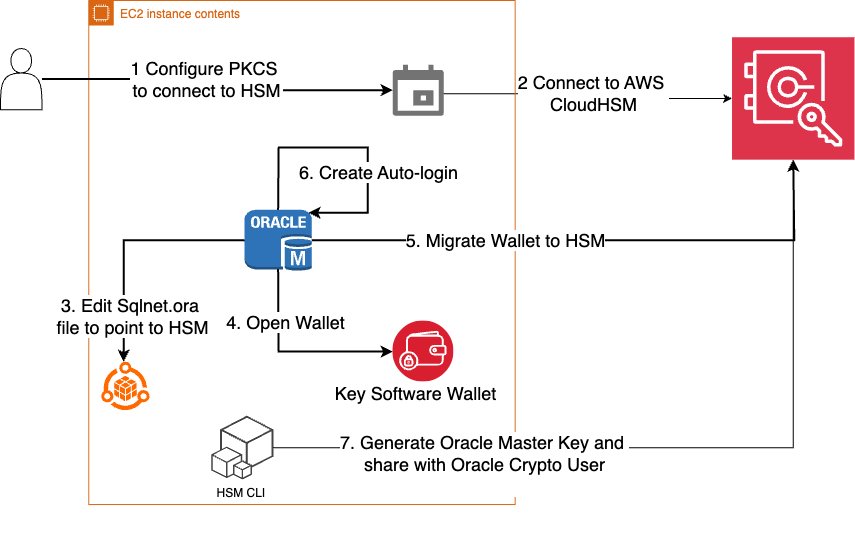
Figure 1: Steps to migrate your EC2 Oracle TDE database encryption wallet to CloudHSM
Note: The following instructions were tested using Oracle version 19c.
Prerequisites
You must have the following prerequisites in place to complete the solution in this post.
- AWS CloudHSM cluster: You need to have a CloudHSM cluster set up and configured with an admin EC2 instance for interacting with CloudHSM following steps and best practices covered in Getting started with AWS CloudHSM.
- Oracle database: Make sure that your Oracle database is up and running. This post assumes that you have an Oracle Database 19c database running on an EC2 Linux instance and there is network connectivity set up to CloudHSM as explained in this Configure the Client Amazon EC2 instance security groups for AWS CloudHSM.
Migrate an Oracle database keystore to a CloudHSM external keystore
As the first step in the migration, you need to migrate your Oracle database keystore to a CloudHSM external keystore. You do this by installing the CloudHSM client and the PKCS#11 library and then configuring the PKCS#11 library to connect to the HSM cluster.
Install the CloudHSM client:
- Install the latest CloudHSM client software on your EC2 instance.
- Configure the client to connect to HSMs in your cluster. For Linux EC2, use the following command:
- Copy the CloudHSM issuing certificate created when you initialized the cluster (
customerCA.crt) to the/opt/cloudhsm/etcfolder. For more information, see Activate the cluster in AWS CloudHSM. - Validate connectivity to the CloudHSM cluster.
- Sign in to the cluster as admin and create a crypto user (e.g.
hsm-crypto-user) and assign it the rolecrypto-user. - Sign in as
hsm-crypto-userand validate the configuration
Install the PKCS#11 Library
- Install the PKCS #11 library for AWS CloudHSM Client SDK 5.
- Configure Oracle to use the PKCS library:
- Copy the PKCS#11 library to the appropriate Oracle folder. Typically, this is:
- Make sure that the folder
/opt/oraclehas the correct ownership, usuallyoracle:dbaasowner:group.
Configure PKCS#11 library to connect to the HSM cluster
Use the following commands:
sudo /opt/cloudhsm/bin/configure-pkcs11 -a <HSM IP addresses>sudo /opt/cloudhsm/bin/configure-pkcs11 --hsm-ca-cert <customerCA certificate file>
Configure the Oracle wallet location
In this section, you configure Oracle to point to CloudHSM using the sqlnet.ora file.
To configure the Oracle wallet location:
- Edit the
sqlnet.oraparameterENCRYPTION_WALLET_LOCATIONto point to the HSM: - Verify that the
WALLET_ROOTparameter is pointing to the current file-based TDE wallet location. This parameter defines the location where the TDE wallet (and other related files) will be stored. You can set it to an existing directory, preferably one in your$ORACLE_BASEor$ORACLE_HOMEdirectory, but other locations are also possible. - Use the following commands to set
WALLET_ROOTif it hasn’t already been set.
Note:
- In Oracle Database 19c and later, the
ENCRYPTION_WALLET_LOCATION. parameter insqlnet.orais deprecated in favor of usingWALLET_ROOTandTDE_CONFIGURATION.- You can also use the
V$ENCRYPTION_WALLETview to check the current keystore location and status.
Point the Oracle database to use a local file-based keystore and CloudHSM
The KEYSTORE_CONFIGURATION attribute within TDE_CONFIGURATION determines the keystore type.
To point the Oracle database:
- Use the following code to point the database to the local keystore and CloudHSM.
- Restart the database to have consistent results.
Verify that the keystore file-based wallet is open
To proceed with encryption key migration, you need to check the current keystore status and make sure that the file-based wallet is open.
To verify that the wallet is open:
- Check to see if the file-based wallet is open.
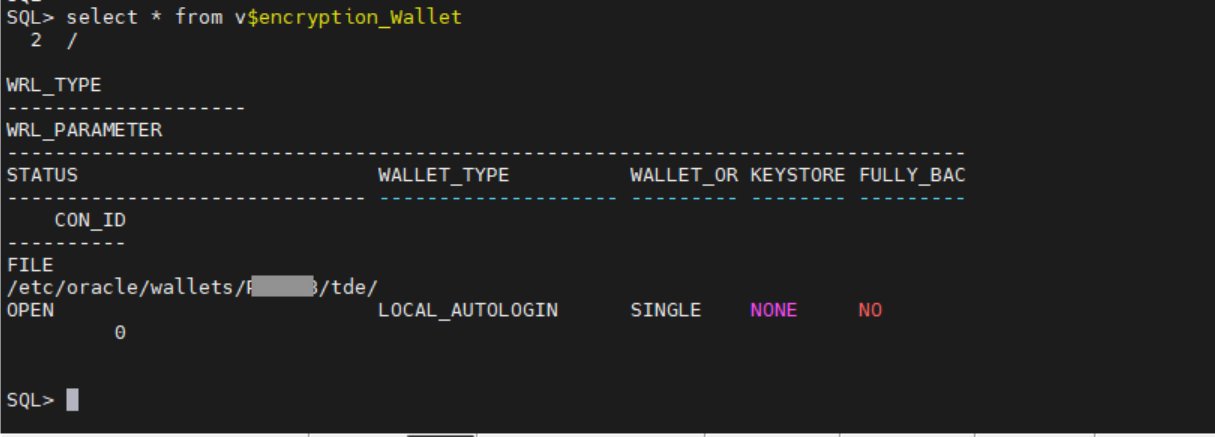
Figure 2: Verify that the wallet status is OPEN
- If the wallet status is not OPEN, use the following command to open it:
Migrate the encryption key to CloudHSM
Use the ADMINISTER KEY MANAGEMENT SET ENCRYPTION KEY command to initiate the TDE primary encryption key migration.
To migrate the encryption key:
- Use the following command to migrate the encryption key:
The parameters used to migrate the encryption key are:
SET ENCRYPTION KEY: Specifies that the command is related to the TDE primary encryption keyIDENTIFIED BY: Specifies the details for migrating the keystore, including the external keystore user and passwordMIGRATE USING: Specifies the password for the file-based wallet containing the primary encryption keyWITH BACKUP: Creates a backup of the keystore before the migration
Verify that the migration is complete
At this point, the migration from Oracle to Cloud HSM should be complete. Use the following steps to verify it.
To verify the migration:
- Check the wallet status again. If the migration was successful, the
WALLET_TYPEwill beHSMand theWALLET_ORwill bePRIMARY.
Figure 3: Verify that WALLET_TYPE and WALLET_OR are correct
- In the wallet is not open, use:
- Verify that the database can access encrypted data without issues, confirming that the migration was successful.
Setup auto-login
Create auto-login to open the wallet during database restarts to connect to AWS CloudHSM.
To set up auto_login:
- Create a new file-based keystore with the same username and password as the CloudHSM crypto user.
- Add the CloudHSM crypto user password to a keystore (TDE wallet).
- The following command creates a new auto-login keystore. This is useful for scenarios where the keystore needs to be accessed without human intervention.
- Open the newly created file based keystore.
Key rotation
Key rotation helps you to adhere to security best practices by providing several data security benefits. Regular rotation of TDE keys reduces the window of opportunity for a bad actor who might have obtained a key, thereby minimizing the impact of a potential breach.
Many established security frameworks and compliance standards—such as PCI DSS and HIPAA—recommend or require regular key rotation to maintain the integrity and confidentiality of encrypted data. By making sure that keys aren’t used indefinitely, you can help reduce the risk of exposure or compromise, which reinforces overall security.
Encryption algorithms can become less secure over time because of advancements in computing power or newly discovered vulnerabilities. By rotating keys regularly, you can transition to stronger encrypting methods as needed, and so improve protection against emerging risks.
When to rotate TDE keys
The frequency of key rotation depends on several factors, including organizational policies, regulatory requirements, and the sensitivity of the data being protected. Here are some common practices:
- Annually: Many organizations rotate TDE keys once a year to align with common compliance requirements.
- Quarterly: For higher-security environments or more sensitive data, rotating keys every quarter can provide an additional layer of security.
- If keys are compromised or suspected to be compromised: If you believe a key to be compromised, rotating that key as soon as possible is recommended to reduce the impact window.
Oracle TDE primary key rotation with an HSM key
In this section, you choose a 32-bit hex value to use as a prefix when generating a key, then use that key to update the Oracle database to use the new primary key.
- Sign in to the database instance as a user who has the
ADMINISTER KEY MANAGEMENTorSYSKMprivilege and execute following command: - Decide on a 32-bit hex value pattern to be used. We used
15A5142C9E2D3C2F18FD435814257DFDin this example. - Add the prefix
ORACLE.TDE.HSM.MKto the hex pattern. - Sign in to CloudHSM and generate a key using the label generated in the previous step.
- Share the key with the Oracle hsm-crypto-user in case the original key was generated through another user.
- Update the Oracle database to use the new primary TDE key.
By following these guidelines, you can enhance the security of your encrypted data, align with regulatory requirements, and maintain robust key management practices.
Conclusion
In this post, we’ve shown you the importance of Transparent Data Encryption (TDE) and the benefits of using an external key manager such as AWS CloudHSM for storing TDE encryption keys. We’ve discussed the benefits of TDE compared to encrypting underlying storage and why using an external key manager is superior to keeping keys on the Oracle wallet on the host. Following these guidelines can help you enhance the security of your encrypted data, align with regulatory requirements, and maintain robust key management practices.
The key takeaways from this post are:
- TDE offers granular encryption, compliance benefits, and robust key management.
- External key managers provide enhanced security, centralized management, improved auditability and scalability.
- Regular rotation of TDE keys is crucial for maintaining security, aligning with regulations, and following recommended practices in key management.
To start securing your Oracle databases with TDE and AWS CloudHSM, visit the AWS Management Console. Follow the steps outlined in this guide to migrate your TDE encryption keystore to AWS CloudHSM and begin rotating your keys regularly to enhance your data security posture. By taking these actions, you can make sure that your sensitive data remains protected, your organization remains aligned with regulations, and you are following the best practices in data encryption and key management.
For more information, see:
- Oracle Documentation on Managing Keystore and TDE Primary Encryption Key
- AWS CloudHSM Documentation
- Oracle Key Documentation
If you have feedback about this post, submit comments in the Comments section below.