AWS News Blog
Introducing the AWS IoT Button Enterprise Program
The AWS IoT Button first made its appearance on the IoT scene in October of 2015 at AWS re:Invent with the introduction of the AWS IoT service. That year all re:Invent attendees received the AWS IoT Button providing them the opportunity to get hands-on with AWS IoT. Since that time AWS IoT button has been made broadly available to anyone interested in the clickable IoT device.
During this past AWS re:Invent 2016 conference, the AWS IoT button was launched into the enterprise with the AWS IoT Button Enterprise Program. This program is intended to help businesses to offer new services or improve existing products at the click of a physical button. With the AWS IoT Button Enterprise Program, enterprises can use a programmable AWS IoT Button to increase customer engagement, expand applications and offer new innovations to customers by simplifying the user experience. By harnessing the power of IoT, businesses can respond to customer demand for their products and services in real-time while providing a direct line of communication for customers, all via a simple device.
AWS IoT Button Enterprise Program
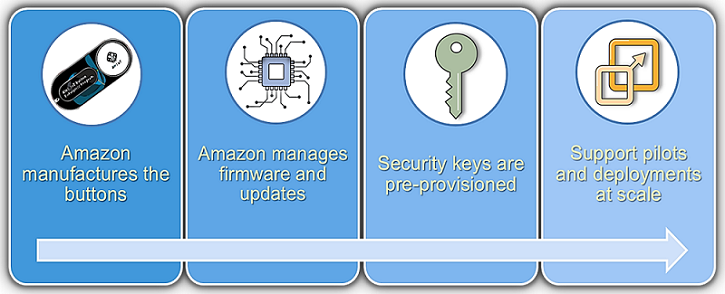
Let’s discuss how the new AWS IoT Button Enterprise Program works. Businesses start by placing a bulk order of the AWS IoT buttons and provide a custom label for the branding of the buttons. Amazon manufactures the buttons and pre-provisions the IoT button devices by giving each a certificate and unique private key to grant access to AWS IoT and ensure secure communication with the AWS cloud. This allows for easier configuration and helps customers more easily get started with the programming of the IoT button device.
Businesses would design and build their IoT solution with the button devices and creation of device companion applications. The AWS IoT Button Enterprise Program provides businesses some complimentary assistance directly from AWS to ensure a successful deployment. The deployed devices then would only need to be configured with Wi-Fi at user locations in order to function.
For enterprises, there are several use cases that would benefit from the implementation of an IoT button solution. Here are some ideas:
- Reordering services or custom products such as pizza or medical supplies
- Requesting a callback from a customer service agent
- Retail operations such as a call for assistance button in stores or restaurants
- Inventory systems for capturing products amounts for inventory
- Healthcare applications such as alert or notification systems for the disabled or elderly
- Interface with Smart Home systems to turn devices on and off such as turning off outside lights or opening the garage door
- Guest check-in/check-out systems
AWS IoT Button
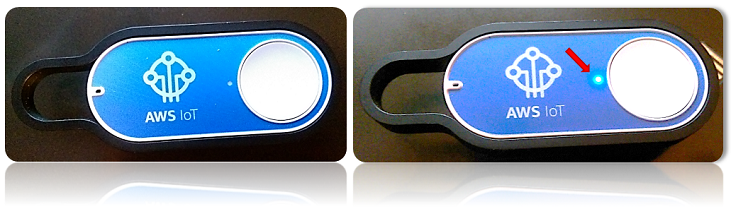
At the heart of the AWS IoT Button Enterprise Program is the AWS IoT Button. The AWS IoT button is a 2.4GHz Wi-Fi with WPA2-PSK enabled device that has three click types: Single click, Double click, and Long press. Note that a Long press click type is sent if the button is pressed for 1.5 seconds or longer. The IoT button has a small LED light with color patterns for the status of the IoT button. A blinking white light signifies that the IoT button is connecting to Wi-Fi and getting an IP address, while a blinking blue light signifies that the button is in wireless access point (AP) mode. The data payload that is sent from the device when pressed contains the device serial number, the battery voltage, and the click type.
Currently, there are 3 ways to get started building your AWS IoT button solution. The first option is to use the AWS IoT Button companion mobile app. The mobile app will create the required AWS IoT resources, including the creation of the TLS 1.2 certificates, and create an AWS IoT rule tied to AWS Lambda. Additionally, it will enable the IoT button device via AWS IoT to be an event source that invokes a new AWS Lambda function of your choosing from the Lambda blueprints. You can download the aforementioned mobile apps for Android and iOS below.
 |
 |
The second option is to use the AWS Lambda Blueprint Wizard as an easy way to start using your AWS IoT Button. Like the mobile app, the wizard will create the required AWS IoT resources for you and add an event source to your button that invokes a new Lambda function.
The third option is to follow the step by step tutorial in the AWS IoT getting started guide and leverage the AWS IoT console to create these resources manually.
Once you have configured your IoT button successfully and created a simple one-click solution using one of the aforementioned getting started guides, you should be ready to start building your own custom IoT button solution. Using a click of a button, your business will be able to build new services for customers, offer new features for existing services, and automate business processes to operate more efficiently.
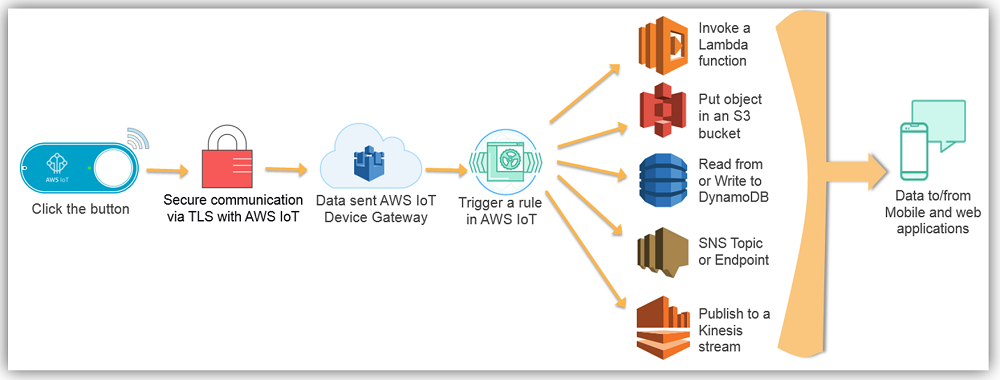
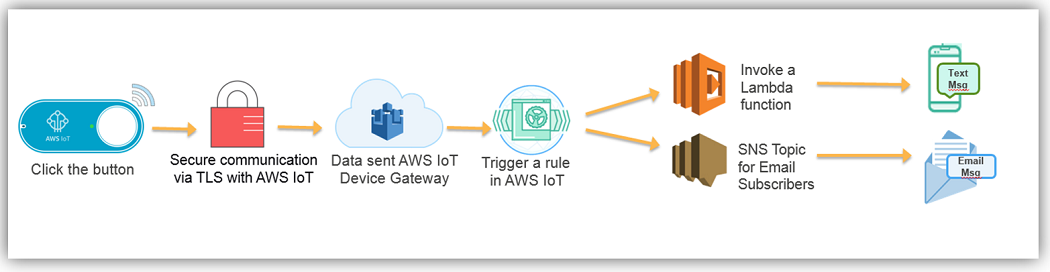
The basic technical flow of an AWS IoT button solution is as follows:
- A button is clicked and secure connection is established with AWS IoT with TLS 1.2
- The button data payload is sent to AWS IoT Device Gateway
- The rules engine evaluates received messages (JSON) published into AWS IoT and performs actions or trigger AWS Services based defined business rules.
- The triggered AWS Service executes or action is performed
- The device state can be read, stored and set with Device Shadows
- Mobile and Web Apps can receive and update data based upon action
Now that you have general knowledge about the AWS IoT button, we should jump into a technical walk-through of building an AWS IoT button solution.
AWS IoT Button Solution Walkthrough
We will dive more deeply into building an AWS IoT Button solution with a quick example of a use case for providing one-click customer service options for a business.
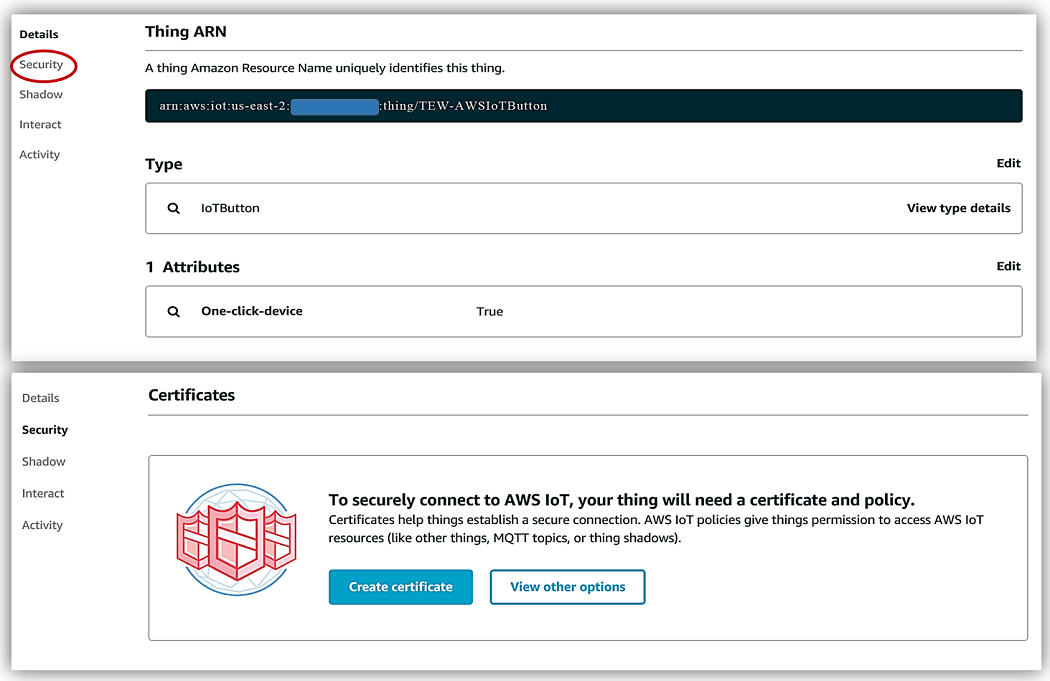
To get started, I will go to the AWS IoT console, register my IoT button as a Thing and create a Thing type. In the console, I select the Registry and then Things options in console menu.

The name of my IoT thing in this example will be TEW-AWSIoTButton. If you desire to categorize the IoT things, you can create a Thing type and assign a type to similar IoT ‘things’. I will categorize my IoT thing, TEW-AWSIoTButton, as an IoTButton thing type with a One-click-device attribute key and select Create thing button.

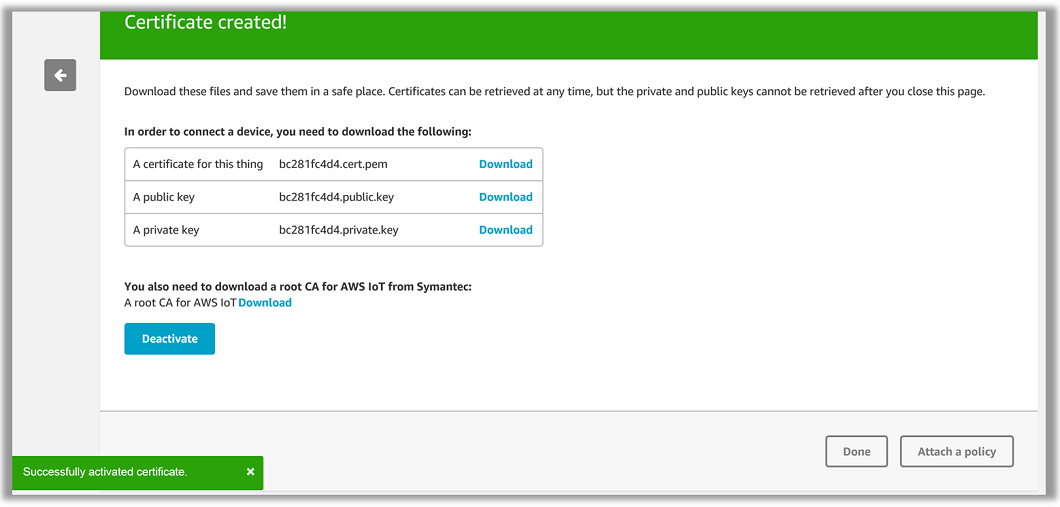
After my AWS IoT button device, TEW-AWSIoTButton, is registered in the Thing Registry, the next step is to acquire the required X.509 certificate and keys. I will have AWS IoT generate the certificate for this device, but the service allows for to use your own certificates. Authenticating the connection with the X.509 certificates helps to protect the data exchange between your device and AWS IoT service.
When the certificates are generated with AWS IoT, it is important that you download and save all of the files created since the public and private keys will not be available after you leave the download page. Additionally, do not forget to download the root CA for AWS IoT from the link provided on the page with your generated certificates.
The newly created certificate will be inactive, therefore, it is vital that you activate the certificate prior to use. AWS IoT uses the TLS protocol to authenticate the certificates using the TLS protocol’s client authentication mode. The certificates enable asymmetric keys to be used with devices, and AWS IoT service will request and validate the certificate’s status and the AWS account against a registry of certificates. The service will challenge for proof of ownership of the private key corresponding to the public key contained in the certificate. The final step in securing the AWS IoT connection to my IoT button is to create and/or attach an IAM policy for authorization.
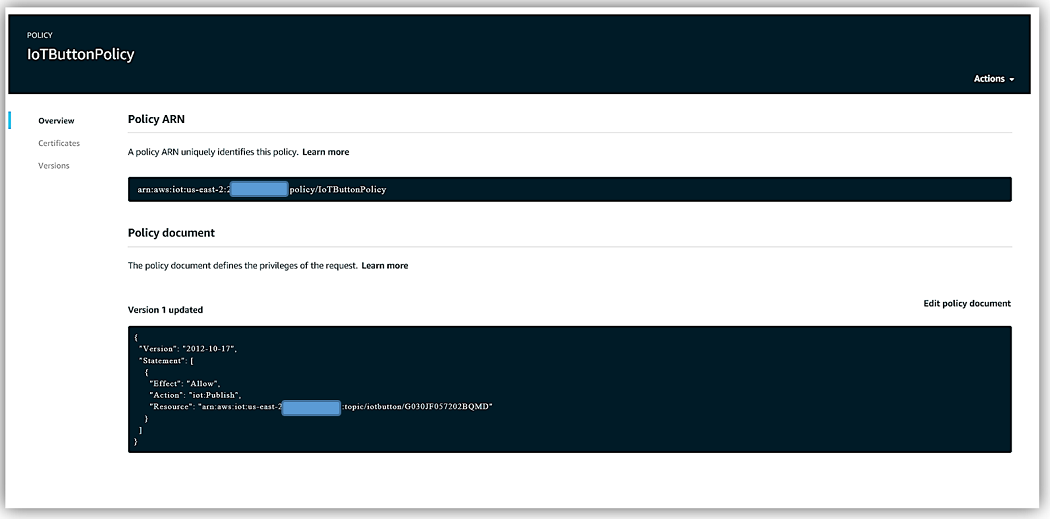
I will choose the Attach a policy button and then select Create a Policy option in order to build a specific policy for my IoT button. In Name field of the new IoT policy, I will enter IoTButtonPolicy for the name of this new policy. Since the AWS IoT Button device only supports button presses, our AWS IoT button policy will only need to add publish permissions. For this reason, this policy will only allow the iot:Publish action.
For the Resource ARN of the IoT policy, the AWS IoT buttons typically follow the format pattern of: arn: aws: iot: TheRegion: AWSAccountNumber: topic/ iotbutton /ButtonSerialNumber. This means that the Resource ARN for this IoT button policy will be:

I should note that if you are creating an IAM policy for an IoT device that is not an AWS IoT button, the Resource ARN format pattern would be as follows: arn: aws: iot: TheRegion: AWSAccountNumber: topic/ YourTopic/ OptionalSubTopic/
The created policy for our AWS IoT Button, IoTButtonPolicy, looks as follows:
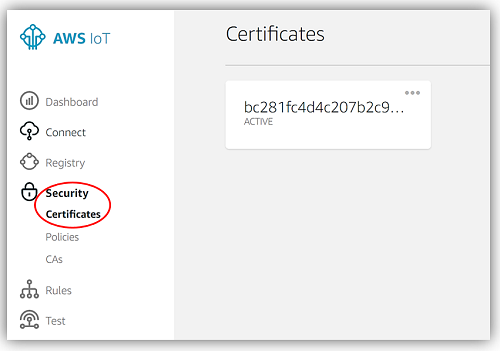
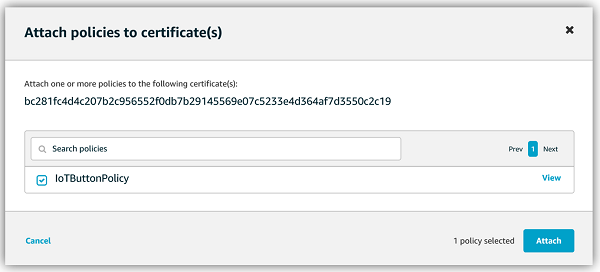
The next step is to return to the AWS IoT console dashboard, select Security and then Certificates menu options. I will choose the certificate created in the aforementioned steps.
Then on the selected certificate page, I will select the Actions dropdown on the far right top corner. In order to add the IoTButtonPolicy IAM policy to the certificate, I will click the Attach policy option.
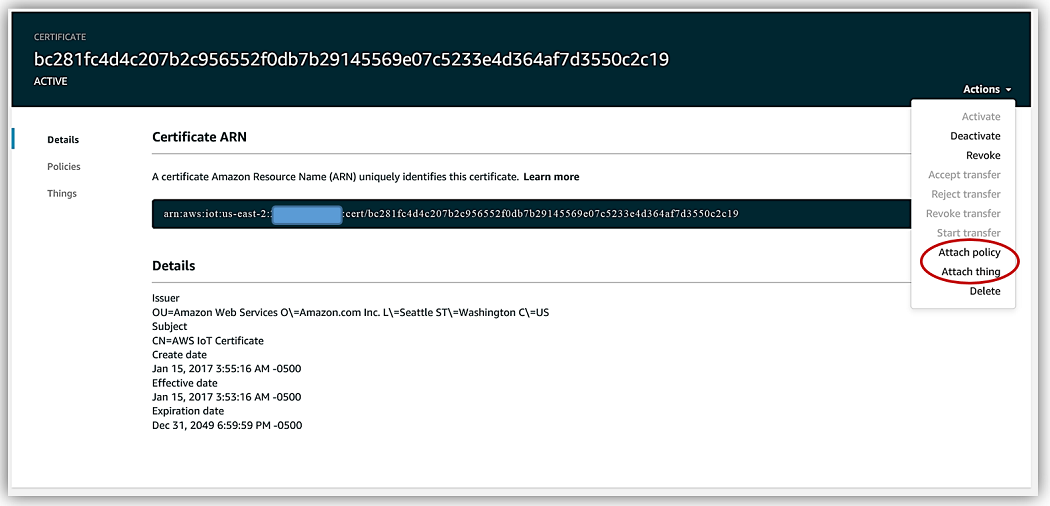
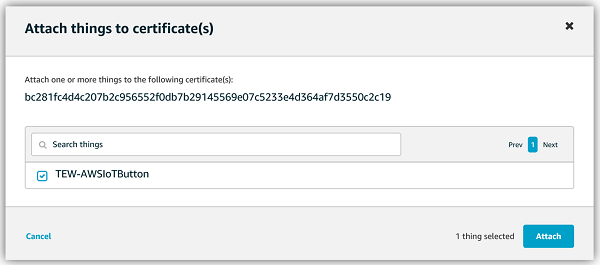
I will repeat all of the steps mentioned above but this time I will add the TEW-AWSIoTButton thing by selecting the Attach thing option.
All that is left is to add the certificate and private key to the physical AWS IoT button and connect the AWS IoT Button to Wi-Fi in order to have the IoT button be fully functional.
Important to note: For businesses that have signed up to participate in the AWS IoT Button Enterprise Program, all of these aforementioned steps; Button logo branding, AWS IoT thing creation, obtaining certificate & key creation, and adding certificates to buttons, are completed for them by Amazon and AWS. Again, this is to help make it easier for enterprises to hit the ground running in the development of their desired AWS IoT button solution.
Now, going back to the AWS IoT button used in our example, I will connect the button to Wi-Fi by holding the button until the LED blinks blue; this means that the device has gone into wireless access point (AP) mode.
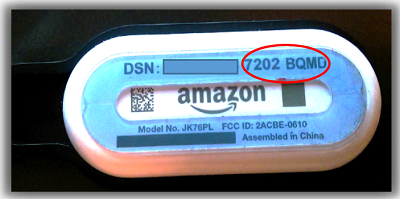
In order to provide internet connectivity to the IoT button and start configuring the device’s connection to AWS IoT, I will connect to the button’s Wi-Fi network which should start with Button ConfigureMe. The first time the connection is made to the button’s Wi-Fi, a password will be required. Enter the last 8 characters of the device serial number shown on the back of the physical AWS IoT button device.

The AWS IoT button is now configured and ready to build a system around it. The next step will be to add the actions that will be performed when the IoT button is pressed. This brings us to the AWS IoT Rules engine, which is used to analyze the IoT device data payload coming from the MQTT topic stream and/or Device Shadow, and trigger AWS Services actions. We will set up rules to perform varying actions when different types of button presses are detected.
Our AWS IoT button solution will be a simple one, we will set up two AWS IoT rules to respond to the IoT button being clicked and the button’s payload being sent to AWS IoT. In our scenario, a single button click will represent that a request is being sent by a customer to a fictional organization’s customer service agent. A double click, however, will represent that a text will be sent containing a customer’s fictional current account status.
The first AWS IoT rule created will receive the IoT button payload and connect directly to Amazon SNS to send an email only if the rule condition is fulfilled that the button click type is SINGLE. The second AWS IoT rule created will invoke a Lambda function that will send a text message containing customer account status only if the rule condition is fulfilled that the button click type is DOUBLE.
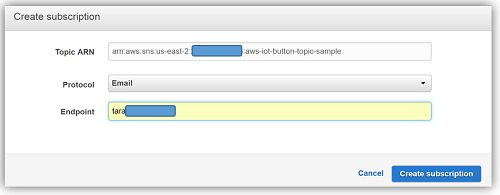
In order to create the AWS IoT rule that will send an email to subscribers of an SNS topic for requesting a customer service agent’s help, we will go to Amazon SNS and create a SNS topic.
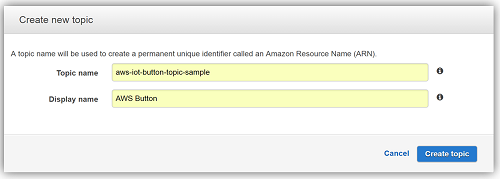
I will create an email subscription to the topic with the fictional subscribed customer service email, which in this case is just my email address. Of course, this could be several customer service representatives that are subscribed to the topic in order to receive emails for customer assistance requests.
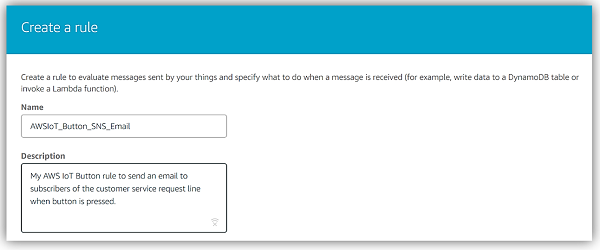
Now returning to the AWS IoT console, I will select the Rules menu and choose the Create rule option. I first provide a name and description for the rule.
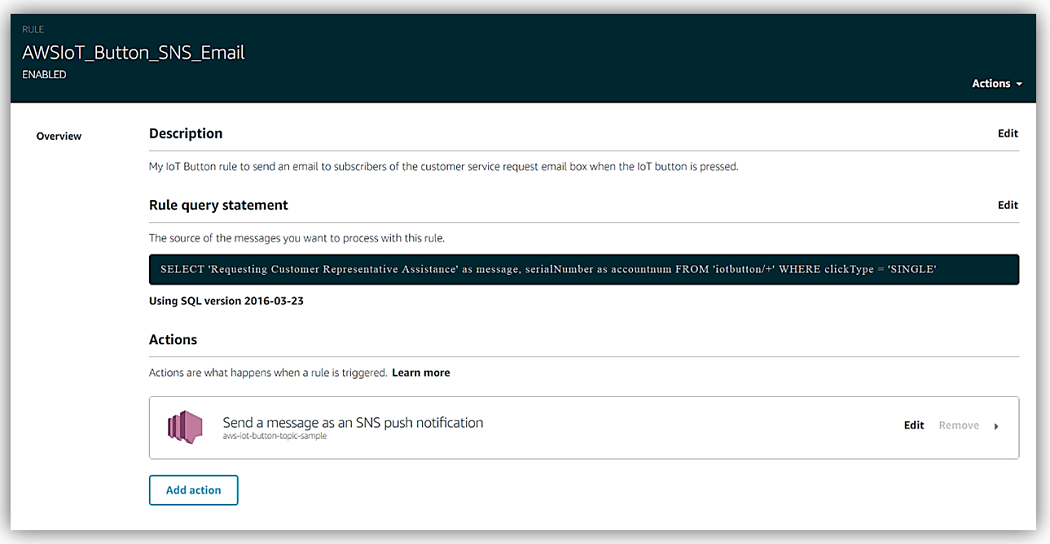
Next, I select the SQL version to be used for the AWS IoT rules engine. I select the latest SQL version, however, if I did not choose to set a version, the default version of 2015-10-08 will be used. The rules engine uses a SQL-like syntax with statements containing the SELECT, FROM, and WHERE clauses. I want to return a literal string for the message, which is not apart of the IoT button data payload. I also want to return the button serial number as the accountnum, which are not apart of the payload. Since the latest version, 2016-03-23, supports literal objects, I will be able to send a custom payload to Amazon SNS.

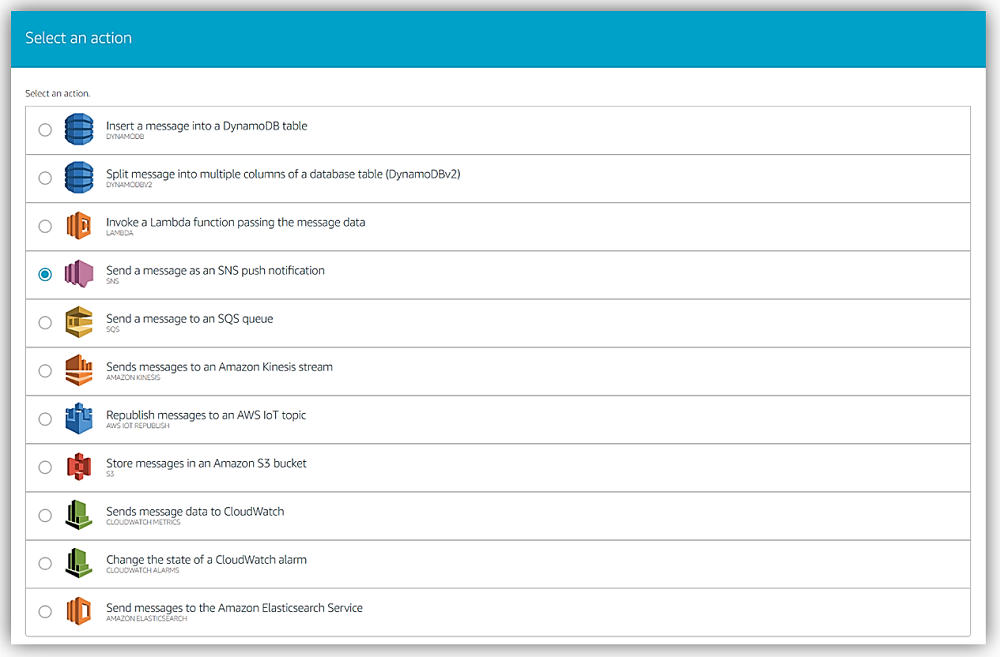
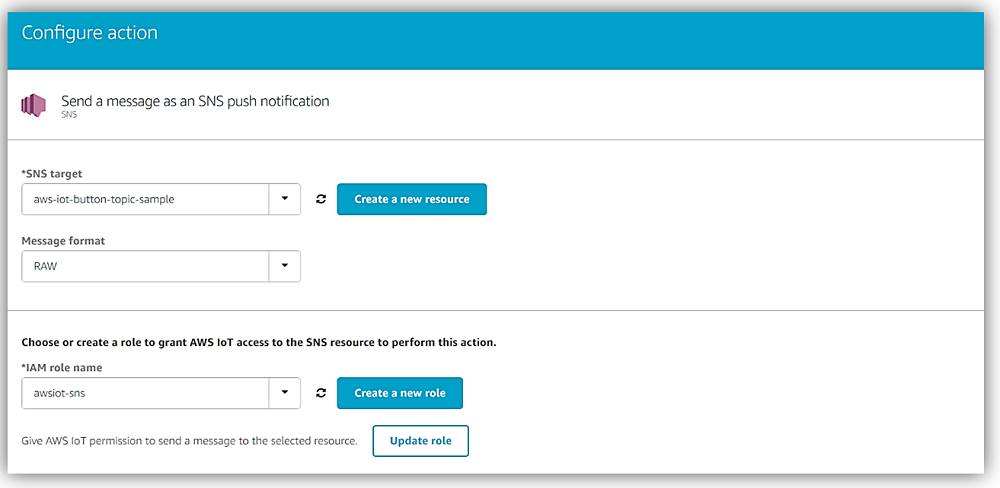
I have created the rule, all that is left is to add a rule action to perform when the rule is analyzed. As I mentioned above, an email should be sent to customer service representatives when this rule is triggered by a single IoT button press. Therefore, my rule action will be the Send a message as an SNS push notification to the SNS topic that I created to send an email to our fictional customer service reps aka me. Remember that the use of an IAM role is required to provide access to SNS resources; if you are using the console you have the option to create a new role or update an existing role to provide the correct permissions. Also, since I am doing a custom message and pushing to SNS, I select the Message format type to be RAW.
Our rule has been created, now all that is left is for us to test that an email is successfully sent when the AWS IoT button is pressed once, and therefore the data payload has a click type of SINGLE.
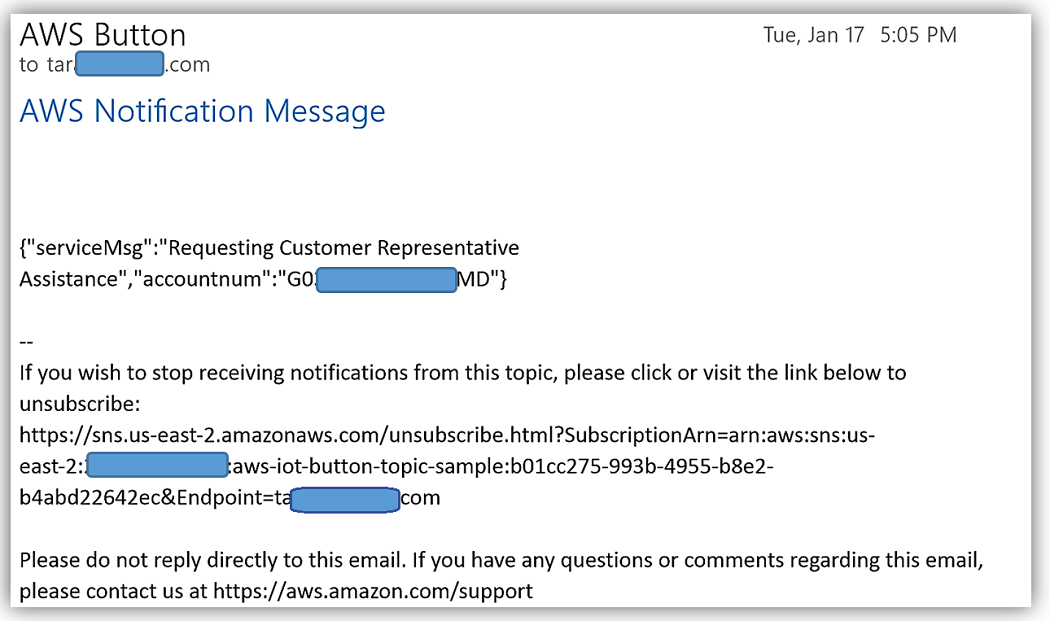
A single press of our AWS IoT Button and the custom message is published to the SNS Topic, and the email shown below was sent to the subscribed customer service agents email addresses; in this example, to my email address.
In order to create the AWS IoT rule that will send a text via Lambda and a SNS topic for the scenario in which customers request account status to be sent when the IoT Button is pressed twice. We will start by creating an AWS IoT rule with an AWS Lambda action. To create this IoT rule, we first need to create a Lambda function and the SNS Topic with a SNS text based subscription.
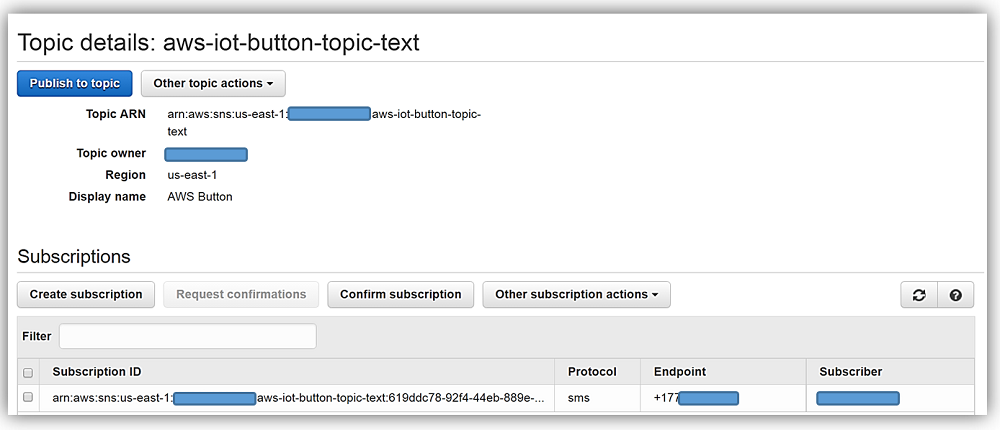
First, I will go to the Amazon SNS console and create a SNS Topic. After the topic is created, I will create a SNS text subscription for our SNS topic and add a number that will receive the text messages. I will then copy the SNS Topic ARN for use in my Lambda function. Please note, that I am creating the SNS Topic in a different region than previously created SNS topic to use a region with support for sending SMS via SNS. In the Lambda function, I will need to ensure the correct region for the SNS Topic is used by including the region as a parameter of the constructor of the SNS object. The created SNS topic, aws-iot-button-topic-text is shown below.
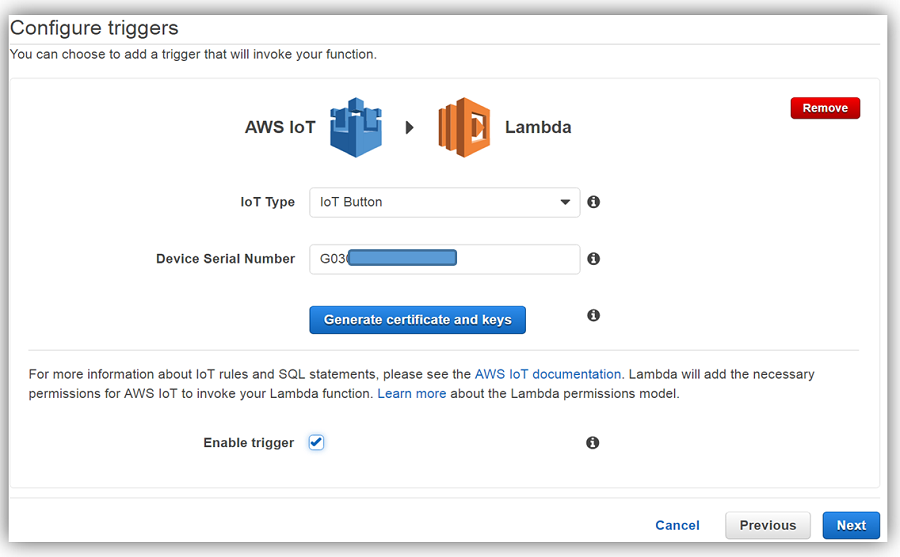
We now will go to the AWS Lambda console and create a Lambda function with an AWS IoT trigger, an IoT Type as IoT Button, and the requested Device Serial Number will be the serial number on the back of our AWS IoT Button. There is no need to generate the certificate and keys in this step because the AWS IoT button is already configured with certificates and keys for secure communication with AWS IoT.
The next is to create the Lambda function, IoTNotifyByText, with the following code that will receive the IoT button data payload and create a message to publish to Amazon SNS.
'use strict';

console.log('Loading function');
var AWS = require("aws-sdk");
var sns = new AWS.SNS({region: 'us-east-1'});

exports.handler = (event, context, callback) => {
    // Load the message as JSON object
    var iotPayload = JSON.stringify(event, null, 2);

    // Create a text message from IoT Payload
    var snsMessage = "Attention: Customer Info for Account #: " + event.accountnum + " Account Status: In Good Standing " +
    "Balance is: 1234.56"

    // Log payload and SNS message string to the console and for CloudWatch Logs
    console.log("Received AWS IoT payload:", iotPayload);
    console.log("Message to send: " + snsMessage);

    // Create params for SNS publish using SNS Topic created for AWS IoT button
    // Populate the parameters for the publish operation using required JSON format
    // - Message : message text
    // - TopicArn : the ARN of the Amazon SNS topic
    var params = {
        Message: snsMessage,
        TopicArn: "arn:aws:sns:us-east-1:xxxxxxxxxxxx:aws-iot-button-topic-text"
     };

     sns.publish(params, context.done);
};
All that is left is for us to do is to alter the AWS IoT rule automatically created when we created a Lambda function with an AWS IoT trigger. Therefore, we will go to the AWS IoT console and select Rules menu option. We will find and select the IoT button rule created by Lambda which usually has a name with a suffix that is equal to the IoT button device serial number.

Once the rule is selected, we will choose the Edit option beside the Rule query statement section.

We change the Select statement to return the serial number as the accountnum and click Update button to save changes to the AWS IoT rule.

Time to Test. I click the IoT button twice and wait for the green LED light to appear, confirming a successful connection was made and a message was published to AWS IoT. After a few seconds, a text message is received on my phone with the fictitious customer account information.

This was a simple example of how a business could leverage the AWS IoT Button in order to build business solutions for their customers. With the new AWS IoT Button Enterprise Program which helps businesses in obtaining the quantities of AWS IoT buttons needed, as well as, providing AWS IoT service pre-provisioning and deployment support; Businesses can now easily get started in building their own customized IoT solution.
Available Now
The original 1st generation of the AWS IoT button is currently available on Amazon.com, and the 2nd generation AWS IoT button will be generally available in February. The main difference in the IoT buttons are the amount of battery life and/or clicks available for the button. Please note that right now if you purchase the original AWS IoT button, you will receive $20 in AWS credits when you register.
Businesses can sign up today for the AWS IoT Button Enterprise Program currently in Limited Preview. This program is designed to enable businesses to expand their existing applications or build new IoT capabilities with the cloud and a click of an IoT button device. You can read more about the AWS IoT button and learn more about building solutions with a programmable IoT button on the AWS IoT Button product page. You can also dive deeper into the AWS IoT service by visiting the AWS IoT developer guide, the AWS IoT Device SDK documentation, and/or the AWS Internet of Things Blog.
– Tara