AWS Big Data Blog
Build a modern data architecture and data mesh pattern at scale using AWS Lake Formation tag-based access control
September 2024: This post was reviewed and updated to use version 4 of the settings for AWS Lake Formation, which allows for cross-account grants with AWS Resource Access Manager and hybrid access mode.
Customers are exploring building a data mesh on their AWS platform using AWS Lake Formation and sharing their data lakes across the organization. A data mesh architecture empowers business units (organized into domains) to have high ownership and autonomy for the technologies they use, while providing technology that enforces data security policies both within and between domains through data sharing. Data consumers request access to these data products, which are approved by producer owners within a framework that provides decentralized governance, but centralized monitoring and auditing of the data sharing process. As the number of tables and users increase, data stewards and administrators are looking for ways to manage permissions on data lakes easily at scale. Customers are struggling with “role explosion” and need to manage hundreds or even thousands of user permissions to control data access. For example, for an account with 1,000 resources and 100 principals, the data steward would have to create and manage up to 100,000 policy statements. As new principals and resources get added or deleted, these policies have to be updated to keep the permissions current.
Lake Formation tag-based access control (TBAC) solves this problem by allowing data stewards to create LF-tags (based on their business needs) that are attached to resources. You can create policies on a smaller number of logical tags instead of specifying policies on named resources. LF-tags enable you to categorize and explore data based on taxonomies, which reduces policy complexity and scales permissions management. You can create and manage policies with tens of logical tags instead of the thousands of resources. Lake Formation TBAC decouples policy creation from resource creation, which helps data stewards manage permissions on many databases, tables, and columns by removing the need to update policies every time a new resource is added to the data lake. Finally, TBAC allows you to create policies even before the resources come into existence. All you have to do is tag the resource with the right LF-tag to make sure existing policies manage it.
This post focuses on managing permissions on data lakes at scale using LF-tags in Lake Formation for cross accounts. For managing data lake tables from AWS Glue catalog and administering permission to Lake Formation, data stewards within the producing accounts have functional ownership based on the functions they support, and can grant access to various consumers, external organizations, and accounts. You can now define LF-tags; associate them at the database, table, or column level; and then share controlled access across analytic, machine learning (ML), and extract, transform, and load (ETL) services for consumption. LF-tags ensure that governance can be scaled easily by replacing the policy definitions of thousands of resources with a few logical tags.
Solution overview
LF-tag access has three key components:
- Tag ontology and classification – Data stewards can define an LF-tag ontology based on their business needs and grant access based on LF-tags to AWS Identity and Access Management (IAM) principals and SAML principals or groups
- Tagging resources – Data engineers can easily create, automate, implement, and track all LF-tags and permissions against AWS Glue catalogs through the Lake Formation API
- Policy evaluation – Lake Formation evaluates the effective permissions based on LF-tags at query time and allows access to data through consuming services such as Amazon Athena, AWS Glue, Amazon Redshift Spectrum, Amazon SageMaker Data Wrangler, and Amazon EMR Studio, based on the effective permissions granted across multiple accounts or organization-level data shares
The following diagram illustrates the relationship between the data producer, data consumer, and central governance accounts. This architecture is suitable for a N:1:N relationship between data producer, central governance and data consumer accounts. All data catalogs from various data producer accounts are centrally managed in the governance account.

In the above diagram, the central governance account box shows the tagging ontology that will be used with the associated tag colors. These will be shared with both the producers and consumers, to be used to tag resources.
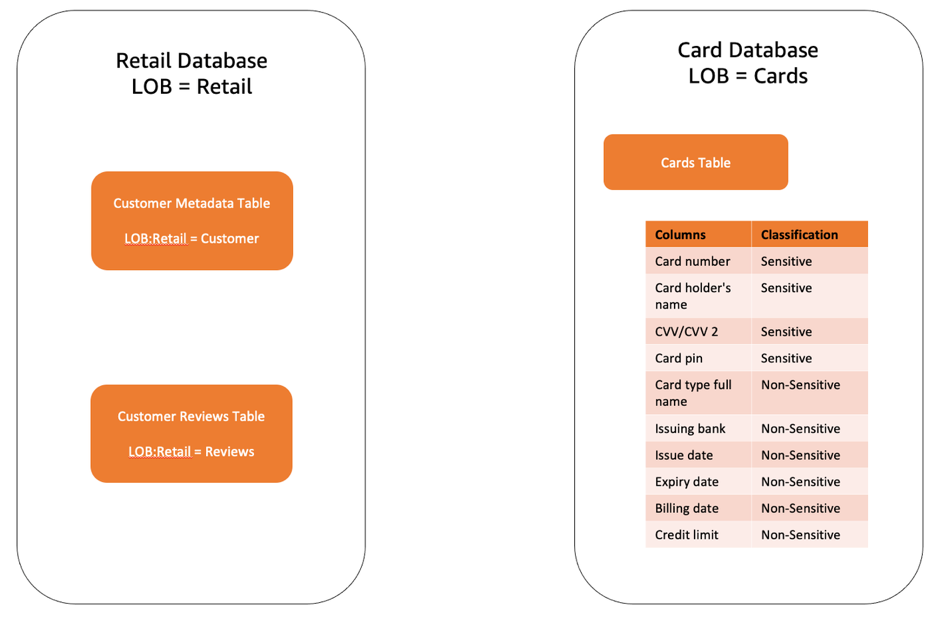
In this post, we consider two databases, as shown in the following figure, and show how you can set up a Lake Formation table and create Lake Formation tag-based policies.
The solution includes the following high-level steps:
- The data mesh owner defines the central tag ontology in central governance account with LF-tags:
- LOB – Classified at the line of business (LOB) level (database)
- LOB:Function – Classified at the business function level (table)
- Classification – Classification of the functional data level (columns)
- The data mesh owner assigns super permission levels to the product data steward in the central account to use centrally defined tags and associates permission to their database and tables with different LF-tags.
- The producer steward in the central account owns two databases:
lob = cardandlob = retail. - The producer steward switches to the data producer account to add table metadata using an AWS Glue crawler.
- The producer steward associates column-level classifications
Classification = SensitiveorClassification = Non-Sensitiveto tables under the Card database in the central account. - The producer steward associates table-level tags
lob:retail = Customerandlob:retail = Reviewsto tables under theRetaildatabase in the central account. - The consumer admin grants fine-grained access control to different data analysts.
With this configuration, the consumer analyst can focus on performing analysis with the right data.
Set up resources with AWS CloudFormation
We provide three AWS CloudFormation templates in this post: for the producer account, central account, and consumer account. Deploy the CloudFormation templates in the order of central, producer, and consumer, because there are dependencies between the templates. Deploy the templates to 3 AWS accounts with no existing Lake Formation setting to avoid conflicts.
The CloudFormation template for the central account generates the following resources:
- Two IAM users:
DataMeshOwnerProducerSteward
- Grant
DataMeshOwneras the LakeFormation Admin - One IAM role:
LFRegisterLocationServiceRole
- Two IAM policies:
ProducerStewardPolicyS3DataLakePolicy
- Create skeleton databases
retailandcardsforProducerStewardto manage the Data Catalog from the central account. - Grant the producer account’s data location permission to the central account.
The CloudFormation template for the producer account generates the following resources:
- Two Amazon Simple Storage Service (Amazon S3) buckets:
RetailBucket, which holds two tables:Customer_InfoCustomer_Review
CardsBucket, which holds one table:Credit_Card
- Grant Amazon S3 bucket access to the central account Lake Formation service role.
- Two AWS Glue crawlers
- One Glue Database
tbacas a placeholder for the Glue crawlers. - One AWS Glue crawler service role
- Grant S3 read permission to the AWS Glue crawler role
- One
ProducerStewardIAM user
The CloudFormation template for the consumer account generates the following resources:
- One S3 bucket:
<AWS Account ID>-<aws-region>-athena-logs
- One Athena workgroup:
consumer-workgroup
- Three IAM users:
ConsumerAdminConsumerAnalyst1ConsumerAnalyst2
Launch the CloudFormation stack in the central account
To create resources in the central account, complete the following steps:
- Sign in to the central account’s AWS Management Console as Admin in the target region.
- Sign in to the Lake Formation console.
- In the Welcome to Lake Formation pop up page, choose Add myself.
- Choose Get Started. This step adds the Admin user as the initial administrative user of Lake Formation. For more information, see the Data Lake Administrator definition in the Lake Formation Terminology.

Next, we update the Data Catalog settings to use Lake Formation permissions to control catalog resources instead of IAM-based access control.
- In the navigation pane, under Administration, choose Data Catalog settings.
- Uncheck Use only IAM access control for new databases.
- Uncheck Use only IAM access control for new tables in new databases.
- Choose Version 3/Version 4 as the Current cross account version, Choose Save. We recommend using Version 4 as The grantor needs version 4 or higher to share Data Catalog resources in hybrid access mode.

- Choose Launch Stack:

- Choose Next.
- For Stack name, enter
stack-central. - For DataMeshOwnerUserPassword, enter the password you want for the data lake admin IAM user in the central account.
- For ProducerStewardUserPassword, enter the password you want for the producer steward IAM user in the producer account.
Note down the username and password.
- For ProducerAWSAccount, enter the AWS
<ProducerAccountID>. - Choose Next.
- On the next page, choose Next.
- Review the details on the final page and select I acknowledge that AWS CloudFormation might create IAM resources.
- Choose Create stack.
- Collect the value for
LFRegisterLocationServiceRoleon the stack’s Outputs tab.
Launch the CloudFormation stack in the producer account
To set up resources in the producer account, complete the following steps:
- Sign in to the producer account’s AWS CloudFormation console in the target Region as Admin.
- Choose Launch Stack:

- Choose Next.
- For Stack name, enter
stack-producer. - For CentralAccountID, copy and paste the value of the
<CentralAccountID>. - For CentralAccountLFServiceRole, copy and paste the value of the
LFRegisterLocationServiceRolecollected from the stack-central. - For LFDatabaseName, keep the default value of the
tbacdatabase name. - For ProducerStewardUserPassword, enter the password you want for the data lake admin IAM user on the producer account. Note down the username and password.
- Choose Next.
- On the next page, choose Next.
- Review the details on the final page and select I acknowledge that AWS CloudFormation might create IAM resources.
- Choose Create stack.
Launch the CloudFormation stack in the consumer account
To create resources in the consumer account, complete the following steps:
- Sign in to the consumer account’s AWS CloudFormation console in the target Region.
- Choose Launch Stack:
- Choose Next.
- For Stack name, enter
stack-consumer. - For ConsumerAdminUserPassword, enter the password for the data lake admin IAM user. Note down the username and password.
- For ConsumerAnalyst1UserPassword, enter password for the
consumeranalyst1IAM user. Note down the username and password. - For ConsumerAnalyst2UserPassword, enter the password for the
consumeranalyst2IAM user. Note down the username and password. - Choose Next.
- On the next page, choose Next.
- Review the details on the final page and select I acknowledge that AWS CloudFormation might create IAM resources.
- Choose Create stack.
Configure Lake Formation Data Catalog settings in the central account
After we complete all the prerequisites, we start the data mesh configuration. We log in as DataMeshOwner in the central account.
Define LF-tags
DataMeshOwner creates the tag ontology by defining LF-tags. Complete the following steps:
- On the Lake Formation console, under Permissions, LF-Tags and permissions in the navigation pane choose LF-Tags tab.
- Choose Add LF-Tag.
- For Key, enter
LOBand for Values, chooseRetailandCards. - Choose Add LF-Tag.

- Repeat these steps to add the key
LOB:Retailand valuesCustomerandReviews, and the keyClassificationwith valuesSensitiveandNon-Sensitive.
Now we complete the configuration of the tag ontology.

Grant permissions
In the following session, you can continue to be logged in as the DataMeshOwner in the central account. The DataMeshOwner grants ProducerSteward in the central accounts describe and associate permissions on the preceding tag ontology. This enables ProducerSteward to view the LF-tags and assign them to Data Catalog resources (databases, tables, and columns). ProducerSteward in the central account can further grant the permission to ProducerSteward in the producer account. For more information, see Granting, Revoking, and Listing LF-Tag Permissions.
When you have multiple producers, grant the relevant tags to each steward.
- On the Lake Formation console, under Permissions, LF-Tags and permissions in the navigation pane choose LF-Tag permissions tab.
- Choose Grant Permissions and then choose Permission type as LF-Tag key-value pair permissions.
- For IAM users and roles, choose the
ProducerStewarduser. - In the LF-Tag key-value pair permissions section, add all three key-value pairs:
- Key
LOBwith valuesRetailandCards. - Key
LOB:Retail with valuesCustomerandReviews. - Key
Classificationwith valuesSensitiveandNon-Sensitive.

- Key
- For Permissions, select Describe and Associate.
- For Grantable permissions, select Describe and Associate.
- Choose Grant.

The LF-Tag permissions for ProducerSteward will look like following.

Next, we grant ProducerSteward tag-based data lake permissions. This enables ProducerSteward to create, alter, and drop tables in the databases with corresponding tags. ProducerSteward in the producer account can further grant the permission across accounts.
- In the navigation pane, under Permissions, Data lake permissions, choose Grant.
- For Principals, choose IAM users and roles, and choose
ProducerSteward. - For LF-tags or catalog resources, select Resources matched by LF-Tags (recommended).
- Choose Add LF-Tag key-value pair.
- For Key, choose
LOBand for Values, chooseCards. - For Database permissions, select the Super permission because
ProducerStewardowns the producer databases.
This permission allows a principal to perform every supported Lake Formation operation on the database. Use this admin permission when a principal is trusted with all operations.
- Select Super under Grantable permissions so the
ProducerStewarduser can grant database-level permissions to the producer and consumer accounts. - For Table permissions, select Super.
- For Grantable permissions, select Super.
- Choose Grant.

- Repeat these steps for key
LOBand valueRetail. - In the navigation pane, under Permissions, Data lake permissions, choose Grant.
- For Principals, choose IAM users and roles, and choose
ProducerSteward. - For LF-tags or catalog resources, select Resources matched by LF-Tags (recommended).
- Add the key
LOBwith valueCards, and the keyClassificationwith valuesSensitiveandNon-Sensitive.

- For Database permissions, select Super.
- Select Super permission under Grantable permissions.
- For Table permissions, select Super.
- For Grantable permissions, select Super.
- Choose Grant.
This gives ProducerSteward fine-grained permission expression on columns with either Sensitive or Non-sensitive tags.
- Repeat these steps for key
LOBand valueRetail, and keyLOB:Retailand valueReviewsorCustomer.

This gives ProducerSteward fine-grained permission expression on tables with either Reviews or Customers tags.
The Data lake permissions for ProducerSteward will look like following.

Producer data steward actions in the central account
Next, we log in as the ProducerSteward user in the central account and assign tags to skeleton databases.
- Sign in to the Lake Formation console as
ProducerSteward. - In the navigation pane, under Data catalog, select Databases.
- Choose the
cardsdatabase. - On the Actions menu, choose Edit LF-tags.

- Choose Assign new LF-tag.
- For Assigned Keys, enter
LOBand for Values, chooseCards. - Choose Save.
This assigns the LOB=Cards tag to the Cards database. Select Cards database link to view LF-Tags for Cards database.

- Repeat these steps for
Retaildatabase and assign theLOB=Retailtag to theRetaildatabase.
Next, we share the LF-tags and data lake permissions with the producer account so that ProducerSteward in the producer account can run AWS Glue crawlers and generate tables in the preceding skeleton databases.
- Under Permissions, LF-Tags and permissions in the navigation pane choose LF-tag permissions tab.
- Choose Grant permissions and then choose Permission type as LF-Tag key-value pair permissions.
- For Principals, select External accounts.
- For AWS account or AWS organization, enter the account ID for the producer account and press enter.
- In the LF-Tag key-value pair permissions section, we only need to add database-level tags.
- For Key, enter LOB and for Values, choose Retail and Cards.
- For Permissions, choose Describe and Associate.
- For Grantable permissions, choose Describe and Associate.
- Choose Grant.

- The LF-Tag permissions for producer account will look like following.

- In the navigation pane, under Permissions, Data lake permissions, choose Grant.
- For Principals, select External accounts.
- For AWS account or AWS organization, enter the account ID for the producer account and press Enter.
- For LF-tags or catalog resources, select Resources matched by LF-Tags (recommended).
- Choose Add LF-Tag key-value pair.
- Choose the key
LOBand valueCards.

- For Database permissions, select Create table and Describe because the
ProducerStewarduser in the producer account will add tables in the database. - Select Create table and Describe under Grantable permissions so the
ProducerStewarduser can further grant the permission to the AWS Glue crawler. - For Table permissions, select Super.
- For Grantable permissions, select Super.
- Choose Grant.

- Repeat these steps for
LOB=Retail.


The Data lake permissions for producer account will look like following.

Now the Lake Formation administrators on the producer account side has the right permissions to add tables.
Producer data steward actions in the producer account
Receive the resources shared from the central account
Next, we log in as the ProducerSteward user in the producer account to receive the databases shared from the central account. Lake Formation Version 3 and Version 4 use AWS RAM resource sharing for cross-account data sharing. If you are using Lake Formation Version 1 or 2, see the configuration details in the Cross-account data sharing prerequisites.
- Open the Resource Access Manager console.
- In the navigation pane, under Shared with me, choose Resource shares.
- You can verify that two resources were shared from the Central Account.

- Select the first resource share, choose Accept resource share.
- Select the second resource share, choose Accept resource share.
Grant needed permission to the Glue Crawler service role
Next, we grant needed permission to the Glue Crawler service role to crawl the source tables for the Cards and Retail databases.
- Open the AWS Lake Formation console.
- In the navigation pane, under Administrative Roles and Tasks, verify that
ProducerStewardis configured as the data lake administrator.

- Under Permissions, LF-Tags and permissions in the navigation pane choose LF-Tags tab.
You can verify the root-level LOB tags that were shared with the producer account.

- In the navigation pane, under Data catalog, select Databases.
You can verify the two databases cards and retail that were shared with the producer account from the previous step.

Now, we create resource links in the producer account for these two databases. These links point at the shared databases and are used by AWS Glue crawler to create the tables. First, we create a resource link for the cards database.
- Select the
cardsdatabase and on the Actions menu, choose Create resource link.

- For Resource link name, enter
rl_cards. - Choose Create.

- Repeat these steps to create a resource link for the
retaildatabase. We userl_retailas the resource link name.
After the resource link creation, you should see both the resource link databases as shown in the following screenshot.

Next, we need to grant permissions to the AWS Glue crawler role so that the crawler can crawl the source bucket and create the tables.
- Select the
rl_cardsdatabase and on the Actions menu, choose Grant. - In the Grant data lake permissions section, select IAM users and roles, and choose the AWS Glue crawler role that was created by the CloudFormation template (for example,
stack-producer-AWSGlueServiceRole-xxxxxx). - For Databases, choose
rl_cards. - For Resource link permissions, select Describe.

- Choose Grant.
- Repeat these steps for
rl_retail. - Next, in the navigation pane, choose Data lake Permissions and choose Grant.
- For IAM users and roles, choose the role
stack-producer-AWSGlueServiceRoleDefault-XXXX. - For LF-Tags or catalog resources, select Resources matched by LF-Tags (recommended).
- Enter the key
LOBand valuesRetailandCards. - For Database permissions, select Create table and Describe.
- For Table permissions, choose Select, Describe, and Alter.
- Choose Grant.
Next, we will verify grant permissions on the S3 bucket locations corresponding to cards and retail producers to the AWS Glue crawler role. This is completed by the CloudFormation template.
In the navigation pane, under Permissions, on the Data Locations, you should see the locations.

Crawl source tables in the producer account
Now we’re ready to configure and run the crawlers. We use the tbac database as a placeholder when creating the crawlers via CloudFormation. We first need to point the crawlers to the right target database.
- Open the AWS Glue console.
- On the AWS Glue console, under Data catalog in the navigation pane, choose Crawlers.
- Select the crawler for the cards database
CardsCrawler-xxxxxxxxxxxxand on the Action menu, choose Edit crawler.

- Select Edit at Step 4: Set output and scheduling.
- For the Target database, choose the resource link database
rl_cardscorresponding to thecardsdatabase. Choose Next.

- Verify all the information and choose Update.
- Repeat these steps for the crawler corresponding to the
retaildatabase. For the Target database, choose the resource link databaserl_retail. - Select both crawlers and choose Run.
When the crawlers finish, they create 3 tables. 2 tables under the retail database and 1 table under the cards database. The table schemas are present in the shared database in the central account.
Configure Lake Formation tags in the central account
Next, we perform fine-grained access control for the tables that the crawlers created to support different consumption use cases using Lake Formation tags.
Tag columns
First, we tag sensitive columns in the cards table corresponding to the cards database, first using the Classification tag that we created earlier.
- Log in to central account as IAM user
ProducerSteward. - On the Lake Formation console, in the navigation pane, choose Data catalog and then choose Tables.
You should see three tables: the cards table corresponding to cards database, and the reviews and customers tables corresponding to the retail database.

- Choose the
cardstable. - Navigate to the Schema section and choose Edit schema.

- Select all the columns and choose Edit tags.

- Choose Assign new LF-Tag.
- For Assigned keys, enter
Classificationand for Values, chooseNon-Sensitive. - Choose Save.

Next, we selectively tag the sensitive columns.
- In the Edit schema section, select columns
card number,card holder’s name,cvv/cvv2, andcard pin. - Choose Edit tags.

- For Assigned keys, enter
Classificationand for Values, chooseSensitive. - Choose Save.
- Choose Save as new version to save the schema.
Tag tables
Next, we tag the reviews and customer tables under the retail database using the LOB:retail tag that we created earlier.
- On the Tables page, select the
reviewstable and on the Actions menu, choose Edit LF-tags.

- Choose Assign new LF-Tag.
- For Assigned keys, choose
LOB:Retailand for Values, choose Reviews. - Choose Save.

- Repeat the steps for the
customertable. ChooseLOB:Retailfor the key andCustomerfor the value.
Grant tag permissions
Next, grant LF-tag permissions to the external consumer account.
- On the Lake Formation console, under Permissions, LF-Tag and permissions in the navigation pane choose LF-tag permissions tab.
- Choose Grant permissions and select Permission type as LF-Tag key-value pair permissions.
- For Principals, select External accounts.
- For AWS account or AWS organization, enter the AWS account number corresponding to the consumer account.
- Below LF-Tag key-value pair permissions, choose Add LF-Tag key-value pair
- For Key, choose
LOBand for Values, chooseRetailandCards. - Repeat these steps for key
Classificationwith valuesNon-SensitiveandSensitive, and keyLOB:Retailwith valuesReviewsandCustomer.

- For Permissions, choose Describe.
- For Grantable permissions, choose Describe.
- Choose Grant.

The LF-Tag permissions for consumer account looks like following.

Next, we grant Lake Formation policy tag expression permissions to the external consumer account.
- In the navigation pane, choose Permissions, Data lake permissions and choose Grant
- In the Principals section, select External accounts.
- For AWS account or AWS organization, enter the AWS account number corresponding to the consumer account.
- For LF-Tags or catalog resources, select Resources matched by LF-Tags (recommended).
- Choose Add LF-Tag key-value pair.
- For Key, choose
LOBand for Values¸ chooseRetail. - For Database permissions, select Describe.
- For Grantable permissions, select Describe.
- Choose Grant.
- Repeat these steps to grant permissions on the policy tag expression
LOB=Cards.
Next, we grant table permissions.
- In the navigation pane, choose Permissions, Data lake permissions and choose Grant.
- For Principals, select External accounts.
- For AWS account or AWS organization, enter the AWS account number corresponding to the consumer account.
- LF-Tags or catalog resources, select Resources matched by LF-Tags (recommended). Press Add LF-Tag key-value pair button.
- Add key
LOBwith valueRetail, and keyLOB:Retailwith valuesReviewsandCustomer. - For Table Permissions, select Select and Describe.
- For Grantable permissions, select Select and Describe.
- Choose Grant.
- Repeat these steps to grant permissions on the policy tag expressions
LOB=CardsandClassification = (Non-Sensitive or Sensitive).
The data lake permissions for consumer account looks like following.

Share and consume tables in the consumer account
When you sign in to the Lake Formation console in the consumer account as ConsumerAdmin, and go to Permissions, LF-Tags and permissions and then LF Tags, you can see all the tags and the corresponding values that were shared by the producer.

Click on View link under LF-Tag permissions column to view permissions.
Next, we receive the databases shared from the Central Account.
- Open the Resource Access Manager console.
- In the navigation pane, under Shared with me, choose Resource shares.
- You can verify that two resources were shared from the central account.
- Select the first resource share, choose Accept resource share.
- Select the second resource share, choose Accept resource share.
In these next steps, we share and consume tables in the consumer account.
Create a resource link to the shared database
On the Databases page on the Lake Formation console, you can see all the databases that were shared to the consumer account. To create a resource link, complete the following steps:
- On the Databases page, select the
cardsdatabase and on the Actions menu, choose Create resource link.

- Enter the resource link name as
rl_cards. - Leave the shared database and shared database’s owner ID as default.
- Choose Create.
- Follow the same process to create the
rl_retailresource link.

Grant Describe permission to ConsumerAnalyst1
To grant Describe permissions on resource link databases to ConsumerAnalyst1, complete the following steps:
- On the Databases page, select the resource database
rl_retailand on the Actions menu, choose Grant.

- In the Grant data permissions section, select IAM users and roles.
- Choose the role
ConsumerAnalyst1. - In the Resource link permissions section, select Describe.
- Choose Grant.

Follow the same steps to grant rl_cards access to ConsumerAnalyst2.
Grant Tag permissions to ConsumerAnalyst1
To grant Tag permissions on the LOB:Retail Customer tag to ConsumerAnalyst1 to access the sales table, complete the following steps:
- In the navigation pane, under Permissions, Data lake permissions, choose Grant.
- In the Grant data permissions section, select IAM users and roles.
- Choose the role
ConsumerAnalyst1. - For LF-Tags or catalog resources, select Resources matched by LF-Tags, and click Add LF-Tag key-value pair.
- Add the key LOB with value
Retail, and the keyLOB:Retailwith valueCustomer. - For Table permissions, select Select and Describe.
- Choose Grant.
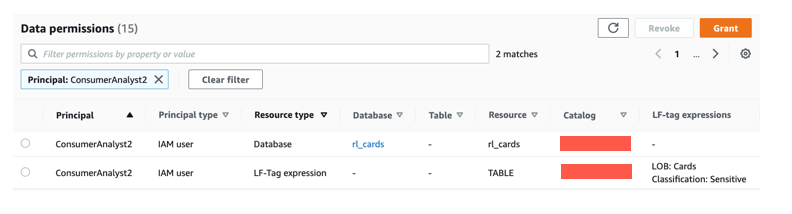
Access to the customers table inside the rl_retail database is granted to ConsumerAnalyst1. Go to Permissions, Data Lake permissions. In the search box , choose Principal=ConsumerAnalyst1 and enter to view permissions for ConsumerAnalyst1.

Grant Tag permissions to ConsumerAnalyst2
To grant Tag permissions on the Classification:Sensitive tag to access attributes tagged as Sensitive in the cards table, complete the following steps:
- In the navigation pane, under Permissions, Data lake permissions, choose Grant.
- In the Grant data permissions section, select IAM users and roles.
- Choose the role
ConsumerAnalyst2. - For LF-Tags or catalog resources, select Resources matched by LF-Tags. Press Add LF-Tag key-value pair button.
- Add the key LOB with value
Cards, and the keyClassificationwith valueSensitive. - For Table permissions, select Select and Describe.
- Choose Grant.
Access to attributes tagged as sensitive in the cards table inside the rl_cards database is granted to ConsumerAnalyst2. Go to Permissions, Data Lake permissions. In the search box , choose Principal=ConsumerAnalyst2 and enter to view permissions for ConsumerAnalyst2.
Validate the access to ConsumerAnalyst1
To confirm ConsumerAnalyst1 access, complete the following steps:
- Log in to the consumer account as
ConsumerAnalyst1. - On the Athena console, choose Query your data with Trino SQL and Launch Query editor.
- For Workgroup, choose
consumer-workgroup. - Choose Acknowledge.
- Choose the database
rl_retail.
You should be able to see the customers table and be able to query.
Validate the access to ConsumerAnalyst2
To confirm ConsumerAnalyst2 access, complete the following steps:
- Log in to the consumer account as
ConsumerAnalyst2. - On the Athena console, choose Query your data with Trino SQL and Launch Query editor.
- For Workgroup, choose
consumer-workgroup. - Choose Acknowledge.
- Choose the database
rl_cards.
You should be able to see only the sensitive attributes from the cards table.

As a thought experiment, you can also check to see the Lake Formation Tag-based access policy behavior on columns to which the user doesn’t have policy grants.
When an untagged column is selected from the table rl_cards.cards, Athena returns an error. For example, you can run the following query to choose the untagged column “issuing_bank” which is non-sensitive.
You will get error “COLUMN_NOT_FOUND: line 1:8: Column 'issuing_bank' cannot be resolved or requester is not authorized to access requested resources”.
Conclusion
In this post, we explained how to create a Lake Formation tag-based access control policy in Lake Formation using an AWS public dataset. In addition, we explained how to query tables, databases, and columns that have Lake Formation tag-based access policies associated with them.
You can generalize these steps to share resources across accounts. You can also use these steps to grant permissions to SAML identities.
A data mesh approach provides a method by which organizations can share data across business units. Each domain is responsible for the ingestion, processing, and serving of their data. They are data owners and domain experts, and are responsible for data quality and accuracy. This is similar to how microservices turn a set of technical capabilities into a product that can be consumed by other microservices. Implementing a data mesh on AWS is made simple by using managed and serverless services such as AWS Glue, Lake Formation, Athena, and Redshift Spectrum to provide a well-understood, performant, scalable, and cost-effective solution to integrate, prepare, and serve data.
About the Authors
 Nivas Shankar is a Principal Data Architect at Amazon Web Services. He helps and works closely with enterprise customers building data lakes and analytical applications on the AWS platform. He holds a master’s degree in physics and is highly passionate about theoretical physics concepts.
 Dylan Qu is an AWS solutions architect responsible for providing architectural guidance across the full AWS stack with a focus on Data Analytics, AI/ML and DevOps.
 Pavan Emani is a Data Lake Architect at AWS, specialized in big data and analytics solutions. He helps customers modernize their data platforms on the cloud. Outside of work, he likes reading about space and watching sports.
 Prasanna Sridharan is a Senior Data & Analytics Architect with AWS. He is passionate about building the right big data solution for the AWS customers. He is specialized in the design and implementation of Analytics, Data Management and Big Data systems, mainly for Enterprise and FSI customers.
 Akshaya Rawat is a Solutions Architect at AWS. He works from New Delhi, India, for large startup customers of India to architect and build resilient, scalable systems in the cloud. He has more than 20 years of experience in multiple engineering roles.
Audit History
Last reviewed and updated in September 2024 by Akshaya Rawat | Solutions Architect