AWS Big Data Blog
Govern Amazon Redshift Data Warehouses Data Across Accounts using Amazon SageMaker Unified Studio
Managing data governance across multiple Amazon Redshift clusters in different AWS accounts presents significant challenges. Organizations operating multiple Amazon Redshift clusters across AWS accounts often rely on manual processes for secure data sharing, which increases operational overhead and governance requirements. In this post, we show you how to use Amazon SageMaker Unified Studio to implement cross-account data sharing in Amazon Redshift using data mesh principles. We demonstrate how to build a scalable data mesh architecture that supports secure, auditable data sharing across AWS accounts while reducing operational burden.
Amazon SageMaker Unified Studio as the backbone of our data mesh
Amazon SageMaker Unified Studio is a data and AI development service which brings together functionality and tools from existing AWS Analytics and AI and machine learning (ML) services, including Amazon EMR, AWS Glue, Amazon Athena, Amazon Redshift, Amazon Bedrock and Amazon SageMaker AI. With the service, organizations can catalog, discover, share, and govern data stored across Amazon Web Services (AWS) without relying on manual coordination between AWS accounts.
A data mesh is an architectural approach that treats data as a product, with decentralized ownership by data producers while maintaining centralized governance. This architecture separates source systems, data producers (data publishers), data consumers (data subscribers), and central governance. The solution we present is tailored for cross-AWS account usage, creating a foundation for data governance so you can share data across Amazon Redshift clusters in different AWS accounts.
Our proposed solution addresses the following common challenges that organizations face when sharing data across AWS accounts:
- Manual, ad-hoc data sharing processes are replaced with automated, event-driven data publishing to the SageMaker Unified Studio catalog.
- Inconsistent governance across different use cases is resolved through a consistent governance framework with proper access controls.
- High load on producer Amazon Redshift clusters is reduced through decoupled publishing that lowers the operational burden on data producers.
- Complex credential management is simplified using AWS Secrets Manager and AWS KMS encryption.
- Lack of auditable data publishing is addressed with full traceability of access and permissions supported by the SageMaker Unified Studio service.
With this approach, you can help reduce the time and effort required for cross-account data sharing while maintaining security and governance standards.
Architectural overview
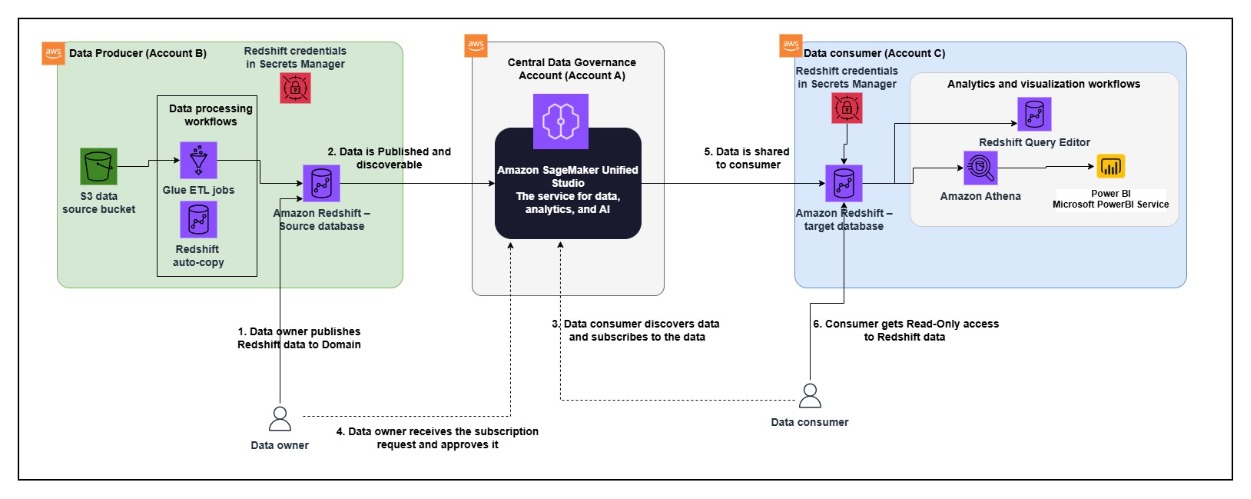
The architecture spans three AWS accounts, each with a distinct role in the data mesh:
Central Data Governance Account (Account A) hosts the Amazon SageMaker Unified Studio domain, which serves as the unified catalog and governance layer for data discovery, access control, and subscription management across accounts.
Data Producer (Account B) hosts the source of data and processing workflows. Raw data lands in an Amazon Simple Storage Service (Amazon S3) source bucket and is processed through AWS Glue extract, transform, and load (ETL) jobs or Amazon Redshift auto copy into the Amazon Redshift source database. Amazon Redshift credentials are securely stored in AWS Secrets Manager.
Data Consumer (Account C) hosts the target Amazon Redshift database and analytics workflows. After access is granted, consumers can query shared data and connect downstream visualization tools.
While this diagram shows a single producer and consumer for simplicity, in a real-world deployment there might be hundreds of producer and consumer accounts connecting through the central governance layer. Amazon SageMaker Unified Studio scales to support this by providing a single place for managing data products regardless of the number of participating accounts.
The data sharing workflow is driven by Amazon SageMaker Unified Studio. The data owner publishes data to the catalog, where it becomes discoverable by consumers across accounts. Consumers browse the catalog, subscribe to data products, and the data owner approves the request. After approval, Amazon SageMaker Unified Studio handles the cross-account sharing, granting the consumer access without requiring direct connectivity between producer and consumer Amazon Redshift clusters.
Publishing Amazon Redshift data assets to the data mesh
In a data mesh architecture, data producers need to make their data products discoverable and accessible across the organization. Amazon SageMaker Unified Studio provides a centralized catalog where data assets can be published for consumer subscription.
In practice, this means registering your data sources with the catalog so they can be discovered, governed, and subscribed to by consuming teams. This section walks through the steps required to register Amazon Redshift data sources with SageMaker Unified Studio.
Before you can publish data assets from your producer account, you need to complete several configuration steps across your Amazon Redshift cluster, AWS Secrets Manager, and Amazon SageMaker Unified Studio.
Prerequisites
- Install the AWS Command Line Interface (AWS CLI) (v2.15+ recommended).
- Obtain temporary credentials with permissions to administer each account (producer, consumer, and domain account)
- IAM permissions required:
redshift:*on the relevant clusters,secretsmanager:CreateSecret / PutResourcePolicy / TagResource,kms:CreateKey / PutKeyPolicy / TagResource,datazone:*for subscription-target creation, andiam:PassRolefor the Amazon Redshift cluster role. - Amazon Redshift clusters must use RA3 node types (ra3.xlplus, ra3.4xlarge, or ra3.16xlarge). Data sharing is not supported on other node types.
- Amazon SageMaker Unified Studio domain must already be created in Account A with the Tooling and LakeHouseCatalog blueprints available.
- All resources must be in an AWS Region where Amazon SageMaker Unified Studio is available.
Step 1: Account association and blueprint enablement
To implement the data mesh architecture described in the previous section, you need to set up the following accounts and enable the required blueprints. This ensures that the central governance layer can discover and manage data assets across your producer and consumer accounts.
This post uses three separate AWS accounts to illustrate the cross-account data sharing pattern. However, Amazon SageMaker Unified Studio also supports publishing and subscribing to data within a single account or across any number of accounts depending on your organizational setup. Additionally, this walkthrough uses a provisioned Amazon Redshift cluster, but Amazon SageMaker Unified Studio also supports Amazon Redshift Serverless for both publishing and subscribing to data assets.
- Amazon SageMaker Unified Studio Domain account (Account A) – This is the central data governance account, which will have the Amazon SageMaker Unified Studio Domain and Project.
- Data producer account (Account B) – This account acts as the data domain producer. It has been added as an associated account to Account A.
- Data consumer account (Account C) – This account acts as the data consumer. It has been added as an associated account to Account A.
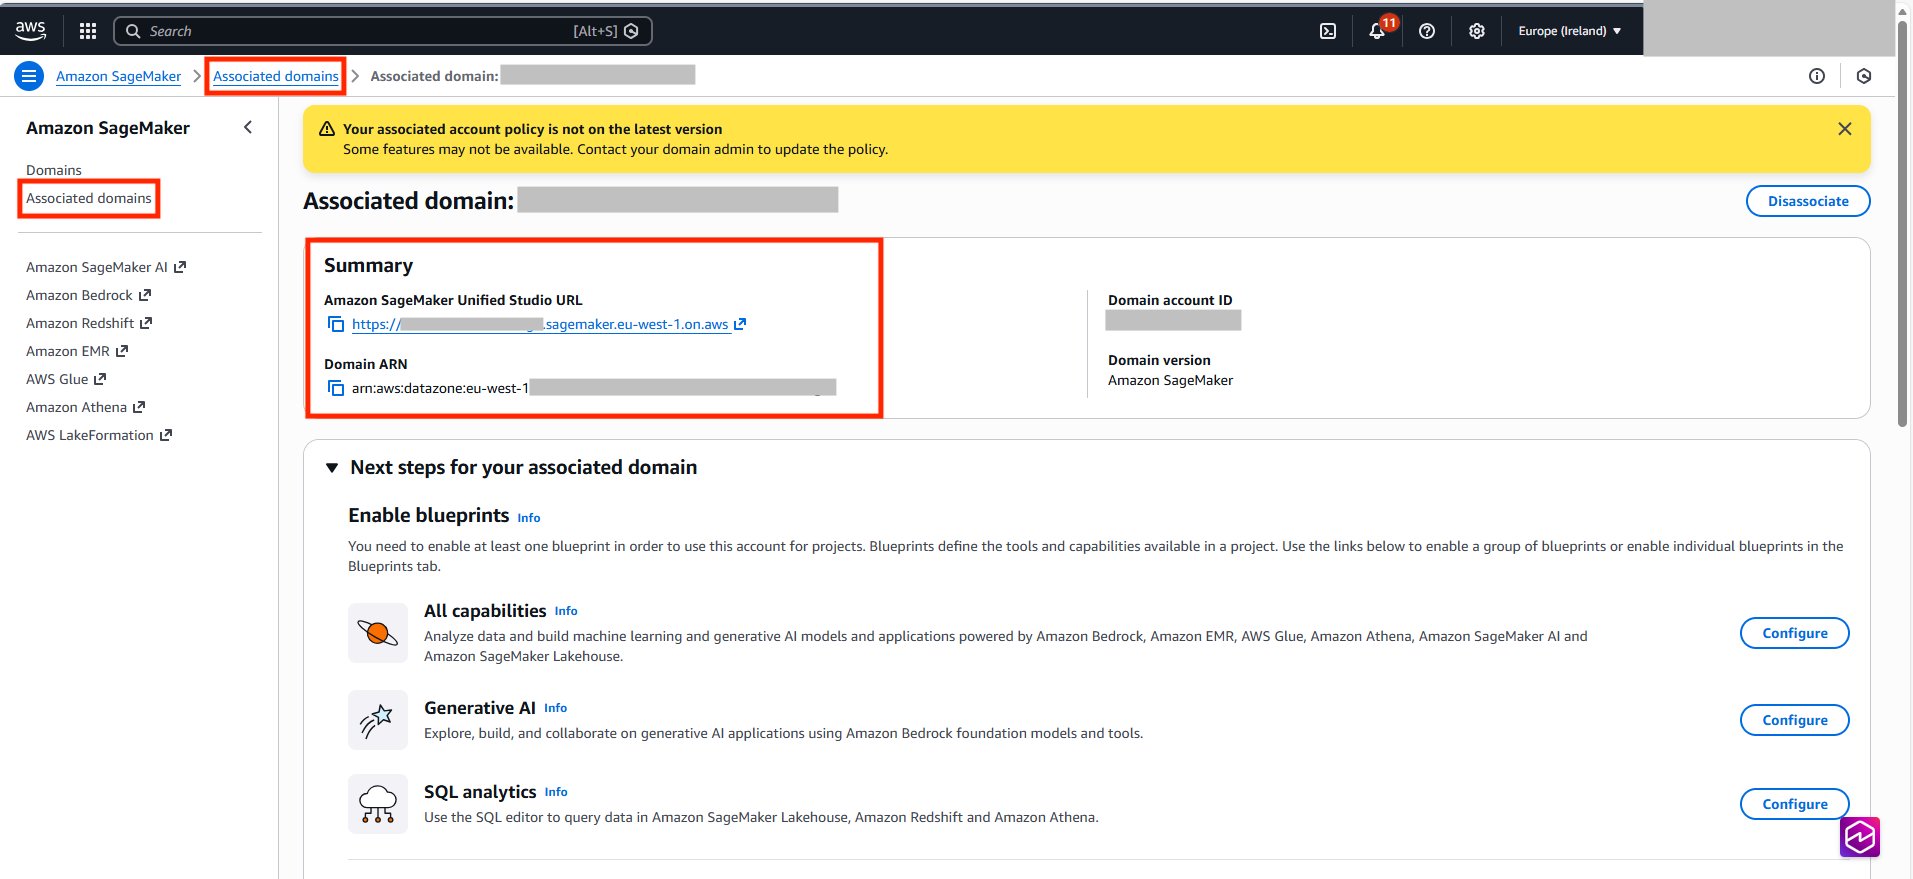
- Log in to Data producer account (Account B) and Data consumer account (Account C).Open the Amazon SageMaker AI console, choose Associated domains, choose your domain, and enable the following blueprints: Tooling and LakeHouseCatalog
- Create a project profile for each associated account (Account B and Account C). Make sure you can log in to the SageMaker Unified Studio domain portal and create a corresponding project with relevant project profile within Amazon SageMaker Unified Studio Domain. You must be added as a member of the corresponding project
Step 2: Configure your Amazon Redshift cluster and credentials
- In the producer account (Account B), the data to be shared resides in an Amazon Redshift cluster.
- Verify that your Amazon Redshift cluster uses node types from the RA3 family.
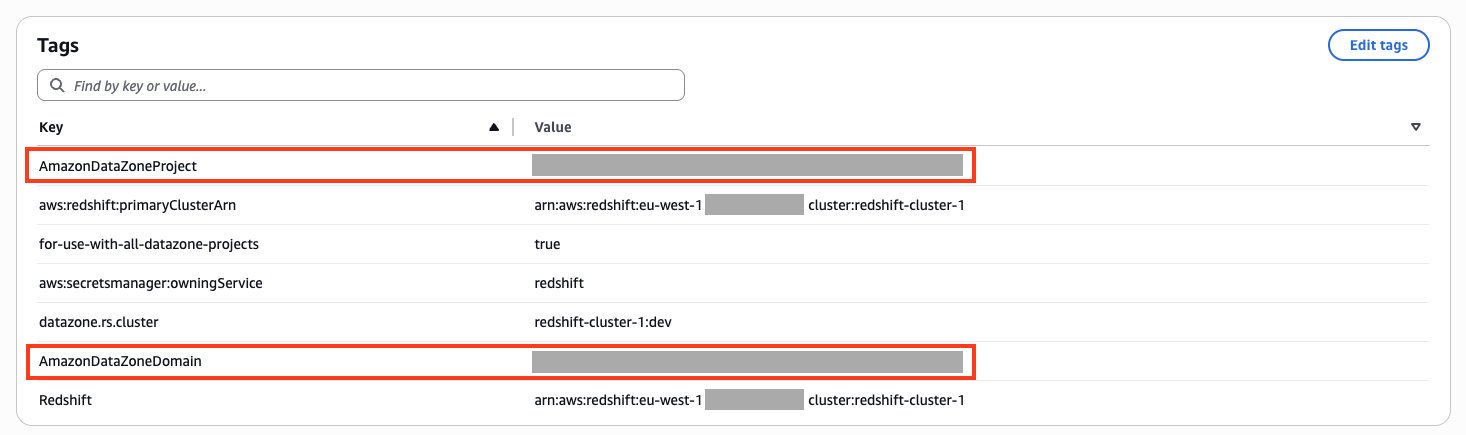
- Add the following tags to your Amazon Redshift cluster.
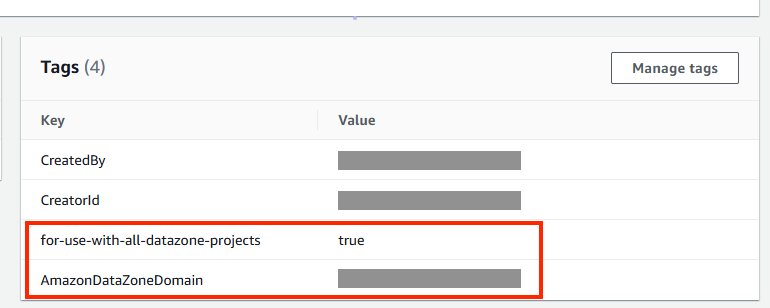
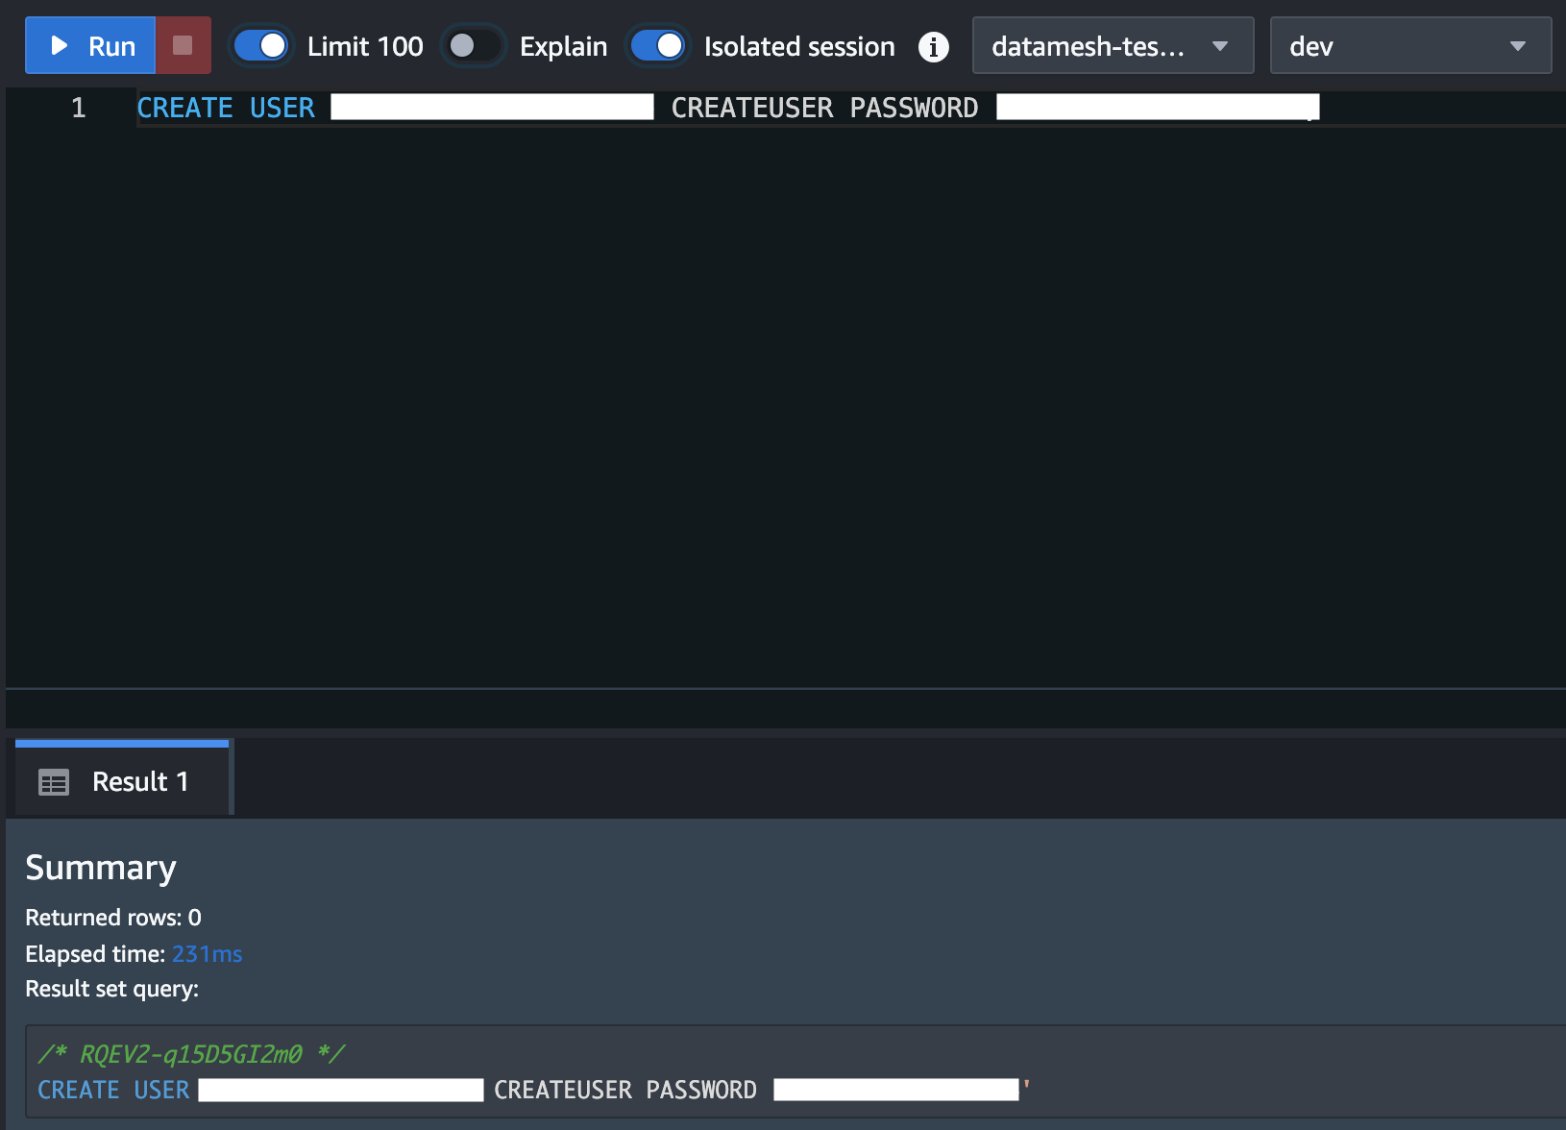
- Create a superuser in Amazon Redshift for Amazon SageMaker Unified Studio. For the Amazon Redshift cluster, the database user you provide in AWS Secrets Manager must have superuser permissions. With superuser permission, your Amazon Redshift cluster can publish data and subscribe from the data mesh created with Amazon SageMaker Unified Studio, and it manages the subscriptions (access) on your behalf. For reference, see the note section in this QuickStart guide with sample Amazon Redshift data.
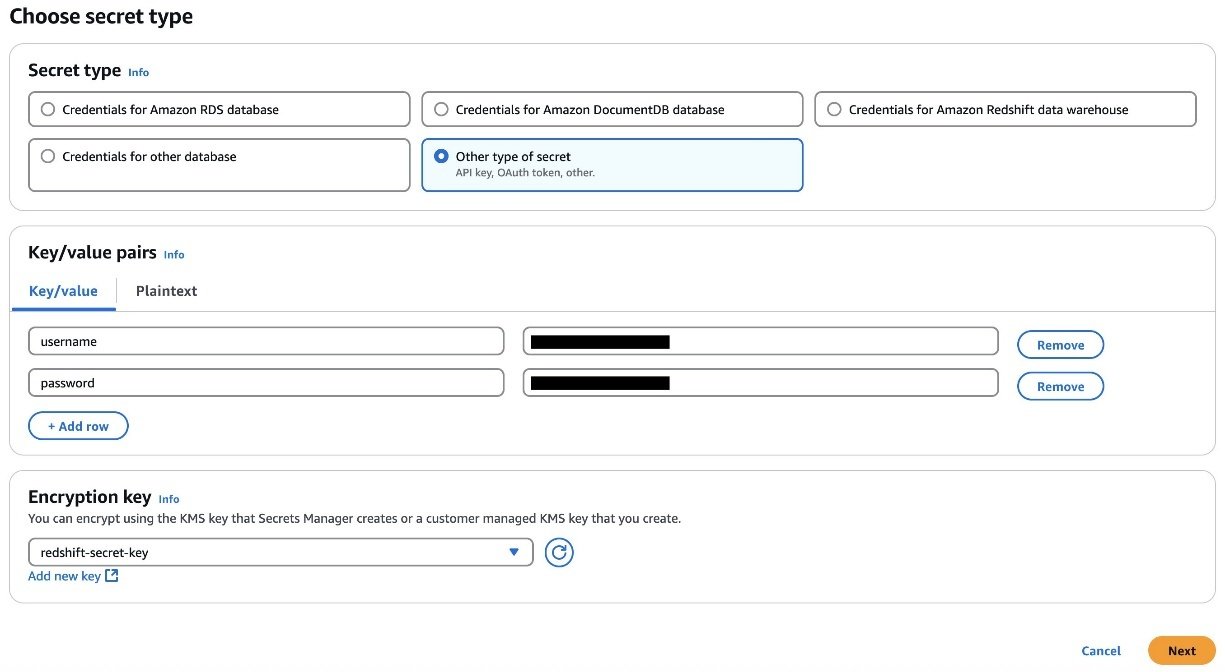
- Store the user’s credentials in Secrets Manager. Select the credential type, enter the credential values, and choose the AWS Key Management Service (AWS KMS) key with which to encrypt the secret
- Add the tags to the AWS Secrets Manager secret to allow Amazon SageMaker Unified Studio to find this secret and limit the access to a particular Amazon SageMaker Unified Studio domain. The Amazon Redshift cluster Amazon Resource Name (ARN) must be added as a tag. For reference, see the QuickStart guide with sample Amazon Redshift data.
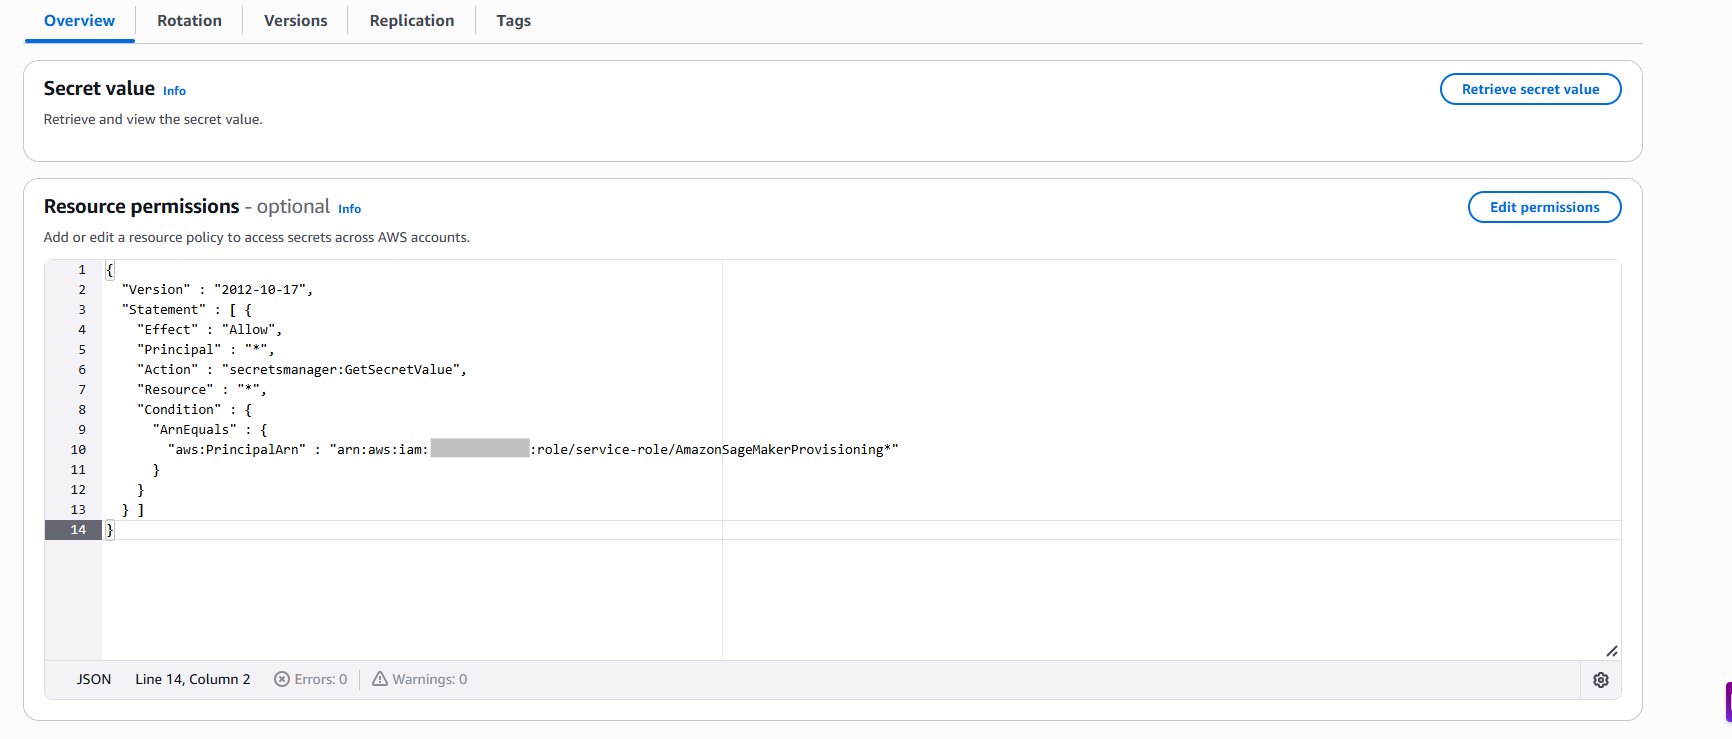
- Add the following resource policy to the secret. See the Amazon SageMaker Unified Studio Provisioning guide for the full reference.
- If your secret is encrypted with a customer managed AWS KMS key, append the key policy with the following statement and add a tag to the key:
AmazonDataZoneEnvironment = All. You can skip this step if you’re using an AWS managed KMS key.
Note: Enable automatic rotation. Configure Secrets Manager automatic rotation for this secret with a rotation interval appropriate to your security policy (for example, every 30 days). When implementing rotation, verify that the rotation Lambda function updates the credentials in both Secrets Manager and Amazon Redshift database users simultaneously. Note that Amazon SageMaker Unified Studio retrieves the secret at connection time, so rotation must produce credentials that are valid immediately upon storage: use the alternating-users rotation strategy if you need to avoid downtime during rotation. See the Secrets Manager rotation documentation for setup instructions.
Using Amazon Redshift Serverless?
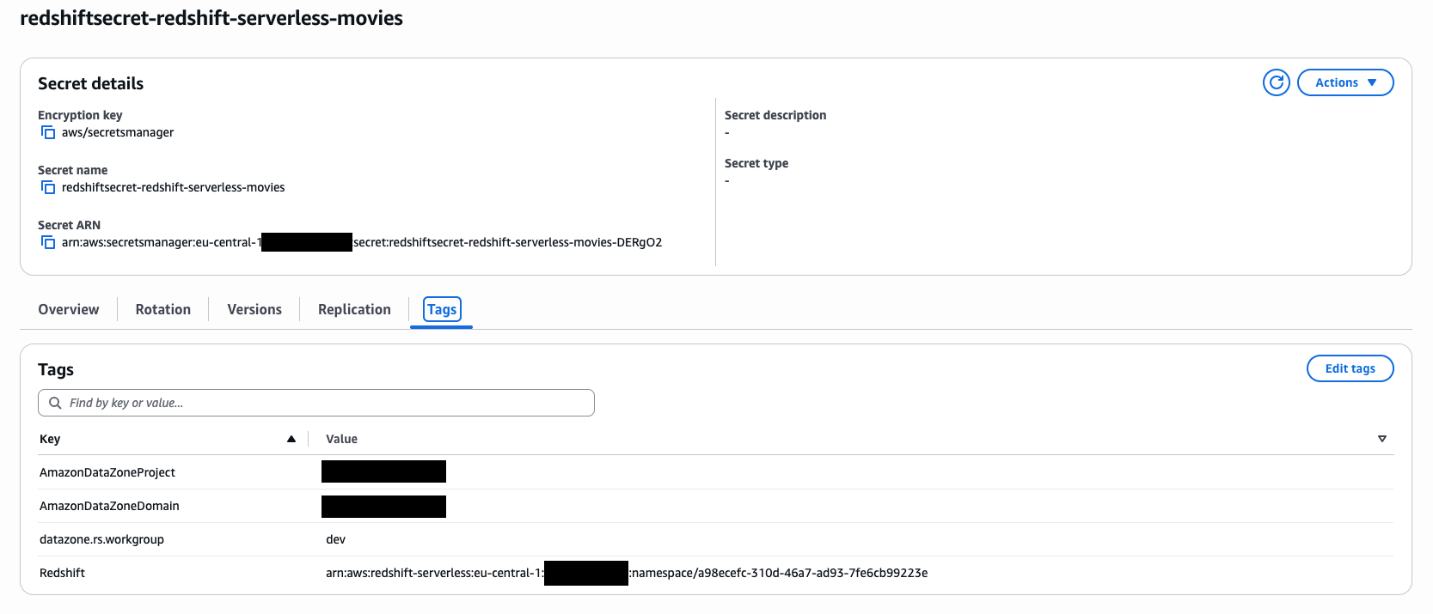
- Add the following Tags to the Amazon Redshift Serverless namespace and workgroup.

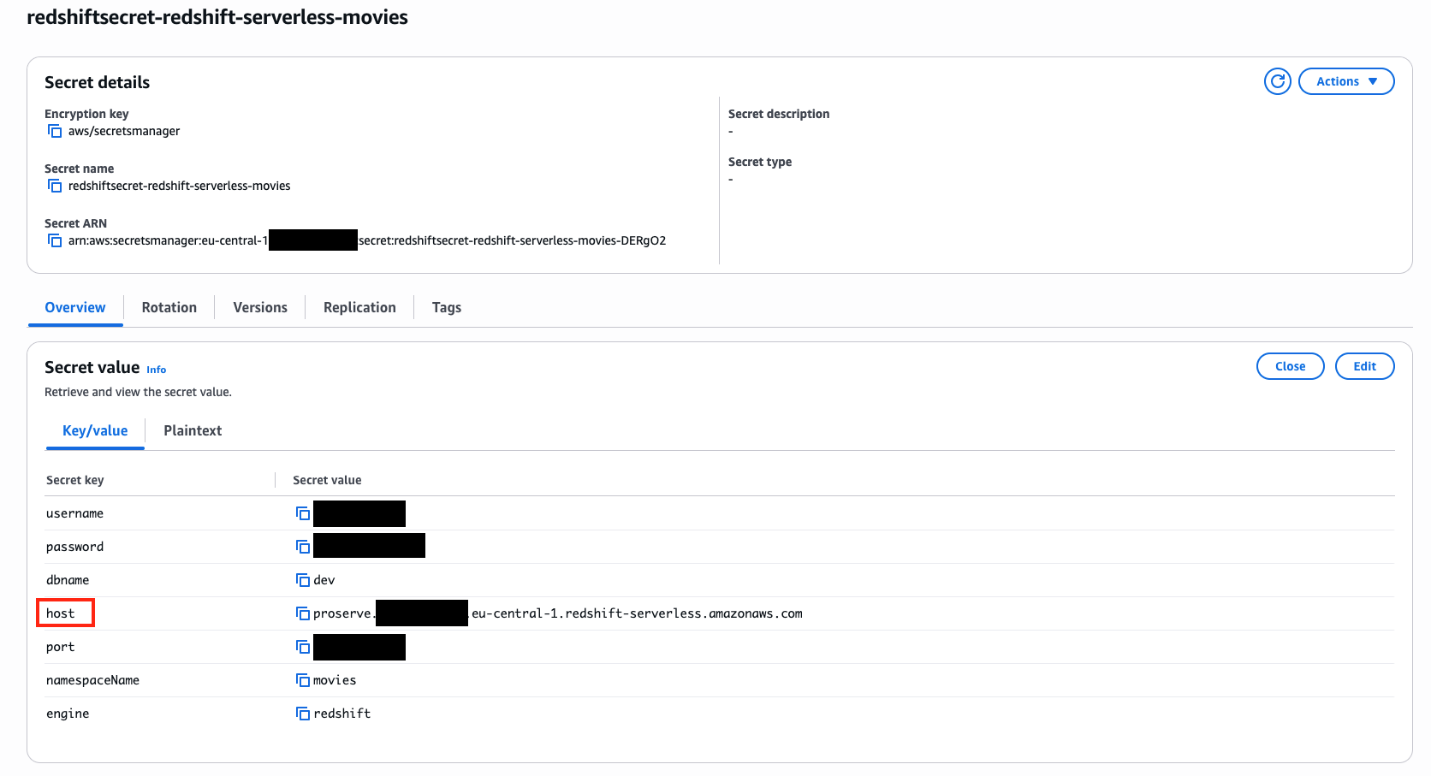
- In the Secrets Manager secret, verify the host points to your Serverless endpoint.
- Add the following tags to the AWS Secrets Manager secret.
Publish Amazon Redshift data to the data mesh
With prerequisites complete, you can now register your Amazon Redshift cluster as a data source in Amazon SageMaker Unified Studio.
Step 1: Create an Amazon Redshift type connection
- Sign in to Account B, navigate to your Amazon SageMaker Unified Studio associated domain, and open the Amazon SageMaker Unified Studio URL.
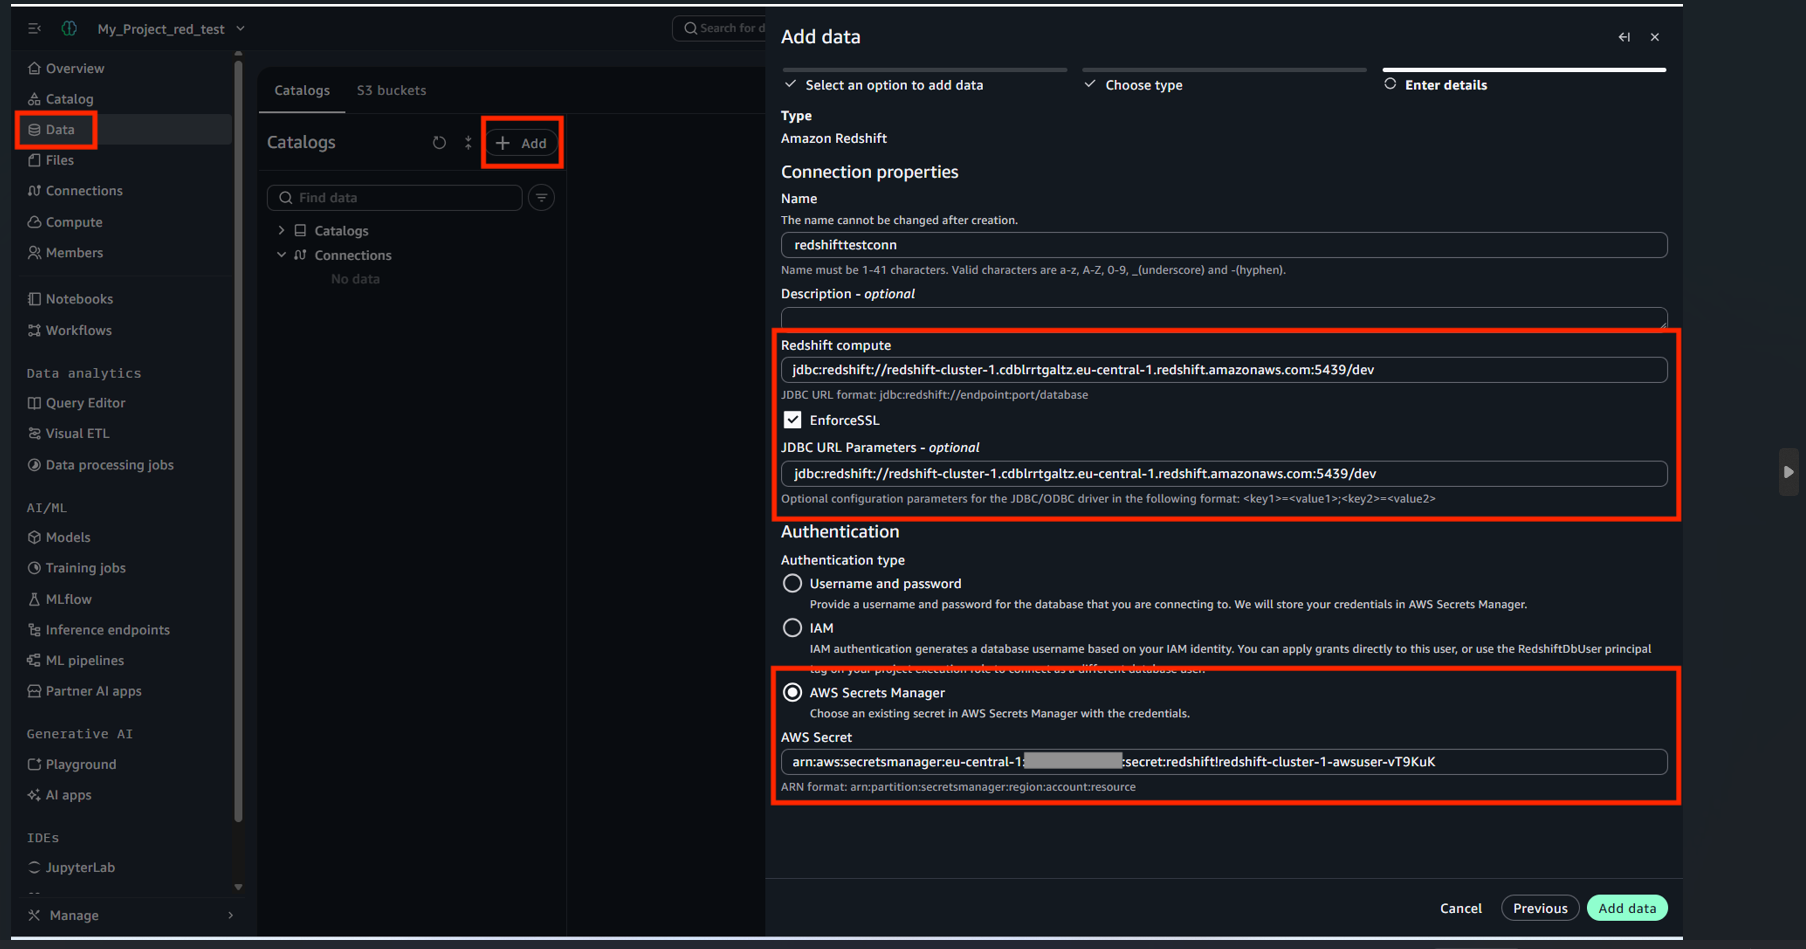
- Follow the instruction here to Add an Amazon Redshift Connection
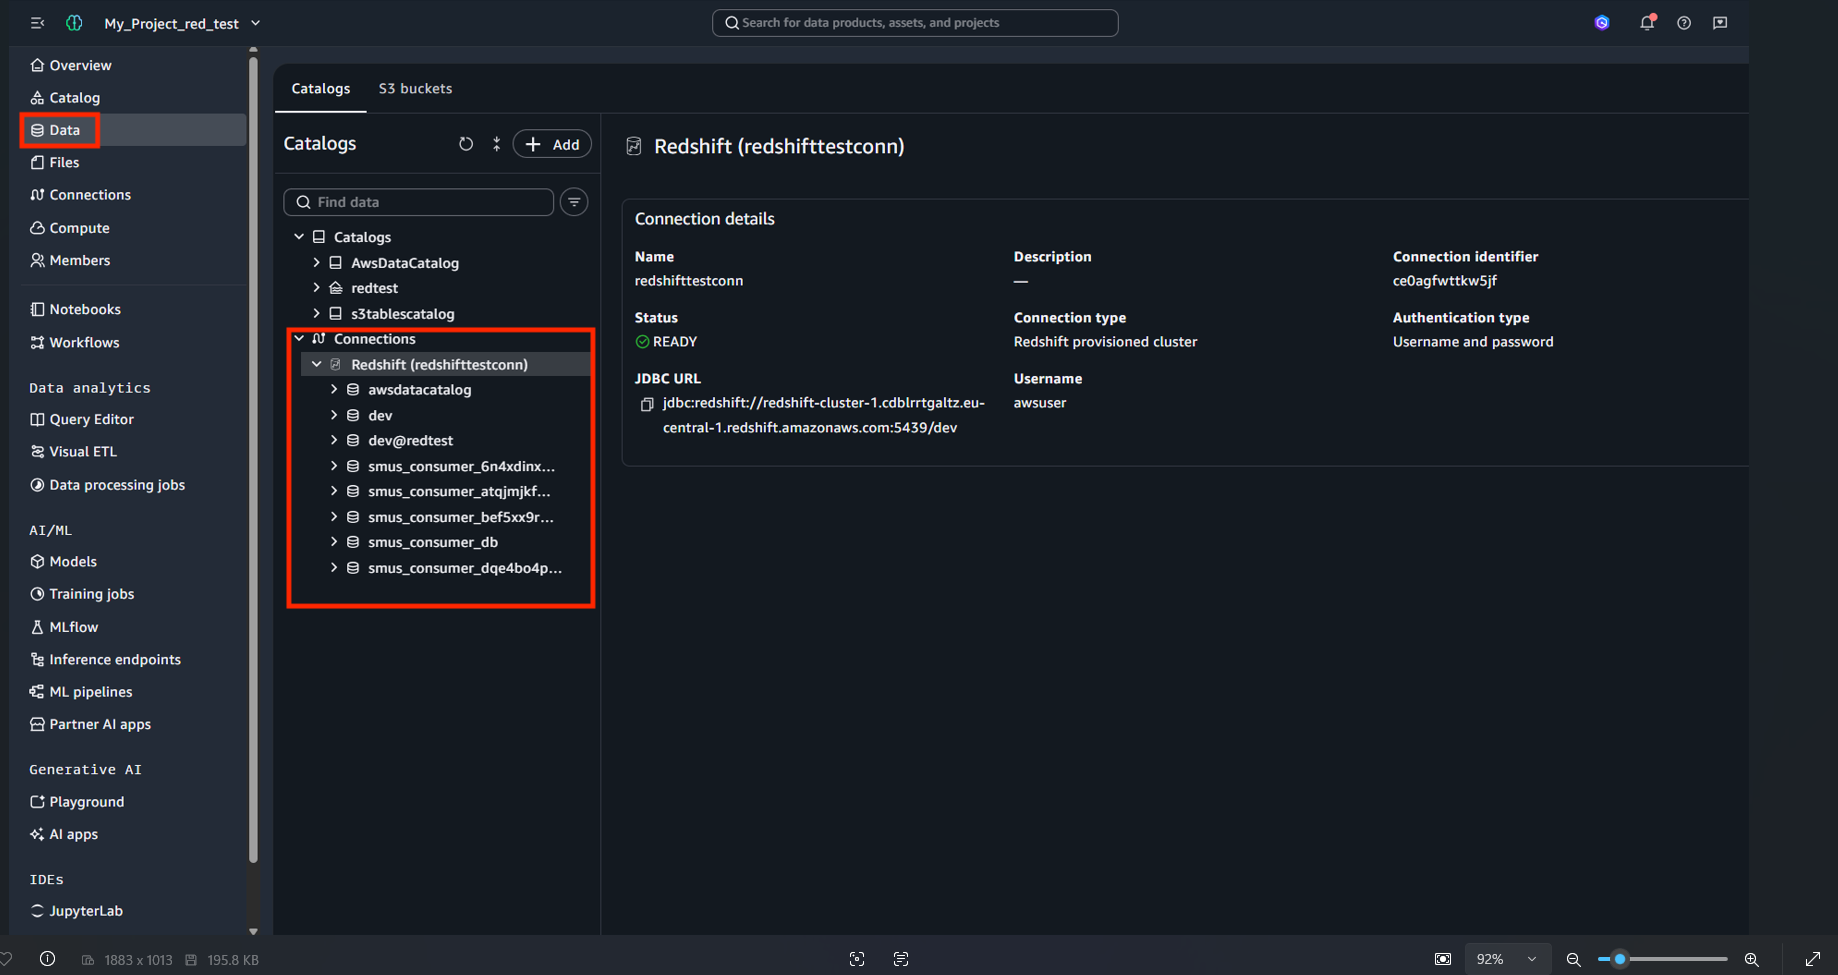
- The newly created Amazon Redshift connection appears here.
Step 2: Create the data source for your Amazon Redshift data warehouse
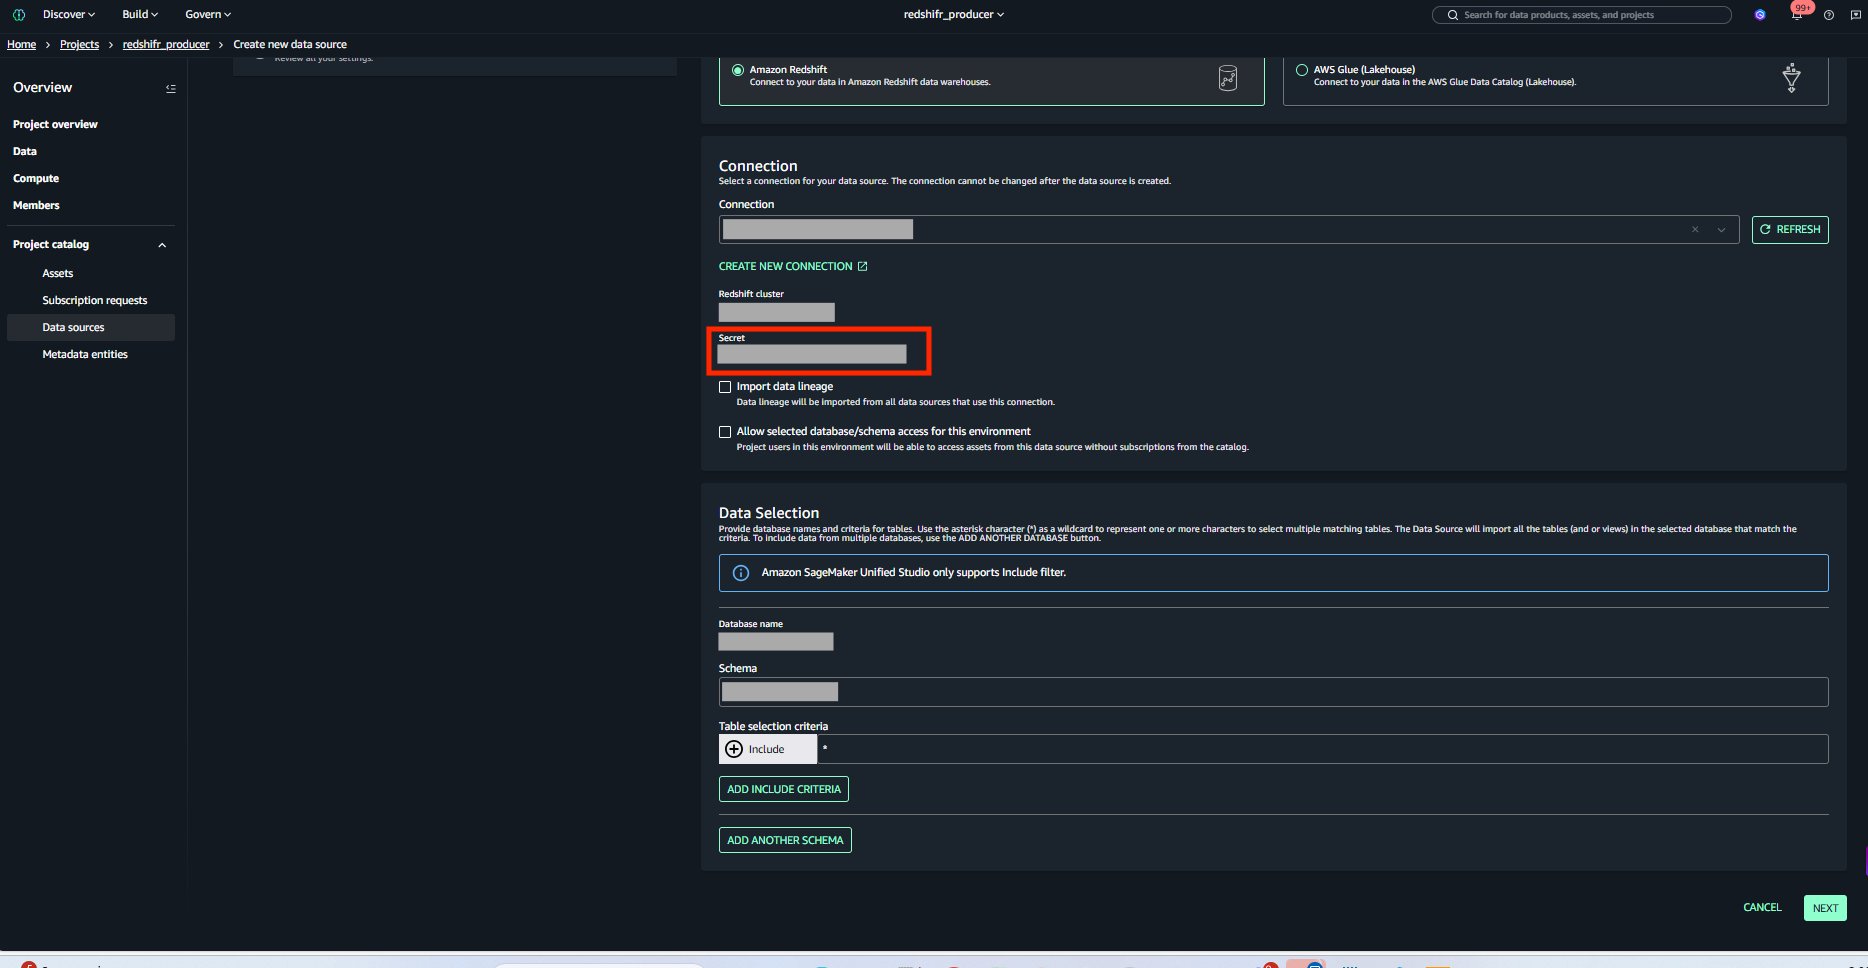
- Follow the instruction here to Add an Amazon Redshift data source
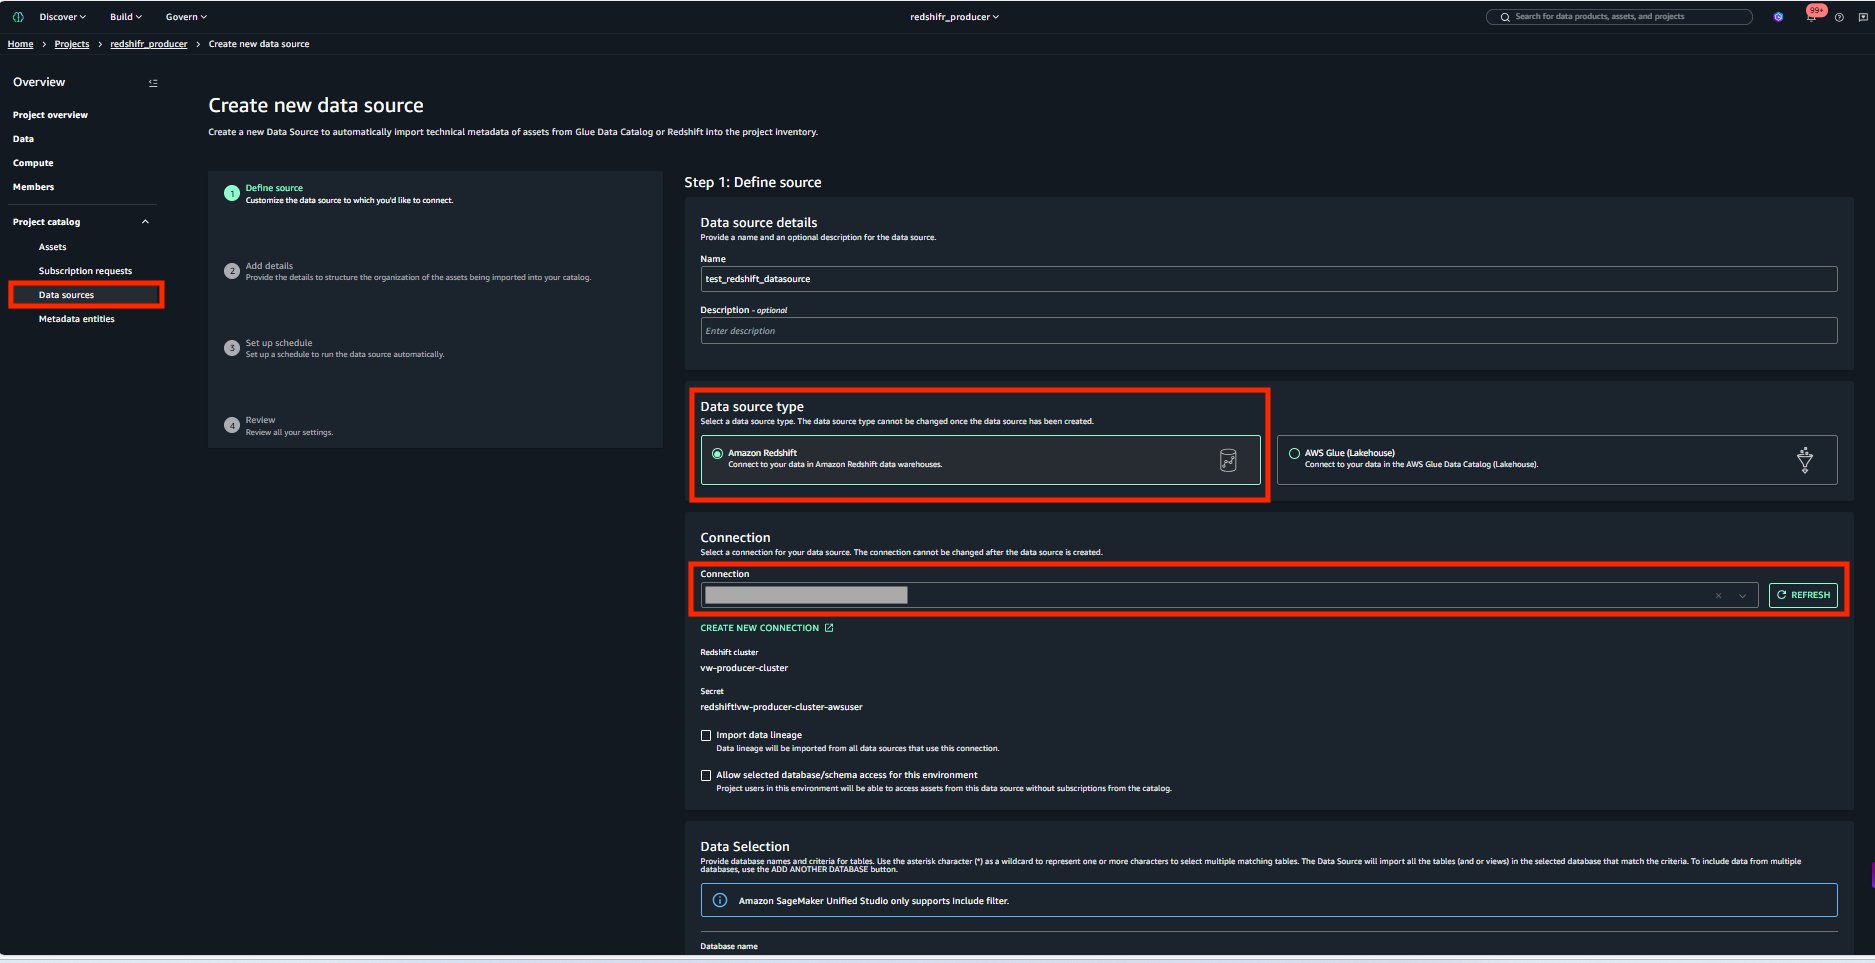
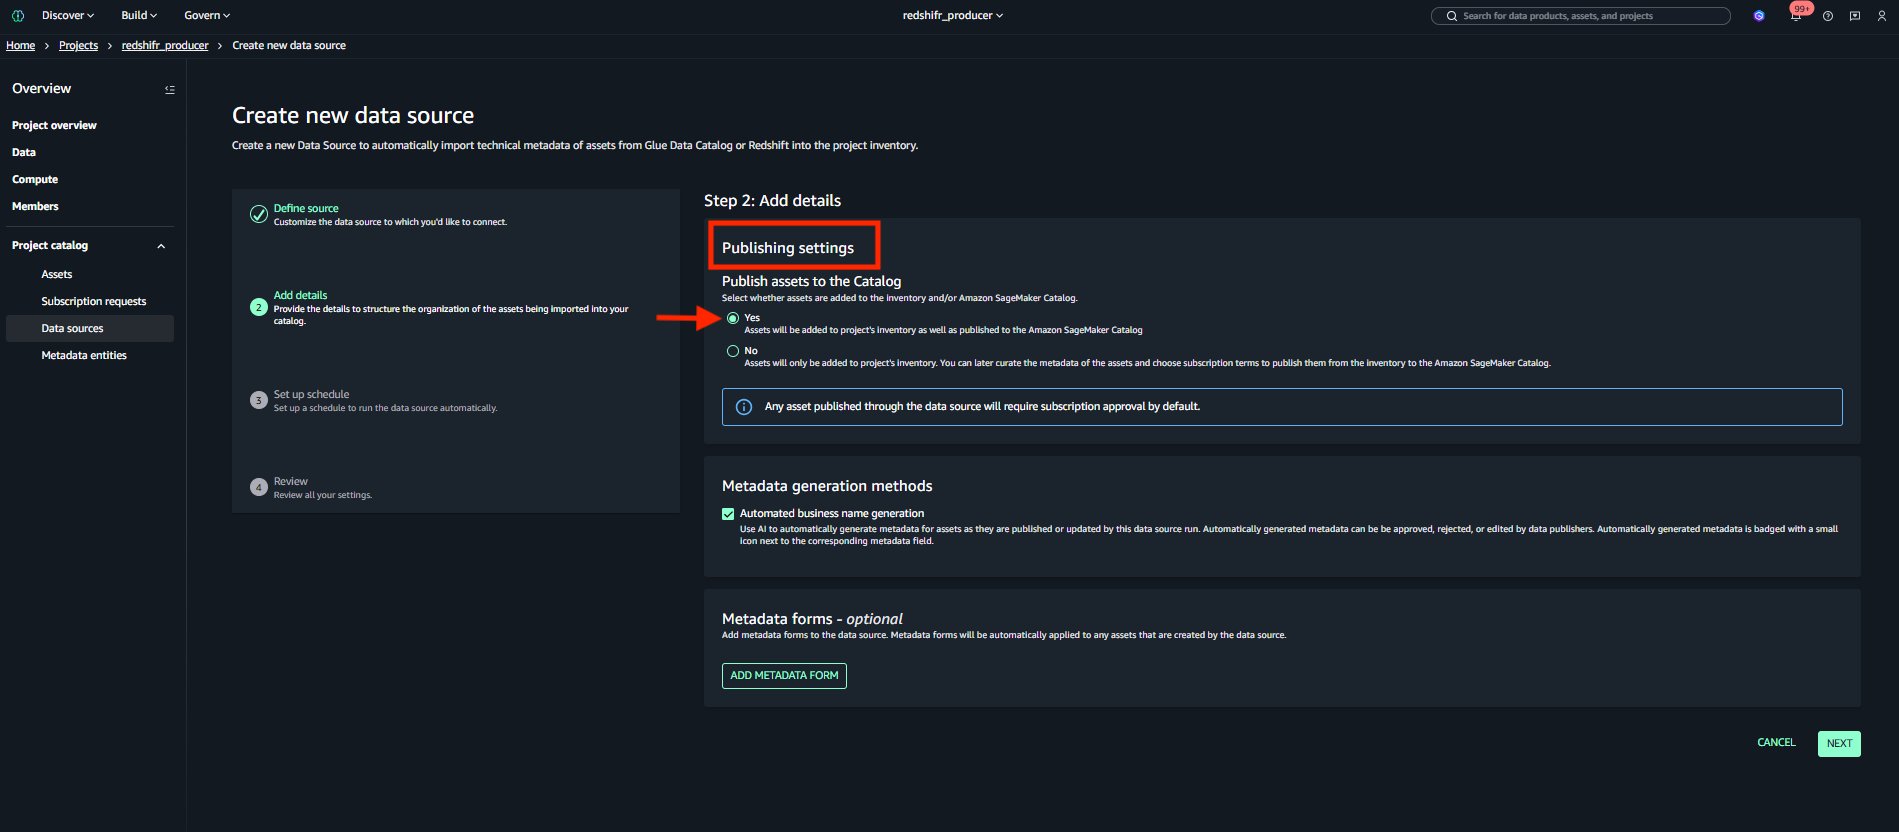
- For Publishing settings, choose whether assets are immediately discoverable in Amazon SageMaker Catalog.
Using Amazon Redshift Serverless?
When creating the connection and data source, use your workgroupName instead of clusterName. The rest of the data source configuration remains the same.
Step 3: Run the data source and publish the data asset to the data mesh
- After the Data source is created, run the Data source. The data source run adds the data.
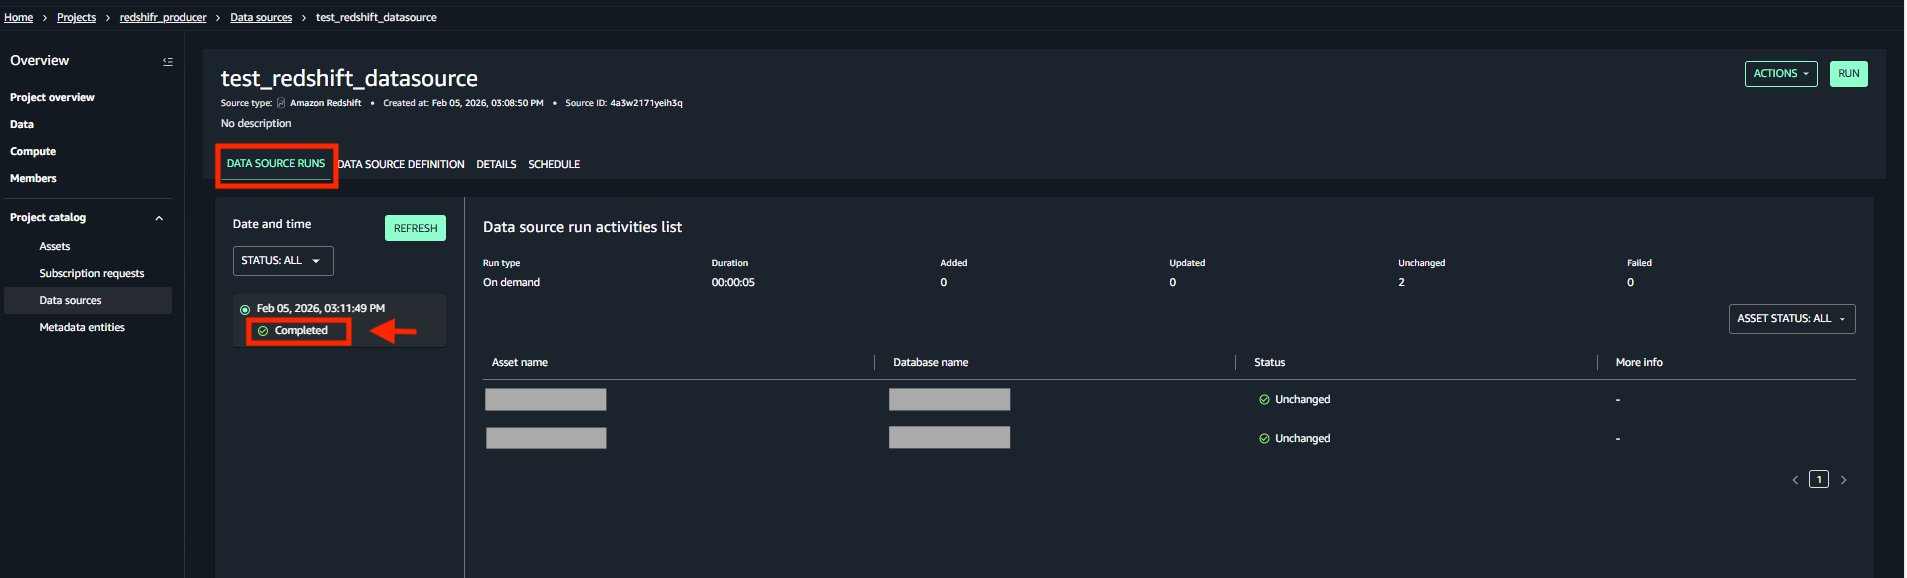
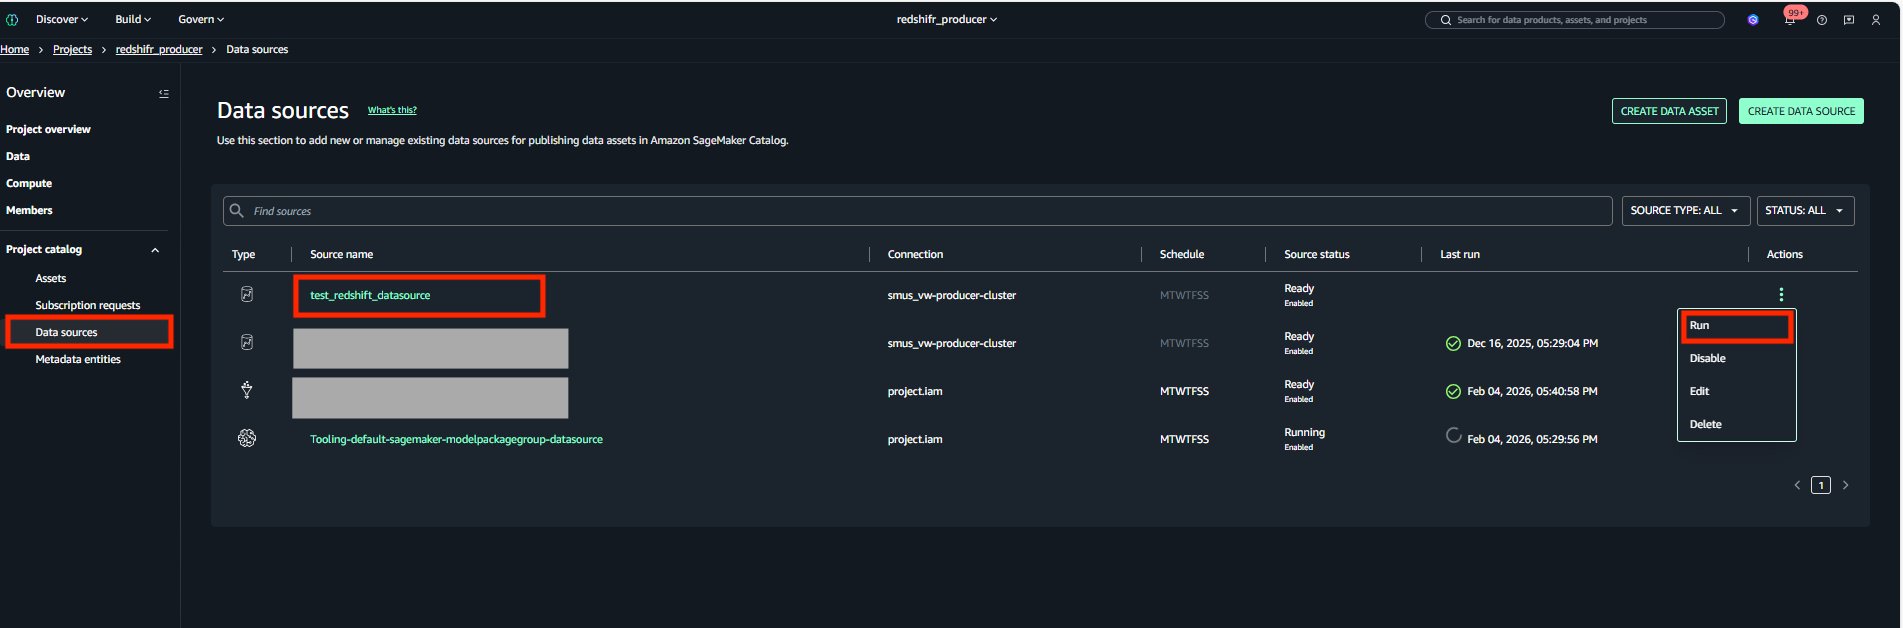
- During creation of data source if you choose Publishing settings such as assets are immediately discoverable, the Amazon Redshift tables and views appear in the catalog as Published, ready for discovery and subscription by data consumers.
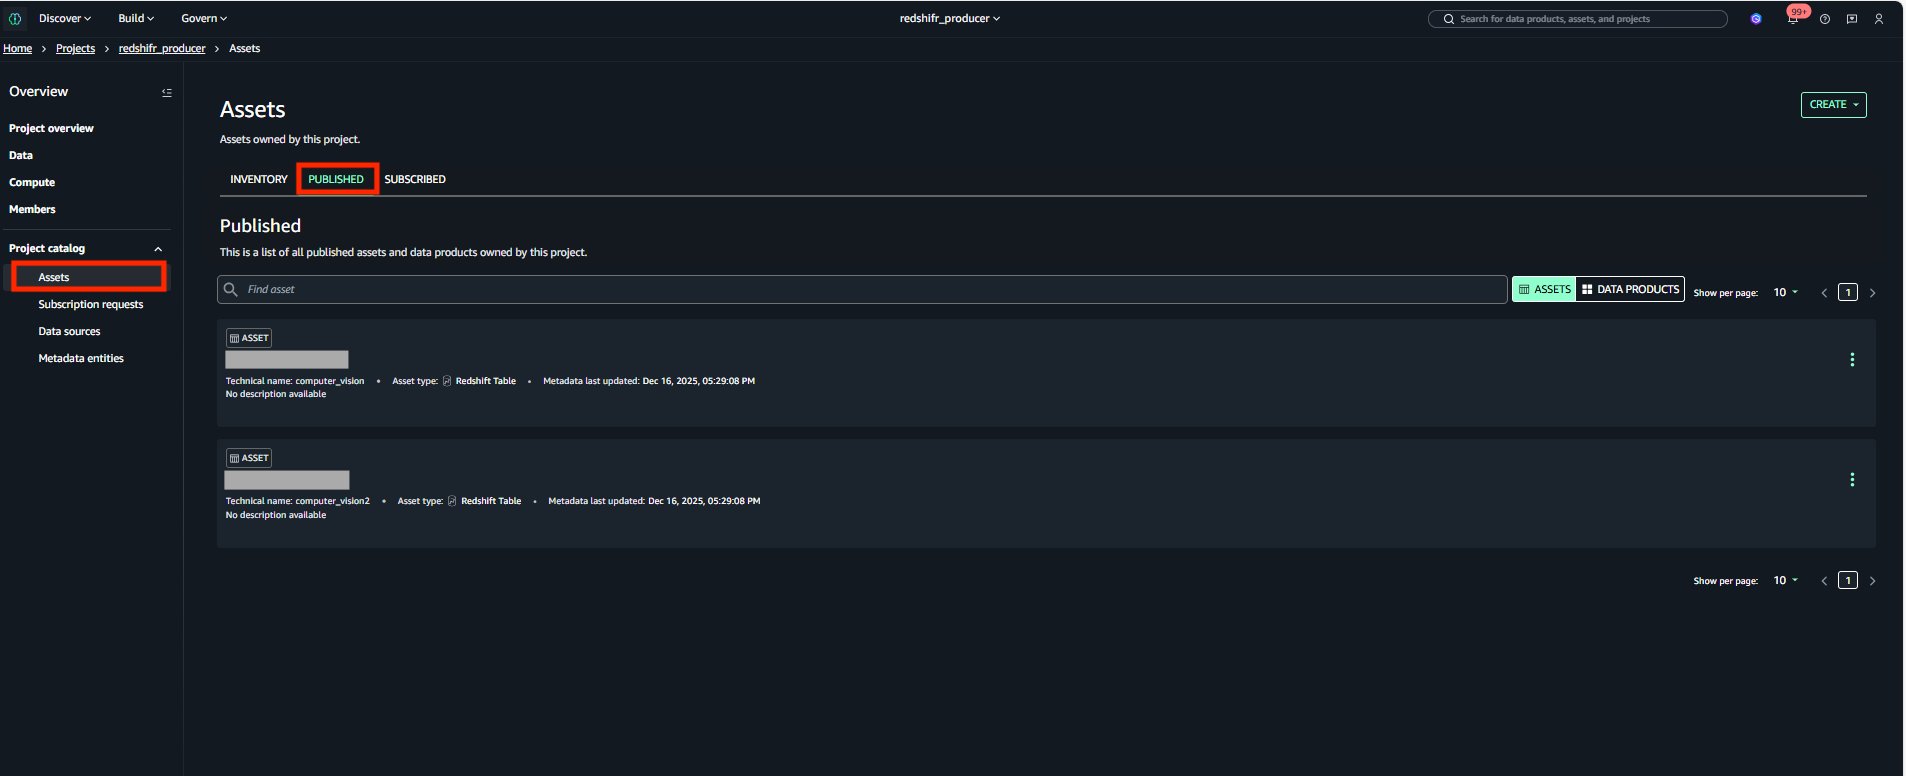
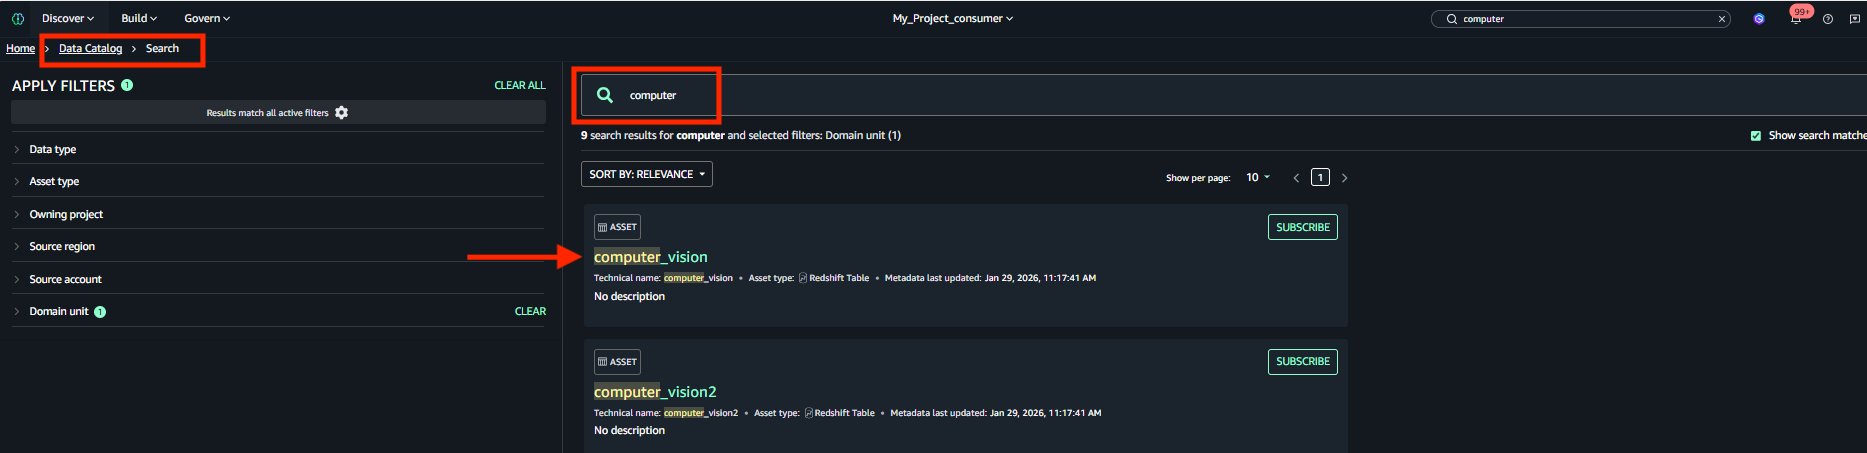
- After the data sources are published, users can discover the published data and submit a subscription request. The data producer can approve or reject requests. After approval, users can consume the data by querying it in the Amazon Redshift query editor. The following screenshot illustrates data discovery in the Amazon SageMaker Unified Studio portal.
Subscribe Amazon Redshift data through the data mesh
To complete the end-to-end test, you need to set up a consumer Amazon Redshift cluster in Account C.
Step 1: Setting up the consumer cluster
- Follow the prerequisites from Steps 1 and 2 in the previous section, make sure the cluster and secret are properly tagged as in the following screenshots:
- Amazon Redshift cluster tags:
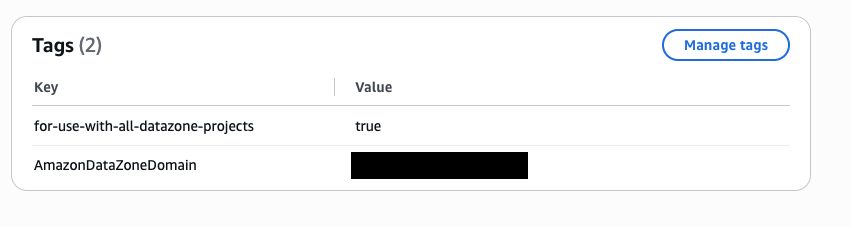
- Tags for the AWS Secrets Manager secret that stores the user credentials for the Amazon Redshift cluster:
Step 2: Connect the consumer cluster to the data mesh
- Log into Amazon SageMaker Unified Studio and navigate to your consumer project.
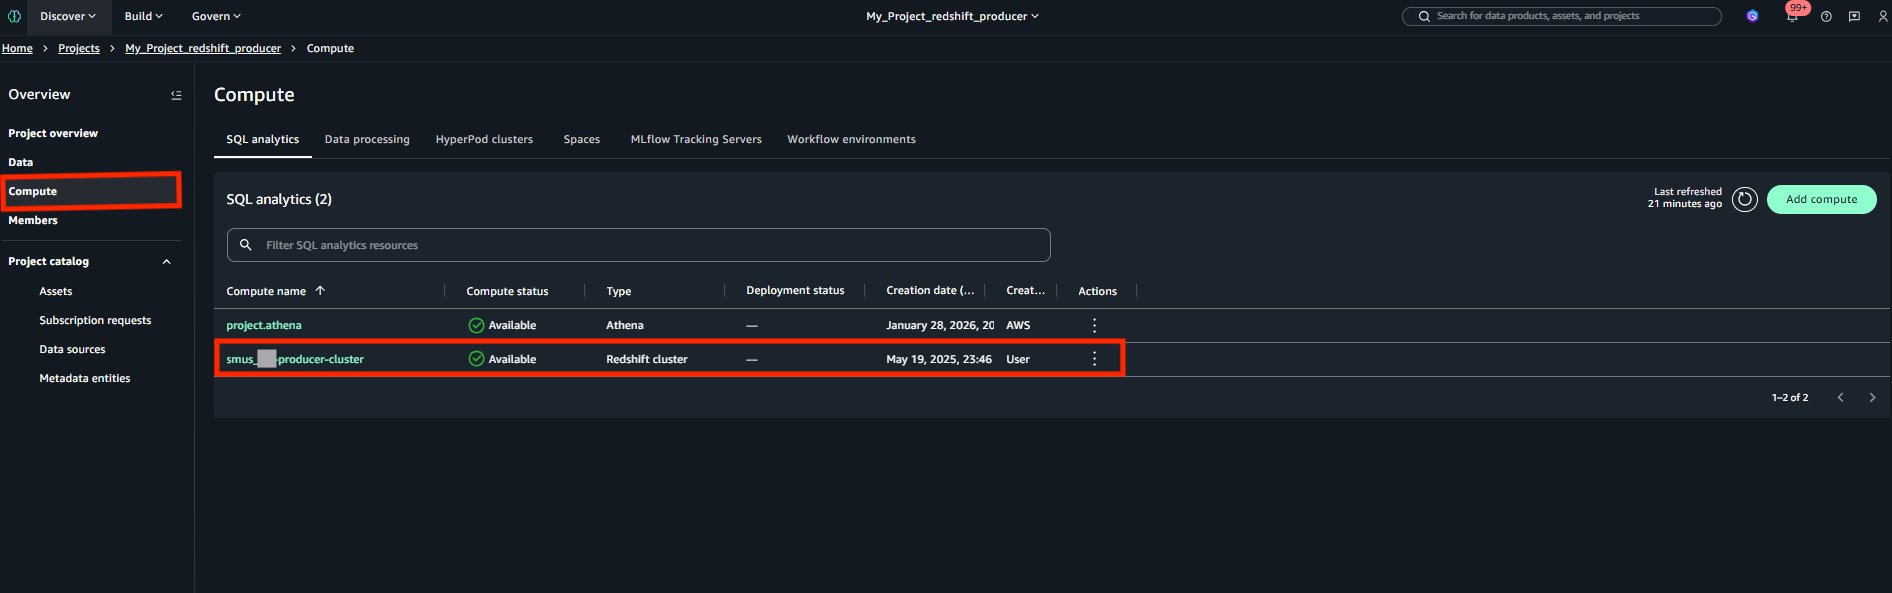
- In the Compute section of your project, choose Add compute, then choose Connect to existing compute resources.
- Choose Amazon Redshift Provisioned.
- Select your consumer Amazon Redshift cluster from the dropdown list and enter the Secrets Manager name.
- Choose Add compute.
- Your newly added Amazon Redshift cluster should now show as available.
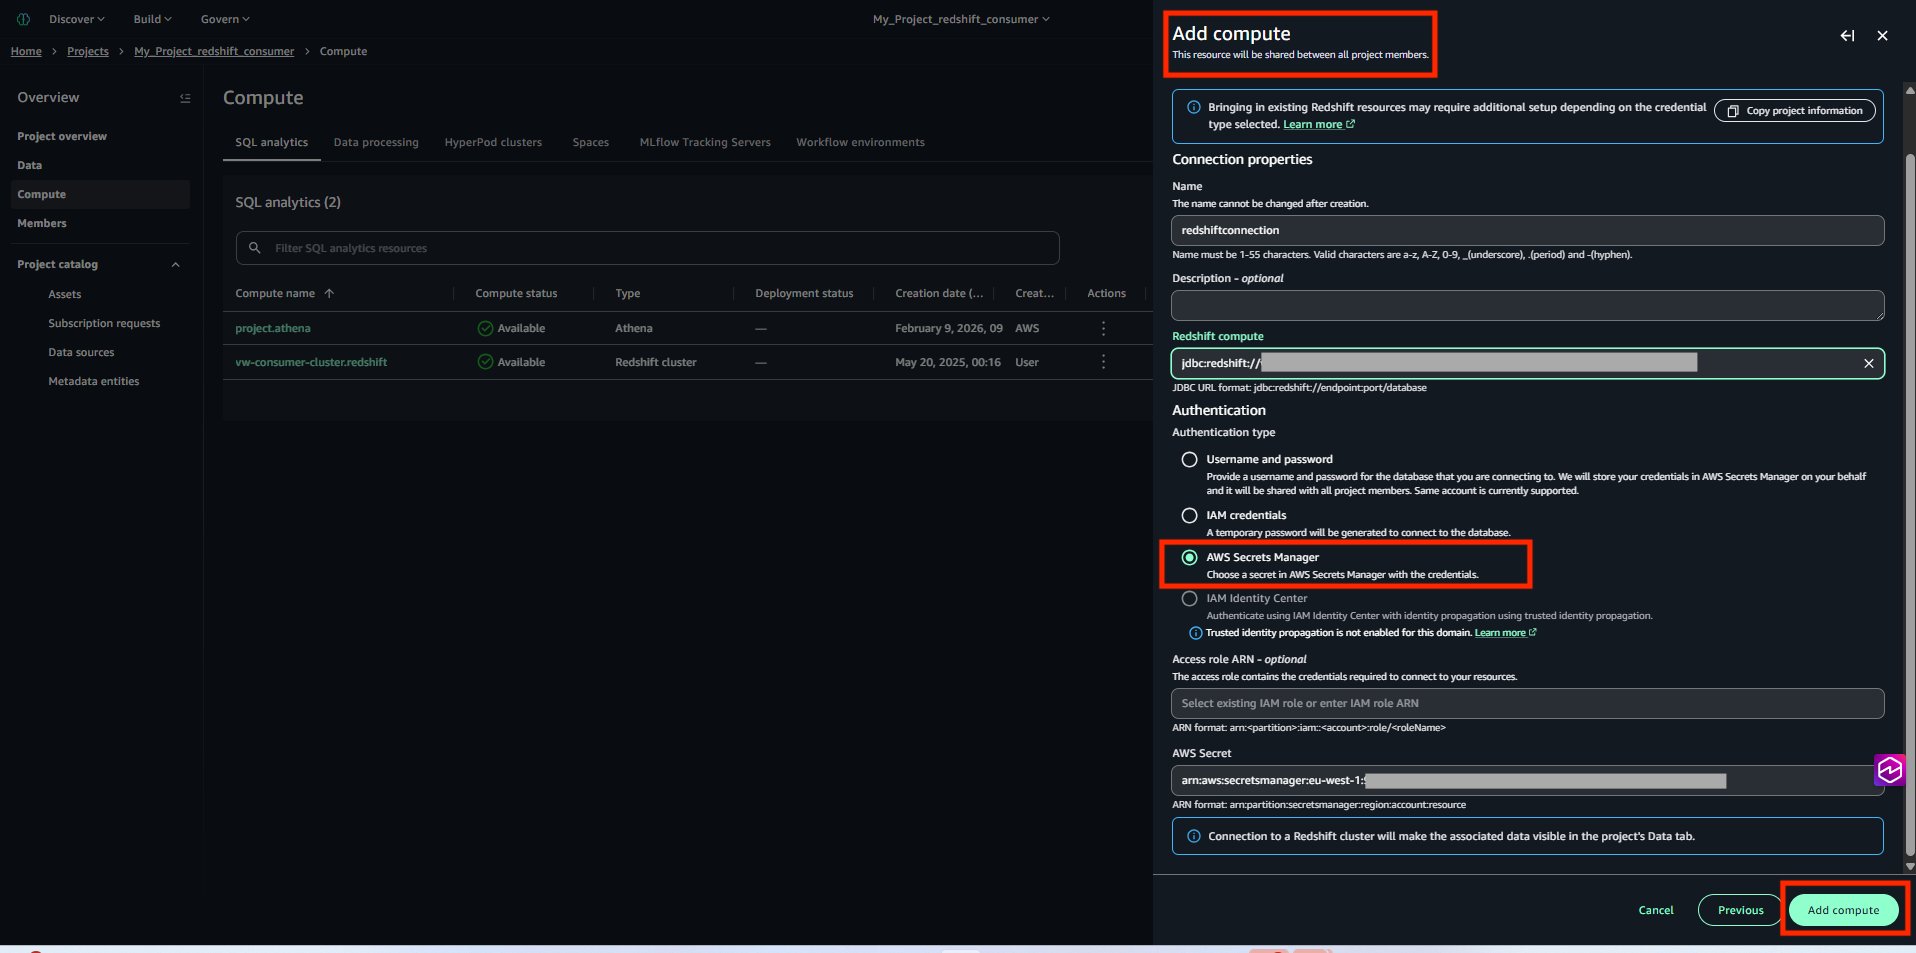
- The newly added Amazon Redshift cluster shows an Available state.
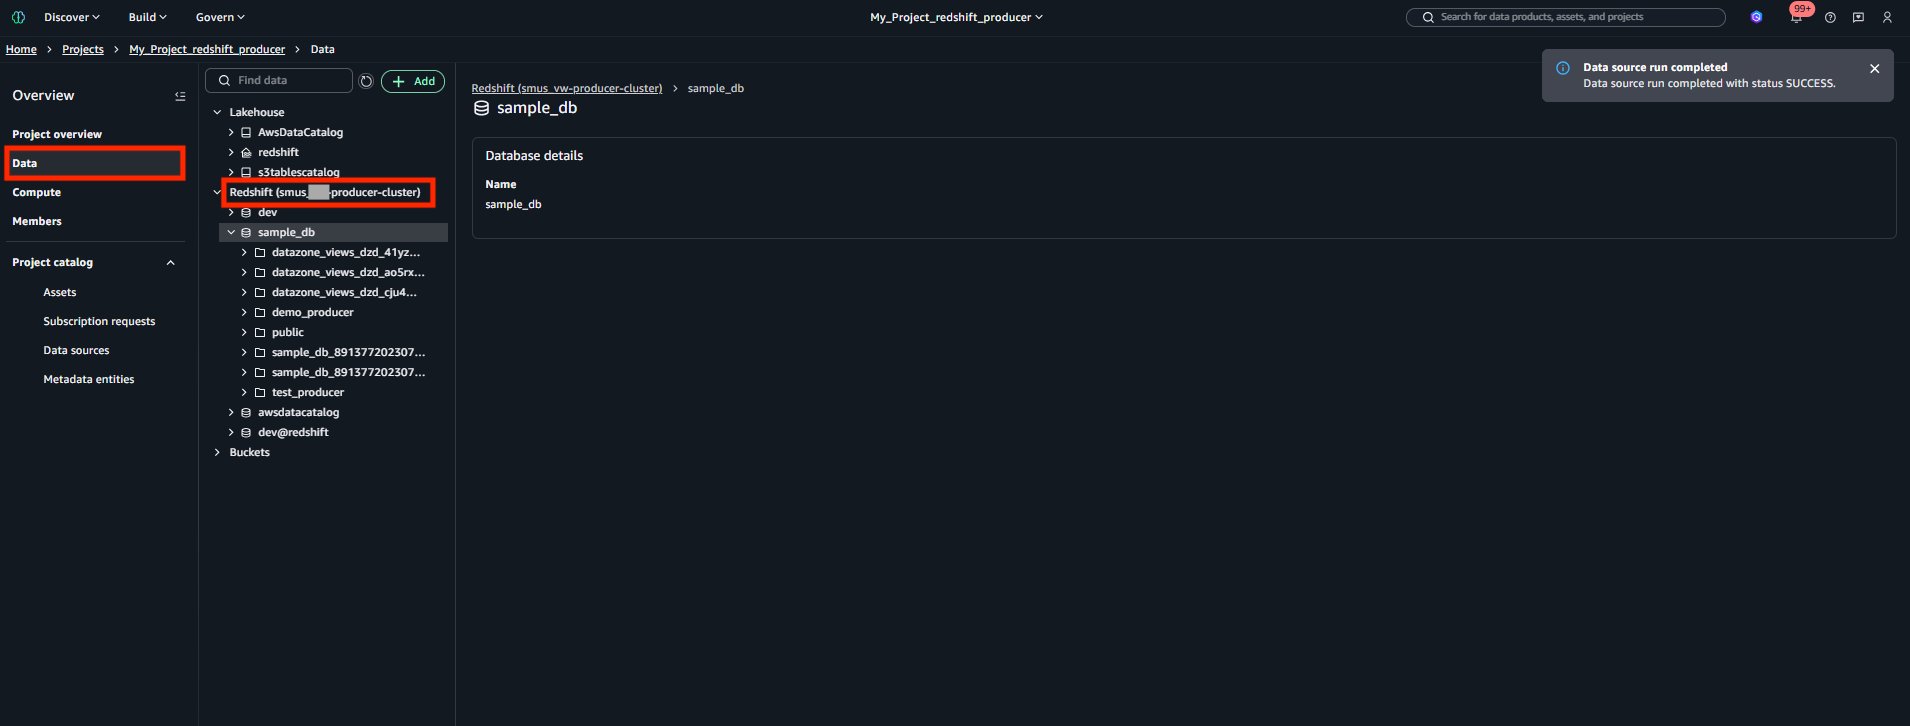
- In the Data section you can see that objects (table/views) from Amazon Redshift cluster are visible and you can query them.
Step 3: Creating a subscription target
- Find the tooling environment ID: in your local terminal after obtaining correct credentials as a project member, run this command to find the tooling environment ID.
- In the response, find and copy the tooling environment ID as shown in the following example.
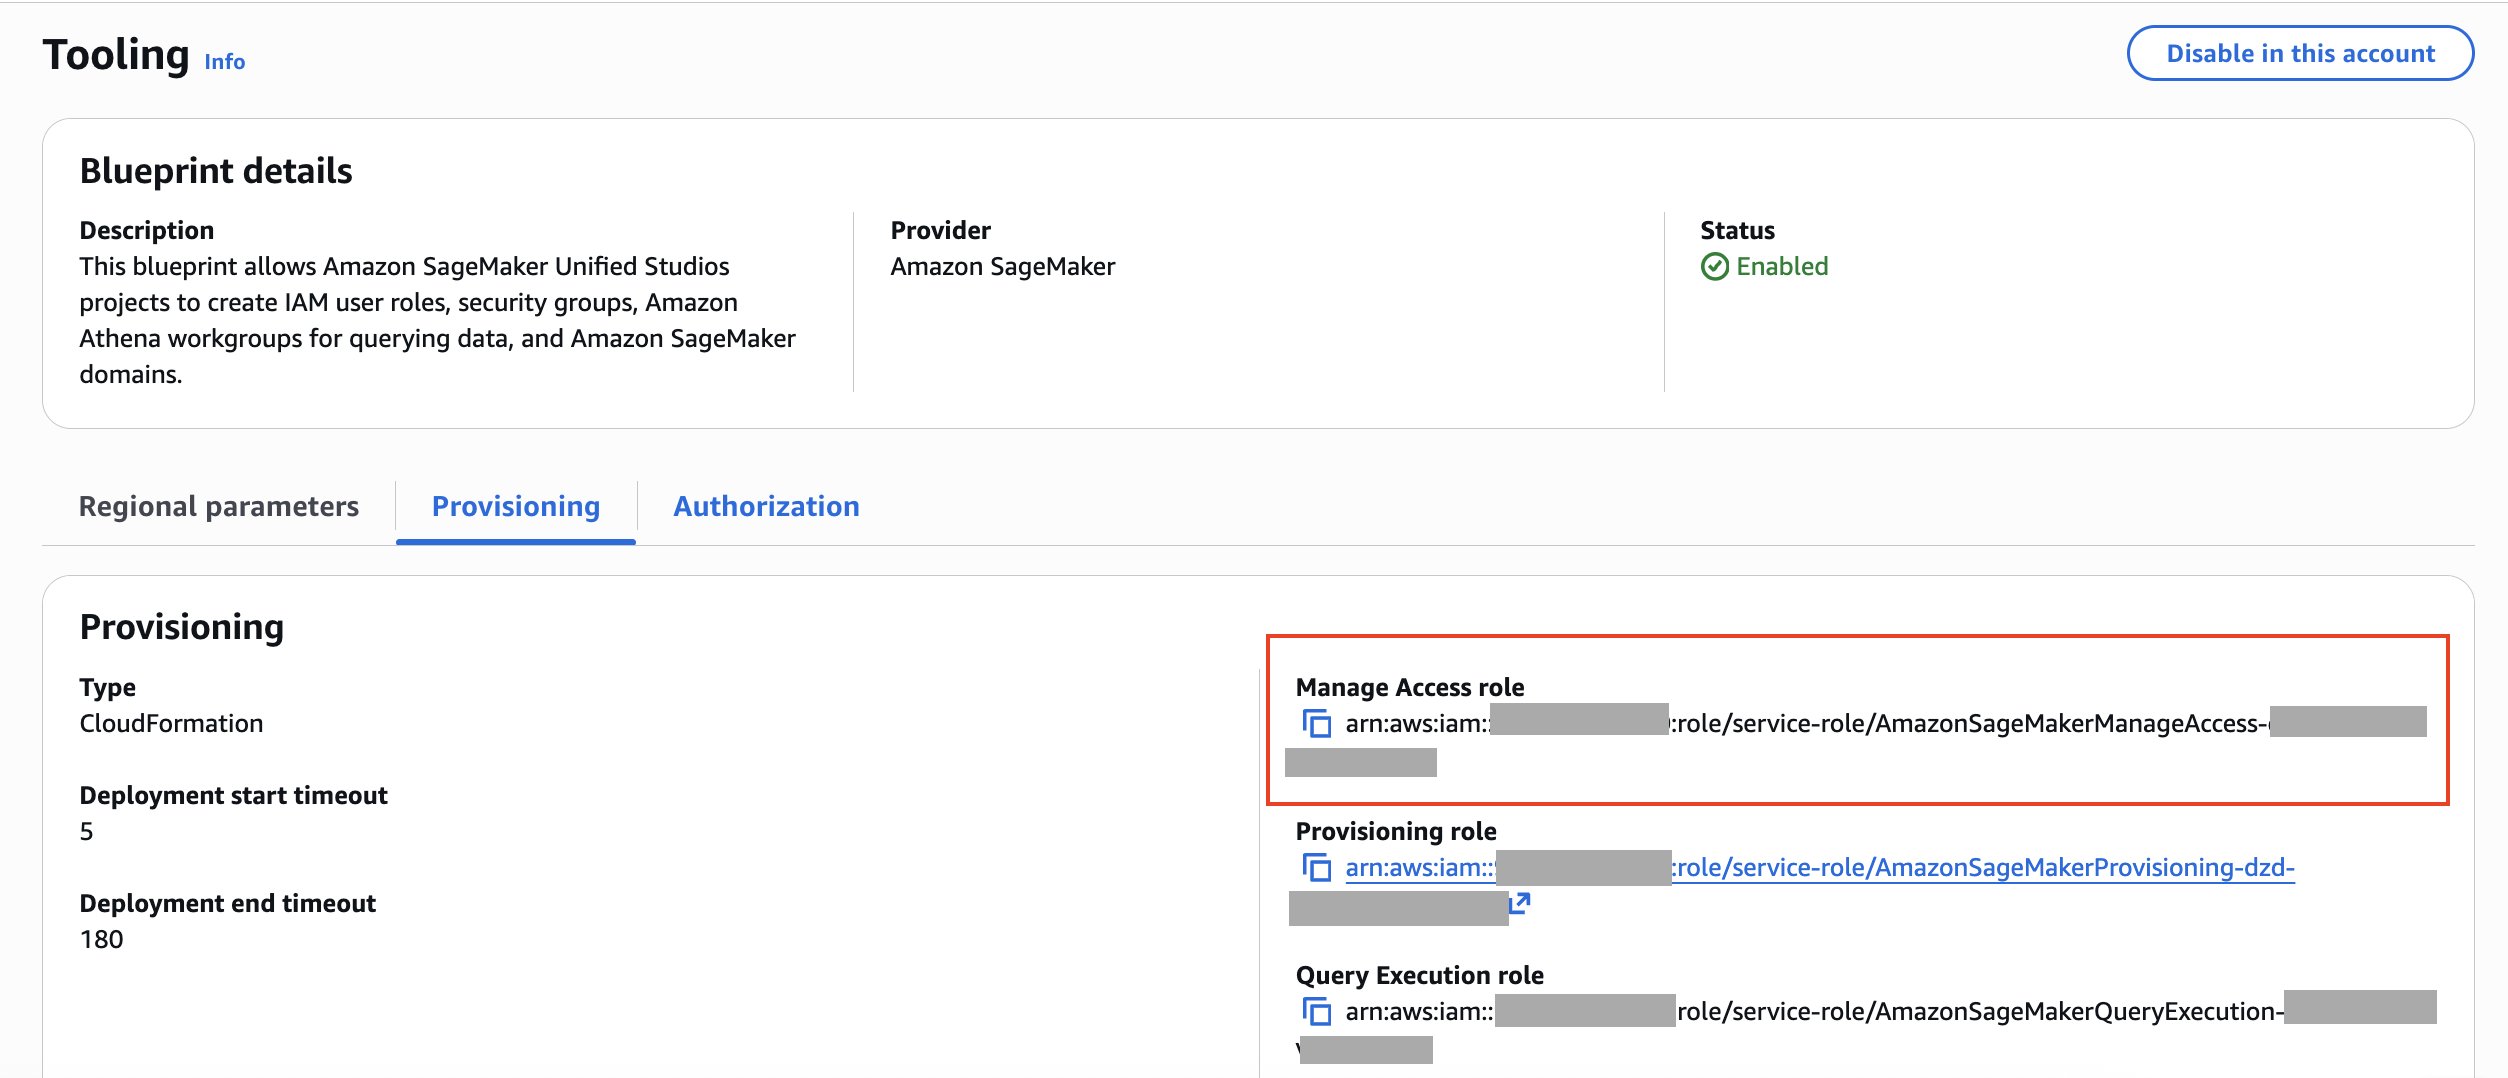
- Locate the Manage Access Role: In Account C, navigate to SageMaker Unified Studio and find the Tooling blueprint. In the Provisioning Tab you will find the Manage Access role and copy the value, as it is needed for the next CLI call.
- Create the Subscription Target.
With all the information collected, you can create the subscription target for the Amazon Redshift cluster as shown by the CLI call.
- Verify the Subscription Target.
To verify that the subscription target was created successfully, make a last CLI call. You should find in the return a new subscription target with the name RedshiftCluster-default-target.
Step 4: Subscribing to data assets
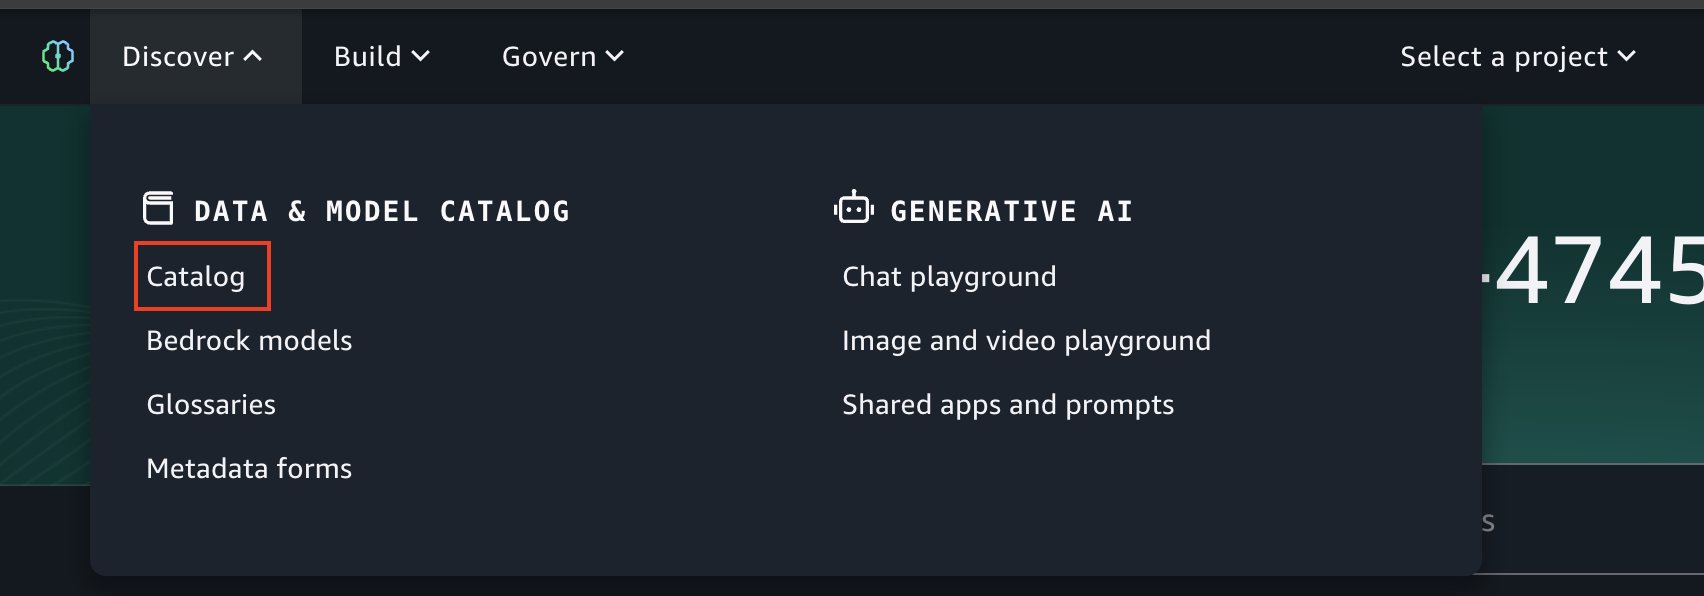
- Open the data catalog inside SageMaker Unified Studio and search for the assets you want to subscribe to.
- Submit your subscription request
- After approval, the subscribed assets appear as views in your consumer Amazon Redshift cluster.
Adding multiple databases and schemas
To publish assets from entirely different databases on the same Amazon Redshift cluster, you need to create a separate data source for each database, meaning repeating the steps mentioned in the section before. Each data source points to the same cluster connection but specifies a different database name. This approach gives you independent control over scheduling, publishing settings, and metadata generation for each database’s assets.
On the consumer side, each subscription target is bound to a specific database and schema combination. This is the target location where SageMaker Unified Studio will create views that give the consumer access to subscribed assets. To receive subscribed data in multiple databases or schemas, you create one subscription target per database-schema combination. For example, different teams within the consumer account might want the data materialized in their own schema. The following example shows this pattern:
Verifying the audit trail
To substantiate the governance and traceability claims in this architecture, enable AWS CloudTrail in all three accounts with data events for Secrets Manager and KMS. Enable Amazon Redshift audit logging on clusters to capture connection and query activity through STL_CONNECTION_LOG and STL_QUERY. Subscription approvals and rejections are recorded by SageMaker Unified Studio and emitted to CloudTrail under the datazone.amazonaws.com event source. Look for CreateSubscriptionRequest, AcceptSubscriptionRequest, and RejectSubscriptionRequest events.
Clean up
If you deployed this solution for testing or evaluation purposes and no longer need the resources, we recommend cleaning up to avoid unnecessary costs. Amazon Redshift clusters, Secrets Manager secrets, and SageMaker Unified Studio projects all incur charges when left running. The following steps guide you through a structured teardown in the correct order: subscriptions first, then data assets, and finally the infrastructure itself. This order verifies that no orphaned resources remain.
- Remove all subscriptions
- Revoke subscriptions from the data assets you have subscribed to in the consumer project.
- Delete your data assets
- Remove the data assets you published on the producer side to avoid leaving unnecessary resources behind.
- Delete the projects
- Delete the project within your SageMaker Unified Studio Domain after all subscriptions are removed. Make sure to delete both the consumer and producer projects.
- Delete the SageMaker Unified Studio Domain in Account A.
Conclusion
In this post, we demonstrated how Amazon SageMaker Unified Studio simplifies cross-account data governance for Amazon Redshift. By implementing this solution, organizations can move away from ad-hoc, non-auditable data sharing processes to a secure, scalable, and fully governed approach. Amazon SageMaker Unified Studio serves as the central governance layer that data producers and consumers use to publish, discover, and subscribe to data products across AWS accounts. This turns a fragmented data landscape into a well-governed data mesh without the need for custom tooling or manual coordination.
With cross-account data sharing and governance in place, the natural next step is to use this well-governed data for machine learning and generative AI workloads. Because Amazon SageMaker Unified Studio brings together data, analytics, and AI capabilities in a single environment, teams can more efficiently transition from discovering and subscribing to data products to building ML models and generative AI applications, all within the same environment. This reduces the traditional friction between data engineering and data science, accelerating time to value. To get started with establishing your organization’s data mesh using Amazon SageMaker Unified Studio, follow the guidance for Setting up Amazon SageMaker Unified Studio.