AWS Big Data Blog
Improve the discoverability of your unstructured data in Amazon SageMaker Catalog using generative AI
Every day, businesses generate massive amounts of unstructured data such as PDFs, images, emails, customer feedback. Although this data holds valuable business insights, extracting meaningful value from it remains a significant challenge. Its lack of proper context and searchability often keeps it siloed and underutilized, limiting data-driven decision making. Financial reports, legal documents, and customer feedback are prime examples. They contain the answers that your business needs, yet they frequently go unanalyzed due to these barriers.The sheer volume of unstructured content requires scalable infrastructure and automated processing tools, while sensitive information embedded within demands sophisticated classification and protection strategies. Without proper management, organizations face operational inefficiencies, high costs, and increased regulatory risks and reduced AI effectiveness.
What if business context from your PDFs, images, and emails could be automatically extracted and surfaced wherever your teams search for information? In this post, we show you how to implement this. By combining Amazon SageMaker Catalog with generative AI capabilities, you can make unstructured data searchable and queryable through the same interfaces that your teams use for structured data analysis. Success requires balancing advanced AI techniques with governance frameworks so that your data is discoverable and secure for better decision making.
This is a two-part series post. In the first part, we walk you through how to set up the automated processing for unstructured documents, extract and enrich metadata using AI, and make your data discoverable through SageMaker Catalog. The second part is currently in the works and will show you how to discover and access the enriched unstructured data assets as a data consumer. By the end of this post, you will understand how to combine Amazon Textract and Anthropic Claude through Amazon Bedrock to extract key business terms and enrich metadata using Amazon SageMaker Catalog to transform unstructured data into a governed, discoverable asset.
Solutions overviewYou will transform unstructured data into an interactive knowledge base through automated processing within the Amazon SageMaker AI environment. Here is how it works:
- You will set up an Amazon SageMaker Unified Studio Data Notebook Jupyter-based workspace where you manage your entire processing pipeline, add metadata to unstructured documents like PDFs, photos, emails, or audio recordings stored in Amazon Simple Storage Service (Amazon S3).
- You will add your files to the SageMaker Project.
- Amazon Textract extracts information and insights from text, removing manual transcription. This extracted content instantly populates your asset’s README.
- Amazon Bedrock turns the text into business terms that provide SageMaker Catalog assets the correct business context to help with semantic search or business query search.
- You will use a publish method to publish the enriched data to the Amazon SageMaker Catalog, making it available to your organization.
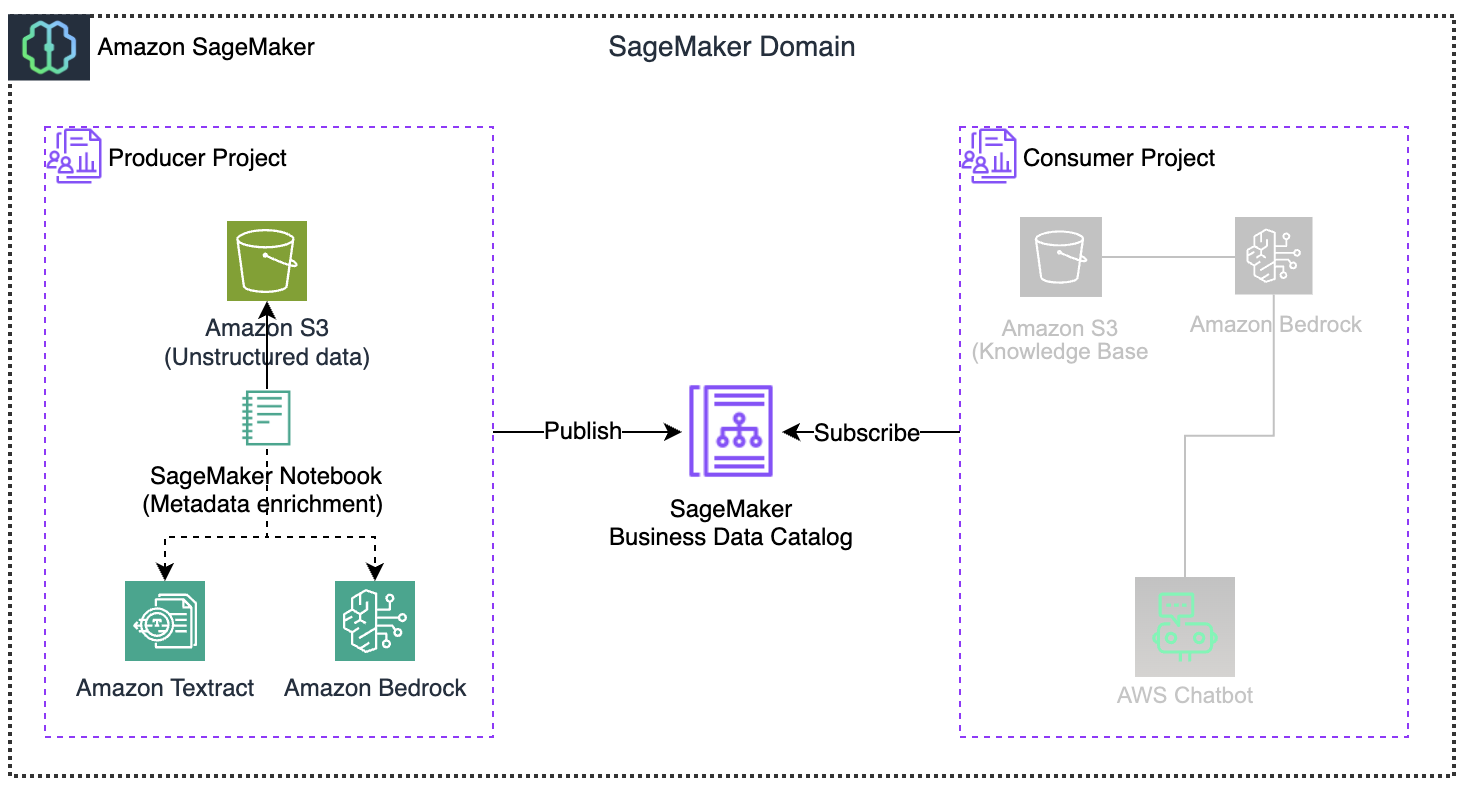
The architecture sets up a pipeline from processing raw documents to enabling end users interaction, with the Amazon SageMaker Catalog serving as the central hub for sending and receiving data. Amazon SageMaker Catalog includes generative AI features that automatically develop and add business descriptions for structured data assets. This capability streamlines documentation processes and provides greater consistency across data assets. You can further enhance this solution to create summaries by also reading and incorporating S3 metadata. This will add more context, such as object properties, access patterns, and storage characteristics, to the extracted document content, streamlining the process to find and catalog data.
Prerequisites
To implement the solution, you must complete the following prerequisites:
- Create an AWS account – Required to access all AWS services (Amazon SageMaker Catalog, Amazon S3, Amazon Textract, Amazon Bedrock) used in this solution.
- Create an Amazon SageMaker Unified Studio domain: This provides a collaborative environment for connecting your assets, users, and their projects.
- Create an SageMaker Project with all capabilities: Your collaborative workspace where you will upload documents, run processing notebooks, and manage permissions for your data enrichment pipeline. Team members added to this project gain immediate access to all shared resources.
- Producer Project (project name: $(-your-project-name) use “unstructured-producer-project”, project profile: All capabilities)
Solution deployment
Now let’s complete the following steps to deploy and verify the solution.
Prepare source datasets
In this section you will use the following sample datasets by downloading them to your local machine. We will upload these files into your SageMaker Project S3 bucket created in the prerequisite step.
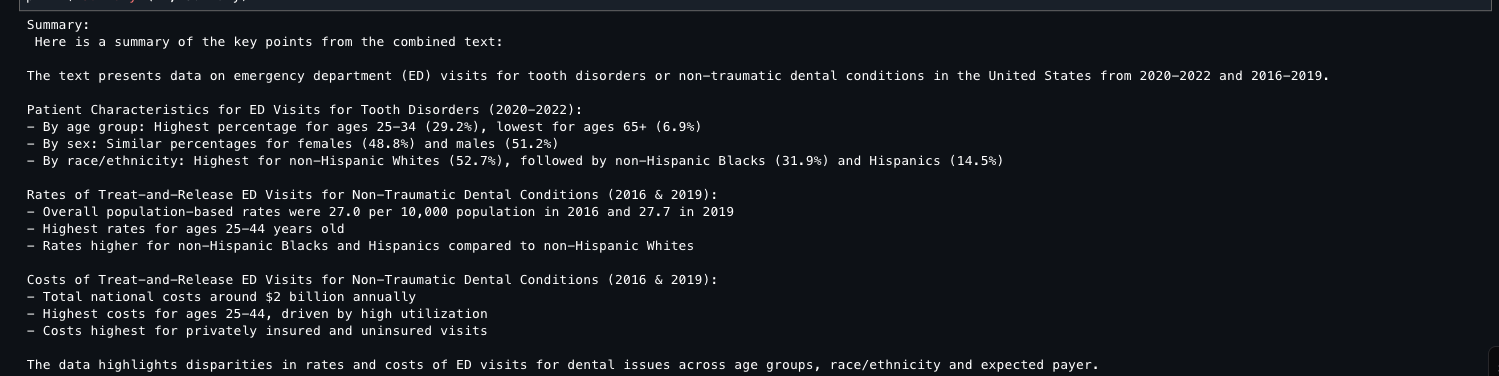
- ED_DistributionToothDisorder.png: The dataset shows emergency department visits for tooth disorders in the US from 2020–2022, broken down by age group, gender, and race/ethnicity.
- analysisDentalEDvsts.pdf: This report shows emergency department visits analysis for dental conditions across the United States between 2016–2019, showing that among non-traumatic dental visits.
- s3_document_processor_unstructured.ipynb notebook (keep in local environment and will be used at a later stage)
With your sample datasets ready, let’s log in to SageMaker Unified Studio and upload them to your project.
Log in to Amazon SageMaker Unified Studio as a data producer
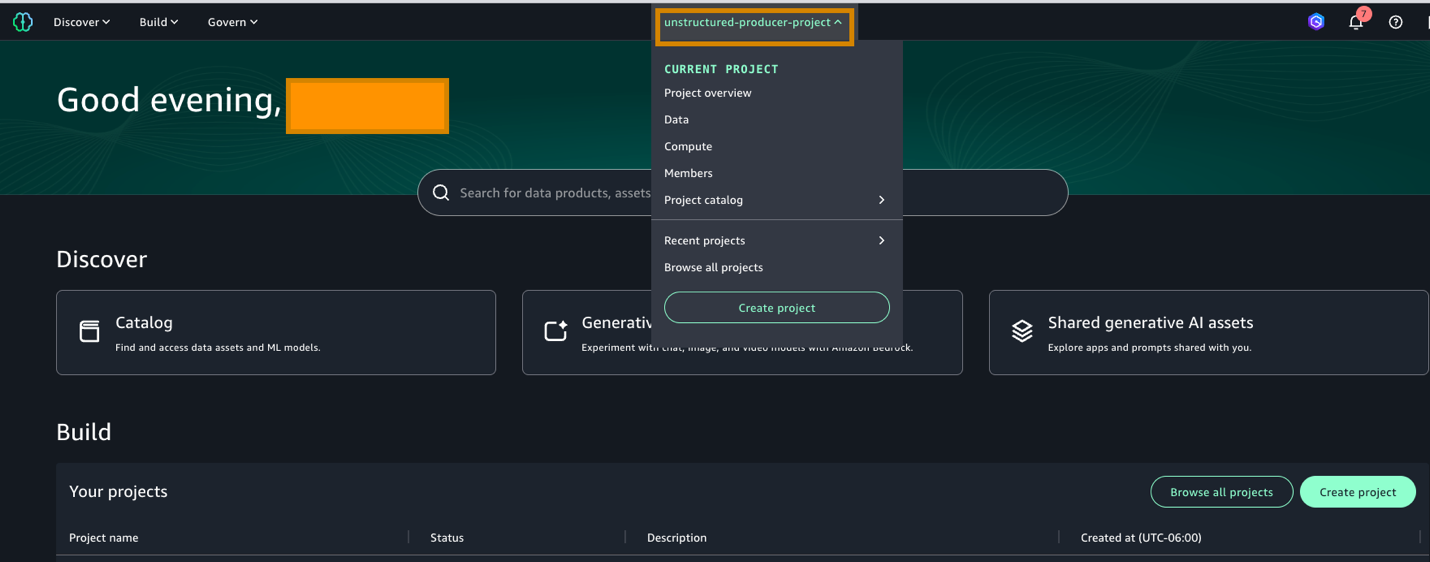
- Log in to the SageMaker Unified Studio URL using your username and password. In the portal UI, select the producer project (unstructured-producer-project) that you created in the project selector (at the top center of the screen).
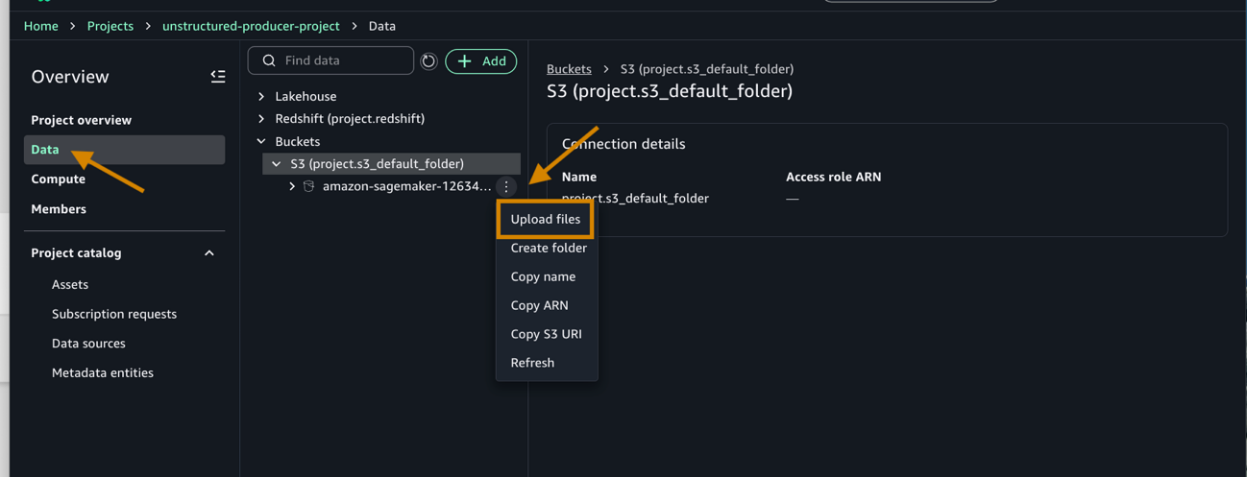
- Under Data, do the following:
- Choose the default project bucket created amazon-sagemaker-12*********-us-west-2-51271642b525/dzd_*********/c3jl67qvxbic9c/.
- Next, choose the three dots and upload the downloaded files (1&2) from the prepared dataset section.
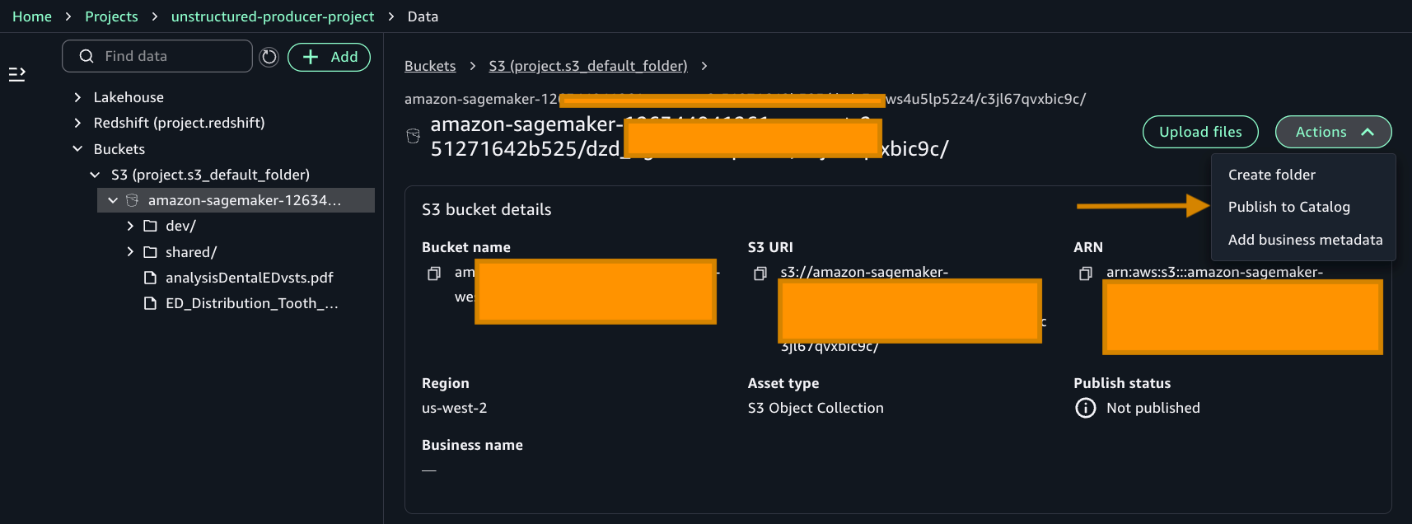
- After adding the files, choose Publish to Catalog to publish your asset.
Your files are now in the catalog. Before we process them, your project needs permission to access the services. Let’s add those permissions.
- Add permissions to an IAM role for the Amazon SageMaker Project role.
- Go to the Project overview tab and find the Project role ARN. It can be found in the Project details section.
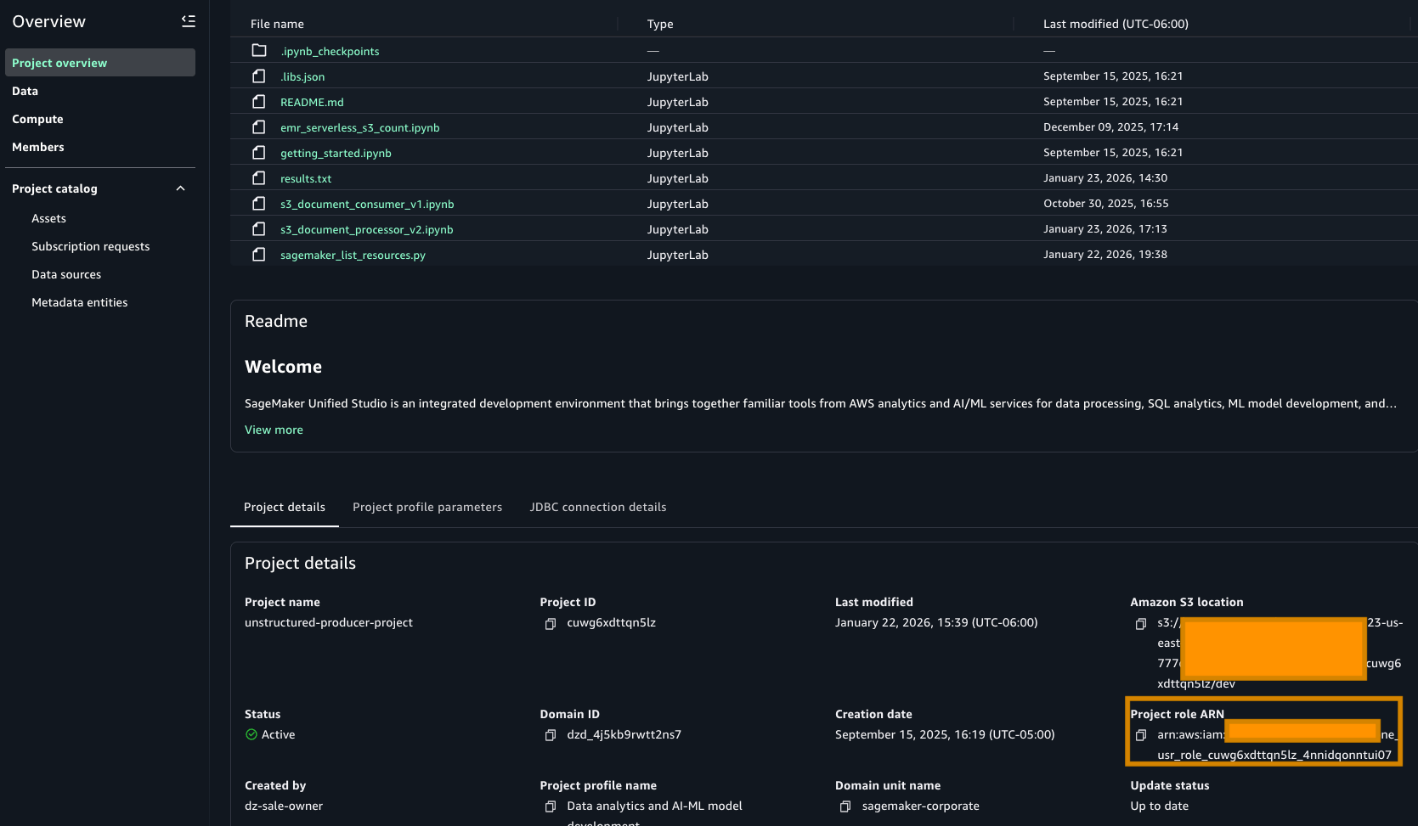
- Go to the AWS IAM service and choose Roles. Search for the role as highlighted in the preceding image and add the following permissions. The following policies use full-access managed policies to keep things straightforward for this walkthrough. We don’t recommend this for production environments. Instead, we encourage you to take a moment to review each policy with your security team and scope them down to the least-privilege permissions that your workload needs:
- Add an AmazonBedrockFullAccess managed policy.
- Add an AmazonTextractFullAccess managed policy.
- Add an AmazonS3FullAccess managed policy.
- Add this inline policy to project policy
- Go to the Project overview tab and find the Project role ARN. It can be found in the Project details section.
With permissions configured, let’s set up the governance framework that will classify your documents. We will create glossary terms to tag sensitive and non-sensitive data.
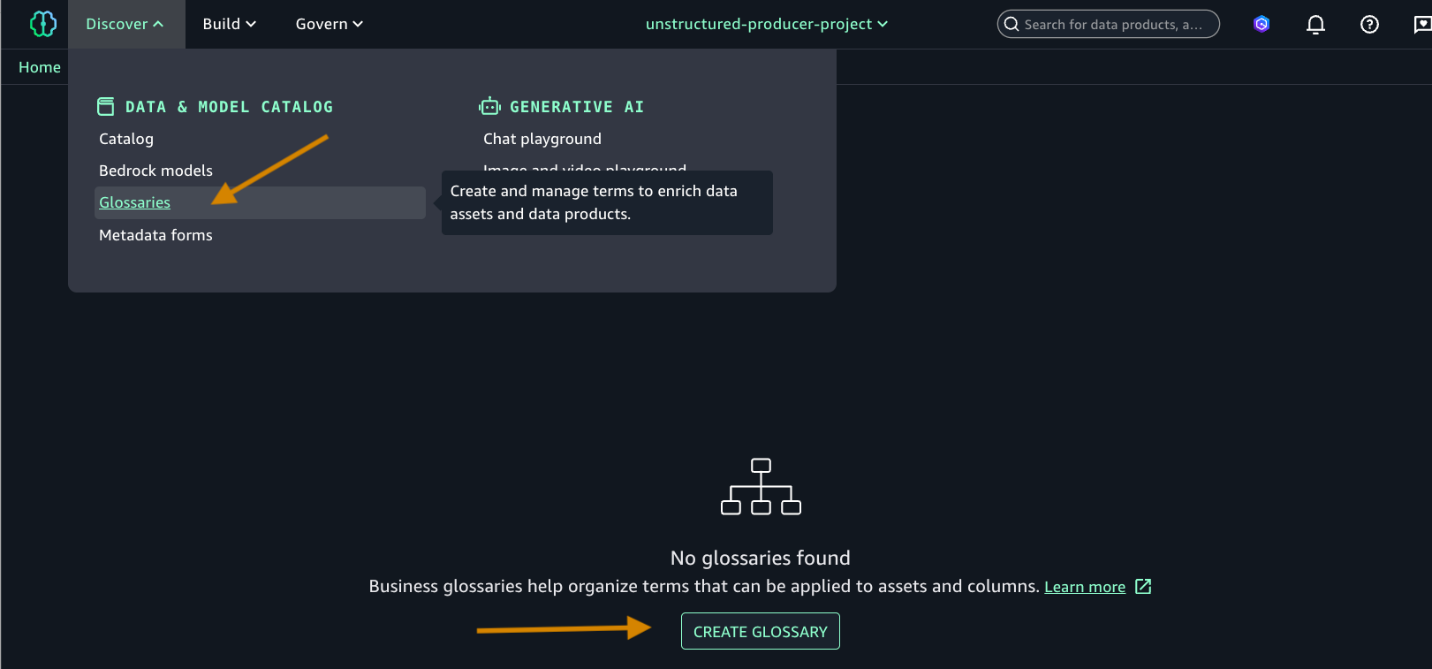
- Add Glossary and Glossary terms.
- Choose Glossaries and CREATE GLOSSARY.
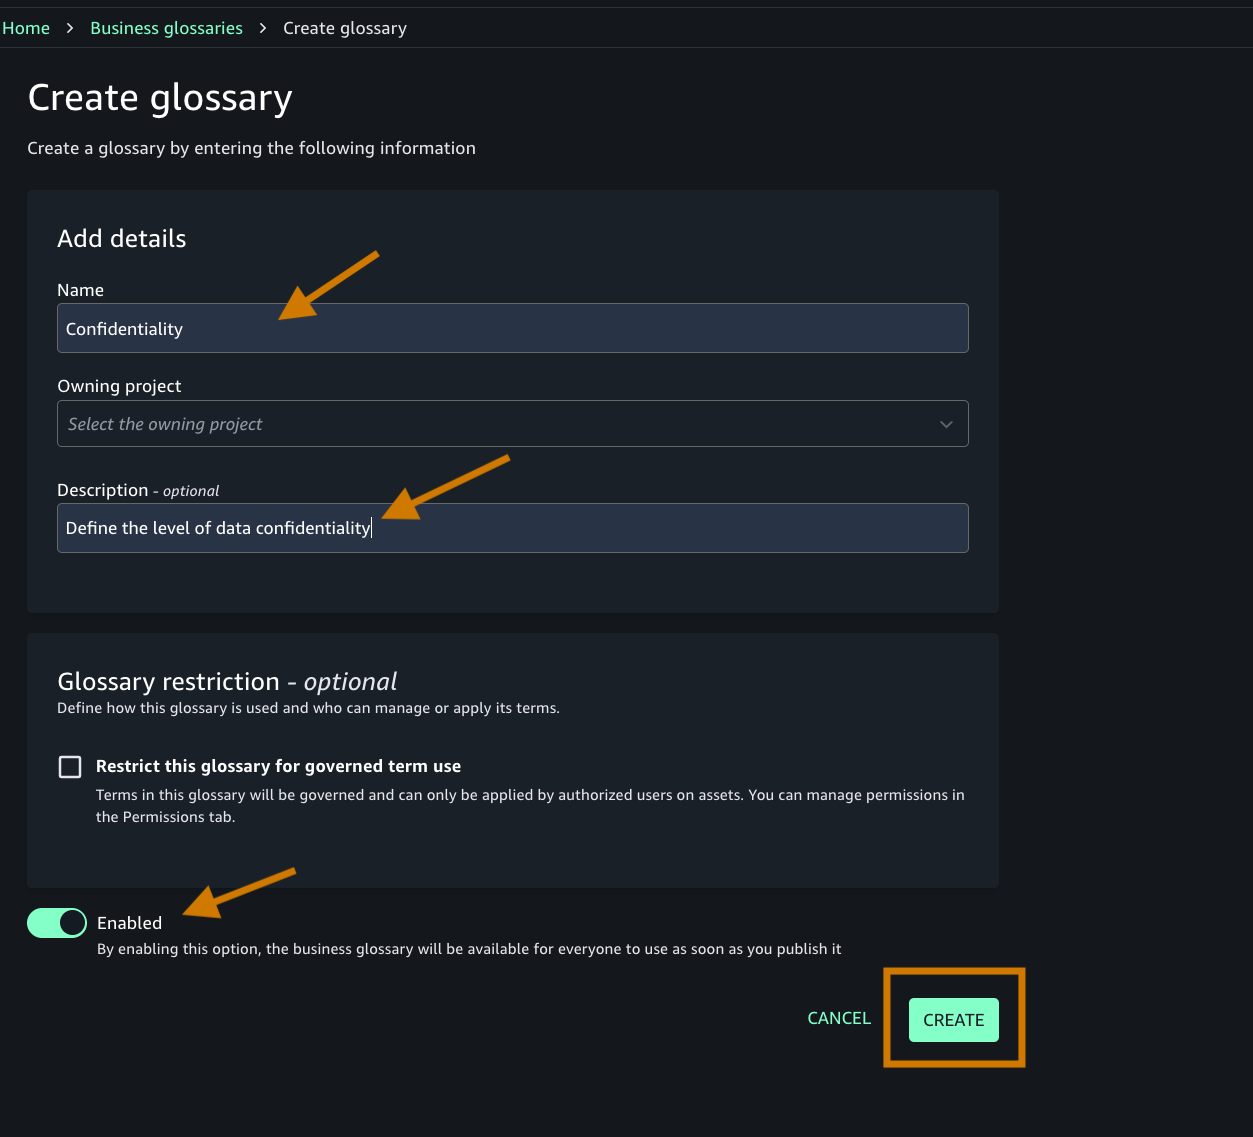
- Add the following:
- Name of the glossary and descriptions.
- Toggle on the Enable button as shown in the following screenshot.
- Create an appropriate glossary term. You will add this term to your business metadata.
- Navigate to the Discover menu in the top navigation bar.
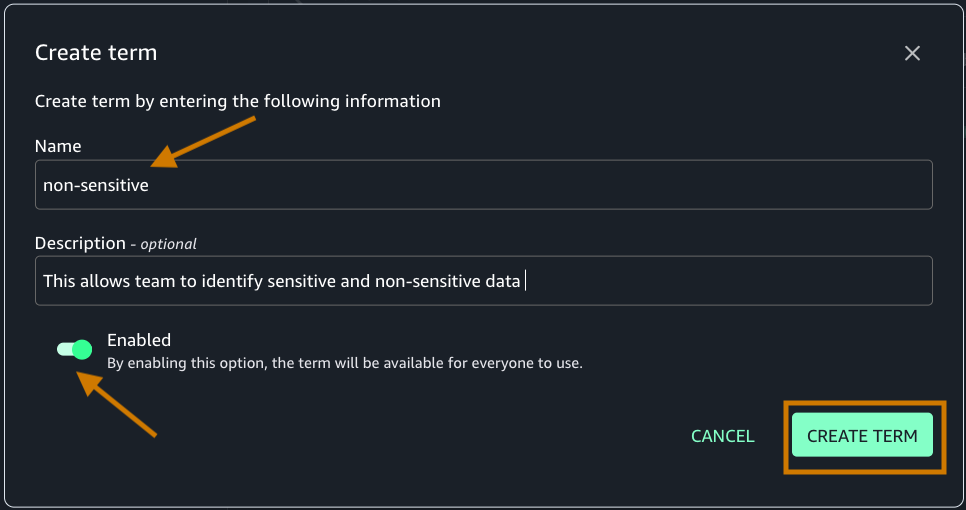
- Choose Glossaries, and then select Create term.
- Ensure that you’re creating the term under the Confidentiality glossary that you created in step 4.
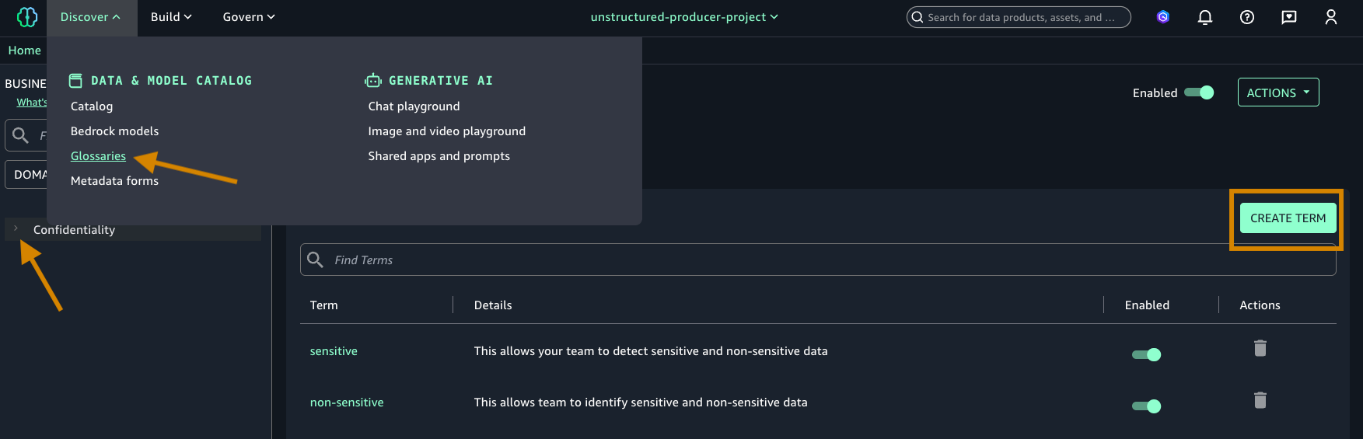
- Create two terms (sensitive and non-sensitive) and add a description. Make sure that the Enabled toggle is on to enable the new term.
- Choose Glossaries and CREATE GLOSSARY.
Now that we have configured the necessary permissions and created our glossary terms, let’s proceed with building the business metadata.
Build business metadata
In this section, you will use Amazon Textract and Amazon Bedrock to automatically build and curate business metadata for your assets using a SageMaker Unified Studio Notebook.
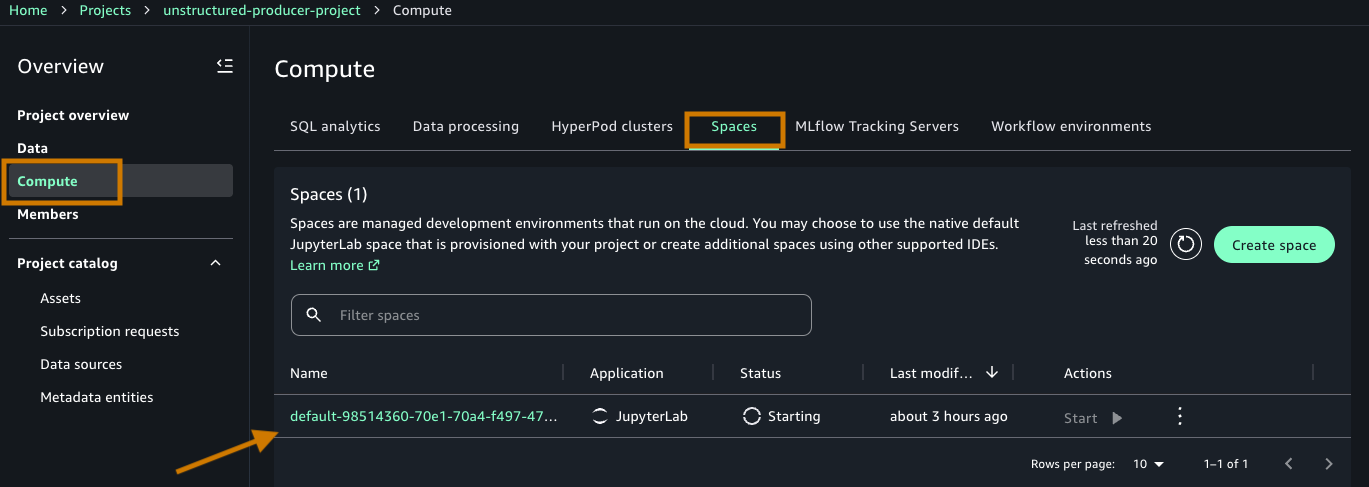
- From the Project Overview page, access the Compute section in the left menu.
- Navigate to the Spaces tab.
- Choose the default space created by your project(default-985-) to begin”.
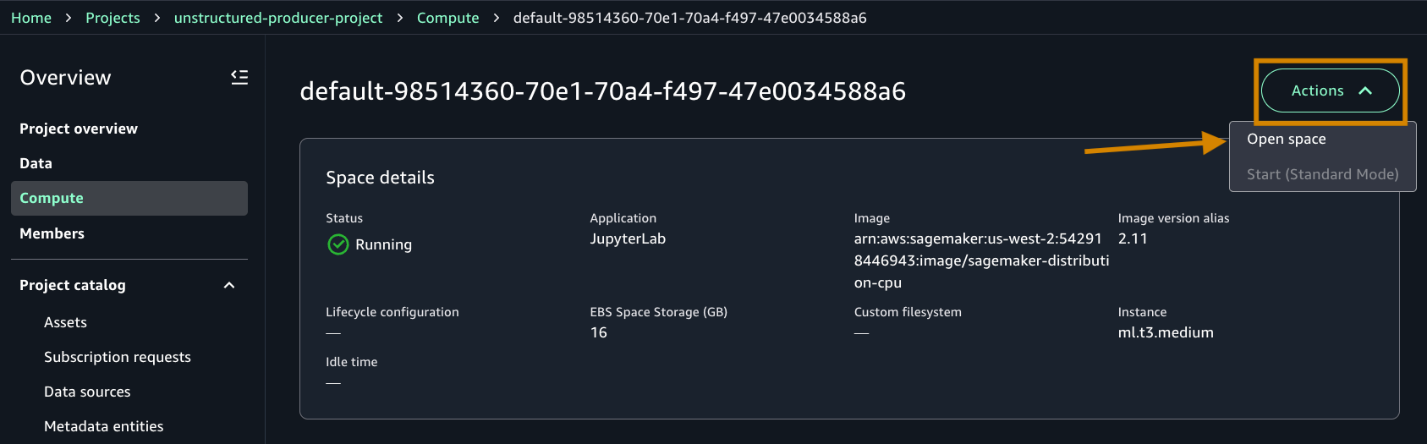
- Open the space details page by selecting the Name (default-****).
- Under Actions, Choose Open space to be taken to the Data Notebook workspace (Jupyter based).
- After connected, upload the downloaded notebook from the prerequisite step in your JupyterLab interface by either dragging it into the File browser or using the upload icon.
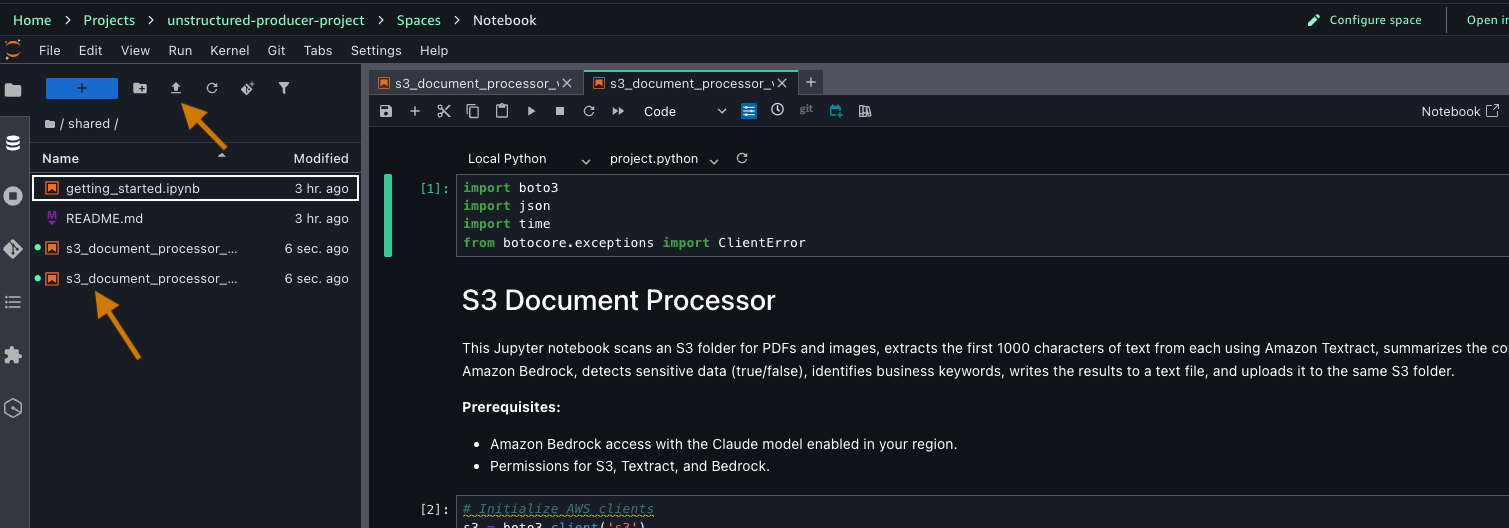
Before running the notebook, let’s understand what each cell does and how they work together to transform your documents into discoverable assets.
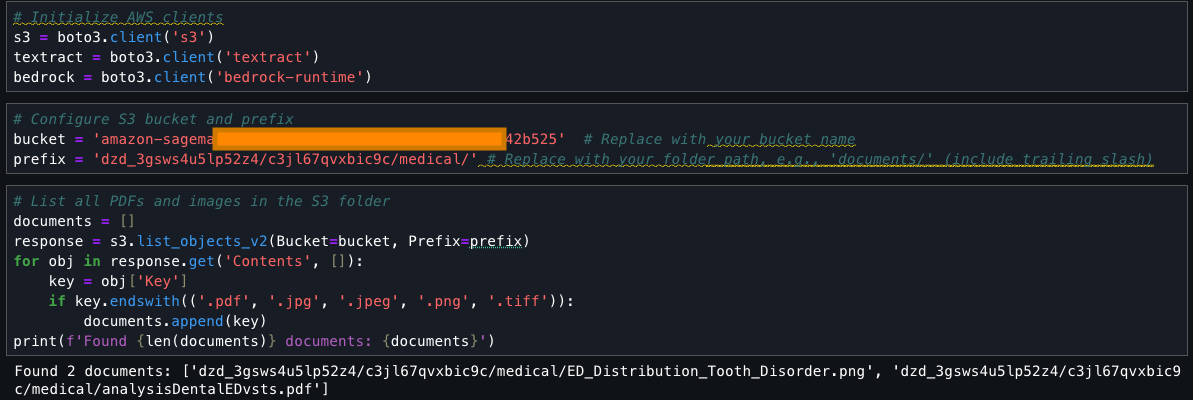
The notebook contains code for processing your documents. It begins by setting up AWS service connections using Boto3, the SDK for Python, importing necessary libraries, and initializing clients for Amazon S3, Amazon Textract, and Amazon Bedrock. The code configures an S3 bucket for processing medical documents.
Now, proceed to run through the individual cells:
This cell searches an S3 bucket for files with specific extensions (.pdf, .jpg, .jpeg, .png, .tiff), collects them into a list called ‘documents’, and prints the total count and names of found files. It uses the list_objects_v2 method to fetch the contents and filters them based on their file extensions.
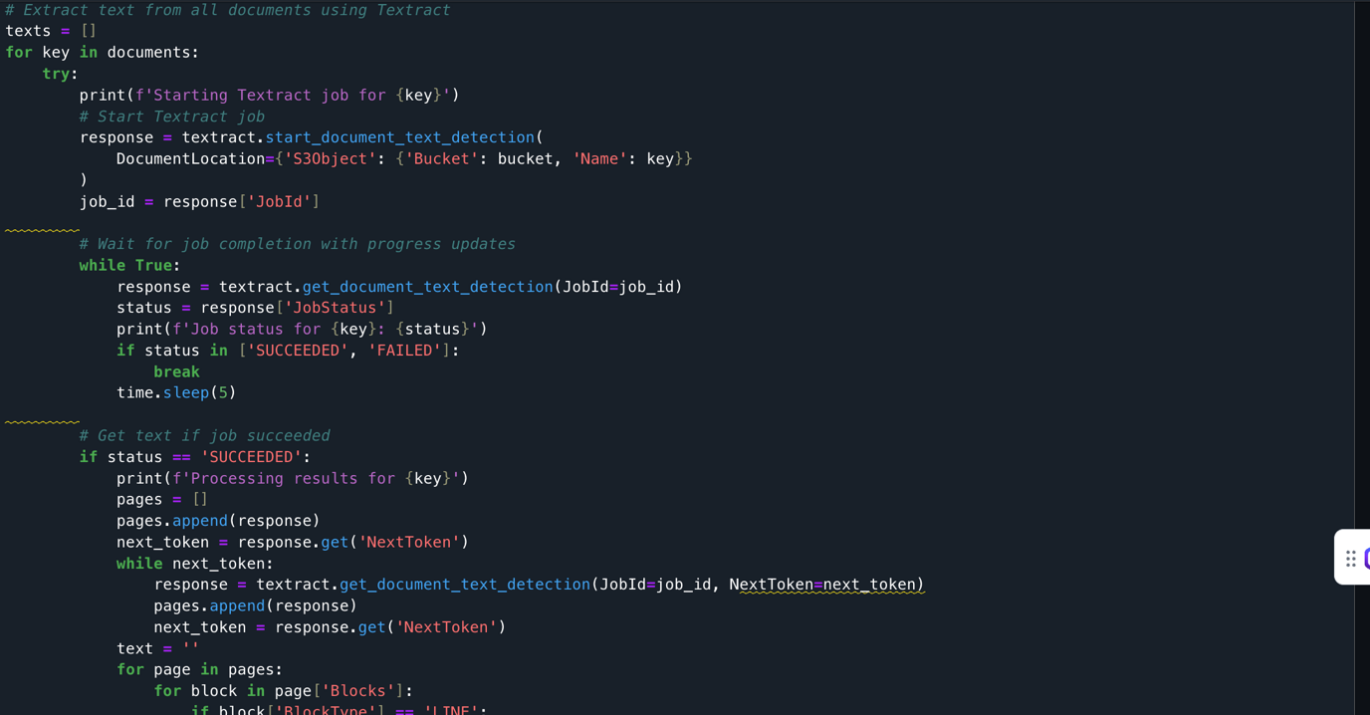
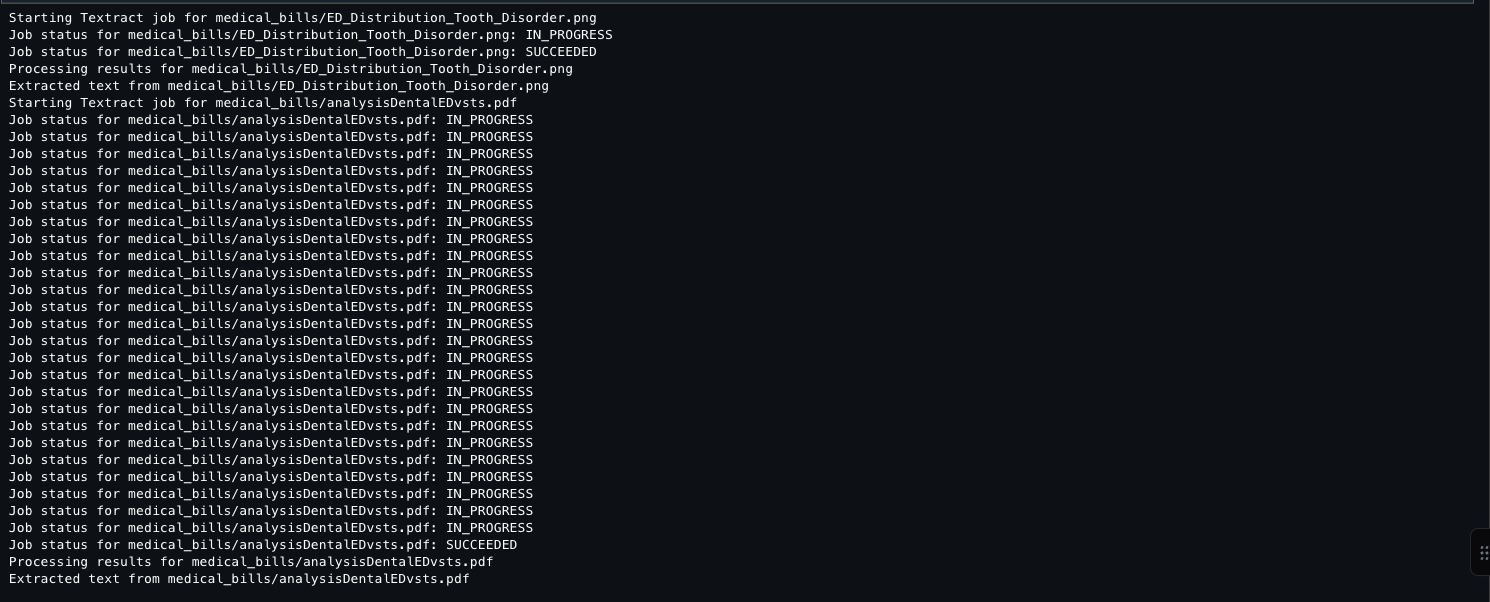
The documents extracted from the S3 bucket are processed using Amazon Textract. It loops through each document, starts an Amazon Textract job, monitors its progress, and when successful, extracts text from all pages. The extracted text is stored in a list along with its document identifier. The code handles pagination, errors, and includes delays between API calls to prevent throttling.
Output [1] The following screenshot shows the output of a Jupyter notebook cell after you run the Amazon Textract API.
This code takes all previously extracted document text, combines it into one string (2,002 characters total), and uses the Anthropic Claude 3 Sonnet model (available through Amazon Bedrock) to generate a concise summary. The code configures the AI model with specific parameters, sends the combined text for analysis, and returns a summarized version of all document content.

Output [2] The following screenshot shows the proceeding output result.
This code detects whether document text contains sensitive PII data (names, emails, addresses, financial details) and returns a Boolean true/false result.

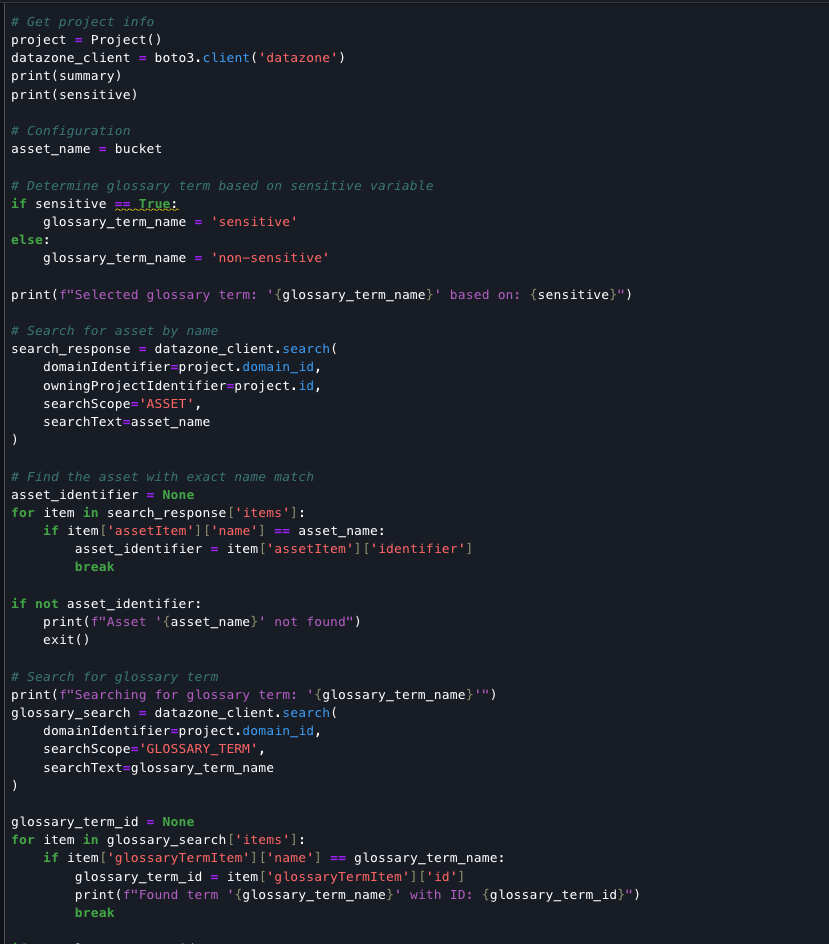
Finally, the code completes the document processing pipeline by classifying the asset based on sensitivity, updating its metadata with an AI-generated summary, and assigning the appropriate glossary term. The script retrieves existing asset details to preserve all metadata forms, updates the README field with the summary content, and creates a new revision. This record of the classification and documentation is stored in the data catalog, accessible alongside your source assets for ongoing governance.

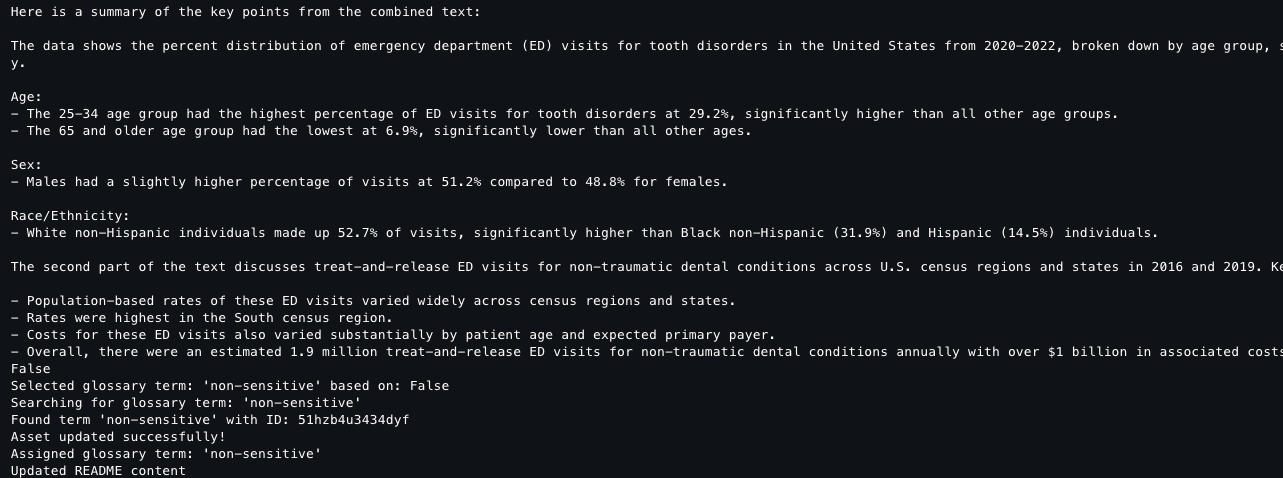
Output: The following screenshot shows the output result.
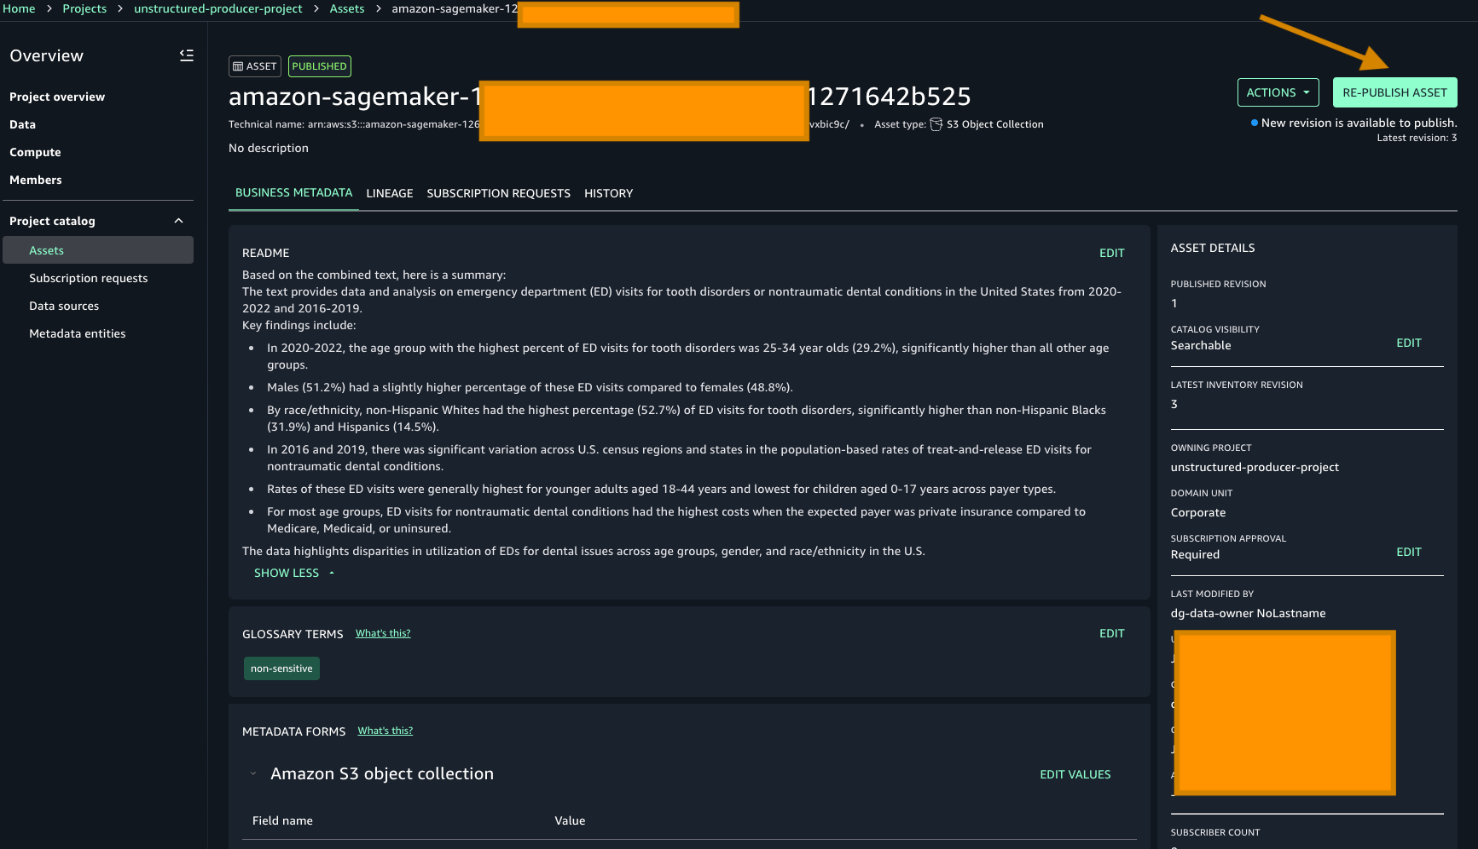
After generating metadata with Amazon Textract and Amazon Bedrock, republish the data to make it discoverable to users. Note the README and the Glossary terms have already been added based on the previous script.
To republish unstructured data with enriched metadata, go to your producer project and choose Re-publish asset.
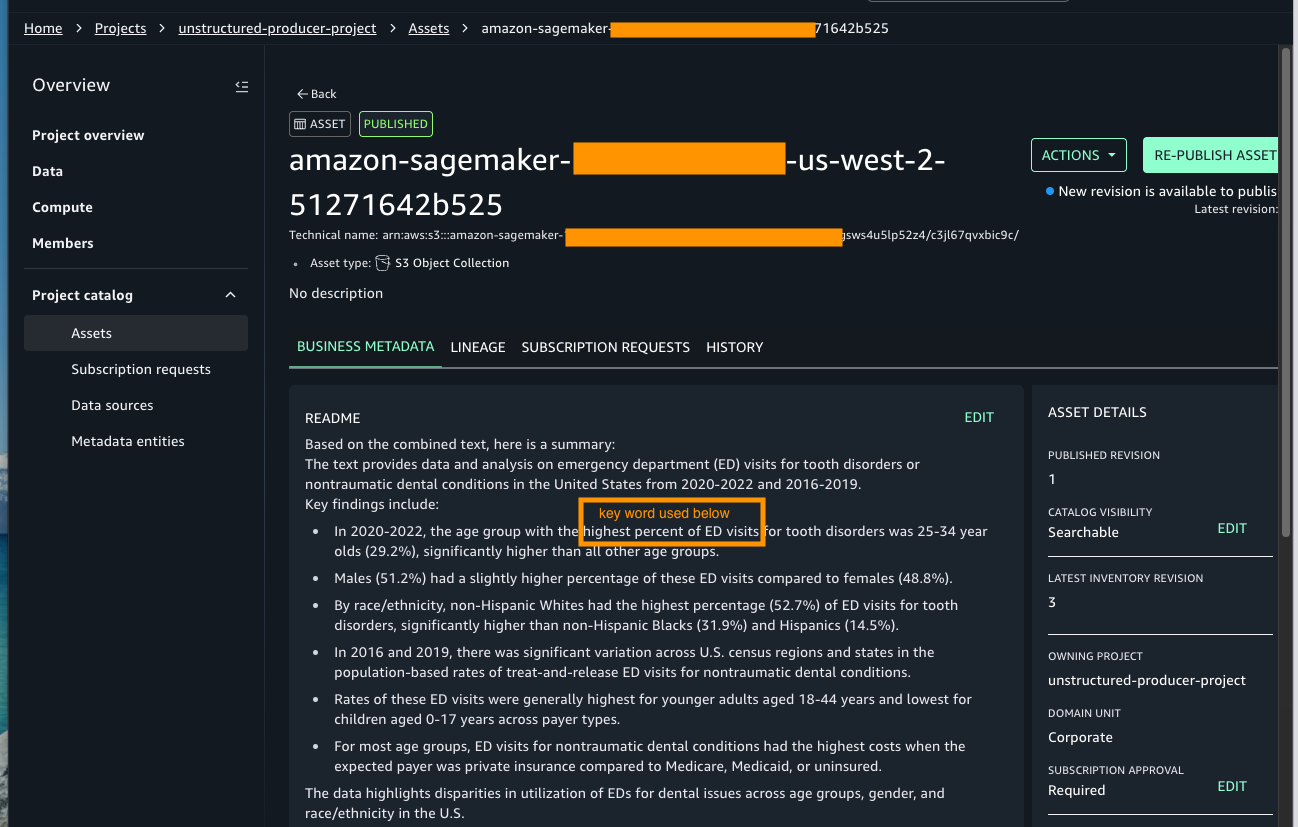
To search for the asset that was published, choose one of the keywords from the README sections. For this example, we search using these keywords high percent of ED visits.
Go to Home in the search bar to enter the keyword. Then choose the asset as displayed in the following screenshot:
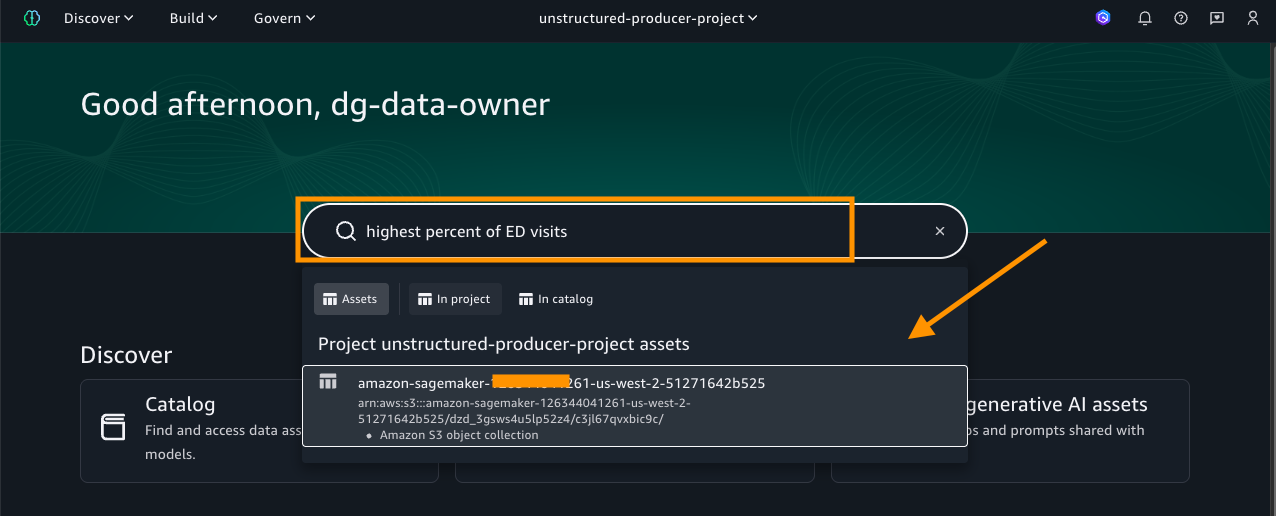
As shown in the preceding image, the search results display the asset name along with the project it belongs to. Select the asset to view its details, where you will find rich business metadata, lineage information, and more, as shown in the following screenshot.
With the asset published and metadata enriched, data assets are ready to be used.
Clean up
To avoid ongoing charges, make sure to delete the resources immediately after completing the tutorial:
- Stop Studio Resources – Close all running notebooks – Stop any running notebook instances – Shut down unused kernels. Running instances continue to incur charges even when not actively used.
- Clean S3 Storage – Delete any temporary files created during processing – Remove uploaded test documents if no longer needed. While Amazon S3 costs are minimal, large volumes of unneeded data can accumulate charges.
Conclusion
In this post we showed you how you can transform unstructured data into valuable business assets through seamless integration with AWS services. You can efficiently process documents using Amazon Textract for text extraction, harness the capabilities of Amazon Bedrock for intelligent term identification, and use Amazon SageMaker Catalog for metadata management—all within a secure, governed framework.
Additional resources
To continue your Amazon SageMaker AI journey, see the following resources:
-
-
- Explore the Amazon SageMaker Developer Guide.
- Documentation – You can find complete setup guides in Amazon SageMaker Unified Studio Documentation.
- Get started with these new integrations through the Amazon s Unified Studio console.
-