AWS Big Data Blog
Migrate JMS applications to Amazon MQ for RabbitMQ with minimal changes
Running JMS applications on on-premises brokers or Apache ActiveMQ requires manual patching cycles, capacity planning for peak loads, and maintaining high availability across multiple data centers. With Amazon MQ version 4 and above, you can migrate your existing JMS applications without rewriting your messaging layer, removing weeks of rewrite work.
This post shows you how to migrate your JMS applications and walks through a complete setup, from creating the broker to sending and receiving messages. You will also see a real-world scenario: migrating an existing Apache ActiveMQ workload to an Amazon MQ broker running RabbitMQ. The post covers configuration changes, monitoring with Amazon CloudWatch, and validation steps to make sure that your migration succeeds.
Amazon MQ version 4 and above includes built-in support for the RabbitMQ JMS Client and the JMS Topic Exchange plugin. The RabbitMQ JMS Client and JMS Topic Exchange plugin work together, allowing your existing JMS applications to connect using familiar JMS APIs. You update the connection factory configuration and broker endpoint. Your business logic, message producers, consumers, and listeners stay exactly as written.
Understanding JMS and AMQP
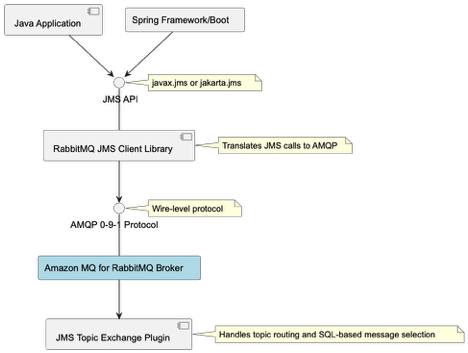
How the RabbitMQ JMS Client works
Use the RabbitMQ JMS Client to connect your Java application to Amazon MQ. The client translates your JMS API calls (javax.jms or jakarta.jms) into AMQP 0-9-1 messages that the broker understands.
Advanced Message Queuing Protocol (AMQP) defines how messages are formatted and transmitted across the network at the wire level. This means that non-Java services can consume the same messages using native AMQP clients, making the protocol language-agnostic
JMS version support
Migrate at the JMS version that your application already uses. The client supports JMS 1.1, 2.0, and 3.1 (Jakarta Messaging), so you don’t need to upgrade your application code before migrating brokers. The client integrates with Spring Framework and Spring Boot applications without requiring custom bean factories or application context configuration.
Because the JMS abstraction layer sits between your application and the broker, most migrations require only a connection factory change, not a logic rewrite.
RabbitMQ JMS Topic Exchange plugin
Your existing publish/subscribe patterns work without client-side routing logic. The JMS Topic Exchange plugin adds server-side support for JMS topic semantics, handling topic routing and SQL-based message selection directly in the broker.
The plugin handles SQL-based message selection (JMS selectors like OrderType = `Electronics` AND Priority > 5) and topic hierarchies with wildcard pattern matching (* for single level, # for multiple levels). Your application uses standard JMS topic APIs (createTopic(), setMessageSelector()) without additional filtering logic.
Getting started
This walkthrough shows you how to set up Amazon MQ and connect your existing JMS application. You will create a broker, configure the connection factory, and send and receive messages.
Prerequisites
You need an existing JMS application built on Apache ActiveMQ or another JMS provider to migrate. If you don’t have one, you can still follow Steps 1–5 to create a broker and test the connection pattern. Before you begin, confirm that you have the following in place:
- An active AWS account
- AWS Command Line Interface (AWS CLI) installed. For instructions, see Installing the AWS CLI.
- Java 11 or later installed on your local development environment.
- An AWS Identity and Access Management (IAM) principal (user or role) with the AmazonMQFullAccess managed policy attached.
- Maven or Gradle for dependency management.
Amazon MQ broker charges apply based on instance type and usage. Review the Amazon MQ pricing page before you start.
Step 1: Create an Amazon MQ for RabbitMQ broker
The following command creates a single-instance broker running RabbitMQ 4.2 on an mq.m7g.medium instance.
aws mq create-broker \
--broker-name my-rabbitmq-broker \
--engine-type rabbitmq \
--engine-version 4.2 \
--deployment-mode SINGLE_INSTANCE \
--host-instance-type mq.m7g.medium \
--auto-minor-version-upgrade \
--publicly-accessible \
--users "Username=admin,Password=[PASSWORD]" \
--region us-west-2
Replace <broker-name> with the name that you want to give to the broker. Replace <username> and <password> as described in the create-broker CLI documentation. After the command runs successfully, the command line displays the BrokerArn and BrokerId.
Note: This command creates a publicly accessible broker for demonstration purposes only. For production workloads, create brokers in private subnets within your VPC and restrict access using security groups. Don’t use the –publicly-accessible flag. For more information, see Security best practices for Amazon MQ.
The command returns output similar to:
{
    "BrokerArn": "arn:aws:mq:us-west-2:111122223333:broker:my-rabbitmq-broker:b-c8352341-ec91-4a78-ad9c-a57f23f235bb",
    "BrokerId": "b-c8352341-ec91-4a78-ad9c-a57f23f235bb"
}
Save the BrokerId value for the next step.
The broker takes approximately 15–20 minutes to reach the Running state. Run the following command every 2 minutes to check the status:
aws mq describe-broker --broker-id <BrokerId> --region us-west-2 --query 'BrokerState' Proceed to the next step after the broker state is RUNNING.
To get the broker endpoints, run:
aws mq describe-broker --broker-id <BrokerId> --region us-west-2 --query 'BrokerInstances'Note the ConsoleURL and Endpoints from the output. The command returns output similar to:
[{
    "ConsoleURL": "https:// b-c8352341-ec91-4a78-ad9c-a57f23f235bb.mq.us-west-2.on.aws",
    "Endpoints": ["amqps://b-c8352341-ec91-4a78-ad9c-a57f23f235bb.mq.us-west-2.on.aws:5671"]
}]Choose the dependency that matches your application’s current JMS version. If your imports reference javax.jms packages, use version 2.12.0. If your imports reference jakarta.jms packages (JMS 3.1 / Jakarta EE 9+), use version 3.4.0.
For JMS 1.1 and 2.0 (javax.jms):
<dependency>
<groupId>com.rabbitmq.jms</groupId>
<artifactId>rabbitmq-jms</artifactId>
<version>2.12.0</version>
</dependency><dependency>
<groupId>com.rabbitmq.jms</groupId>
<artifactId>rabbitmq-jms</artifactId>
<version>3.4.0</version>
</dependency>Step 3: Configure the connection factory
Store your broker credentials in AWS Secrets Manager before configuring the connection factory. This keeps credentials out of your source code and configuration files.
Create the secret:
aws secretsmanager create-secret \
--name dev-rabbitmq \
--description "Amazon MQ broker credentials" \
--secret-string '{"username":"admin","password":"[PASSWORD]"}' \
--region us-west-2
Add the AWS SDK for Secrets Manager to your pom.xml:
<dependency>
<groupId>software.amazon.awssdk</groupId>
<artifactId>secretsmanager</artifactId>
<version>2.20.0</version> </dependency>

<dependency>
<groupId>com.fasterxml.jackson.core</groupId>
<artifactId>jackson-databind</artifactId>
<version>2.15.0</version>
</dependency>
Replace your existing broker URL with the Amazon MQ endpoint. In most cases, this is the only change required in your application configuration:
import com.rabbitmq.jms.admin.RMQConnectionFactory;
import software.amazon.awssdk.services.secretsmanager.SecretsManagerClient;
import software.amazon.awssdk.services.secretsmanager.model.GetSecretValueRequest;
import software.amazon.awssdk.services.secretsmanager.model.GetSecretValueResponse;
import software.amazon.awssdk.regions.Region;
import com.fasterxml.jackson.core.type.TypeReference;
import com.fasterxml.jackson.databind.ObjectMapper;
import java.util.Map;
import javax.jms.*;

// Retrieve credentials from AWS Secrets Manager
Map<String, String> creds;
try (SecretsManagerClient secretsClient = SecretsManagerClient.builder().region(Region.US_WEST_2).build()) {
    GetSecretValueResponse response = secretsClient.getSecretValue(GetSecretValueRequest.builder().secretId("dev-rabbitmq").build());
    ObjectMapper objectMapper = new ObjectMapper();
    creds = objectMapper.readValue(response.secretString(),new TypeReference<Map<String, String>>() {});
    }

// Create and configure the connection factory
RMQConnectionFactory connectionFactory = new RMQConnectionFactory();
connectionFactory.setHost("b-c8352341-ec91-4a78-ad9c-a57f23f235bb.mq.us-west-2.on.aws");
connectionFactory.setPort(5671);connectionFactory.setVirtualHost("/");
connectionFactory.useSslProtocol();
connectionFactory.setUsername(creds.get("username"));
connectionFactory.setPassword(creds.get("password"));
Replace the host value with your broker endpoint from Step 1.
The connection factory requires four parameters:
- Host: Your broker endpoint from the describe-broker output
- Port: 5671 for AMQP over TLS (Amazon MQ requires encryption in transit)
- VirtualHost: “/” (the default RabbitMQ virtual host)
- UseSslProtocol: true (required by Amazon MQ)
Step 4: Send messages
The following examples show how to send messages to a queue and a topic using the JMS 2.0 simplified API.
Point-to-point (queue) for one-to-one delivery:
try (JMSContext context = connectionFactory.createContext()) {
Queue queue = context.createQueue("orders");
context.createProducer().setProperty("OrderType", "Electronics").send(queue, "Order #12345");
System.out.println("Sent message to queue: orders");
}
Publish/subscribe (topic) for one-to-many broadcast:
try (JMSContext context = connectionFactory.createContext()) {
	Topic topic = context.createTopic("orders.electronics");
	context.createProducer().setProperty("MessageType", "Broadcast").send(topic, "New electronics order received!");
	System.out.println("Published message to topic: orders.electronics");
}
Message properties(OrderType, MessageType) are JMS headers that consumers can use for filtering. These properties become AMQP message headers when transmitted to the broker.
Step 5: Receive messages asynchronously
To receive messages asynchronously, attach a MessageListener to a consumer. The listener fires each time a message arrives.
Queue consumer:
Asynchronous consumers process messages in a background thread without blocking your main application logic. The MessageListener callback fires each time a message arrives, allowing your application to handle messages as they’re delivered rather than polling with receive().
try (JMSContext context = connectionFactory.createContext()) {
	Queue queue = context.createQueue("orders");
	JMSConsumer consumer = context.createConsumer(queue);
	consumer.setMessageListener(message -> {
		if (message instanceof TextMessage) {
			try {
				System.out.println("Received: " + ((TextMessage) message).getText());
			} catch (JMSException e) {
				e.printStackTrace();
			}
		}
	});

	System.out.println("Listening for messages on queue: orders");

	// Keep the consumer active for 30 seconds
	Thread.sleep(30000);
}
Topic subscriber:
try (JMSContext context = connectionFactory.createContext()) {
	Topic topic = context.createTopic("orders.electronics");
	JMSConsumer consumer = context.createConsumer(topic);
	consumer.setMessageListener(message -> {
		if (message instanceof TextMessage) {
			try {
				System.out.println("Subscriber received: " + ((TextMessage) message).getText());
			} catch (JMSException e) {
				e.printStackTrace();
			}
		}
	});

	System.out.println("Subscribed to topic: orders.electronics");

	// Keep the consumer active for 30 seconds
	Thread.sleep(30000);}
The Thread.sleep(30000) call keeps the consumer active for 30 seconds.
Use case: Migrating an ActiveMQ Workload to Amazon MQ for RabbitMQ
Migrate your Apache ActiveMQ applications to Amazon MQ by updating four configuration points. Your business logic, message producers, consumers, and listeners stay exactly as written. This walkthrough uses a real JMS 1.1 application with a centralized broker configuration class to show precisely which lines change and which remain identical.
Apache ActiveMQ powers messaging infrastructure for thousands of Java applications worldwide. If you run JMS applications on ActiveMQ, you can migrate to Amazon MQ for RabbitMQ with minimal code changes. The following steps demonstrate a complete migration using an application that includes a centralized broker configuration class, a message producer, and a message consumer.
Step 1: Update the Maven dependency
Replace the ActiveMQ client dependencies with the RabbitMQ JMS client in your pom.xml. The rabbitmq-jms artifact includes the RabbitMQ AMQP client and JMS API as transitive dependencies, so a single entry replaces both ActiveMQ artifacts.
Before (ActiveMQ):
<dependency>
<groupId>org.apache.activemq</groupId>
<artifactId>activemq-client</artifactId>
<version>5.18.6</version>
</dependency>

<dependency>
<groupId>org.apache.activemq</groupId>
<artifactId>activemq-pool</artifactId>
<version>5.18.6</version>n>5.18.6</version>
</dependency>
After (Amazon MQ):
<dependency>
<groupId>com.rabbitmq.jms</groupId>
<artifactId>rabbitmq-jms</artifactId>
<version>2.12.0</version>
</dependency>
The rabbitmq-jms artifact pulls in the RabbitMQ AMQP client and the JMS API as transitive dependencies, so a single entry replaces both ActiveMQ artifacts.
Step 2: Update the broker configuration
If your application centralizes connection details in a shared configuration class, that class is the only file that needs to change. The queue name and everything else your application references remain the same.
Before (ActiveMQ):
// BrokerConfig.java - ActiveMQ version
public final class BrokerConfig {
	// OpenWire endpoint
	public static final String BROKER_URL = "tcp://localhost:61616";
	public static final String USERNAME = "[PASSWORD]";
	public static final String PASSWORD = "[PASSWORD]";
	public static final String QUEUE_NAME = "demo.queue";
	private BrokerConfig() {}}
After (Amazon MQ):
// BrokerConfig.java - Amazon MQ version

import com.fasterxml.jackson.core.type.TypeReference;import com.fasterxml.jackson.databind.ObjectMapper;
import software.amazon.awssdk.regions.Region;
import software.amazon.awssdk.services.secretsmanager.SecretsManagerClient;
import software.amazon.awssdk.services.secretsmanager.model.GetSecretValueRequest;
import software.amazon.awssdk.services.secretsmanager.model.GetSecretValueResponse;
import java.util.Map;

public final class BrokerConfig {
	// AMQPS endpoint (TLS required by Amazon MQ)
	public static final String BROKER_URL = "amqps://b-c8352341-ec91-4a78-ad9c-a57f23f235bb.mq.us-west-2.on.aws:5671";

	// Queue name carries over unchanged
	public static final String QUEUE_NAME = "demo.queue";

	// Secret name in AWS Secrets Manager
	private static final String SECRET_ID = "dev-rabbitmq";
	private static final Map<String, String> CREDENTIALS = loadCredentials();
	public static String getUsername() {return CREDENTIALS.get("username");}
	public static String getPassword() {return CREDENTIALS.get("password");}
	private static Map<String, String> loadCredentials() {
		try (SecretsManagerClient client = SecretsManagerClient.builder().region(Region.US_WEST_2).build()) {
			GetSecretValueResponse response = client.getSecretValue(GetSecretValueRequest.builder().secretId(SECRET_ID).build());
			ObjectMapper mapper = new ObjectMapper();
			return mapper.readValue(response.secretString(), new TypeReference<Map<String, String>>() {});
		} catch (Exception e) {
			throw new RuntimeException("Failed to load broker credentials from Secrets Manager", e);
		}
	}
	private BrokerConfig() {}}
Two things changed in this file compared to the ActiveMQ version: the protocol prefix (tcp:// to amqps://) and the host and port (OpenWire on 61616 to AMQP over TLS on 5671). The queue name is identical. Credentials are no longer stored as static string constants. Instead, loadCredentials() retrieves them from AWS Secrets Manager at startup, and getUsername() and getPassword() expose them to the rest of the application. This follows AWS security best practices and streamlines credential rotation.
Step 3: Update the message producer
The producer requires two changes: the import statement and the factory instantiation. Every JMS API call after the factory (createConnection, createSession, createProducer, send) is identical to the ActiveMQ version.
Before (ActiveMQ):
import org.apache.activemq.ActiveMQConnectionFactory;
import javax.jms.*;

public class MessageProducer {
	public static void main(String[] args) {
		Connection connection = null;
		try {
			ActiveMQConnectionFactory factory = new ActiveMQConnectionFactory(BrokerConfig.USERNAME,BrokerConfig.PASSWORD,BrokerConfig.BROKER_URL);
			connection = factory.createConnection();
			connection.start();
			Session session = connection.createSession(false, Session.AUTO_ACKNOWLEDGE);
			Destination destination = session.createQueue(BrokerConfig.QUEUE_NAME);
			javax.jms.MessageProducer producer = session.createProducer(destination);
			producer.setDeliveryMode(DeliveryMode.PERSISTENT);
			for (int i = 1; i <= 5; i++) {
				TextMessage message = session.createTextMessage("Hello from ActiveMQ - message #" + i);
				producer.send(message);
				System.out.println("Sent: " + message.getText());
			}
			producer.close();
			session.close();
		} catch (JMSException e) {
			e.printStackTrace();
		} finally {
			if (connection != null) {
				try {
					connection.close();
				} catch (JMSException ignored) {}}
			}
		}
	}
After (Amazon MQ):
import com.rabbitmq.jms.admin.RMQConnectionFactory;
import javax.jms.*;

public class MessageProducer {

	public static void main(String[] args) {
		Connection connection = null;
		try {
			RMQConnectionFactory factory = new RMQConnectionFactory();
			factory.setUri(BrokerConfig.BROKER_URL);
			factory.setUsername(BrokerConfig.getUsername());
			factory.setPassword(BrokerConfig.getPassword());

			// Everything below this line is identical to the ActiveMQ version
			connection = factory.createConnection();
			connection.start();
			Session session = connection.createSession(false, Session.AUTO_ACKNOWLEDGE);
			Destination destination = session.createQueue(BrokerConfig.QUEUE_NAME);
			javax.jms.MessageProducer producer = session.createProducer(destination);
			producer.setDeliveryMode(DeliveryMode.PERSISTENT);
			for (int i = 1; i <= 5; i++) {
				TextMessage message = session.createTextMessage("Hello from Amazon MQ - message #" + i);
				producer.send(message);
				System.out.println("Sent: " + message.getText());
			}
			producer.close();
			session.close();
		} catch (JMSException e) {
			e.printStackTrace();
		} finally {
			if (connection != null) {
				try {
					connection.close();
				} catch (JMSException ignored) {}
			}
		}
	}
}
The import changes from org.apache.activemq.ActiveMQConnectionFactory to com.rabbitmq.jms.admin.RMQConnectionFactory. The factory construction switches from a constructor that accepts credentials and URL to a no-arg constructor with explicit setter calls. Credentials are now retrieved from AWS Secrets Manager through BrokerConfig.getUsername() and BrokerConfig.getPassword(). That is the complete change set for the producer.
Step 4: Update the message consumer
The consumer follows the same pattern as the producer. Swap the factory class and import, update the credential calls, and keep everything else.
Before (ActiveMQ):
import org.apache.activemq.ActiveMQConnectionFactory;
import javax.jms.*;
public class MessageConsumer {
	public static void main(String[] args) {
		Connection connection = null;
		try {
			ActiveMQConnectionFactory factory = new ActiveMQConnectionFactory(BrokerConfig.USERNAME, BrokerConfig.PASSWORD, BrokerConfig.BROKER_URL);
			connection = factory.createConnection();
			connection.start();
			Session session = connection.createSession(false, Session.AUTO_ACKNOWLEDGE);
			Destination destination = session.createQueue(BrokerConfig.QUEUE_NAME);
			javax.jms.MessageConsumer consumer = session.createConsumer(destination);
			System.out.println("Waiting for messages on queue: " + BrokerConfig.QUEUE_NAME);
			Message message;
			while ((message = consumer.receive(10000)) != null) {
				if (message instanceof TextMessage) {
					TextMessage textMessage = (TextMessage) message;
					System.out.println("Received: " + textMessage.getText());
				}
			}
			consumer.close();
			session.close();
		} catch (JMSException e) {
			e.printStackTrace();
		} finally {
			if (connection != null) {
				try {
					connection.close();
				} catch (JMSException ignored) {}
			}
		}
	}
}
After (Amazon MQ):
import com.rabbitmq.jms.admin.RMQConnectionFactory;
import javax.jms.*;

public class MessageConsumer {
	public static void main(String[] args) {
		Connection connection = null;
		try {
			RMQConnectionFactory factory = new RMQConnectionFactory();
			factory.setUri(BrokerConfig.BROKER_URL);
			factory.setUsername(BrokerConfig.getUsername());
			factory.setPassword(BrokerConfig.getPassword());

			// Everything below this line is identical to the ActiveMQ version
			connection = factory.createConnection();
			connection.start();
			Session session = connection.createSession(false, Session.AUTO_ACKNOWLEDGE);
			Destination destination = session.createQueue(BrokerConfig.QUEUE_NAME);
			javax.jms.MessageConsumer consumer = session.createConsumer(destination);
			System.out.println("Waiting for messages on queue: " + BrokerConfig.QUEUE_NAME);
			Message message;
			while ((message = consumer.receive(10000)) != null) {
				if (message instanceof TextMessage) {
					TextMessage textMessage = (TextMessage) message;
					System.out.println("Received: " + textMessage.getText());
				}
			}
			consumer.close();
			session.close();
		} catch (JMSException e) {
			e.printStackTrace();
		} finally {
			if (connection != null) {
				try {
					connection.close();
				} catch (JMSException ignored) {}
			}
		}
	}
}
The import changes from org.apache.activemq.ActiveMQConnectionFactory to com.rabbitmq.jms.admin.RMQConnectionFactory. The factory construction switches to a no-arg constructor with explicit setter calls, and BrokerConfig.USERNAME / BrokerConfig.PASSWORD are replaced with BrokerConfig.getUsername() / BrokerConfig.getPassword(). The session creation, queue lookup, consumer setup, and message processing loop are identical to the ActiveMQ version.
Configuration
The following table summarizes the changes required when migrating from Apache ActiveMQ.
| ActiveMQ | Amazon MQ for RabbitMQ | |
| Maven dependency | activemq-client 5.18.6 | rabbitmq-jms 2.12.0 |
| Connection factory class | ActiveMQConnectionFactory | RMQConnectionFactory |
| Import package | org.apache.activemq | com.rabbitmq.jms.admin |
| Broker URL format | tcp://host:61616 | amqps://broker-id.mq.region.on.aws:5671 |
| Protocol | OpenWire | AMQP 0-9-1 |
| Port | 61616 (OpenWire) | 5671 (AMQP over TLS) |
| TLS | Optional | Required |
| Credentials | Plain text / JNDI | AWS Secrets Manager (recommended) |
| Virtual host | N/A | / (default) |
| JMS version support | JMS 1.1 | JMS 1.1, 2.0, 3.1 (Jakarta) |
| Queue/Topic names | demo.queue | demo.queue (no change) |
| JMS API calls | Standard JMS 1.1 | Standard JMS 1.1 (no change) |
Validating the migration
Run your application against Amazon MQ for RabbitMQ in a staging environment before directing production traffic to the new broker. Verify that messages flow correctly, consumers process as expected, and no data loss occurs during cutover.
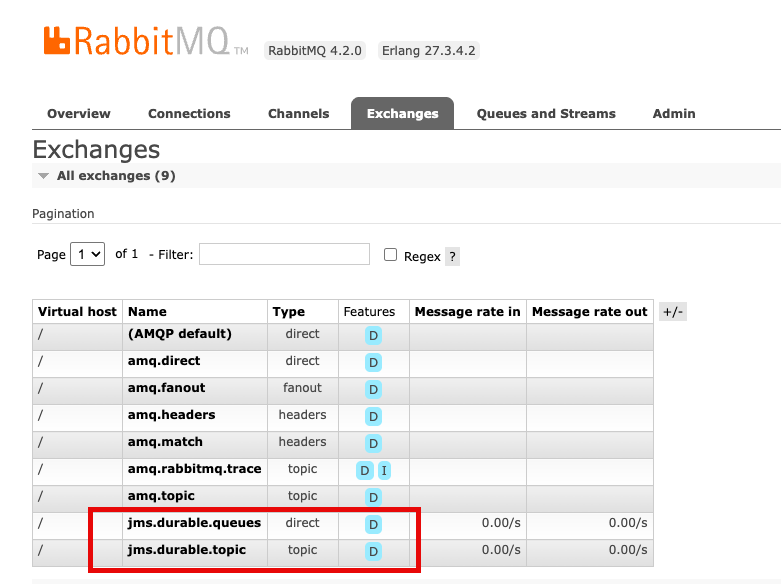
The RabbitMQ management console provides real-time visibility into broker operations. Access it through the ConsoleURL from your broker details. The console shows queue depths, consumer counts, and message rates. Use it during testing to identify routing or throughput issues before production deployment
The console displays jms.durable.queues and jms.durable.topic exchanges. The JMS client creates these automatically when your application creates queues and topics, so no manual exchange configuration is required.
Monitoring with Amazon CloudWatch
Amazon MQ publishes broker metrics to Amazon CloudWatch with no additional configuration needed. This gives you persistent monitoring and alerting that works alongside the rest of your AWS observability setup, beyond what the RabbitMQ management console provides in real time.
After your JMS messages reach the Amazon MQ for RabbitMQ broker, they’re transported as AMQP messages, which means standard RabbitMQ operational best practices apply. Keep queue depth low to avoid memory pressure and consumer lag. Follow message durability and reliability guidelines to prevent message loss during broker restarts. For connection management, review broker setup and connection best practices to avoid connection churn.
Set Amazon CloudWatch alarms on MessageCount and ConnectionCount first. A rising queue depth with a stable or dropping consumer count is an early signal of a processing bottleneck. A sudden drop in connections can indicate a client configuration issue that’s more straightforward to catch before it affects production traffic.
Clean up
To avoid ongoing charges after testing, delete the Amazon MQ broker and Secrets Manager secret using the AWS CLI.
Delete the broker:
aws mq delete-broker --broker-id <your-broker-id> --region us-west-2Delete the Secrets Manager secret:
aaws secretsmanager delete-secret \
--secret-id dev-rabbitmq \
--force-delete-without-recovery \
--region us-west-2
Broker deletion is permanent and can’t be undone. Amazon MQ removes all messages, configurations, and user credentials. Leaving the broker running incurs hourly charges based on the instance type, plus storage costs for message data retained on the broker.
Conclusion
In this post, we walked you through how to migrate your JMS applications. We also walked through a complete setup, from creating the broker to sending and receiving messages. Migrating the broker is the straightforward part. The more significant question is what you do next. After your JMS application is running on Amazon MQ for RabbitMQ, you have access to native AMQP clients, which means non-Java services can start consuming the same messages without a JMS layer. A Java-centric messaging system becomes a shared event backbone that service can participate in. The migration is a starting point, not just a lift-and-shift.
Next Steps
To get started with your migration, create your first Amazon MQ for RabbitMQ broker. For detailed technical guidance, see the Amazon MQ Developer Guide and explore the RabbitMQ JMS Client documentation.