AWS Compute Blog
Deploy an 8K HEVC pipeline using Amazon EC2 P3 instances with AWS Batch
Update – April 14, 2020: AWS Elemental MediaConvert now supports 8K UHD video encoding. 8K encoding is available in the MediaConvert on-demand, professional tier, for resolutions up to 8192 x 4320 using HEVC encoding at 10-bit including HDR. To learn more, please visit https://aws.amazon.com/about-aws/whats-new/2019/11/8k-resolution-encoding-now-available-with-aws-elemental-media-convert/.
Contributed by Amr Ragab, HPC Application Consultant, AWS Professional Services
AWS provides several managed services for file- and streaming-based media encoding options.
- Amazon Elastic Transcoder and AWS Elemental MediaConvert each provide several options for video/audio transcoding, optimized for various client devices.
- AWS Elemental Live provides online streaming-based encoding from edge camera devices.
- Through AWS Greengrass, edge devices can consume and encode video content at the edge and upload it to AWS for distribution or machine learning (ML) inference.
Currently, these services offer up to 4K encoding. Recent developments and the growing popularity of 8K content has now increased the need to distribute higher resolution content.
In this solution, you use an Amazon EC2 P3 instance to create a file-based encoding pipeline utilizing AWS Batch by first uploading a sample 8K (7680×4320) file to Amazon S3.
AWS Batch
AWS Batch enables developers, scientists, and engineers to easily and efficiently run hundreds of thousands of batch computing jobs on AWS. AWS Batch dynamically provisions the optimal quantity and type of compute resources (e.g., CPU or memory optimized instances) based on the volume and specific resource requirements of the batch jobs submitted. With AWS Batch, there is no need to install and manage batch computing software or server clusters that you use to run your jobs, allowing you to focus on analyzing results and solving problems. AWS Batch plans, schedules, and executes your batch computing workloads across the full range of AWS compute services and features, such as Amazon EC2 and Spot Instances.
P3 instances for video transcoding workloads
The P3 instance comes equipped with the NVIDIA Tesla V100 GPU. The V100 is a 16 GB 5,120 CUDA Core-GPU based on the latest Volta architecture; well suited for video coding workloads. The largest instance size in that family, p3.16xlarge, has 64 vCPU, 488 GB of RAM, 8 NVIDIA Tesla V100 GPUs, and 25 Gbps networking bandwidth.
Other than being a mainstay in computational workloads the V100 offers enhanced hardware-based encoding/decoding (NVENC/NVDEC). The following tables summarize the NVENC/NVDEC options available compared to other GPUs offered at AWS.
NVENC Support Matrix
| AWS GPU instance
|
GPU FAMILY | GPU | H.264 (AVCHD) YUV 4:2:0 | H.264 (AVCHD) YUV 4:4:4 | H.264 (AVCHD) Lossless | H.265 (HEVC) 4K YUV 4:2:0 | H.265 (HEVC) 4K YUV 4:4:4 | H.265 (HEVC) 4K Lossless | H.265 (HEVC) 8k |
| G2 | Kepler | GRID K520 | YES | ||||||
| P2 | Kepler (2nd Gen) | Tesla K80 | YES | ||||||
| G3 | Maxwell (2nd Gen) | Tesla M60 | YES | YES | YES | YES | |||
| P3 | Volta | Tesla V100 | YES | YES | YES | YES | YES | YES | YES |
NVDEC Support Matrix
| AWS GPU instance | GPU FAMILY | GPU | MPEG-2 | VC-1 | H.264 (AVCHD) | H.265 (HEVC) | VP8 | VP9 |
| G2 | Kepler | GRID K520 | YES | YES | YES | |||
| P2 | Kepler (2nd Gen) | Tesla K80 | YES | YES | YES | |||
| G3 | Maxwell (2nd Gen) | Tesla M60 | YES | YES | YES | YES | ||
| P3 | Volta | Tesla V100 | YES | YES | YES | YES | YES | YES |
Cinematic 8K encoding is supported using the Tesla V100 (P3 instance family) either in landscape or portrait orientations using the HEVC codec.
| GPU | H264 | H264_444 | H264_ME | H264_WxH | HEVC | HEVC_Main10 | HEVC_Lossless | HEVC_SAO | HEVC_444 | HEVC_ME | HEVC_WxH |
| Tesla M60 | + | + | + | 4096x
4096 |
+ | 4096x
4096 |
|||||
| Tesla V100 | + | + | + | 4096x
4096 |
+ | + | + | + | + | + | 8192x
8192 |
Prerequisites
To follow along with these procedures, ensure that you have the following:
- An AWS account with permissions to create IAM roles and policies, as well as read and write access to S3
- Registration with the NVIDIA Developer Network
- Familiarity with Docker
Deployment
For deployment, you containerize the encoding pipeline. After building the underlying P3 container instance, you then use nvidia-docker2 to build the video-encoding Docker image, which is registered with Amazon Elastic Container Registry (Amazon ECR).
As shown in the following diagram, the pipeline reads an input raw YUV file from S3, then pulls the containerized encoding application to execute at scale on the P3 container instance. The encoded video file is then be transferred to S3.

The nvidia-docker2 image video encoding stack contains the following components:
- NVIDIA CUDA 9.2
- FFMPEG 4.0
- NVIDIA Video Codec SDK 8.1

This is a relatively lengthy procedure. However, after it’s built, the underlying instance and Docker image are reusable and can be quickly deployed as part of a high performance computing (HPC) pipeline.
Creating the ECS container instance
The underlying instance can be built by selecting the Amazon Linux AMI with the p3.2xlarge instance type in a public subnet. Additionally, add an EBS volume (150 GB), which is used for the 8k input, raw yuv, and output files. Scale the storage amount for larger input files. Persist the mount in /etc/fstab. Connect to the instance over SSH and install any OS updates as well as the EPEL Release and support packages as well as the base docker-ce.
The NVIDIA/CUDA stack can be installed using the cuda-repo-rhel7.rpm file. The CUDA framework installs the NVIDIA driver dependencies.
Next, install nvidia-docker2 as provided in the NVIDIA GitHub repo.
With the base components in place, make this instance compatible with the ECS service:
Create the /etc/ecs/ecs.config file with the following template:
Iptables and packet forwarding rules need to be created to pass IAM roles into task operations:
Finally, a systemd unit file needs to be created:
Ensure that the docker-container@ecs-agent service starts successfully.
Creating the NVIDIA-Docker image
With Docker installed, pull the latest nvidia/cuda:latest image from DockerHub.
It is best at this point to run the Docker container in interactive mode. However, a Docker build file can be created afterwards. At the time of publication, only CUDA 9.0 is installed. NVIDIA has already provided the necessary repositories. Install CUDA 9.2, and support packages, inside the Docker container, referenced by the (docker) label:
Next, download the FFMPEG 4.0, nv-codec-headers, and the Video Codec SDK 8.1 from the NVIDIA Developer platform.
First, extract the nv-codec-headers and into the directory:
Extract the ffmpeg-4.0 directory and compile and install FFmpeg:
Download and extract the NVIDIA Video Codec SDK 8.1. The “Samples” directory has a preconfigured Makefile that compiles the binaries in the SDK. After it’s successful, confirm that the binaries are correctly set up.
Create a small script to be used for the 8K-encoding test inside the Docker container. Save the file as /root/nvenc-processor.sh. In the basic form, this script encodes using a single thread. For comparison, the same file is encoded using four threads.
This script downloads a file from S3 and processes it through FFmpeg. Using the AppEncCuda and AppEncPerf methods, create the 8K-encoded file to be uploaded back to S3. Commit your Docker container into a new Docker image:
Ensure that a Docker repo has been created in Amazon ECS. Choose Repositories, Create Repository. After you open the repository, choose View Push Commands. Commit the new created image to your ECR repo.
After confirming that your image is in your ECR repo, delete all images locally in the instance:
Before stopping the instance, remove the ECS agent checkpoint file:
Create an AMI from the instance, maintaining the attached EBS volume. Note the AMI ID.
Creating IAM role permissions
To ensure that access to ECS is controlled and to allow AWS Batch to be called, create two IAM roles:
- BatchServiceRole allows AWS Batch to call services on your behalf.
- ecsInstanceRole is specific to this workflow and adds permissions for S3FullAccess. This allows the container to read from and write to your S3 bucket. The following screenshot shows the example policy stack.

In AWS Batch, select the compute environment and create a managed compute environment. Assign a cluster name and min and max vCPUs values. Use the AMI ID, and IAM roles created earlier. Use the Spot pricing model with a consideration of running at 60% of the On-Demand price. Look at the current Spot price to see if more aggressive discounts are possible.
Note the cluster name. In Amazon ECS, you should see the cluster created. Next, create a job queue and associate this job queue with the compute environment created earlier. Note the job queue name.
Next, create a job definition file. This provides the job parameters to be used including mounting paths, CPU, and memory requirements.
Save the file as nvenc-test.json and register the job in AWS Batch.
In the AWS Batch console, create a job queue assigning a priority of 1 to the compute environment created earlier. Create a job assigning a job name, with the job definition file, and job queue. Add additional environment variables for the S3 bucket. Ensure that these buckets and input file are created.
Execute the job. In a few moments, the job should be in the Running state. Check the CloudWatch logs for an updated status of the job progression. Open the job record information and scroll down to CloudWatch metrics. The events are logged in a new AWS Batch log stream.
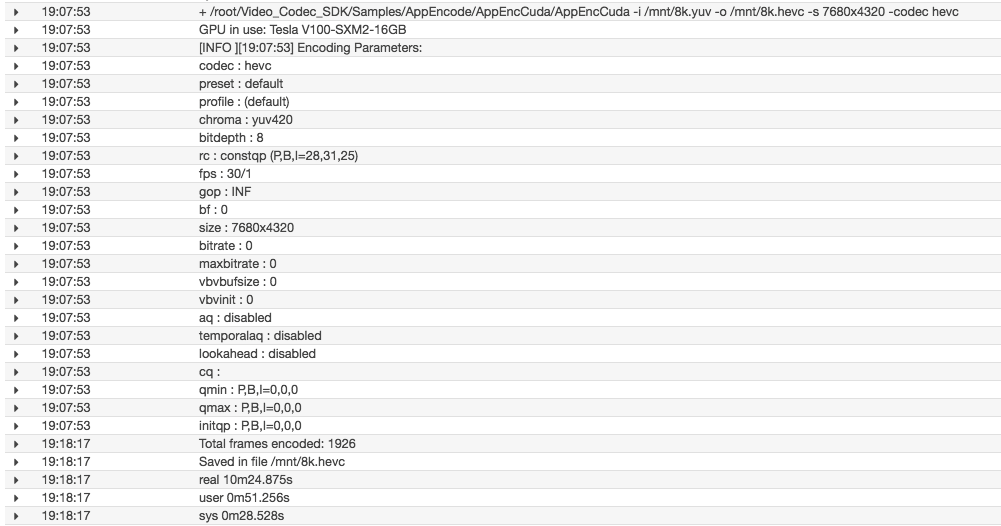
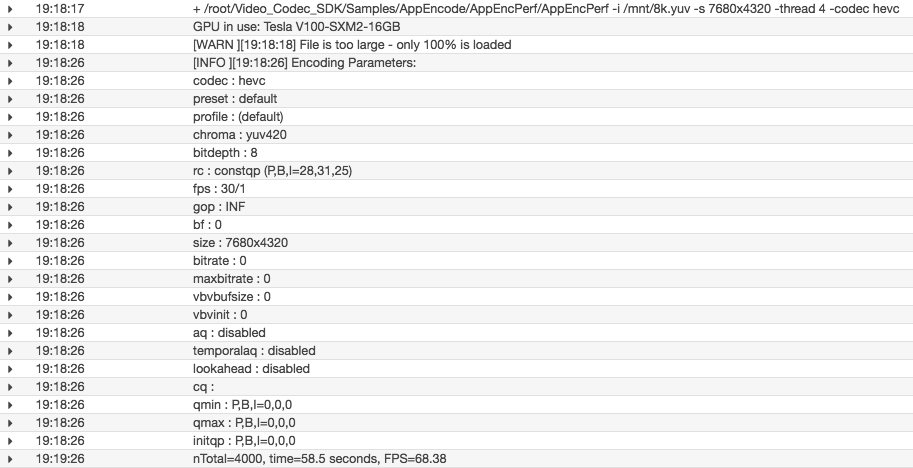
A 1-minute 8K YUV 4:2:0 file took approximately 10 minutes single-threaded (top panel), and 58 seconds using four threads (bottom panel). The nvenc-processor.sh script serves as a basic implementation of 8K encoding. Explore the options provided by the NVIDIA Video Codec SDK for additional encoding/decoding and transcoding options.
Conclusion
With AWS Batch, a customized container instance, and a dockerized NVIDIA video encoding platform, AWS can provide your HD, 4K, and now 8K media distribution. I invite you to incorporate this into your automated pipeline.
With some minor modification, it’s possible to trigger this pipeline after a new file is uploaded into S3. Then, execute through AWS Lambda or as part of an AWS Step Functions workflow.