AWS Compute Blog
Overriding request/response parameters and response status in Amazon API Gateway
This post is courtesy of Akash Jain, Partner Solutions Architect – AWS
APIs are driving modern architectures. Many customers are moving their traditional architecture to service-oriented or microservices-based architectures.
As part of this transition, you may face a few complex situations. For example, a backend API returns an HTTP status code of 2XX that must be changed to 4XX because of a new API architecture standard in the organization. Or you may want to override the headers or query string of the API to differentiate the client request without doing any API code changes.
Developers are looking for easier ways to handle such situations. With the new override feature of Amazon API Gateway, you can set the required status and parameter mappings and handle these kinds of situations.
As part of the override feature, AWS introduced new context variables for overriding both request and response parameters.
| Request Body Mapping Template | Response Body Mapping Template |
| $context.requestOverride.header.<header_name> | $context.responseOverride.header.<header_name> |
| $context.requestOverride.path.<path_name> | $context.responseOverrider.status |
| $context.requestOverride.querystring.<querystring_name> |
Using these context variables, you can:
- Create a new header (or overwrite an existing header) as a concatenation of two parameters.
- Override the response code to a success or failure code based on the contents of the body.
- Conditionally remap a parameter based on its contents or the contents of some other parameter.
- Iterate over the contents of a JSON body and remap key-value pairs to headers or query strings.
In this post, I demonstrate an example for overriding the status code without modifying the actual API code. Use the PetStore API, which is available as a sample API under Amazon API Gateway.
Override responses
Invoke the GET method on the /pets/{petId} resource by passing -1 as the petId value. You get the following response.
You can see that the status code is 200 and the error message is “The value is out of range”. You may challenge this response by asking why the status code is not “400 – Bad Request”, as the petId parameter value passed by the client is incorrect. Both approaches have merit. For this post, use “400 – Bad request” as 400 is the right code for a client error.
Your requirement is to implement this change without modifying the API code because of the risks involved or because there is no control over the legacy API. To implement this scenario, use the newly introduced override status feature with mapping templates.
To access mapping templates, under the GET request for the /pets/{petID} resource, choose Integration response.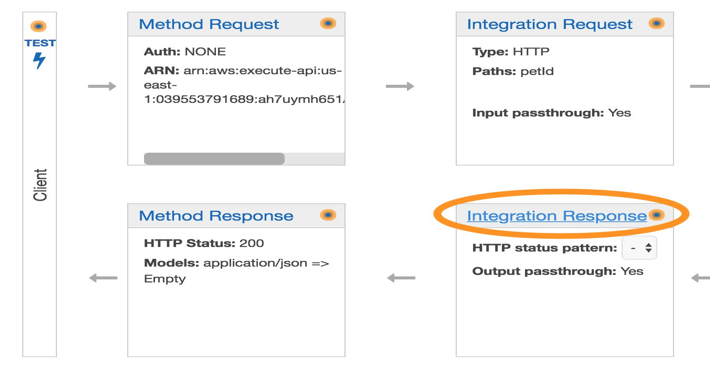
Under Body Mapping templates, for Content-Type, enter application/json. Choose Add mapping template.
Paste the following code in the template area and choose Save.
#set($inputRoot = $input.path('$'))
$input.json("$")
#if($inputRoot.toString().contains("error"))
    #set($context.responseOverride.status = 400)
#end
When you run the test again by passing -1 for petId, you get the following response.
The status code changed from 200 to 400 without modifying the actual API.
In this PetStore API example, you use the $context.response.override.status variable to override the response status when you see an error key in the body content. The following code snippet searches the error string in the response body and does the status overriding.
#if($inputRoot.toString().contains("error"))
    #set($context.responseOverride.status = 400)
Override request headers, paths, and query strings
You can override the response status using the new response status override feature. Similarly, you can override request headers, paths, and query strings by using the $context.requestOverride variable.
Consider a situation where you have launched a new version of your API that is highly performant and much improved. However, your existing API clients are not willing to transition because of the changes that would be involved to their existing systems. You want to maintain a single API version for low maintenance, performance, and agility. What choices do you have?
The override request feature can come to the rescue. For example, you have an older version of an API endpoint that looks like the following, with “v1” in the path and a productId parameter in the query string with value=1234.
https://xxxx.execute-api.us-east-1.amazonaws.com/prod/v1/products?productId=1234
The new version of the endpoint looks like the following, with “v2” in the path and a productId parameter in the query string that requires the client to send value=4567. It also accepts a header to check if the request is from a client using the old API. To demonstrate this feature, create a request path parameter appversion that can accept any string as the version path.
https://xxxx.execute-api.us-east-1.amazonaws.com/prod/v2/pets?productId=4567
Using the new $context.requestOverride variable in the body mapping template, you can now override the requested path value from “v1” to “v2” and the query string parameter value from “1234” to “4567”. You can also add a new header to pass a flag for requests from an old API version. For example, see the following mapping template.
#set($version = "v2")
#set($newProductKey = "4567")
#set($customerFlag = "1")
## Perform normal body mapping. In this case, just pass the body mapping through **
$input.json("$")
## Override path parameter **
#set($context.requestOverride.path.appversion = $version)
## Override query string parameters **
#set($context.requestOverride.querystring.productId = $ newProductKey)
## Add new header parameter **
#set($context.requestOverride.header.flag = $customerFlag)
In the above mapping template, first set the values of the required path, query string, and header for your new backend API. Then, use $input.json(“$”) to do normal body mapping. Finally, override the API path, query string, and header with the values set earlier.
When you run your API with the updated body template, the API Gateway logs show that overrides have been successfully applied.
Overrides are final. An override may only be applied to each parameter one time. Trying to override the same parameter multiple times results in 5XX responses from API Gateway.
If you must override the same parameter multiple times to build it throughout the template, I recommend creating a variable and applying the override at the end of the template. For more information, see Use a Mapping Template to Override an API’s Request and Response Parameters and Status Codes.
Conclusion
In this post, I showed you how to change the response status code of an API with the new override feature of API Gateway without modifying the API itself. You also saw how to transform requests coming to your new API from existing or legacy clients, without asking your customer to do any code changes.
The override feature enables you to have more control over the request and response parameters and status. You can now integrate legacy APIs to API Gateway, even when you want a different status from the API or to pass a different set of parameters based on the client call.