AWS Compute Blog
Securing applications with AWS Nitro Enclaves: TLS termination, TAP networking, and IMDSv2
AWS Nitro Enclaves provide isolated environments that keep critical operations such as decryption and cryptographic key management secure from both from root user and external threats.
Many customers have applications that require end-to-end authentication using Transport Layer Security (TLS) and requiring control over TLS termination.
TLS termination refers to the process where encrypted TLS traffic is decrypted using the server’s private key, converting the secure encrypted communication back to plaintext for processing. TLS termination can be done directly within an enclave, helping to ensure that encrypted traffic is not exposed outside the trusted boundary.
This is particularly valuable for public-facing services such as anonymization proxies and Model Context Protocol (MCP) servers, where clients demand assurance that their communications are protected and the application’s integrity can be independently verified using cryptographic attestation in a remote fashion.
This post covers critical design and implementation decisions from the Build multi-party crypto wallets with AWS Nitro Enclaves workshop and the associated public GitHub repository.
Specifically, in this blog we explore patterns on how:
- you can build applications that are remotely verifiable by clients, including enclave-based TLS termination using Nitriding, an open-source framework built by Brave on AWS Nitro Enclaves.
- you can configure TAP networking devices for AWS Nitro Enclaves using gvproxy.
- your enclaves can access EC2 instance metadata service (IMDSv2) and fetch temporary AWS credentials.
- you can decrypt secrets via AWS Key Management Service (KMS) using cryptographic attestation and the Python Boto3 SDK.
Prerequisites and Deployment
This post builds on our workshop “Build multi-party crypto wallets with AWS Nitro Enclaves” which demonstrates a Shamir Secret Sharing (SSS) application. The SSS app securely splits cryptographic private keys into multiple shards, requiring a threshold number to reconstruct the original key, ideal for Nitro Enclaves as it prevents any single party from accessing the complete key while maintaining operational functionality.
To follow along hands-on, you’ll need to deploy the provided AWS Cloud Development Kit (CDK) stack from the workshop repository on GitHub. However, you can understand the concepts and architecture discussed in this post without deploying the solution yourself.
Solution architecture
The following diagram depicts the high-level architecture of the solution.
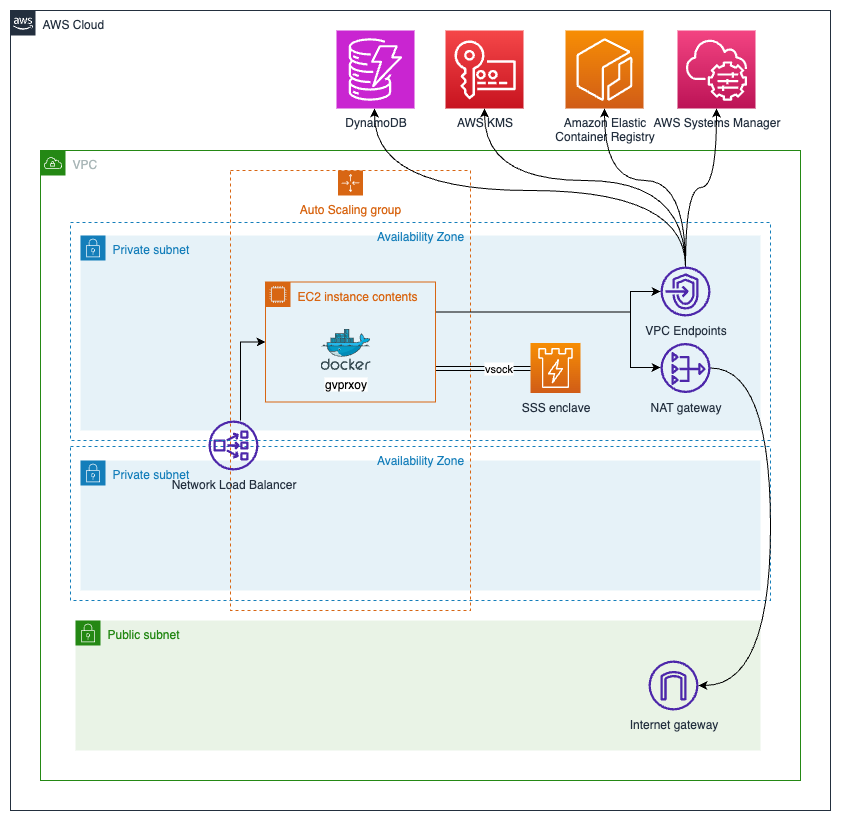
Before we dive deep into the application design, lets introduce the high-level components enclosed in the AWS Cloud Development Kit (AWS CDK) stack:
- A dedicated virtual private cloud (VPC) and private subnets are created. Internet access is only possible through a NAT gateway, avoiding public exposure of the Amazon Elastic Compute Cloud (EC2) instances.
- EC2 instances are placed in several private subnets and in different Availability Zones (AZ) using the auto-scaling group (ASG) to provide high availability. Network Load Balancer (NLB) is used to distribute the requests between different EC2 instances in the ASG. Each EC2 instance has one AWS Nitro enclave associated.
- AWS Key Management Service (AWS KMS) manages the symmetric key required for secure private key management using AWS Nitro Enclaves.
- Amazon DynamoDB is used to store the key shards for the Shamir Secret Sharing (SSS) solution.
Application design
During the AWS CDK deployment process (shown in the following figure), the following application will be built and deployed to the EC2 instance and the associated enclave. You can review the Python source code for the different components in the public GitHub repository.
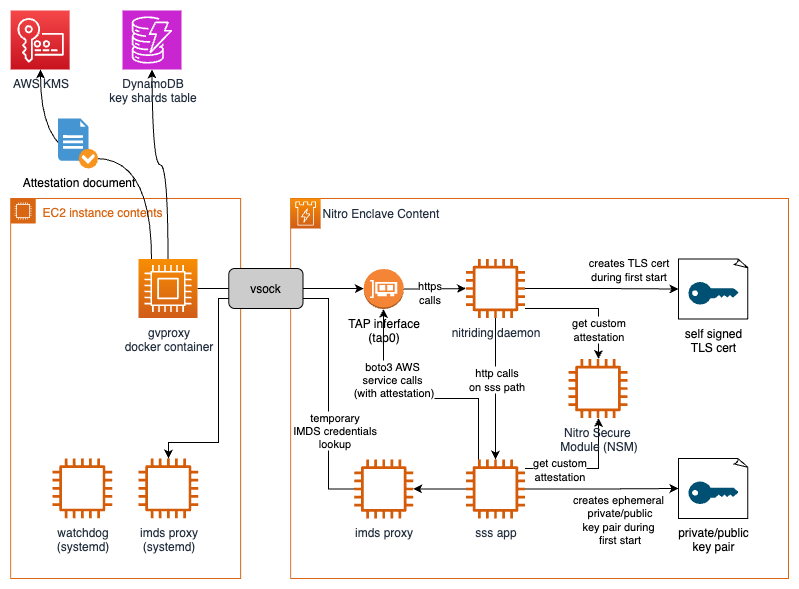
EC2 instance (left side)
- gvproxy: Proxy component that manages outbound and inbound TCP to vsock connections.
- watchdog: Systemd service that starts the enclave and makes sure it stays up and healthy.
- imds proxy: Systemd service that forwards
Instance Metadatacalls originating from vsock to169.254.169.254. This allows the enclave to request fresh IMDSv2 credentials.
Enclave (right side)
- TAP interface:
gvproxycounterpart. A fully routed network interface created bynitriding-daemonthat allows inbound and outbound traffic routing in the enclave. - imds proxy: IMDS proxy counterpart that allows the enclave to request credentials from its parent instance metadata service.
- nitriding-daemon: HTTPS service that terminates incoming HTTPS connections, responds to
attestationrequests, and forwards all/app*HTTP requests to thesss appHTTP listener. - SSS application: An SSS application that interacts with all AWS services such as AWS KMS or DynamoDB through
Boto3and provides key management and signing capabilities. - Nitro Secure Module: Enclave internal
/dev/nsmdevice that providesattestationand random number generator capabilities. Attestation private/public keys are managed by AWS.
Enclave based TLS termination and Remote Validation
Let’s now see how we can achieve TLS termination inside the enclave and allow remote clients to verify the enclaves code.
To do so, we are using Nitriding, a Go toolkit that simplifies running web applications inside AWS Nitro Enclaves without requiring networking stack changes. It uses gvproxy to create a tap0 interface, enabling controlled inbound and outbound traffic for the application inside the enclave.
Let’s have a look at the most important features nitriding offers.
TLS Termination: Nitriding generates an ephemeral private/public key pair on first launch, issuing a self-signed certificate for TLS. Furthermore, it supports Let’s Encrypt certificates for production use.
Application integration: Nitriding terminates TLS and forwards all /app* HTTP requests to the HTTP listener of the configured application. In the workshop these requests are forwarded to the SSS application.
Attestation endpoint: By default, nitriding exposes an /attestation endpoint that accepts a nonce value and returns a signed cryptographic attestation document.
This cryptographic attestation document includes hash measurements, also referred to as platform configuration registers (PCR), such as the hash of the enclave images (PCR0) or details about the parent EC2 instance (PCR4). For details on these measurements, refer to Where to get an enclave’s measurements.
The attestation document supports optional, customizable fields, namely nonce, public-key and user_data, which can be set individually for every attestation doc. For more information on the Nitro Enclaves attestation process and document structure, refer to Nitro Enclaves Attestation Process or check out the workshop sections about Customizing Attestation or document Validation.
Nitriding adds the nonce to the attestation document as a measure of freshness. Furthermore, the fingerprint (hash) of TLS certificate used by the enclave, is being added to the user_data field, as shown in the following sequence diagram.
This binds the certificate to the specific enclave instance.
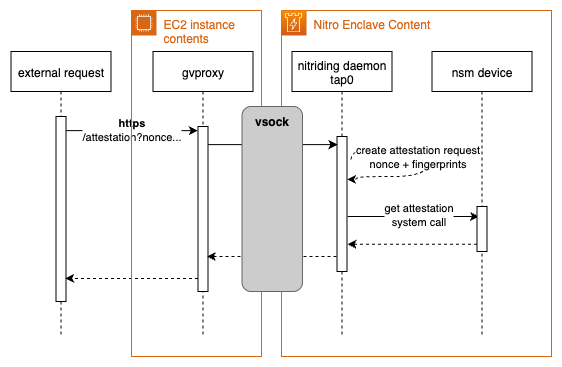
By comparing the TLS certificate fingerprint presented during the HTTPs connection and the fingerprint in the attestation document, you can prove the following aspects:
- The private key for TLS termination resides securely inside the enclave (in a trusted AWS environment).
- The enclave is running trusted code, as verified by the attestation’s PCR (Platform Configuration Register) measurements.
- The identity of the enclave is validated, whether the code is open source (allowing deterministic measurement through reproducible builds) or closed source (with measurements distributed by the provider). For more information on deterministic and reproducible builds, refer to Establishing verifiable security: Reproducible builds and AWS Nitro Enclaves.
Horizontal scaling
Let’s now have look into the scaling properties of a AWS Nitro Enclave based nitriding application and learn how we can improve the processing capacities of our application by scaling out horizontally.The provided CDK, by default, provisions a single EC2 instance with its associated enclave. As depicted in the preceding sequence diagram, nitriding generates a self-signed certificate at the start and uses it to terminate TLS connections. This approach is limited to a single worker because load balancing requests over several workers would introduce non-identical TLS certificates. Non-identical TLS certificates behind NLB can cause certificate mismatch errors and TLS handshake failures when clients are routed to different backend servers with certificates that don’t match (the expected domain name) or have different validation properties.There are different ways you can address this issue besides implementing your own cryptographic attestation-based method:
- Create a symmetric KMS key and associate it with your enclaves using AWS KMS condition keys for AWS Nitro Enclaves. Use AWS Certificate Manager (ACM) to create an exportable TLS certificate. Alternatively, generate a custom TLS certificate in a trusted environment. Encrypt all sensitive key material via AWS KMS and store the ciphertext in a database such as DynamoDB. Provide the encrypted TLS certificate to each enclave that requires access and use cryptographic attestation to decrypt the TLS certificate or key.
- Nitriding provides an enclave key synchronization mechanism based on AWS Nitro Enclaves cryptographic attestation. This mechanism supports Let’s Encrypt certificates out of the box so organizations can avoid all the operational and security challenges associated with self-signed certificates, particularly in context of web browsers.
Virtual Networking for Enclaves with Tap Interface
Now let’s deep dive into how nitriding provides tap0based networking (to the enclave) and learn how we can use tap0 networking without nitriding.
As mentioned previously, nitriding uses gvisor-tap-vsock package to provide tap0 based networking to the enclave.
gvisor-tap-vsock delivers a user-mode network stack for virtual machines (VMs) and containers, enabling secure, flexible connectivity between AWS Nitro Enclaves and external networks.
You can use gvisor-tap-vsock independently from nitriding if you only require tap0 networking without TLS termination and http forwarding capabilities. The setup remains the same as in the workshop; however instead of nitriding binary, you need to include the gvforwarder binary in the enclave Dockerfile. The build instructions can be found in Makefile.
After copying the binary into your Docker file, use a similar command in your enclave start.sh file to activate DNS resolution and start gvforwarder:
After you have started your enclave with gvforwarder you can manage port forwarding using the gvproxy process running on EC2 parent instances as done in the workshop.
IMDSv2 access from inside Enclaves
This section explores the requirement of accessing EC2 Instance Metadata Service Version 2 (IMDSv2) from inside an enclave and discusses different ways on how access can be provided.
Applications inside AWS Nitro Enclaves often need access to IMDSv2 to obtain temporary AWS credentials to interact with AWS services such as AWS KMS for decrypt operations. IMDSv2 is only accessible from within the associated EC2 instance and can be accessed at 169.254.169.254.You can enable IMDSv2 access for enclaves using one of the following two approaches:
Dedicated vsock proxy route (as done in the workshop)
Run a vsock proxy on the EC2 parent instance and one inside the enclave to provide access to IMDSv2 from inside the enclave. Apply the following configuration to your enclave to map 169.254.169.254 from inside the enclave to the endpoint on the parent instance:
This method is suitable if you do not need a tap interface in the enclave and want to tightly control outbound communication.
TAP interface with gvisor-tap-vsock
If your enclave uses a tap interface via gvisor, pass the -ec2-instance-metadata flag in the gvisor start command on the parent EC2 instance. This allows the host process to forward IMDSv2 traffic from the enclave (via tap0) to the metadata service. Ensure you are using gvisor-tap-vsock version v0.8.7 or newer for this feature.
Any of the EC2 parent instance or enclave related changes described in this section can be applied to an existing workshop CDK stack by rerunning the cdk deploy command as described here: Deploy the CDK application.
Encrypting and decrypting secrets inside AWS Nitro Enclaves using Python and Cryptographic Attestation
In this section we will go in depth on how KMS based decryption can be implemented inside enclaves in Python using AWS SDK for Python (Boto3).
Decryption, leverages the enclave’s unique cryptographic attestation feature unavailable directly on standard EC2 instances – ensuring enhanced security by verifying the enclave’s integrity.Encryption inside an enclave using the Boto3 SDK however mirrors the process outside the enclave, so it’s not detailed here.
High-Level Decryption Flow
The process for decrypting content inside a Nitro Enclave follows these streamlined steps:
- Ensure that the enclave has outbound networking configured.
- Generate an ephemeral RSA key pair.
- Request an attestation document that includes the public key.
- Create a KMS decrypt request with the ciphertext and attached attestation document.
- Receive and parse the resulting ciphertext_for_recipient in Cryptographic Message Syntax (CMS) format.
This flow enables secure decryption in Python, aligning with workshop examples for practical implementation.
Make sure that the tap0 network Interface is up and running and DNS has been configured
The Python code example discussed uses Boto3 SDK. Boto3 requires a fully routed network interface such as tap0 as described previously and access to AWS credentials. The credentials can be managed manually as done in the workshop or managed automatically by the SDK. See the previous section about managing AWS credentials.
Generate an ephemeral RSA key pair inside the enclave
Generate a fresh RSA private/public key pair for each session. This key is just used for the re-encryption schema and does not need persisted.
Request an attestation document included the public key
Use the Nitro Secure Module (NSM) to generate an attestation document that cryptographically proves enclave identity and includes the ephemeral public key.
AWS Nitro Enclaves SDK for C can be used along with Python to interact with the NSM device as done in the Validate a Nitro Enclave Attestation Document sample code repository.
Create an AWS KMS decrypt request including the ciphertext and attestation document
Send the attestation document as part of the Recipient parameter in the AWS KMS decrypt API call. AWS KMS will verify the attestation and encrypt the response for your enclave’s public key.
Receive and parse the ciphertext_for_recipient CMS document
AWS KMS returns a Cryptographic Message Syntax (CMS) structure containing the encrypted symmetric key and ciphertext. To decrypt, use the following steps:
- Load the private key from Step 2
- Parse the CMS structure
Use a library such as asn1crypto to extract the encrypted key, initialization vector (IV), and encrypted content.
- Decrypt the symmetric key
CMS uses private/public key cryptography to encrypt a symmetric key that is used for the payload. Use the enclave’s RSA private key to decrypt the symmetric key with OAEP padding.
- Decrypt the content with Advanced Encryption Standard (AES)
Use the decrypted symmetric key and IV to decrypt the content (typically using AES-CBC).
- Encode the content for transport
Encode the decrypted content as base64 for safe transport or further processing.
Cleanup
To avoid incurring future charges, delete the resources following the steps described in the workshop Cleanup section.
Conclusion
In this post, you learned how to use AWS Nitro Enclaves for building secure (public) applications using TLS termination, cryptographic attestation and TAP networking. The implementation includes practical examples using gvisor-tap-vsock tap networking, secure IMDSv2 access patterns and Python based CMS decrypt..
Ready to enhance your application security? Visit our GitHub repository and workshop to start building with AWS Nitro Enclaves today.