AWS Contact Center
Configure scheduling notification rules in Amazon Connect Customer
Introduction
When you publish a contact center schedule, you assume the people it affects will see it. In practice, that assumption creates operational risk. Agents miss shifts, arrive late to training sessions, or create unplanned coverage gaps because a schedule change was communicated through a bulk email or a channel post that never surfaced in their workflow. For a 300-agent contact center, even a small percentage of unacknowledged updates translates directly into unplanned shrinkage, degraded service levels, and hours of supervisor follow-up.
The problem is not the schedule — it is the notification loop. When schedule updates depend on manual outreach, communication failures become recurring events. An agent who does not know their shift was modified is not a performance issue; it is a process gap that inflates costs and distorts planning.
1.1. What breaks down without automated notifications
Unplanned shrinkage from communication gaps. When agents miss a shift or a training block because they were not notified of a change, the absence appears in your adherence data as an agent performance issue. In most cases, it is a notification failure. These gaps inflate shrinkage metrics, force reactive coverage adjustments, and undermine forecast accuracy — all of which carry direct cost implications.
Supervisor time diverted from coaching. Every minute a supervisor spends manually forwarding schedule changes, confirming receipt, or answering questions about whether a time-off request was approved is time unavailable for agent development and quality management. In centers where supervisors carry large team spans, this notification overhead accumulates into hours per week spent on communication logistics rather than performance improvement.
Erosion of agent trust. When agents wait days for confirmation of a time-off request that was approved within hours, the delay creates the impression of an unresponsive process. In a high-attrition environment, that perception has retention consequences. Agents who receive timely, direct communication about their own schedules are better positioned to plan their personal lives and show up prepared — which correlates with higher adherence and lower attrition.
1.2. The solution — scheduling notification rules
Amazon Connect Customer’s Forecasting, Capacity Planning, and Scheduling (FCS) now supports Scheduling Notification Rules, which automate the delivery of schedule updates to the agents and supervisors they affect. Notifications trigger at the moment a schedule event occurs — an approved time-off request, a modified shift, a newly added activity — eliminating the manual follow-up loop entirely.
Notification Rules are configured through the Connect Customer Rules engine. When a schedule change meets the conditions defined in a rule, the system routes the notification through one or more channels:
- Email for formal records and out-of-office updates
- Connect Customer Tasks to place acknowledgments directly in the agent’s work queue
- Amazon EventBridge for integration with external tools such as Slack, Microsoft Teams, or SMS
This post walks you through how to configure Scheduling Notification Rules, covers available trigger conditions and channel options, and provides guidance on choosing the right configuration for each notification type.
1.3. Overview of scheduling notification rules
Scheduling notification rules extend Connect Customer’s existing Rules engine with a new scheduling rule type. The Rules engine is a familiar feature that contact center administrators already use for tasks such as Contact Lens alerts, real-time guidance, and contact categorization. Scheduling notification rules follow the same create-and-publish workflow.
Each scheduling notification rule consists of two components:
- Rule condition: Defines which scheduling event triggers the rule and which agents, staffing groups, or forecast groups it applies to. You can optionally filter by specific shift activities or time-off activity types.
- Actions: Defines what happens when the rule condition is met. You can configure one or more actions per rule — email notifications, Connect Customer Tasks, or Amazon EventBridge events.
There are three scheduling event types that can trigger notification rules:
| Event Type | Triggers When | Condition Filters |
|---|---|---|
| New schedule is published | A schedule is published and impacts agents in the selected groups | Staffing groups, forecast groups, or individual agents |
| Published schedule is updated | A previously published schedule is updated | Staffing groups, forecast groups, or individual agents + specific shift activities (e.g., training, work) |
| Time-off request status is updated | A time-off request is created or its status changes (approved, denied) | Staffing groups, forecast groups, or individual agents + specific time-off activity types (e.g., vacation, sick leave) |
Figure 1: Three scheduling event types.
And three action types you can configure for each rule:
| Action Type | Description | Recipients |
|---|---|---|
| Send email notification | Sends an email with customizable subject and body using dynamic tokens (schedule dates, instance ARN, rule name) | Impacted agents, their supervisors, specific users (by username or tags), with optional user exclusions |
| Create task | Creates a task with event-specific content (impacted dates, agents). Task is routed via a selected contact flow. | Determined by the contact flow selected in the action configuration |
| Generate an EventBridge event | Publishes an event to Amazon EventBridge containing agent ARNs, rule name, action name, and instance ARN | Any downstream consumer — Lambda, SNS, Step Functions, third-party integrations such as Microsoft Teams, Slack, SMS, and in-app agent workspace alerts |
Figure 2: The three action types available for scheduling notification rules.
You can configure multiple actions per rule. For example, a single rule can send an email to supervisors and simultaneously publish an EventBridge event for a custom Slack integration.
2. Prerequisites
Before configuring scheduling notification rules, ensure the following:
- An active Connect Customer instance with Forecasting, Capacity Planning, and Scheduling (FCS) enabled
- At least one published schedule with configured staffing groups and forecast groups
- Agents assigned to staffing groups with active schedules
- For email notifications: agents and supervisors must have email addresses configured in their Connect Customer user profiles
- For task notifications: a contact flow configured to route tasks to the appropriate agent
- For EventBridge notifications: an Amazon EventBridge rule configured in your AWS account to consume scheduling events
- Appropriate security profile permissions to create and manage rules in Connect Customer
3. Creating a schedule publish notification rule
When a WFM team publishes the weekly schedule every Thursday afternoon, supervisors need to review it before agents start their shifts the following Monday — confirming coverage gaps are addressed, training windows don’t conflict with peak hours, and newly onboarded agents have been properly assigned. Without automated notification, supervisors discover the schedule was published only when they happen to check the portal, which means review often doesn’t happen until Monday morning — too late to request changes. Let’s create a notification rule that automatically emails supervisors the moment a schedule is published for their staffing groups.
3.1. Step 1: Create a new scheduling rule
- Navigate to the Connect Customer admin console and select Rules from the left navigation panel.
- Click Create a rule and select Create scheduling rule from the dropdown.
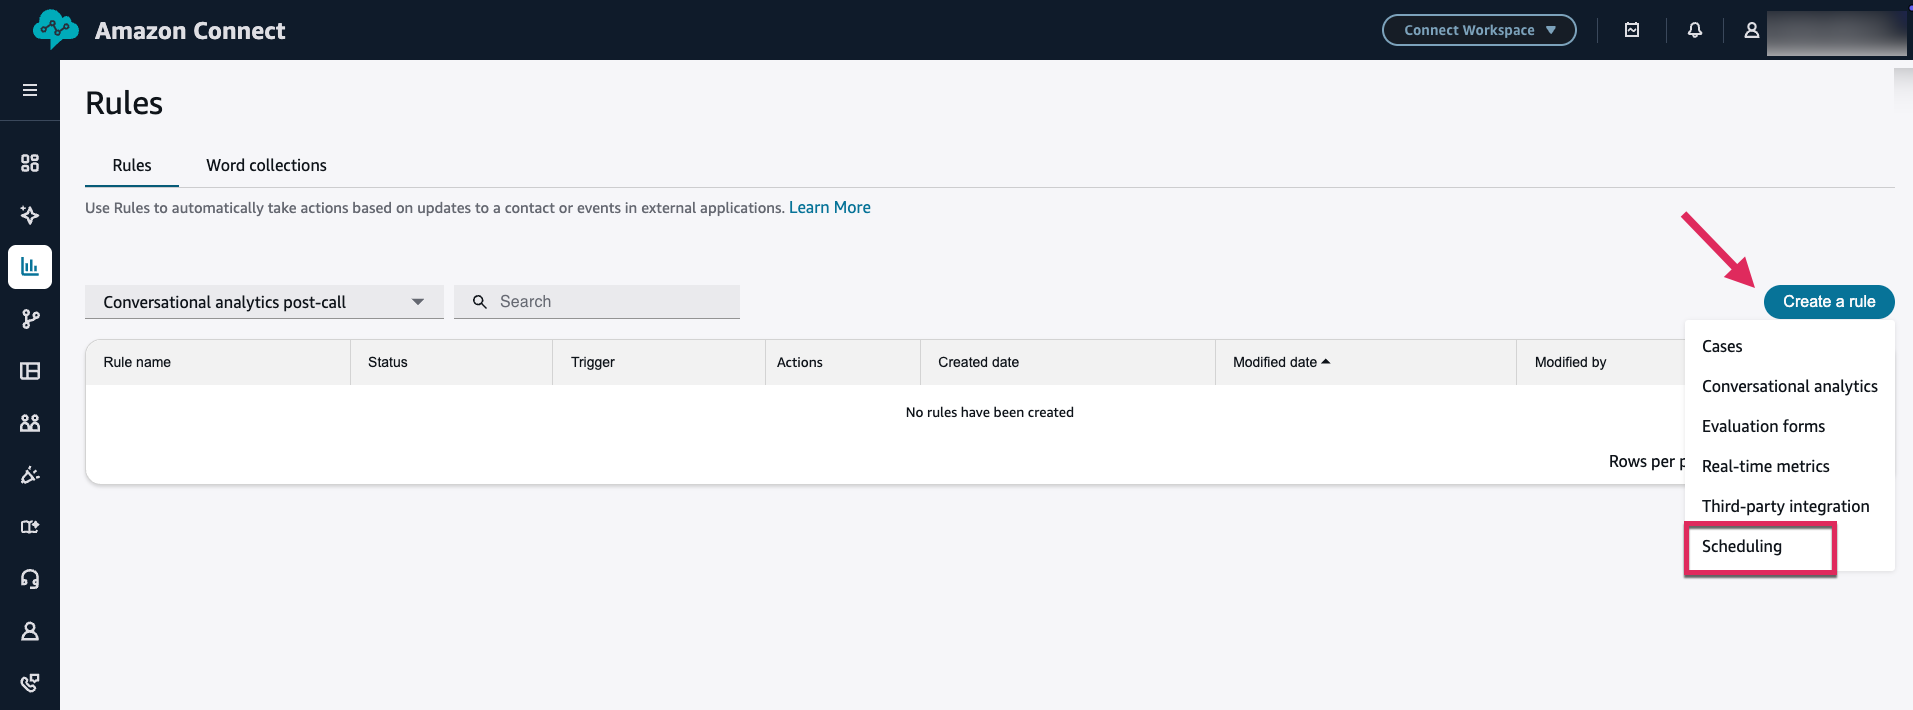
Figure 3: Creating a new scheduling rule from the Rules page.
- You will see three scheduling-related event sources. Select “New schedule is published”
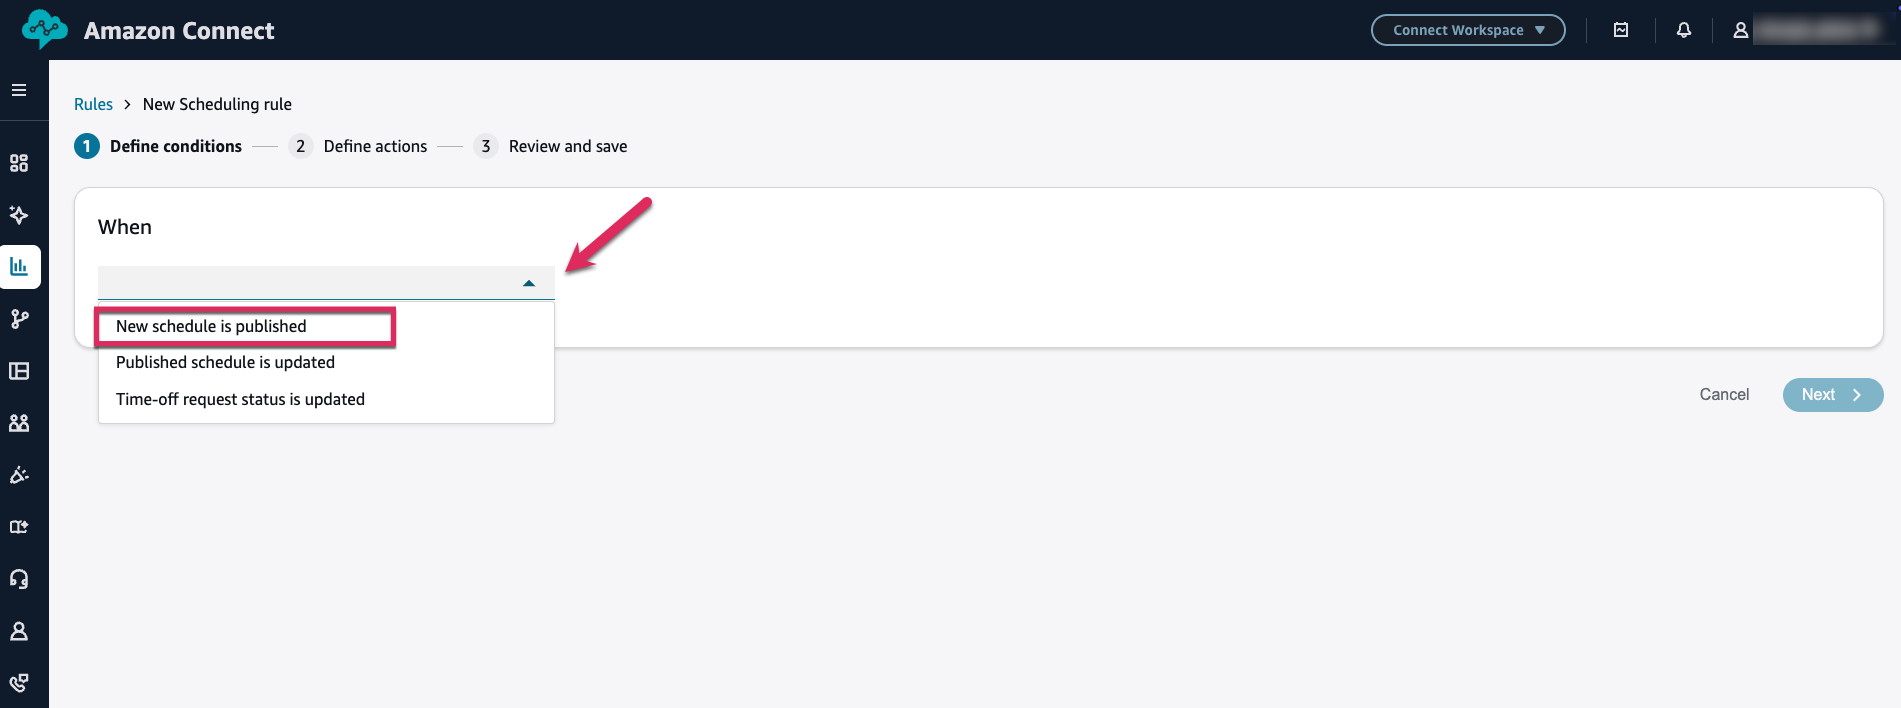
Figure 4: Selecting the schedule publish event type.
3.2. Step 2: Configure the rule condition
The rule condition defines which schedule publishes trigger the notification. You can scope the rule to:
- Individual agents: Trigger when a schedule publish impacts specific named agents.
- Forecast groups: Trigger when a schedule publish impacts agents in the selected forecast groups.
- Staffing groups: Trigger when a schedule publish impacts agents in the selected staffing groups.
You can select only one condition type per rule. For this example, we’ll select staffing groups.
- Click Add condition and select Staffing group from the dropdown.
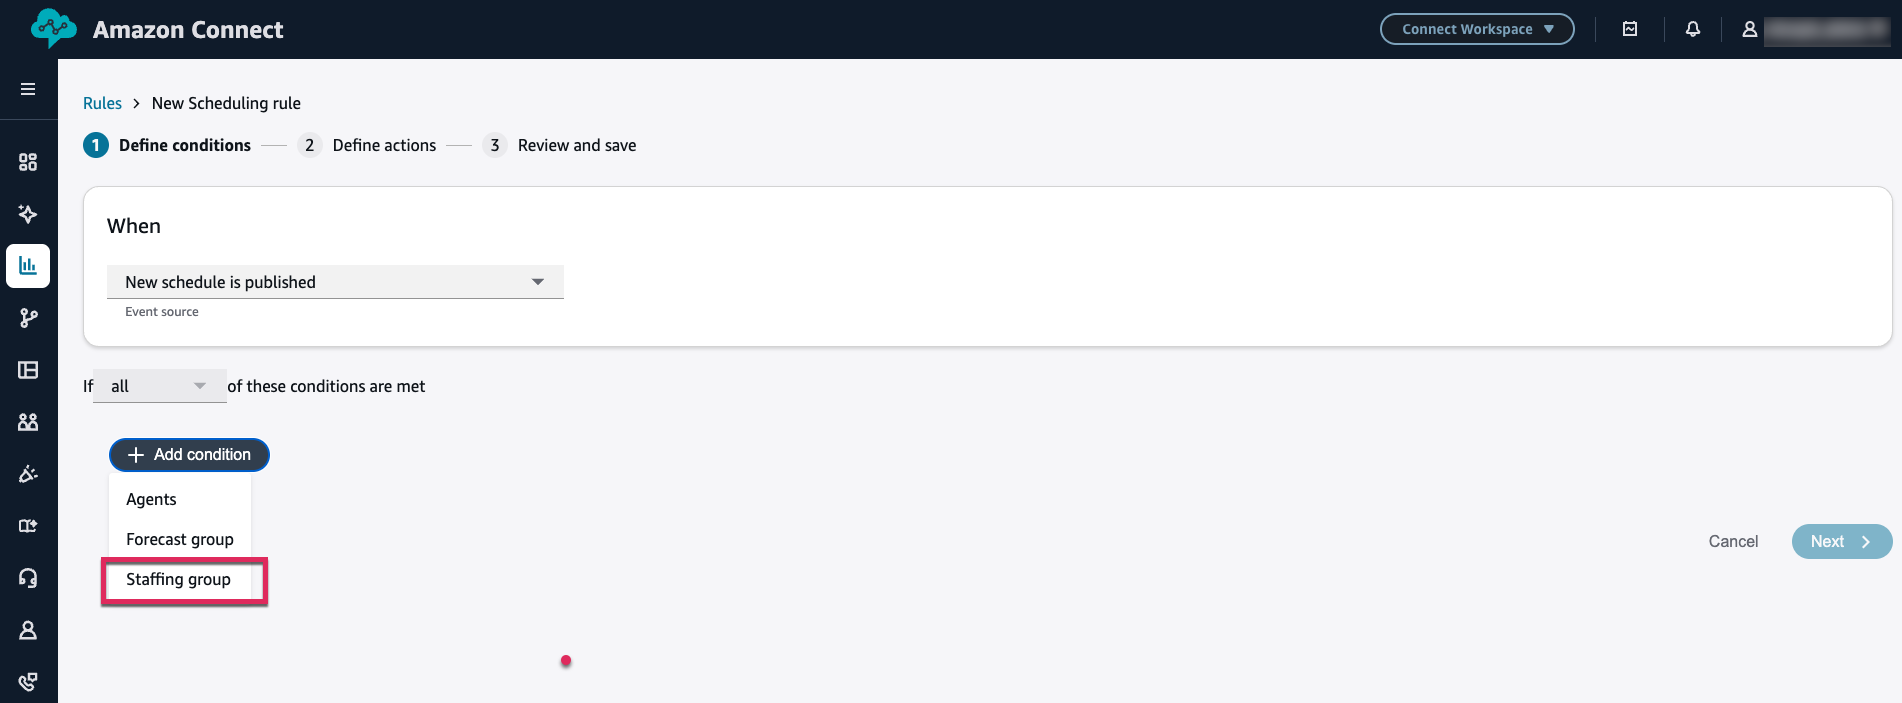
- Select the staffing groups you want to monitor. In this example, we select two available staffing groups.
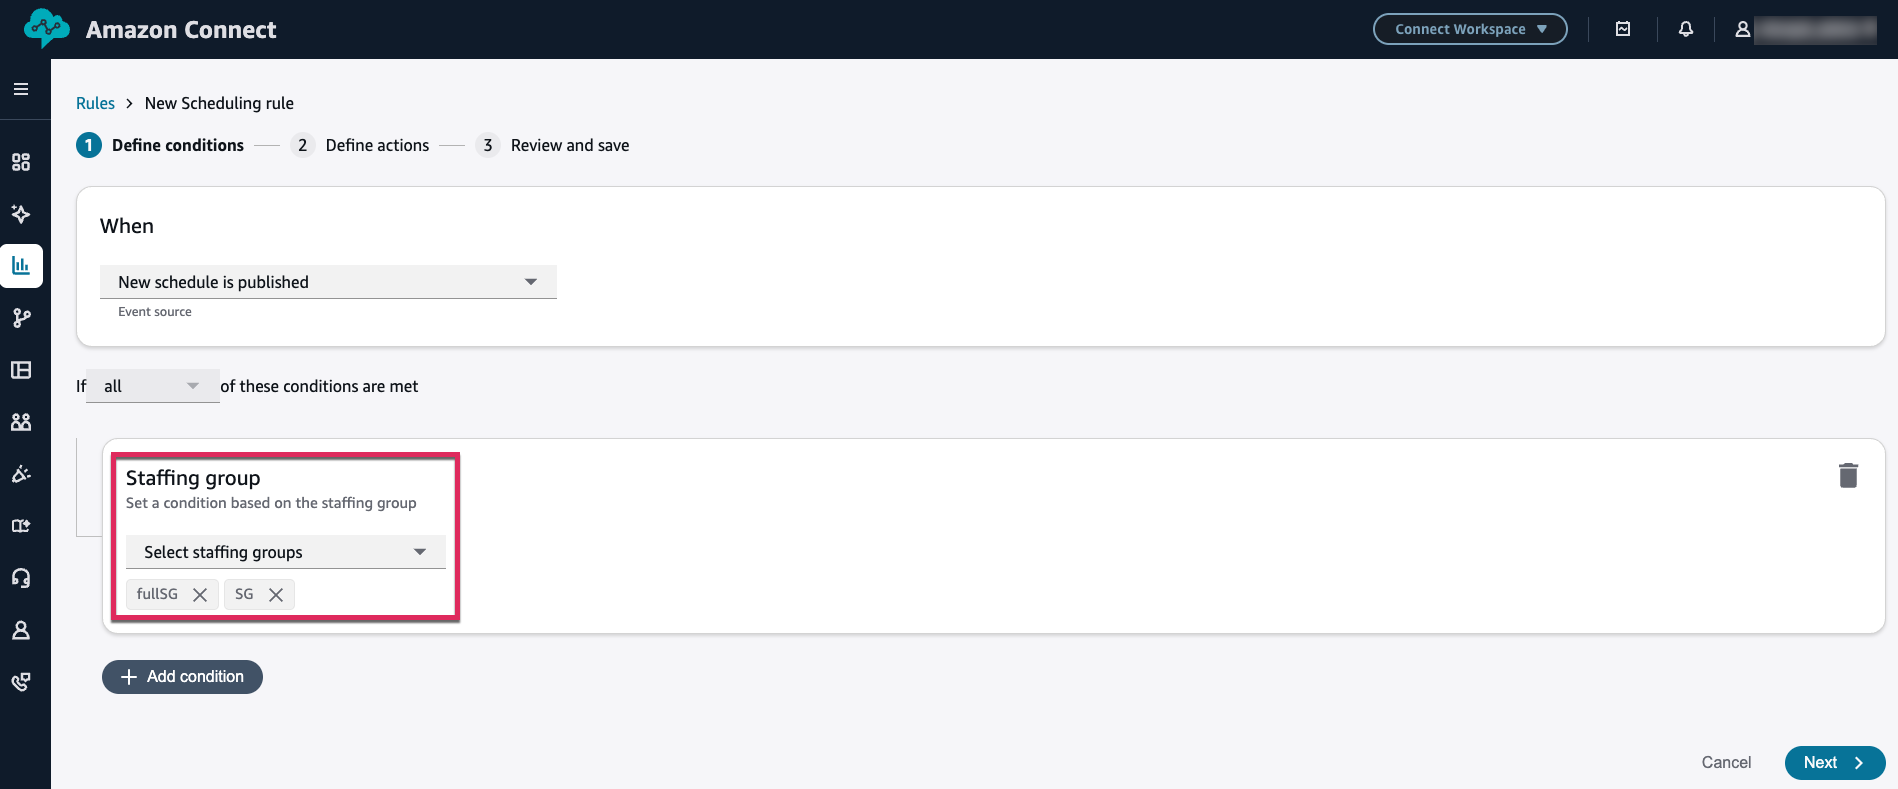
Figure 5: Rule condition configuration showing staffing group selection with two groups selected.
The rule evaluates every time a schedule is published. If the publish impacts agents belonging to one or more of the selected staffing groups, the configured actions are triggered.
3.3. Step 3: Configure the email action
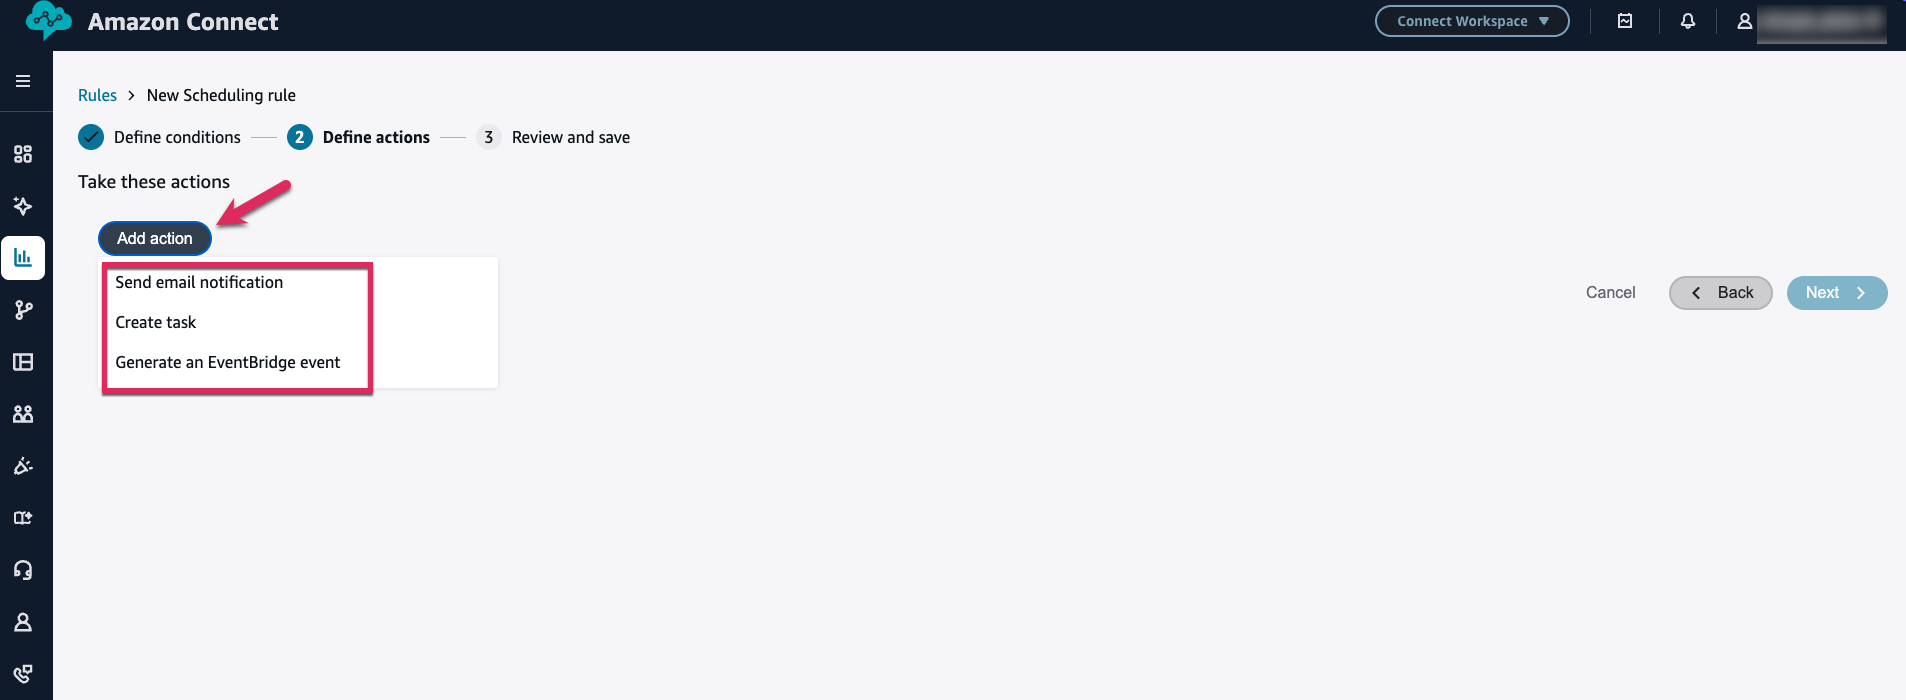
Click Next to proceed to the actions configuration. Click Add action and select Send email notification.
The email action provides:
- Customizable subject line: A default subject is provided, but you can modify it to match your organization’s communication standards.
- Customizable email body: A default body is provided with dynamic tokens that populate with event-specific information.
- Dynamic tokens: Insert tokens that automatically resolve to event-specific values when the email is sent.
Available dynamic tokens for schedule publish emails include:
| Token | Description | Example Value |
|---|---|---|
| {Schedule Start Date} | First day of the published schedule | 2026-04-21 |
| {Schedule End Date} | Last day of the published schedule | 2026-04-27 |
| {Instance URL} | URL of the Connect Customer instance | https://mycompany.my.connect.aws |
| {Rule Name} | Name of the rule that triggered the notification | Weekly Schedule Publish Alert |
Figure 6: Dynamic tokens available for schedule publish email notifications.
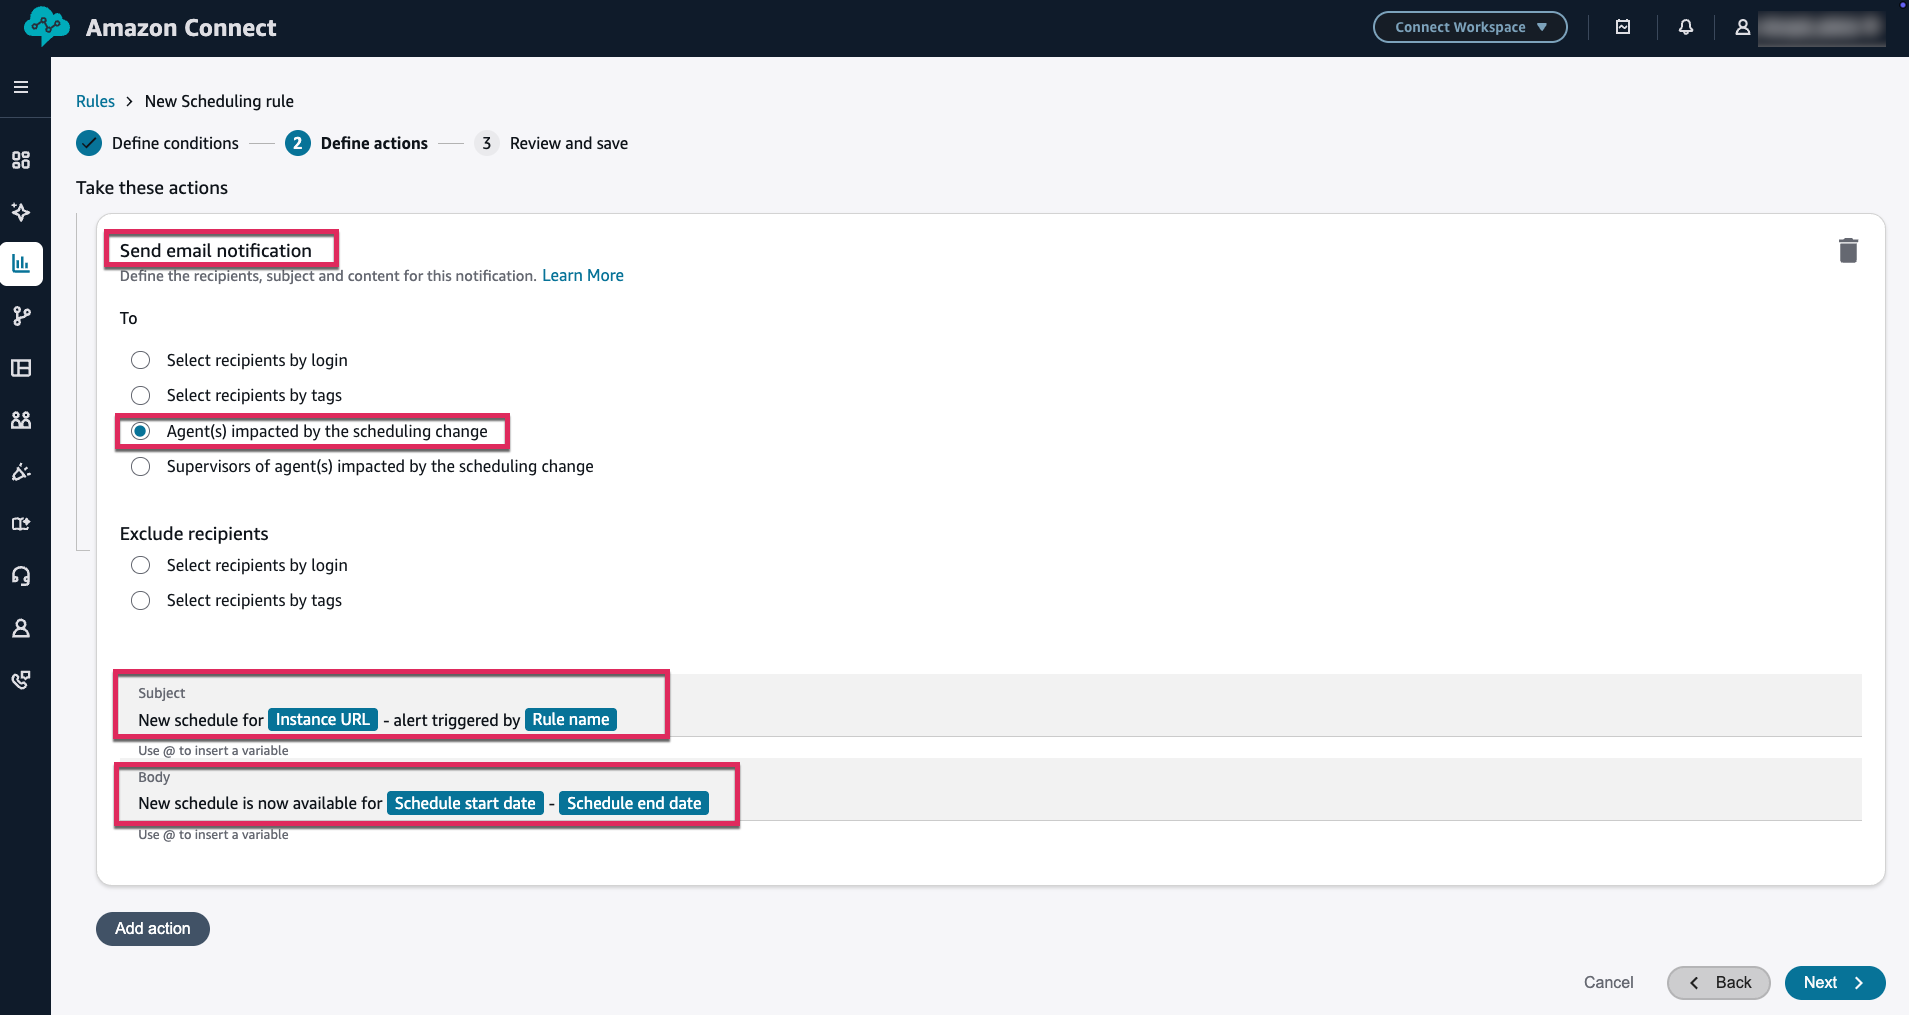
Figure 7: Email action configuration showing customizable subject, body with dynamic tokens, and recipient selection.
3.4. Step 4: Configure email recipients
The email recipient configuration offers flexible targeting:
| Recipient Type | Description | When to Use |
|---|---|---|
| Impacted agents | Sends the email to every agent whose schedule was affected by the publish event | Direct agent communication |
| Supervisors | Sends the email to the supervisors of the impacted agents | Management visibility |
| Specific users | Sends the email to users selected by username or by tags | WFM team, operations leads |
Figure 8: Email recipient targeting options.
When you select Impacted agents or Supervisors as the recipient type, you also have the option to exclude specific users. For example, you may want to notify all supervisors except a particular user who does not need scheduling-related communications.
3.5. Step 5: Add an EventBridge action (optional)
You can add additional actions to the same rule. Click Add action and select “Generate an EventBridge event”.
The EventBridge action requires only a name for the action. When triggered, it publishes an event to Amazon EventBridge with the following payload structure (the “resources” field will be populated with the impacted agents):
{
  "version": "0",
  "id": "aaaaaaaa-bbbb-cccc-dddd-bf3703467718",
  "source": "aws.connect",
  "detail-type": "Scheduling Rule Matched",
  "account": "123456789012",
  "time": "2026-01-19T18:43:48Z",
  "region": "us-west-2",
  "resources": [
    "arn:aws:connect:us-east-1:your-AWS-account-ID:instance/instance-ARN/agent/agent-ARN"
  ],
  "detail": {
    "version": "1.0",
    "ruleName": "Schedule Published - Notify FG Supervisors",
    "actionName": "NOTIFY_OF_SCHEDULE_CHANGE",
    "instanceArn": "arn:aws:connect:us-west-2:123456789012:instance/12345678-1234-1234-1234-123456789012"
  }
}
Figure 9: Sample EventBridge event payload for a schedule publish notification.
The resources array contains the Connect Customer agent ARNs of all impacted agents. You can use this in downstream Lambda functions, SNS topics, or Step Functions workflows to build custom notification channels such as Microsoft Teams, Slack, SMS, and in-app agent workspace alerts.
3.6. Step 6: Name and publish the rule
- Click Next to proceed to the rule naming page.
- Enter a descriptive name for the rule (e.g., “Schedule_Publish_Agent_Impacted_Notification”).
- Click Save and publish to activate the rule.
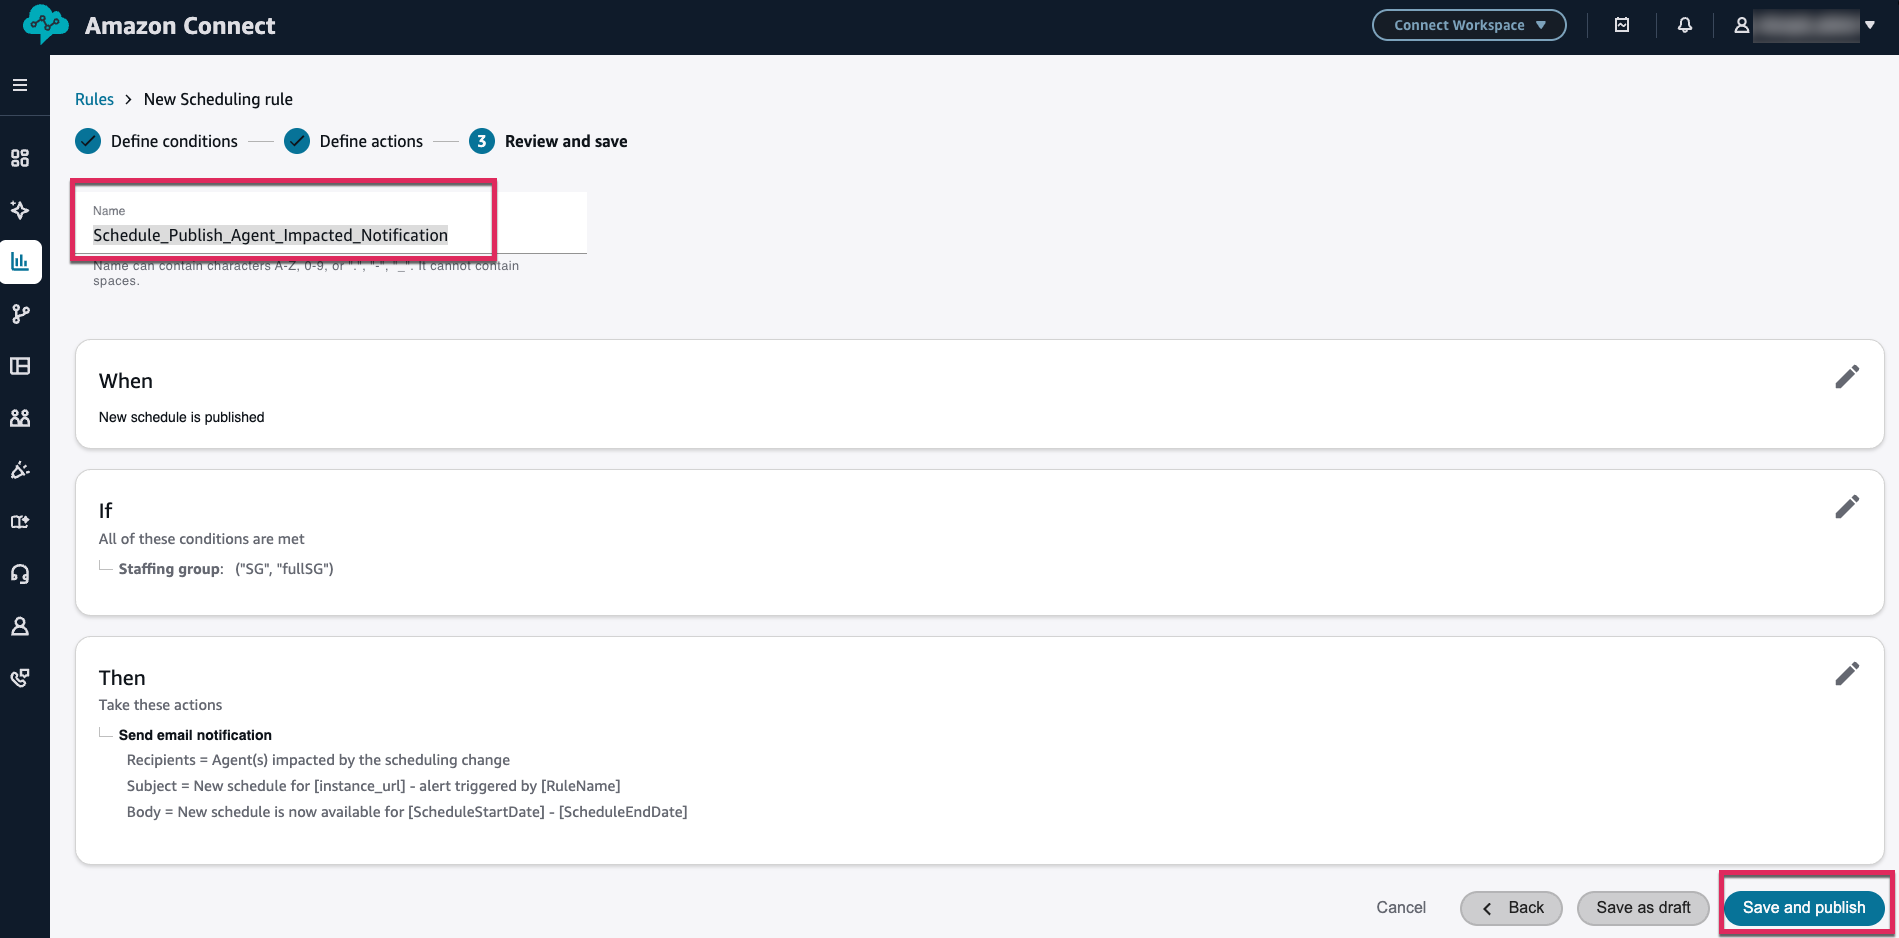
Figure 10: Naming and publishing the scheduling notification rule.
Once published, the rule is active and will trigger automatically the next time a schedule is published that impacts agents in the configured staffing groups.
4. Creating a schedule update notification rule
It’s Wednesday afternoon and the WFM team needs to add a mandatory compliance training session for 15 agents on Friday. They update the published schedule, but the agents — currently on calls and in back-to-back contacts — have no idea their Friday schedule now includes a 2-hour training block. By Friday morning, several agents planned personal errands during what used to be their break time, and the training room is half-empty for the first 15 minutes while supervisors scramble to track down attendees. Schedule update notifications solve this by alerting recipients when a previously published schedule is modified — particularly useful for mid-week changes such as training sessions being added, or shifts being adjusted
4.1. Configure the rule condition with shift activity filtering
- Navigate to Rules and click Create a rule > Create scheduling rule.
- Select Published schedule is updated as the event source.
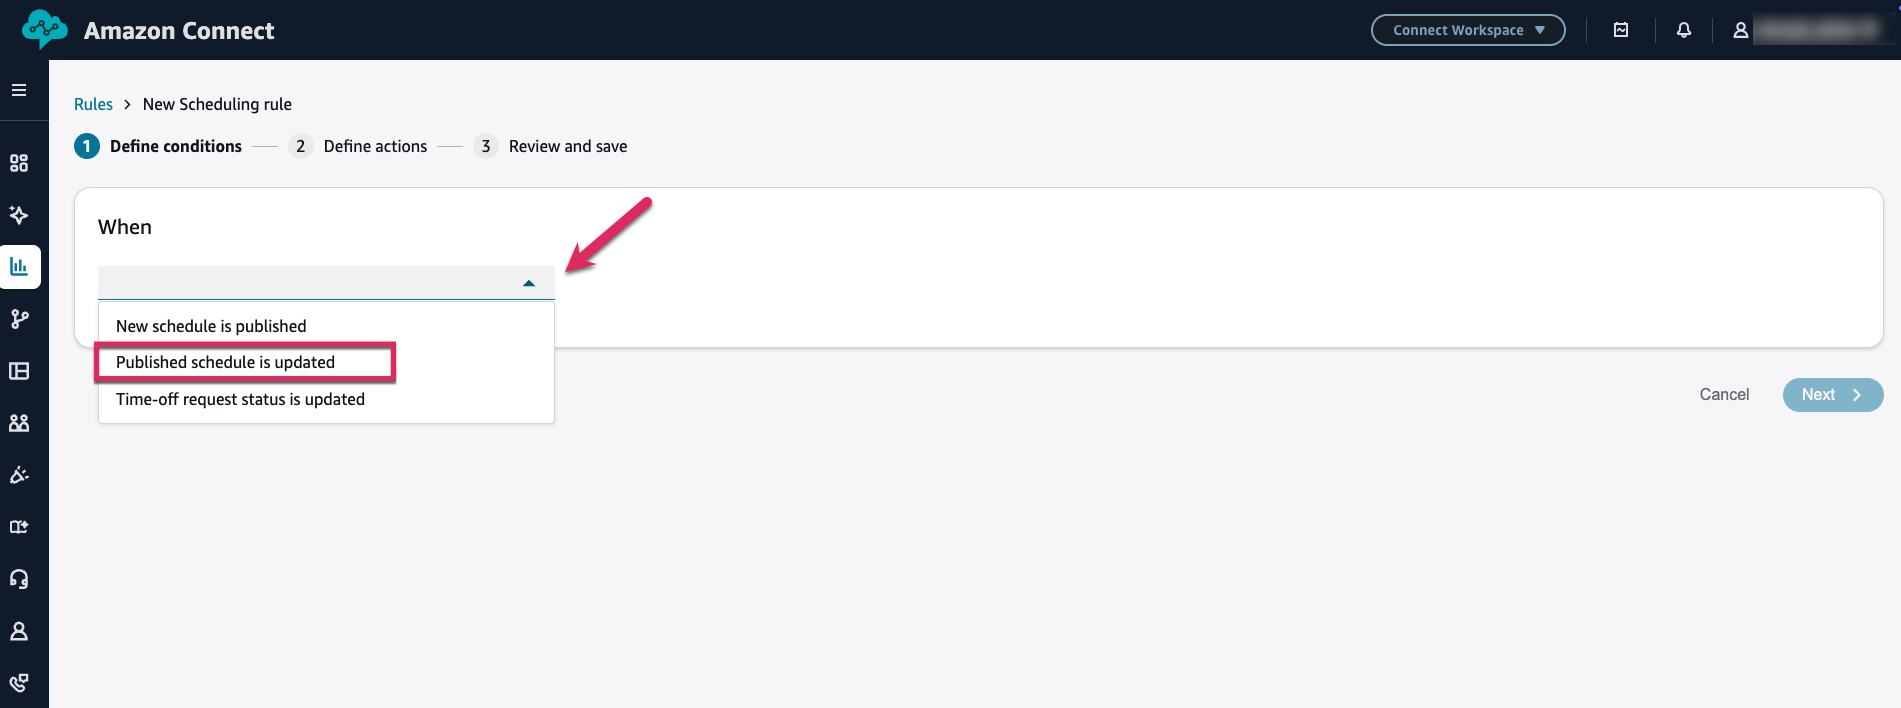
Figure 11: Selecting the schedule update event type.
The rule condition for schedule updates is similar to schedule publish, with one important addition: you can filter by specific shift activities. This means you can create targeted notifications that only trigger when certain types of schedule changes occur.
For example, you might want to notify supervisors only when training-related schedule updates occur for a specific forecast group, but not for routine work schedule adjustments.
- Select your staffing groups, forecast groups, or individual agents.
- Optionally, click Add shift activities to filter by specific activity types.
- Select the shift activities you want to monitor (e.g., Training, Meeting).
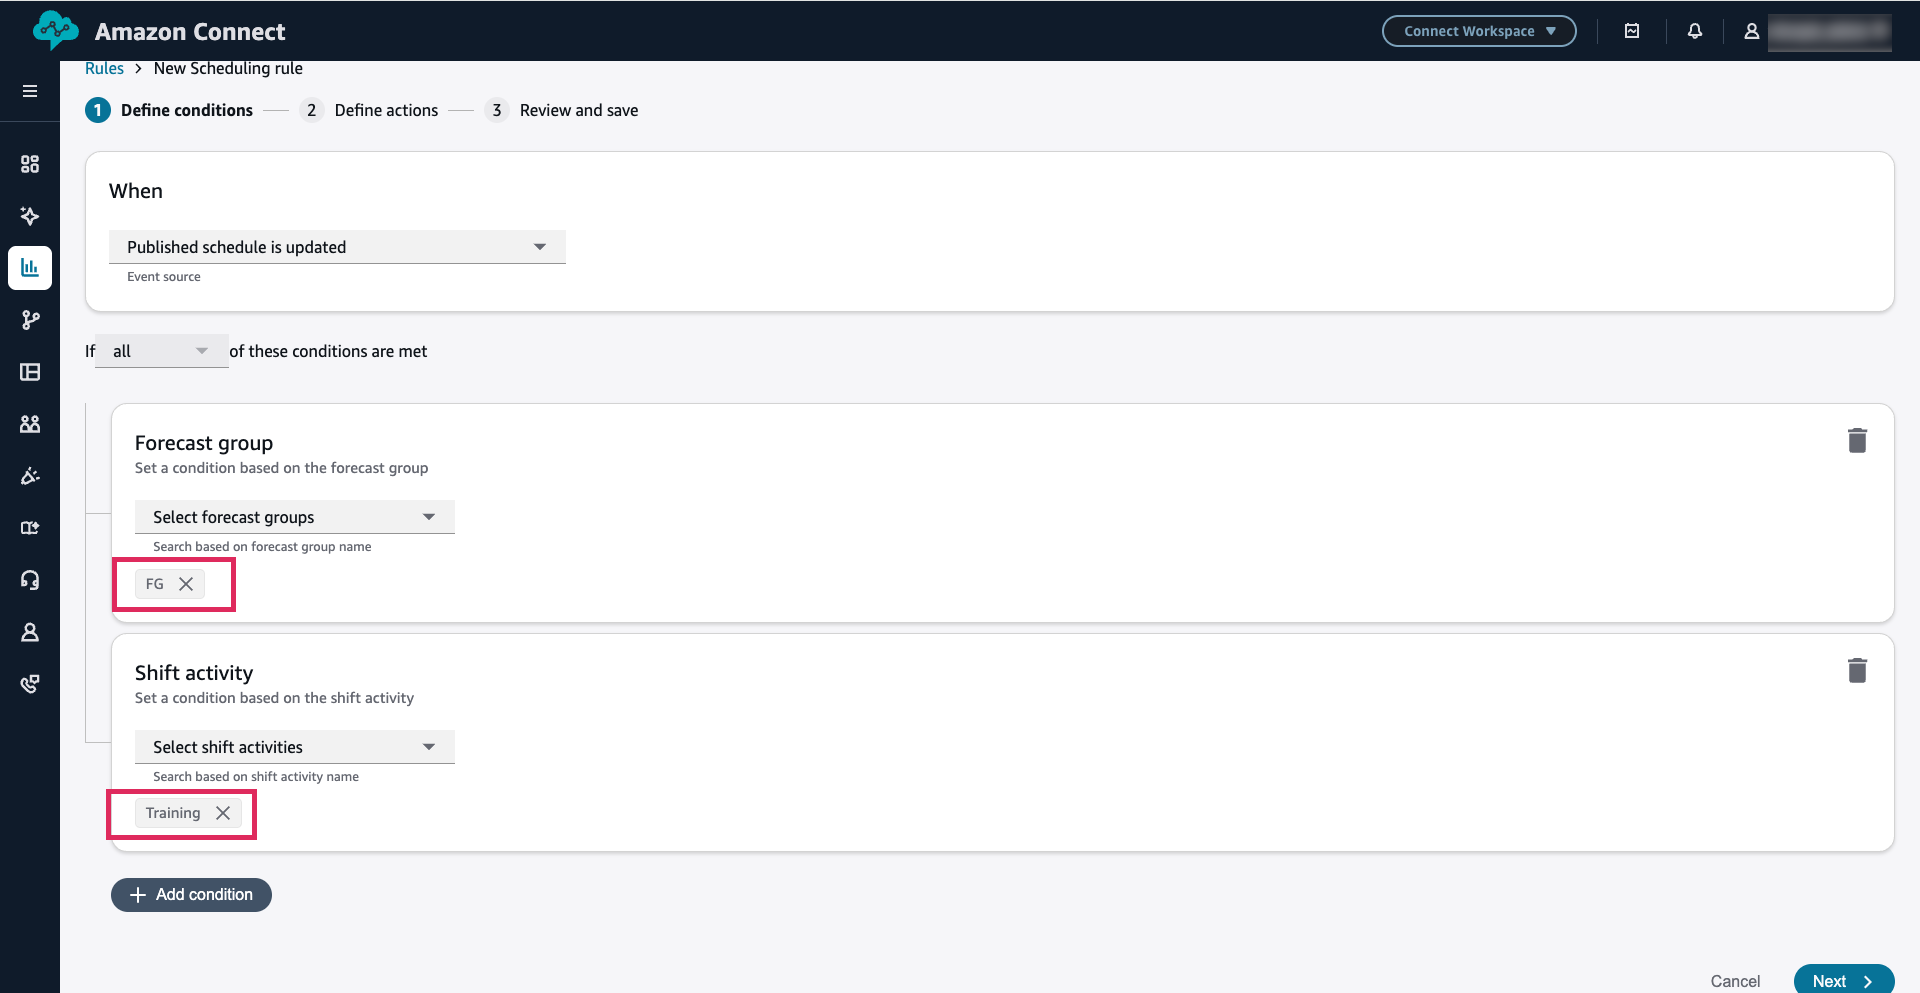
Figure 12: Rule condition with forecast group selected and Training shift activity filter applied.
If you do not select any shift activities, the rule triggers for any schedule update regardless of which activity is impacted. Selecting specific activities narrows the scope to only those changes.
4.2. Configure the notification actions
The actions for schedule update rules are identical to schedule publish rules — email, task, and EventBridge. The key difference is in the dynamic tokens available for email and task content:
| Token | Description | Available In |
|---|---|---|
| {ImpactedDates} | The dates affected by the schedule update | Email, Task |
| {Instance URL} | URL of the Connect Customer instance | Email, Task |
| {Rule Name} | Name of the rule that triggered the notification | Email, Task |
Figure 13: Dynamic tokens available for schedule update notifications.
5. Creating a time-off request notification rule
An agent submits a vacation request for the following week. They need to know whether it’s approved in time to confirm their travel plans. On the supervisor’s side, the request sits in the queue unnoticed for two days because there’s no alert — the supervisor only sees pending requests when they proactively open the scheduling portal. By the time the request is approved, the agent has already made backup plans and is frustrated by the lack of communication. Time-off request notifications solve this by triggering when agents submit time-off requests or when the status of an existing request changes (approved, denied, or cancelled), keeping supervisors informed of incoming requests and ensuring agents receive timely updates on their request status.
5.1. Configure the rule condition with time-off activity filtering
- Navigate to Rules and click Create a rule > Create scheduling rule.
- Select Time-off request is updated as the event source.
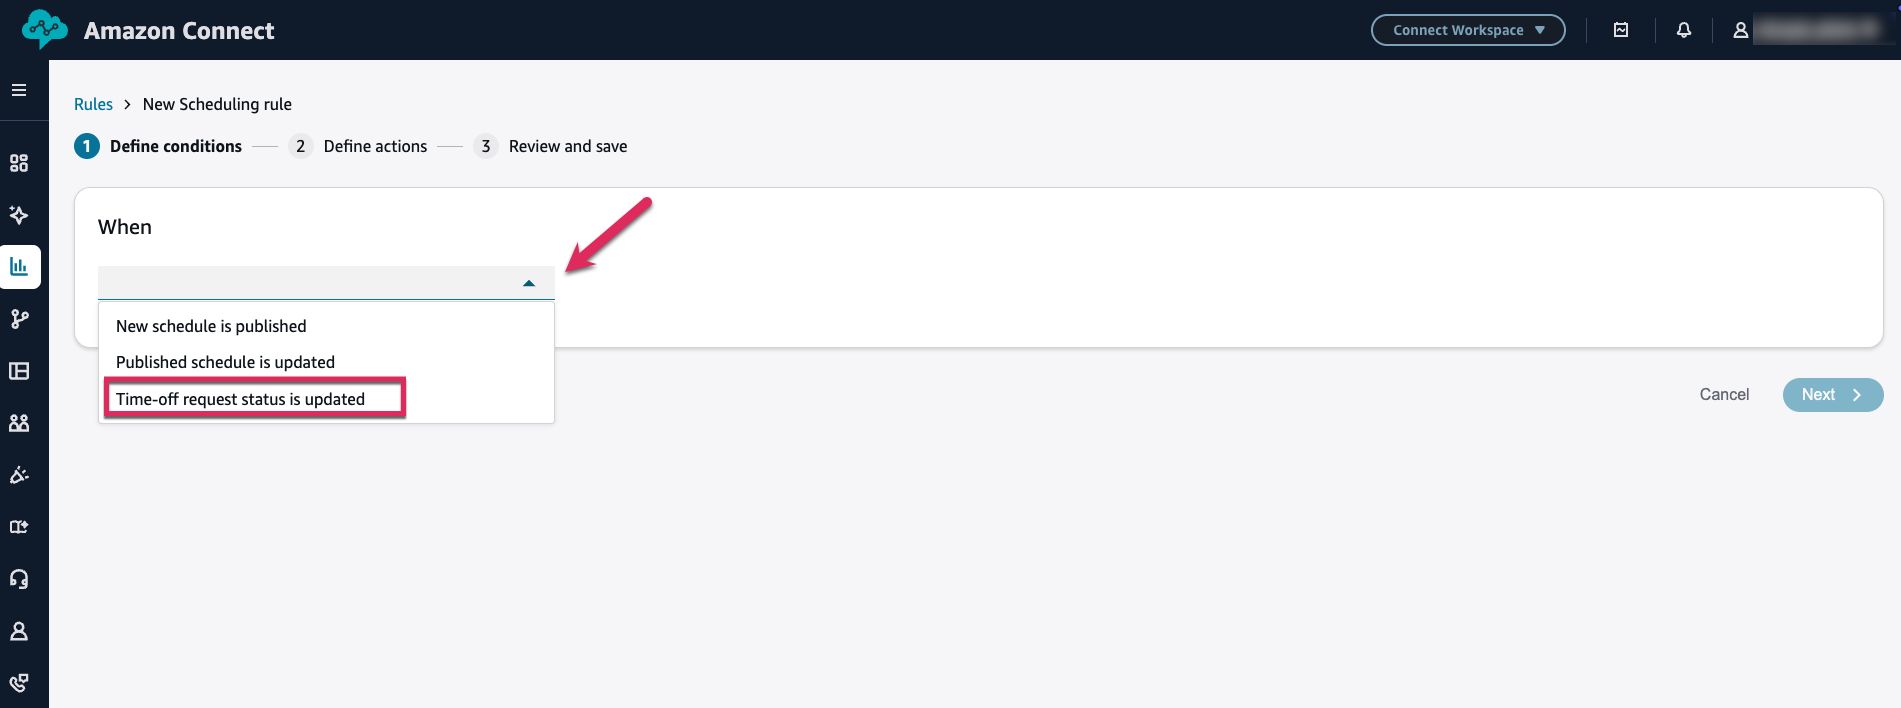
Figure 14: Selecting the time-off request event type.
Similar to schedule update rules, you can filter by specific time-off activity types. This is useful when you want different notification rules for different types of leave.
For example, you might want vacation requests to notify supervisors via email for approval, while sick leave requests trigger an EventBridge event for automated processing.
- Select your staffing groups, forecast groups, or individual agents.
- Optionally, click Add time-off activities to filter by specific types.
- Select the time-off activity types you want to monitor (e.g., Vacation, Sick Leave).
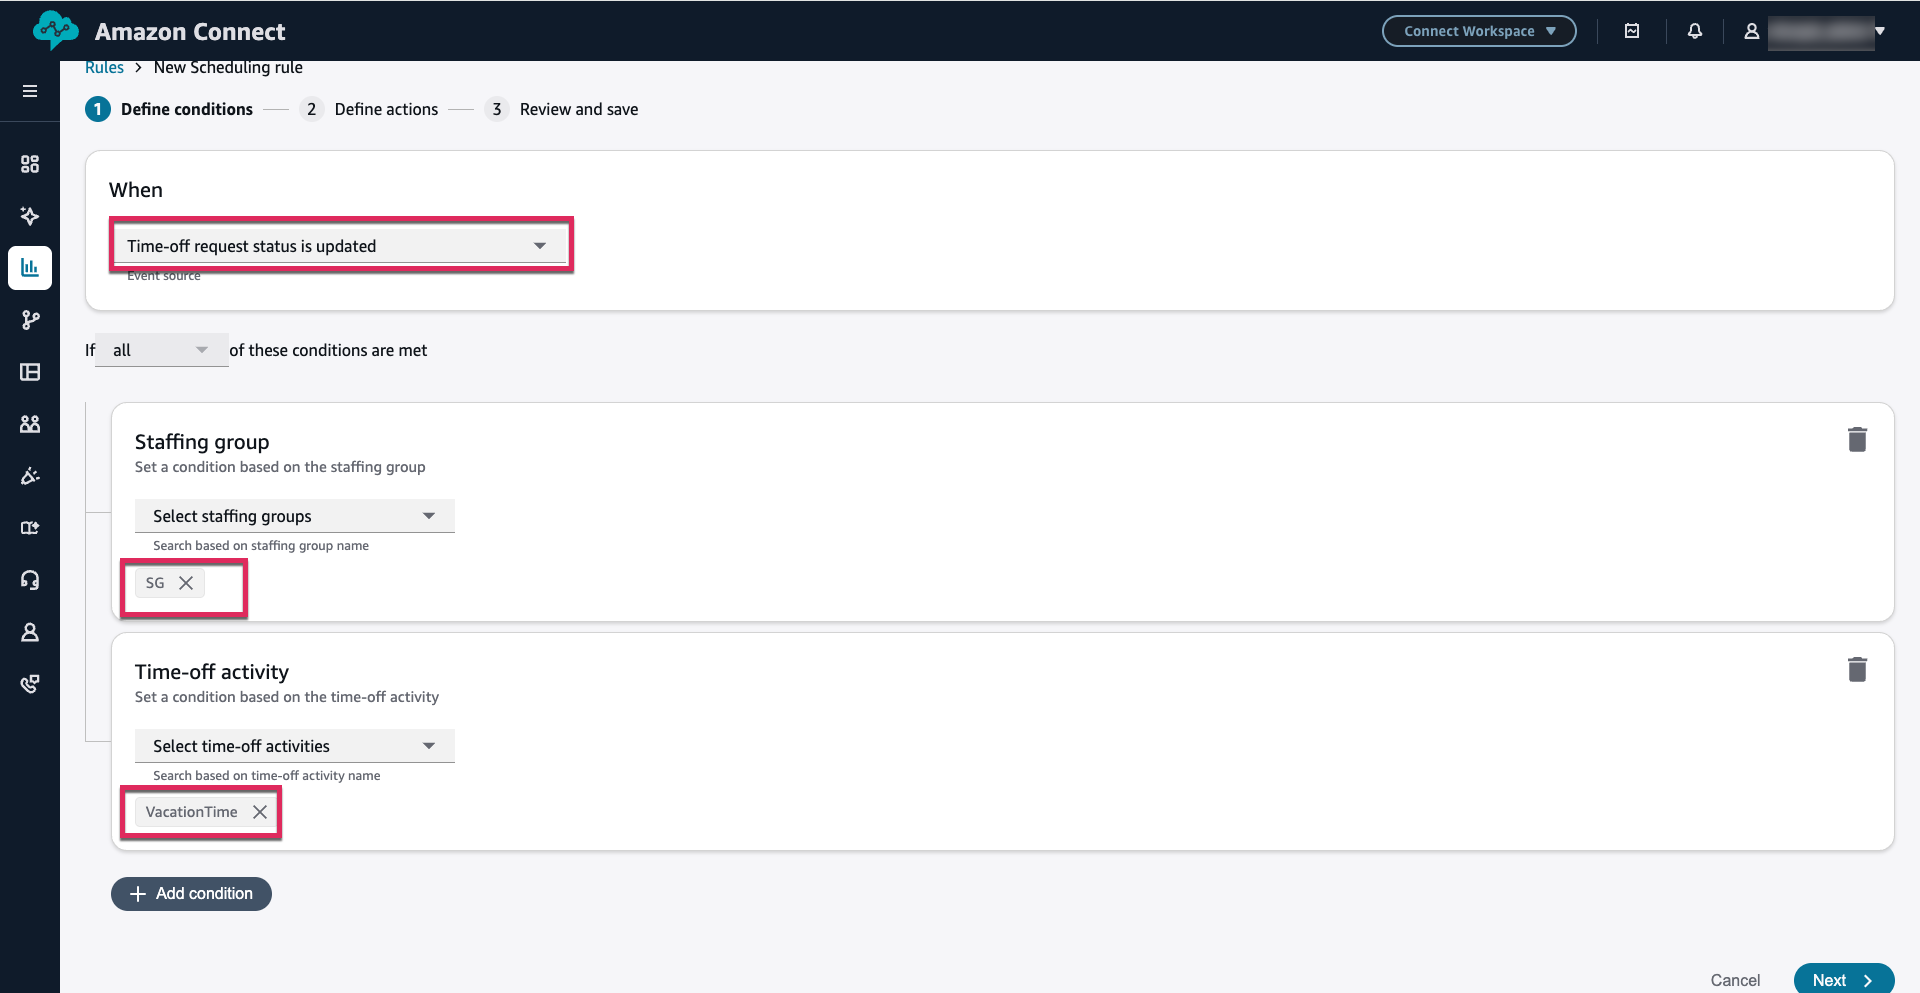
Figure 15: Rule condition with Vacation time-off activity filter selected.
5.2. Configure the email action
For time-off request notifications, the email action includes tokens specific to the request details:
| Token | Description | Example Value |
|---|---|---|
| {Instance URL} | URL of the Connect Customer instance | https://mycompany.my.connect.aws |
| {Rule Name} | Name of the rule that triggered the notification | SG_Vacation_Time_NotifySupervisor |
| {Impacted agent} | Impacted agent | agent1, agent2 |
| {TimeOffActivityName} | Name of the time-off activity type | Vacation |
| {TimeOffStartTime} | Start date/time of the requested time off | 2026-05-06T04:00:00Z |
| {TimeOffEndTime} | End date/time of the requested time off | 2026-05-06T04:00:00Z |
| {TimeOffStatus} | Current status of the request | Pending / Approved / Denied |
Figure 16: Dynamic tokens available for time-off request email notifications.
A common pattern is to send the email to the supervisors of the requesting agent, so they can review and act on the request promptly.
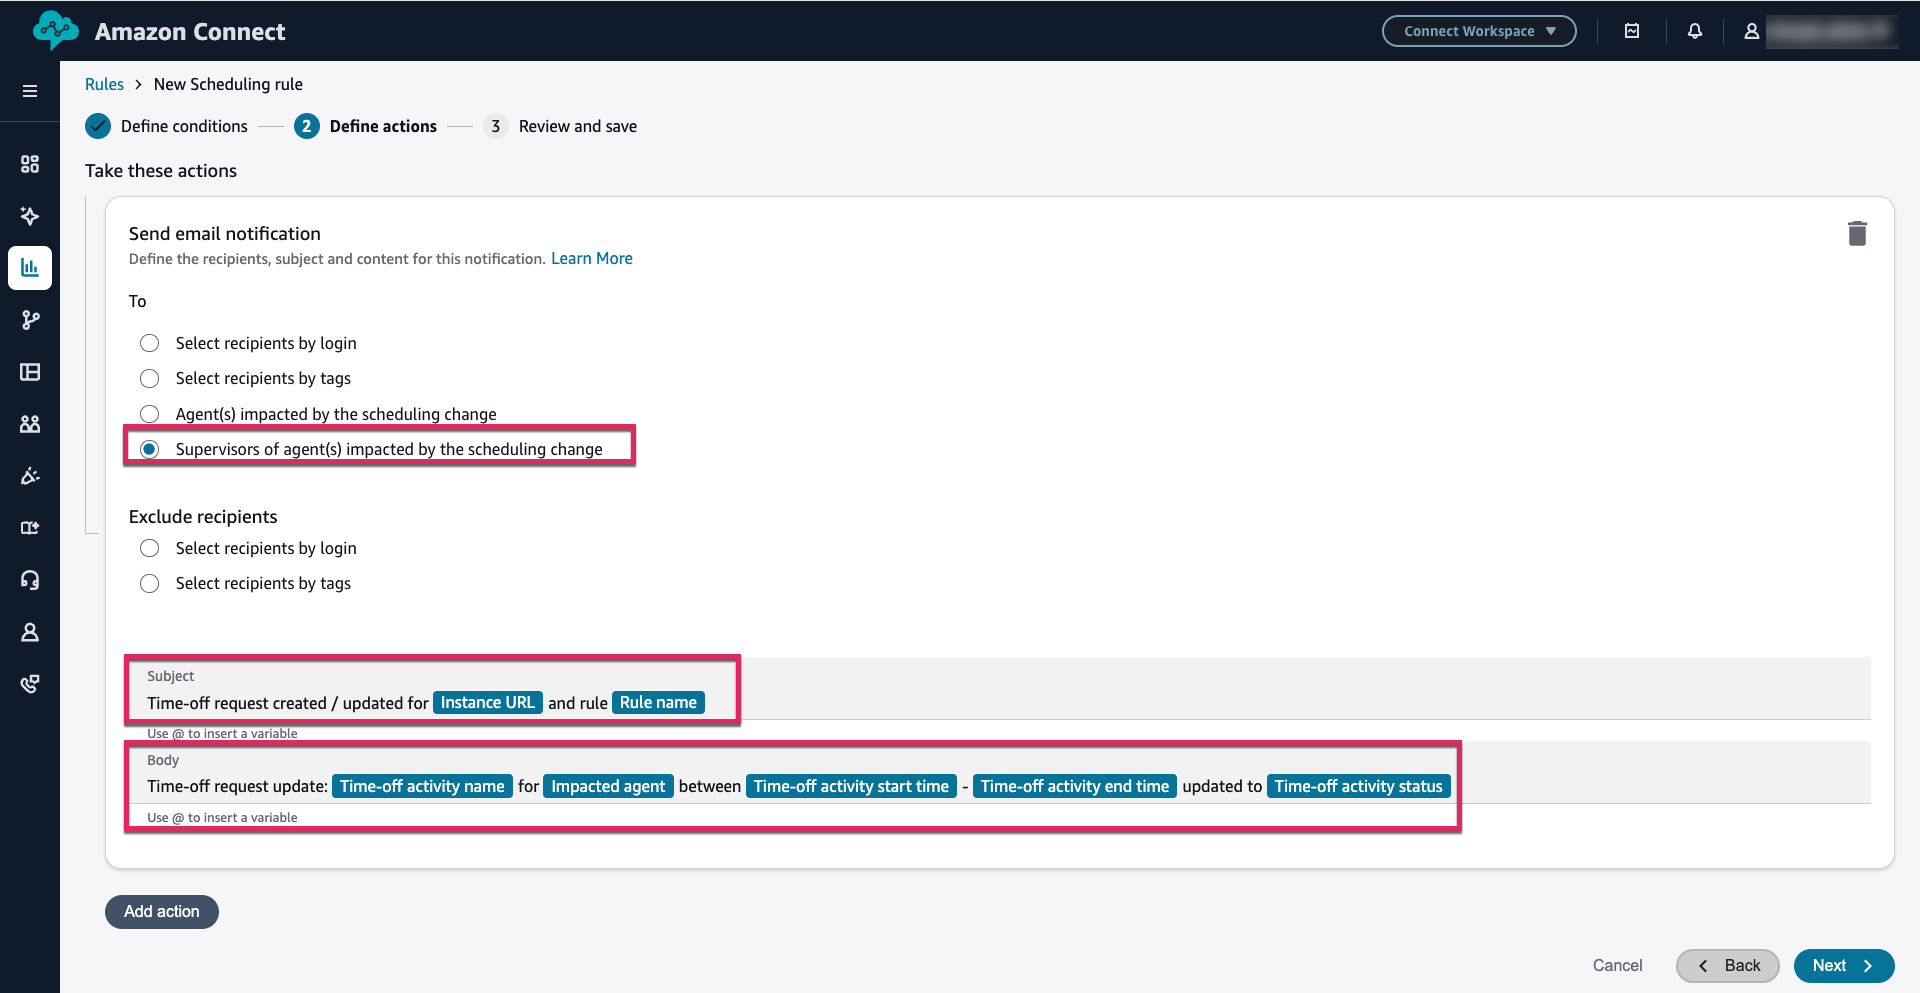
Figure 17: Email action configured with time-off tokens and Supervisors selected as recipients.
6. Rule management
Connect Customer provides several management capabilities for scheduling notification rules.
6.1. Viewing and editing rules
All scheduling notification rules are listed on the Rules page and can be filtered by rule type. From this view, you can:
- View the rule name, event type, and current status (published or draft)
- Click on a rule to edit its conditions, actions, or name
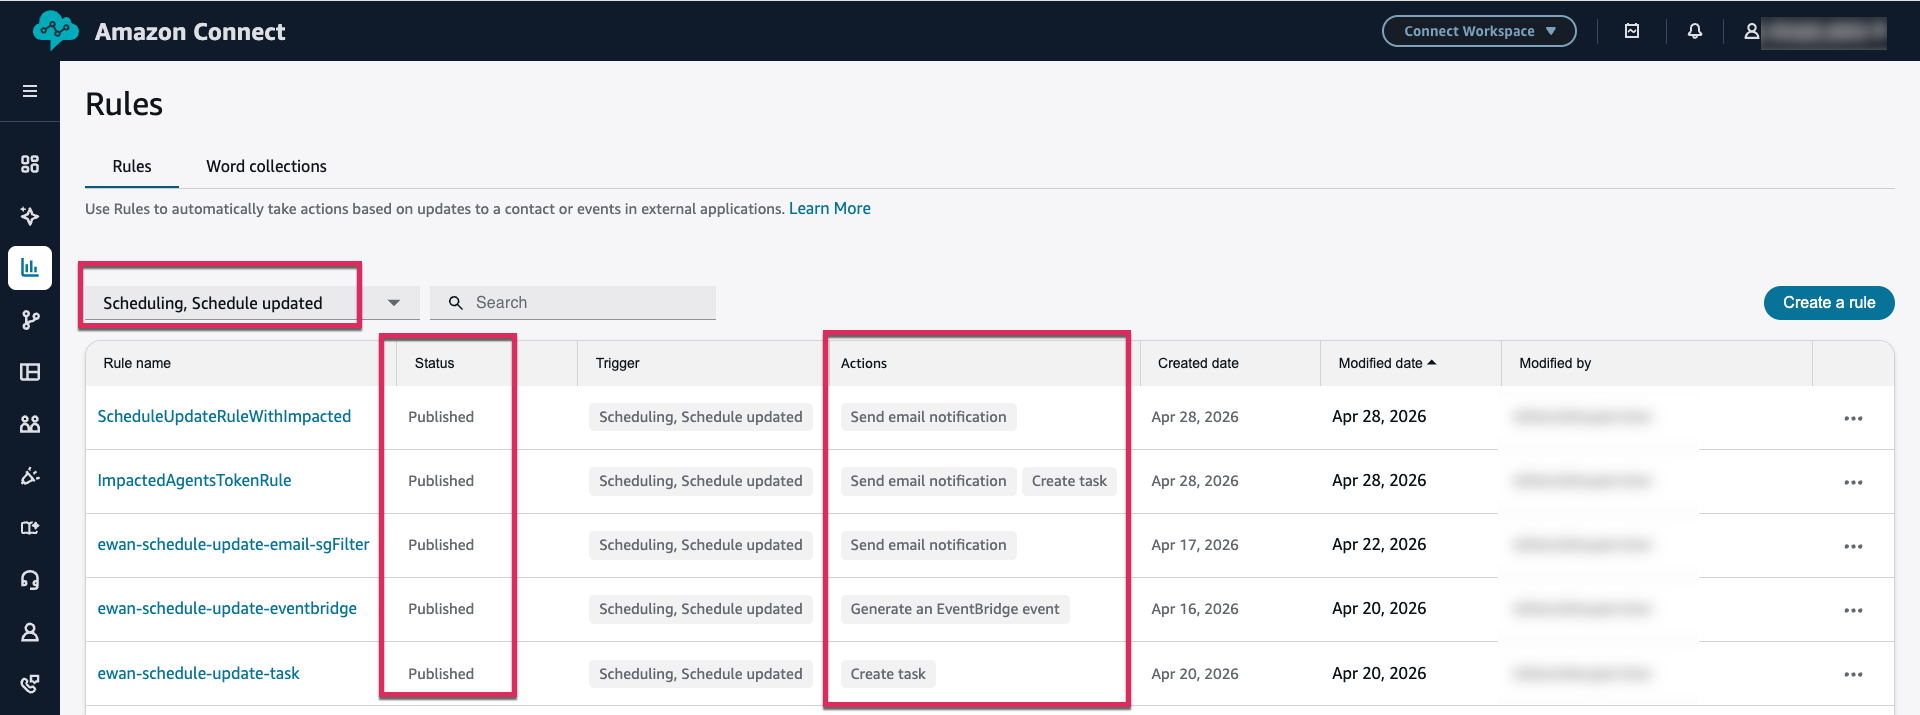
Figure 18: Managing scheduling notification rules from the Rules page.
6.2. Duplicating rules
One of the most useful management features is rule duplication. This allows you to quickly create variations of an existing rule without configuring it from scratch.
A common pattern is to create a rule that notifies supervisors, then duplicate it and modify the copy to notify agents instead. The duplicated rule retains all conditions and actions from the original, so you only need to change the recipient type.
7. Advanced integration patterns
While email and task notifications cover many use cases directly, the EventBridge action unlocks a broader set of integration patterns. By publishing scheduling events to Amazon EventBridge, you can route notifications to any channel or system your organization uses — Microsoft Teams, Slack, SMS, custom dashboards, or even the Connect Customer agent workspace itself.
In this section, we walk through advanced patterns that extend scheduling notifications beyond the built-in actions.
7.1. Sending notifications to Slack
Your supervisors spend most of their day in Slack — monitoring queues, coordinating with agents, and managing escalations. They rarely check email during peak hours. When a schedule is published or updated, the notification needs to arrive where they’re already working — not buried in an inbox they’ll check at end of day. We will achieve this by routing an Connect Customer Rule through Amazon EventBridge, using an Input Transformer to format the payload for a Slack Incoming Webhook.
7.1.1. Step 1: Create the Connect Customer rule
First, we need to tell Connect Customer to emit an event whenever a schedule is published.
- Log in to your Connect Customer admin portal.
- On the left navigation menu, go to Rules and click Create a rule.
- Select Scheduling from the drop-down list.
- Define the Condition: Set the rule to trigger when a schedule is published (you can scope this to specific staffing groups if needed).
- Define the Action: Select Generate an EventBridge event.
- Action Name: Type
SCHEDULE_PUBLISHED. (This is a custom label that we will display in your Slack message). - Click Save and name your rule (e.g.,
schedule-published-staffing-groups).
7.1.2. Step 2: Set up the Slack webhook
Next, we need a destination URL in Slack to receive our alerts.
- Go to the Slack API Apps (https://api.slack.com/apps) and click Create New App.
- Choose From scratch, name the app “Connect Alerts”, and select your workspace.
- On the left menu under Features, click Incoming Webhooks.
- Toggle the switch to Activate Incoming Webhooks.
- Scroll down and click Add New Webhook to Workspace.
- Select the channel you want alerts sent to (e.g.,
#scheduling-updates) and click Allow. - Copy the Webhook URL provided (it starts with
https://hooks.slack.com/...). Save this for the next step.
7.1.3. Step 3: Configure Amazon EventBridge
Now we wire the two systems together. EventBridge will catch the Connect event, transform the JSON into a clean message, and push it to Slack.
Create the connection
EventBridge needs a connection profile to talk to external APIs.
- Open the Amazon EventBridge Console.
- Under Integration on the left, click API destinations, then click the Connections tab.
- Click Create connection.
- Name:
Slack-Webhook-Connection - Destination type: Select Other.
- Authorization type: Select API Key.
- API key name: Type
Authorization. - Value: Type
Bearer dummy-token. (Slack’s auth is built directly into the Webhook URL).
- Name:
- Click Create.
Create the API destination
- Switch to the API destinations tab and click Create API destination.
- Name:
Slack-Channel-Destination - Endpoint: Paste your Slack Webhook URL here.
- HTTP method: Select POST.
- Connection: Select the
Slack-Webhook-Connectionwe just made.
- Name:
- Click Create.
Create the event rule and input transformer
- On the left menu, click Rules, then Create rule.
- Name it
Connect-Schedules-To-Slack. Select Rule with an event pattern and click Next. - In the Event pattern section, make the following selections:
- Event source: AWS service
- AWS service: Connect Customer
- Event type: Scheduling Rules Matched
- Click Next until you reach Step 3 (Select targets).
- Target types: Select EventBridge API destination.
- API destination: Choose your
Slack-Channel-Destination. - Scroll down to Additional settings and expand it.
- Change the Target input drop-down to Input transformer and click Configure input transformer.
- Input Path: Paste this to extract the specific data points from the Connect event:
{
  "action": "$.detail.actionName",
  "rule_name": "$.detail.ruleName",
  "time": "$.time"
}
- Template: Paste this JSON to format the final Slack message:
{
  "text": ":calendar: *Schedule Updated!*

*Rule:* <rule_name>
*Action:* `<action>`
*Time:* <time>

_Please check the Connect Customer portal for your updated shifts._"
}
- Click Confirm, skip through the tags, and click Create rule.
7.1.4. Step 4: Test the Slack notification
To test it:
- Go back into Connect Customer Scheduling and Publish a schedule.
- Open the Slack channel to verify delivery. The alert appears:
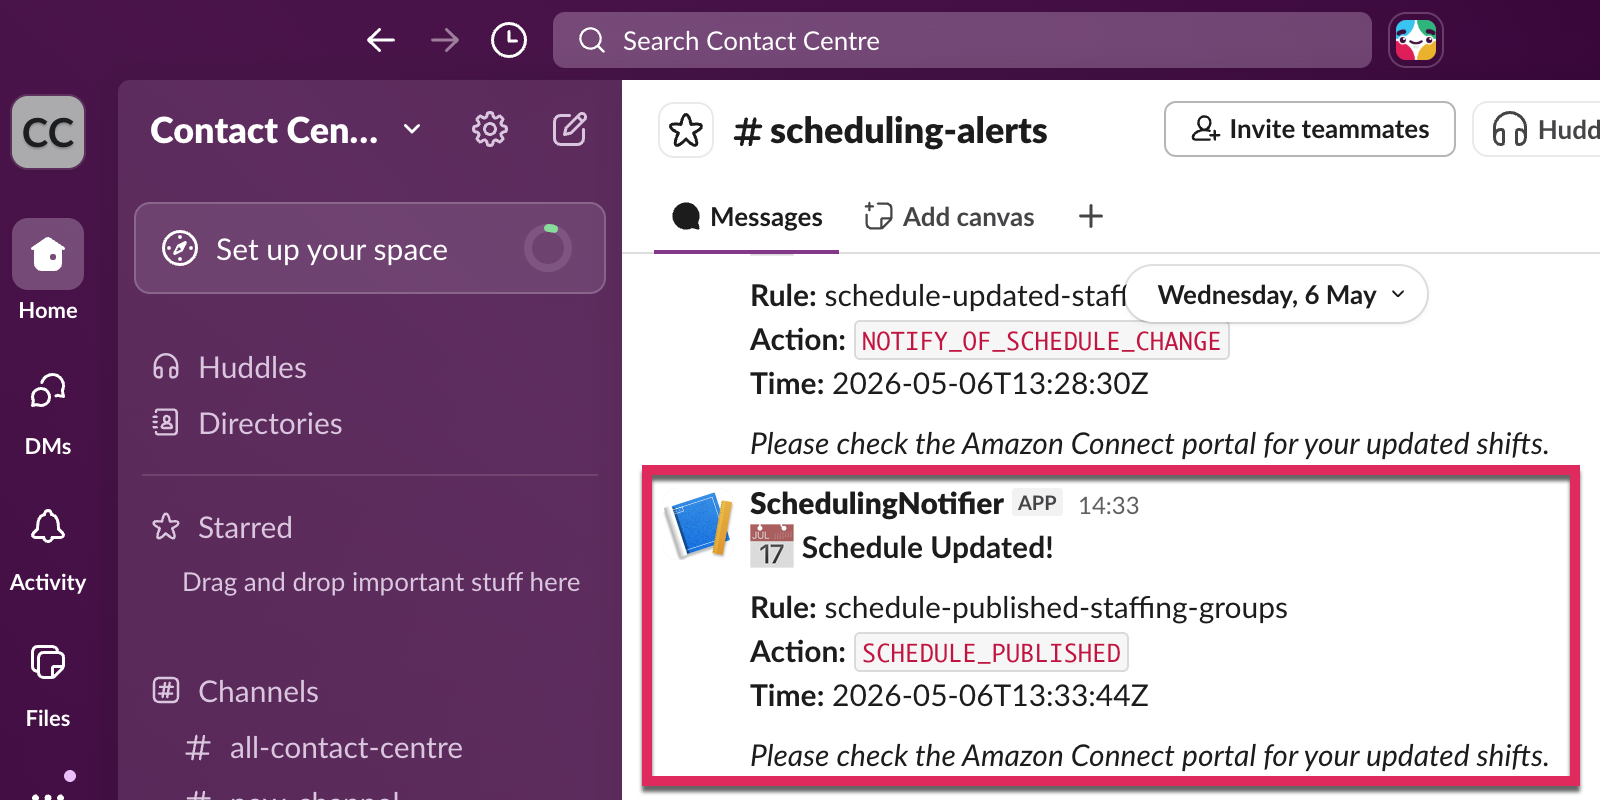
Figure 19: Scheduling notification displayed in a Slack channel.
7.2. Extending to other destinations
The same EventBridge pattern used above for Slack can be reused for other channels such as Microsoft Teams, SMS, or in-app agent notifications. Because the scheduling event lands in EventBridge as a structured JSON payload, you can fan out to multiple targets or swap the destination without changing the upstream Connect Customer rule. For channels that require custom message formatting or agent-level routing, add an AWS Lambda function between EventBridge and the destination.
8. Conclusion
Scheduling notification rules in Connect Customer transform how contact centers communicate schedule information — replacing manual emails, verbal reminders, and supervisor follow-ups with automated, targeted, event-driven notifications that reach the right person, in the right channel, at the right time.
In this post, we walked through:
- How to notify supervisors when a new schedule is published, so they can review and flag issues before agents start their shifts — eliminating the Monday-morning scramble.
- How to alert agents when their published schedule is updated with new activities like training or meetings — reducing missed sessions and unintentional adherence violations.
- How to keep agents and supervisors informed in real time on time-off request submissions and status changes — accelerating approval cycles and building agent trust.
- How to use rule duplication to quickly create variations for different audiences.
- Advanced integration patterns using EventBridge to extend notifications to Slack, Microsoft Teams, SMS, and the agent workspace — ensuring schedule information reaches the channels your teams actually use.
Next steps
- Review your current scheduling communication workflow and identify the manual notification steps you want to automate.
- Start with a schedule publish notification rule for your largest staffing group — this provides immediate value with minimal configuration.
- Add schedule update rules with shift activity filtering to target high-impact changes (e.g., training, overtime).
- Implement time-off request notifications to streamline the approval workflow between agents and supervisors.
- Explore the advanced integration patterns in Section 7 to extend notifications to your organization’s preferred communication channels.
9. Related resources
- Connect Customer Forecasting, Capacity Planning, and Scheduling documentation
- Set up scheduling notifications in Connect Customer
- Create Contact Lens rules using Connect Customer
- Amazon EventBridge User Guide
- Configure schedule adherence thresholds in Connect Customer to account for operational variances
- Implementing multi-skill forecasting and scheduling in Connect Customer
About the Authors
Vikas Prasad is a Senior Specialist Solutions Architect at Amazon Web Services, focused on Connect Customer. He works with enterprise customers to design and implement cloud contact center solutions, with deep expertise in workforce management (Forecasting, Capacity Planning, and Scheduling). Vikas is passionate about helping organizations modernize their contact center operations using AI-powered WFM capabilities.
Pavan Dusanapudi is a Manchester-based AWS Applied AI Solutions Architect with 20+ years of expertise in Customer Experience, Contact Centres, and Workforce Management (WFM). At AWS, he specializes in operationalising ML-powered Forecasting, Capacity Planning, and Scheduling (FCS) for Connect Customer customers. Pavan bridges the gap between data science and operations by architecting end-to-end Data & Analytics frameworks that turn complex models into real-time observability. He recharges through family hikes, CrossFit workouts, and mindfulness.