Containers
Running GitHub Actions runners with Amazon EKS Auto Mode
If you run GitHub Actions runners at scale on your own infrastructure, capacity management is often the biggest challenge. Continuous integration and continuous delivery (CI/CD) workloads are inherently bursty. A team might trigger 200 parallel jobs during peak hours and zero overnight. A static fleet of runners means paying for idle compute most of the day, while under-provisioning means queued workflows and delayed delivery. Although GitHub’s hosted runners work well for many teams, organizations with specific compliance requirements, private networking policies, or custom tooling needs often turn to self-hosted runners. Managing capacity for these runners has traditionally been complex and costly.
Amazon Elastic Kubernetes Service (Amazon EKS) Auto Mode changes this equation, by handling provisioning, scaling, and lifecycle management of the underlying Amazon Elastic Compute Cloud (Amazon EC2) instances, with support for EC2 Spot Instances and AWS Graviton (ARM64) processors. When you combine GitHub’s Actions Runner Controller (ARC), you get an elastic, self-hosted runner infrastructure that scales to hundreds of runners. This approach minimizes capacity planning, idle compute costs, and manual node operations.
In this post, you learn how to:
- Deploy an EKS cluster with Auto Mode.
- Install GitHub ARC and configure authentication.
- Configure runner scale sets that run on On-Demand/Spot and Graviton instances.
- Route workflows to the appropriate runner fleet based on job characteristics.
Solution overview
The design uses an event-driven model: GitHub Actions sends a runner request, ARC provisions runner pods, and EKS Auto Mode dynamically provisions the underlying compute.
Architecture
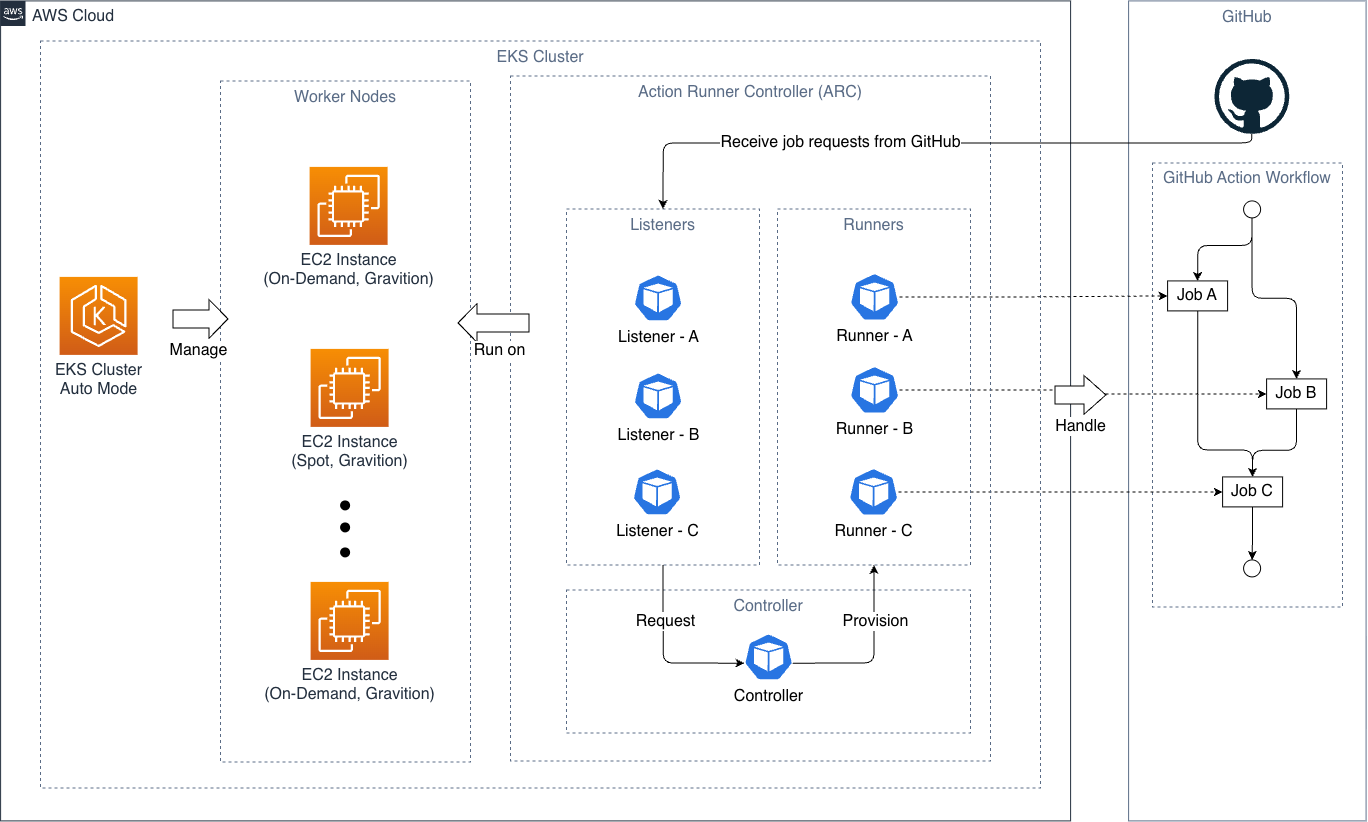
Figure 1: Architecture showing the flow from a GitHub Actions workflow sending job requests to the ARC listener, the controller creating runners, and EKS Auto Mode provisioning EC2 instances across different specifications
An overview of the design is as follows:
- A workflow job starts. GitHub Actions sends a request to the corresponding runner scale set.
- The runner scale set’s listener receives the job and increases the replica count in its
EphemeralRunnerSet. The controller then creates the runner pods. - EKS Auto Mode detects an unscheduled runner pod. It launches a right-sized EC2 instance from the
NodePoolthat matches the pod’s scheduling rules, and chooses Spot or On-Demand capacity and amd64 or arm64 (Graviton) architecture. - The runner registers with GitHub, runs the job, and streams logs and status back. When the job finishes, ARC deletes the runner pod.
- EKS Auto Mode automatically removes nodes that no longer have runner pods.
The solution uses the following building blocks:
- Amazon EKS Auto Mode manages the compute lifecycle: provisioning, scaling, consolidation, and upgrades.
- Actions Runner Controller (ARC) listens for GitHub Actions job requests and manages the runner pod lifecycle.
- GitHub App authentication provides secure, scoped authentication between ARC and your GitHub organization.
- EC2 Spot Instances can offer savings of up to 90 percent compared to On-Demand for ephemeral, interruption-tolerant runner workloads.
- AWS Graviton (ARM64) processors are designed to deliver the best price performance for cloud workloads on Amazon EC2. Graviton-based instances cost up to 20 percent less than comparable x86-based EC2 instances and use up to 60 percent less energy for the same performance.
Prerequisites
Before you begin, make sure that you have the following:
- Access to an AWS account with the necessary permissions to create EKS clusters and related resources.
- The following tools: AWS CLI v2, eksctl (v0.195.0+), kubectl (compatible with your cluster version), and Helm (v3.x+).
- A GitHub account as the GitHub organization owner or app manager.
Sample code
To help with configuration, we have included the artifacts in the aws-samples repository on GitHub. You can clone this repository to follow along.
Estimated cost
Prices in this section are for US East (N. Virginia) at the time of writing. For current rates, see Amazon EKS pricing.
Amazon EKS control plane:
Each cluster costs $0.10 per hour (about $73 per month) while its Kubernetes version is in standard support, and $0.60 per hour once the version enters extended support.
Compute and networking:
EC2 instances run the ARC controller, listeners, and runners. They are billed per second with a one-minute minimum. You also pay for the attached Amazon Elastic Block Store (Amazon EBS) volumes, the NAT gateway, and data transfer. Runner pods scale to zero between jobs. The ARC controller and listeners always run, so at least one node always runs.
The EKS Auto Mode management fee is charged per second for each instance that Auto Mode launches, with a one-minute minimum. The fee depends on the instance type. Spot, Reserved Instance, and Savings Plans discounts don’t reduce it. For rates by instance type, see Amazon EKS pricing.
GitHub Actions:
At the time of writing, GitHub doesn’t charge for minutes used by jobs on self-hosted runners, including the ARC-managed runners in this post. GitHub bills artifact storage and Actions cache storage above your plan’s included amounts separately. For details, see GitHub Actions billing.
Walkthrough
The following steps walk through the complete setup, from cluster creation to workflow validation. Each step builds on the previous one, and the entire walkthrough takes about 30 minutes.
Step 1: Create an Amazon EKS cluster with Auto Mode using eksctl
The following configuration provisions an EKS cluster with Auto Mode:
Create the cluster:
This takes approximately 15 minutes. The cluster status should transition to ACTIVE upon completion:
Step 2: Create a GitHub App for authentication
ARC can authenticate to the GitHub API using a GitHub App, a personal access token (classic or fine-grained), or vault secrets. For more information, see Authenticating ARC to the GitHub API. In the following example, we demonstrate using the GitHub App on an organization. For the detailed steps, see Register a GitHub App:
- Go to the GitHub App creation page: Your organization > Settings > Developer settings > GitHub Apps > New GitHub App.
- Configure the app:
- Name: A name that is unique across GitHub, for example
<your-org>-arc-runners. - Homepage URL: https://github.com/actions/actions-runner-controller.
- Webhook: Clear Active, because ARC receives jobs through listeners, not webhooks.
- Name: A name that is unique across GitHub, for example
- Set Repository permissions:
- Actions: Read.
- Administration: Read & Write.
- Metadata: Read.
- Set Organization permissions:
- Self-hosted runners: Read & Write.
- Select Create GitHub App. You are redirected to the settings page.
- On the settings page, navigate to Install App and install it in the desired GitHub organization. The redirected URL has the following format. Note the
INSTALLATION_IDfor the next step.https://github.com/organizations/ORGANIZATION/settings/installations/INSTALLATION_ID
Collect the app credentials
After you have created and installed the GitHub App, you need the following credentials for ARC to authenticate with GitHub:
APP_ID: The value in the App ID field on the app’s settings page.INSTALLATION_ID: The number at the end of the installation URL.PATH_TO_DOWNLOADED_PEM_FILE: On the GitHub App settings page, generate and download the .pem key from Private keys, then choose Generate a private key. Provide the absolute or relative path of the .pem key.
With these credentials ready:
- Create a namespace for ARC.
- In the new namespace, create a Kubernetes Secret to hold the credentials.
Step 3: Install Actions Runner Controller (ARC)
The ARC controller manages the lifecycle of runner scale sets and runner pods. The following command installs the controller and uses a nodeSelector to schedule it on On-Demand capacity, so that Spot interruptions do not affect it.
Verify the controller is running:
The controller and the listener pods always run, so this On-Demand node is the fixed baseline cost described in the Estimated cost section. In Step 5, you apply the same nodeSelector to the listener pods through listenerTemplate.
Step 4: Create and configure a GitHub repository
ARC monitors your GitHub repositories for workflow job requests. Use the following steps to create one. You can also use an existing repository.
- Go to GitHub, choose the plus icon in the top-right corner, then choose New repository.
- Configure the repository.
- Owner: choose the organization that the GitHub App was installed in during Step 2.
- Repository name: choose a suitable name.
- Visibility: choose Public (private repositories require a paid GitHub plan, see GitHub pricing).
- Proceed with Create repository and note the repository URL for the next step.
- (Optional) If you installed the GitHub App in Step 2 on a selected repository only, add this repository to the installation.
For more information, see the GitHub documentation Create a new repository. Additionally, the walkthrough demonstrates using ARC to deploy a single-page app (SPA) on GitHub Pages. Use the following steps to enable GitHub Pages, or see Configuring a publishing source for your GitHub Pages site.
- Navigate to the GitHub repository you created, then go to Settings.
- In the Code, planning, and automation section of the sidebar, choose Pages.
- Under Build and deployment, for Source, select GitHub Actions.
Step 5: Deploy a NodePool and runner scale sets
In this step, you create three runner scale sets, each targeting a different compute profile:
- x86 Spot runners: Interruption-tolerant CI workloads such as tests and linting.
- ARM64/Graviton Spot runners: Lower-cost jobs for arm64-compatible workloads (in this example, the GitHub Pages deployment).
- On-Demand runners: Builds and long-running jobs that must not be interrupted.
All three profiles use a single NodePool that allows both Spot and On-Demand capacity and both amd64 and arm64 architectures. Each runner scale set selects its profile with a nodeSelector on karpenter.sh/capacity-type and kubernetes.io/arch. If a pod doesn’t specify a capacity type, EKS Auto Mode launches Spot capacity.
For more configuration details, see Karpenter NodePool and Create a Node Pool for EKS Auto Mode.
Deploy the NodePool:
Verify the NodePool. The READY status should be True:
Create the runner scale set
A runner scale set is a group of runners that ARC scales for one set of workflows. Each scale set has two parts:
- Listener: Receives job requests from GitHub and scales the runners.
- Runner: The pod that runs the job.
You configure each scale set with a Helm values file. The pod template in this file tells EKS Auto Mode which nodes to launch. Key settings include the following:
githubConfigUrl: The code repository that the runner registers with. Replace it with the repository you created in Step 4.listenerTemplate.spec.nodeSelector.karpenter.sh/capacity-type = on-demand: Keeps listener pods on On-Demand capacity.template.spec.nodeSelector: Places runner pods on nodes with the matching capacity type and architecture.template.spec.containers[0].resources: Sets the CPU and memory that each runner requests.
For all the options, see the full values.yml.
x86 Spot runners
Create the Helm values file for the x86 Spot runner scale set:
Install the scale set. The release name, arc-runner-x86-spot, is the value that you use for runs-on in your workflows.
ARM64/Graviton Spot runners
On-Demand runners (for critical jobs)
Verify the runner scale sets
After deploying the preceding runner scale sets, there should be a listener for each of them, and the status should be Running. The output should be like the following:
Verify the helm charts installation:
Finally, verify the runners in the GitHub repository. In the repository, navigate to Settings > Actions > Runners > Runner scale sets. The runners should be listed with their status as Online. Individual runners appear only while a job runs.
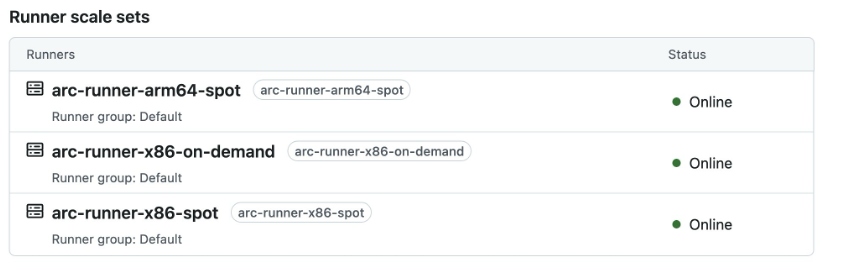
Figure 2: The runner scale sets appear in the GitHub repository settings after successful deployment
Step 6: Route workflows to the right runner fleet
Use the runs-on label in the GitHub Actions workflows to select the appropriate runner scale set by name, in this case arc-runner-x86-spot, arc-runner-arm64-spot, or arc-runner-x86-on-demand.
The following example workflow uses all three runner scale sets. The workflow file must be stored in the .github/workflows directory, in this example .github/workflows/ci.yml. To facilitate the test, we add workflow_dispatch in the on section so that it can be triggered manually. Note that it must be committed to the default branch.
For the demo React app, see the sample code repository.
The workflow tests, builds, and deploys a ReactJS single-page app (SPA) to GitHub Pages. The build runs on On-Demand because it is the longest job and produces the artifact that the deployment needs. The test job runs on x86 Spot, and the deployment runs on Graviton Spot, so that the example exercises all three runner scale sets. If Spot reclaims a runner mid-job, that job fails and nothing retries it automatically. In that case, choose Re-run failed jobs in the Actions tab, then confirm that your Pages site shows the expected deployment. See the Follow-up section.
Step 7: Validate the end-to-end flow
- Trigger the workflow on GitHub.The triggering methods are defined in the
onsection in the workflow YAML. In the preceding example, you can trigger it manually by navigating to Actions > CI/CD Pipeline > Run workflow. - Monitor ARC for scheduling the runner.After triggering the workflow, the job starts. The listener starts scheduling runner pods to handle the job. You can monitor the runners by:
- Monitor EKS Auto Mode node handling.Because the preceding workflow runs on different node types, we expect EKS Auto Mode to provision multiple nodes to handle each job.
- Monitor the workflows on GitHub.
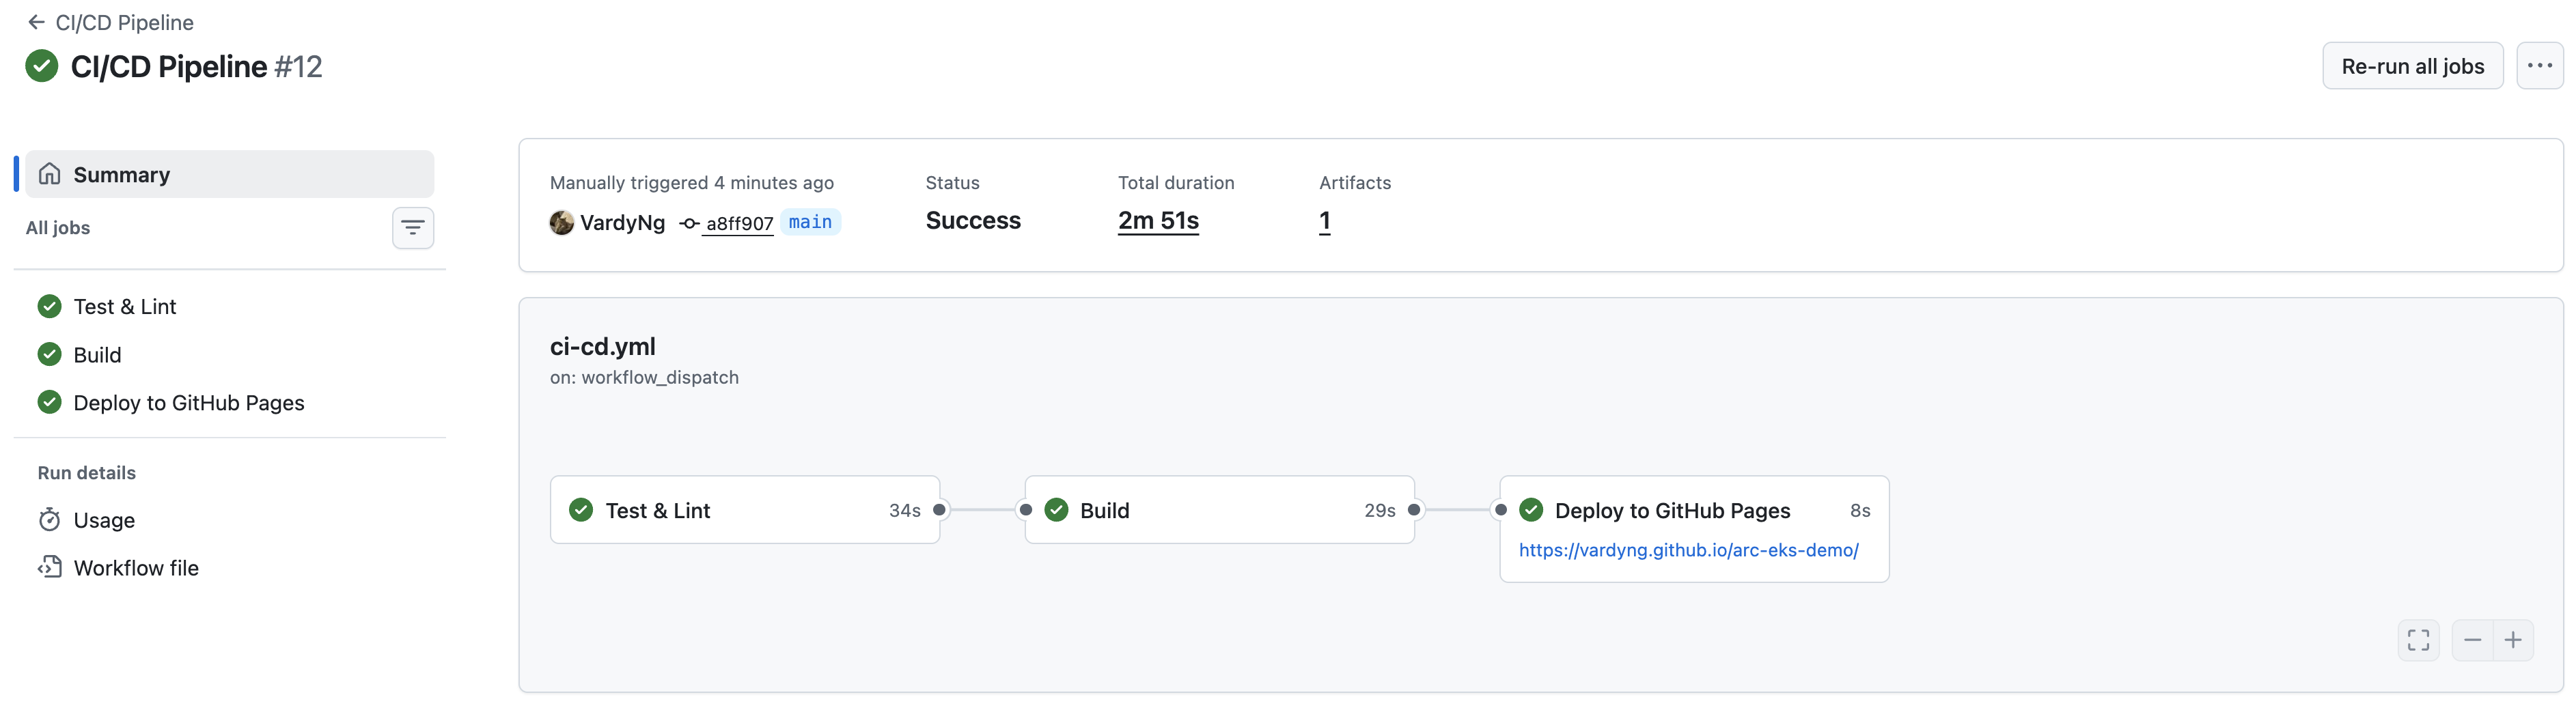
Figure 3: CI/CD pipeline run in GitHub Actions with each job routed to the appropriate runner scale set
- After workflow completion, the unused nodes should be drained and removed automatically.
Follow-up: The two sides of using Spot Instances for GitHub Actions runners
Spot Instances offer up to 90 percent savings on On-Demand prices with a 2-minute interruption notification, which makes them best suited for fault-tolerant, flexible workflows. They are particularly suitable for GitHub Actions workflows that have a short job duration and can accept interruption, such as unit tests and linting.
With that said, Spot Instances can still be reclaimed and the jobs they host interrupted. This typically fails with the “The self-hosted runner … lost communication with the server” error. Currently, neither GitHub Actions nor ARC automatically retries in this scenario.
Therefore, keep long, non-idempotent, or release-critical jobs on the On-Demand set, keep retriable test shards on Spot, and add an explicit re-run path. The GitHub Pages deployment in this walkthrough runs on Spot mainly to demonstrate the Graviton fleet. For a production release pipeline, run the deployment on the On-Demand set as well. The goal is to maximize cost efficiency while minimizing interruptions to the workflows.
Clean up
- Delete the runner scale sets.
- Delete the ARC controller.
- Delete the EKS cluster. This removes all associated resources, including the Kubernetes secret.
- In GitHub, uninstall the GitHub App from the organization and delete the GitHub App you created.
Conclusion
Amazon EKS Auto Mode reduces the operational complexity that previously made self-hosted runners a burden. In this walkthrough, you learned how to deploy an EKS cluster with Auto Mode, configure NodePools, and install GitHub ARC to run a self-hosted runner cluster that is scalable (right-sized compute provisioned on demand), secure (runners stay in your virtual private cloud (VPC) and compliance boundary), and cost efficient (Spot + Graviton + scale-to-zero).
Optional enhancements
The following sections cover optional enhancements for production deployments that improve performance, security, and operational maturity.
EKS provisioned control plane
Amazon EKS offers two modes of operation for the cluster control plane: Standard mode and Provisioned mode. By default, EKS uses Standard mode, where the control plane automatically scales up and down based on workload demand. With Provisioned mode, you can pre-allocate control plane capacity that is always ready to handle demanding workload requirements.
As ARC scales, each runner pod generates API requests to the control plane. When scaling is more aggressive and at a larger scale, Standard mode might not be sufficient. With Provisioned mode, you configure the control plane to scale at fixed, higher tiers, which delivers more consistent API performance and pod scheduling rates. To determine whether your workload needs Provisioned mode, see the tier specification.
Also consider the cost. Each tier is billed per cluster-hour on top of the standard cluster fee. For example, the XL tier is $1.65 per hour in addition to the $0.10 per hour cluster fee (see Amazon EKS pricing for all tiers). We recommend Standard mode for most use cases. Provisioned mode is aimed at very large-scale workloads, so evaluate it only if Standard mode isn’t meeting your needs.
AWS Secrets and Configuration Provider (ASCP)
In the preceding walkthrough, ARC authenticates with GitHub using credentials stored in a Kubernetes Secret. With the AWS Secrets and Configuration Provider (ASCP), you can instead store the credentials in AWS Secrets Manager and sync them into that Kubernetes Secret with the Secrets Store CSI Driver, using secretObjects in the SecretProviderClass. This centralizes secret management, supports automatic rotation, and provides audit logging through AWS CloudTrail. The driver creates the Kubernetes Secret only while a pod mounts the volume, and deletes it when the last such pod is removed. To keep the secret available, run a small, long-lived pod that mounts it. For more information, see the AWS Secrets Manager User Guide.
To build on this solution, consider exploring the following:
- Amazon Elastic Container Registry (Amazon ECR) Pull Through Cache (PTC): Cache runner Docker images in Amazon ECR for faster job startup.
- EKS Pod Identity: A secure way to provide AWS access to runner pods.
- Workflow optimization: Use GitHub Actions matrix strategies to run jobs in parallel.