AWS Database Blog
Dynamic view-based data masking in Amazon RDS and Amazon Aurora MySQL
Data masking is an important technique in cybersecurity, allowing organizations to safeguard personally identifiable information (PII) and other confidential data, while maintaining its utility for development, testing, and analytics purposes. Data masking involves replacing original sensitive data with false, yet realistic information. This process helps ensure that the masked version preserves the format and characteristics of the original data, making it indistinguishable from real data for most purposes, while eliminating the risk of exposing actual sensitive details.
In MySQL community versions, there are no built-in data masking abilities. By extension, Amazon Relational Database Service (Amazon RDS) for MySQL and Amazon Aurora MySQL-Compatible Edition also do not have a native data masking feature today. However, while there are no native data masking abilities, you can leverage view-based data masking to create database views to hide or transform sensitive data, while preserving the original information. In this post, we show you a step-by-step solution for implementing view-based data masking in Amazon RDS and Aurora MySQL.
Solution overview
The solution uses view-based masking capabilities in Amazon RDS for MySQL and Aurora MySQL-Compatible Edition to implement role-based access control for sensitive data. Using example tables (employees, customers, and patients), we demonstrate how to create and manage database views that automatically mask sensitive fields such as Social Security numbers and email addresses. Through these views, administrative users can maintain complete data visibility into the original table, while other users are denied access to the original table and can only access masked versions of the sensitive data through views. This view-based masking approach not only provides robust data protection, but also offers a maintainable and scalable solution for managing data access across your organization. The following diagram shows the steps involved in the MySQL custom data masking solution:
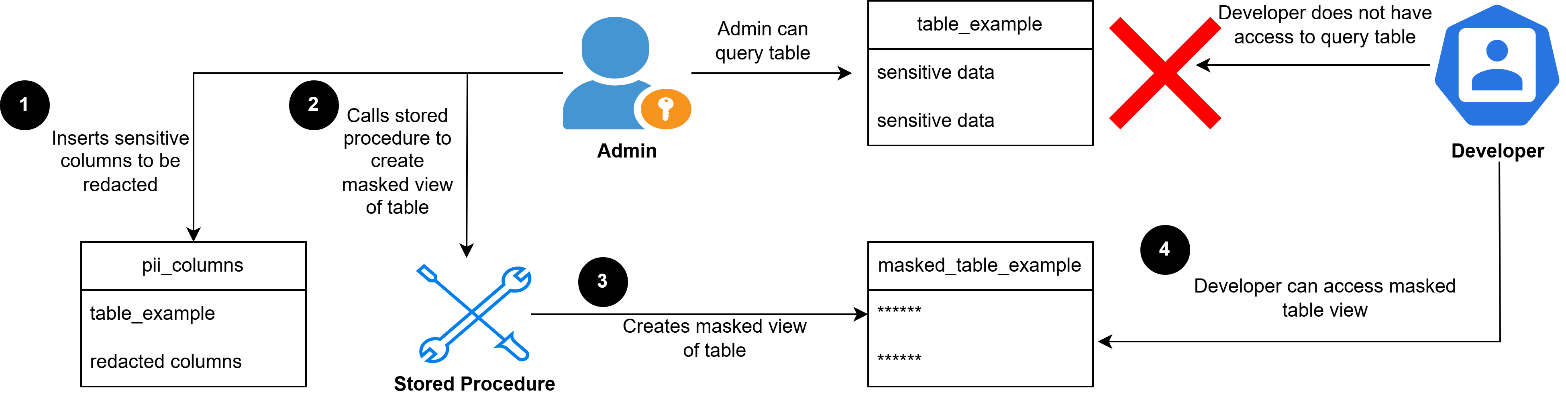
As shown in the preceding figure, the following actions take place:
- The administrator inserts the desired columns and subsequent tables to be masked into the configuration table named
data_mask_configuration. - The administrator calls a stored procedure to generate a masked view of the tables using the metadata entered in the configuration table.
- The stored procedure creates a masked view of the table/s.
- The developer can access the masked view of the table/s without revealing any sensitive data.
It’s important to note that this solution is designed to work with live, dynamic environments. The views created are not static snapshots, but rather live representations of the source tables, automatically reflecting any changes made to the underlying data. Any changes to table structure/schema would require a few extra steps. We discuss this later in the post in the Pros, Cons, and Customization section.
By creating a masked view within the same database, it allows for real-time data analysis by users who need current data, but shouldn’t have access to sensitive information. It’s also useful for debugging production issues where sanitized, up-to-date data is necessary. This solution provides flexibility to address various data access scenarios while maintaining data protection.
Prerequisites
To follow along, you must have an RDS or Aurora MySQL database which you can connect. Within this database, you must be able to create the configuration table, a data masking function, and a stored procedure to perform the data masking. This requires the following access and privileges:
- Full access to the configuration table
CREATE FUNCTIONprivilegeCREATE PROCEDUREprivilege
Create the configuration table
First, you need to create a table to track which columns in which tables contain PII. You’ll use the mask_type column and the ENUM data type for the different levels of data masking in the database. These values include FULL for complete data masking, PARTIAL for partial data masking, EMAIL for specific masking for email addresses, and NONE for no masking applied. These options can be customized to fit your use case in the Create the masking function section.
- Create a database where the configuration table will exist if you haven’t already:
- And then use this database:
- Next, create the configuration table (
data_mask_configuration) to track which columns you want to mask across your database:
Create the masking function
You now create the masking function that’s responsible for masking the data when you create a view of the table. The type of masking performed depends on what values are inserted into the data_mask_configuration table that you created.
Create the masking function:
The PARTIAL and EMAIL masking types can be customized based on your use case.
Create stored procedures to generate masked views
Now, you create two stored procedures for later use. These procedures will generate masked views for the tables. In this example, you create two procedures:
generate_masked_view: Used to create a masked view for a specific table.generate_all_masked_views: Used to create masked views for all tables included within thedata_mask_configurationtable.
When setting up the procedure for a specific table, you can select which table you want to make the view for.
In these examples, we use masked_ as the prefix of the view name. You can change this view name format to suit your use case.
Stored procedure for a specific table:
Stored procedure for all tables:
Insert columns to mask within the configuration table
Now, you can insert columns with data that you want masked into the configuration table. This example uses the demo tables employees, customers, and patients which exist within the mydb schema.
Below are examples of rows we inserted into the data_mask_configuration table:
Note: If a developer wants to add additional masked columns, they must have SELECT, INSERT, and UPDATE permissions to the configuration Table.
Create masked views for tables
In this section, you call the stored procedures to generate the masked views. When the stored procedure generates the views, it can result in greater CPU utilization depending on the size of the table because the tables are masked on the fly. Generating the masked views concurrently can also result in increased CPU utilization.
Call the stored procedure for a specific table (for example, the employees table in the mydb schema):
Call the stored procedure for all tables:
High I/O activity can occur when calling the stored procedure generate_all_masked_views(), because it recreates the views for all entries in the data_mask_configuration table.
Test the solution
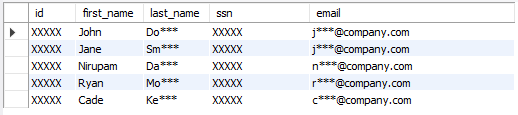
After creating the masked views as the administrator user, you can create a new user and restrict it to access only the masked view in order to simulate what a developer would observe.
- Create a new user
- Only provide this user with the ability to view the masked views
- Use this same user and attempt to read from the newly created masked views
Considerations for maintaining the solution
In this section, we provide the create script for two stored procedures. One that you can use to quickly update the mask type of a specific row within the data_mask_configuration table. You can use the other stored procedure to insert columns into the data_mask_configuration table.
Stored procedure: Update the mask type of a specific row
This stored procedure is only for updating the mask type. DDL changes must be manually altered.
Stored procedure: Row insertion
An important consideration when you’re updating the data_mask_configuration table is that you must also recreate your views. If you perform UPDATE, DELETE, or INSERT operations within the data_mask_configuration table, your views will not be automatically updated. This is why it’s important to rerun either the generate_masked_view(‘db’,‘table’) or generate_all_masked_views() stored procedure. You can also build a trigger or different solution to automatically detect changes and regenerate the required view.
Pros, Cons, and Customization
We now cover the pros and cons of this solution as well as how to best customize it in order to fit your business use case.
Pros:
- Real-time data masking: The solution provides live, dynamic masking of sensitive data without creating separate copies.
- Flexible and customizable: Can be adapted to various masking requirements and data types.
- Role-based access control: Allows different levels of data access for different users.
- No additional software required: Utilizes built-in MySQL features.
Cons:
- Manual updates required: Changes to table structures necessitate manual updates to the configuration and view regeneration. If the table structure changes (such as new columns are added), you must update the
data_mask_configurationtable. - Performance impact: Creating the masked views can cause performance degradation depending on the amount of data to be masked and number of views created.
- Maintenance overhead: Requires ongoing management of the masking configuration and views.
Customization considerations:
- Masking Functions: Modify the
get_masked_column_error_handlingfunction to include additional masking types or alter existing ones to suit your specific data patterns. - Configuration Table: Extend the
data_mask_configurationtable to include additional metadata, such as reason for masking or last review date. - View Naming: Adjust the view naming convention in the
generate_masked_viewprocedure to align with your organization’s naming standards. - Logging and Auditing: Add logging capabilities to track when and by whom masked data is accessed.
When implementing this solution, carefully consider these factors and adjust the approach as needed to meet your specific security requirements and operational needs. Regular review and testing of the masking implementation is crucial to ensure ongoing effectiveness and compliance with data protection standards.
Clean up
If you no longer require the resources used to set up this configuration, delete the following resources to avoid incurring future charges:
- To delete a DB instance, see Deleting a DB instance
- To delete an Aurora cluster and its DB Instances, see Deleting Aurora DB clusters and DB instances
- Drop the stored procedures
- Drop the function
- Drop the configuration table
Conclusion
In this post, we presented a view-based data masking solution you can use in your Aurora MySQL and RDS for MySQL databases. You can use this solution to meet your business and security requirements. Leave your feedback in the comments section.