AWS Database Blog
Using SSL for in-transit encryption to connect Oracle as a source for AWS DMS
As organizations migrate their Oracle databases to AWS, ensuring data security during transit is critical. You can encrypt connections for source and target endpoints by using Secure Sockets Layer (SSL). SSL encryption is often preferred for Oracle RAC to AWS DMS migrations because it provides end-to-end encryption at the application layer and offers simpler certificate management compared to other solutions. For organizations already using Oracle Wallet for other database connections, SSL also provides consistency with existing security practices, making it a natural choice for maintaining uniform security standards across the database environment.
This post demonstrates how to implement SSL encryption for in-transit data protection when connecting Oracle Real Application Clusters (Oracle RAC) as a source to AWS Database Migration Service (AWS DMS). Additionally, it covers the unique steps required to configure SSL for Oracle Automatic Storage Management (Oracle ASM) instances.
Oracle RAC provides high availability and scalability for Oracle databases, while Oracle ASM delivers storage management. When using AWS DMS to migrate data from Oracle RAC to AWS, implementing SSL encryption helps safeguard sensitive information as it traverses the network, protecting against potential eavesdropping or man-in-the-middle attacks.In this post, we explore the steps to create AWS DMS source endpoint with SSL for in-transit encryption while connecting to Oracle RAC database instance and Oracle ASM instance.
Solution overview
In this post, we will discuss the steps to use the SSL for in-transit encryption for Oracle RAC instance and Oracle ASM instance while configuring Oracle RAC as a source for AWS DMS.
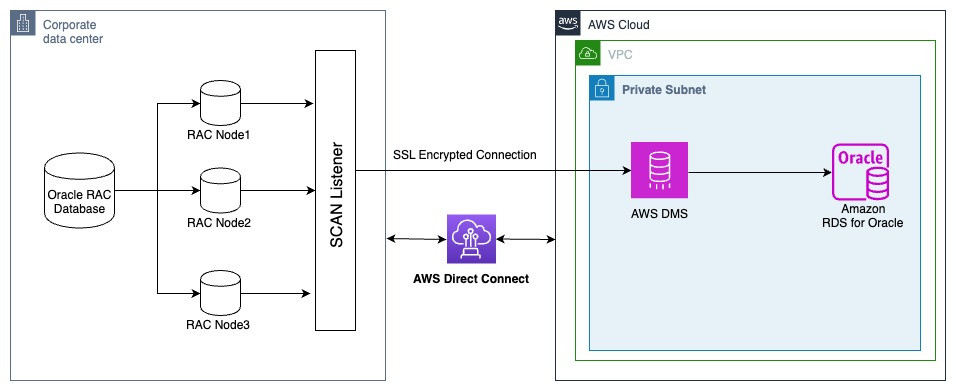
We have 3 nodes Oracle RAC database in on-premises environment and we create AWS DMS source endpoint to connect to Oracle RAC database using SSL. We use the Oracle RAC configuration shown in the following table for illustration:
For illustration, we use a three-node Oracle RAC environment in an on-premises setup. We’ll create an AWS DMS source endpoint to connect to the Oracle RAC database using SSL with the following sample configuration:
| SCAN Name | scan.cluster.dev.test.com | |
| SCAN 1 VIP | node01-vip.dev.test.com | 10.0.3.31 |
| SCAN 2 VIP | node02-vip.dev.test.com | 10.0.3.32 |
| SCAN 3 VIP | node03-vip.dev.test.com | 10.0.3.33 |
The following diagram illustrates this blog post’s solution architecture.
Prerequisites
To complete the steps in this blog post, you must first meet the following prerequisites:
- You must have an active AWS account.
- The on-premises account and the AWS account must have connectivity using either AWS Direct Connect or AWS Site-to-Site VPN. For more information, see Network-to-Amazon VPC connectivity options.
- The on-premises security firewall should allow incoming and outgoing traffic between the on-premises network and the Amazon VPC.
- SSL is already configured on the on-premises Oracle RAC database, and the
cwallet.ssofile is available. - The on-premises firewall allows connections from the AWS DMS replication instance to the Oracle RAC SCAN hostname or SCAN IPs.
- Create an Oracle with the appropriate permissions for AWS DMS to access your source Oracle Database instance e.g.
dms_userand Oracle ASM instance e.g.asm_dmsuser
Step1: Create an AWS DMS replication instance
AWS DMS uses a replication instance to connect to your source data store, read source data, and format it for loading into the target data store. Most processing occurs in memory, but large transactions may require temporary buffering on disk. Cached transactions and logs are also stored on disk. You create an AWS DMS replication instance called dms-repl-instance-oracle-01 in your AWS account.
Step2: Import the source SSL certificate
When establishing SSL encryption with Oracle endpoints in AWS DMS, the service supports SSL version 3 with two authentication modes: none and verify-ca. Unlike typical SSL implementations that use .pem certificate files, AWS DMS requires you to upload an Oracle wallet for the endpoint authentication.
To enable SSL connectivity between AWS DMS and your Oracle RAC database, you’ll need to import the SSL certificate that was either previously configured in your on-premises Oracle RAC and ASM environments, or create a new certificate following SSL Support for an oracle endpoint.
- In the AWS DMS console, choose the Certificates from the navigation pane.
- Choose Import certificate.
- Upload the source SSL certificate
cwallet.ssofile. - Name the imported certificate
source-cert.
For more information, see Using SSL with AWS Database Migration Service.
Step3: Create an AWS DMS source endpoint using SSL
In this step you create the source endpoint for Oracle RAC database instance and Oracle ASM instance as well. In AWS DMS, there are two methods for reading the redo logs when doing change data capture (CDC) for Oracle as a source: Oracle LogMiner and AWS DMS Binary Reader. LogMiner is an Oracle API to read the online redo logs and archived redo log files. Binary Reader is AWS DMS method that reads and parses the raw redo log files directly. AWS DMS uses LogMiner by default. LogMiner is often slower and might consume more resources on the source database, which could lead to source latency. If the archive generation size is more than 20 GB per hour, we recommend Binary Reader. When you use Oracle RAC as a source, we also recommend Binary Reader.
Use the useLogMinerReader=N;useBfile=Y;extra connection attributes (ECA) if you want to use Binary Reader. For Binary Reader, AWS DMS will read the archive and redo log files from the Oracle ASM instance or a database cluster file system based on the Oracle archive log location.
Before creating the endpoint, ensure Oracle ASM is registered with the Oracle SCAN listener:
As shown in the preceding output, the remote_listener parameter is not set. Use the following SQL command to register the Oracle ASM instances with the SCAN listener:
To confirm the Oracle ASM instances have been registered with the SCAN listener, check the status of the SCAN listener:
Create a source endpoint using an Oracle RAC SCAN
After the Oracle ASM instances are registered with the SCAN listener, create an AWS DMS source endpoint called source-ep in your AWS account for the source database using the following parameters:
| Endpoint identifier | source-ep |
| Descriptive Amazon Resource Name (ARN) | source-db-endpoint-descriptive-arn |
| Source engine | Oracle |
| Server name | scan.cluster.dev.test.com |
| Port | 1436 |
| Username | dmsuser |
| Password | oracle_user_password,asm_user_password |
| SSL mode | verify-ca |
| CA certificate | source-cert |
| SID/service name | ORCL |
| Extra connection attributes | asm_user=asm_dmsuser; asm_server=scan.cluster.dev.test.com:1436/+ASM;useLogMinerReader=N;useBfile=Y; |
| AWS Key Management Service (AWS KMS) key | Choose an AWS KMS key |
After creating the endpoint, use Test endpoint connection on the Create endpoint page of the console or the AWS CLI test-connection command to verify that connectivity is established.
Now you’ve successfully created a source endpoint that uses SSL for in-transit encryption for both Oracle RAC and Oracle ASM.If you can’t register Oracle ASM with the Oracle SCAN, you have two options that depends on if you specify Descriptive Amazon Resource Name (ARN) for the endpoint or not. Descriptive ARN is a friendly name to override the default DMS ARN. You cannot modify it after creation.
In the following sections, we have used Oracle SCAN VIP host names for the asm_server extra connection attribute. If AWS DMS is unable to resolve the Oracle SCAN VIP host names, you can replace the Oracle SCAN VIP host names with the respective Oracle SCAN VIPs.
Option1: Create a source endpoint with a descriptive ARN
This approach specifies the SSL wallet path using the descriptive ARN of the source endpoint that you have created.
Use the following parameters to create the AWS DMS source endpoint with a descriptive ARN:
| Option | Values |
| Endpoint identifier | source-ep |
| Descriptive ARN | source-db-endpoint-descriptive-arn |
| Source engine | Oracle |
| Server name | scan.cluster.dev.test.com |
| Port | 1436 |
| Username | dmsuser |
| Password | oracle_user_password,asm_user_password |
| SSL mode | verify-ca |
| CA certificate | source-cert |
| SID/service name | ORCL |
| Extra connection attributes | asm_user=asm_dmsuser; asm_server=(DESCRIPTION=(ADDRESS_LIST=(CONNECT_TIMEOUT=8)(ENABLE=BROKEN)
(LOAD_BALANCE=ON)(FAILOVER=ON)(ADDRESS=(PROTOCOL=tcps)(HOST=node01-vip.dev.test.com)(PORT=1436)) (ADDRESS=(PROTOCOL=tcps)(HOST=node02-vip.dev.test.com)(PORT=1436))(ADDRESS=(PROTOCOL=tcps) (HOST=node03-vip.dev.test.com)(PORT=1436)))(CONNECT_DATA=(SERVICE_NAME=+ASM)) (SECURITY=(MY_WALLET_DIRECTORY=/rdsdbdata/rds-metadata/certificates/source-db-endpoint-descriptive-arn))); useLogMinerReader=N;useBfile=Y; |
| AWS KMS key | Choose an AWS KMS key |
Option2: Create a source endpoint without a descriptive ARN
When you create an AWS DMS source endpoint, AWS DMS generates the ARN for the respective source endpoint. The endpoint’s ARN is a unique identifier for the AWS DMS source endpoint. If you create AWS DMS source endpoint without a Descriptive ARN and endpoint ARN looks as following:arn:aws:dms:us-east-1:555555555555:endpoint:KOSN7IOWBFECDLHA4ZZCW55SAA
In this case, the MY_WALLET_DIRECTORY location that needs to be specified in the extra connection attributes is: MY_WALLET_DIRECTORY=/rdsdbdata/rds-metadata/certificates/KOSN7IOWBFECDLHA4ZZCW55SAA
Use the following parameters to create the AWS DMS source endpoint without a descriptive ARN:
| Option | Values |
| Endpoint identifier | source-ep |
| Source engine | Oracle |
| Access to endpoint database | Provide access information manually |
| Server name | scan.cluster.dev.test.com |
| Port | 1436 |
| User name | dmsuser |
| Password | oracle_user_password,asm_user_password |
| SSL mode | verify-ca |
| CA certificate | source-cert |
| SID/service name | ORCL |
| Extra connection attributes | asm_user=asm_dmsuser;useLogMinerReader=N;useBfile=Y |
| AWS KMS key | Choose an AWS KMS key |
Once your source endpoint is ready without a descriptive ARN, you modify the source endpoint to add the asm_server parameter as an extra connection attribute:
Clean up
As part of this post, you deployed an AWS DMS endpoint in your AWS account. Be sure to delete any source endpoints that you no longer need.
Conclusion
This post showed how to securely connect Oracle RAC and Oracle ASM instances to AWS DMS using SSL for in-transit encryption. You learned about prerequisites, configuration steps, and alternate methods to handle complex Oracle RAC and ASM connectivity scenarios. By following these best practices, you can ensure that sensitive data remains encrypted in transit during your Oracle-to-AWS migration. If you have any questions or feedback about this process, leave a comment below—we’ll be happy to assist further.