Desktop and Application Streaming
Generate logon messages for security and compliance in Amazon WorkSpaces
Customers can require that users be prompted with a security or legal notice upon logon to restricted systems. For example, the notice might indicate that the system is for “official use only,” restricted to access by “authorized personnel,” or highlight that activity may be audited.
Microsoft Windows provides a mechanism to generate these message prompts using Interactive Logon policy settings. However, as stated in the Amazon WorkSpaces documentation, this Group Policy setting is not currently supported.
In this blog, you’ll cover the steps to implement an alternative logon prompt solution for Amazon WorkSpaces launched from Windows-based bundles. The solution uses Group Policies, and a PowerShell script. The script processes at user logon to generate a message prompt. You can customize the message to meet your requirements.
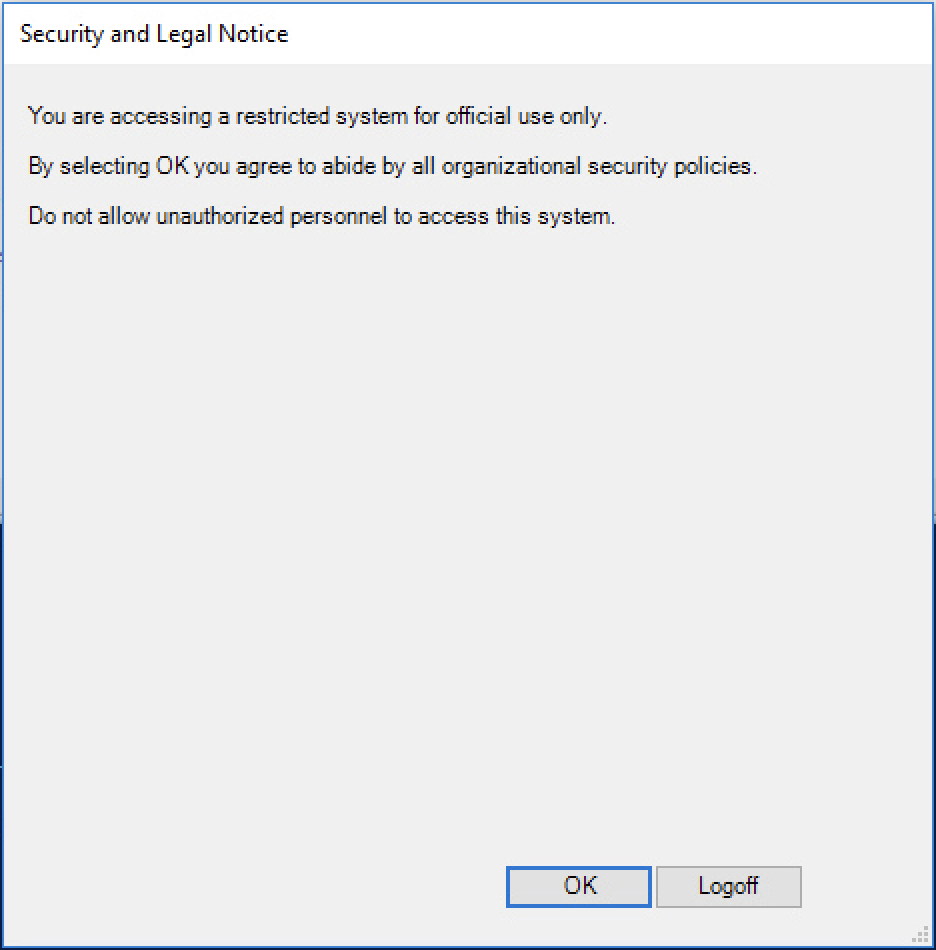
An example of the logon prompt we’ll setup in this blog. Select “OK,” and the window disappears and you can continue working in your session. Alternatively, select “Logoff” and you are logged out of your Windows session.
Prerequisites
- An AWS account
- A registered directory in Amazon WorkSpaces.
- At least one WorkSpace assigned to a test domain user for testing purposes. This WorkSpace must be launched from a Windows bundle. NOTE: this solution described in this blog is only applicable to Windows-based WorkSpaces.
- Access to create and manage Group Policy Objects in Active Directory.
Walkthrough
Step 1: Configure scripts and your custom message
- Download the following script: WorkSpacesLoginScript.ps1.
- Edit the contents of WorkSpacesLoginScript.ps1 so that it contains a message which meets your organizational requirements. You can also edit the script to change the size of the message prompt.
- (Optional, but recommended for production environments) Sign WorkSpacesLoginScript.ps1 using a certificate. See methods of signing scripts and sign a script in Microsoft documentation for more information.
- Place the PowerShell script in a location on your network file share.
- Create a batch script file called WorkSpacesLoginScript.bat with the following contents:
%windir%\System32\WindowsPowerShell\v1.0\powershell.exe -ExecutionPolicy Bypass -file %~dp0WorkSpacesLoginScript.ps1
Step 2: Create necessary Group Policy Object in Active Directory
Create a Group Policy Object in your WorkSpaces Active Directory domain. Name the GPO something like WorkSpaces-Logon-Message. We’ll configure one setting within this GPO:
Configure login prompt setting that specifies a script to run at logon
- Edit the GPO. Navigate to User Configuration -> Policies -> Windows Settings -> Scripts (logon/logoff) -> Logon.
- In the Logon Properties pop-up window, select “Show files…” This will reveal the SYSVOL location for logon scripts in your policy.
- Copy both WorkSpacesLoginScript.ps1 and WorkSpacesLoginScript.bat into the logon script location for the policy (revealed in the previous step).
- In the Logon Properties pop-up window, under the Scripts tab, select Add.
- In the Add a Script pop-up window, select Browse and then select WorkSpacesLoginScript.bat. Select OK to finish adding the script.
- Select OK in the Logon Properties pop-up window.
Step 3: Link GPOs to the WorkSpaces Organizational Unit (OU)
- Start the Group Policy Management application.
- In your WorkSpaces Domain, select the OU that contains your WorkSpaces users.
- Right click on the OU, and select Link an existing GPO.
- Select the Group Policy Object which you created in Step 2.
Step 4: Test the logon prompt
- Using a WorkSpaces client, log into a WorkSpace assigned to your test domain user.
- After log-on, validate that a logon prompt with your custom message appears. NOTE: If the prompt does not appear, you can use the gpresult utility to check if the policy has been successfully applied to your WorkSpace. You may need to run gpupdate /force on the WorkSpace to inherit the latest GPO you created.
- Select “OK” on the prompt. The window disappears and you can continue working in your session.
- Log off.
- Log on to the WorkSpaces. Select “Logoff,”and you are logged out of your Windows session.
Step 5 (optional): Launch logon prompt during session reconnect (not just at user logon)
Log on to your WorkSpace. Then, close the WorkSpaces client (without logging off). Launch the WorkSpaces client and log-on to your WorkSpace. This is a reconnect event.
To display the message prompt on reconnect, you can use a task in Task Scheduler. The task can use the same batch script used in the previous steps. The script is triggered on a reconnection to the user session. Follow these steps to create this task on a WorkSpace. Once you’ve configured this task, you can create a golden image which you can distribute to your users:
- Open Windows Task Scheduler.
- Create a new Task.
- Set the following configuration:
- Select the General tab. Specify a name like Logon-Prompt-At-Session-Reconnect.
- Set the Task to run as BUILTIN\Users.
- Select the Actions tab, then New… and Start a program as the Action. Specify the WorkSpacesLoginScript.bat script in a network share location (you can use the SYSVOL location from previous steps).
- Select the Triggers tab. Choose On connection to user session.
- Test the Task by closing your WorkSpaces client without logging off, and then reconnecting to your WorkSpace. You are presented with a message prompt.
You can also create this Scheduled Task using Group Policy with these additional steps:
- On a WorkSpace, in Task Scheduler, right click on the Logon-Prompt-At-Session-Reconnect task you previously created and choose Export… . This will generate an XML file called Logon-Prompt-At-Session-Reconnect.xml.
- On a domain controller, open Group Policy Management and edit an existing GPO or create a new one.
- Navigate to User Configuration -> Policies -> Windows Settings -> Scripts (logon/logoff) -> Logon.
- In the Logon Properties pop-up window, select “Show files…” This will reveal the SYSVOL location for logon scripts in your policy.
- Place Logon-Prompt-At-Session-Reconnect.xml (your exported Scheduled Task) in the login scripts directory (revealed in the previous step).
- Create a new batch script called CreateScheduledTask.bat and also place it in the login scripts directory. The script should have the following contents:
schtasks /query /TN "Logon-Prompt-On-Session-Reconnect" >NUL 2>&1

 if %errorlevel% NEQ 0 schtasks.exe /Create /XML "%~dp0Logon-Prompt-On-Session-Reconnect.xml" /tn "Logon-Prompt-On-Session-Reconnect"
- In the Logon Properties pop-up window, under the Scripts tab, select Add.
- In the Add a Script pop-up window, select Browse and select CreateScheduledTask.bat. Select OK to finish adding the script.
- Select OK in the Logon Properties pop-up window.
- When the user logs into their WorkSpace, the logon script specified by this GPO will check if a Scheduled Task exists with the provided name. If the Scheduled Task does not exist, this script will create it.
Clean up
To remove resources created in this blog:
- Unlink and delete the GPOs.
- Delete the batch script and PowerShell script that generates the logon prompt from your network file share location.
- Delete any Scheduled Tasks you have created.
- Remove any WorkSpaces you have created for testing purposes.
Conclusion
In this blog, you configured Amazon WorkSpaces to prompt with a security or legal notice upon logon. You can use this solution as an alternative to native Interactive Logon policy settings, which are not currently supported in WorkSpaces.
To get started with Amazon WorkSpaces, visit the WorkSpaces console and see Get Started with WorkSpaces Quick Setup.