AWS Developer Tools Blog
Exploring .NET 5 with the AWS Toolkit for Visual Studio
This week, .NET 5.0 was officially released. Read about how you can get more out of your .NET investments on AWS and some of the services and tools that we have worked on to support .NET 5 on AWS.
In this post we show how you can use the AWS Toolkit for Visual Studio to run .NET 5 code on AWS Lambda and AWS Elastic Beanstalk. The AWS Toolkit for Visual Studio is an extension for Microsoft Visual Studio running on Microsoft Windows that makes it easier for developers to develop, debug, and deploy .NET applications using Amazon Web Services. With the AWS Toolkit for Visual Studio, you’ll be able to get started faster and be more productive when building AWS applications.
Setting up
Visual Studio 2019 & .NET 5
The minimum version of Visual Studio 2019 that supports .NET 5 is 16.8.
While installing Visual Studio 2019, select the .NET Core cross-platform development workload. This adds support for .NET development into Visual Studio, and installs a version of .NET 5.
AWS Toolkit
Launch Visual Studio 2019. From the Extensions menu, select Manage Extensions. Select Online and search for AWS Toolkit. Select the AWS Toolkit for Visual Studio 2017 and 2019 and install it.

Note: If you have more than one copy of Visual Studio installed on your system, the Visual Studio VSIX Installer may prompt you to choose which instance(s) to install the AWS Toolkit into. At a minimum, select Visual Studio 2019.
AWS Lambda Functions
AWS Lambda can run .NET 5 based functions using custom AWS Lambda runtimes. Previous non-LTS versions of .NET Core (like 3.0 and 2.2) were hosted in Lambda the same way, which you can read about in a previous post.
The AWS Toolkit adds some new projects to Visual Studio. From the File menu, select New, then Project… In the new project dialog, search for AWS Lambda, and choose AWS Lambda Project (.NET Core – C#).

After entering your project name and location, you’ll be taken to the Blueprint selection dialog. Select the Custom Runtime Function blueprint and press Finish.

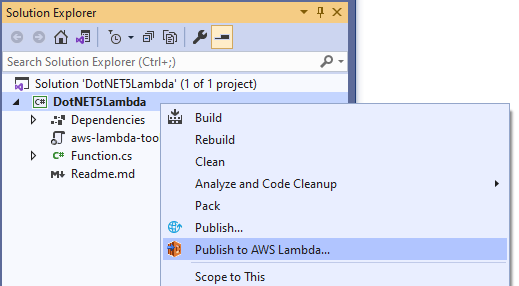
This creates a simple C# project that targets .NET 5. The project is configured as a custom runtime Lambda function, and contains code which performs a simple string manipulation. You can now deploy this code to AWS Lambda by right clicking on the project in the Solution Explorer, and selecting Publish to AWS Lambda.
In the Upload dialog, you’ll notice that Language Runtime is configured to use a custom runtime, and Framework is configured to use .NET 5. Enter a name for your Lambda function, and press Next.

Select a Role for your Lambda function (if you don’t have one or are unsure what to select here, the new Role based on AWS Managed Policy for AWSLambdaBasicExecutionRole is a simple start with minimal access permissions). Finally, press Upload.
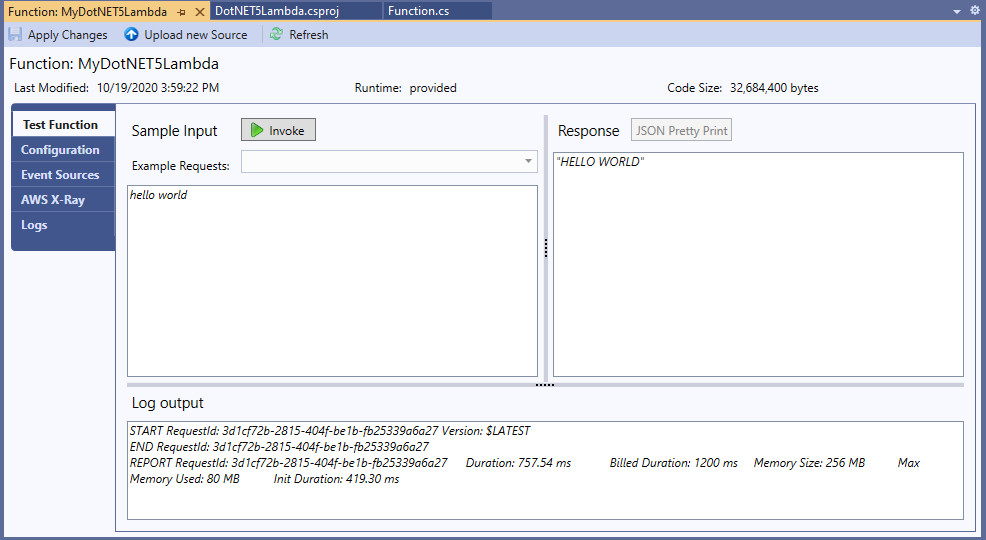
Your function is then compiled, bundled with .NET 5, and uploaded to AWS Lambda. Afterwards, the Toolkit displays your new Lambda function’s configuration, and you can now try invoking it. Type something into the request field and press Invoke. The response should show your text, converted to uppercase.
To wrap up, delete the function that was created. This way you do not accumulate unused resources in your account. Functions can be deleted using the context menu on Lambda function nodes in the AWS Explorer.
AWS Elastic Beanstalk
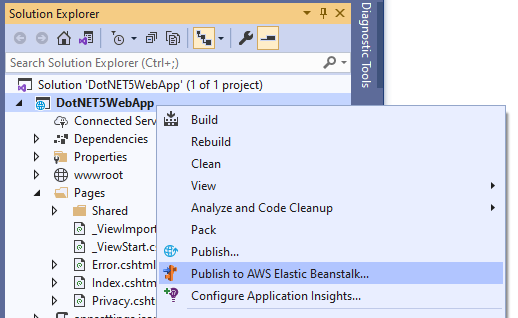
.NET 5 applications can be deployed to Elastic Beanstalk. To try this out, create a new project in Visual Studio 2019, and choose ASP.NET Core Web Application, and have it target .NET 5. This is a regular project offered by Visual Studio. Once it is created, right click on the project in the Solution Explorer, and select Publish to AWS Elastic Beanstalk…
As you fill in your deployment settings, the container type is the key setting. On the AWS Options page, you can deploy your .NET 5 application to an “Amazon Linux 2” or “Windows Server” instance in the container type drop-down list. Elastic Beanstalk provides images that support .NET 5. Select one of the images referenced in the announcement post (or a newer version).

After filling out the deploy options, the Toolkit compiles the project, deploys it to Beanstalk, and displays the Beanstalk Environment. Once the environment launches and reports a healthy status, you can try accessing your website. I modified my sample application to output the .NET version, which we can see reporting as 5.0.0.

To wrap up, terminate your Beanstalk environment. This way you are not charged for continued use of resources (like EC2), and you do not accumulate unused resources in your account. Beanstalk environments can be terminated using the context menu on Beanstalk environment nodes in the AWS Explorer.
Conclusion
There are many exciting improvements available in .NET 5. With the AWS Toolkit for Visual Studio, you can start exploring with .NET 5 on AWS today. If you have feedback on the AWS Toolkit, we would love to hear from you over on our GitHub repo at https://github.com/aws/aws-toolkit-visual-studio.