AWS DevOps & Developer Productivity Blog
Extending AWS Transform custom with MCP Servers for End-to-End Code Modernization
Automating migration pipelines shifts valuable resources toward innovation. In this post, we will help you learn how to extend AWS Transform custom with Model Context Protocol (MCP) server integrations that connect project management, automated testing, and source control.
You will discover how turning a code transformation tool into an automated migration pipeline can take you from a Jira user story to a validated pull request.
Introduction
AWS Transform custom learns organization-specific transformations and executes them consistently across codebases. However, real-world enterprise migrations don’t happen in a vacuum they require coordination across project management (Jira), source control (GitHub), and verification (Playwright) systems.
This post demonstrates how three MCP server integrations close the loop from planning to verification:
- Jira/Confluence MCP Server – The agent retrieves a user story with acceptance criteria and reads Confluence wiki pages containing org-specific migration standards, every transformation then follows institutional patterns.
- GitHub MCP Server – After the transformation completes, the agent automatically creates a pull request with the transformed code, proper commit messages, and links back to the Jira ticket.
- Playwright MCP Server – The agent validates the transformation by launching the migrated application in a headless browser and verifying UI functionality, catching regressions before any human reviews the PR.
Together, these integrations turn AWS Transform custom from a code transformation tool into an automated migration pipeline.
Solution Overview
Use Case: Migrate an AngularJS 1.4.7 Weather Dashboard application to React 19, orchestrated end-to-end through MCP integrations.
Source Repository: weather-dashboard-angular
Architecture
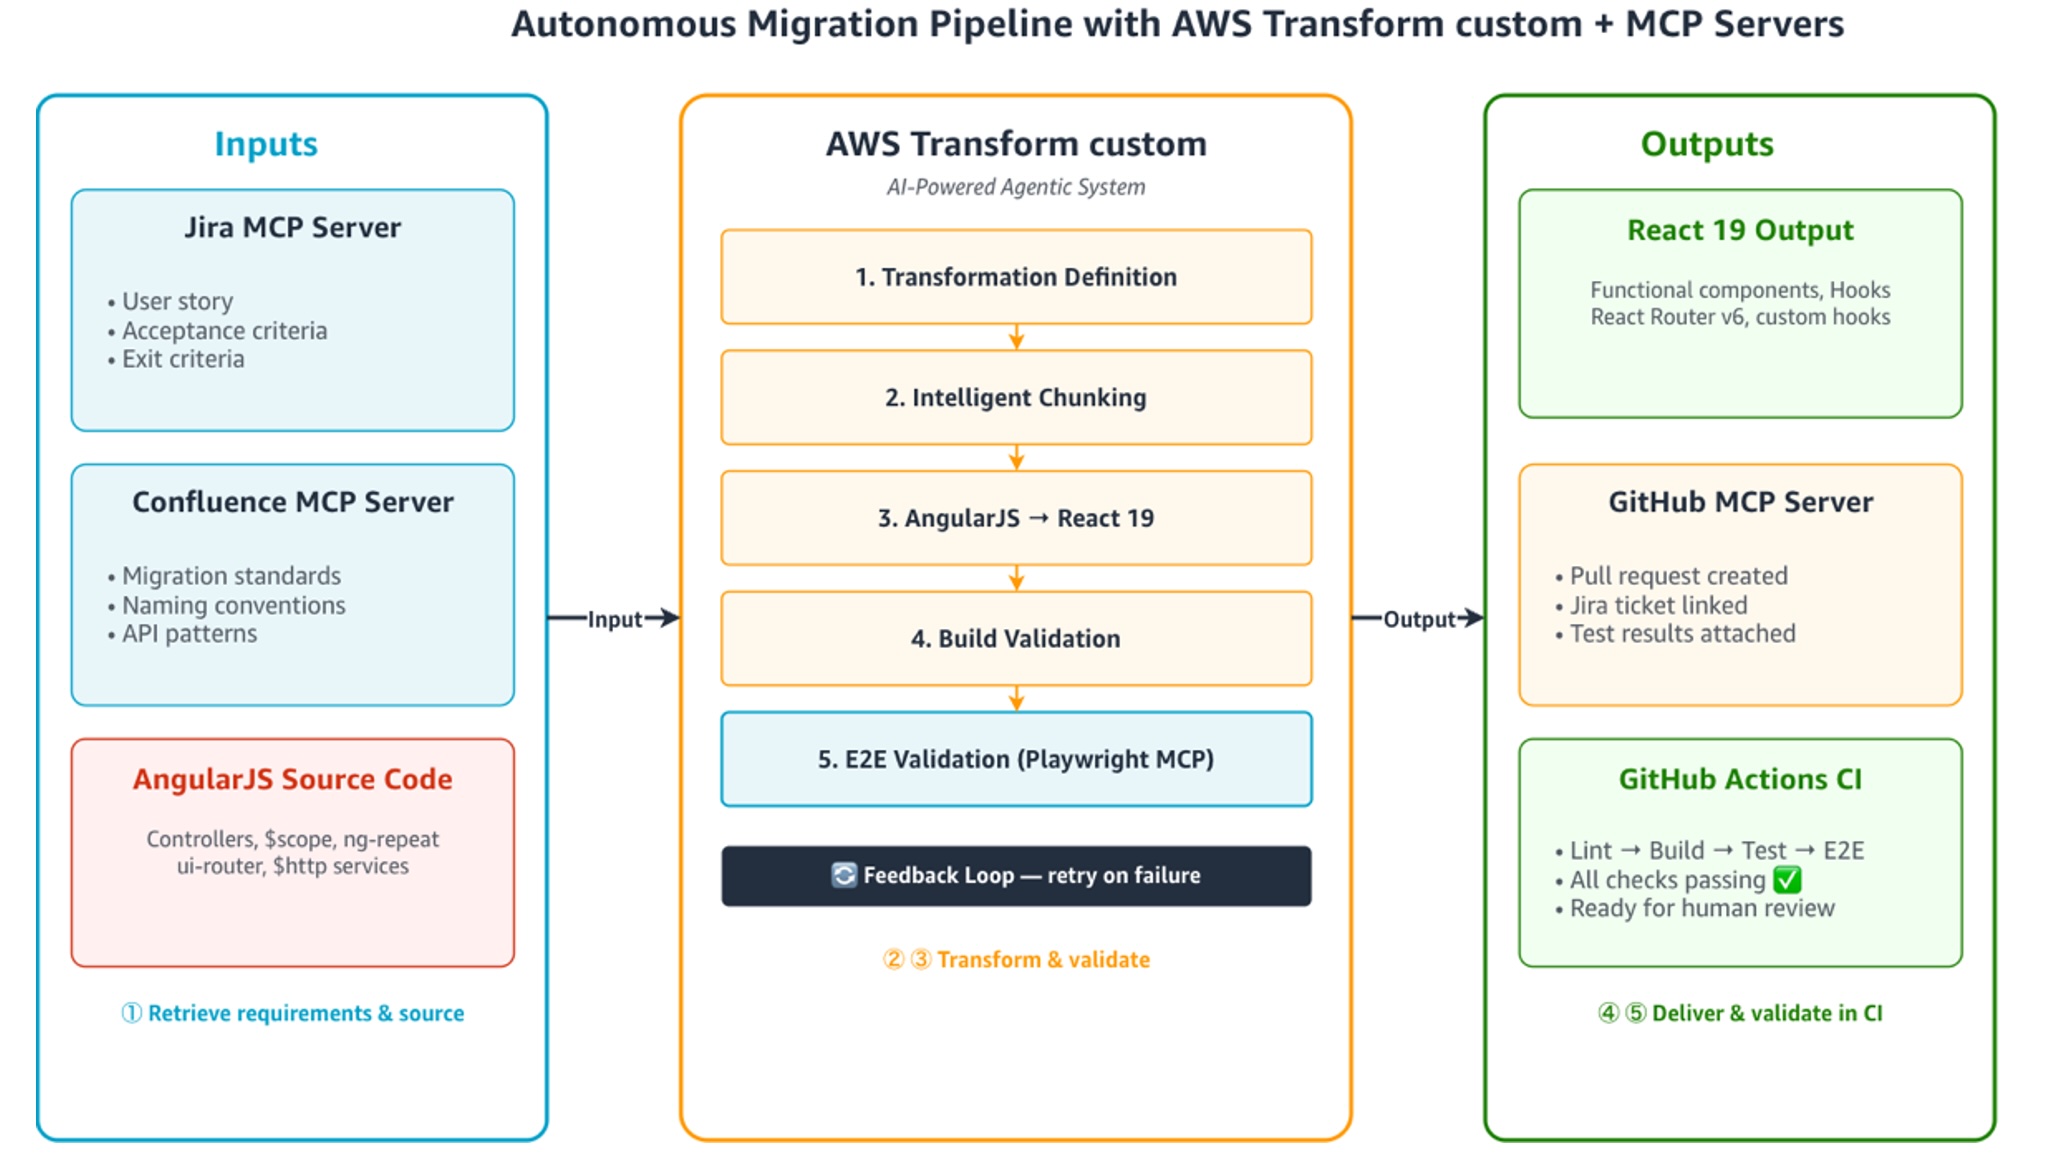
Figure 1: Autonomous migration pipeline architecture with MCP servers
The pipeline follows this flow (Figure 1):
- Jira/Confluence MCP Server – retrieves the user story, acceptance criteria, and org-specific migration standards from Confluence
- AWS Transform custom – uses these as context to execute the AngularJS → React 19 transformation
- Playwright MCP Server – validates the React output against acceptance criteria
- GitHub MCP Server – creates a PR with the transformed code, test results, and Jira links
- GitHub Actions – runs the CI pipeline to validate the build and tests on the PR
Prerequisites
Complete the following before you begin:
- AWS account with permissions for AWS Transform custom
- AWS Transform CLI installed and configured
- Node.js v20+
- Git initialized repository
- Jira/Confluence instance with API access (Atlassian Cloud)
- GitHub repository with write access
- Playwright installed (npm install -D @playwright/test)
- Docker Desktop installed and running (for Playwright MCP browser validation)
MCP server dependencies
| Server | Package | Purpose |
|---|---|---|
| Jira/Confluence | mcp-atlassian |
User stories, wiki standards |
| GitHub | @modelcontextprotocol/server-github |
Branch, commit, PR creation |
| Playwright | @playwright/mcp |
Browser-based UI validation |
The sample application
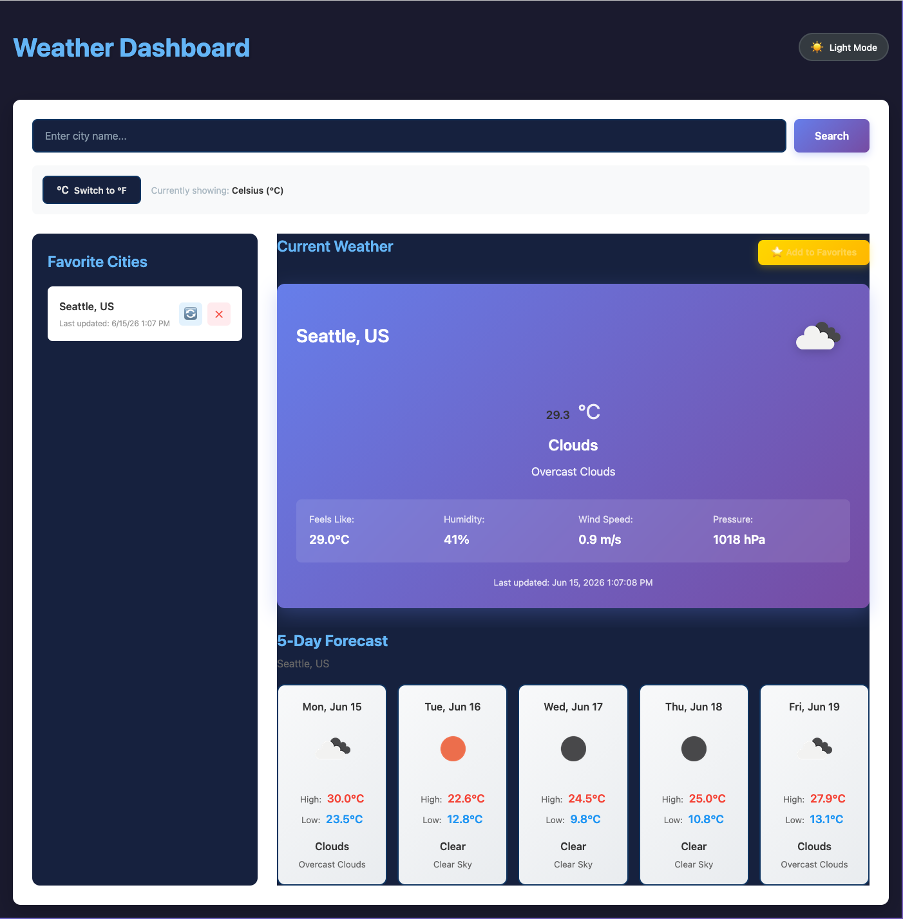
Figure 2: AngularJS Weather Dashboard application
This walkthrough uses an AngularJS 1.4.7 Weather Dashboard application with the following features (Figure 2):
- City weather search using OpenWeatherMap API
- 5-day forecast display
- Favorites management with local storage persistence
- Dark mode / light mode toggle
- Search history with autocomplete
- Temperature unit switching (Celsius/Fahrenheit)
- Responsive design and WCAG AA(Web Content Accessibility Guidelines) accessibility
- Playwright E2E(End to End) tests validate UI functionality
This application demonstrates real-world migration challenges including component state management, service injection patterns, event broadcasting, and local Storage persistence while remaining compact enough for a post walkthrough.
Step 1: Configure MCP servers for AWS Transform custom
AWS Transform custom reads MCP server configurations from ~/.aws/atx/mcp.json. Create this file with the three servers
{
"mcpServers": {
    "mcp-atlassian": {
      "command": "uvx",
      "args": ["mcp-atlassian@latest"],
      "env": {
        "JIRA_URL": "https://your-instance.atlassian.net",
        "JIRA_USERNAME": "your-email@example.com",
        "JIRA_API_TOKEN": "${JIRA_API_TOKEN}",
        "CONFLUENCE_URL": "https://your-instance.atlassian.net/wiki",
        "CONFLUENCE_USERNAME": "your-email@example.com",
        "CONFLUENCE_API_TOKEN": "${CONFLUENCE_API_TOKEN}"
      }
    },
    "playwright": {
      "url": "http://localhost:8931/mcp"
    },
    "github": {
      "command": "npx",
      "args": ["-y", "@modelcontextprotocol/server-github"],
      "env": {
        "GITHUB_PERSONAL_ACCESS_TOKEN": "${GITHUB_PAT}"
      }
    }
  }
}
Pro tip: The Playwright MCP server uses HTTP transport (“url”) rather than stdio (“command”). AWS Transform custom connects to a Docker-hosted Playwright browser that reaches your locally-served application. Step 4 explains the Docker setup.
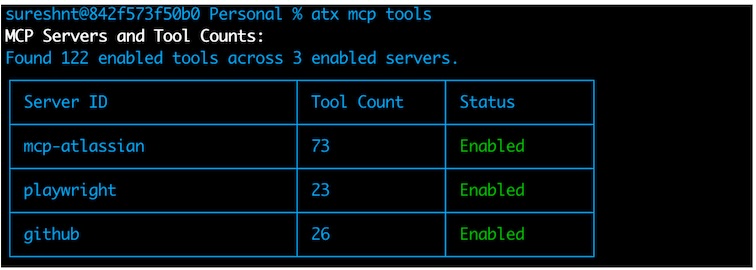
Verify the configuration- run this in the terminal
atx mcp tools
You should see three servers listed: mcp-atlassian (73 tools), playwright (23 tools), and github (26 tools).
Step 2: Jira/Confluence MCP server — sourcing requirements and standards
What this integration does
The Jira/Confluence MCP Server provides AWS Transform custom with structured requirements and organizational context. Rather than a developer manually describing what needs to happen, the agent pulls:
- User Story – The migration scope and acceptance criteria
- Confluence Wiki – Org-specific standards and migration best practices
- Status Updates – Comments back to the ticket as the pipeline progresses
Create the Jira user story
Create a story in your Jira project with acceptance criteria that define the migration scope.
Key fields:
Title: Migrate AngularJS Weather Dashboard to React 19 (Figure 3)
Type: Story
Priority: High
Acceptance Criteria: Check-boxes for each migration requirement (components converted, hooks used, tests passing, build succeeds)
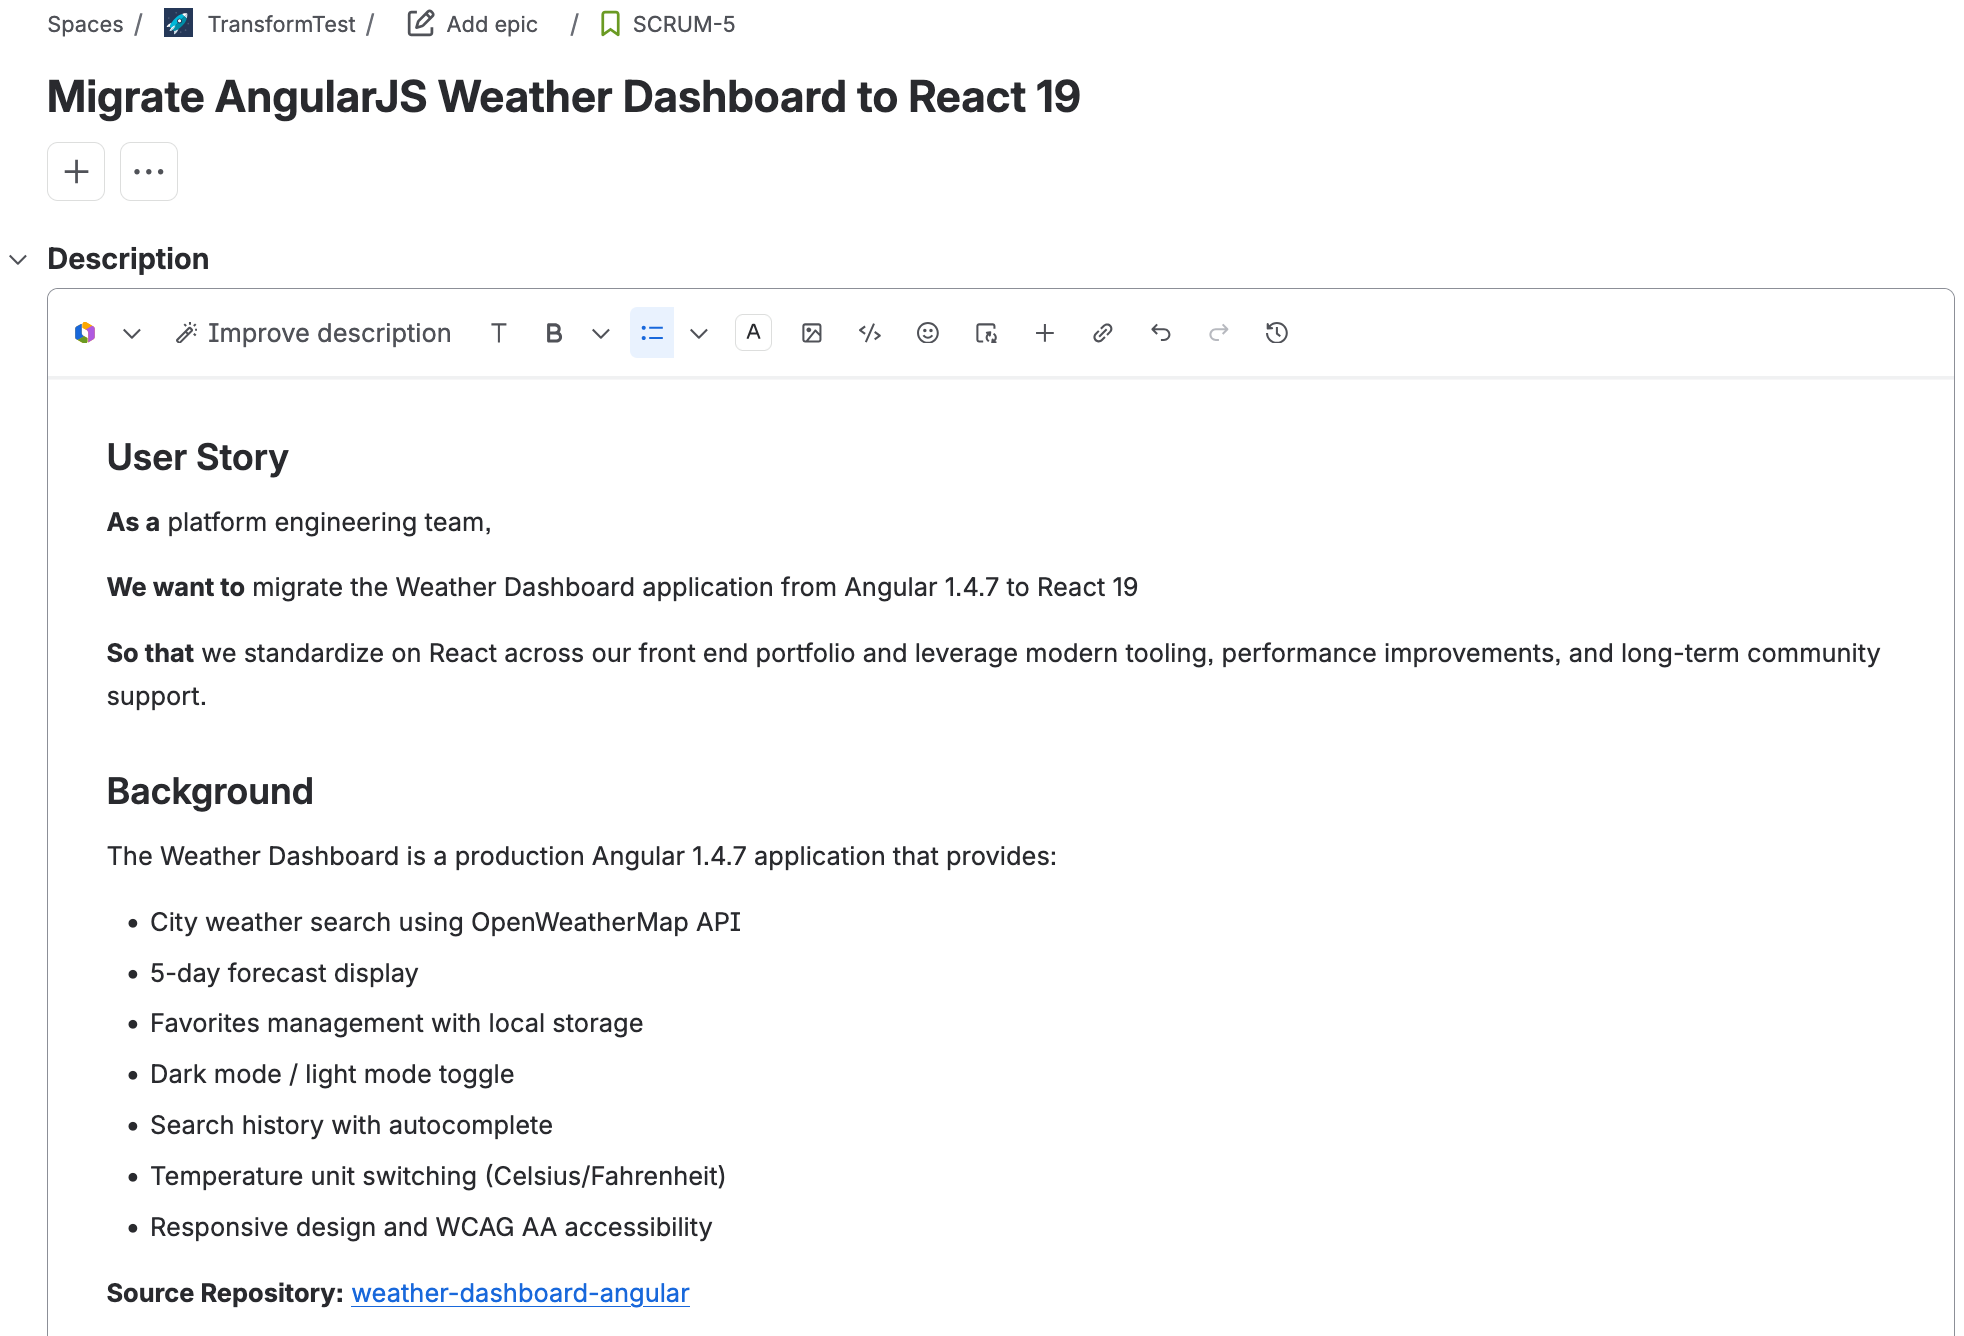
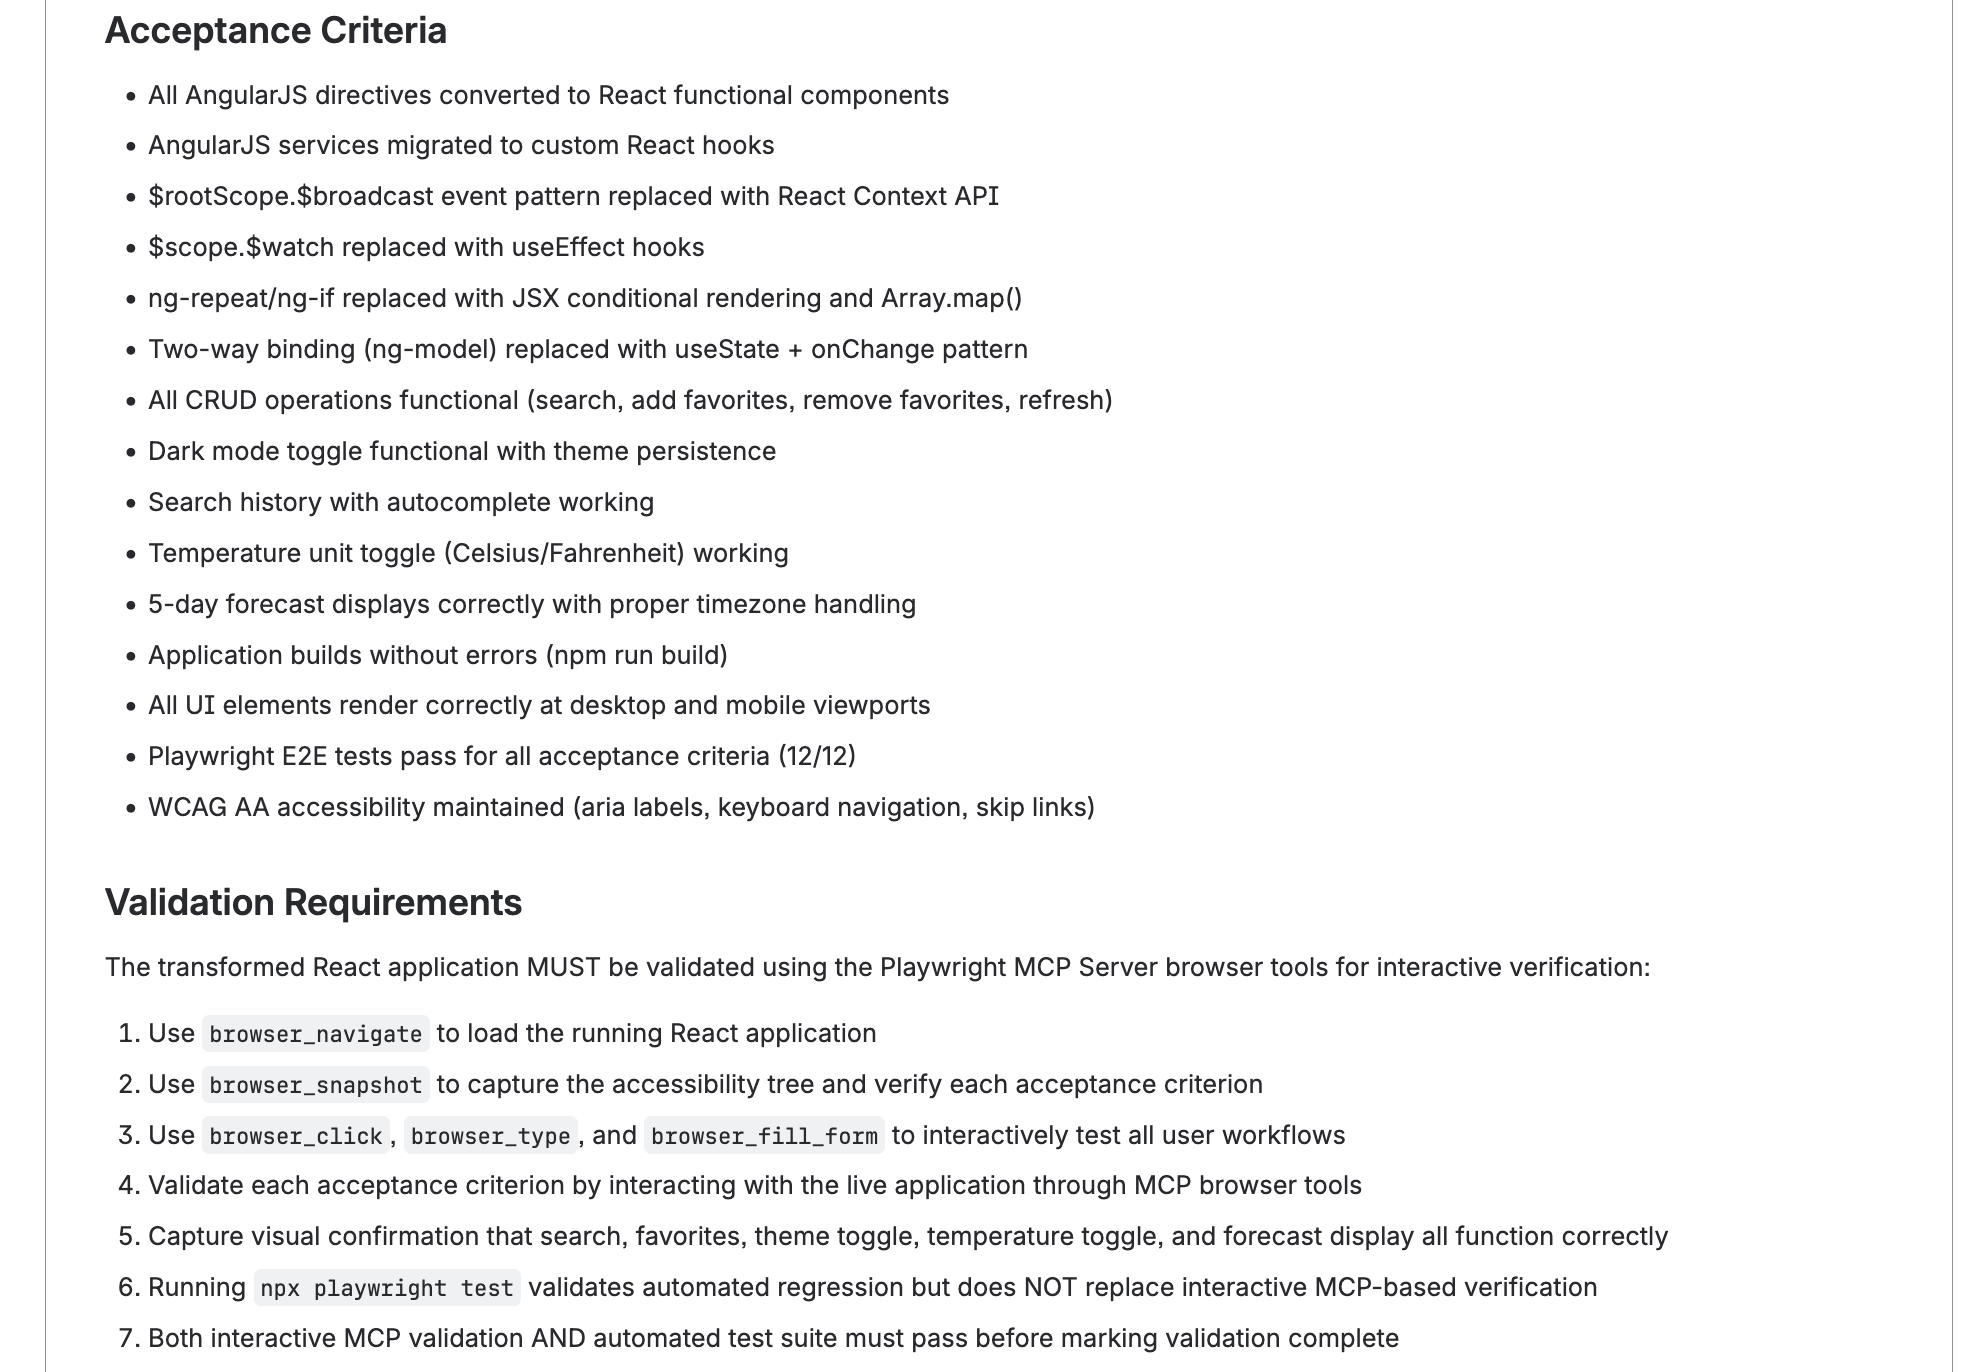
Figure 3: Jira user story with migration acceptance criteria
Create the Confluence wiki page
Create a Confluence page with your org-specific migration standards. Include:
- Pattern mappings (AngularJS directives → React components, services → hooks)
- File structure conventions
- Naming conventions
- Quality gates (build, tests, accessibility requirements)
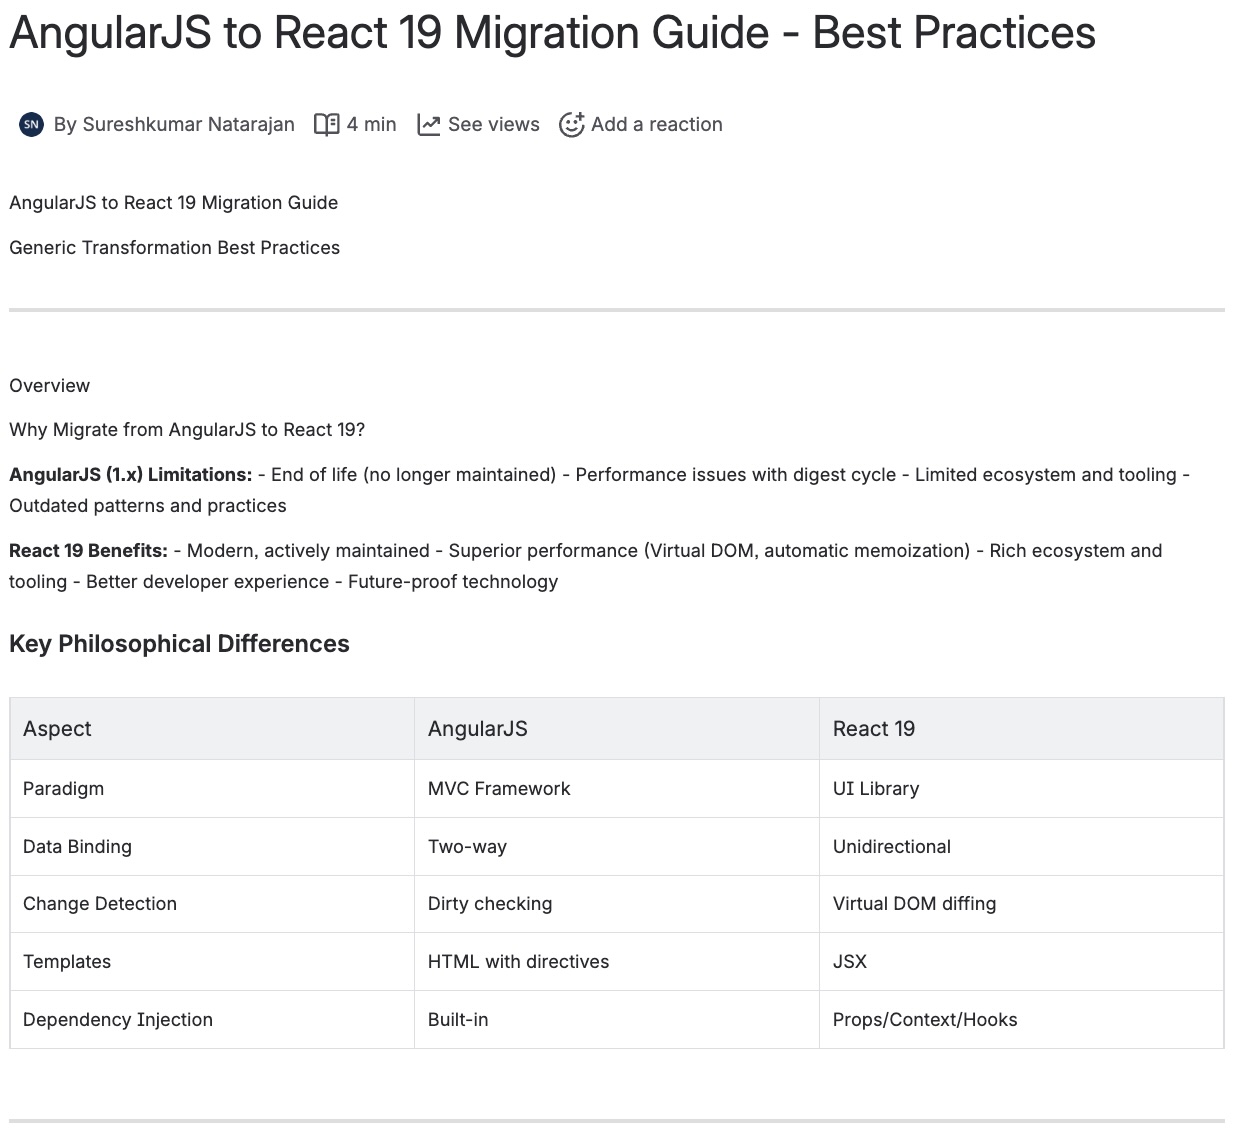
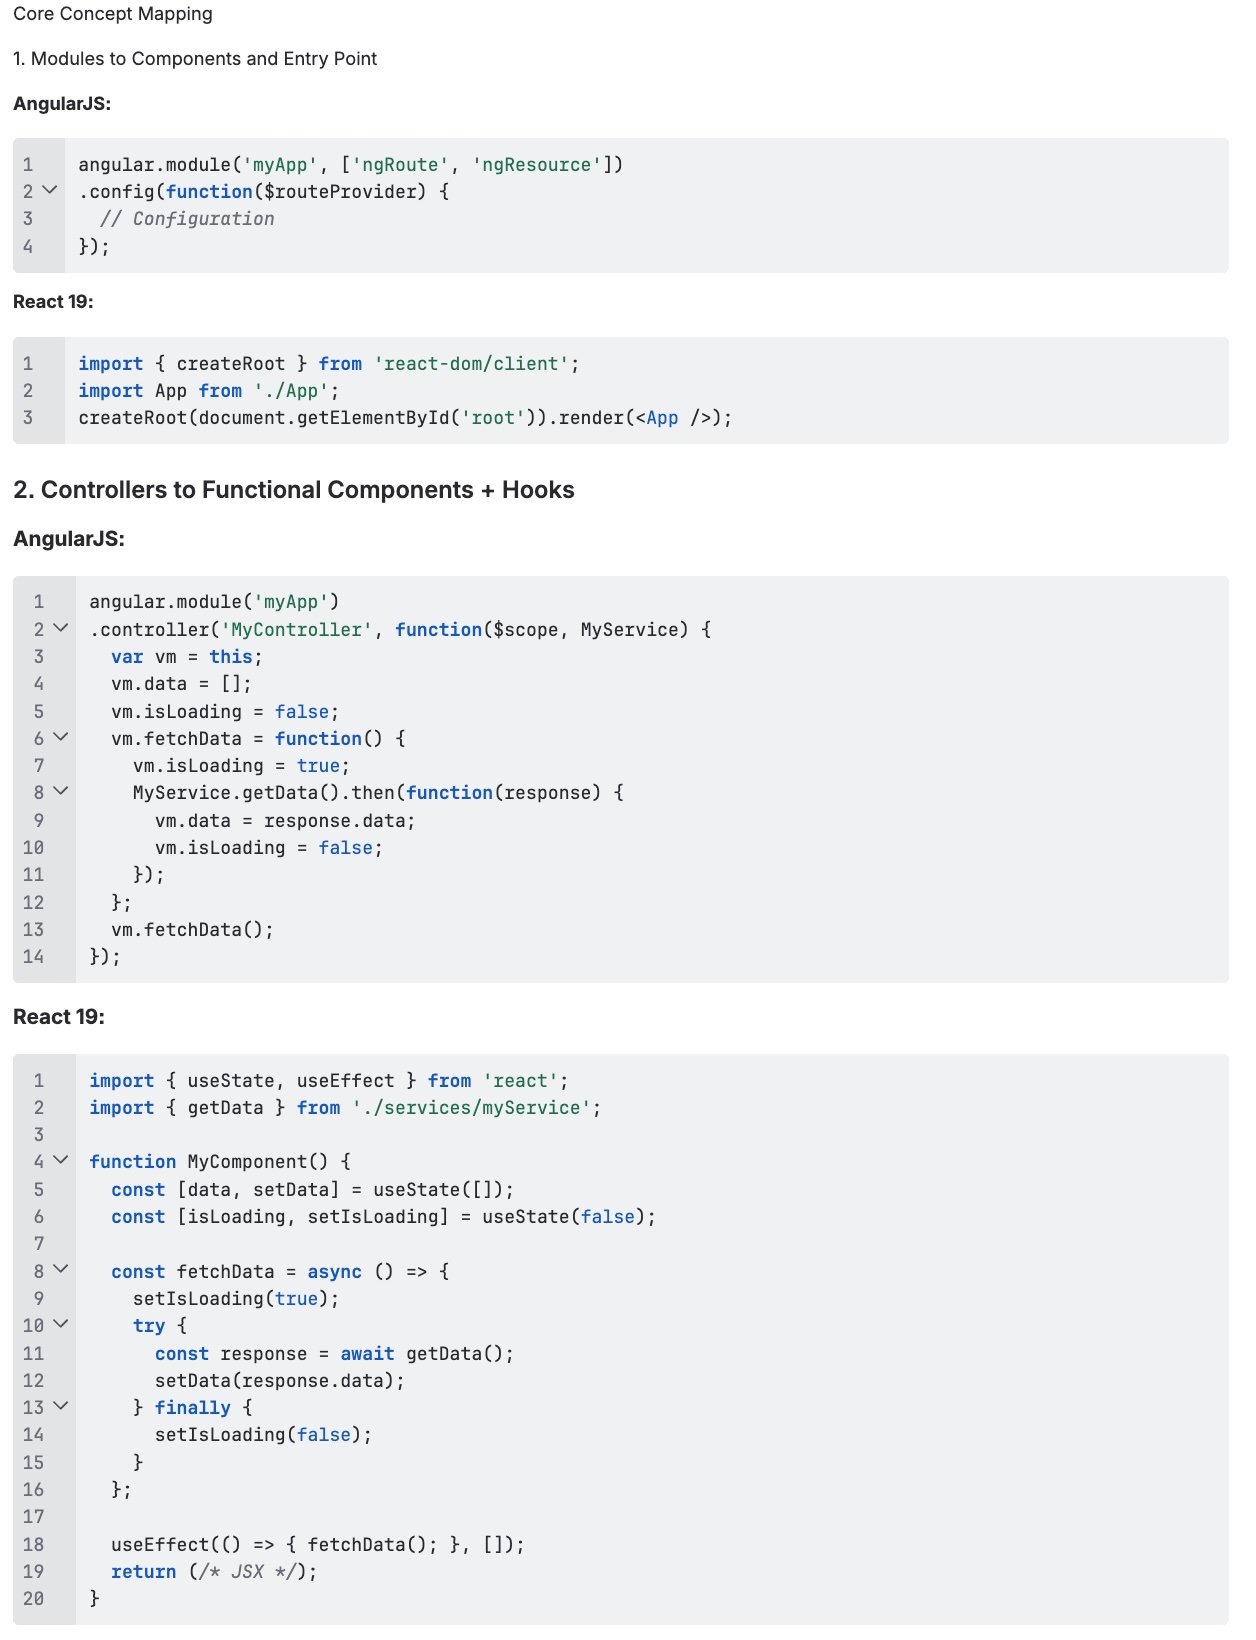
Figure 4: Confluence migration guide with pattern mapping table
How the agent uses these sources
During the transformation, agent invokes:
- jira_get_issue(“SCRUM-5”) → Retrieves story and acceptance criteria
- confluence_get_page(“622593”) → Retrieves org-specific migration standards
- jira_add_comment(“SCRUM-5”, “Transformation started…”) → Updates stakeholders
The acceptance criteria become the exit criteria for the transformation, and the wiki references guide code generation patterns.
Step 3: AWS Transform custom — AngularJS to React 19
Create the additional context
Create a config.json file that instructs the agent to use the MCP integrations:
{
  "codeRepositoryPath": "./weather-dashboard-angular",
  "transformationName": "AngularJS-to-React19-WeatherDashboard",
  "buildCommand": "npm run build",
  "additionalPlanContext": "The target framework is React 19 with functional components and hooks.\nUse Vite as the build tool.\n\nBefore starting the transformation:\n1. Connect to Jira via the MCP server and read user story SCRUM-5 to retrieve acceptance criteria and migration scope.\n2. Connect to Confluence via the MCP server and read the migration standards and best practices pages from the Software Development space.\n\nAfter transformation completes:\n1. Build the React app: cd react-app && npm run build\n2. Run the Playwright E2E tests: cd react-app && npx playwright test (all 12 must pass)\n3. You must have a preview server already running externally on port 4173 serving the built files. Do NOT start any server or run any shell command to start a server. Use the Playwright MCP browser tools IMMEDIATELY to validate the app interactively:\n   - browser_navigate to http://host.docker.internal:4173 (MUST use host.docker.internal, NOT localhost or 127.0.0.1)\n   - browser_snapshot to capture the accessibility tree and verify the page renders\n   - browser_type to enter a city name in the search input\n   - browser_click to click the search button, temperature toggle, and dark mode toggle\n   - Verify: app loads without errors, search input present, temperature toggle visible, dark mode works, favorites section renders, empty state displays, accessibility attributes present\n4. Use the GitHub MCP server to create a pull request with the transformation summary and test results, linking back to Jira ticket SCRUM-5.\n5. Connect to Jira via the MCP server and update ticket SCRUM-5 with the PR link and transition to In Review status.",
  "validationCommands": "npm run build"
}
Set up the playwright MCP Docker container
The Playwright MCP browser runs inside a Docker container. The container connects to your Mac’s locally-served application via host.docker.internal.
Start the Docker container
docker run -d -i --rm --init \
  --name mcp-playwright \
  -p 8931:8931 \
  --add-host=host.docker.internal:host-gateway \
  --entrypoint node \
  mcr.microsoft.com/playwright/mcp \
  /app/cli.js --headless --browser chromium --no-sandbox \
  --port 8931 --host 0.0.0.0
Install browsers inside the container:
Set up the pre-start server script
ATX’s shell tool cannot properly background long-running processes any server start command blocks for up to 900 seconds, causing the MCP browser session to expire. To solve this, run a helper script that watches for the build output and serves it automatically:
#!/bin/bash
# serve-for-atx.sh — Run this in a separate terminal BEFORE launching ATX
cd /path/to/weather-dashboard-angular
echo " Waiting for react-app/dist/index.html to be created by ATX build..."
while [ ! -f "./react-app/dist/index.html" ]; do
sleep 2
done
echo " Found! Serving on http://0.0.0.0:4173"
cd react-app/dist && python3 -m http.server 4173 --bind 0.0.0.0
This script
- Watches for ATX to complete the build (creates react-app/dist/index.html)
- Automatically starts serving the built files on port 4173
- Binds to 0.0.0.0 so the Docker container reaches it via host.docker.internal
Execute the transformation
Open two terminals
Terminal 1 — Start the pre-serve script
chmod +x serve-for-atx.sh./serve-for-atx.shTerminal 2 — Run the transformation
atx custom def exec \
  -n "AWS/early-access-angular-to-react-migration" \
  -p ./weather-dashboard-angular \
  -c "npm run build" \
  -g file://./config.json \
  --trust-all-tools \
  --non-interactive
What happens during execution
The agent:
- Reads Jira – Retrieves acceptance criteria from the user story
- Reads Confluence – Loads migration standards and pattern mappings
- Plans – Analyzes AngularJS component tree and identifies dependencies
- Transforms – Converts in dependency order: Constants/utilities → Services/hooks → Components → App shell
- Validates build – Runs npm run build after transformation
- Runs E2E tests – Executes npx playwright test (12 tests)
- Validates interactively – Uses Playwright MCP browser to navigate, click, type, and verify the running app
- Creates PR – Uses GitHub MCP server
- Updates Jira – Transitions ticket to “In Review” with PR link
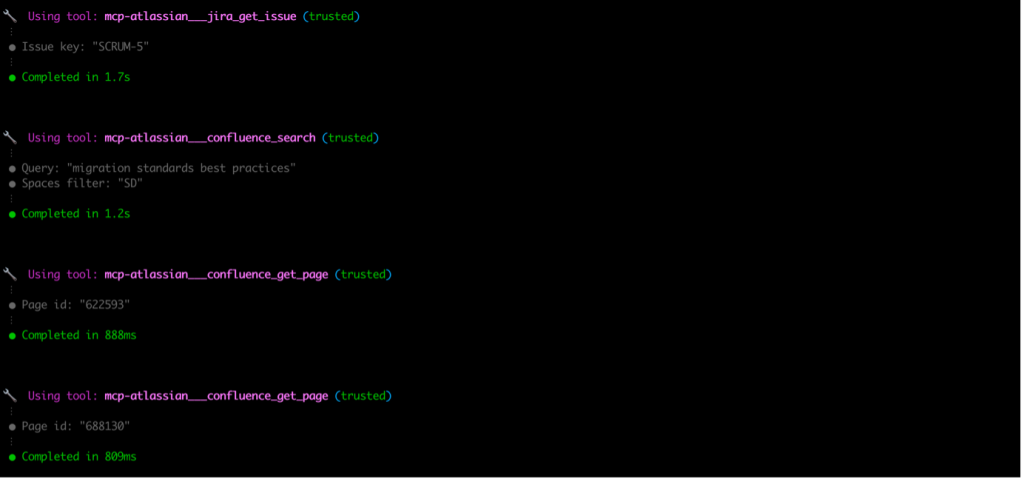
*Figure 5: MCP tool calls for Jira and Confluence context gathering*
Key transformation mappings
| AngularJS Pattern | React 19 Equivalent |
|---|---|
| Directive with template | Functional component with JSX |
| $scope / Controller | useState hook |
| $scope.$watch | useEffect with dependency array |
| $rootScope.$broadcast / $on | React Context API + useContext |
| Service with DI | Custom hook or service module |
| ng-repeat / ng-if | Array.map() / conditional rendering |
| ng-model (two-way binding) | useState + onChange handler |
| ng-class | Conditional className |
Step 4: Playwright MCP server — validating the output
What this integration does
The Playwright MCP Server launches the transformed React application in a headless browser and validates UI functionality against the acceptance criteria. It catches functional regressions before any human reviews the code.
How the agent uses Playwright MCP
After the build succeeds and the E2E test suite passes, the agent calls the Playwright MCP browser tools to interactively validate the application (Figure 6):
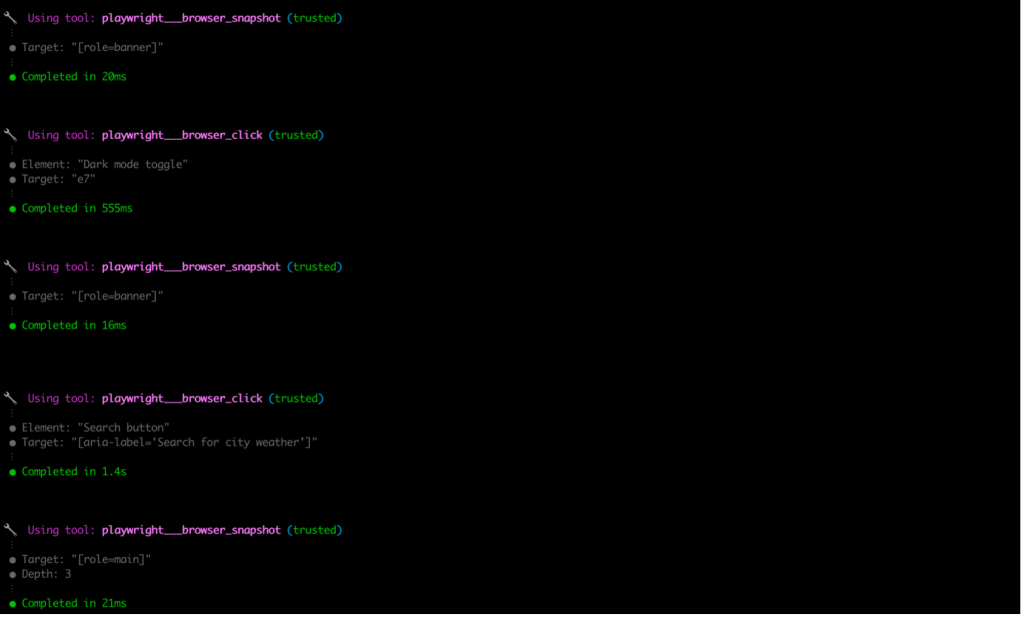
Figure 6: Playwright MCP tool calls for end-to-end validation
- browser_navigate(“http://host.docker.internal:4173”) – Loads the app
- browser_snapshot() – Captures the accessibility tree to verify structure
- browser_type(target, “London”) – Types a city name in search
- browser_click(target) – Clicks search, toggles, and buttons
- browser_snapshot() -Verifies results rendered correctly
Why Docker hosts the browser
The Docker container solves three problems:
- Shell timeout — ATX’s shell tool waits up to 900 seconds for background processes, causing MCP session expiry. The Docker container runs independently.
- Network isolation — The Docker-hosted browser connects to ATX via HTTP transport on port 8931, keeping the session alive regardless of shell commands.
- Host access — The browser reaches the locally-served app via host.docker.internal, which Docker resolves to the host machine’s IP.
Validation criteria
| Test | What It Validates |
|---|---|
| AC1 | Application renders without console errors |
| AC2 | City search returns and displays weather data |
| AC3 | 5-day forecast displays with correct dates |
| AC4 | Dark mode toggle switches theme |
| AC5 | Temperature unit toggle works |
| AC6 | Favorites can be added and removed |
| AC7 | Search history autocomplete appears |
| AC8 | Responsive layout at mobile viewport |
| AC9 | Accessibility — ARIA labels present |
| AC10 | Skip to main content link exists |
The feedback loop
If Playwright tests fail, the pipeline iterates:
- Playwright reports which acceptance criteria failed
- AWS Transform custom reads the failure output
- The agent corrects the transformation and re-runs build validation
- Playwright re-validates
- Only when all tests pass does the agent create the PR via GitHub MCP
This closed-loop approach means the PR already has passing tests before any human reviewer sees it..
Step 5: GitHub MCP server — creating the pull request
What this integration does
After the transformation passes validation, the GitHub MCP Server automatically creates a pull request with (Figure 7):
- A feature branch with descriptive naming
- Proper commit messages referencing the Jira ticket
- PR body with transformation summary and test results
- Links back to the original Jira story
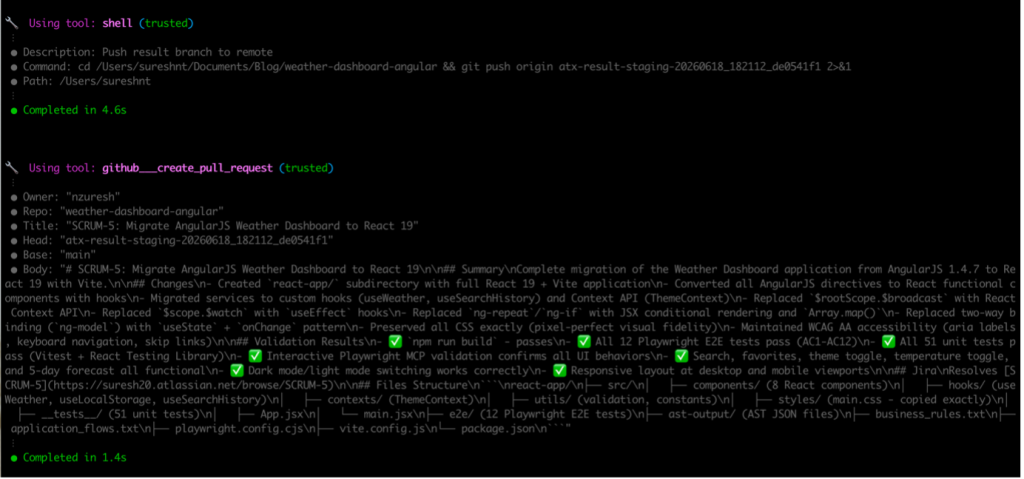
Figure 7: Git push and pull request creation with validation results
CI pipeline validation
A GitHub Actions workflow triggers automatically on the PR to independently verify the transformation (Figure 8):
name: Validate Migration
on:
  pull_request:
    branches: [main]
jobs:
  build-and-test:
    runs-on: ubuntu-latest
    steps:
      - uses: actions/checkout@v4
      - uses: actions/setup-node@v4
        with:
          node-version: '20'
      - run: cd react-app && npm ci
      - run: cd react-app && npm run build
      - run: cd react-app && npx playwright install --with-deps chromium
      - run: cd react-app && npx playwright test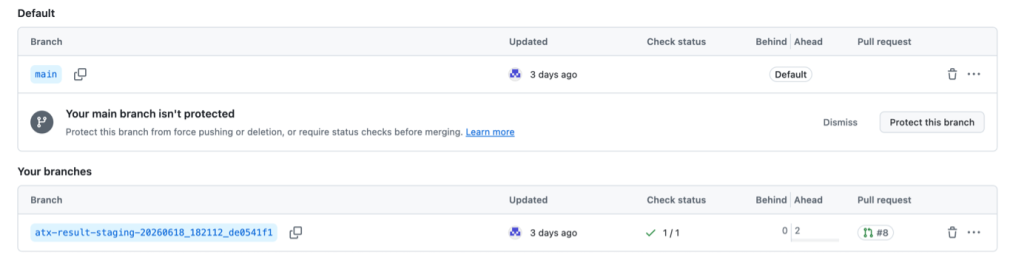
Figure 8: GitHub repository with result staging branch and passing CI checks
Post-PR actions
The agent also:
- Updates the Jira ticket status to “In Review”
- Adds a comment with the PR link and test results
- Documents the validation evidence in the PR description
Results
AWS Transform custom completed the transformation successfully. You can verify that the build passes, all E2E tests pass, all unit tests pass, and the interactive browser validation confirms full functionality. AWS Transform custom successfully migrated components and services from AngularJS directives to React components and custom hooks. The automated pipeline handled the transformation steps. Results may vary based on project complexity, codebase structure, and other factors.
Cleanup
Remove transformation session artifacts
rm -rf ~/.aws/atx/custom/<conversation-id>Stop the Docker container
docker stop mcp-playwrightKill the pre-serve script (Ctrl+C in Terminal 1)Conclusion
In this post, you learned how to extend AWS Transform custom with MCP server integrations that connect project management (Jira/Confluence), automated testing (Playwright), and source control (GitHub) into an automated migration pipeline.
By combining these three integrations with AWS Transform custom’s automated transformation capabilities, you can:
- Source requirements automatically from Jira user stories and organizational Confluence wikis
- Validate transformations against acceptance criteria using browser-based E2E tests and interactive MCP browser verification
- Deliver results as validated pull requests with full traceability back to the original ticket
- Run CI pipelines that independently verify the transformation before human review
This approach eliminates the manual coordination overhead that typically slows enterprise migrations — every transformation meets organizational standards and passes functional validation before human review.
The Model Context Protocol (MCP) provides an open, extensible integration layer — meaning you can swap Jira for Linear, GitHub for GitLab, or add additional MCP servers (Slack notifications, Confluence documentation updates, SonarQube quality gates) to further automate your modernization workflows.
Getting started
Ready to extend AWS Transform custom with MCP integrations? Use the following resources to help you get started:
• AWS Transform custom Getting Started Guide
• Model Context Protocol (MCP) specification
• Source application — weather-dashboard-angular
• Introducing AWS Transform custom (AWS News Blog)