.NET on AWS Blog
Host a .NET Blazor WebAssembly App on Amazon S3 and Amazon CloudFront
With Blazor WebAssembly (WASM), you build interactive web applications entirely in C#, no JavaScript required. After compilation, a Blazor WASM application is just a folder of static files: HTML, CSS, JavaScript, and WASM binaries. Because the output is entirely static, you can host it on AWS with Amazon Simple Storage Service (Amazon S3) and Amazon CloudFront. Users worldwide get low-latency access with no servers to manage.
In this post, you host a .NET 10 Blazor WebAssembly application on AWS using Amazon S3 as the origin and Amazon CloudFront as the Content Delivery Network (CDN). You create the infrastructure with Terraform and automate deployments with a shell script. You should have basic familiarity with Blazor, Amazon CloudFront, Amazon S3, and Terraform.
What this post covers:
- How the S3 and CloudFront combination works well for Blazor WASM
- A complete Terraform configuration for S3, CloudFront, and Origin Access Control (OAC)
- A deployment script that handles Multipurpose Internet Mail Extensions (MIME) types, cache headers, and cache invalidation
- How to handle Blazor’s client-side routing (deep links) at the CDN level
Benefits of S3 and CloudFront for Blazor WASM
Blazor WASM output is purely static. There is no runtime server to operate these static files. The compiler produces a folder containing index.html, CSS, JavaScript, and WASM binaries. You store these files in Amazon S3 and distribute them to users through CloudFront’s edge locations, with no application server in between.
| Hosting Challenge | AWS Solution |
| File storage | Every file is stored as an S3 object with no file system to manage. |
| Global performance | CloudFront distributes files from 400+ edge locations worldwide. |
| HTTPS & HTTP/2 | CloudFront terminates TLS using its default certificate or an AWS Certificate Manager (ACM). ACM renews certificates automatically without manual lifecycle management required. |
| Cost | No running servers means no compute costs; you pay only for storage and bandwidth, which remain minimal for static sites. |
| Operations | No servers to run, no patches to apply, no scaling to configure. |
One challenge: client-side routing
Blazor WASM uses the browser URL to determine which component to render. When a user navigates to https://example.com/counter, the browser requests /counter from the server. That path doesn’t exist as a file in S3, so S3 returns a 403 (the bucket is private). Without a fix, deep links break.
The solution is to configure CloudFront custom error responses to rewrite both 403 and 404 errors to index.html with an HTTP 200 status. The browser loads the app, and the Blazor router reads the URL as well as renders the correct component. This technique works for Single Page Application (SPA) frameworks such as React, Angular, Vue, and Svelte.
Solution Overview
The architecture consists of three layers, shown in Figure 1.
- Blazor WASM: a .NET 10 SPA compiled to static files by
dotnet publish - Amazon S3: a private bucket that stores the static files
- Amazon CloudFront: the public HTTPS entry point; caches and distributes files from edge locations; enforces caching rules and handles SPA routing
Architecture Diagram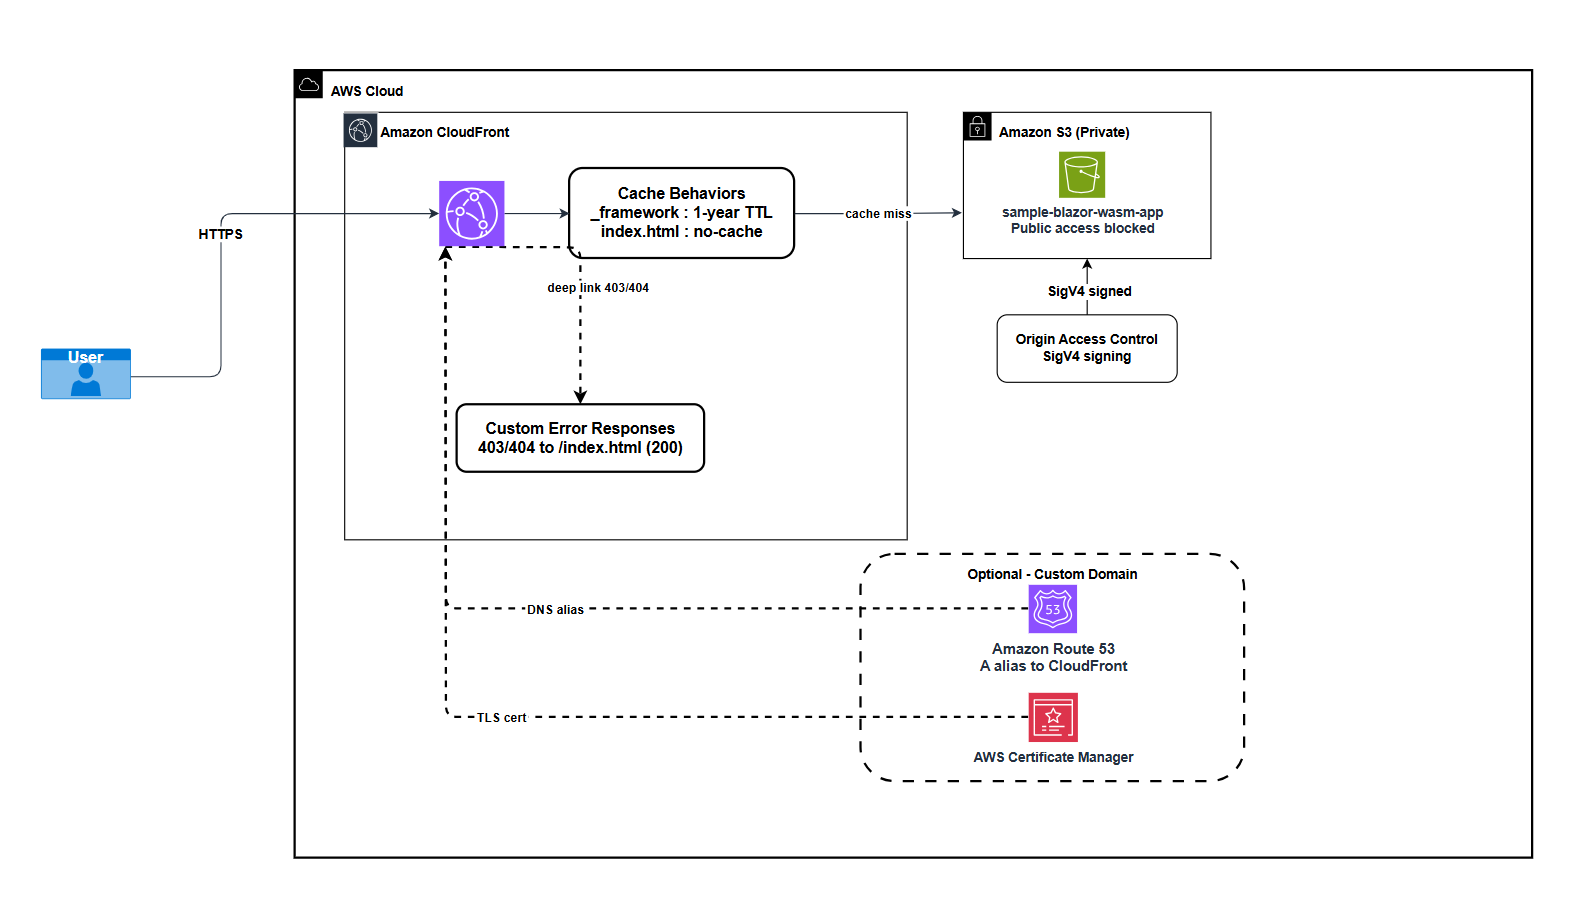
Figure 1: Architecture diagram – A .NET 10 Blazor WebAssembly app hosted on AWS using Amazon S3 & Amazon CloudFront
Key design decisions:
- Origin Access Control (OAC) instead of Origin Access Identity (OAI): CloudFront OAC is the modern replacement for OAI. OAC uses SigV4 request signing and the bucket policy restricts access to a specific CloudFront distribution ARN, not just a different distribution.
- S3 static website hosting disabled: There’s no need for it when CloudFront is the sole entry point. The bucket blocks all public access.
- Two cache policies: Framework files under
_framework/carry content-hashed file names and are safe to cache for one year.index.htmlmust never be cached so that new deployments are picked up immediately. - No multithreading:
WasmEnableThreadsis off by design. Enabling it requiresCross-Origin-Opener-PolicyandCross-Origin-Embedder-Policyresponse headers, which complicates OAuth pop-ups and CloudFront configuration. For an I/O-bound app, async/await is sufficient.
Prerequisites
Before you begin, verify that you have the following installed and configured:
| Tool | Version | Purpose |
| .NET SDK | 10.0+ | Build the Blazor WASM app |
| Terraform | 1.6+ | Provision AWS infrastructure |
| AWS Command Line Interface (AWS CLI) | v2 | Upload files and create cache invalidations |
| Git | Any | Clone the repository |
You also need an AWS account with an AWS Identity and Access Management (IAM) user or role that has the following permissions:
- s3:CreateBucket, s3:PutObject, s3:DeleteObject, s3:ListBucket, s3:PutBucketPolicy, s3:PutBucketVersioning, s3:PutBucketPublicAccessBlock
- cloudfront:CreateDistribution, cloudfront:UpdateDistribution, cloudfront:CreateInvalidation, cloudfront:CreateOriginAccessControl
Configure the AWS CLI before proceeding:
aws configure
Walkthrough
Step 1: Create the Blazor WebAssembly App
Start by scaffolding a new Blazor WASM project targeting .NET 10:
dotnet new blazorwasm -o src/BlazorApp --framework net10.0
The default template includes three pages (Home, Counter, Weather) that demonstrate routing, interactivity, and HTTP data fetching. No changes to the app code are needed for hosting on AWS.
Verify the app runs locally before deploying:
dotnet run --project src/BlazorApp# Open https://localhost:5XXX in a browser
Step 2: Provision Infrastructure with Terraform
Define AWS resources in the infra/ directory. Terraform creates the S3 bucket (with public access blocked and versioning enabled), a CloudFront distribution with Origin Access Control, and two cache policies. If you provide a custom domain, it also provisions ACM certificate and Amazon Route 53 records.
Project structure
Split Terraform configuration across several files, each handling a specific concern:
infra/├── main.tf # S3 bucket, public access block, versioning, bucket policy├── cloudfront.tf # CloudFront distribution, OAC, cache policies, optional ACM + Route53├── variables.tf # Input variables├── outputs.tf # Bucket name, CloudFront domain, distribution ID└── terraform.tfvars # Your values (not committed to source control)
The following sections walk through each file. Start with the S3 bucket, then move to CloudFront, and finish with variables and outputs.
S3 bucket (main.tf)
This terraform code creates a private, versioned S3 bucket with all public access blocked, and grants read-only access exclusively to a specific CloudFront distribution via a bucket policy. The bucket policy uses aws:SourceArn to restrict access to this CloudFront distribution.
Listing 1: main.tf
The bucket policy uses aws:SourceArn to restrict access to exactly this CloudFront distribution, not just another principal that happens to be the CloudFront service.
Origin Access Control and cache policies (cloudfront.tf)
The following code creates a CloudFront Origin Access Control (OAC) that uses SigV4 signing to securely access your S3 bucket. It also defines two cache policies with different strategies.
The first policy targets immutable, content-hashed assets like JavaScript and CSS bundles. Because these filenames change on every build, the policy caches them for one year with Brotli and gzip compression support. This maximizes performance without the risk of serving stale content.
The second policy handles files like index.html that must always return the latest version from origin. It sets a zero TTL so CloudFront fetches a fresh copy on every request, ensuring users always get the most recent deployment without stale references.
Listing 2: cloudfront.tf
CloudFront distribution (cloudfront.tf)
The following code creates a CloudFront distribution for a Blazor WASM app that serves from S3 with HTTPS enforcement. It applies a one year cache to content-hashed _framework/* files and rewrites 403/404 errors to index.html. It also supports an optional custom domain with ACM certificate.
Listing 3: cloudfront.tf
Variables and outputs
Add a terraform.tfvars file (do not commit this to source control if you add secrets). This file configures a production Blazor WASM deployment in us-west-2 with CloudFront distribution limited to US/Europe edge locations, using the default *.cloudfront.net domain.
# terraform.tfvarsaws_region = "us-west-2"bucket_name = "my-blazor-wasm-app" # Must be globally uniqueenvironment = "prod"cloudfront_price_class = "PriceClass_100" # US + Europe edge locationscustom_domain = "" # Leave empty to use *.cloudfront.netroute53_zone_id = ""
Key outputs to save after terraform apply:
output "cloudfront_distribution_id" { value = aws_cloudfront_distribution.blazor_app.id}
output "app_url" { value = var.custom_domain != "" ? "https://${var.custom_domain}" : "https://${aws_cloudfront_distribution.blazor_app.domain_name}"}
Apply the infrastructure
These commands initialize the Terraform working directory under infra/, preview the planned infrastructure changes, and then apply them to provision the resources.
cd infraterraform initterraform planterraform apply
Note the outputs. You’ll need cloudfront_distribution_id for deployments. Note that the CloudFront distribution creation takes 5–10 minutes while the configuration propagates to edge locations
Outputs:

cloudfront_distribution_id = "E1046LYL76VP34"
app_url                    = "https://d1mw9a12s7eftc.cloudfront.net"
CloudFront distribution creation takes 5–10 minutes while the configuration propagates to edge locations.
Step 3: Deploy the App
The deploy.sh script handles three things in sequence: build, upload, and cache invalidation.
The script runs three stages. First, it builds the Blazor app. Then it uploads the output to S3 with the correct MIME types and cache headers. Finally, it invalidates the CloudFront cache.
./scripts/deploy.sh <bucket-name> <cloudfront-distribution-id>
# Output Example:./scripts/deploy.sh my-blazor-wasm-app E1046LYL76VP34
Build:
The following command publishes the Blazor WASM app in Release mode, producing the static site files under publish/wwwroot/
dotnet publish src/BlazorApp/BlazorApp.csproj \ -c Release \ -o publish \ --nologo# Output: publish/wwwroot/
Upload (multiple sync passes for correct MIME types):
Blazor’s dotnet publish generates pre-compressed .br (Brotli) variants of .wasm, .js, and .dat files. S3 doesn’t know how to deliver these correctly without explicit Content-Encoding and Content-Type headers. The AWS CLI –content-type auto-detection does not help here. The script handles each file type explicitly:
Listing 4: upload script
Cache invalidation:
The invalidation flushes the cached objects. Because _framework/* files have content-hashed names, they will be re-cached immediately on the next request and users will get the correct versions.
Listing 5: cache invalidation script
Cache strategy summary
| Path | Cache-Control | Reason |
| _framework/* | max-age=31536000, immutable | File names include a content hash, safe to cache for one year |
| css/, lib/, images/ | max-age=31536000, immutable | Static assets; version via file name if they change |
| index.html | no-cache, no-store, must-revalidate | Must always be fresh so browsers pick up new deployments |
Step 4: Verify the Deployment
In a browser, navigate to the app_url from the Terraform outputs. You should see the Blazor app home page.
Verify the key headers with curl:
Listing 6: curl script
Test client-side routing by navigating to https://<your-url>/counter in a fresh browser tab. The Counter page should load correctly.
Optional: Add a Custom Domain
If you have a domain managed by Amazon Route 53, set these variables in terraform.tfvars:
custom_domain = "app.yourdomain.com"route53_zone_id = "Z1234567890ABC"
Terraform will:
1. Provision an ACM certificate in us-east-1 (required for CloudFront)
2. Add DNS CNAME records for certificate validation
3. Add an A alias record pointing your domain to the CloudFront distribution
4. Update the CloudFront distribution to require the certificate
Run terraform apply again after updating terraform.tfvars.
Note: ACM certificate creation requires DNS propagation and can take 5–30 minutes. Terraform will wait for validation to complete before proceeding.
Cleanup
To avoid ongoing charges, destroy the resources when you no longer need them.
1. Empty the S3 bucket (required before Terraform can delete it):
aws s3 rm s3://my-blazor-wasm-app --recursive
If you turned on versioning, you also need to delete the object versions:
# Delete all object versions
aws s3api delete-objects \
  --bucket my-blazor-wasm-app \
  --delete "$(aws s3api list-object-versions \
    --bucket my-blazor-wasm-app \
    --query '{Objects: Versions[].{Key:Key,VersionId:VersionId}}' \
    --output json)"

# Delete all delete markers
aws s3api delete-objects \
  --bucket my-blazor-wasm-app \
  --delete "$(aws s3api list-object-versions \
    --bucket my-blazor-wasm-app \
    --query '{Objects: DeleteMarkers[].{Key:Key,VersionId:VersionId}}' \
    --output json)"
2. Destroy all Terraform-managed resources:
cd infraterraform destroy
Terraform will show a plan of everything to be deleted. Type “yes” to confirm. CloudFront distribution deletion takes a few minutes after it is disabled.
3. Verify the bucket is gone:
aws s3 ls | grep my-blazor-wasm-app# Should return no output
Conclusion
In this post, you hosted a .NET 10 Blazor WebAssembly application on AWS using S3 as a private origin and CloudFront as the CDN, with infrastructure managed by Terraform.
Key takeaways:
· Blazor WASM is static: dotnet publish produces a folder of files that S3 stores natively with no server needed.
· OAC secures the origin: The S3 bucket is completely private; only the specific CloudFront distribution can read from it via SigV4-signed requests.
· Cache policies matter: _framework/* files are hashed and immutable. Cache them for a year. index.html must never be cached so that new deployments take effect immediately.
· Custom error responses solve SPA routing: Rewriting 403/404 → index.html (HTTP 200) lets the Blazor router handle client-side navigation, including direct URL access to deep links.
· MIME types require care: Pre-compressed .br files need explicit “Content-Encoding” and “Content-Type” headers set at upload time. The AWS CLI does not infer them correctly.
The same pattern works for other SPA frameworks such as React, Angular, Vue, and Svelte. Swap the dotnet publish step for the framework’s build command and everything else stays the same.