The Internet of Things on AWS – Official Blog
Convert glTF to 3D Tiles for streaming of large models in AWS IoT TwinMaker
Introduction
Have you experienced long wait times when loading up a 3D scene in AWS IoT TwinMaker? Perhaps struggling with poor rendering performance when navigating a complex 3D model? There is a way to convert your models into the 3D Tiles standard for efficient streaming in a scene.
In this blog you will learn how to compress a 3D model or Point Cloud file into 3D tilesets using Cesium ion and how to create a TwinMaker scene using the converted 3D tilesets. Using 3D tilesets, you can reduce the original model size by 50% to 90% and improve the rendering performance in an AWS IoT TwinMaker powered dashboard.
Overview
In this blog post, several file extensions and model process standards are referenced. Before getting started, here is a quick refresher on the terminologies that you will encounter in this blog:
- glTF – Graphics Language Transmission Format is a standard file format for three-dimensional scenes and models. A glTF file uses one of two possible file extensions: .gltf or .glb
- Cesium ion – Cesium ion is a robust, scalable, and secure platform for 3D geospatial data offered by Cesium.
- Draco Compression – Draco is an open-source library for compressing and decompressing 3D geometric meshes and point clouds. It is intended to improve the storage and transmission of 3D graphics. Cesium offers to use this compression to further reduce file size.
- 3D Tileset – 3D Tiles is an Open Geospatial Consortium (OGC) Community Standard. The 3D tileset is used for sharing, visualizing, fusing, and interacting with massive heterogeneous 3D geospatial content across desktop, web, and mobile applications.
AWS IoT TwinMaker supports 3D assets in the glTF and 3D Tiles format. glTF is the standard for displaying 3D content on a web browser, but today, very large (>100MB) and/or very complex models (>10K nodes) can take too long to render. glTF, and it’s binary format glb, can be converted to the 3D Tiles format to avoid long load times and low frame rate. 3D Tiles uses a hierarchical level of detail (HLOD) to stream content in tiles that are spatially bounded. Streaming content means a large asset will only render smaller chunks depending on where the user is oriented in the 3D scene. A tile can render the chunks in batches of distinct models, or instances of the same model can be optimally rendered. Point clouds can also be rendered in a tile as a complete model or separately as spatially bounded points. The 3D Tiles 1.0 format uses JSON and binary format to store the different tile types. This reorganization of large 3D assets allows IoT TwinMaker to deliver a 3D scene with high fidelity, a higher frame rate, and faster loading. Fast rendering of 3D scenes is imperative for effectively visualizing data in your digital twin.
Cesium ion is a powerful, fully managed platform for managing 3D geospatial data. Cesium ion’s 3D Tiling Pipeline compresses and converts large 3D models from many formats (gltf, .glb, .obj, .las, .laz, .fbx, .dae) into 3D Tiles to optimize rendering and streaming of the content to any device. Cesium ion stores 3D models, converts models into 3D Tiles, and exports the tilesets to an AWS S3 bucket. We will walk you through a step-by-step guide to convert a large model into 3D Tileset and import it as an AWS IoT TwinMaker scene using Cesium ion. The process will involve running the provided scripts to construct an IoT TwinMaker Scene with the converted 3D Tilesets.
Prerequisites
- An account on Cesium ion. You can register Cesium and choose the appropriate subscription plan based on your business requirement on this Cesium’s pricing page. To follow this blog post, you can choose the free community tier since the model size is smaller than 5GB.
- An existing AWS IoT TwinMaker Workspace
- AWS Cloud9 will be used for this blog. If you choose to run this in another environment, the following is required:
- Node.js, NPM, and Git installed
- A desktop with at least 5GB storage space and 4GB of ram to run the script.
Open Source Model
For this article we will use the open source Cookie Factory Warehouse model. This model will be downloaded in later steps. The CF_BUILDING.glb is 57MB.
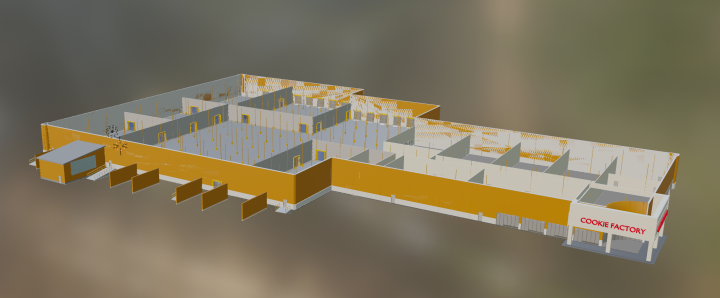
Cookie Factory Warehouse Model
Walkthrough
Step 1: Create a Cesium access token
- Login to your Cesium account and go to the tokens page
- Click Create token
- Name it TwinMaker token
- Toggle on the following permission scopes:
- assets:read
- assets:write
- assets:list
- archives:read
- archives:write
- Click Create
Tutorial reference for Cesium authentication

Cesium ion access token generation: toggle on the permissions in this image
Step 2: Prepare the cesium_sample script
Note: The script in this blog is not recommended for a production environment. Cesium ion is a 3rd party service so you must explicitly confirm that you opt-in to use it. We recommend reviewing terms and conditions that apply to this script on the Cesium website
- Log on to AWS Console and select a region that supports AWS IoT TwinMaker
- Launch AWS Cloud9 in your AWS Console
- Create a new environment and select t2.medium and Amazon Linux 2.
- In the terminal run this command to download the Cookie Factory Warehouse model
- In the terminal for AWS Cloud9, run the command below to clone the aws-iot-twinmaker-samples repo
- Install node modules for the scene_utils lib
- If you are using a dev machine other than AWS Cloud9, ensure you have created AWS credentials
-
- Minimum permissions are encapsulated in the following policy JSON:
-
- Run this command below to set your AWS Region environmental variable to the region of your AWS IoT TwinMaker workspace. The command below is using us-east-1 but may be different for your environment.
Step 3: Automated Conversion and Scene Creation
- Set the environment variable CESIUM_ACCESS_TOKEN with the token you created in Step 1
- Run the sample script with your workspaceId, a given sceneId, and the local path to CF_BUILDING.glb.
- View the Scene in your IoT TwinMaker workspace to see the scene and model created for you.
Result
You now have a new IoT TwinMaker scene with your 3D asset compressed using 3D Tiles! Click the Snap to floor checkbox on the right to see the full model above the floor.
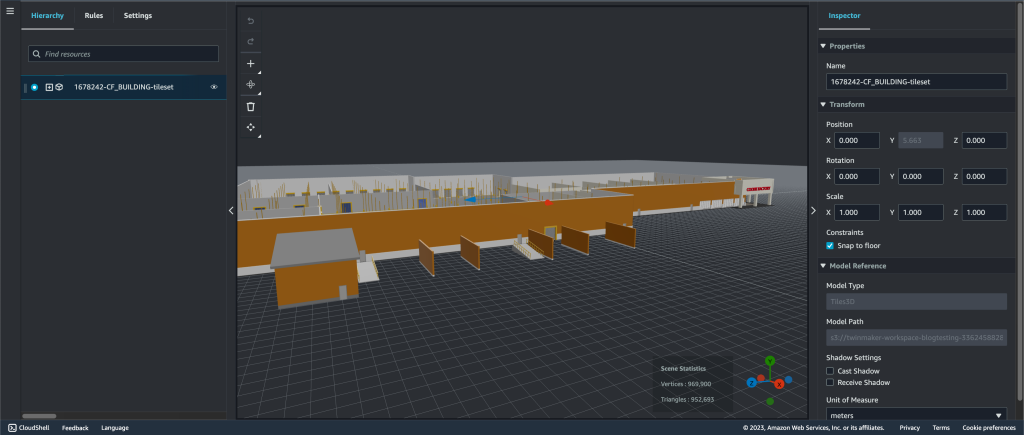
Example scene with the CF_BUILDING 3D tileset
File Size Compression
Now, navigate to Amazon S3, and locate your AWS IoT Twinmaker workspace S3 bucket. Checking the size of the Cookie Factory 3D Tileset in S3 shows a decrease in size from 57MB to 2.9MB. That is a 95% compression.
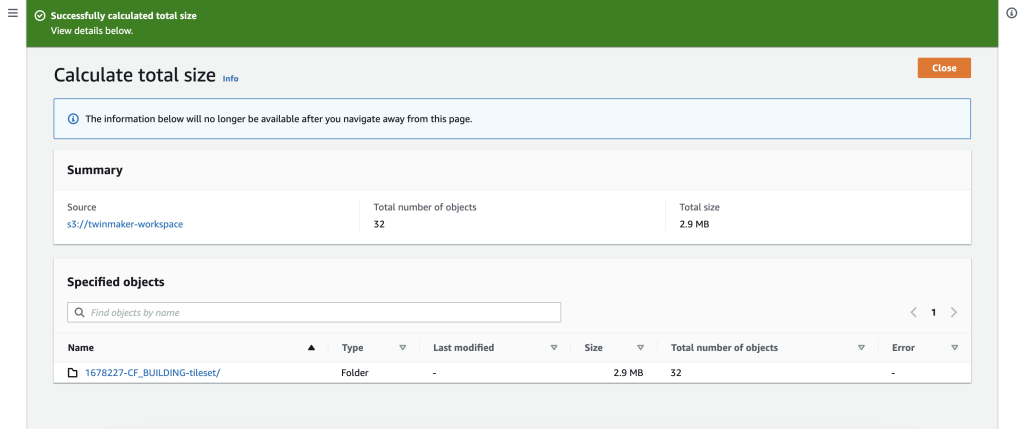
S3 folder size calculation for the cookie factory tileset
File Load Time Comparison
Scene Viewer took around 32 seconds to load the original 57MB glb file when it is directly added to the scene.
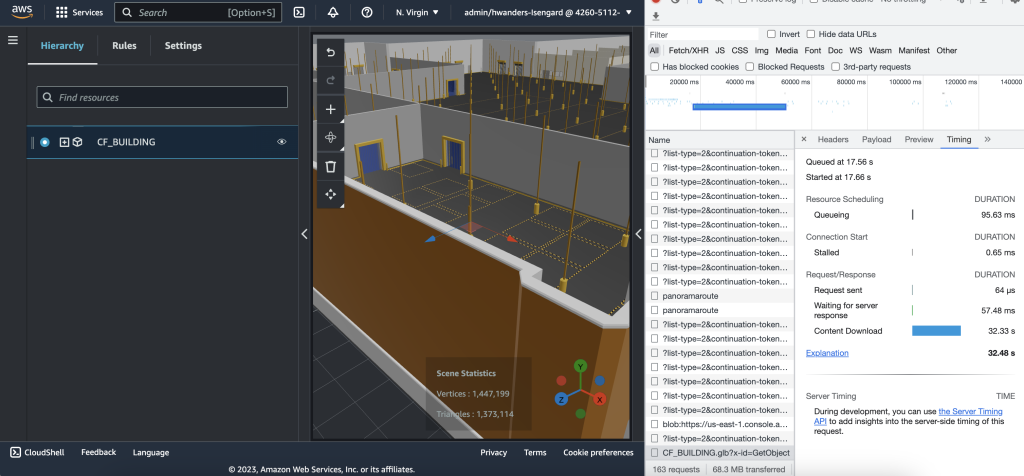
IoT TwinMaker scene with the original CF_BUILDING.glb – S3 GetObject network call timing tab shows >20s of load time
In comparison, Scene Viewer takes around 40ms to load the 3D tileset, reducing the loading time by 99.9%.

IoT TwinMaker scene with the cookie factory 3D tileset – accumulation of S3 GetObject network calls complete within 1 second as seen on the request timeline
Notable Differences
It is clear that 3D Tiles improves the loading and rendering experience of your 3D asset visualization. However, the 3D tileset is does not yet support geometric and semantic metadata. The Cesium team is currently working on this. Currently, the mesh hierarchy of the original file cannot be used for the sub-model selection feature. The images below compares a scene with the original CF_BUILDING glb and its mesh hierarchy breakdown to the scene with the CF_BUILDING tileset without any hierarchy breakdown.

IoT TwinMaker scene with the original CF_BUILDING.glb – mesh hierarchy list is supported |

IoT TwinMaker scene with the CF_BUILDING 3D tileset – there is no mesh hierarchy |
It is recommended to use the 3D Tiles conversion for large assets that serve as context for the background of a scene. In the Cookie Factory example, if you wanted the highlighted node to be further broken down and annotated then it should be extracted as a separate glTF/glb asset and added directly to the scene. This can be done with free and common 3D tools like Blender.
Troubleshooting
- Issue with the Cesium ion tiling process: If there is any error during the tiling conversion process, the sample script will notify you to check on your asset on the Cesium ion site asset page. One common issue is that a model is already draco compressed which is not supported as a source file for Cesium ion. For other issues please post to the Cesium Community Forum to reach the Cesium ion team directly.
- Script quit because a step took too long: The default wait times for tiling and downloading archives from Cesium ion is 5 minutes for each step. For very large files (>1GB) this could take longer. Please read the documentation of the sample script to see how to continue with the next step after Cesium finishes processing your asset.
Conclusion
In this blog, you learned how to convert a standard glTF/glb file into the optimized 3D Tiles and created a scene in AWS IoT TwinMaker with faster loading speed. You can apply this to any of your large assets. You can also edit the script for your use case. To learn how to customize the Scene Util script, please visit the source sample code.
Here are other model conversion blogs available, with more to come:
– How to convert and compress OBJ models to glTF for use with AWS IoT TwinMaker
About the authors
Harry Wandersman Harry is a Software Development Engineer on the IoT TwinMaker frontend service team. Harry has worked in the IoT space since 2018, helping build and develop the IoT SiteWise and TwinMaker services. Harry is passionate about 3D graphics and immersive virtual experiences, and its application in IoT to support digital twins. Harry is a Software Development Engineer on the IoT TwinMaker frontend service team. Harry has worked in the IoT space since 2018, helping build and develop the IoT SiteWise and TwinMaker services. Harry is passionate about 3D graphics and immersive virtual experiences, and its application in IoT to support digital twins. |
Chris Azer is a Principal IoT Specialist Solutions Architect helping customers with their digital twin initiatives. Chris has worked in various roles at AWS since 2017 supporting partners and customers with architecting IoT solutions. This includes a broad set of use cases covering the DoD, Manufacturing, State and Local Government, Federal and Civilian, Smart Cities, Partners, and others. His career in Industrial Automation dates back to 2004 where he continues to assist enterprises today with their smart manufacturing journey. is a Principal IoT Specialist Solutions Architect helping customers with their digital twin initiatives. Chris has worked in various roles at AWS since 2017 supporting partners and customers with architecting IoT solutions. This includes a broad set of use cases covering the DoD, Manufacturing, State and Local Government, Federal and Civilian, Smart Cities, Partners, and others. His career in Industrial Automation dates back to 2004 where he continues to assist enterprises today with their smart manufacturing journey. |