Migration & Modernization
Modernizing Legacy Applications with Event-Driven Architecture: The Leave-and-Layer Pattern
When your 20-year-old monolithic application needs new features and you can’t afford downtime or risk breaking existing functionality, what do you do? This challenge faces countless organizations running mission-critical legacy systems that power their business but struggle to keep pace with modern requirements.
At AWS, we often hear from customers who need to modernize their legacy applications while maintaining business continuity. In this blog post, we will explore how to use event-driven architecture (EDA) with the leave-and-layer pattern to modernize your applications incrementally.
The “leave-and-layer” architectural pattern, combined with using an event bus like Amazon EventBridge, enables you to add new capabilities to existing applications without the complexity and risk of traditional modernization approaches.
The Challenge: Innovation vs. Stability
Consider a scenario: a developer with extensive experience in JavaScript and .NET joins a company running a Java-based e-commerce application. The application has been successful for two decades, but the company is losing market share because they can’t innovate fast enough. The new developer’s lack of domain knowledge of the application and limited Java skills create a challenge.
The business needs to integrate with a third-party customer support system to notify teams whenever new customers sign up. The challenges are significant: the developer doesn’t know Java, the application can’t have downtime, and leadership mandates all new development must be cloud-native.
This scenario illustrates a common dilemma: how do you extend existing applications, with new modern components, while maintaining business continuity and reducing risk?
Two Paths: Strangler Fig vs. Leave-and-Layer
The Strangler Fig Pattern
The strangler fig pattern involves gradually replacing parts of a legacy application by extracting functionality from the monolith, implementing it as microservices, routing traffic to new services, and eventually “strangling” the old system.
While effective, this approach presents several challenges. Teams need deep knowledge of the existing codebase to safely extract functionality. Database splitting becomes complex when multiple services share data stores. Converting synchronous transactions to asynchronous patterns requires careful orchestration. Application Programming Interface (API) design and versioning add another layer of complexity as you manage contracts between old and new systems.
The Leave-and-Layer Pattern
The leave-and-layer pattern takes a fundamentally different approach. You leave the existing application completely unchanged while layering new functionality alongside it. This approach uses loose coupling for integration and allows you to build new capabilities in your preferred technology stack.
This pattern is ideal when you need to add functionality without affecting existing systems, work with unfamiliar legacy technology, deliver quickly with minimal risk, or build cloud-native extensions to traditional applications.

Figure 1- Strangler Fig versus Leave-and-Layer Pattern
Building Asynchronous Integration with Amazon EventBridge
The key to a successful leave-and-layer implementation lies in asynchronous communication. Modern systems benefit from asynchronous patterns where actions trigger responses without requiring immediate acknowledgment.
Amazon EventBridge provides foundation for event-driven architecture through three core components. Event producers are systems that generate events, such as when a new customer signs up. Event consumers are systems that react to these events, like sending notifications to support teams. The event broker, which is EventBridge itself, acts as the intelligent routing layer between producers and consumers.
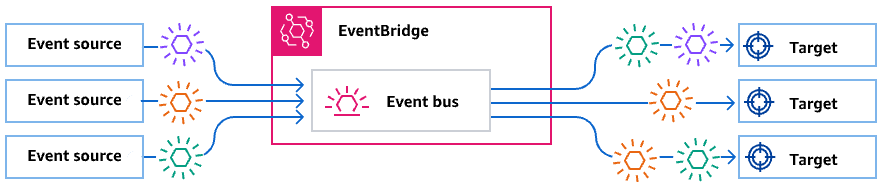
Figure 2 – Event-Driven Architecture with Amazon EventBridge
EventBridge offers three types of event buses to handle various integration scenarios. The default event bus works with events coming from AWS services. Custom event buses handle events from your applications. Software as a Service (SaaS) event buses integrate with upstream SaaS platforms that support EventBridge as a destination.
Implementation: Minimal Code, Maximum Impact
The integration challenge is solved with just a few lines of code added to the existing application. There are three steps: enabling event production in the legacy application, configuring EventBridge rules for routing and transformation, and setting up API Destinations for third-party integration.
The Complete Solution Architecture
The final architecture demonstrates the elegance of the leave-and-layer pattern. The legacy application continues running unchanged, serving existing customers without any disruption. A minimal event publishing layer publishes customer signup events to EventBridge.
EventBridge rules provide the integration intelligence, matching event patterns and transforming data as needed. API Destinations handle connections to external systems, providing reliable delivery with built-in retry mechanisms. The entire integration happens asynchronously, ensuring that third-party system availability doesn’t impact the core application.
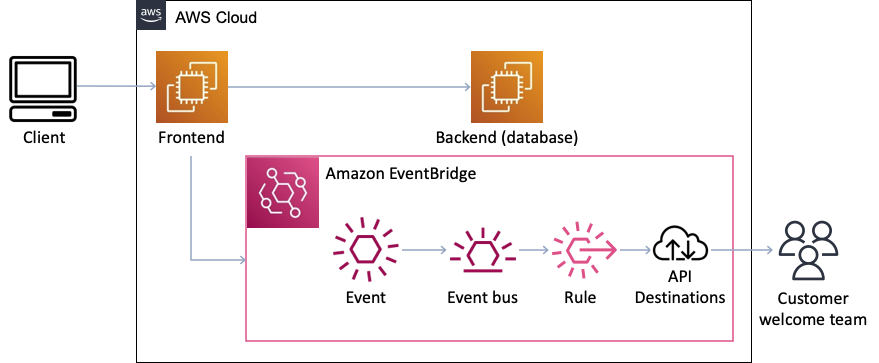
Figure 3 – Complete Leave-and-Layer Solution Architecture
Step 1: Enable Event Production
To add event publishing to your legacy application, create an abstraction layer that hides the EventBridge implementation details. This approach lets you switch between event buses and publish events both synchronously and asynchronously.
The following examples use the AWS SDK for Java v2 EventBridge client. Read, What is the AWS SDK for Java 2.x for complete SDK documentation.
Create the Event Publishing Interface
First, define the PostEvents interface that specifies how to publish events:
import java.util.concurrent.CompletableFuture;

public interface PostEvents {
    void publishEvent(String source, String detailType, Object eventData);
    CompletableFuture<Void> publishEventAsync(String source, String detailType, Object eventData);
}
Implement the EventBridge Publisher
Next, create the EventBridgeEventPublisher class that implements the PostEvents interface:
import software.amazon.awssdk.services.eventbridge.EventBridgeClient;
import software.amazon.awssdk.services.eventbridge.model.PutEventsRequest;
import software.amazon.awssdk.services.eventbridge.model.PutEventsRequestEntry;
import com.fasterxml.jackson.databind.ObjectMapper;
import java.util.concurrent.CompletableFuture;
import org.springframework.stereotype.Component;

@Component
public class EventBridgeEventPublisher implements PostEvents {
    private final EventBridgeClient eventBridgeClient = EventBridgeClient.create();
    private final ObjectMapper objectMapper = new ObjectMapper();

    @Override
    public void publishEvent(String source, String detailType, Object eventData) {
        try {
            PutEventsRequestEntry event = PutEventsRequestEntry.builder()
                .source(source)
                .detailType(detailType)
                .detail(objectMapper.writeValueAsString(eventData))
                .eventBusName("unicorn-shop-events")
                .build();

            eventBridgeClient.putEvents(PutEventsRequest.builder()
                .entries(event)
                .build());
        } catch (Exception e) {
            // Handle serialization/publishing errors
            throw new RuntimeException("Failed to publish event", e);
        }
    }

    @Override
    public CompletableFuture<Void> publishEventAsync(String source, String detailType, Object eventData) {
        return CompletableFuture.runAsync(() -> publishEvent(source, detailType, eventData));
    }
}
Update Your Controller
Finally, modify your controller to use the new event publishing abstraction:
import org.springframework.web.bind.annotation.RestController;
import org.springframework.web.bind.annotation.PostMapping;
import org.springframework.web.bind.annotation.RequestBody;
import org.springframework.http.ResponseEntity;

@RestController
public class UserController {
    private final PostEvents eventPublisher;

    public UserController(PostEvents eventPublisher) {
        this.eventPublisher = eventPublisher;
    }

    @PostMapping("/signup")
    public ResponseEntity<String> createUser(@RequestBody User user) {
        // Existing user creation logic remains unchanged...

        // Publish event using abstraction
        eventPublisher.publishEvent("unicorn.shop", "New Customer Signup", user);

        return ResponseEntity.ok("User created successfully");
    }
}
This approach maintains your existing user creation logic while adding event publishing capabilities. This abstraction provides several benefits: the EventBridge implementation details are hidden from business logic, and both synchronous and asynchronous publishing patterns are supported based on use case requirements.
Step 2: Configure EventBridge Rules
In Step 1, you configured your application to publish events with the source ‘unicorn.shop’ and detail type ‘New Customer Signup’. Now you’ll create rules to handle these specific events. EventBridge rules provide the intelligence layer that determines how events flow through your system. These rules match specific event patterns, transform data for downstream systems, and route events to appropriate targets, as shown in Figure 4. The rule includes pattern matching that ensures only events containing the required fields get processed. Any events that don’t match this pattern are automatically rejected.
You can create EventBridge rules using the AWS Command Line Interface (CLI), AWS CloudFormation, or the AWS Management Console. Here’s how to set up the rule using AWS CLI:
# First, create the custom event bus
aws events create-event-bus --name customer-events

# Create the EventBridge rule
aws events put-rule \
    --event-bus-name customer-events \
    --name customer-signup-rule \
    --event-pattern '{
        "source": ["ecommerce.application"],
        "detail-type": ["New Customer Signup"],
        "detail": {
            "firstName": [{"exists": true}],
            "lastName": [{"exists": true}],
            "email": [{"exists": true}]
        }
    }' \
    --description "Route new customer signup events to external systems"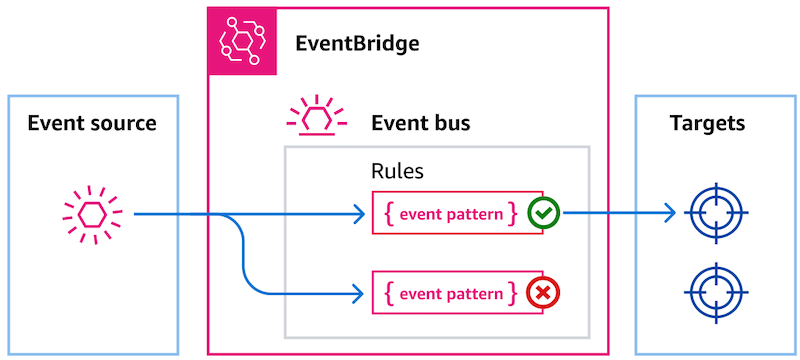
Figure 4 – EventBridge Rule Configuration and Event Flow
Step 3: Use API Destinations
EventBridge API Destinations eliminate the need for custom integration code when connecting to third-party systems. This feature provides built-in retry logic, error handling, and authentication support including API keys and OAuth.
You configure an API Destination pointing to your third-party system’s webhook URL. The rule includes an input transformer that converts the EventBridge event format into the JSON structure that the external system expects. This transformation happens entirely within EventBridge, requiring no additional compute resources or custom code.
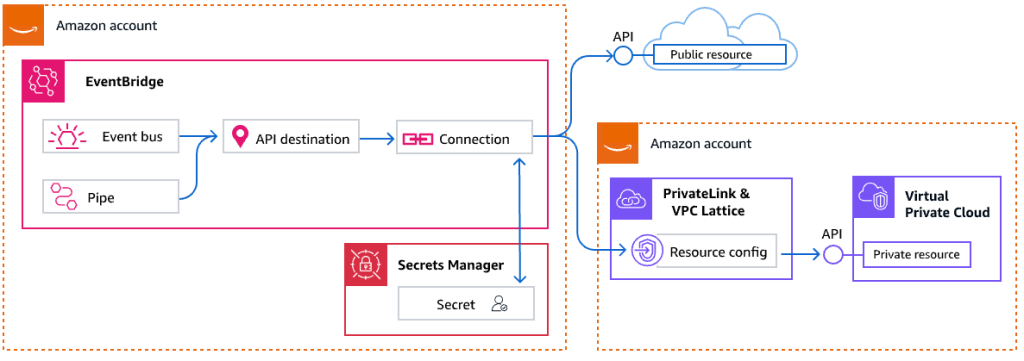
Figure 5 – API Destinations Integration Architecture
Create the Authentication Connection
First, set up authentication for your third-party system:
# Create a connection for authentication
aws events create-connection \
    --name slack-connection \
    --description "Connection to Slack webhook" \
    --authorization-type API_KEY \
    --auth-parameters '{
        "ApiKeyAuthParameters": {
            "ApiKeyName": "Authorization",
            "ApiKeyValue": "Bearer xoxb-your-slack-bot-token"
        }
    }'
Create the API Destination
Next, configure the destination endpoint:
# Create the API destination
aws events create-destination \
    --name slack-customer-notifications \
    --description "Send customer notifications to Slack" \
    --connection-arn arn:aws:events:us-east-1:123456789012:connection/slack-connection \
    --http-method POST \
    --invocation-endpoint https://hooks.slack.com/services/YOUR/SLACK/WEBHOOK
Add the Target to Your Rule
Finally, connect the API destination to your EventBridge rule:
# Add the API destination as a target to the rule
aws events put-targets \
    --event-bus-name customer-events \
    --rule customer-signup-rule \
    --targets '[
        {
            "Id": "1",
            "Arn": "arn:aws:events:us-east-1:123456789012:destination/slack-customer-notifications",
            "HttpParameters": {
                "HeaderParameters": {
                    "Content-Type": "application/json"
                }
            }
        }
    ]'
Benefits Realized
This approach delivers immediate and measurable value to organizations. Existing applications experience limited downtime during implementation and continue to serve customers with no performance impact on the legacy application. Development teams can deliver new features within single sprints, demonstrating the speed advantage of the leave-and-layer approach.
Developers can implement solutions using familiar AWS services rather than spending weeks learning legacy frameworks and patterns. The cloud-native foundation built with EventBridge provides a platform for future integrations without requiring additional changes to legacy applications. When used with the strangler fig pattern, this can accelerate the decomposition of the monolith by providing loose coupling.
Perhaps most importantly, the solution proves its resilience in production. When external systems experience temporary outages, EventBridge automatically retries failed deliveries, ensuring no notifications are lost.
Key Takeaways
Pattern selection impacts project success. Choose leave-and-layer pattern when you need to extend rather than replace functionality, especially when working with unfamiliar technology stacks or tight delivery timelines.
Asynchronous architecture provides inherent resilience. Event-driven systems handle third-party unavailability gracefully, automatically retrying failed operations and maintaining system stability even when dependencies experience issues.
Minimal code changes can enable significant new capabilities. With a few lines of code to unlock integration possibilities that would require extensive custom development using traditional approaches.
EventBridge simplifies complex integrations through managed services. API Destinations eliminate the need for custom integration code, while built-in transformation capabilities handle data format differences between systems.
Call to Action
Ready to implement the leave-and-layer pattern in your own legacy modernization project? Start by exploring the EventBridge documentation to learn more about event-driven architecture patterns. For hands on work, try out Building Event-Driven Applications With Amazon EventBridge on Skill Builder or Building event-driven architectures on AWS Workshop Studio.