Networking & Content Delivery
How to integrate Linux instances with AWS Gateway Load Balancer
When I meet with customers and discuss AWS Gateway Load Balancer (GWLB), I often get asked for suggestions regarding integrating it with their existing Linux appliances. GWLB utilizes GENEVE encapsulation with some important custom metadata, which doesn’t natively work with either Linux or Linux’s GENEVE module (which is designed only for Ethernet (Layer 2) packets, and thus can’t handle the IP (Layer 3) packets that GWLB sends). These applications can range from firewalling appliances, to email inspection, deep packet inspection, and specialized Network Address Translation (NAT) solutions – anything that must be able to see traffic as a ‘bump in the wire’. Several posts have discussed the mechanisms behind GWLB, including this one, that go into the technical details. Previous posts, such as this, talk about a way to use Suricata’s built-in GENEVE handling to support that system using GWLB.
This post presents a sample handler that implements Linux virtual Layer 3 interfaces (using Linux’s TUN support, explained here) to handle the GWLB connectivity. This leaves customers free to focus on building their own inspection, monitoring, or any other logic they like that expects to work with normal Linux-based networking interfaces.
Solution overview
The example code that implements this solution is now posted here and it’s called “gwlbtun”. It handles all of the interaction details with GWLB, the GENEVE encapsulation, and packet handling requirements. This post provides examples on using gwlbtun to implement traffic shaping and NAT’ing. However, anything that can work on network traffic can be used with gwlbtun.
First, let’s look at what the gwlbtun application does. It runs as a user-space program, listening for incoming GENEVE packets from the GWLB. When it sees packets coming in from a new GWLB endpoint, it creates two new tunnel interfaces, named “gwo-(string)” and “gwi-(string)”, where the string is the base-60 encoded GWLB endpoint ENI ID. The “gwi” (for ‘gateway inbound’) interface provides the packets coming in from the endpoint, decapsulated, and appearing as the original L3 packet that the gateway endpoint received. After processing, a utility can opt to let the packet continue through by letting it go through the “gwo” (for ‘gateway outbound’) interface. The user space application listens to this interface, and it will re-encode the packet in the correct flow’s GENEVE headers, and then send it back out to the GWLB to continue its path. The simplest deployment, with a single endpoint and traffic flowing bi-directionally through GWLB, can look like the following drawing:

Figure 1: Network diagram of gwlbtun usage in 1-arm mode
We sometimes refer to this layout type as “1-arm” mode. This is because there is only a single way that traffic can flow in and out of the Inspection VPC. This post covers the alternative “2-arm” mode later.
The gwlbtun software handles every detail of the GENEVE handling. Furthermore, it takes a couple command line arguments that specify scripts or programs launch when setting up new endpoints, as can be seen in its help:
# ./gwlbtun -h
AWS Gateway Load Balancer Tunnel Handler
Usage: ./gwlbtun [options]
Example: ./gwlbtun

  -h         Print this help
  -c FILE    Command to execute when a new tunnel has been built. See below for arguments passed.
  -r FILE    Command to execute when a tunnel times out and is about to be destroyed. See below for arguments passed.
  -t TIME    Minimum time in seconds between last packet seen and to consider the tunnel timed out. Set to 0 (the default) to never time out tunnels.
             Note the actual time between last packet and the destroy call may be longer than this time.
  -p PORT    Listen to TCP port PORT and provide a health status report on it.
  -s         Only return simple health check status (only the HTTP response code), instead of detailed statistics.
  -d         Enable debugging output.
  -x         Enable dumping the hex payload of packets being processed.

---------------------------------------------------------------------------------------------------------
Tunnel command arguments:
The commands will be called with the following arguments:
1: The string 'CREATE' or 'DESTROY', depending on which operation is occurring.
2: The interface name of the ingress interface (gwi-<X>).
3: The interface name of the egress interface (gwo-<X>).  Packets can be sent out via in the ingress as well, but having two different interfaces makes routing and iptables easier.
4: The GWLBE ENI ID in base 16 (e.g. '2b8ee1d4db0c51c4') associated with this tunnel.

The <X> in the interface name is replaced with the base 60 encoded ENI ID (to fit inside the 15 character device name limit).
The -c and -r arguments allow a user-provided script to trigger on the new tunnel creation or destruction, with gwlbtun providing as inputs what is happening (“CREATE” or “DESTROY”), the interface names that gwlbtun has already created or is about to destroy, and the original ENI ID should scripts need that information. Those scripts can set up any networking or security constructs that are desired. The “example-scripts” directory contains several examples to serve as starting points.
Starting simple – Pass the traffic through
The most basic example script, named “create-passthrough.sh”, simply sets up a basic traffic shaper that mirrors from the input back to the output:
#!/bin/bash

echo "==> Setting up simple passthrough"
echo Mode is $1, In Int is $2, Out Int is $3, ENI is $4
tc qdisc add dev $2 ingress
tc filter add dev $2 parent ffff: protocol all prio 2 u32 match u32 0 0 flowid 1:1 action mirred egress mirror dev $3
These commands do the following:
Line 1: Standard bash script header
Lines 3-4: Echoing out that the script has fired and what its parameters are. This is only for informational purposes.
Line 5: Instruct tc to create a new “queueing discipline” (the base element to the Linux traffic control system) to the gwi- interface (given by gwlbtun as $2 to the shell script), applied to the ingress (incoming traffic).
Line 6: Apply a filter on the gwi- interface, parented to the root, matching all of the protocols, all packets, all of the flows, and mirroring them to the gwo- interface (given by gwlbtun as $3 to the shell script).
This implements the 1-arm drawing that’s shown above, using the Linux native traffic control (tc) functionality. Understanding tc is not required for gwlbtun to operate, and later examples don’t use it, but this is an example of what is possible. Customers can extend this to implement QoS, rate shaping, or other similar mechanisms. Furthermore, the main page for tc gives many examples of schedulers, Random Early Detection (RED) dropping, and other functionality. Customers may also find the documentation here for understanding tc. It’s a useful tool to have in the networking toolbox.
In the Gitlab repository, there’s an AWS CloudFormation script that sets up this topology, called “example-topology-one-arm.template”. By deploying that, and then using AWS Systems Manager to connect to our instances, we can see what’s happening.
% aws ssm start-session --target <gwlbtun instance id>
Starting session with SessionId: <session id>
sh-4.2$ sudo systemctl status gwlbtun
gwlbtun.service - AWS GWLB Tunnel Handler
   Loaded: loaded (/usr/lib/systemd/system/gwlbtun.service; static; vendor preset: disabled)
   Active: active (running) since Thu 2022-03-10 18:56:27 UTC; 1h 54min ago
 Main PID: 28839 (gwlbtun)
   CGroup: /system.slice/gwlbtun.service
           └─28839 /root/aws-gateway-load-balancer-tunnel-handler/gwlbtun -c /root/aws-gateway-load-balancer-tunnel-handler/example-scripts/create-passthrough.sh -p 80

Mar 10 18:56:27 ip-10-10-1-65.us-west-2.compute.internal systemd[1]: Started AWS GWLB Tunnel Handler.
Mar 10 18:56:41 ip-10-10-1-65.us-west-2.compute.internal gwlbtun[28839]: New interface gwi-g0W4R5VOKSp and gwo-g0W4R5VOKSp for ENI ID 8665b333888bd421 created.
Mar 10 18:56:41 ip-10-10-1-65.us-west-2.compute.internal gwlbtun[28839]: ==> Setting up simple passthrough
Mar 10 18:56:41 ip-10-10-1-65.us-west-2.compute.internal gwlbtun[28839]: Mode is CREATE, In Int is gwi-g0W4R5VOKSp, Out Int is gwo-g0W4R5VOKSp, ENI is 8665b333888bd421
These lines are indicating that the CloudFormation template successfully deployed gwlbtun onto our instance via the UserData script that was included in it, and that it has started. The log lines show that it has auto-detected the traffic coming from our Application host, and it has created the two virtual interfaces “gwi-g0W4R5VOKSp“ and “gwo-g0W4R5VOKSp“ for use. Then, it called the “create-passthrough.sh” script to enable everything.
We can verify that this is working by using Systems Manager to connect to the Application instance. Since this requires network connectivity, and the only connectivity is via GWLB and gwlbtun, it’s a good test case:
% aws ssm start-session --target <application instance id>
Starting session with SessionId: <session id>
sh-4.2$
We can test by pinging a remote host – 8.8.8.8 in this example:
sh-4.2$ ping 8.8.8.8
PING 8.8.8.8 (8.8.8.8) 56(84) bytes of data.
64 bytes from 8.8.8.8: icmp_seq=1 ttl=101 time=11.7 ms
64 bytes from 8.8.8.8: icmp_seq=2 ttl=101 time=9.77 ms
64 bytes from 8.8.8.8: icmp_seq=3 ttl=101 time=9.95 ms
Leaving this ping running, we can do a tcpdump on the eth0 interface of our gwlbtun instance to understand what’s happening from our application. The application has taken the IP address 10.20.0.60 for this example. Capturing only one ping and its reply, we see the following:
sh-4.2$ sudo tcpdump -n -i eth0 port 6081
tcpdump: verbose output suppressed, use -v or -vv for full protocol decode
listening on eth0, link-type EN10MB (Ethernet), capture size 262144 bytes
21:11:25.948176 IP 10.10.1.150.60362 > 10.10.1.65.6081: Geneve, Flags [none], vni 0x0, options [32 bytes]: IP 10.20.0.60 > 8.8.8.8: ICMP echo request, id 8242, seq 946, length 64
21:11:25.948597 IP 10.10.1.65.60362 > 10.10.1.150.6081: Geneve, Flags [none], vni 0x0, options [32 bytes]: IP 10.20.0.60 > 8.8.8.8: ICMP echo request, id 8242, seq 946, length 64
21:11:25.955709 IP 10.10.1.150.60362 > 10.10.1.65.6081: Geneve, Flags [none], vni 0x0, options [32 bytes]: IP 8.8.8.8 > 10.20.0.60: ICMP echo reply, id 8242, seq 946, length 64
21:11:25.956236 IP 10.10.1.65.60362 > 10.10.1.150.6081: Geneve, Flags [none], vni 0x0, options [32 bytes]: IP 8.8.8.8 > 10.20.0.60: ICMP echo reply, id 8242, seq 946, length 64
Fortunately, tcpdump (along with similar tools like Wireshark) understand GENEVE and help decode some of the data. Looking at the captured packet line, along with a diagram of the packet, can help understand what tcpdump is telling us:

Figure 2: GENEVE-encapsulated packet diagram
Looking at this packet from right to left can be easier. GWLB has encapsulated the original ICMP packet, from 10.20.0.60 to 8.8.8.8, as shown on the far right. One layer up is the GENEVE header that GWLB added. Gwlbtun records the options inside of the header (the ENI ID and Flow Cookie) to be able to re-apply them when sending traffic back out toward GWLB. GWLB added the outer UDP header to send the traffic to our gwlbtun instance.
The four lines are, in order, the ping request coming into gwlbtun which appears on the gwi- interface, the ping request sent out the gwo- interface, the ping reply coming back in, and finally the reply being sent back to GWLB to continue onward.
Next, we inspect the same packets, decapsulated, on the gwi interface:
sh-4.2$ sudo tcpdump -i gwi-g0W4R5VOKSp -n
tcpdump: verbose output suppressed, use -v or -vv for full protocol decode
listening on gwi-g0W4R5VOKSp, link-type RAW (Raw IP), capture size 262144 bytes
21:11:25.948415 IP 10.20.0.60 > 8.8.8.8: ICMP echo request, id 8242, seq 946, length 64
21:11:25.956061 IP 8.8.8.8 > 10.20.0.60: ICMP echo reply, id 8242, seq 946, length 64
This is done along with the packets on the matching gwo- interface:
sh-4.2$ sudo tcpdump -i gwo-g0W4R5VOKSp -n
tcpdump: verbose output suppressed, use -v or -vv for full protocol decode
listening on gwo-g0W4R5VOKSp, link-type RAW (Raw IP), capture size 262144 bytes
21:11:25.948424 IP 10.20.0.60 > 8.8.8.8: ICMP echo request, id 8242, seq 946, length 64
21:11:25.956066 IP 8.8.8.8 > 10.20.0.60: ICMP echo reply, id 8242, seq 946, length 64
These packets match with the encapsulated packets seen earlier. However, they’re now native IP packets, with the GENEVE encapsulate handled by gwlbtun. Finally, we can get some statistics from gwlbtun itself by querying its status page, which is running on port 80. This is also used for the load balancer’s health check target, serving both roles.
sh-4.2$ curl localhost
<!DOCTYPE html>
<html lang="en-us">
<head><title>Health check</title></head><body>
UDP receiver on port 6081: Healthy, 77582 packets in, 76741737 bytes in, 0.627s since last packet.
Interface gwi-g0W4R5VOKSp: Healthy, 12 packets in from OS, 576 bytes in from OS, 77582 packets out to OS, 73638457 bytes out to OS, 0.627s since last packet.
Interface gwo-g0W4R5VOKSp: Healthy, 77593 packets in from OS, 73638985 bytes in from OS, 0 packets out to OS, 0 bytes out to OS, 0.627s since last packet.
Flow Cache contains 8 records - 0 were just purged.
</body></html>
This page provides some interface statistics, along with the number of flows that gwlbtun currently has cached. The cache is used to re-apply the GENEVE headers as required by GWLB on traffic egress. It will expire records out of its cache after 350 seconds of inactivity. Gwlbtun will return a 200 response code if everything is Healthy, and a 503 if there’s a problem. Therefore, a target group can direct traffic appropriately.
More complex example – NATing
The next example script, named “create-nat.sh”, sets up NAT’ing for the incoming traffic, and routes it out the instance’s native eth0. The return traffic is de-NAT’ed by the instance and routed directly back to the source instance. It doesn’t go back through GWLB (again because GWLB is a ‘bump in the way’ – the outer 5-tuple can’t be changed, which NAT’ing does). Transit Gateway can process this return traffic (as shown in the following), but any method that allows the network traffic through (VPC peering or others) will work. This topology is sometimes called “2-arm” mode:
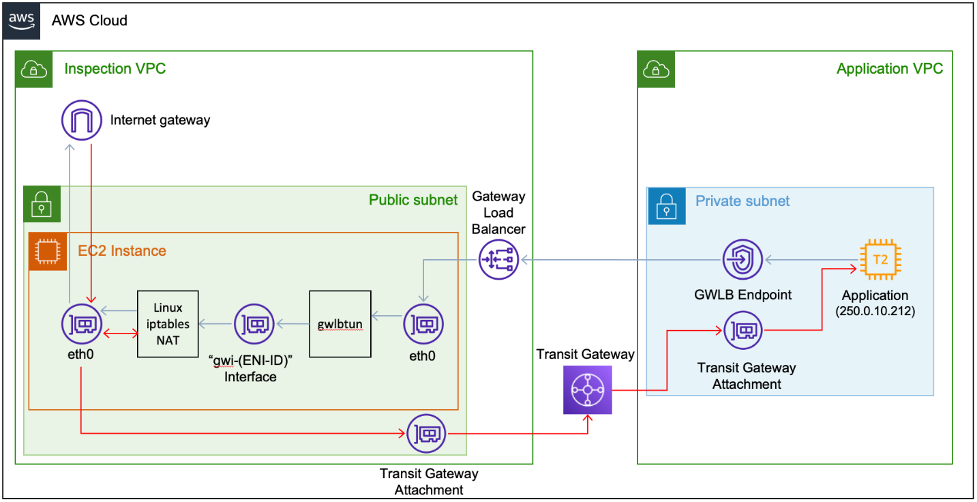
Figure 3: Network diagram of gwlbtun usage in 2-arm mode
The contents of the “create-nat.sh” script is as follows:
#!/bin/bash

# Note: This requires this instance to have Source/Dest check disabled:
# aws ec2 modify-instance-attribute --instance-id=<instID> --no-source-dest-check

echo "==> Setting up one-armed NAT"
echo Mode is $1, In Int is $2, Out Int is $3, ENI is $4

iptables -t nat -A POSTROUTING -o eth0 -j MASQUERADE
iptables -A FORWARD -i $2 -o eth0 -j ACCEPT

echo 1 > /proc/sys/net/ipv4/ip_forward
echo 0 > /proc/sys/net/ipv4/conf/$2/rp_filter
This script does the following:
Line 1: Standard bash script header.
Lines 3-4: A note that since this instance is doing NAT’ing, we must disable AWS’s default Source/Dest check for Amazon Elastic Compute Cloud (Amazon EC2) instances.
Lines 6-7: Echoing out that the script has fired and what its parameters are. This is for informational purposes only.
Lines 9-10: Create NATing (called MASQUEADE by the Linux kernel) from the gwi- interface (passed by gwlbtun as $2 to the script) to the instance’s native eth0 interface.
Line 12: Make sure that the kernel’s IP packet forwarding is enabled (it is disabled by default).
Line 13: Disable the kernel’s Reverse Path Filtering on the gwi- interface.
The note about Source/Dest check is typical for NAT’ing applications inside of AWS. The disabling of the rp_filter on the gwi interface is needed because this tunnel interface doesn’t have an IP address of its own assigned to it (nor does it need one). Therefore, incoming traffic would normally be dropped by the kernel’s rp_filter.
Setting up our test 2-arm environment as above – with our “Application” at IP address 250.0.10.212 doing a ping to 8.8.8.8, and doing a packet capture on the gwlbtun’s eth0 showing the incoming GWLB packets – helps explain what GWLBTun is doing with the above NAT script. First, let’s inspect the incoming GENEVE packets, which appear as UDP port 6081 traffic on eth0:
[root@t1 ec2-user]# tcpdump -i eth0 -n port 6081
tcpdump: verbose output suppressed, use -v or -vv for full protocol decode
listening on eth0, link-type EN10MB (Ethernet), capture size 262144 bytes
00:42:04.491081 IP 172.31.6.107.60270 > 172.31.5.12.6081: Geneve, Flags [none], vni 0x0, options [32 bytes]: IP 250.0.10.212 > 8.8.8.8: ICMP echo request, id 3114, seq 921, length 64
Next, inspect the decapsulated packets on the gwi interface:
[root@t1 ec2-user]# tcpdump -i gwi-5bsNEVT4BvM -n
tcpdump: verbose output suppressed, use -v or -vv for full protocol decode
listening on gwi-5bsNEVT4BvM, link-type RAW (Raw IP), capture size 262144 bytes
00:42:36.731169 IP 250.0.10.212 > 8.8.8.8: ICMP echo request, id 3114, seq 952, length 64
Here, you can see that the gwi- has had the outer IP header, outer UDP header, and GENEVE header removed by gwlbtun. Furthermore, the original packet is presented to the OS for processing.
Finally, watching the eth0 interface for ICMP packets shows our ping NAT’ed out (packet 1), the response coming back (packet 2), being de-NAT’ed, and sent back out to the original host of 250.0.10.212 (packet 3):
[root@t1 ec2-user]# tcpdump -i eth0 icmp
tcpdump: verbose output suppressed, use -v or -vv for full protocol decode
listening on eth0, link-type EN10MB (Ethernet), capture size 262144 bytes
00:43:25.534885 IP ip-172-31-5-12.us-west-2.compute.internal > dns.google: ICMP echo request, id 3114, seq 999, length 64
00:43:25.542130 IP dns.google > ip-172-31-5-12.us-west-2.compute.internal: ICMP echo reply, id 3114, seq 999, length 64
00:43:25.542152 IP dns.google > 250.0.10.212: ICMP echo reply, id 3114, seq 999, length 64
Supporting multiple GWLB endpoints with the same instance
This same system can work for multiple GWLB endpoints if the original IP addresses do not overlap, or if you use advanced Linux routing techniques to implement multiple route tables to support the overlapping IP space. For example, with two VPCs:

Figure 4: Network diagram of using gwlbtun with multiple GWLB endpoints
This is the same overall traffic flow as the single VPC NAT model described above. The gwlbtun software manages the fact that there are now two separate endpoints from the same load balancer coming into it. Then, it creates a second pair of gwi- and gwo- virtual interfaces. The NAT examples don’t use the gwo- interfaces, so the drawing doesn’t show them. You may also use multiple GWLBs, pointing to the same gwlbtun instance, and it will handle that scenario as well. Modern Linux kernels don’t have any typical limits on the number of interfaces that can be created, and thus the number of endpoints that gwlbtun can manage. The limiting factor will be the RAM and CPU of the instance itself to process the traffic.
Demonstration
The GitHub repository includes a “example-topology-two-way.template” file in the example-scripts folder. This is a CloudFormation template that you can deploy that sets up the first topology pictured above (“1-arm” mode). It also lets you try things out. The template depends on Systems Manager to connect to the instances. If you haven’t enabled this on your account, simply:
- Log in to your AWS Account.
- Go to the Systems Manager service.
- Select “Quick Setup”.
- Select Host Management, and accept all defaults.
This will take a few minutes to complete. Alternatively, you can add in a small Amazon EC2 instance in the Application Public subnet, and then SSH to the other hosts from there.
Cleaning up
To avoid incurring future charges, delete the CloudFormation stack that was created.
Conclusion
AWS Gateway Load Balancer allows a centralized location for packet filtering, shaping, or other traffic manipulation functions. The GWLBTun program handles the work of managing the interface to GWLB. This lets you concentrate on the logic that you want to implement, using standard Linux utilities and interface handling.

Andrew Gray
Andrew is a Solutions Architect at AWS with a focus on networking. Prior to AWS, Andrew was a lead networking engineer for cable ISPs and large universities. He enjoys solving technical challenges that mix networking architecture, engineering, and programming.