Networking & Content Delivery
Introducing Amazon VPC Regional NAT Gateway
Overview
AWS NAT Gateway is a fully managed, highly available, and horizontally scalable Network Address Translation (NAT) service that enables resources in private subnets to initiate outbound connections to destinations outside their subnet using the NAT Gateway’s IP address. These destinations can include resources in the same VPC, different VPCs, the internet, or your on-premises network. By using a NAT Gateway, you can enable egress-only connectivity for your workloads while only needing to allowlist the NAT Gateway’s IP address. For additional NAT Gateway use cases, refer to the AWS documentation.
Today, AWS announced regional availability mode for NAT Gateways. With this launch, you can create a single NAT Gateway that automatically expands and contracts across availability zones (AZs) in your Virtual Private Cloud (VPC) based on your workload presence, to maintain high availability. You create a Regional NAT Gateway for your VPC, and you do not need public subnets in every availability zone to host your regional NAT Gateway (RNAT). In this post, we walk through how you can leverage this new availability mode on your NAT Gateways.
How it works and why it matters
Traditionally, NAT Gateways are built with high resilience in an AZ. To maintain high availability, you must create separate NAT Gateways for workloads in different AZs and only route traffic from workloads to the local NAT Gateway (in the same AZ).
Whenever you instantiate private workloads that need outbound internet access in a new AZ, you first create a public subnet in this AZ with a default route to the internet gateway, then create a NAT Gateway inside this public subnet and then create a route entry for the subnet hosting the private workload to route traffic to the NAT Gateway. You repeat this step every time you create workloads in a new AZ.
The Regional NAT Gateway (RNAT) simplifies this setup by eliminating the need for per-AZ deployments and reducing the number of components you need to manage. Your RNAT operates at the VPC level, and you do not need to create public subnets to host it. When expanding to a new AZ, you can reuse the same route table and the same Regional NAT Gateway ID. The Regional NAT Gateway automatically expands and maintains zonal affinity for high availability.
Benefits
Improved security posture
Traditionally, NAT Gateways require public subnets for internet access. Security conscious customers go to great lengths to ensure that their private resources have egress-only connectivity and that no one is allowed to instantiate resources inside the public subnets that are meant to host NAT Gateways. With Regional NAT Gateways, these customers no longer need a public subnet in the VPCs that host private and sensitive workloads. This eliminates any risk of accidentally instantiating sensitive workloads and exposing them to unsolicited traffic from the internet.
Built-in protection against port exhaustion
Your Regional NAT Gateway automatically associates an IP address any time it requires additional ports. Every IP address allocated to RNAT can support up to 55,000 concurrent connections to a unique destination (identified by a unique combination of destination IP, destination port and protocol).
If the connection count in an AZ approaches this threshold, RNAT automatically:
- Adds additional IP addresses in that AZ
- Scales up to a maximum of 32 IP addresses per AZ
This ensures high availability and protects workloads from port exhaustion without manual intervention.
Integrates with VPC IPAM to offer IP selection for translation
If your organization uses VPC IP Address Manager (IPAM), RNAT becomes even more powerful. You can configure RNAT to automatically pull IP addresses from your IPAM pools when:
- Expanding into a new Availability Zone
- Scaling up due to connection volume
IPAM policies dictate which addresses RNAT can use, giving you predictable, governed IP allocation across environments.
Scaling up of IPs takes approximately 5 minutes to complete and begins when the number of concurrent connections to the same destination exceeds approximately 40,000. When the number of concurrent connections to the same destination in that zone decreases to <20,000 for approximately 1 hour, the service scales down. It’s aggressive in scaling up and conservative in scaling down.
Maintaining full control over scaling and AZ selection
If you want to have more control on which IP does your RNAT use and which AZ it operates in, you can manually configure them. As soon as you do so, you enable the manual method. In this method, you are responsible for configuring the AZs for RNAT, managing the allocation and association of EIPs, and expanding or contracting across AZs to maintain high availability. When RNAT is not enabled in a particular AZ where you have workloads, any internet-bound traffic from those resources will be randomly routed to an AZ where RNAT is enabled. Be mindful of this behavior and consider enabling RNAT in all AZs where you have workloads to avoid cross-AZ data transfer charges.
Routing
For the routing configuration, your RNAT comes equipped with a route table containing an explicit route to the VPC’s Internet Gateway. You can use this route table to insert Network Firewall or other middle-boxes in the networking path between your private subnets and the NAT Gateway. We provide a detailed walk-through of this process in the ‘Getting Started’ section below.
Monitoring
Regarding monitoring, you can use Amazon CloudWatch metrics since RNAT emits the same metrics as zonal NAT for each AZ. For logs, the following Amazon CloudWatch logs are available:
resource-id(instead of ENI ID).az-id: The ID of the Availability Zone.pkt-srcaddr: The source IP address of the traffic.pkt-dstaddr: The destination IP address of the traffic.srcport: The source port of the traffic.dstport: The destination port of the traffic.protocol: The IANA protocol number of the traffic.
Use cases
Organizations should select their deployment model based on their specific requirements and operational preferences. Here are some of the most common implementation patterns:
- VPC internet egress – simplest
- VPC internet egress with traffic inspection
Let’s explore each of these patterns in detail to understand their implementation.
VPC internet egress
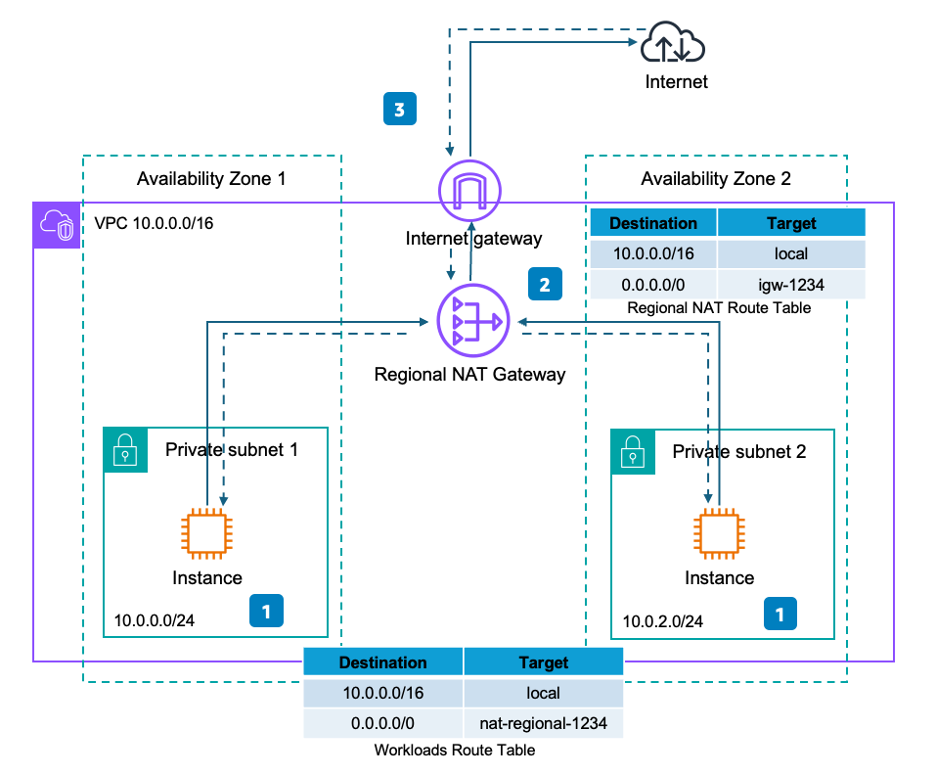
Figure 1: VPC internet egress with Regional NAT Gateway
- Application workloads requiring internet access consult their associated route tables, in this case, both subnets share the same routing table and there is only one route, which is the default (0.0.0.0/0) pointing to the Regional NAT Gateway ID.
- The RNAT receives the traffic and translates the resource’s private IP to its own Elastic IP, then consults its AWS-managed route table, which contains a default route pointing directly to the VPC’s Internet Gateway (IGW), enabling outbound internet access.
- The response traffic is destined for the Regional NAT Gateway which translates the destination IP address on the traffic to the IP address of the application.
VPC internet egress with traffic inspection

Figure 2: VPC internet egress with traffic inspection and Regional NAT Gateway
- Application workloads requiring internet access consult their associated route tables, in this case, each App Subnet has its own route table and each of them forward the traffic to the corresponding AWS Network Firewall (NFW) endpoint or an AWS Gateway Load Balancer endpoint (for third-party inspection appliances).
- The firewall inspects the traffic against defined security policies. If allowed, packets follow the route defined in the NFW endpoints subnet’s route table, which forwards internet-bound traffic to the RNAT.
- The RNAT receives the traffic and translates the resource’s private IP to its own Elastic IP, then consults its AWS-managed route table, which contains a default route pointing directly to the VPC’s Internet Gateway (IGW), enabling outbound internet access.
- When the response packet arrives from the internet, it first passes through the IGW and reaches the RNAT, which translates its assigned EIP to the resource’s private IP. The RNAT’s routing table rules are then evaluated, and as shown in the figure 2, the resource subnet’s CIDR range points to the corresponding AWS Network Firewall endpoint located in Firewall Subnet 1 or Firewall Subnet 2, as a next hop.
Getting Started
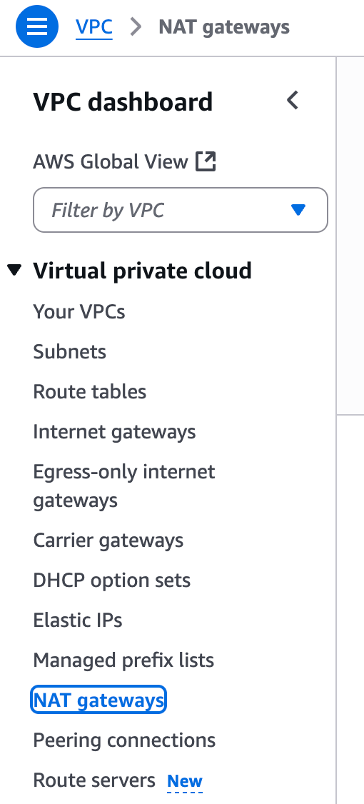
Let’s go through the steps to create a Regional NAT Gateway through the AWS Console. Open the Amazon VPC console on your desired region and select NAT gateways on the left:
Then click create NAT gateway:

Now you see two availability modes: Regional and Zonal. Let’s choose the regional. Then you need to select the VPC in which you want to create the Regional NAT Gateway and choose the desired method: Automatic or Manual. In this example, let’s choose manual:
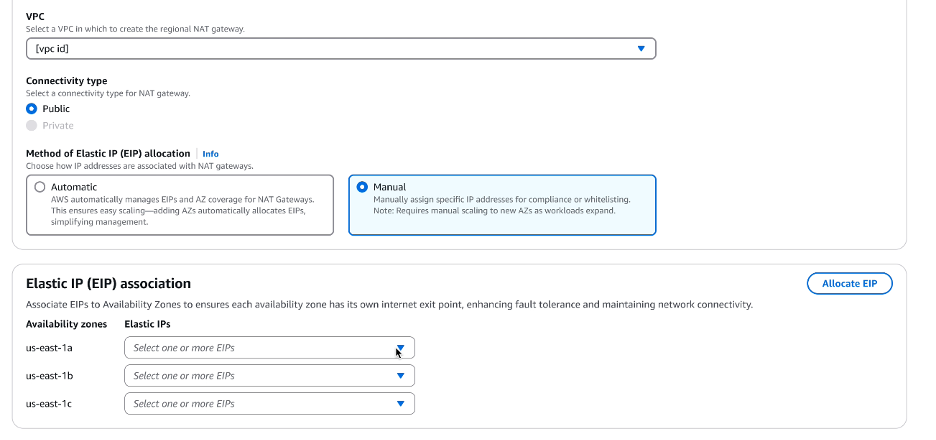
When manual option is selected, an EIP association drop-down menu appears where you’ll need to select one or more EIP addresses for each AZ where you want the RNAT to operate and then you click on Create NAT gateway:

After creation, you can view various details including the NAT Gateway ID, ARN, Availability mode, IP allocation method, Route Table ID, and associated IP addresses:

Let’s click on the Route table ID to see the RNAT routing table in more detail:

You can observe the default route (0.0.0.0/0) to the IGW, which was automatically added by AWS. You can add and edit additional routes to specific targets such as an Internet Gateway, Gateway Load Balancer/Network Firewall endpoints, or Network Interfaces.
You can also create and manage your regional NAT gateway using the AWS Command Line Interface (AWS CLI). Let’s see a couple of commands.
To create it in regional mode and automatic method:
$ aws ec2 create-nat-gateway \
--vpc-id vpc-123\
--availability-mode regional \
To remove an Elastic IP or Availability Zone support:
$ aws ec2 disassociate-nat-gateway-address \
--nat-gateway-id nat-123 \
--association-ids eipassoc-1 eipassoc-2 \
To know more CLI commands and APIs available, check our official documentation.
Considerations
Consider the following when using Regional NAT Gateway:
- RNAT isn’t bound to a specific subnet; instead, it’s associated with your entire VPC. Therefore, subnet-level configurations don’t apply to it.
- If you have workloads in a specific AZ, the RNAT’s automatic method will provide support to that zone. RNAT takes an average of 15-20 minutes and can take up to a maximum of 60 minutes, to expand to a new AZ upon ENI detection in that AZ. If your workloads launch faster, their internet-bound traffic will be temporarily routed to one of the RNAT AZs randomly, until scaling is complete.
- You’re only allowed to perform association of EIPs in manual method.
- With automatic method enabled, when you deploy workloads in an additional AZ, your RNAT will horizontally scale to that AZ and will automatically take care of allocating and associating an EIP to the RNAT in the new AZ
- You can have up to 5 RNATs in your VPC. Customers typically use more than one RNAT if workloads in their VPC require different set of allowlisted IP addresses to talk to different partner networks.
- RNAT supports 5 Gbps of bandwidth for each AZ and automatically scales up to 100 Gbps and supports TCP, UDP, and ICMP protocols.
- The RNAT route table cannot be linked to either additional subnets or other RNATs.
- Private connectivity type is not supported by RNAT at launch. For workloads requiring private connectivity, we recommend continuing with the zonal NAT Gateway implementation.
- For detailed pricing information and examples, please refer to the NAT Gateway pricing page.
Conclusion
NAT Gateway now offers a regional availability mode that simplifies internet egress architecture by operating at the VPC level instead of per-AZ. This new Regional NAT Gateway (RNAT) availability mode, automatically scales across Availability Zones based on workload presence, eliminates the need for public subnets, and reduces operational overhead. It provides built-in protection against port exhaustion by automatically managing IP addresses and integrates with VPC IPAM for governed IP allocation. This enhancement particularly benefits organizations looking to improve their security posture while simplifying their network architecture.
In this blog, we went over the benefits of using Regional NAT Gateway, its launch methods, some use cases and finally how to set it up. To learn more about this service, visit the NAT Gateway documentation, and if you have any questions, please don’t hesitate to reach out through AWS Support or your AWS account team.
About the authors

Daniel Neri
Daniel is a Telecommunications Engineer and currently serves as a Senior Networking Solutions Architect at AWS. He specializes in helping customers design secure, scalable, and cost-efficient cloud architectures using AWS technologies. When he’s not architecting solutions, you can find him enjoying his favorite sports or exploring new ways to stay active and energized.

Priyanka Khandelwal
Priyanka is a Senior Product Manager in the Networking and Security Services Team at Amazon Web Services. She is focused on making Virtual Private Clouds more intuitive and secure for the millions of customers running their workloads on AWS. In her free time, she enjoys playing soccer, trying out new recipes, and driving.