Networking & Content Delivery
Reintroducing Network Firewall Proxy for Secure Egress Connectivity
At re:Invent 2025 we launched AWS Network Firewall proxy in preview to gather feedback from customers before making it generally available. That feedback was clear and consistent: customers want the flexibility to use their Network Firewall, with all its existing capabilities, as an explicit proxy. Rather than managing a separate proxy product with its own security policy model, customers told us they would prefer to apply one security policy across both their transparent firewall and explicit proxy use cases, and to get the full set of Network Firewall features when they do it.
We took that feedback to heart. AWS is now re-introducing the explicit proxy as a capability of AWS Network Firewall rather than as a standalone product. With this change, the explicit proxy inherits everything Network Firewall already offers, and you can use the same security policy, and even the same firewall, for both transparent firewalling and explicit proxying. There is no second rule language to learn, no duplicate policy to keep in sync, and no separate product to operate. This post updates our earlier preview of AWS Network Firewall proxy.
To make this possible, Network Firewall is introducing a new deployment mode called no-source-preservation. In the default deployment mode you have used until now (source-preservation), the firewall receives traffic from the client through the firewall endpoint, inspects it, and returns it to the endpoint to continue on its path. Here, the traffic retains the source IP address of the client.
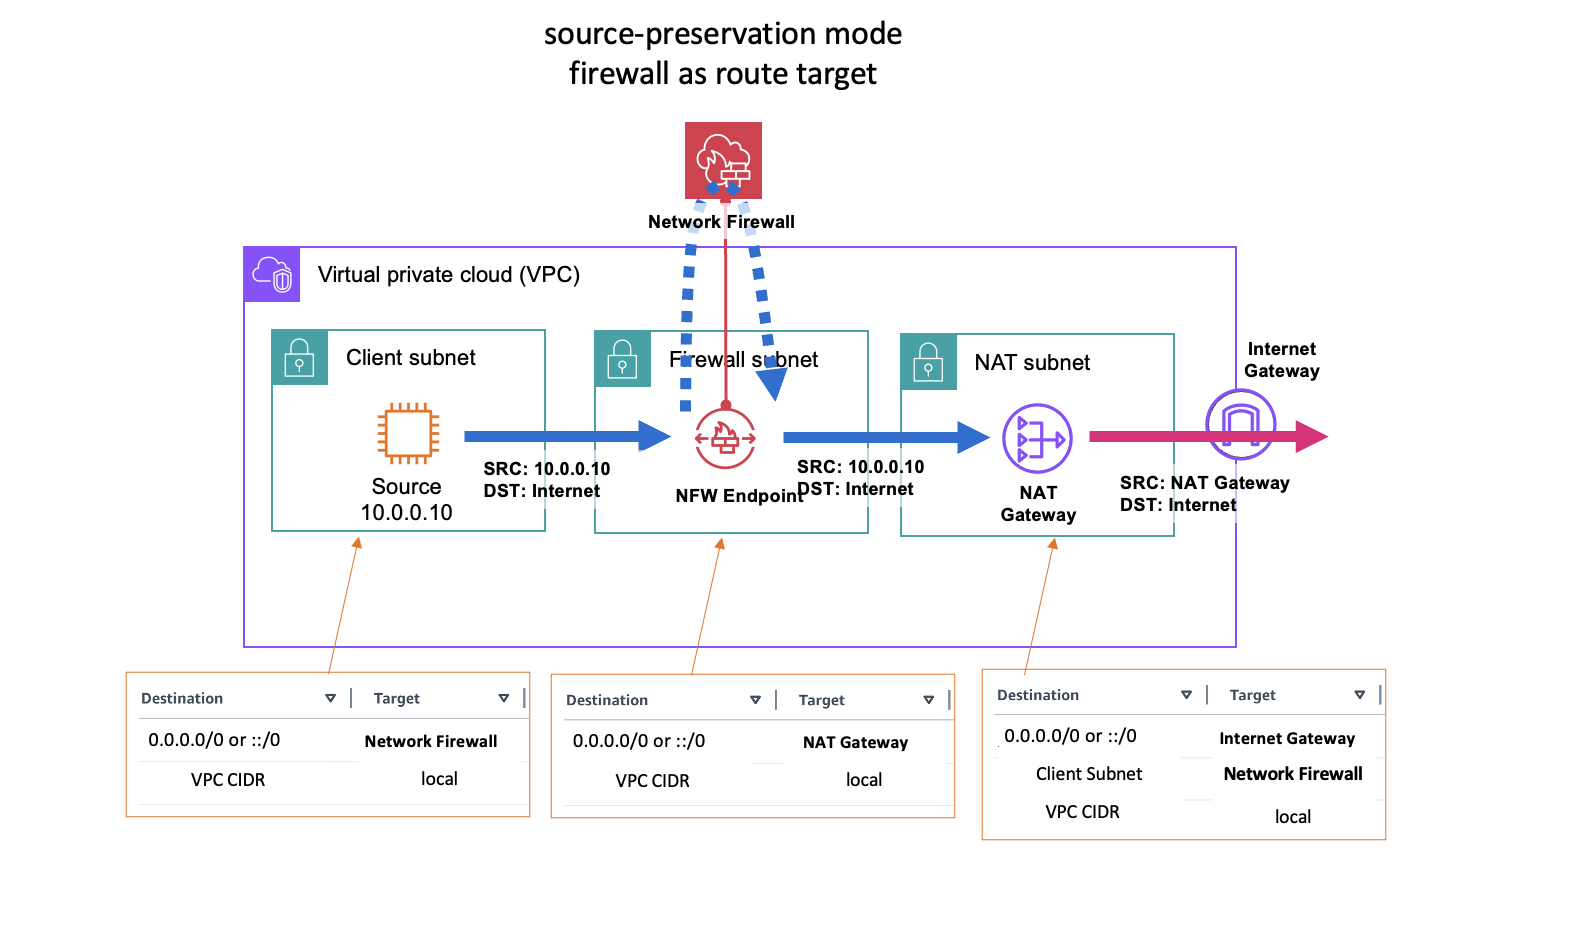
Figure 1: Default network firewall deployment – source-preservation and firewall as route target.
In no-source-preservation mode, the firewall is attached to a NAT Gateway. The Firewall filters the traffic, masks the original source of the filtered traffic and uses the IP address of the attached NAT Gateway to communicate with the upstream destination on the client’s behalf. With this mode, you can centralize egress even from networks with overlapping CIDRs.
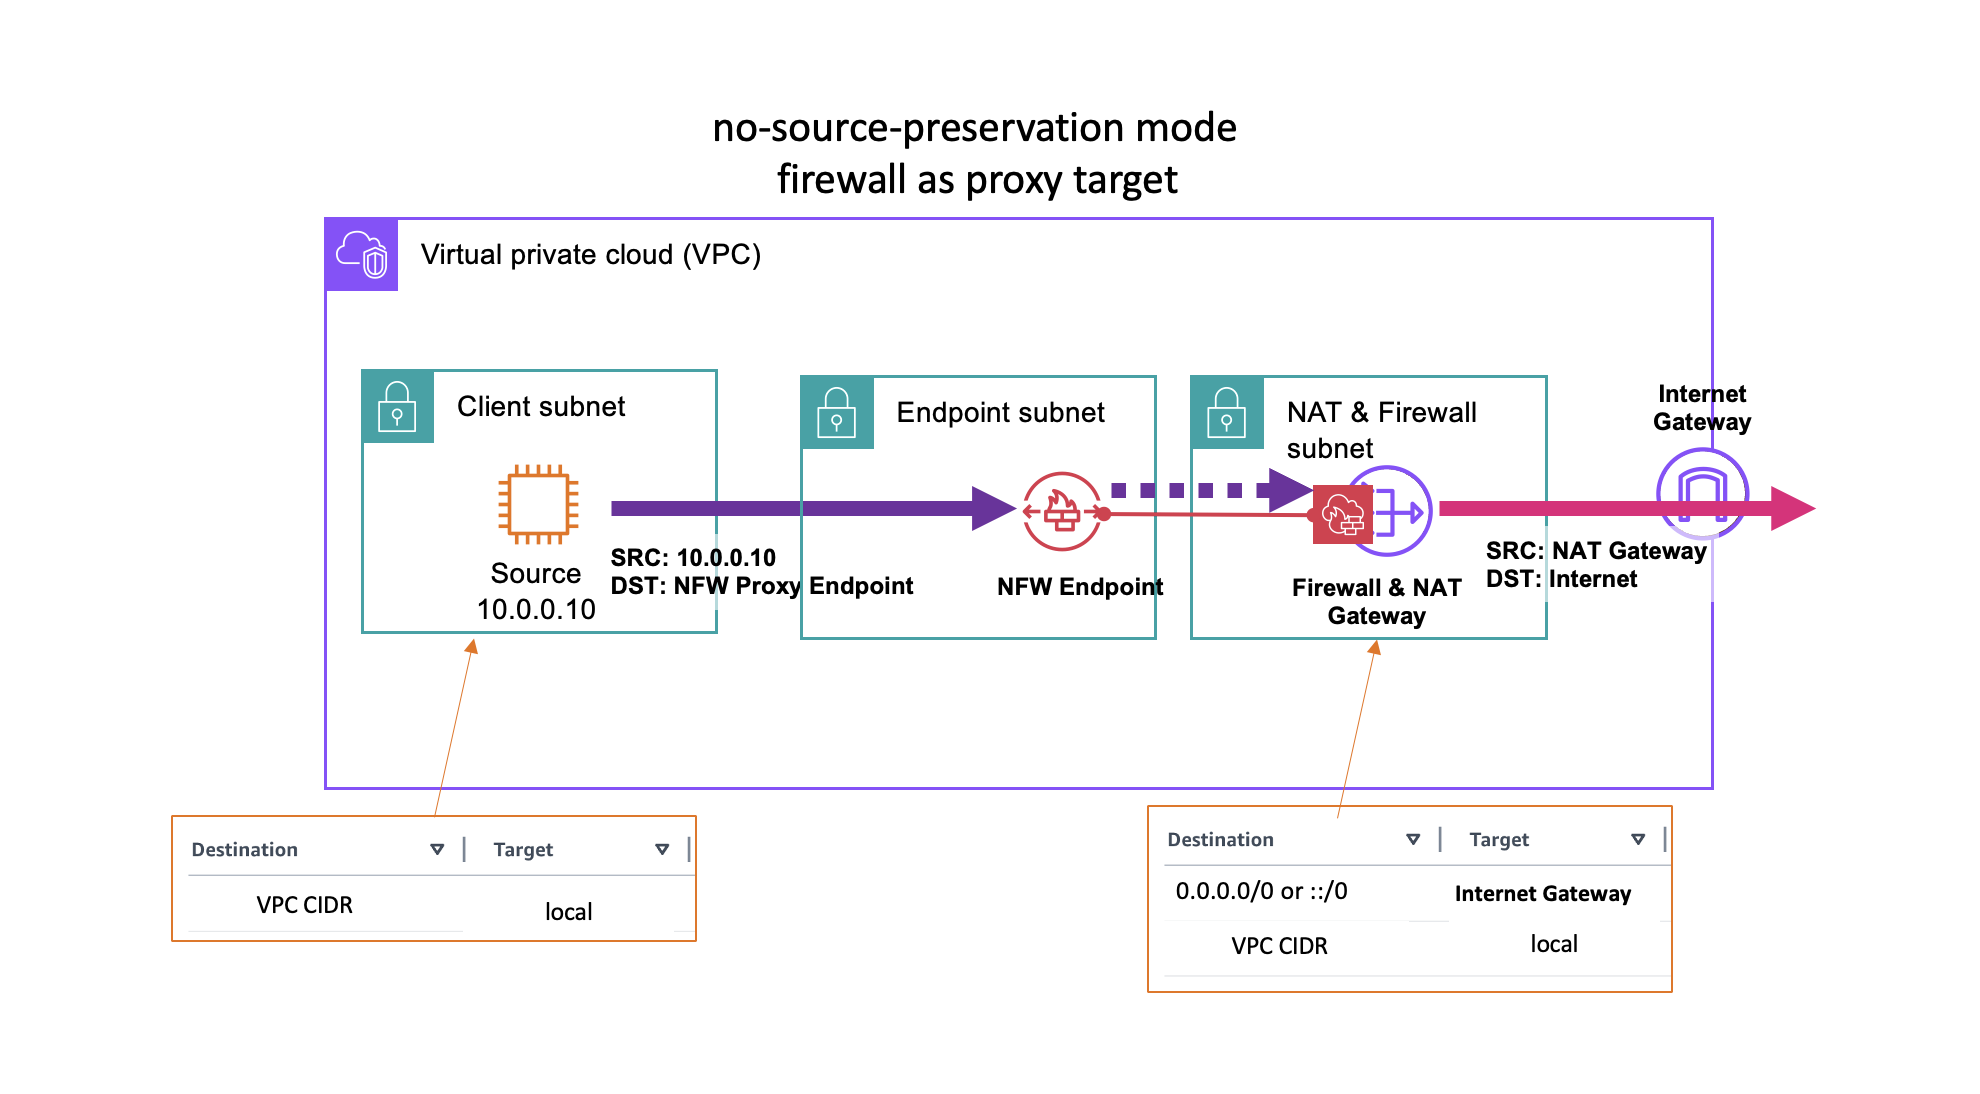
Figure 2 – New firewall deployment mode. Firewall as proxy target and no-source-preservation.
Features that the no-source-preservation Network Firewall (with explicit Proxy functionality) Now Supports
Because the explicit proxy is now a function of Network Firewall, it supports the full breadth of Network Firewall capabilities at preview and launch. Here is what you get.
Flexible stateful and stateless rules engine. Network Firewall’s Suricata-compatible rules engine provides Layer 3 through Layer 7 filtering and deep packet inspection. You can build fine-grained custom rules based on domain, port, protocol, IP address, and pattern matching, and arrange thousands of rules in the priority order you want.
Intrusion detection and prevention (IDS/IPS). The stateful engine inspects flows against signatures and can alert on or actively block suspicious traffic, giving you both detection and inline prevention from the same policy.
AWS managed rule groups. AWS maintains and continuously updates managed rule groups so you don’t have to curate signatures yourself: Domain and IP rule groups block HTTP/HTTPS traffic to low-reputation domains and to domains and IPs known or suspected to be associated with malware or botnets.
Threat signature rule groups cover several categories of threats, including malware and exploits, denial-of-service attempts, botnets, web attacks, credential phishing, scanning tools, and mail or messaging attacks.
Active threat defense. This advanced managed rule group provides network threat protection powered by Amazon threat intelligence. It blocks communication with known-harmful infrastructure, such as malware staging URLs, botnet command-and-control servers, and crypto-mining pools, across multiple protocols including TCP, TLS, HTTP, and outbound UDP, and it applies deep threat inspection using verified indicators to minimize false positives. AWS updates the indicators automatically, so no action is needed on your part once the rule group is attached.
Geographic IP filtering. Allow or block traffic based on the source or destination country, so you can enforce location-based egress policy without maintaining IP ranges yourself.
URL and domain category filtering. Using the aws_url_category and aws_domain_category keywords, you can filter traffic by category (for example, Malicious) and specify multiple categories per rule.
TLS inspection. The firewall can decrypt and inspect TLS to apply fine-grained Layer 7 policy, or leave TLS untouched and enforce policy on unencrypted metadata such as SNI, DNS, and IP address.
Container attribute-based rules for Amazon EKS and Amazon ECS. Instead of writing rules against ephemeral pod IP addresses, you can define rules using native container attributes including namespaces, pod names, labels, and cluster names. Network Firewall automatically discovers and tracks the pods that match your attributes, updating IP mappings in near real time as pods scale or restart. It also enriches alert logs with container context so security teams can trace allowed or blocked traffic back to the originating workload.
Automated domain lists. Network Firewall can analyze your HTTP/HTTPS traffic logs to surface domain usage patterns, helping you build accurate custom domain rules based on real traffic.
Logging and metrics. Alert logs, flow logs, and TLS logs can be published to the destination of your choice, and Amazon CloudWatch metrics give you near real-time visibility into dropped packets, TLS errors, and more. When using the proxy, logs are enriched with fields such as the requested domain from the CONNECT request, the SNI domain, the client’s network interface, and the VPC endpoint the traffic entered through.
Getting Started
You can set up Network Firewall in no-source-preservation mode in four steps.
Step 1: Create (or reuse) a firewall policy. A firewall policy is the top-level container where you stack your custom rule groups, AWS managed rule groups, and partner managed rule groups. If you already use Network Firewall, you can reuse your existing policy directly, and the same policy drives both transparent firewall and explicit proxy behavior. To create a new policy, follow the steps on this document
Step 2: Create the Network Firewall in no-source-preservation mode using the policy you created and establish connectivity. Go to the Network Firewall section in the VPC console and choose ‘Create Firewall’.
You can see the six steps required to create the Firewall. You set the deployment mode to no-source-preservation and later choose the security policy.
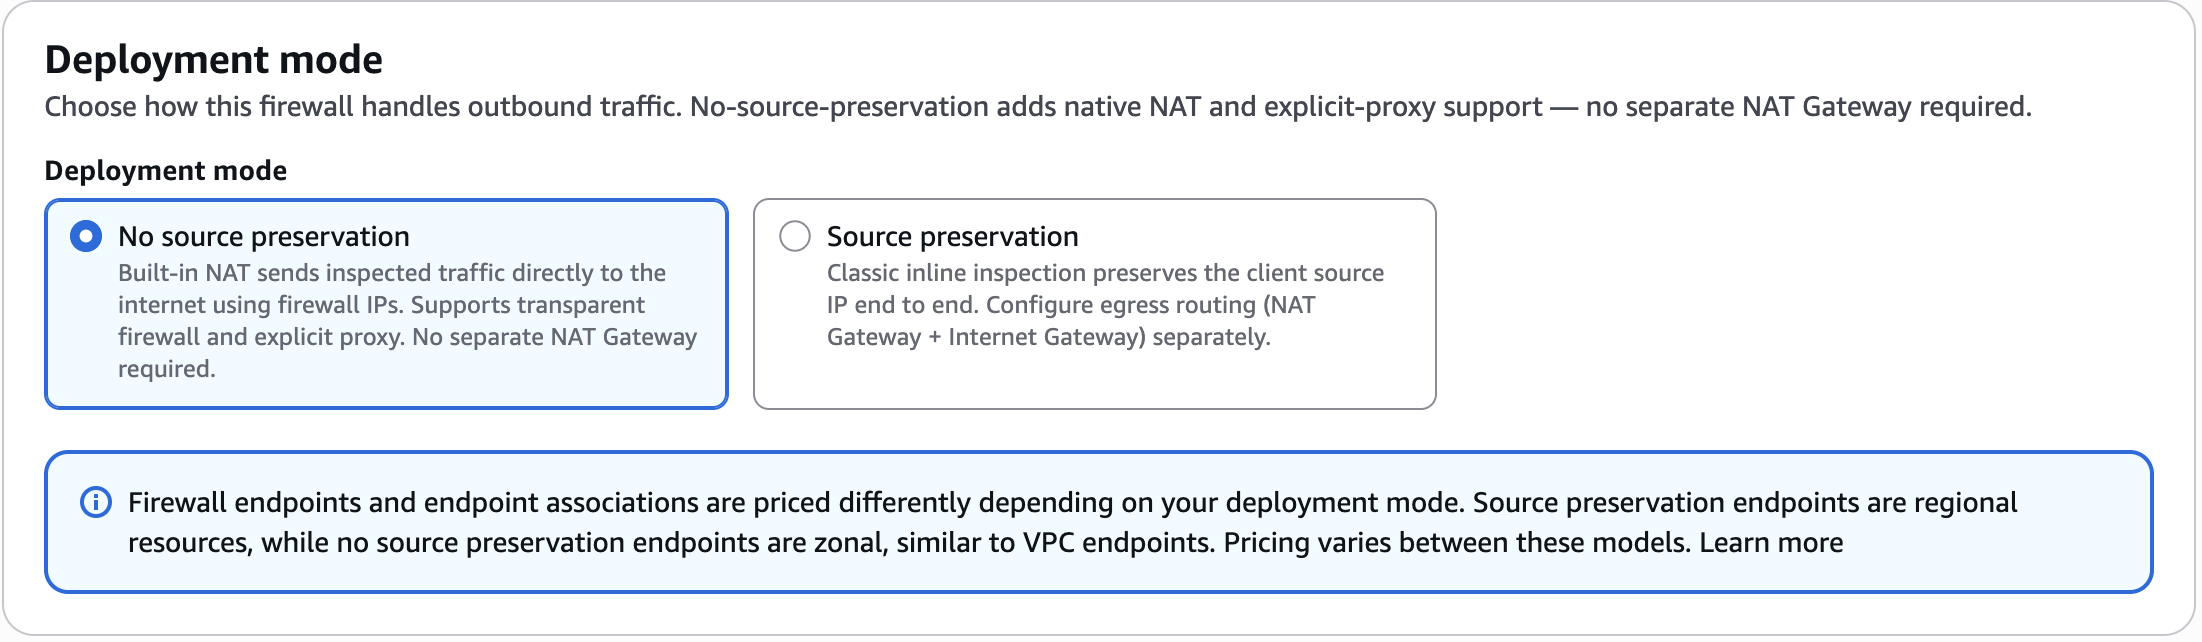
Figure 3: Create firewall console – deployment mode
Once you select the no-source-preservation deployment, you first need to select the NAT Gateway to which the Network Firewall is attached and then the VPC and the subnet where the Firewall endpoint is deployed.
Your traffic from the client ingresses from the endpoint, reaches the Firewall. The Firewall filters the traffic and the filtered traffic then egresses from the NAT Gateway using the NAT Gateway’s IP address to communicate with the destination.
Your NAT Gateway and the endpoint to access the Firewall must reside in the same availability zone. Once you select the NAT Gateway in your console, it shows the subnets in the same availability zone to drop your Firewall endpoint. You can drop the endpoint in the same VPC as the NAT Gateway or a different VPC.
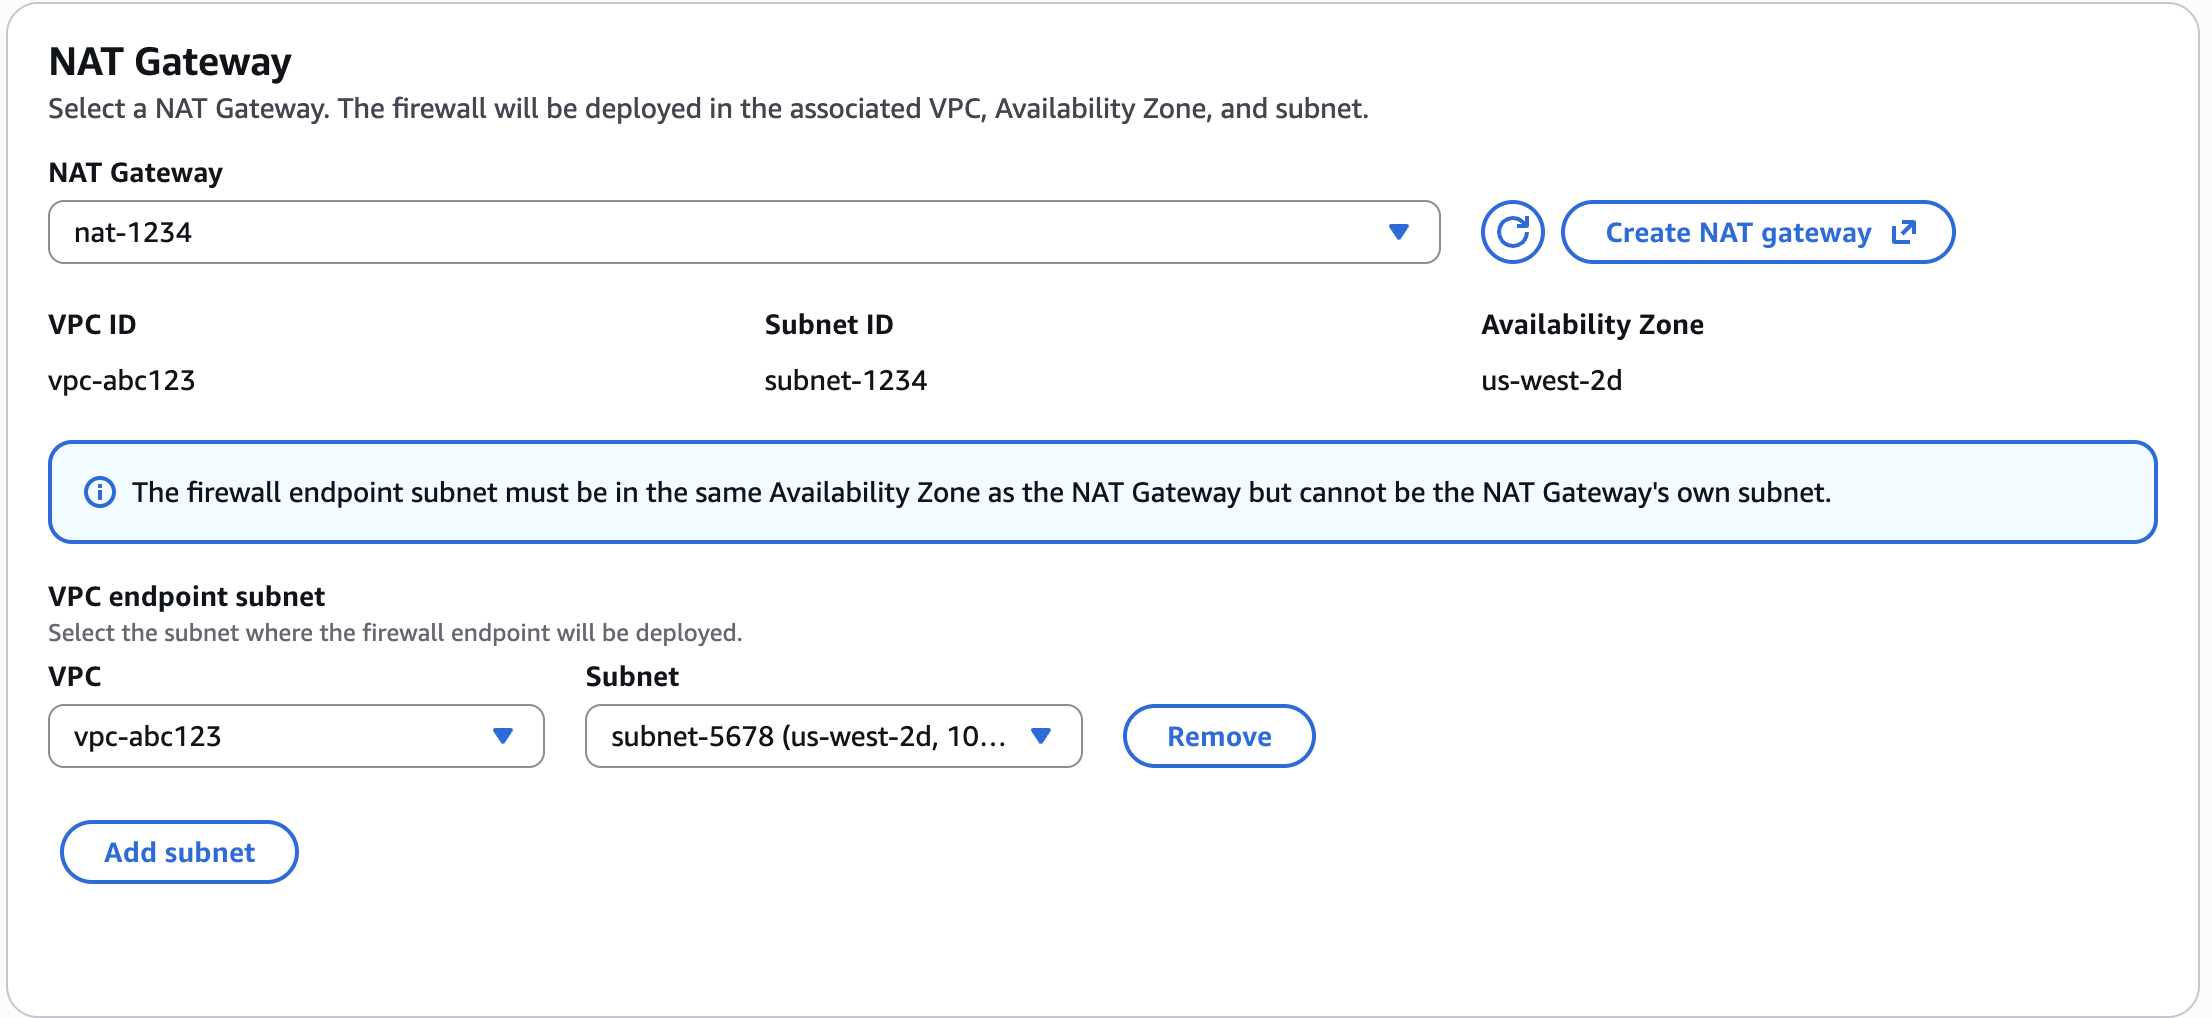
Figure 4: Create firewall console – NAT gateway and Endpoint
During preview, you can deploy only one endpoint for a Network Firewall.
In the next step, you can then select listeners for your Proxy:
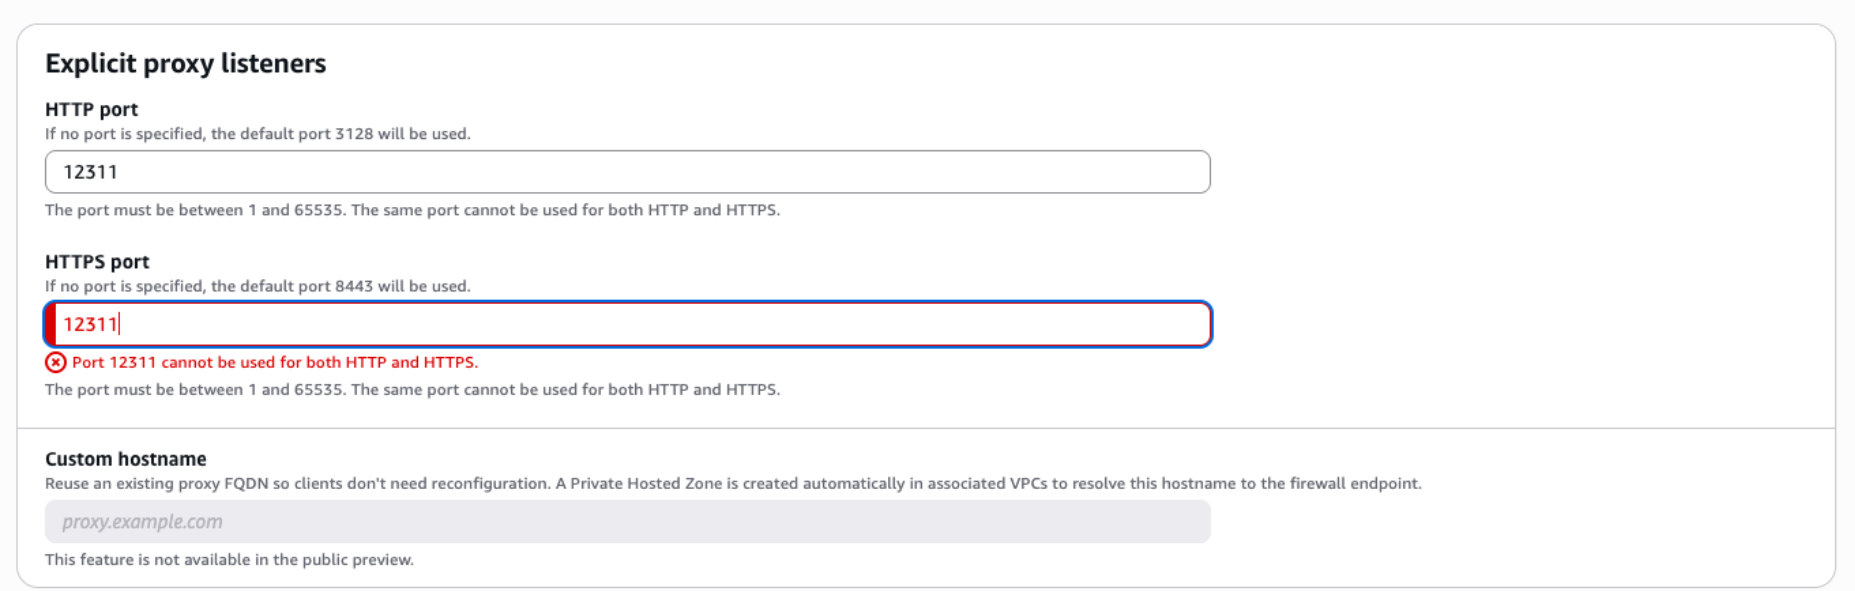
Figure 5: Create firewall console – proxy listeners
If you do not select listeners, the Firewall automatically picks port 3128 for HTTP and port 8443 for HTTPS traffic.
Next, you select the policy that you created, set the tags and create the Firewall.
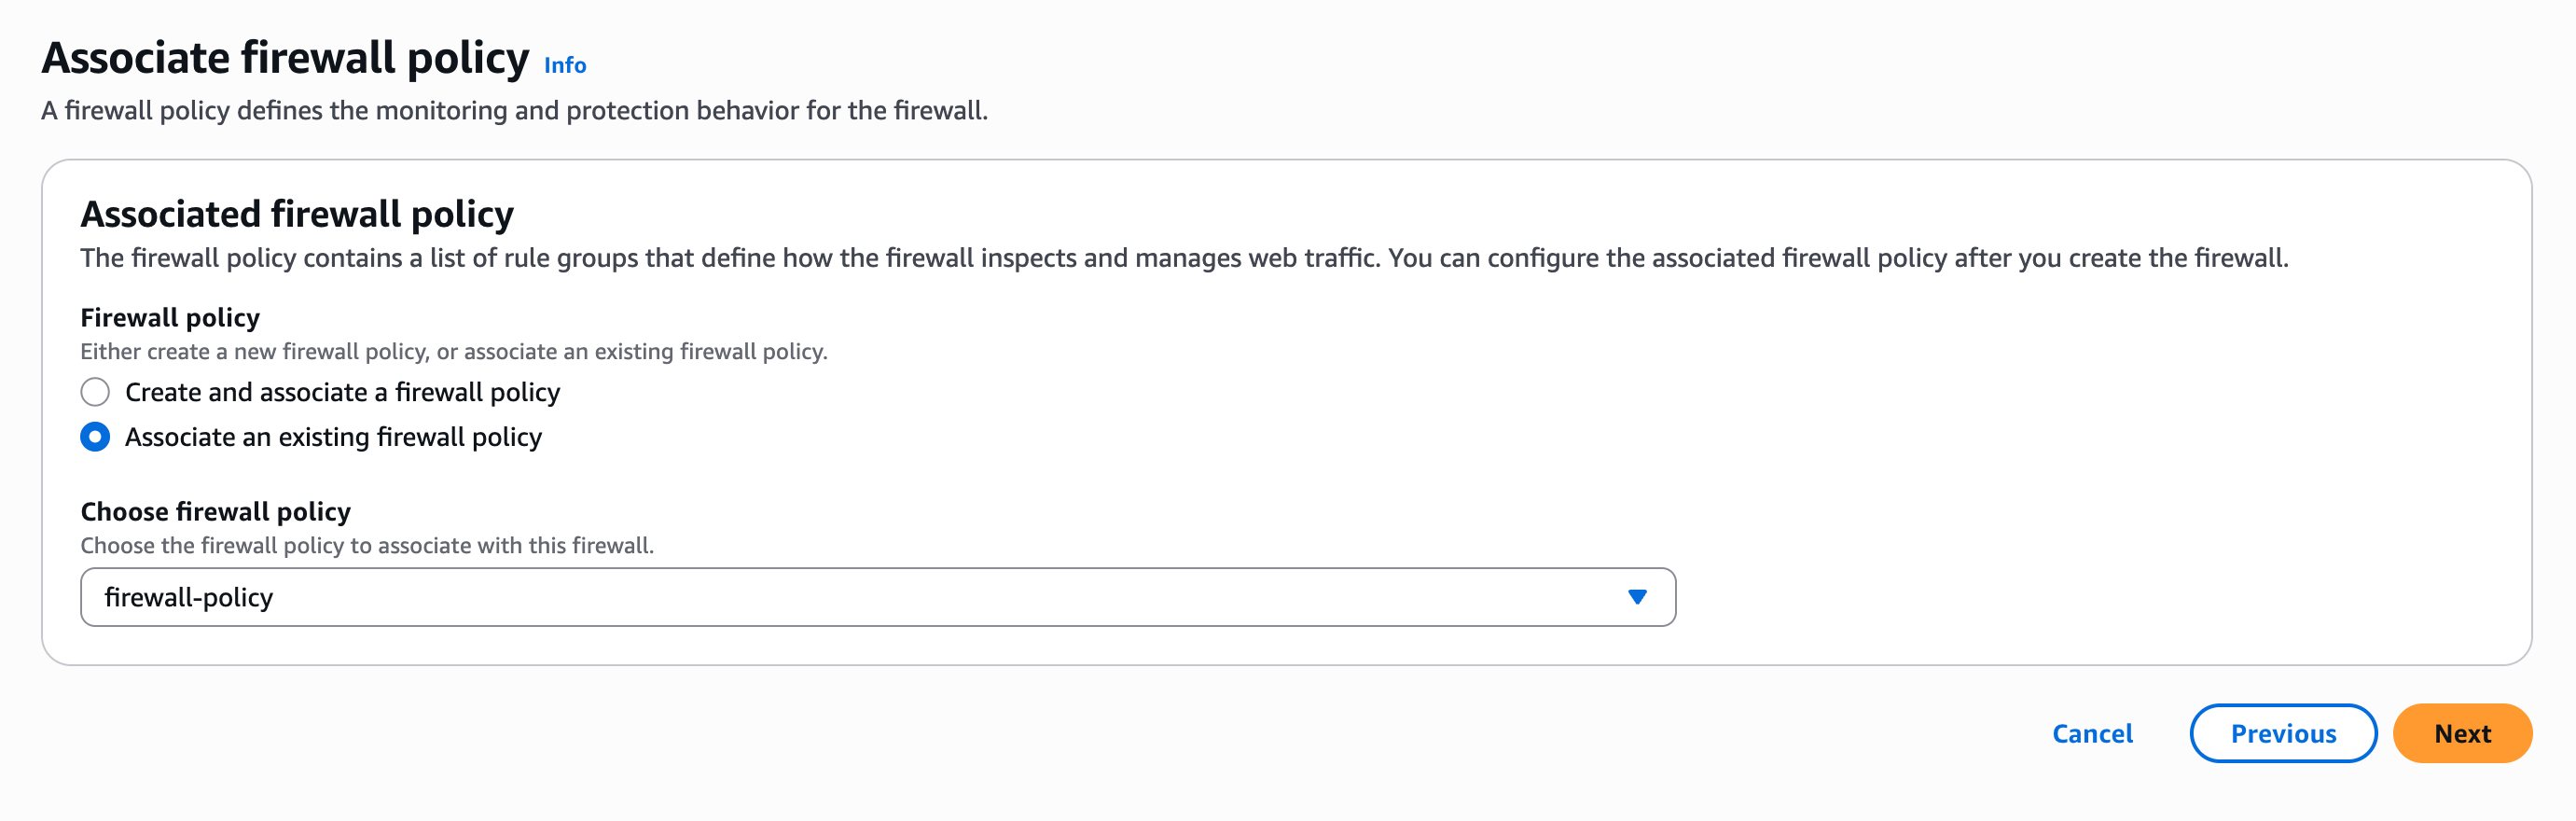
Figure 6: Create firewall console – associate policy
When created in this mode, the firewall is provisioned with a fully qualified domain name (FQDN) and a VPC endpoint service name. You can find the Proxy hostname in the Firewall console under Endpoints and identity section. Use this hostname to set up your applications to send traffic to the Network Firewall and use Proxy functionality.
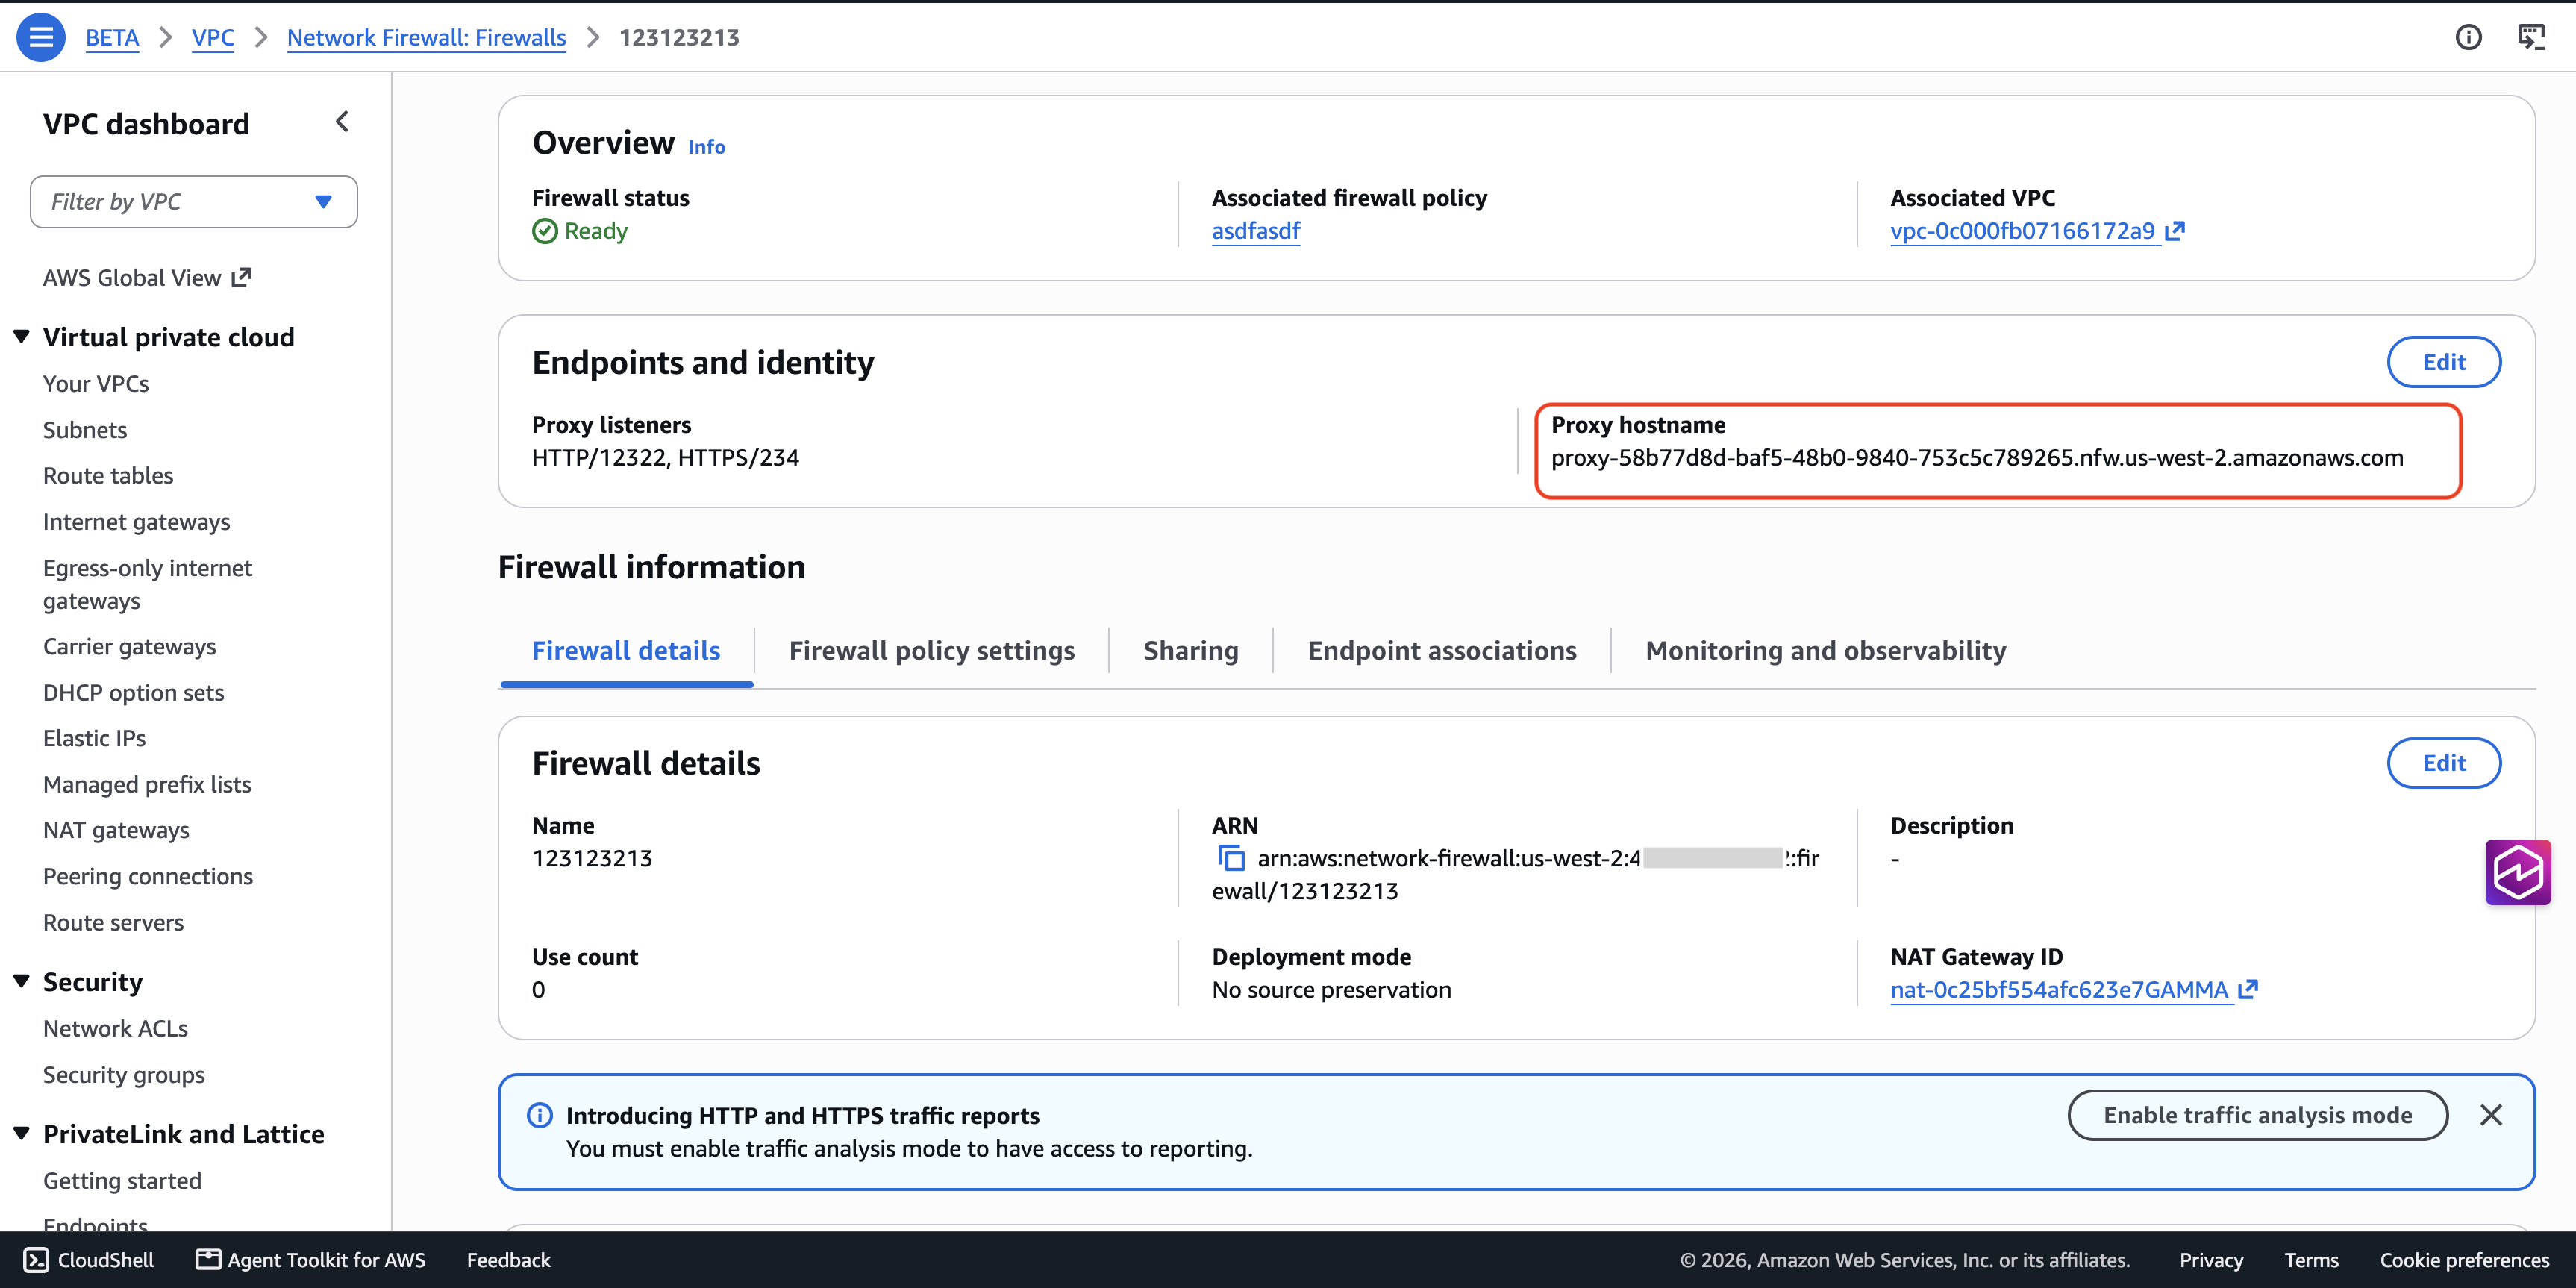
Figure 7: Create firewall console – identify the endpoint
Step 3: Direct traffic to the firewall. To use the Proxy functionality of the Network Firewall, you must configure your workloads to send traffic to the Firewall’s FQDN. On Linux, for example, this is typically done with environment variables:
export https_proxy="https://<nfw_hostname>:<port>"
export http_proxy="https://<nfw_hostname>:<port>"
Note that both variables use the https:// scheme intentionally. This directs the client to establish a TLS-secured connection to the proxy for all traffic, including HTTP requests, ensuring that communication between the client and the proxy is always encrypted.
The hostname resolves to the local VPC endpoint, so no route table changes are required for proxied traffic.
If you configure TLS inspection for proxied HTTPS traffic, you will also establish trust between your clients and the firewall by importing your enterprise CA (or an AWS Private CA subordinate) so clients trust the certificates the firewall generates on behalf of destinations.
Architecture Patterns Possible with Network Firewall used for Proxy functionality
no-source-preservation Network Firewall can be used to protect proxied traffic from the local VPC, remote VPC, or even on-premises sources. As long as your workload has connectivity to the Network Firewall endpoint, it can use the proxy functionality of the NFW. Note that traffic can only reach the Network Firewall through an endpoint. If you simply route traffic to the NAT Gateway, it will not apply Network Firewall policies on it.
Because the no-source-preservation Network Firewall is attached to a NAT Gateway, it can reach the same destinations as the NAT Gateway. This includes destinations on the Internet, on-premises, or even in other VPCs. The following figure shows examples of traffic sources and destinations.
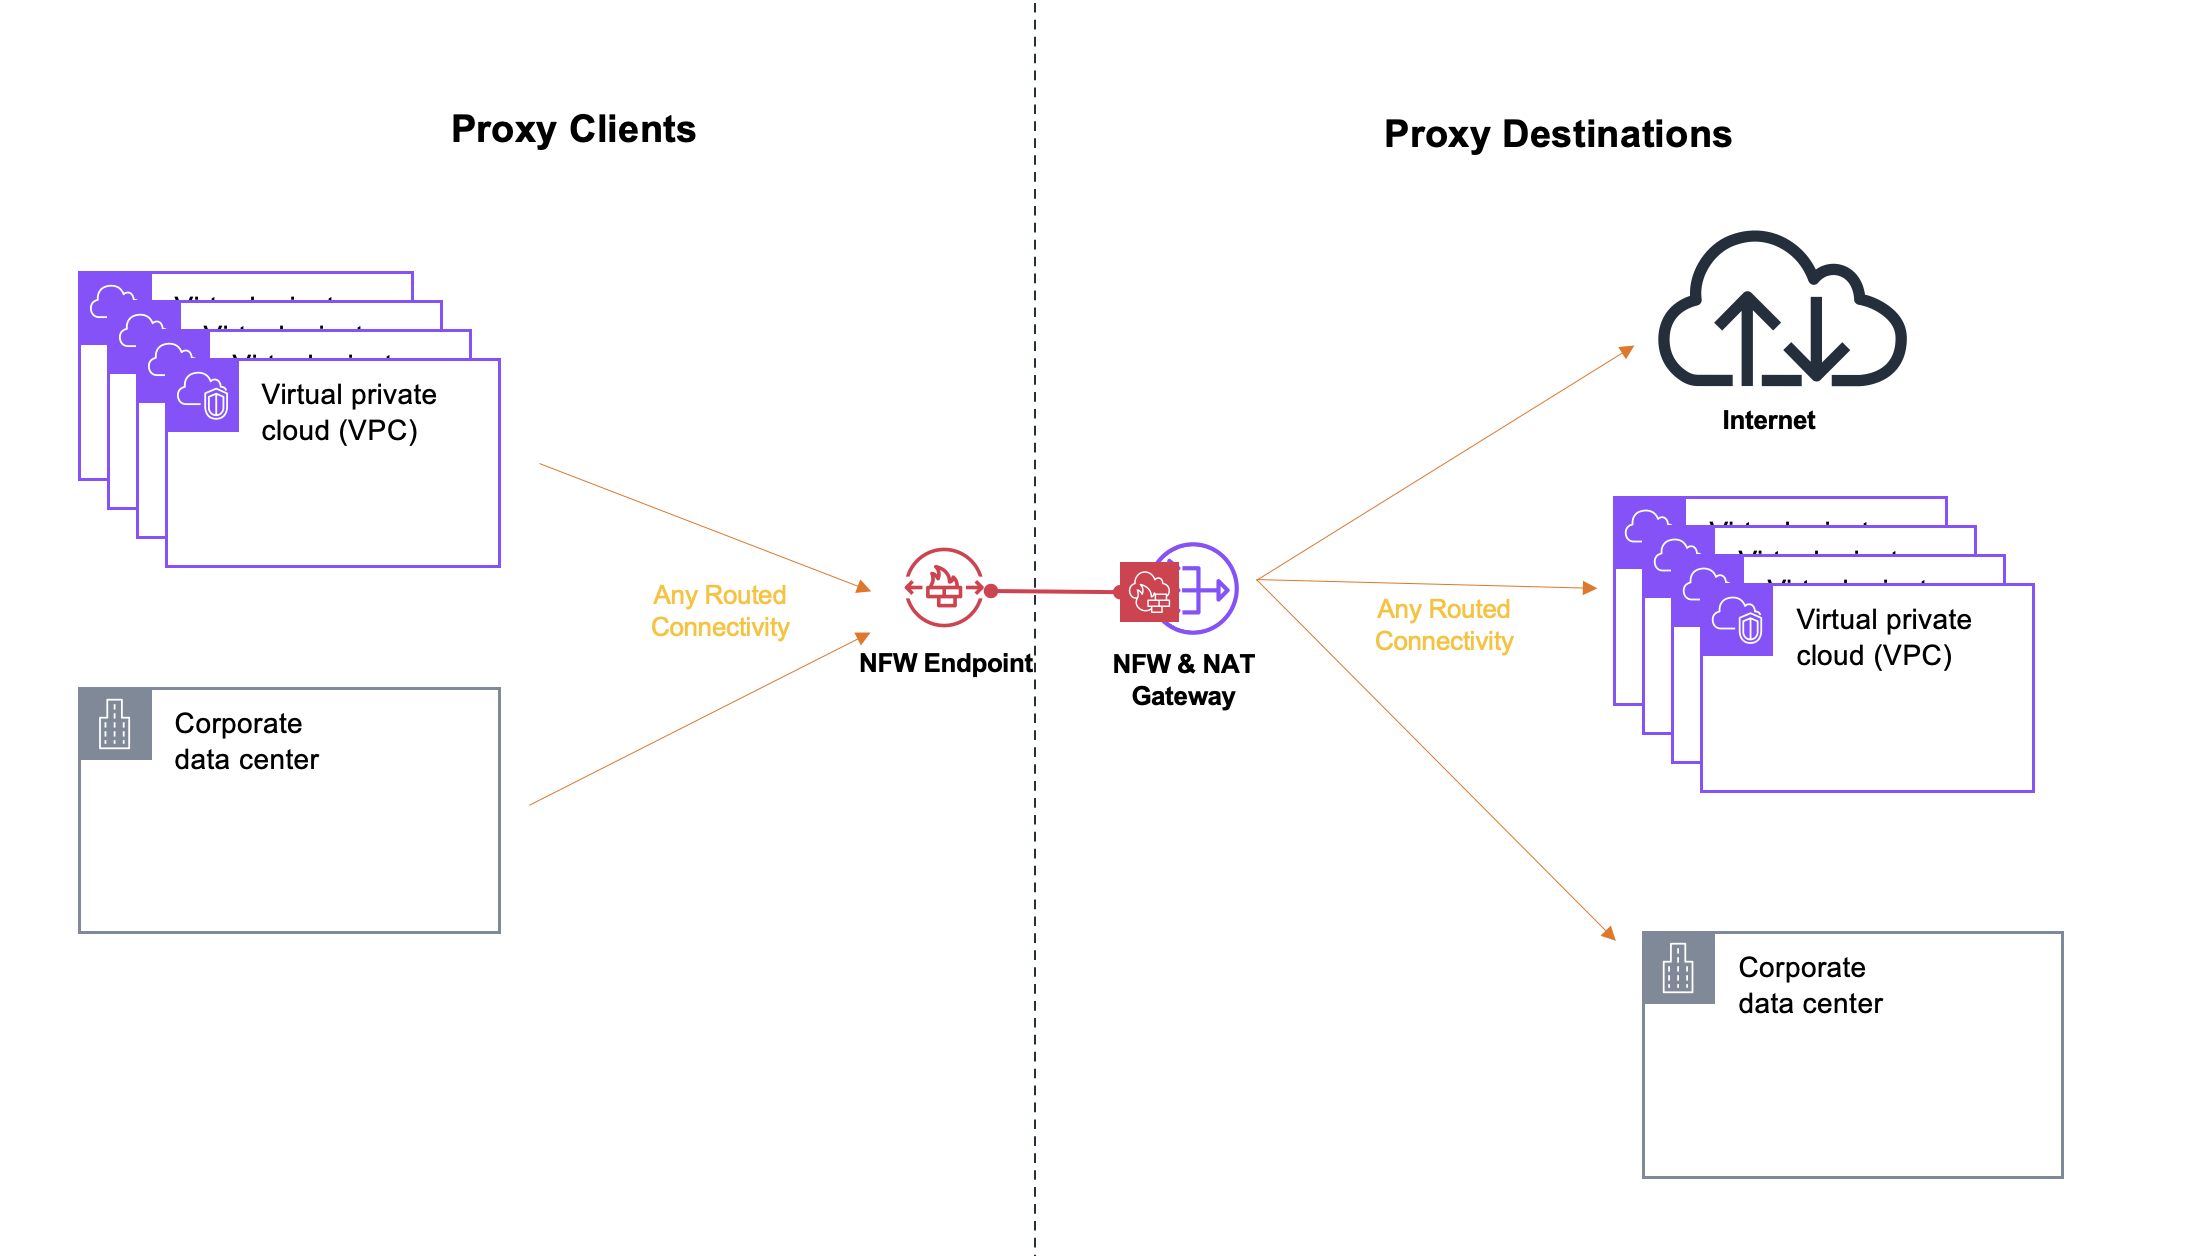
Figure 8: Network Firewall no-source-preservation access patterns
Conclusion
In this blog post, we covered the re-introduction of AWS Network Firewall’s explicit proxy capability through the new no-source-preservation deployment mode. By integrating the proxy directly into Network Firewall, you can now use a single service – with a single policy model – for both transparent firewalling and explicit proxy inspection. With this preview, we also intend to release new enhancements in regular quick sprints until we make this feature globally available. We request you follow what’s new or reach out to your account teams to stay tuned with the latest enhancements. To get started, follow the directions in the documentation.
An update was made on October 7, 2026: The post has been updated to clarify that both http_proxy and https_proxy should use the https:// scheme, which ensures TLS-secured communication between the client and the proxy for all traffic.
About the authors

Tom Adamski
Tom is a Principal Solutions Architect specializing in Networking and Security. He has over 15 years of experience building networks and security solutions across various industries – from telcos and ISPs to small startups. He has spent the last 8 years helping AWS customers build their network environments in the AWS Cloud. In his spare time Tom can be found hunting for waves to surf around the California coast.

Akshay Choudhry
Akshay is a Principal Product Manager in the Networking and Security Services Team at Amazon Web Services. He is focused on making Virtual Private Clouds more intuitive and secure for the millions of customers running their workloads on AWS. In his free time, he enjoys exploring the outdoors, trying out new restaurants, and spending time with friends and family.