AWS Security Blog
A framework for securely collecting forensic artifacts into S3 buckets
When customers experience a security incident, they need to acquire forensic artifacts to identify root cause, extract indicators of compromise (IoCs), and validate remediation efforts. NIST 800-86, Guide to Integrating Forensic Techniques into Incident Response, defines digital forensics as a process comprised of four basic phases: collection, examination, analysis, and reporting. This blog post focuses on the first phase—collection—and provides best practices for implementing least privilege during the forensic evidence collection processes that collect evidence and store the artifacts in Amazon Simple Storage Service (Amazon S3) buckets. The architecture presented in this post can be used to collect forensic evidence from both Amazon Web Services (AWS) and non-AWS compute resources.
It’s important to consider the security of the forensic artifact collection process because it involves communicating with potentially compromised resources. The collection methodology itself should be designed to avoid adding additional risks to infrastructure or other forensic investigation processes. At the same time, the collection of forensic artifacts requires the use of specialized tools that are difficult to change or adapt to new security requirements.
This post outlines factors that you should consider when creating an evidence collection capability and introduces an architecture that implements the best practices for least privilege and integrating with (instead of changing or adapting) existing forensic tools that support uploading artifacts to S3 buckets by using AWS security credentials.
Solution architecture
The architecture presented in this post demonstrates the following AWS best practices:
- Least privilege – Use AWS Identity and Access Management (IAM) policies to provide least privilege access to upload forensic artifacts to an S3 location dedicated to a specific forensic collection task. The locked down credentials cannot be used to view or modify any other forensic collections.
- Time-limited credentials – Use AWS Security Token Service (AWS STS) to provide time limited credentials, reducing the potential for an unauthorized user to abuse credentials while they’re visible on the target machine during the artifact collection process.
- Compatibility with third-party tools – Forensic tools are specialized and changing a forensic collection process to adapt to different collection methods might not be possible. To avoid the risk of needing to change tools, maximize compatibility with any third-party tools that support uploading to S3 buckets. The method introduced in this post to generate time-limited, scoped down credentials can be used with most third-party forensic tools that support uploading to S3 buckets.
- Credential vending – Use time-limited tokens, which can be vended on demand through an automated process, eliminating the need for forensic investigators to use the AWS Management Console, understand least privilege, or have any access to the AWS control plane. Forensic investigators can focus on the process of collecting and analyzing evidence.
- Process automation – Deploy the process as infrastructure as code (IaC) and automate it through AWS services, reducing the burden on security teams to manually perform runbook steps during an active security incident.
This post starts with an overview of the digital forensic process, provides best practices for using Amazon S3 to store forensic artifacts, details how you can create time-limited, least privilege tokens to provide secure access to upload forensic artifacts to S3 buckets, and introduces a sample architecture that automates the end-to-end process.
The digital forensic process
Organizations need to have practices and resources in place to support a digital forensic investigation environment before an incident occurs. AWS has published several resources, including Forensic investigation environment strategies in the AWS Cloud and AWS prescriptive guidance: Security Reference Architecture, Cyber forensics, to provide best practices for organizing your AWS accounts using AWS Organizations to support forensic clean-room environments. Creating segregated AWS accounts and resources for your security teams is critical to provide your incident responders a location to store and analyze any digital forensic evidence collected during an investigation.
After you’ve established a landing zone for performing digital forensics, you’re ready to collect and process digital forensic evidence. AWS supports the collection of digital forensics through extensive logging of control plane events in AWS CloudTrail, and metrics and application logs that can be stored in Amazon CloudWatch. In addition, AWS core compute services, such as Amazon Elastic Compute Cloud (Amazon EC2), support forensics operations through snapshots of the underlying Amazon Elastic Block Storage (Amazon EBS) volume. An example architecture to demonstrate how to automate the collection of EBS volume snapshots for forensic investigations can be found in How to automate forensic disk collection in AWS.
You might want to use the same AWS infrastructure to collect, examine, analyze, and report on forensic incidents that occur on other resources, such as corporate laptops. You can use existing forensic tooling to perform live response, collecting specific artifacts such as Windows NT File System (NTFS) Master File Table (MFT), logs from Linux machines, volatile memory images, or other artifacts that are specified as part of your organization’s incident response plan. These tools can be provided by third parties or built in-house, and many support uploading to S3 buckets using AWS security credentials.
Using Amazon S3 for forensic artifact collection
Amazon S3 provides the foundational requirements for collecting and storing forensic artifacts. Digital forensics requires highly available, durable, and secure storage of artifacts collected from potentially compromised systems. Amazon S3 is designed for 11 nines of durability and can be configured to provide protection against modification, deletion, and unauthorized access to sensitive forensic artifacts. You can also use S3 to store forensic artifacts of almost any size—from one byte to 5 TB—in an S3 object.
S3 buckets used to store forensic artifacts require custom configuration to provide additional security. You should configure the S3 bucket that you use to store forensic artifacts to enable the following security and governance features:
- Encryption in transit. You can require the use of encryption in transit and specify acceptable TLS versions using the
aws:SecureTransportands3:TlsVersioncondition keys on the S3 bucket policy. - Encryption at rest using a customer managed key. You can automatically encrypt all objects uploaded to the bucket using a specified customer managed key by specifying a default server-side encryption key in the bucket’s configuration. For this post, we encourage you to use a customer managed key rather than relying upon an AWS managed key, so you can control the associated key policy.
- Encryption at rest provides an additional layer of protection, because only entities that have both the permission to read from the bucket and permission to use the AWS Key Management Service (AWS KMS) key for decryption can download the forensic artifact from the S3 bucket.
- You need to adjust the example KMS policies in this post if the evidence collection S3 bucket uses the S3 Bucket Key feature.
- Audit logs of all S3 data event activity. You can turn on CloudTrail data events for any S3 buckets that contain forensic artifacts to provide a comprehensive audit trail of S3 object-level API activity. This helps provide a chain of custody of any artifacts stored in your forensic buckets.
- Fine-grained access control using IAM permissions. You can define the set of entities (both human and machine) that have access to the artifacts in the S3 bucket. This post includes how to create time-limited, least privilege access using IAM permissions for uploading files into an S3 bucket. The permissions are fine-grained enough to scope down access to specific object names or object prefixes in an S3 bucket. Additionally, access to read the artifacts can be controlled through IAM permissions and access to the encryption-at-rest KMS key.
- Protections against data modification and deletion. S3 provides features, such as S3 object versioning, to provide assurances that data hasn’t been modified or removed after it’s been collected. This is an additional layer of protection beyond the fine-grained access permissions, so even if an authorized entity attempts to overwrite or delete an object in the S3 bucket, the previous version of the object is still available.
- There are additional options that you can configure on the S3 bucket to protect your data against modification and deletion, including S3 Object Lock and multi-factor authentication (MFA) delete.
In addition to the preceding configuration, consider how to organize forensic artifacts in the S3 bucket. This post introduces a folder structure using S3 object prefixes to segregate each forensic artifact collection task into its own S3 object namespace. An example S3 namespace structure for an S3 bucket is shown in Figure 1.
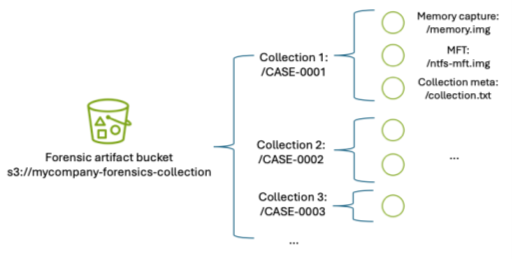
Figure 1: S3 namespace structure for an S3 forensics artifact bucket using object prefixes
By separating each forensic collection task by its own prefix, you can use fine-grained IAM permissions to permit object uploads only into the active collection task. For example, scoped down credentials can be generated to only allow uploads into buckets with the CASE-0001 prefix using an IAM permission as shown in the following code example. Temporary security credentials can be generated using these limited permissions and the key is then used by the forensic acquisition tool to upload the artifacts into the S3 bucket.
Manually creating temporary IAM credentials for each forensic collection activity can be error-prone and time-consuming. Therefore, this post demonstrates how to use AWS tooling to automate the process of generating time-limited, scoped-down credentials.
Adapt existing forensic tools for AWS best security practices
Existing forensic tools typically use IAM access keys to perform S3 operations. Using a static IAM user secret access key isn’t a best practice. Even if the static key is associated with an IAM user that has been scoped down to only have access to the forensic collection S3 bucket as described previously, that means anyone with access to that key can potentially upload objects into that bucket. Therefore, the best practice is to create a time-limited temporary security credential unique to each collection activity, scoped down to only allow uploading files to a specific prefix in the target S3 bucket.
The examples in this post use the following resource names. Because these names will change based on your deployment, substitute your resource names in place of the names in the example code.
- The evidence S3 bucket is named mycompany-forensics-collection
- The forensics AWS account number is 112233445566. For the purposes of this example, all resources will live within this account.
- The customer managed key used to encrypt the forensic artifacts at rest is ForensicsEvidenceKey
- The IAM role that incident responders will assume when signing in to their AWS account is ForensicsUserRole
- The IAM role that incident responders will use for generating S3 file upload temporary credentials is ForensicsUploadRole
- The example uses the us-east-1 AWS Region
The following steps show you how to configure the IAM policies associated with the customer managed key ForensicsEvidenceKey and the IAM role ForensicsUploadRole.
Before you begin, create the evidence S3 bucket configured as described in Using S3 for artifact collection and a customer managed key to encrypt the forensic artifacts at rest. Configure the evidence S3 bucket to use the KMS key by opening the S3 bucket’s properties tab in the Amazon S3 console and setting the new KMS key as the default encryption key for the bucket.
Next, create an IAM role that incident responders will assume through the AWS STS AssumeRole API to generate the temporary credentials. This role will define the maximum set of permissions allowed to upload artifacts to your evidence S3 bucket. This role, ForensicsUploadRole, created using the following example code, defines the maximum allowable permissions: the ability to upload objects into the evidence S3 bucket and to use the KMS key to encrypt those uploads. The effective permissions available to the forensic tool will be scoped down even further to the specific object prefix when the AWS STS temporary security credential is generated.
Note that the policy allows the forensics upload role Decrypt permission in addition to Encrypt; this is required when uploading files larger than 5 GB using the multi-part S3 file upload feature.
Next, you need to provide an ability to assume this role and generate AWS STS tokens using the role’s permissions. This is accomplished by creating a trust relationship associated with the IAM role you just created. The trust relationship shown in the following code sample describes which AWS principals are allowed to assume the role—in this case, you will allow any user who has federated into the ForensicsUserRole IAM role to be able to generate AWS STS tokens for forensic artifact collection.
After the role is established and access to the encryption key is granted, you can use the AWS STS AssumeRole API to create temporary credentials using this role. You can call this API using the AWS Command Line Interface (AWS CLI) or programmatically from a script. To scope down the token’s access to only provide permission to upload to the specific evidence object prefix, you must include a session policy as part of your AssumeRole API request to AWS STS. The following is an example session policy to restrict access to only upload objects into the CASE-0001 prefix.
The effective permissions available to the session role will be the intersection of permissions available in the role policy (ForensicsUploadRole), the resource policy (in this case, mandating TLS-encrypted connections to the bucket), and the session policy that’s created on demand for every forensic collection (only allowing access to upload objects into the CASE-0001 prefix, as shown in the preceding example). Pictorially, this looks like the Venn diagram shown in Figure 2.
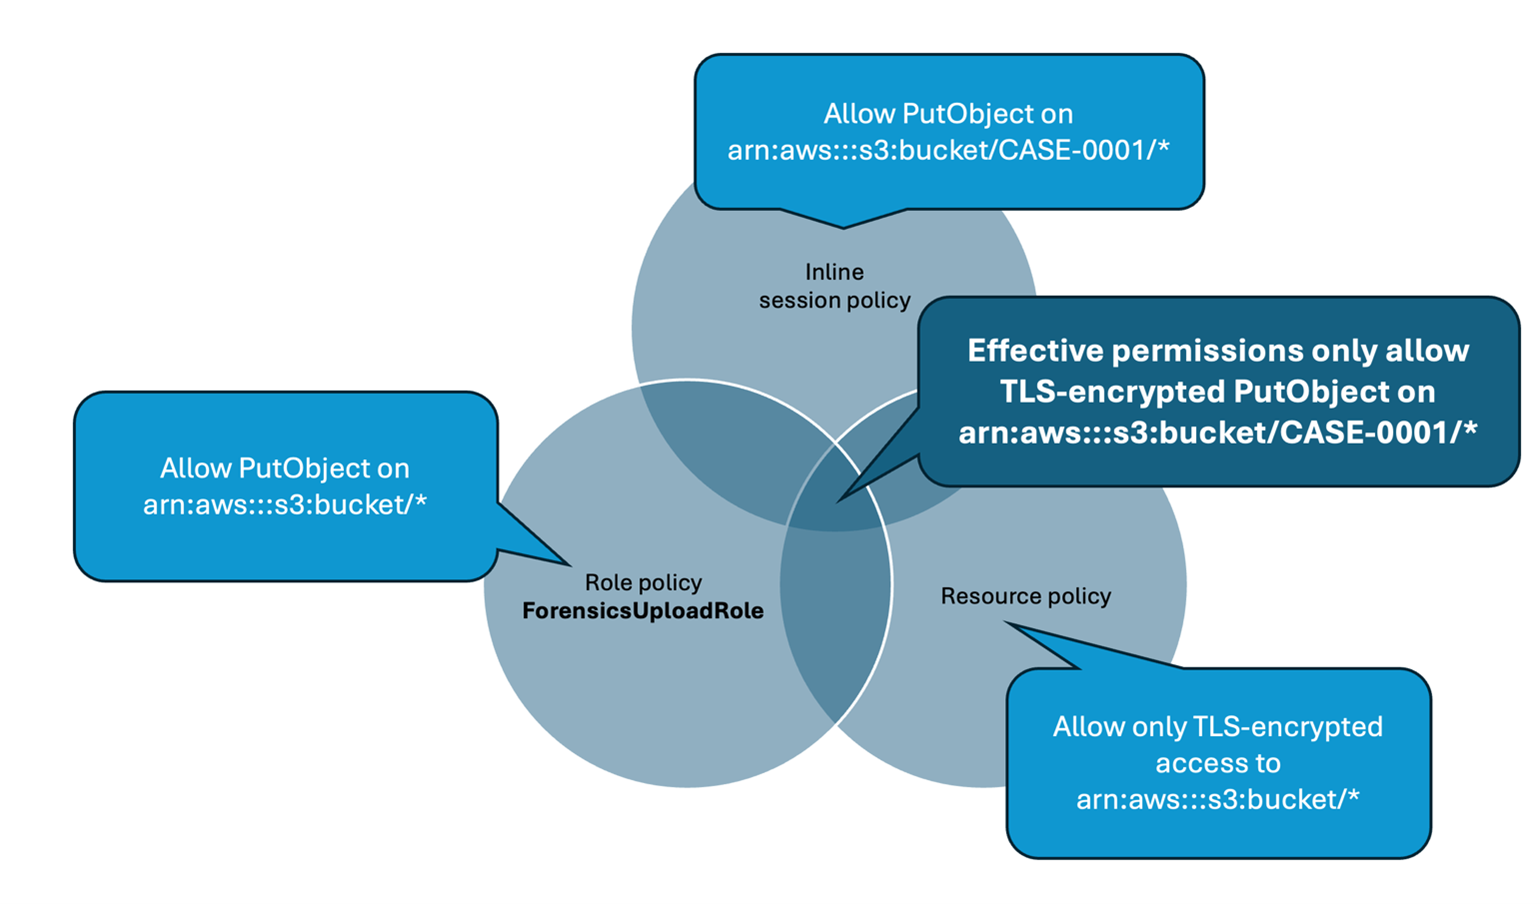
Figure 2: Intersection of IAM policies determine the effective permissions for the restricted forensic session role.
Test the temporary credentials
Now that the bucket has been created and the AWS KMS key and roles configured, you can use AWS STS to create a temporary security credential for a collection on CASE-0001. You can use the AWS CLI to do this manually or you can write a script to automate this process using the AWS API. The IAM access key, secret access key, and session token returned by this call can then be used by any tool that can use AWS access keys to upload files into the specified S3 bucket.
The following example shows an AWS CLI call to AssumeRole using the example ForensicsUploadRole and a case named CASE-0001. The --duration-seconds parameter defines the period, in seconds, that the temporary credentials are valid; the default of 3600 seconds will provide temporary credentials that are valid for one hour.
Now that you have obtained temporary credentials from AWS STS, you can use those credentials to upload a file into Amazon S3:
You can also verify that you can’t use those credentials to upload a file into any other object prefixes or S3 buckets. For example, if you change CASE-0001 to CASE-0004 in the Amazon S3 upload command, you will receive an AccessDenied error because you’re trying to upload an object outside of the allowed key prefix.
Additionally, if you wait more than the lifetime of the token (1 hour in this case), attempting to upload a file into the bucket will fail, because the token will no longer be valid:
Create an automated process to vend temporary credentials on demand
After you’ve verified the security benefits of creating temporary credentials for S3 uploads and validated that the credentials work with your forensic software of choice, you can now use them as part of an automated process.
A sample automated architecture is shown in Figure 3.
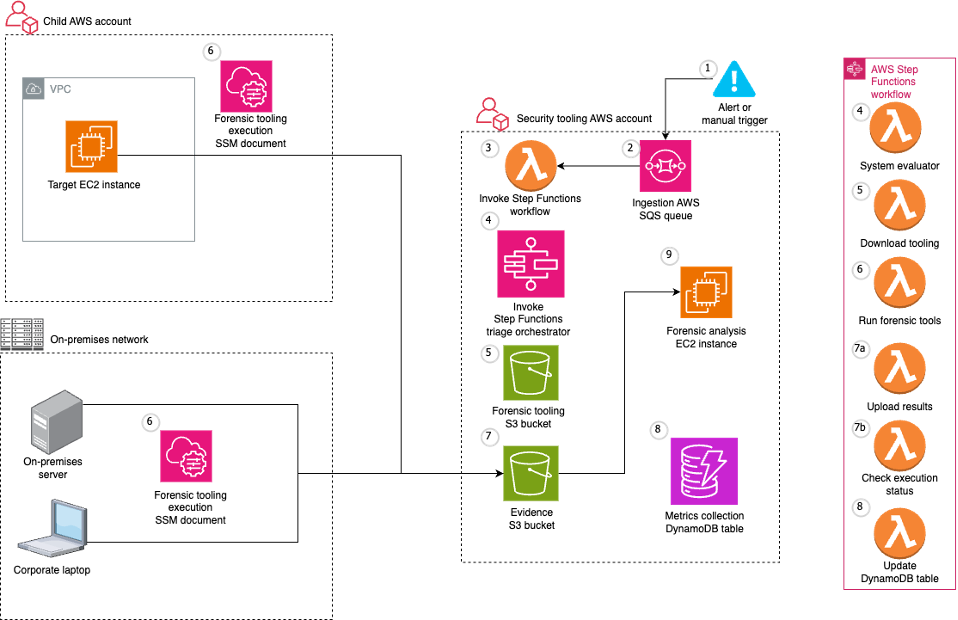
Figure 3: Architecture to automate S3 credential vending and forensic artifact collection.
The workflow depicted in Figure 3 includes the following steps:
- The workflow is triggered by an alert from a detection source or a manual trigger from an incident responder.
- The workflow input is added to an Amazon Simple Queue Service (Amazon SQS) queue.
- The Amazon SQS queue invokes an AWS Lambda function which in turn executes a Step Functions state machine to orchestrate the workflow.
- First, the Step Functions workflow determines whether the target system is managed by AWS Systems Manager.
- If the target system isn’t managed by Systems Manager, an error is noted, and the execution is abandoned.
- If the target system is managed by Systems Manager, the Step Functions workflow determines the operating system (OS) of the target system and proceeds with the flow of execution.
- The workflow then continues by executing the Systems Manager documents that implement the forensic collection process:
- Downloads tooling:
- Generates dynamically scoped IAM temporary credentials that provide access to download the OS-specific tooling to be executed on the target system from the tooling S3 bucket. These credentials are tightly scoped to only allow downloads from the S3 prefix that corresponds to the tooling for the target system’s OS.
- Executes a Systems Manager command on the target system that uses the credentials generated from the previous step to download the OS tooling on the target system.
- Runs forensic tools:
- Executes a Systems Manager command on the target system to execute the OS tooling on the target system.
- The Systems Manager commands run on the target system, which in this case is an EC2 instance.
- Results are uploaded to the evidence S3 bucket:
- Generates dynamically scoped IAM temporary credentials (as described previously) that provide access to upload the output of the previously executed tooling to the evidence S3 bucket. These credentials are tightly scoped to only allow uploads to a particular S3 prefix corresponding to the alert prefix.
- Executes a Systems Manager command on the target system to upload the output of the previously executed tooling to the evidence S3 bucket. After the upload is complete, it cleans up both the output and the evidence tooling from the target system.
- The evidence S3 bucket is tightly locked down to a subset of identities within the AWS security account. Access attempts from identities that aren’t allow listed trigger an Amazon EventBridge rule to alert the security team through an Amazon Simple Notification Service (Amazon SNS) topic.
- When the workflow is complete, related details and metrics are recorded in an Amazon DynamoDB table.
- The forensic analysis can be performed on a separate EC2 instance that has access to read from the evidence S3 bucket.
Deploying the example solution
You can use the AWS Cloud Development Kit (AWS CDK) repository to implement the architecture shown in Figure 3.
The AWS CDK solution is split into three stacks:
- SecurityStack: This stack contains the basic forensic artifact workflow orchestration infrastructure described in this post, including the Step Functions workflow, Lambda functions, AWS SQS queues, IAM roles, and S3 buckets.
- AlertStack: This stack contains the EventBridge workflow to notify administrators of anomalous activity in the evidence S3 bucket.
- CustomerStack: This stack contains the SSM documents that are executed for the forensic artifact workflow and an IAM role assumed by the SecurityStack when the workflow is invoked. It’s deployed into each child AWS account containing EC2 instances from which the security account is authorized to collect forensic artifacts.
Configuration
Before deploying the solution, there are several variables in the config.ts file that must be modified for the environment:
SECURITY_ACCOUNT: Security Tooling AWS account ID.CUSTOMER_ACCOUNTS: Target AWS account IDs (the Child AWS account in the architecture diagram).ALERT_EMAIL_RECIPIENTS: List of email addresses that receive alerts when there is unexpected access to the evidence S3 bucket.ALLOW_LISTED_ROLE_NAMES: Roles allowed to access the evidence S3 bucket. Any other identities accessing the evidence S3 bucket will result in an alarm.
Deployment
After you’ve updated the config.ts file to reflect the account numbers, email recipients, and role names, the stacks can be deployed into your AWS infrastructure.
- Set Up AWS credentials using the AWS CLI:
aws configure - Install dependencies and configure constants:
- Clone the repository.
- Navigate to the project directory.
- Install project dependencies:
npm install - Configure constants in
constants/config.tswith the required information:
- Bootstrap AWS CDK in your accounts (if it hasn’t been done already):
- Example:
cdk bootstrap aws://456789012345/us-east-1(example security AWS account). - Then bootstrap if necessary in any target AWS accounts.
- Example:
- Deploy the AWS CDK Stacks:
- Synthesize the CloudFormation template:
cdk synth - Deploy the security and alert stacks in your security account:
cdk deploy SecurityStack AlertStack - Deploy the customer stacks in your workload accounts:
cdk deploy CustomerStack-ACCOUNT_ID
- Synthesize the CloudFormation template:
- Set up your email alerts:
- After the
AlertStackis deployed, it will email all addresses listed inALERT_EMAIL_RECIPIENTS. Choose the embedded link to accept the AWS SNS topic in each of those accounts.
- After the
Testing
With deployment complete, it’s time to test the solution.
- Trigger an analysis
- Make sure you have a Linux EC2 instance running in one of your customer accounts and in the AWS Region where you deployed the preceding customer stack.
- Because this example uses Systems Manager to orchestrate the collection script, make sure that the EC2 instance is visible in Systems Manager either by checking the Systems Manager console, or by using the AWS CLI:
- Console: In the AWS Systems Manager console, choose Managed instances in the left navigation pane and verify your instance appears in the list. For more information, see Managed Instances in the AWS Systems Manager User Guide.
- AWS CLI: Run the following command to verify the instance is managed:
aws ssm describe-instance-information --filters “Key=InstanceIds,Values=<instance-id>
If the command returns instance information withPingStatus: Online, the instance is properly connected to Systems Manager.
- Post a message in your security account to the Amazon SQS queue to start the Step Functions workflow. Note that the values in angle brackets (for example
<accountID>) are placeholders that you must update with relevant AWS account ID, tracking ticket ID, AWS Region, and EC2 instance ID values:
aws sqs send-message --queue-url --message-body ‘{ “account”: “”, “ticket_id”: “”, “region”: “>”, “instance_id”: “” }’
- Go to the Step Functions console to view the successful execution of the workflow:
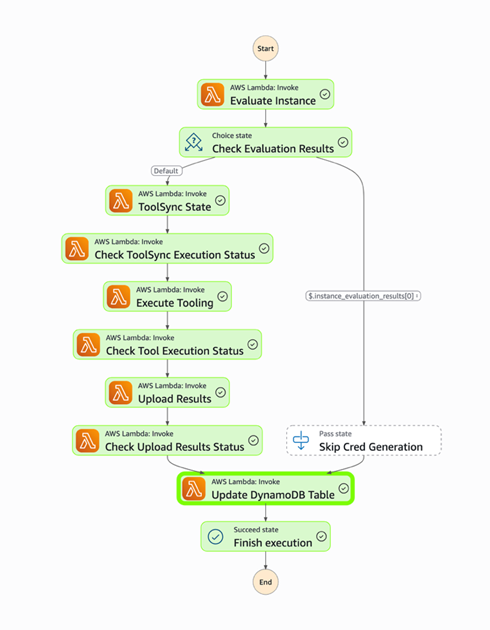
Figure 4: Workflow as shown in the Step Functions console
- View the DynamoDB table to see the metadata for the results.
- Check the evidence S3 bucket to see the uploaded files from the forensic collection.
Conclusion
Collecting forensic artifacts securely is a critical component of any digital forensics investigation. This post demonstrated how to implement least privilege access controls and time-limited credentials for forensic evidence collection workflows that use Amazon S3 for artifact storage. By combining IAM session policies with AWS STS temporary credentials, you can provide forensic tools with secure, scoped-down access to upload artifacts without exposing long-lived credentials or granting overly permissive access.
The architecture presented in this post automates the process of generating temporary credentials, collecting forensic artifacts from both AWS and non-AWS resources, and securely storing them in S3 buckets with appropriate encryption, access controls, and audit logging. With this approach, your security teams can focus on analyzing evidence instead of managing credentials and permissions during active security incidents.To get started with this solution, deploy the example AWS CDK stacks provided in the collect forensic artifacts repository and customize them for your organization’s forensic investigation requirements. For more information about related AWS forensic investigation architectures, review the Automated Forensics Orchestrator for EC2 and How to build forensic kernel modules for Linux EC2 instances resources.
If you have feedback about this post, submit comments in the Comments section below. If you have questions about this post, contact AWS Support.