AWS Security Blog
Best practices and advanced patterns for Lambda code signing
November 9, 2023: We updated this blog post to correct a typo in the policy.
Amazon Web Services (AWS) recently released Code Signing for AWS Lambda. By using this feature, you can help enforce the integrity of your code artifacts and make sure that only trusted developers can deploy code to your AWS Lambda functions. Today, let’s review a basic use case along with best practices for lambda code signing. Then, let’s dive deep and talk about two advanced patterns—one for centralized signing and one for cross account layer validation. You can use these advanced patterns to use code signing in a distributed ownership model, where you have separate groups for developers writing code and for groups responsible for enforcing specific signing profiles or for publishing layers.
Secure software development lifecycle
For context of what this capability gives you, let’s look at the secure software development lifecycle (SDLC). You need different kinds of security controls for each of your development phases. An overview of the secure SDLC development stages—code, build, test, deploy, and monitor—, along with applicable security controls, can be found in Figure 1. You can use code signing for Lambda to protect the deployment stage and give a cryptographically strong hash verification.
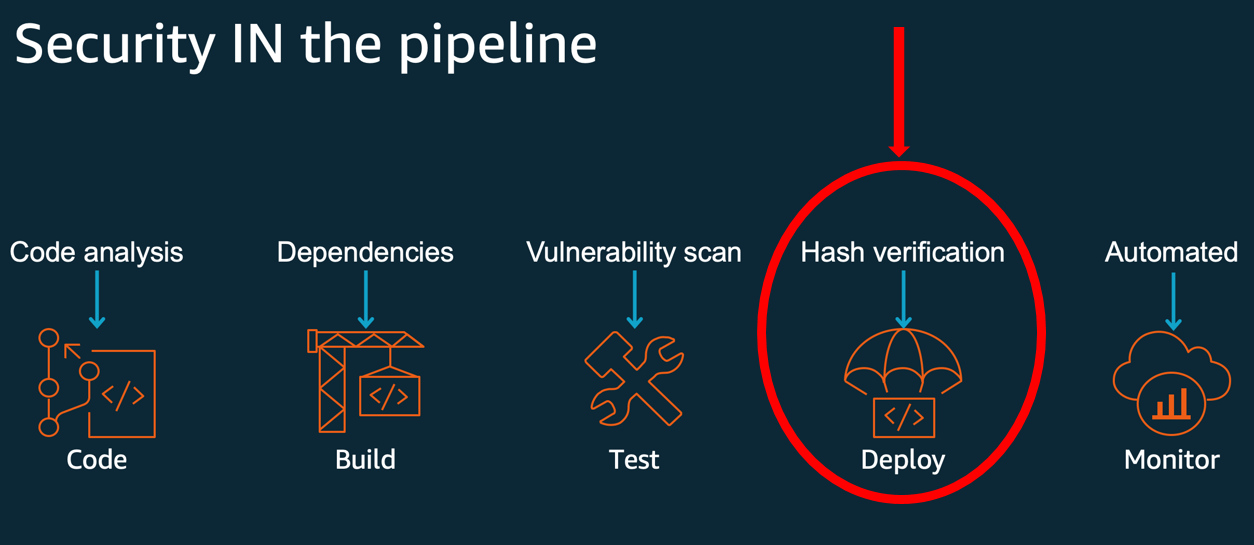
Figure 1: Code signing provides hash verification in the deployment phase of a secure SDLC
Adding Security into DevOps and Implementing DevSecOps Using AWS CodePipeline provide additional information on building a secure SDLC, with a particular focus on the code analysis controls.
Basic pattern:
Figure 2 shows the basic pattern described in Code signing for AWS Lambda and in the documentation. The basic code signing pattern uses AWS Signer on a ZIP file and calls a create API to install the signed artifact in Lambda.
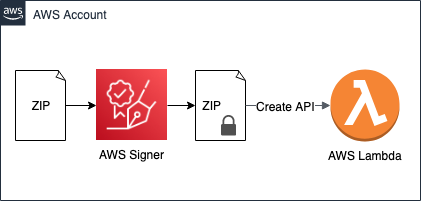
Figure 2: The basic code signing pattern
The basic pattern illustrated in Figure 2 is as follows:
- An administrator creates a signing profile in AWS Signer. A signing profile is analogous to a code signing certificate and represents a publisher identity. Administrators can provide access via AWS Identity and Access Management (IAM) for developers to use the signing profile to sign their artifacts.
- Administrators create a code signing configuration (CSC)—a new resource in Lambda that specifies the signing profiles that are allowed to sign code and the signature validation policy that defines whether to warn or reject deployments that fail the signature checks. CSC can be attached to existing or new Lambda functions to enable signature validations on deployment.
- Developers use one of the allowed signing profiles to sign the deployment artifact—a ZIP file—in AWS Signer.
- Developers deploy the signed deployment artifact to a function using either the CreateFunction API or the UpdateFunctionCode API.
Lambda performs signature checks before accepting the deployment. The deployment fails if the signature checks fail and you have set the signature validation policy in the CSC to reject deployments using ENFORCE mode.
Code signing checks
Code signing for Lambda provides four signature checks. First, the integrity check confirms that the deployment artifact hasn’t been modified after it was signed using AWS Signer. Lambda performs this check by matching the hash of the artifact with the hash from the signature. The second check is the source mismatch check, which detects if a signature isn’t present or if the artifact is signed by a signing profile that isn’t specified in the CSC. The third, expiry check, will fail if a signature is past its point of expiration. The fourth is the revocation check, which is used to see if anyone has explicitly marked the signing profile used for signing or the signing job as invalid by revoking it.
The integrity check must succeed or Lambda will not run the artifact. The other three checks can be configured to either block invocation or generate a warning. These checks are performed in order until one check fails or all checks succeed. As a security leader concerned about the security of code deployments, you can use the Lambda code signing checks to satisfy different security assurances:
- Integrity – Provides assurance that code has not been tampered with, by ensuring that the signature on the build artifact is cryptographically valid.
- Source mismatch – Provides assurance that only trusted entities or developers can deploy code.
- Expiry – Provides assurance that code running in your environment is not stale, by making sure that signatures were created within a certain date and time.
- Revocation – Allows security administrators to remove trust by invalidating signatures after the fact so that they cannot be used for code deployment if they have been exposed or are otherwise no longer trusted.
The last three checks are enforced only if you have set the signature validation policy—UntrustedArtifactOnDeployment parameter—in the CSC to ENFORCE. If the policy is set to WARN, then failures in any of the mismatch, expiry, and revocation checks will log a metric called a signature validation error in Amazon CloudWatch. The best practice for this setting is to initially set the policy to WARN. Then, you can monitor the warnings, if any, and update the policy to enforce when you’re confident in the findings in CloudWatch.
Centralized signing enforcement
In this scenario, you have a security administrators team that centrally manages and approves signing profiles. The team centralizes signing profiles in order to enforce that all code running on Lambda is authored by a trusted developer and isn’t tampered with after it’s signed. To do this, the security administrators team wants to enforce that developers—in the same account—can only create Lambda functions with signing profiles that the team has approved. By owning the signing profiles used by developer teams, the security team controls the lifecycle of the signatures and the ability to revoke the signatures. Here are instructions for creating a signing profile and CSC, and then enforcing their use.
Create a signing profile
To create a signing profile, you’ll use the AWS Command Line Interface (AWS CLI). Start by logging in to your account as the central security role. This is an administrative role that is scoped with permissions needed for setting up code signing. You’ll create a signing profile to use for an application named ABC. These example commands are written with prepopulated values for things like profile names, IDs, and descriptions. Change those as appropriate for your application.
To create a signing profile
- Run this command:
Running this command will give you a signing profile version ARN. It will look something like arn:aws:signer:sa-east-1:XXXXXXXXXXXX:/signing-profiles/profile_for_application_ABC/XXXXXXXXXX. Make a note of this value to use in later commands.
As the security administrator, you must grant the developers access to use the profile for signing. You do that by using the add-profile-permission command. Note that in this example, you are explicitly only granting permission for the signer:StartSigningJob action. You might want to grant permissions to other actions, such as signer:GetSigningProfile or signer:RevokeSignature, by making additional calls to add-profile-permission.
- Run this command, replacing <role-name> with the principal you’re using:
Create a CSC
You also want to make a CSCwith the signing profile that you, as the security administrator, want all your developers to use.
To create a CSC
Run this command, replacing <signing-profile-version-arn> with the output from Step 1 of the preceding procedure—Create a signing profile:
Running this command will give you a CSCARN that will look something like arn:aws:lambda:sa-east-1:XXXXXXXXXXXX:code-signing-config:approved-csc-XXXXXXXXXXXXXXXXX. Make a note of this value to use later.
Write an IAM policy using the new CSC
Now that the security administrators team has created this CSC, how do they ensure that all the developers use it? Administrators can use IAM to grant access to the CreateFunction API, while using the new lambda:CodeSigningConfigArn condition key with the CSC ARN you created. This will ensure that developers can create functions only if code signing is enabled.
This IAM policy will allow the developer roles to create Lambda functions, but only when they are using the approved CSC. The additional clauses Deny the developers from creating their own signing profiles or CSCs, so that they are forced to use the ones provided by the central team.
To write an IAM policy
Run the following command. Replace <code-signing-config-arn> with the CSC ARN you created previously.
Create a signed Lambda function
Now, the developers have permission to create new Lambda functions, but only if the functions are configured with the approved CSC. The approved CSC can specify the settings for Lambda signing policies, and lists exactly what profiles are approved for signing the function code with. This means that developers in that account will only be able to create functions if the functions are signed with a profile approved by the central team and the developer permissions have been added to the signing profile used.
To create a signed Lambda function
- Upload any Lambda code file to an Amazon Simple Storage Service (Amazon S3) bucket with the name main-function.zip. Note that your S3 bucket must be version enabled.
- Sign the zipped Lambda function using AWS Signer and the following command, replacing <lambda-bucket> and <version-string> with the correct details from your uploaded main-function.zip.
- Download the newly created ZIP file from your Lambda bucket. It will be called something like signed-XXXXXXX-XXXX-XXXX-XXXX-XXXXXXXXXXXX.zip.
- For convenience, rename it to signed-main-function.zip.
- Run the following command, replacing <lambda-role> with the ARN of your Lambda execution role, and replacing <code-signing-config-arn> with the result of the earlier procedure Create a CSC.
Cross-account centralization
This pattern supports the use case where the security administrators and the developers are working in the same account. You might want to implement this across different accounts, which requires creating CSCs in specific accounts where developers need to deploy and update Lambda functions. To do this, you can use AWS CloudFormation StackSets to deploy CSCs. Stack sets allow you to roll out CloudFormation stacks across multiple AWS accounts. Use AWS CloudFormation StackSets for Multiple Accounts in an AWS Organization illustrates how to use an AWS CloudFormation template for deployment to multiple accounts.
The security administrators can detect and react to any changes to the stack set deployed CSCs by using drift detection. Drift detection is an AWS CloudFormation feature that detects unmanaged changes to the resources deployed using StackSets. To complete the solution, Implement automatic drift remediation for AWS CloudFormation using Amazon CloudWatch and AWS Lambda shares a solution for taking automated remediation when drift is detected in a CloudFormation stack.
Cross-account validation for Lambda layers
So far, you have the tools to sign your own Lambda code so that no one can tamper with it, and you’ve reviewed a pattern where one team creates and owns the signing profiles to be used by different developers. Let’s look at one more advanced pattern where you publish code as a signed Lambda layer in one account, and you then use it in a Lambda function in a separate account. A Lambda layer is an archive containing additional code that you can include in a function.
For this, let’s consider how to set up code signing when you’re using layers across two accounts. Layers allow you to use libraries in your function without needing to include them in your deployment package. It’s also possible to publish a layer in one account, and have a different account consume that layer. Let’s act as a publisher of a layer. In this use case, you want to use code signing so that consumers of your layer can have the security assurance that no one has tampered with the layer. Note that if you enable code signing to verify signatures on a layer, Lambda will also verify the signatures on the function code. Therefore, all of your deployment artifacts must be signed, using a profile listed in the CSC attached to the function.
Figure 3 illustrates the cross-account layer pattern, where you sign a layer in a publishing account and a function uses that layer in another consuming account.

Figure 3: This advanced pattern supports cross-account layers
Here are the steps to build this setup. You’ll be logging in to two different accounts, your publishing account and your consuming account.
Make a publisher signing profile
Running this command will give you a profile version ARN. Make a note of the value returned to use in a later step.
To make a publisher signing profile
- In the AWS CLI, log in to your publishing account.
- Run this command to make a signing profile for your publisher:
Sign your layer code using signing profile
Next, you want to sign your layer code with this signing profile. For this example, use the blank layer code from this GitHub project. You can make your own layer by creating a ZIP file with all your code files included in a directory supported by your Lambda runtime. AWS Lambda layers has instructions for creating your own layer.
You can then sign your layer code using the signing profile.
To sign your layer code
- Name your Lambda layer code file blank-python.zip and upload it to your S3 bucket.
- Sign the zipped Lambda function using AWS Signer with the following command. Replace <lambda-bucket> and <version-string> with the details from your uploaded blank-python.zip.
Publish your signed layer
Now publish the resulting, signed layer. Note that the layers themselves don’t have signature validation on deployment. However, the signatures will be checked when they’re added to a function.
To publish your signed layer
- Download your new signed ZIP file from your S3 bucket, and rename it signed-layer.zip.
- Run the following command to publish your layer:
This command will return information about your newly published layer. Search for the LayerVersionArn and make a note of it for use later.
Grant read access
For the last step in the publisher account, you must grant read access to the layer using the add-layer-version-permission command. In the following command, you’re granting access to an individual account using the principal parameter.
(Optional) You could instead choose to grant access to all accounts in your organization by using “*” as the principal and adding the organization-id parameter.
To grant read access
- Run the following command to grant read access to your layer, replacing <consuming-account-id> with the account ID of your second account:
Create a CSC
It’s time to switch your AWS CLI to work with the consuming account. This consuming account can create a CSC for their Lambda functions that specifies what signing profiles are allowed.
To create a CSC
- In the AWS CLI, log out from your publishing account and into your consuming account.
- The consuming account will need a signing profile of its own to sign the main Lambda code. Run the following command to create one:
- Run the following command to create a CSC that allows code to be signed either by the publisher or the consumer. Replace <consumer-signing-profile-version-arn> with the profile version ARN you created in the preceding step. Replace <publisher-signing-profile-version-arn> with the signing profile from the Make a publisher signing profile procedure. Make a note of the CSC returned by this command to use in later steps.
Create a Lambda function using the CSC
When creating the function that uses the signed layer, you can pass in the CSC that you created. Lambda will check the signature on the function code in this step.
To create a Lambda function
- Use your own lambda code function, or make a copy of blank-python.zip, and rename it consumer-main-function.zip.) Upload consumer-main-function.zip to a versioned S3 bucket in your consumer account.
Note: If the S3 bucket doesn’t have versioning enabled, the procedure will fail.
- Sign the function with the signing profile of the consumer account. Replace <consumers-lambda-bucket> and <version-string> in the following command with the name of the S3 bucket you uploaded the consumer-main-function.zip to and the version.
- Download your new file and rename it to signed-consumer-main-function.zip.
- Run the following command to create a new Lambda function, replacing <lambda-role> with a valid Lambda execution role and <code-signing-config-arn> with the value returned from the previous procedure: Creating a CSC.
- Finally, add the signed layer from the publishing account into the configuration of that function. Run the following command, replacing <lamba-layer-arn> with the result from the preceding step Publish your signed layer.
Lambda will check the signature on the layer code in this step. If the signature of any deployed layer artifact is corrupt, the Lambda function stops you from attaching the layer and deploying your code. This is true regardless of the mode you choose—WARN or ENFORCE. If you have multiple layers to add to your function, you must sign all layers invoked in a Lambda function.
This capability allows layer publishers to share signed layers. A publisher can sign all layers using a specific signing profile and ask all the layer consumers to use that signing profile as one of the allowed profiles in their CSCs. When someone uses the layer, they can trust that the layer comes from that publisher and hasn’t been tampered with.
Conclusion
You’ve learned some best practices and patterns for using code signing for AWS Lambda. You know how code signing fits in the secure SDLC, and what value you get from each of the code signing checks. You also learned two patterns for using code signing for distributed ownership—one for centralized signing and one for cross account layer validation. No matter your role—as a developer, as a central security team, or as a layer publisher—you can use these tools to help enforce the integrity of code artifacts in your organization.
You can learn more about Lambda code signing in Configure code signing for AWS Lambda.
If you have feedback about this post, submit comments in the Comments section below. If you have questions about this post, start a new thread on the AWS Lambda forum or contact AWS Support.
Want more AWS Security how-to content, news, and feature announcements? Follow us on Twitter.