AWS Security Blog
How to update CRLs without public access using AWS Private CA
Certificates and the hierarchy of trust they create are the backbone of a secure infrastructure. AWS Private Certificate Authority is a highly available certificate authority (CA) that you can use to create private CA hierarchies, secure your applications and devices with private certificates, and manage certificate lifecycles.
A certificate revocation list (CRL) is a file that contains a signed list of certificates revoked before their scheduled expiration date. Certificates can be revoked for a variety of reasons, including unintended key exposure, or because of discontinued use.
AWS Private CA writes CRLs to an Amazon Simple Storage Service (Amazon S3) bucket that you specify. CRLs are public, fully qualified domain names (FQDNs), but you might have requirements for a CRL that is only accessible internally to your organization, or you might have security standards that require all S3 buckets to have Amazon S3 block public access enabled.
The recommended practice for S3 buckets is to enable Block Public Access, which enables only authorized and authenticated AWS accounts to have access to a bucket and its contents. However, because some public key infrastructure (PKI) clients retrieve CRLs across the public internet, a workaround might be necessary to serve CRLs without requiring authenticated client access to an S3 bucket. One recommended solution is to use Amazon CloudFront to provide access to the CRL. This will likely be the best solution for most customers. Our documentation specifically highlights CloudFront as the recommended implementation path. However, you might not be able to use CloudFront or might need another option.
You might need a solution where the CRL lookups don’t traverse the public internet. In this post, we go over two different approaches to achieve this.
Option 1: Relocate CRLs to an internally accessible location
By default, AWS Private CA writes CRLs to an S3 bucket that you specify. This solution consists of moving the CRL to a separate location that is internally accessible to your TLS clients, but not accessible via the public internet such as an on-premises server. A CRL distribution point (CDP) is a link that points to the location of the CRL where revoked certificates appear. However, when private certificates are generated by AWS Certificate Manager (ACM), the CDP universal resource identifiers (URI) in the certificates point by default to the S3 bucket initially specified.
This solution uses a custom CNAME in the CDP to indicate, during certificate generation, the location where the CRL will ultimately be located.
The steps in the solution are as follows:
- Select the S3 bucket where the CRL will be stored.
- Issue a certificate through the CA with a custom CNAME.
- Create an AWS Lambda function that moves the CRL file from the S3 bucket to another specified location.
- Create an Amazon Simple Notification Service (Amazon SNS) notification that alerts a user to the success metric of the CRL generation event.
Prerequisites:
For this walkthrough, you must have the following resources ready to use:
- An AWS account with:
- An AWS Identity and Access Management (IAM) role with permissions for Amazon S3, ACM Private CA, Amazon EventBridge, and Lambda
- An ACM private CA root and subordinate CA configured in the same AWS Region
- An S3 bucket for the CRL with permissions that allow the AWS Private CA service principal to
PutObject,PutObjectACL,GetBucketACLandGetBucketLocation(see the following example bucket policy)
2. AWS Command Line Interface (AWS CLI) configured
Deploy:
With the prerequisites in place, you’re ready to deploy the first solution.
To enable CRL distribution:
- Use your account to sign in to the AWS Management Console for AWS Private Certificate Authority.
- Select the name of your subordinate CA. This should take you to another page with more details.
- Scroll down and choose the Revocation configuration tab.
- Choose Edit on the top right.
- Select Activate CRL distribution. Select the CRL S3 bucket you created prior to the walkthrough.
- Modify the CDP by expanding the CRL settings dropdown. In the Custom CRL Name field, enter the URL where you will eventually move the CRL. This should be a place that is accessible by your internal organization, but not accessible externally. If you use partitioned CRLs, select the Enable partitioning checkbox. To learn more about CRL partitioning, see Plan your AWS Private CA certificate revocation method.
- Choose Save changes.
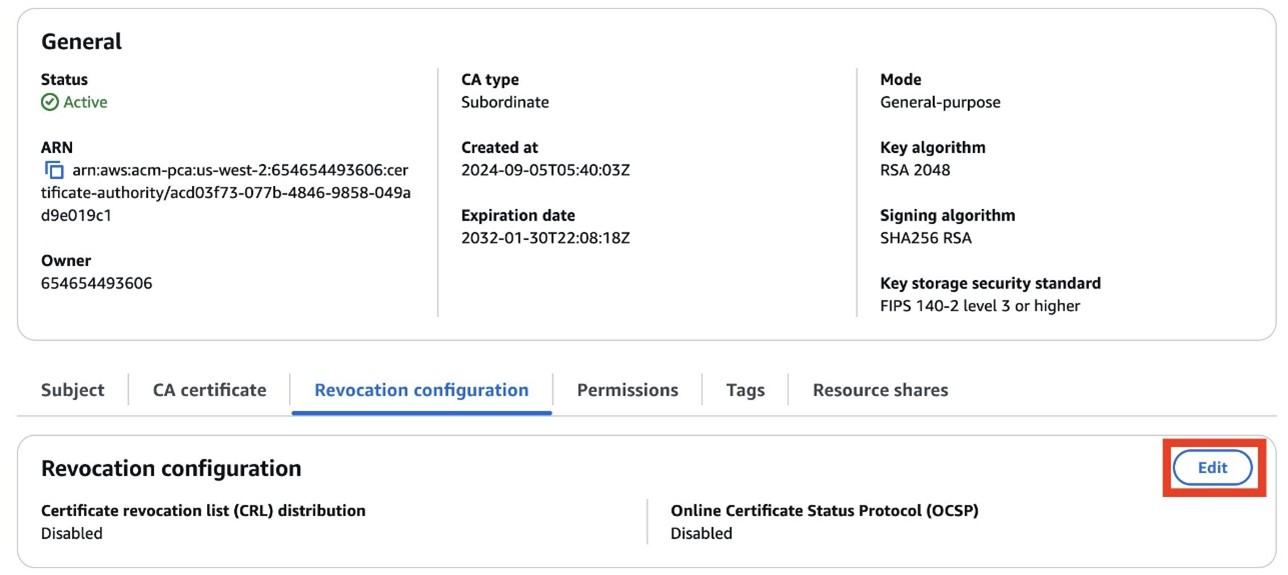
Figure 1: Edit the revocation configuration
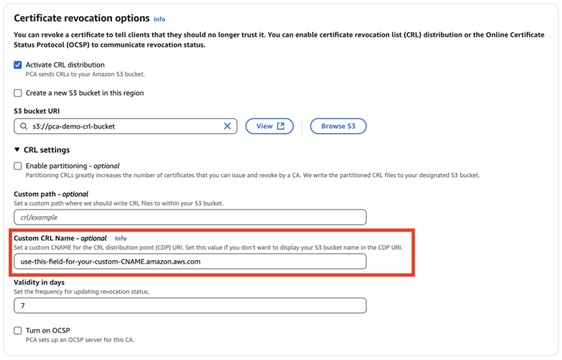
Figure 2: Enter a name for your CRL
To create an SNS topic and Lambda function:
- Go to the Amazon SNS console.
- Create a standard SNS topic. Leave all options as default and subscribe an appropriate email to the topic.
- Go to the Lambda console.
- Choose Create Function.
- Enter a name for your function. Under Runtime, select Python 3.12 from the dropdown.
- Verify that the role associated with your Lambda function has permissions to get objects from the S3 bucket where AWS Private CA places the CRL (set when you configured the revocation details for the CA), copy objects in Amazon S3, then put objects in an S3 bucket (or wherever the new CRL distribution point specified in the certificate custom CNAME will be—for example, an internal-only accessible location), and publish to an Amazon SNS topic. The Lambda function also checks the success metric of a CRL generation event. If the event fails, an SNS topic will notify an admin. If the event is successful, a copy of the CRL in the original S3 bucket is created in the new specified location and an SNS topic will notify an admin.
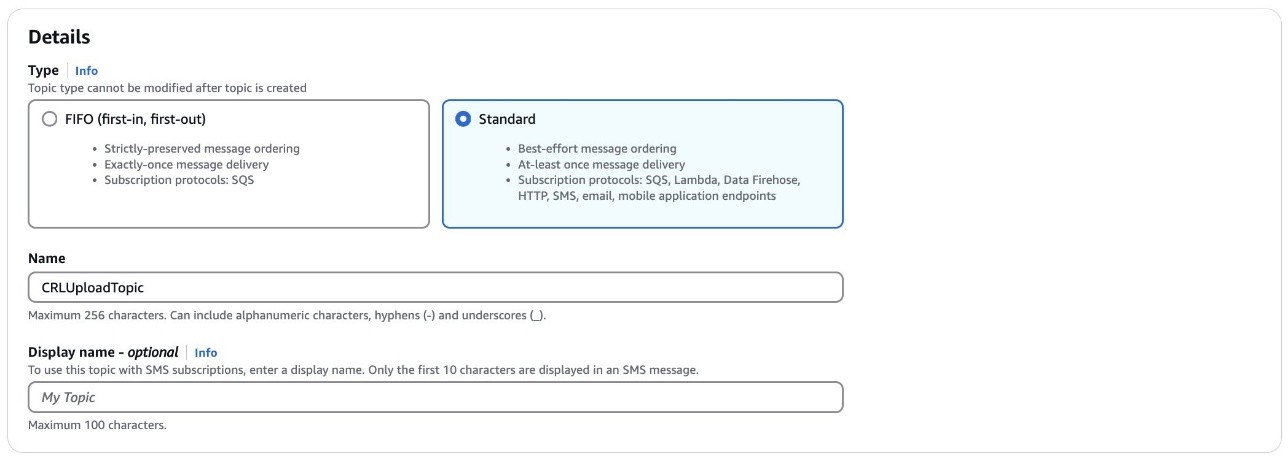
Figure 3: Create an SNS topic
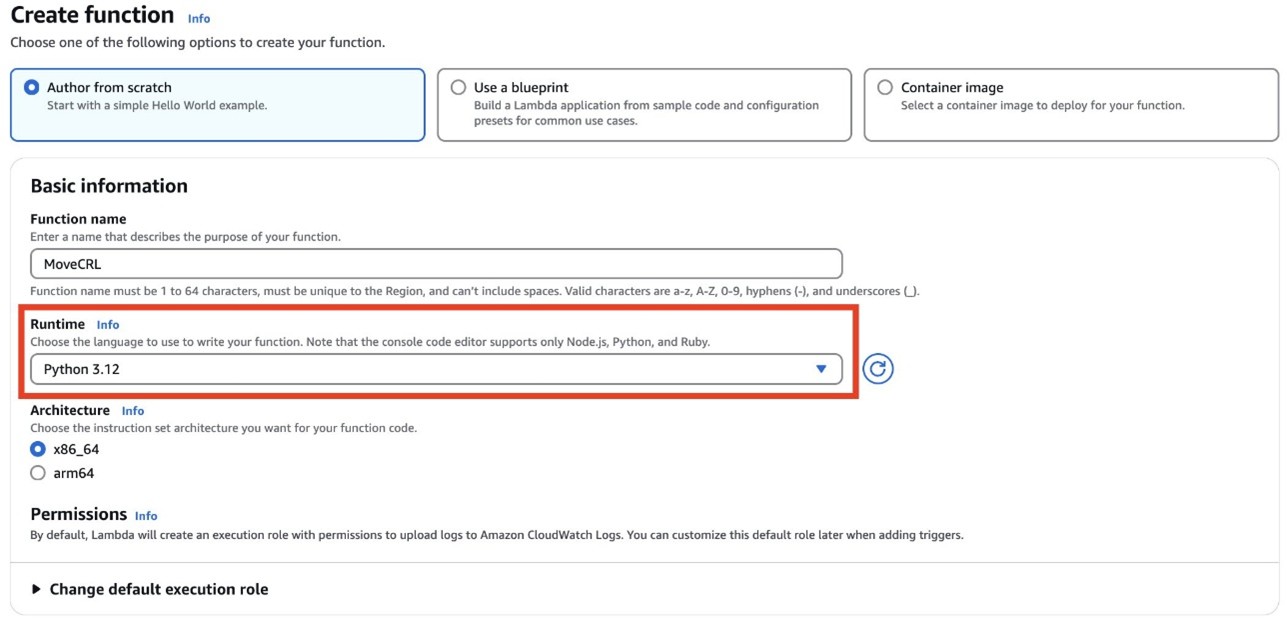
Figure 4: Create a Lambda function
Example code (Python 3.13):
Note: By default, the non-partitioned CRL path in S3 is
<s3-bucket-name>/crl/<CA-ID>.crl.If you used a custom path, modify the path name to the CRL accordingly. Alternatively, if using partitioned CRLs, the path changes to<s3-bucket-name>/crl/<CA-ID>/<partition_GUID>.crl; in that case, you can loop over each file in the<CA-ID>path to achieve the same effect.
To create an EventBridge that deploys your Lambda function:
- Go to the EventBridge console. Under Buses, select Rules.
- Choose Create Rule.
- Enter a name for your rule. Under Rule Type, select Rule with an Event Pattern and choose Next.
- Under Events, select AWS events or EventBridge partner events as the Event Source.
- For the Event pattern, select Use pattern form. For the Event source, select AWS services. For Event Type, select ACM Private CA CRL Generation.
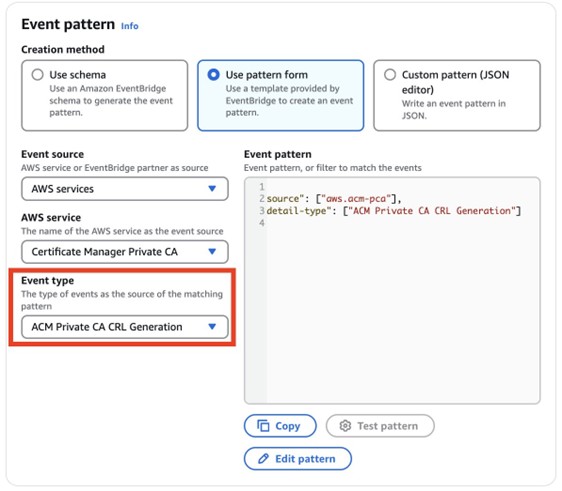
Figure 5: Configure the event pattern
- Choose Next.
- Under Target types, choose AWS Service, and then select Lambda function from the Select a target dropdown and select the function that you created earlier.
- Choose Next. Review your topic, then choose Update rule.
- To test the EventBridge topic, create and revoke a certificate. You can do this using the AWS CLI by getting the serial number of a certificate using openSSL:
openssl x509 -in cert.pem -noout -serial - Use the following command to revoke the certificate:
aws acm-pca revoke-certificate —certificate-authority-arn <CA ARN> \ —certificate-serial <SERIAL NUMBER RETURNED IN STEP 1> --revocation-reason “UNSPECIFIED” - To make sure that the Lambda function is triggered, wait 5–30 minutes. Check CloudTrail to make sure that
RevokeCertificatewas called, then monitor the CloudWatch log of the Lambda function. You should also get a notification message from your SNS topic. - You have now successfully moved your CRL to a new location.
- Authorizing essential AWS Private CA permissions
- Constraining CRL access to a designated Gateway VPC endpoint
- Explicitly blocking access attempts from other sources.
- Create a root CA and subordinate CA with CRL enabled
- Configure a dedicated S3 bucket for CRL storage
- Issue private certificates through ACM
- Set up a VPC with private subnets
- Configure a Gateway VPC endpoint for Amazon S3
- Set up route tables for local traffic only
- Implement an S3 bucket policy with specific permissions
- Configure private DNS resolution
- Set up access controls through VPC endpoints
- Test private access from within the VPC
- Verify that public access is blocked
- An AWS account with necessary permissions
- AWS CLI installed and configured
- OpenSSL installed for certificate operations
- Access to the following AWS services: ACM, AWS Private CA, Amazon Virtual Private Cloud (Amazon VPC), Amazon S3, and Amazon Route 53
- Go to the AWS Private Certificate Authority console.
- In the navigation pane, choose Create a Private CA.
- Under Mode options, select General-purpose.
- For CA type options, select root.
- For the Subject distinguished name options: Fill in at least one of the subject distinguished name options: Organization(O), Organization unit (OU), Country(C), State, Locality name, and Common name (CN).
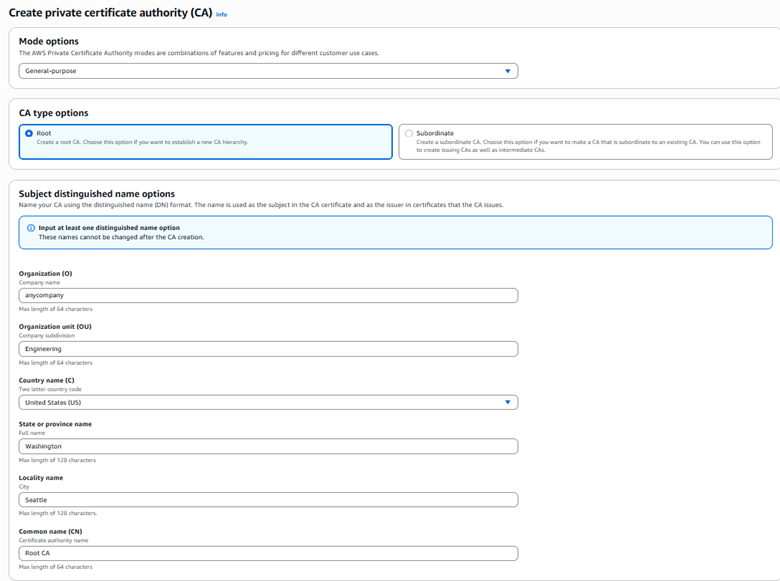
Figure 7: Create a private CA (root)
- Select Key algorithm options, for example, RSA 2046.
- Under Certificate revocation options, select Activate CRL Distribution, and select or create an S3 bucket for CRL storage.
- Under Pricing, select the checkbox to acknowledge pricing and then select Create CA.
- Go to the Amazon VPC console
- In the left navigation pane, select Endpoints, and choose Create Endpoint.
- Configure the Gateway VPC endpoint settings:
- Enter a descriptive name for your endpoint (optional).
- Type: Select AWS services.
- Services: Select the service name com.amazonaws.[region].s3 from the list.
- Type: Verify that Gateway is selected (automatically chosen for Amazon S3).
- VPC: Choose the VPC where you want to create the endpoint.
- Route tables: Select the route tables associated with the subnets that need Amazon S3 access.
- Policy: Select Full Access or create a custom policy to restrict access to specific S3 buckets or actions.
- Review your configuration and choose Create endpoint.
- Create two private subnets:
- In the Amazon VPC console, choose Subnets and then Create subnet.
- Select your VPC and enter the subnet details (name, Availability Zone, and CIDR block).
- Repeat for the second subnet in a different Availability Zone.
- Configure route tables:
- Navigate to Route Tables and choose Create route table.
- Create and name two route tables for your private subnets.
- Associate each route table with its corresponding private subnet.
- Make sure that each route table contains only local routes (VPC CIDR).
- Remove any routes for internet access (0.0.0.0/0).
- You can see now see under Resource Map that the Gateway VPC endpoint provides secure access to Amazon S3 resources within the private network.
- Use the following example code to implement a bucket policy that enforces the following key security controls:
- Grant AWS Private CA the necessary permissions for certificate management.
- Restrict CRL access exclusively through the specified VPC endpoint.
- Explicitly deny GetObject requests not originating from the designated Gateway VPC endpoint.
- Go to the Route 53 console.
- In the left navigation pane, choose Hosted zones.
- Choose Create hosted zone.
- Configure the following:
- Domain name: Enter s3.amazonaws.com
- Description: (optional) enter Private hosted zone for S3 CRL endpoint
- Type: Select Private hosted zone.
- VPC: For Region, select your VPC’s Region; for VPC ID, select your VPC from the dropdown list.
- Choose Create hosted zone.
- Inside your new private hosted zone:
- Choose Create record.
- Select Simple routing policy.
- Choose Next.
- Configure record:
- Record name: Enter your S3 bucket name.
- Record type: Select A – Routes traffic to an IPv4 address.
- Alias: Toggle Yes.
- Route traffic to: Select Alias to S3 website endpoint.
- Region: Select your Region.
- S3 endpoint: Select from dropdown list.
- TTL: Leave as default (300 seconds).
- Choose Create record.
- Go to the Amazon EC2 console and choose Launch instance.
- Select Amazon Linux 2.
- Choose Instance Type.
- Select you VPC and subnet.
- Under Network settings, select Create security group, then choose Allow SSH traffic from and enter your IP address.
- Choose Launch instance.
- After the instance is launched, select the instance and choose Connect.
- Select EC2 Instance Connect and choose Connect.
- Retrieves the CRL from Amazon S3
- Decodes it using OpenSSL
- Displays comprehensive CRL information including issuer details, update timestamps, revoked certificate list, signature algorithm, and other metadata
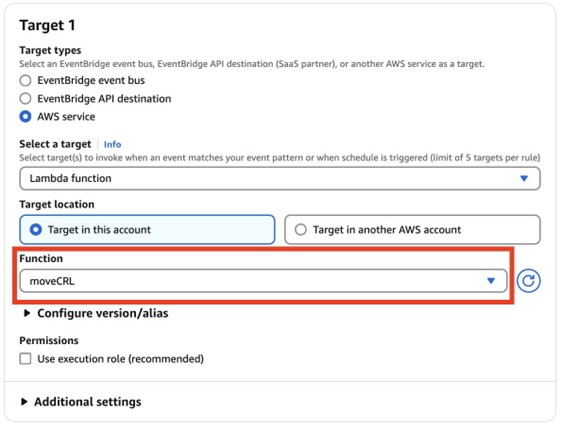
Figure 6: Select the Lambda function as the target
To test the success of the Lambda function:
Option 2: Implement Private CRL Access Through AWS Private CA
This solution provides private Certificate CRL access within AWS Private CA, avoiding the need for public internet exposure. The design centers on establishing root and subordinate CAs with CRL functionality enabled within a dedicated S3 bucket, combined with a private network infrastructure using Gateway VPC endpoints and private subnets. Security is enforced through an S3 bucket policy that accomplishes three critical objectives:
The solution includes private DNS zone configuration for proper resolution and can be verified through access testing confirming successful CRL retrieval from private VPC instances while making sure that requests from public instances are denied, maintaining a strictly private PKI.
Prerequisites for CRL solution 2
For this walkthrough, you must have the following resources available:
Deploy CRL solution 2
With the prerequisites in place, you’re ready to use the console and AWS CLI to deploy the solution.
To deploy the solution:
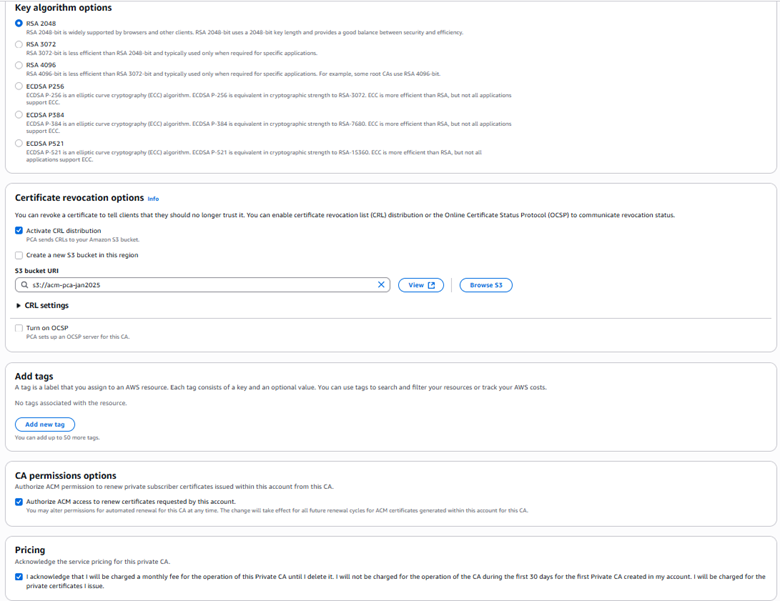
Figure 8: Configure a private CA (root)
3. After creating a root CA, repeat all of step 2 to create a subordinate CA, selecting Subordinate CA under CA options (step 2-b). When completed, both the root CA and subordinate CA will be visible on the Private certificate authority page.
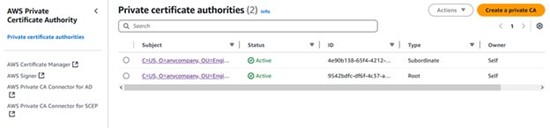
Figure 9: View of root CA and subordinate CA
With the root CA and subordinate CA in place, the next step is to create a VPC gateway endpoint for S3 access to enable private network communication.
To create a VPC gateway endpoint:
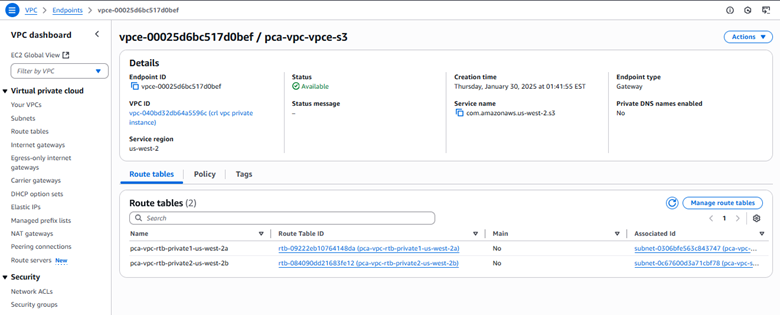
Figure 10: Gateway VPC endpoint configuration
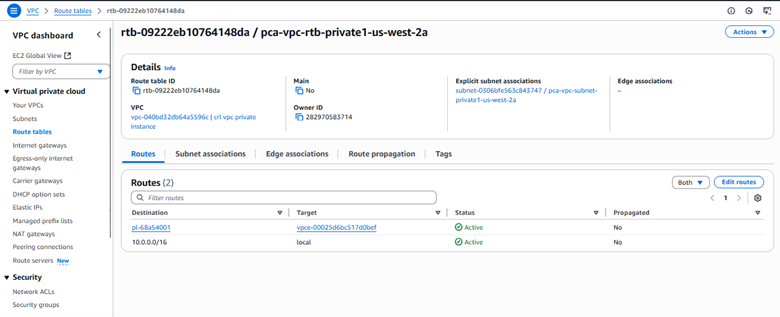
Figure 11: Private route table configuration
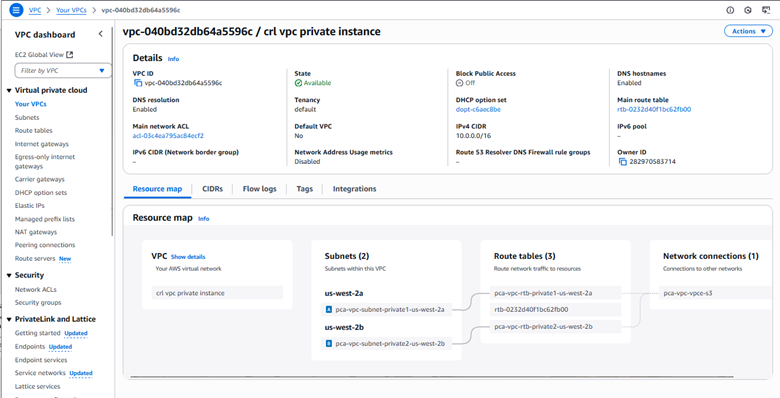
Figure 12: VPC private instance configuration
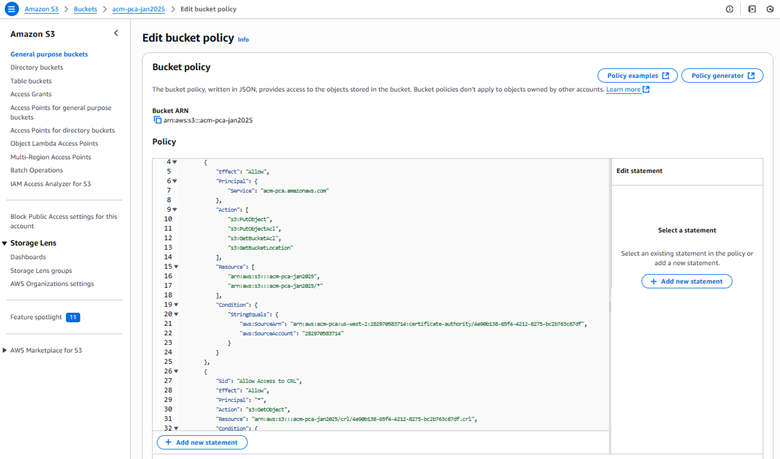
Figure 13: S3 bucket policy
The following is an example S3 bucket policy for private CA CRL access with VPC endpoint restrictions:
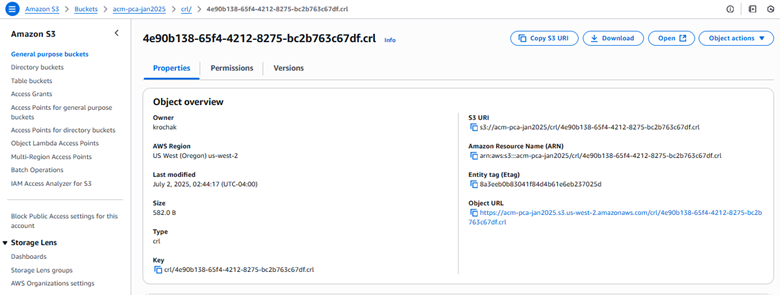
Figure 14: S3 bucket CRL properties
Create a private hosted zone:
Create a record set:
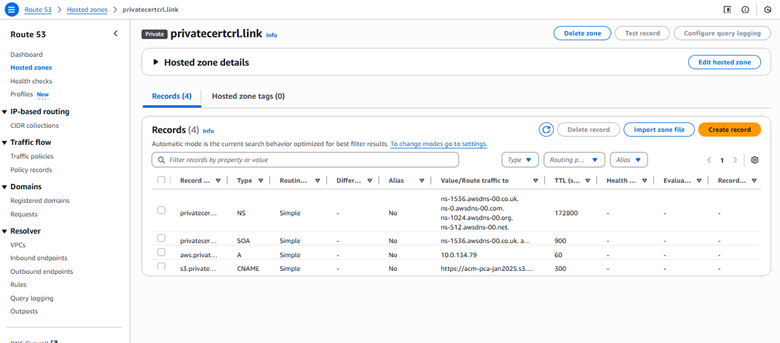
Figure 15: Hosted zone details
Verify configuration:
Test the solution
To test private access from an EC2 instance within your private VPC, verify CRL access using:
curl -s https://<bucket-name>.s3.<region>.amazonaws.com/crl/<certificate-id>.crl | openssl crl -text -noout
If successful, the command completes the following steps, as shown in Figure 16:
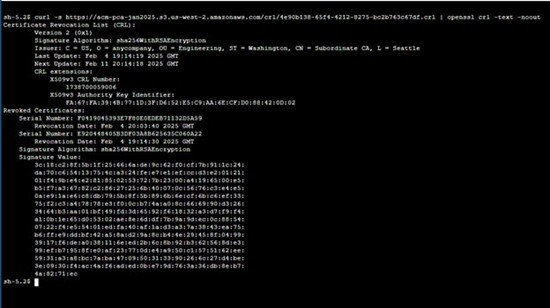
Figure 16: Public access verification
To validate your security controls, attempt access from a public EC2 instance using the following command:
curl https://<bucket-name>.s3.<region>.amazonaws.com/crl/<certificate-id>.crl
This should fail, receiving an access denied error confirming that the CRL cannot be accessed from the public internet, as shown in Figure 17.
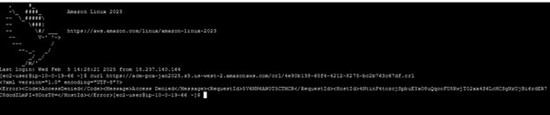
Figure 17: Access denied error confirming that the CRL cannot be accessed from the public internet
Conclusion
In this post, we walked you through two solutions that you can use to make your CRLs accessible to your internal organization, but not publicly available. First, we showed you how to configure a custom CNAME in your CRL distribution point and deploy Lambda functions to automatically copy each newly generated CRL from the default S3 bucket into a private S3 store.
Next, we showed you a VPC architecture that uses an Amazon S3 VPC gateway endpoint, tightly scoped bucket policies, and private Route 53 DNS zones to make sure that CRL retrieval is confined to your VPC. We also covered the essential IAM and bucket policies that your clients need to access those CRLs securely. You can get started with setting up this solution on AWS Private CA today.
If you have feedback about this post, submit comments in the Comments section below. If you have questions about this post, start a new thread on the AWS Certificate Manager forum or contact AWS Support.