AWS Storage Blog
Automated malware scanning for Amazon FSx for Windows File Server with GuardDuty protection for Amazon S3
In today’s cloud-first environment, protecting file storage systems against malware threats is a critical component of any robust security strategy. Amazon FSx for Windows File Server (FSx for Windows) delivers enterprise-grade Windows file storage in AWS, combining the reliability of fully managed services with native Windows file sharing capabilities. Built on Microsoft Windows file system technology, it enables seamless migration of Windows-based enterprise workloads to AWS while maintaining familiar features and performance standards.
One common approach to malware scanning for FSx for Windows involves deploying dedicated Amazon EC2 instances with anti-malware software, mounting their FSx for Windows file shares to these instances, and managing the scanning process at the client level. While functional, this approach requires ongoing maintenance of EC2 instances, license management for anti-malware software, and additional operational overhead.
In this blog post, we’ll introduce a modern, serverless approach to implementing automated malware scanning for FSx for Windows. Our solution eliminates the need to manage EC2 instances while providing robust protection for your file shares. By leveraging AWS serverless services, we’ve created a scalable, cost effective scanning mechanism that helps protect your data from malicious content. This solution provides additional security controls that can help strengthen your FSx for Windows deployment’s security posture while minimizing operational overhead. Organizations can use it as part of their strategy for protecting sensitive data, supporting compliance requirements, and implementing security best practices.
Solution overview
This solution extends Amazon GuardDuty‘s malware protection capabilities to FSx for Windows by automatically synchronising file changes on your FSx for Windows file systems to S3, enabling seamless malware scanning without managing additional infrastructure. Figure 1 shows a high-level architecture for this solution:
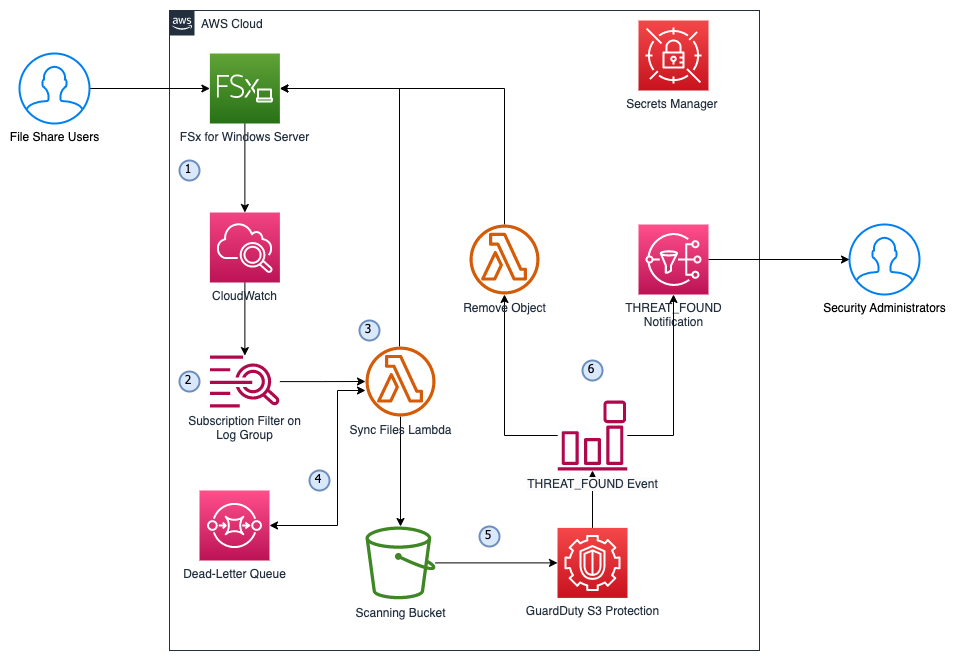
Figure1: Solution architecture
The following steps describe the solution architecture (figure 1):
- File share users upload/modify files on FSx for Windows File Server with file access auditing enabled, which generates logs with the event details, including the file path. The logs are published to CloudWatch Log Group.
- A log-group subscription filter with AWS Lambda is set up to trigger a Lambda function with the “4417” pattern. This filter monitors Write Data or Add File operations in the file share.
- The Lambda function connects to the FSx for Windows File Server via SMB protocol using domain credentials stored in Secrets Manager, and copies the changed files to the Scanning Bucket in S3. The Scanning Bucket has a lifecycle rule to expire objects after 1 day to save costs.
- If the file processing is unsuccessful, the Sync Files Lambda function will automatically retry twice, and send to a dead-letter queue (DLQ) if the event fails all attempts. The DLQ will trigger the Sync Files Lambda function again after 300 seconds (adjustable) to retry the file processing until successful.
- The Scanning Bucket has GuardDuty Malware Protection for S3 enabled, which scans newly uploaded objects and publishes the malware scan results to Amazon EventBridge event bus.
- An event rule is set up to monitor the “THREATS_FOUND” event and triggers two actions:
- SNS notification to Security Administrators with event details
- A Lambda function to move the malicious file into a “quarantine” folder for further investigation
Walkthrough
This section will dive into the technical details of this solution and step-by-step process for the deployment. There are four steps to deploy this solution:
- Prepare the Lambda layer for required dependencies.
- Deploy the infrastructure. You can deploy in many ways. In this walkthrough we will use CloudFormation.
- Update the Secrets Manager secret created in step 2 for file share access.
- Configure FSx for Windows File Server file access auditing.
Refer to this GitHub repository for the solution source code.
Prerequisites
The prerequisites for this walkthrough include:
- Administrator-level access to an AWS account and AWS CloudShell.
- An AWS Managed Microsoft Active Directory (self-managed Microsoft Active Directory is also supported, but for this walkthrough we will use AWS managed).
- An email address to receive the notifications.
- A VPC with private subnet to host the solution. The private subnet needs outbound connectivity to the internet.
- An Windows EC2 instance with network access to mount the FSx for Windows file share.
Step 1:
We will be using the smbprotocol library for the Lambda Functions to connect to FSx for Windows to perform file syncs and move to quarantine.
In this step, since this library is not included in the Lambda python runtime by default, we will use AWS CloudShell to prepare a Lambda Layer content for this library with consistent architecture support. Follow these steps to create the required ZIP file:
- Open CloudShell in the AWS Management Console.
- Run the prepare-layer.sh script with the below command.
git pull https://github.com/aws-samples/sample-fsx-for-windows-malware-scan

cd fsx-for-windows-malware-scan

chmod +x prepare-layer.sh

./prepare-layer.sh
This script will:
-
- Install the required python version (3.12 by default).
- Create a virtual environment.
- Install the smbprotocol package and zip the package.
- Create an S3 bucket called “lambda-layer-smbprotocol-{AccountNumber}” for the package and upload the zip file.
Now we have packaged the layer content be used in later steps to create the Lambda layer.
Step 2:
In this step, we will deploy the AWS resources required for this solution using CloudFormation:
- Sign in to your AWS account.
- Download the fsx-malware-scan.yaml for creating the stack.
- Navigate to the AWS CloudFormation page.
- Choose Create stack, and then choose With new resources (standard).
- Select Upload a template file and upload the CloudFormation template that you downloaded earlier: fsx-malware-scan.yaml. Then choose Next.
- Enter the stack name FSx-Malware-Scan.
- Enter the following values for the parameters:
- VpcId: VPC ID where the FSx for Windows File Server and Lambda will be deployed.
- SubnetIds: Private subnet ID where the FSx for Windows File Server and Lambda will be deployed.
- NotificationEmail: Email address for threat notification.
- LayerBucketName: S3 Bucket name for the Lambda layer (created in step 1).
- ManagedADId: ID of the Managed Microsoft Active Directory.
- Choose Next, and then optionally enter tags and choose Submit. Wait for the stack creation to finish.
The following resources have now been deployed in your account:
- A Secrets Manager secret with FSx for Windows administrator domain credentials to be used by Lambda to connect to the file share. This is a placeholder to be updated in the next step.
- A S3 bucket to copy files in to perform malware scans.
- A GuardDuty malware protection plan for the scanning bucket.
- A FSx for Windows File Server with file access auditing enabled.
- A CloudWatch Log Group to store the FSx for Windows access logs.
- A CloudWatch log subscription filter in the log group to monitor 4417 (file create or update) events and trigger Lambda function.
- A Lambda layer for the smbprotocol python module.
- A EventBridge rule to trigger Lambda function and send email notification when “THREATS_FOUND” event is generated by GuardDuty.
- Two Lambda functions reside in the same VPC as the FSx for Windows to:
- Sync files from FSx for Windows file share to S3 when file create or update events occur in the file share.
- Move the malicious file from source location to a “quarantine” folder when GuardDuty S3 malware protection finds threats.
- A SNS topic to send email notifications.
- Required IAM roles and permissions for different components.
Note: We have used single-AZ in this blog, please consider multi-AZ setup in production environment for high availability.
Step 3:
In this step, we will manually update the Secrets Manager secret to store the FSx for Windows administrator username and password. This user needs to be either the AWS Managed AD Administrator account or part of the AWS Delegated FSx Administrators group.
- Open the Secrets Manager console.
- From the list of secrets, choose the secret named fsx-admin-user.
- On the secret details page, on the Overview tab, in the Secret value section, choose Retrieve secret value and then choose Edit.
- Update the value for username and password and then Save.
Now you have updated the credentials to be used by Lambda functions to connect to the FSx for Windows File Server to perform file copy and move operations.
Step 4:
Now that we have all the required resources for this solution deployed, including an FSx for Windows File Server with file access auditing enabled to deliver logs to CloudWatch Logs. In this step, we will set audit controls on the file share to audit user access attempts for Write Data or Add File.
- Connect to the EC2 instance that has the required network access to the file share
- Open PowerShell and run the following commands:
# Mount the FSx file share
net use Z: \\<FSX-DNS-NAME>\share

# Set auditing on FSx file share
$sharePath = "\\<FSX-DNS-NAME>\share"
$auditUser = "Everyone"
$auditRights = "CreateFiles,WriteData"
$auditType = "Success"

# Get current ACL
$acl = Get-Acl $sharePath

# Create audit rule
$auditRule = New-Object System.Security.AccessControl.FileSystemAuditRule($auditUser, $auditRights, "ContainerInherit,ObjectInherit", "None", $auditType)

# Add audit rule to ACL
$acl.SetAuditRule($auditRule)

# Apply the ACL
Set-Acl -Path $sharePath -AclObject $acl

Write-Host "Auditing configured for $sharePath"
Testing
To test this solution, connect to the EC2 instance that has the required network access to the file share, and follow these steps:
- Turn off Real-time Virus and Threat Protection in the Windows Security App as it will automatically remove the test virus file when you try to upload to the FSx file share:
- Open the Windows Security App by searching the start menu for Windows Security.
- Select Virus & threat protection.
- Under Virus & threat protection settings, open Manage settings.
- Toggle the Real-time protection switch to Off.
- Go to Z:\ (or other drive letter you mounted to), and upload the clean.txt file into the file share.
- Go to the scanning S3 bucket created in Step 2, and confirm the clean.txt file has been copied into the scanning bucket. No further action should occur as this file does not contain any threats.
- Next, upload the eicar.txt file into the file share. This is a test virus file developed by the European Institute for Computer Antivirus Research (EICAR), this is an industry-standard malware test file.
- Within 30 seconds, the eicar.txt file will be moved to a “quarantine” folder in the file share, and you should receive an email notification with the GuardDuty Malware Protection for S3 scan details.
Cleaning up
To avoid incurring expenses, remove the unneeded resources after testing the solution by following these steps:
- Go to Amazon S3, select the bucket starting with scanning-bucket, choose Empty, and empty the bucket.
- Go to Amazon S3, select the bucket starting with lambda-layer, choose Empty, and empty and delete the bucket.
- In the CloudFormation console, delete the FSx-Malware-Scan stack
- Turn on Real-time Virus and Threat Protection in the Windows Security App on your EC2 used in testing:
- Open the Windows Security App by searching the start menu for Windows Security.
- Select Virus & threat protection.
- Under Virus & threat protection settings, open Manage settings.
- Toggle the Real-time protection switch to On.
Additional Considerations
- There are costs involved to perform malware scans with GuardDuty Malware protection for S3, refer to GuardDuty protection plans pricing for pricing details and examples.
- The Lambda layer preparation and management can be simplified using tools such as SAM or CDK python lambda construct.
- The latency between file uploads and scan starts ranges from seconds to minutes depending on the file size and FSx for Windows throughput capacity.
- Small/frequent modifications of large files (e.g., appending to files) would require uploading the full file to S3 for scanning. Although the solution has a lifecycle policy on S3 to remove files after one day, this may incur additional costs.
- The “quarantine” folder in the file share should have restricted access for security administrators to investigate further.
- Review the best practices for using AWS Lambda to optimise the performance of your function as required.
Conclusion
In this blog post, we’ve demonstrated a serverless solution for implementing automated malware scanning for FSx for Windows File Server. By leveraging Amazon GuardDuty’s Malware Protection capabilities, organizations can enhance their FSx for Windows File Server security posture while maintaining operational efficiency. This approach eliminates the need for managing dedicated scanning infrastructure while providing the scalability and reliability inherent to AWS services. The solution’s serverless architecture provides cost-effectiveness, as you only pay for actual usage.As cyber threats continue to evolve, protecting file storage systems becomes increasingly critical. This solution demonstrates how AWS services can be combined creatively to address security challenges and meet compliance requirements. Get started with this solution today to strengthen your cloud security posture and protect your organization’s valuable data assets.