AWS Storage Blog
Integrating Amazon FSx for NetApp ONTAP and Amazon FSx for Windows File Server with Microsoft Entra ID
Organizations are increasingly adopting cloud-based identity solutions to reduce infrastructure overhead and improve their security posture. For customers running file workloads on AWS, both Amazon FSx for NetApp ONTAP and Amazon FSx for Windows File Server require joining a Microsoft Active Directory domain to serve SMB file shares and support Windows-based authentication. When customers have retired their Active Directory (AD) in favor of Microsoft Entra ID, neither FSx for NetApp ONTAP nor FSx for Windows File Server can authenticate directly against it. Deploying a standalone AD just to support these services defeats the purpose of cloud consolidation and creates identity silos.
Microsoft Entra Domain Services provides managed domain services that automatically sync with Entra ID, exposing traditional AD protocols while maintaining a single identity source—effectively acting as a bridge between Amazon FSx and Entra ID.
In this post, you will learn how to connect FSx for NetApp ONTAP and FSx for Windows File Server to Entra ID on Azure using Entra Domain Services. The solution presented is designed for cloud architects and storage administrators managing multi-cloud environments who need secure integration between AWS storage services and Azure-based identity management.
Solution overview
Figure 1 shows the high-level architecture for integrating FSx for NetApp ONTAP or FSx for Windows File Server on AWS with Entra Domain Services.
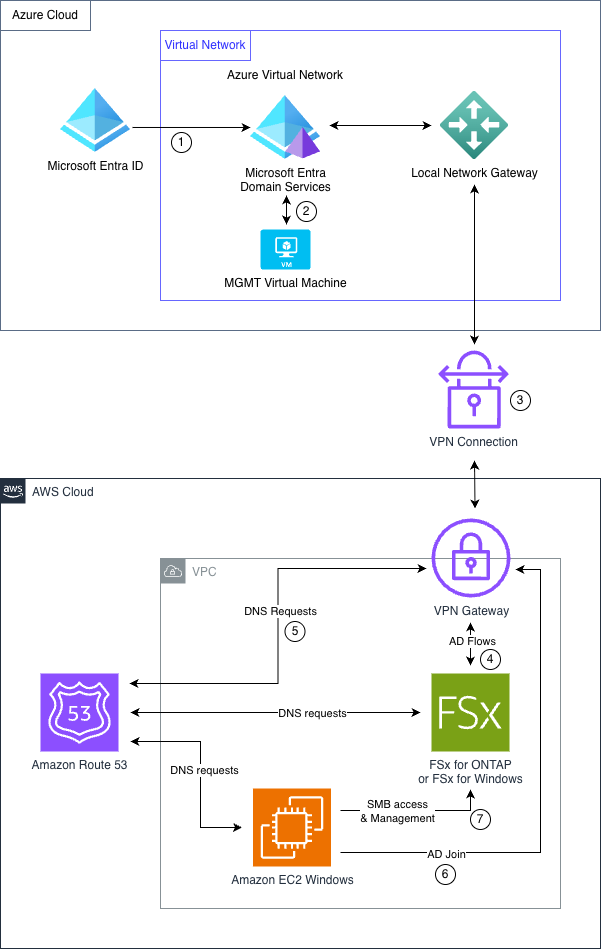
Figure 1: Reference Architecture: Entra ID Integration with Amazon FSx
The workflow consists of the following key steps:
- Users, groups, and password hashes are synchronized from Entra ID to managed domain controllers.
- A domain-joined virtual machine (VM) is used to configure DNS PTR records, manage organizational units (OUs), and validate the AD sync.
- An encrypted tunnel bridges Azure Virtual Network and Amazon Virtual Private Cloud (Amazon VPC).
- LDAP, Kerberos, and NTLM protocols are made available over the VPN tunnel. An Amazon FSx storage virtual machine (SVM) or FSx for Windows File Server instance joins the Entra Domain Services managed domain using Kerberos or LDAP.
- DNS queries for the managed domain (for example, fsxblog.local) are forwarded through the VPN to Entra Domain Services.
- Windows desktop joins the Entra Domain Services managed domain using Kerberos or LDAP.
- Users authenticate with Entra ID credentials to access SMB shares; admins manage SMB configuration.
Microsoft Entra Domain Services acts as a bridge between Entra ID and Amazon FSx. It deploys managed domain controllers that synchronize users, groups, and credentials from your Entra ID tenant and expose traditional Active Directory protocols (LDAP, Kerberos, NTLM) that Amazon FSx requires for SMB authentication. The site-to-site VPN connects your Azure Virtual Network to your VPC, enabling the Amazon FSx SVM or FSx for Windows instance to join the Entra Domain Services managed domain and authenticate users over SMB. Synchronization from Entra ID to Entra Domain Services is one-way and automatic—password changes propagate without manual intervention. In the following sections, we walk through the steps to integrate Amazon FSx with Entra ID:
- Configure reverse DNS pointer (PTR) records for Entra Domain Services (only needed for FSx for NetApp ONTAP).
- Create an FSx for NetApp ONTAP or FSx for Windows File Server file system.
- If using FSx for NetApp ONTAP:
- Create an SVM and join the SVM to the Entra Domain Services managed domain.
- Create a CIFS server on FSx for NetApp ONTAP.
- If using FSx for Windows File Server:
- Join the FSx for Windows File Server instance to the Entra Domain Services managed domain during the creation of the file system.
- Map the SMB share on an Amazon EC2 Windows instance to validate authentication.
Prerequisites
Make sure the following Azure resources are preconfigured before you begin:
- Entra ID tenant with a user account and an admin account
- Entra Domain Services deployed
- Azure Windows Server VM (in this post, MGMT) joined to Entra Domain Services with administrator access, and Active Directory administration tools installed
- VPN connection to AWS (refer to the first section of the post Using Amazon FSx for Windows File Server with Azure ADDS domain for instructions)
You must also set up the following AWS resources:
- Amazon VPC with appropriate IP address ranges that don’t overlap between AWS and Azure
- Amazon EC2 Windows instance on the VPC that can resolve your Entra Domain Services domain (for example, using DHCP Option Set or Route 53 VPC Resolver).
- VPN connection to Azure (refer to the first section of the post Using Amazon FSx for Windows File Server with Azure ADDS domain for instructions)
Configure reverse DNS (PTR) records for Entra Domain Services
For Amazon FSx to successfully join the Entra Domain Services managed domain (Figure 2), you must configure reverse DNS pointer (PTR) records that map the domain controller IP addresses back to their fully qualified domain names:
- Connect to the Azure MGMT VM that is joined to the Entra Domain Services domain using Remote Desktop.
- Open Server Manager as a domain administrator. Navigate to Tools and choose DNS.
- In the Azure portal, navigate to your Entra Domain Services instance. Note the two domain controller IP addresses (for example, 10.1.0.4 and 10.1.0.5).
- Create the reverse lookup zone:
- In DNS Manager, choose (right-click) Reverse Lookup Zones and choose New Zone.
- Select Primary zone and select Store the zone in Active Directory.
- Choose To all DNS servers running on domain controllers in this domain.
- Select IPv4 Reverse Lookup Zone.
- Enter the network ID (for example, 10.1.0 for a 10.1.0.0/24 subnet). Allow only secure dynamic updates.
- Create the PTR records:
- Expand Reverse Lookup Zones and select your zone.
- Choose (right-click) the zone and choose New Pointer (PTR).
- Enter the first domain controller IP address (for example, 10.1.0.4) and the FQDN (for example, DC1.fsxblog.local),
- Choose OK.
- Repeat these steps for the second domain controller.
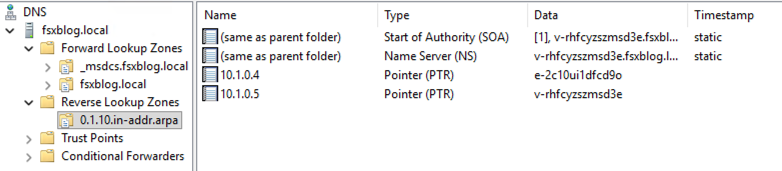
Figure 2: Domain Services reverse DNS configuration
- Verify the PTR records:
- Open PowerShell on the Azure MGMT VM.
- Run nslookup <DomainController-IP-address>.
- Confirm it returns the correct FQDN for each domain controller.
The reverse DNS configuration is now complete and Amazon FSx can perform the necessary DNS lookups during domain join operations.
FSx for NetApp ONTAP: Create FSx for NetApp ONTAP file system
If you already have an existing file system and SVM, you can skip the creation steps and proceed directly to joining the AD.
Create an FSx for NetApp ONTAP file system and SVM in your VPC that has VPN connectivity to Azure. If using the Amazon FSx console, complete the following steps. For detailed instructions on creating file systems, see Creating file systems.
- On the Amazon FSx console, choose Standard create.
- In the Network & security section, select the VPC that has VPN connectivity to your Azure Virtual Network.
- In the Default storage virtual machine configuration section, choose Join an Active Directory.
Join SVM to Azure AD Domain Services managed domain
To join the AD, provide the following information (Figure 3):
- Active Directory domain name: Enter your Entra Domain Services domain name (for example, fsxblog.local).
- DNS server IP addresses: Enter the IP addresses of your Entra Domain Services domain controllers, separated by commas (for example, 10.1.0.4,10.1.0.5).
- Credentials: Use AWS Secrets Manager and provide the AWS secret Amazon Resource Name (ARN). For more information, see Storing Active Directory credentials using AWS Secrets Manager.
- Organizational Unit (OU): (Optional) Specify a custom OU (for example, OU=AADDC Computers,DC=fsxblog,DC=local).
- Delegated file system administrators group: (Optional) Specify an Active Directory group for delegated administration (for example, AAD DC Administrators).
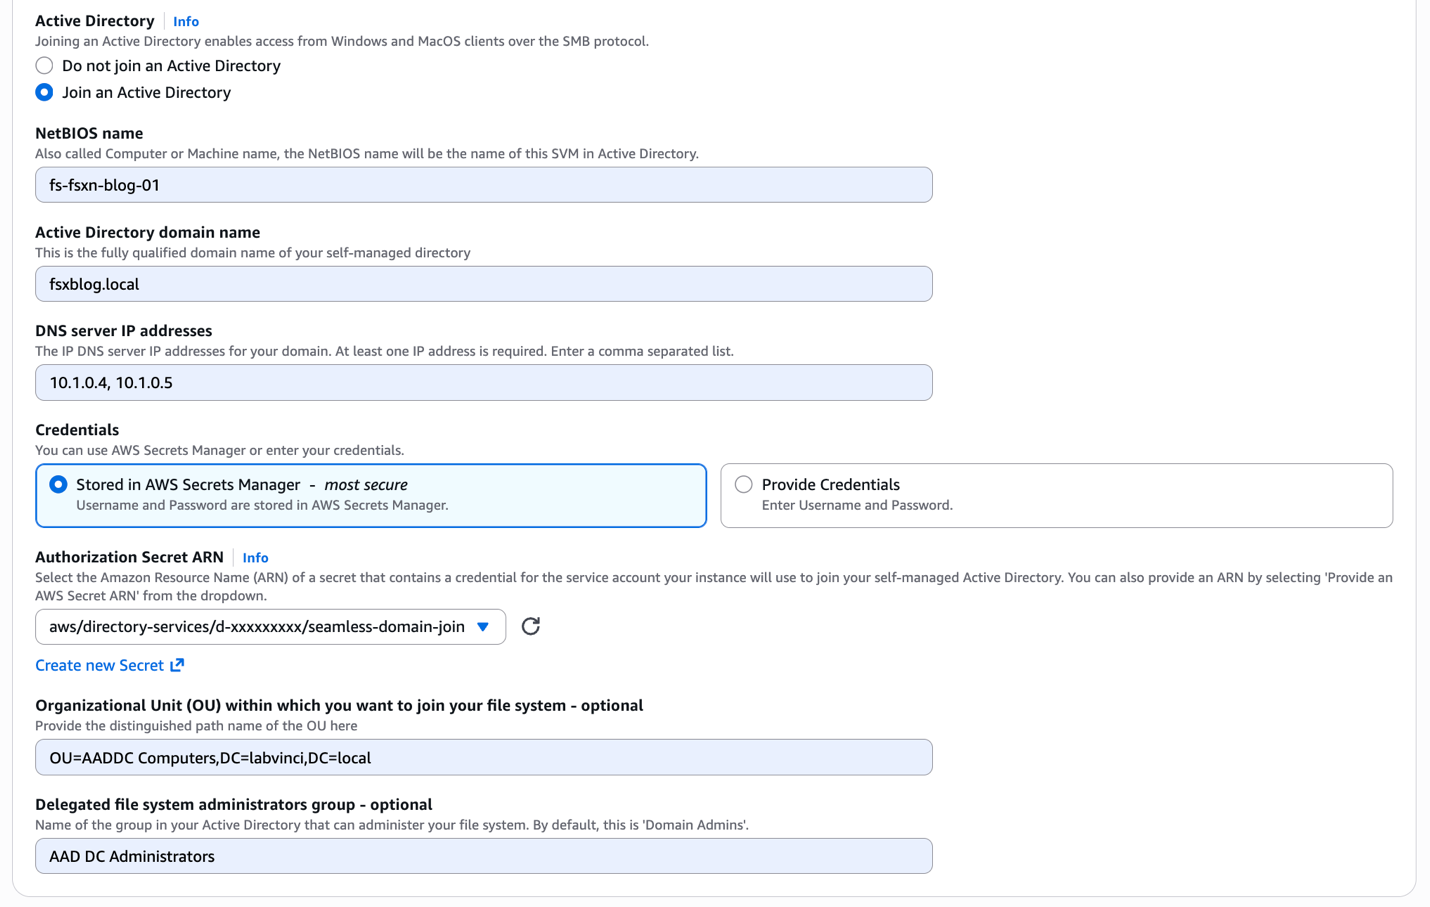
Figure 3: FSx for NetApp ONTAP Active Directory settings
Review your configuration settings, then choose Next and proceed with the file system creation. The file system creation typically takes 20–40 minutes. Wait until the status shows Available.
FSx for NetApp ONTAP: Create CIFS server
After you create and join the SVM to Active Directory, create a CIFS server to enable SMB file sharing (Figure 4). You can create the CIFS server using the NetApp ONTAP CLI from a PowerShell terminal on your Windows EC2 instance. To connect to the NetApp ONTAP management endpoint from the Windows instance, complete the following steps:
- Connect to your Windows EC2 instance using Remote Desktop or Session Manager, a capability of AWS Systems Manager.
- Open a PowerShell terminal. Connect to the FSx for NetApp ONTAP management endpoint through SSH:
PS C:\> ssh fsxadmin@<management-endpoint-dns-name>Replace <management-endpoint-dns-name> with your file system’s management endpoint (found on the Amazon FSx console).
- After you log in, use the vserver cifs create ONTAP CLI command to create an SMB server on the SVM. For more details, see Creating an SMB server in a workgroup. For this post, we use VOL1 as the share name.

Figure 4: CIFS server creation from the ONTAP CLI
FSx for Windows File Server: Create file system
Create an FSx for Windows File Server file system in your VPC that has VPN connectivity to Azure. For detailed instructions on creating file systems, see Getting started with Amazon FSx for Windows File Server.
To create an FSx for Windows File Server file system, complete the following steps:
- On the Amazon FSx console, choose Create file system.
- Choose FSx for Windows File Server, then choose Next.
- On the Create file system page, provide the following information:
- Creation method: Select Standard Create to view all available options.
- File system name: Enter a name for your file system (for example, fs-fsxw-blog-01).
- Deployment type: Choose your preferred deployment type.
- Storage Class: Select between SSD or HDD storage class.
- SSD / HDD storage capacity: Specify the storage capacity for your file system.
- Throughput capacity: Choose the required throughput capacity.
- VPC: Select the VPC that has VPN connectivity to your Azure Virtual Network.
- Security Group: Select the VPC Security Group to associate with the file system’s network interface.
- Subnet: Specify the subnet in which your file system’s network interface resides.
- Network type: Select IPv4 or Dual-stack networking.
- Windows Authentication: Select Self-managed Microsoft Active Directory.
- Active Directory domain name: Enter your Entra Domain Services domain name (for example, fsxblog.local).
- DNS server IP addresses: Enter the IP addresses of your Entra Domain Services domain controllers, separated by commas (for example, 10.1.0.4,10.1.0.5).
- Credentials: Use Secrets Manager and provide the AWS secret ARN. For more information, see Storing Active Directory credentials using AWS Secrets Manager.
- Service account username: Enter your Entra ID domain administrator account.
- Service account password: Enter the password for the service account.
- Organizational Unit (OU): (Optional) Specify a custom OU (for example, OU=AADDC Computers,DC=fsxblog,DC=local).
- Delegated file system administrators group: (Optional) Specify an Active Directory group for delegated administration (for example, AAD DC Administrators).
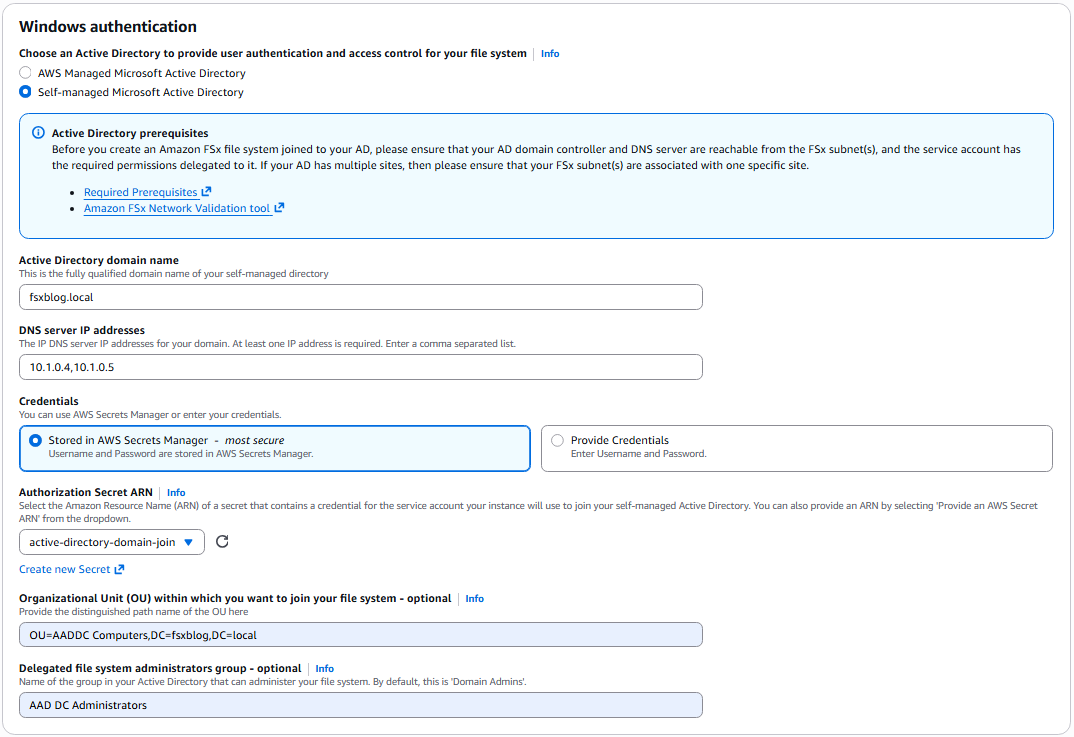
Figure 5: FSx for Windows File Server Active Directory settings
- Review and choose Next.
After you confirm the details of the new file system, the creation and domain join process takes approximately 15–30 minutes.
Validate deployment
Validate that Entra ID users can authenticate and access Amazon FSx shares by mapping a network drive from your Windows EC2 instance:
- If using FSx for NetApp ONTAP:
- On the Amazon FSx console, navigate to your file system.
- On the Storage virtual machines tab, select your SVM.
- On the Endpoints tab, note the SMB DNS name.
- If using FSx for Windows File Server:
- On the Amazon FSx console, navigate to your file system.
- On the Network & security tab, note the DNS name.
- Connect to your Windows EC2 instance using Remote Desktop or Session Manager.
- Open File Explorer and choose This PC.
- Choose Map network drive from the toolbar.
- In the Map Network Drive dialog box (Figure 6):
-
- Drive: Select an available drive letter
- Folder: Enter
\\<smb-dns-name or dns-name>\<share-name>.
For example, if using FSx for NetApp ONTAP, use the SMB DNS name: \\svm-01234567890abcdef.fs-01234567890abcdef.fsx.us-east-1.amazonaws.com\vol1. If using FSx for Windows File Server, use the DNS name: \\amznfsxigfezn7k.fsxblog.local\share.
- Select Connect using different credentials and specify an Entra ID user account.
- Choose OK.
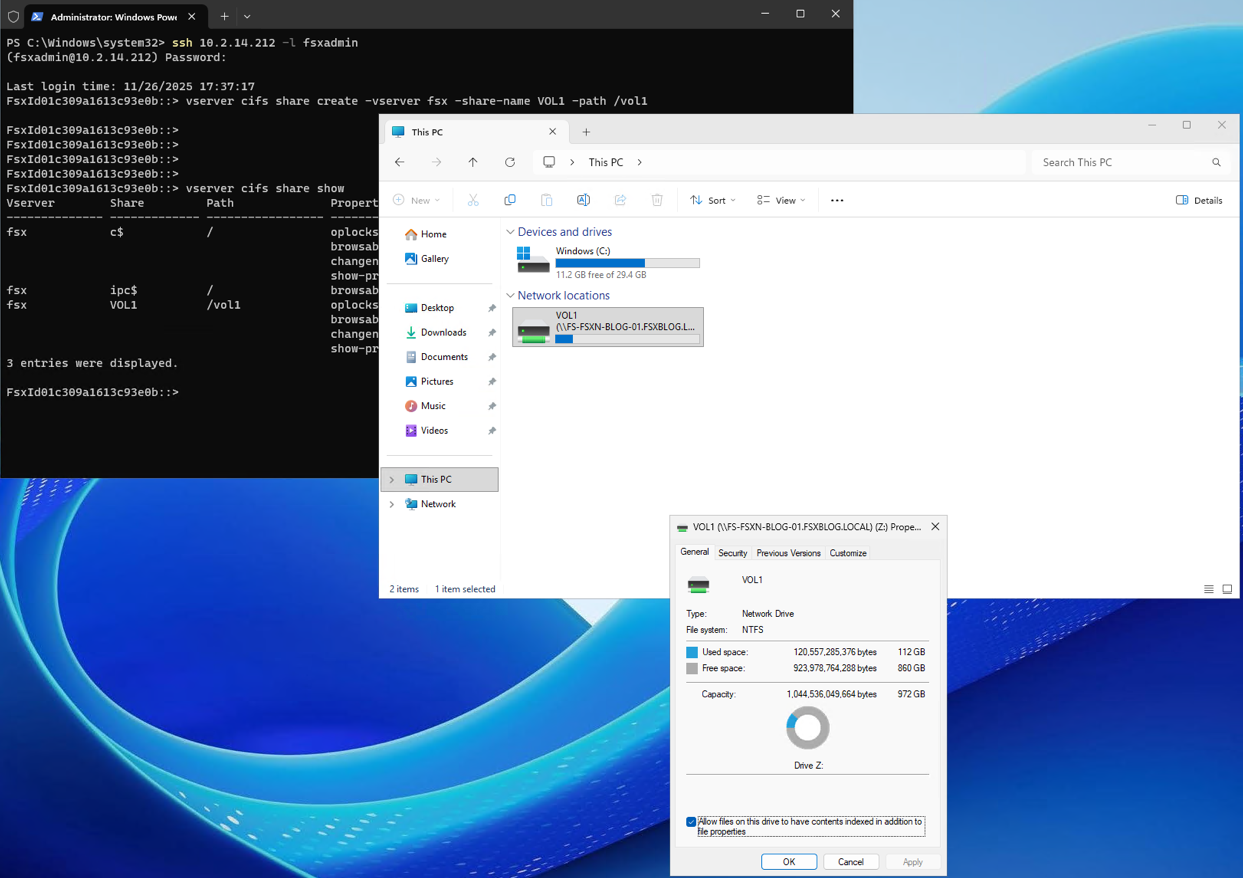
Figure 6: Mapping the network drive from Windows Desktop
The network drive is now mapped and accessible. You have successfully validated that Entra ID users can authenticate to FSx for NetApp ONTAP through Entra Domain Services.
Clean up
To avoid incurring additional charges, delete the created resources:
- MGMT Azure VM
- EC2 Windows VM
- FSx for NetApp file system or FSx for Windows File Server instance
- Entra Domain Services
Conclusion
In this post, we demonstrated how to integrate FSx for NetApp ONTAP or FSx for Windows File Server on AWS with Entra ID using Entra Domain Services. We established site-to-site VPN connectivity between Azure and AWS, deployed Entra Domain Services synchronized with Entra ID, and configured DNS pointer records for proper domain resolution. We then deployed an FSx for NetApp ONTAP file system, joined the storage virtual machine to the Entra Domain Services managed domain, and created a CIFS server for SMB access. We also created an FSx for Windows File Server instance and joined it to the Entra Domain Services managed domain. Finally, we validated that Entra ID users can authenticate and mount Amazon FSx file shares using their cloud-based credentials.This solution alleviates the need for on-premises Active Directory infrastructure while maintaining full SMB protocol support for FSx for NetApp ONTAP or FSx for Windows File Server. Organizations can now consolidate identity management in Entra ID while using enterprise-grade NetApp ONTAP or FSx for Windows File Server storage on AWS. If you have questions or comments, leave them in the comments section.