AWS Security Blog
Fine-tune and optimize AWS WAF Bot Control mitigation capability
Introduction
A few years ago at Sydney Summit, I had an excellent question from one of our attendees. She asked me to help her design a cost-effective, reliable, and not overcomplicated solution for protection against simple bots for her web-facing resources on Amazon Web Services (AWS). I remember the occasion because with the release of AWS WAF Bot Control, I can now address the question with an elegant solution. The Bot Control feature now makes this a matter of switching it on to start filtering out common and pervasive bots that generate over 50 percent of the traffic against typical web applications.
Reduce Unwanted Traffic on Your Website with New AWS WAF Bot Control introduced AWS WAF Bot Control and some of its capabilities. That blog post covers everything you need to know about where to start and what elements it uses for configuration and protection. This post unpacks closely-related functionalities, and shares key considerations, best practices, and how to customize for common use cases. Use cases covered include:
- Limiting the crawling rate of a bot leveraging labels and AWS WAF response headers
- Enabling Bot Control only for certain parts of your application with scope down statements
- Prioritizing verified bots or allowing only specific ones using labels
- Inserting custom headers into requests from certain bots based on their labels
Key elements of AWS WAF Bot Control fine-tuning
Before moving on to precise configuration of the bot mitigation capability, it is important to understand the components that go into the process.
Labels
Although labels aren’t unique to Bot Control, the feature takes advantage of them, and many configurations use labels as the main input. A label is a string value that is applied to a request based on matching a rule statement. One way of thinking about them is as tags that belong to the specific request. The request acquires them after being processed by a rule statement, and can be used as identification of similar requests in all subsequent rules within the same web ACL. Labels enable you to act on a group of requests that meets specific criteria. That’s because the subsequent rules in the same web ACL have access to the generated labels and can match against them.
Labels go beyond just a mechanism for matching a rule. Labels are independent of a rule’s action, as they can be generated for Block, Allow, and Count. That opens up opportunities to filter or construct queries against records in AWS WAF logs based on labels, and so implement sophisticated analytics.
A label is a string made up of a prefix, optional namespace, and a name delimited by a colon. For example: prefix:[namespace:]name. The prefix is automatically added by AWS WAF.
AWS WAF Bot Control includes various labels and namespaces:
- bot:category: Type of bot. For example, search_engine, content_fetcher
- bot:name: Name of a specific bot (if available). For example, scrapy, mauibot, crawler4j
- bot:verified: Verified bots are generally safe for web applications. For example, googlebot and linkedin. Bot Control performs validation to confirm that such bots come from the source that they claim, using the bot confirmation detection logic described later in this section.
By default, verified bots are not blocked by Bot Control, but you can use a label to block them with a custom rule.
- signal: attributes of the request indicate a bot activity. For example, non_browser_user_agent, automated_browser
These labels are added through managed bot detection logic, and Bot Control uses them to perform the following:
Known bot categorization: Comparing the request user-agent to known bots to categorize and allow customers to block by category. Bots are categorized by their function, such as scrapers, search engines, social media.
Bot confirmation: Most respectable bots provide a way to validate beyond the user-agent, typically by doing a reverse DNS lookup of the IP address to confirm the validity of domain and host names. These automatic checks will help you to ensure that only legitimate bots are allowed, and provide a signal to flag requests to downstream systems for bot detection.
Header validation: Request headers validation is performed against a series of checks to look for missing headers, malformed headers, or invalid headers.
Browser signature matching: TLS handshake data and request headers can be deconstructed and partially recombined to create a browser signature that identifies browser and OS combinations. This signature can be validated against the user-agent to confirm they match, and checked against lists of known-good browser known-bad browser signatures.
Below are a few examples of labels that Bot Control has. You can obtain the full list by calling the DescribeManagedRuleGroup API.
awswaf:managed:aws:bot-control:bot:category:search_engine
awswaf:managed:aws:bot-control:bot:name:scrapy
awswaf:managed:aws:bot-control:bot:verified
awswaf:managed:aws:bot-control:signal:non_browser_user_agent
Best practice to start with Bot Control
Although Bot Control can be enabled and start protecting your web resources with the default Block action, you can switch all rules in the rule group into a Count action at the beginning. This accomplishes the following:
- Avoids false positives with requests that might match one of the rules in Bot Control but still be a valid bot for your resource.
- Allows you to accumulate enough data points in the form of labels and actions on requests with them, if some of the requests matched rules in Bot Control. That enables you to make informed decisions on constructing rules for each desired bot or category and when switching them into a default action is appropriate.
Labels can be looked up in Amazon CloudWatch metrics and AWS WAF logs, and as soon as you have them, you can start planning whether exceptions or any custom rules are needed to cater for a specific scenario. This blog post explores examples of such use cases in the Common use cases sections below.
Additionally, as AWS WAF processes rules in sequential order, you should consider where the Bot Control rule group is located in your web ACL. To filter out requests that you confidently consider unwanted, you can place AWS Managed Rules rule groups—such as the Amazon IP reputation list—before the Bot Control rule group in the evaluation order. This decreases the number of requests processed by Bot Control, and makes it more cost effective. Simultaneously, Bot Control should be early enough in the rules to:
- Enable label generation for downstream rules. That also provides higher visibility as a side benefit.
- Decrease false positives by not blocking desired bots before they reach Bot Control.
AWS WAF Bot Control fine-tuning wouldn’t be complete and configurable without a set of recently released features and capabilities of AWS WAF. Let’s unpack them.
How to work with labels in CloudWatch metrics and AWS WAF logs
Generated labels generate CloudWatch metrics and are placed into AWS WAF logs. It enables you to see what bots and categories hit your website, and the labels associated with them that you can use for fine tuning.
CloudWatch metrics are generated with the following dimensions and metrics.
- Region dimension is available for all Regions except Amazon CloudFront. When web ACL is associated with CloudFront, metrics are in the Northern Virginia Region.
- WebACL dimension is the name of the WebACL
- Namespace is the fully qualified namespace, including the prefix
- LabelValue is the label name
- Action is the terminating action (for example, Allow, Block, Count)
AWS WAF includes a shortcut to associated CloudWatch metrics at the top of the Overview page, as shown in Figure 1.

Figure 1: Title and description of the chart in AWS WAF with a shortcut to CloudWatch
Alternatively, you can find them in the WAFV2 service category of the CloudWatch Metrics section.
CloudWatch displays generated labels and the volume across dates and times, so you can evaluate and make informed decisions to structure the rules or address false positives. Figure 2 illustrates what labels were generated for requests from bots that hit my website. This example configured only a couple of explicit Allow actions, so most of them were blocked. The top section of the figure 2 shows the load from two selected labels.
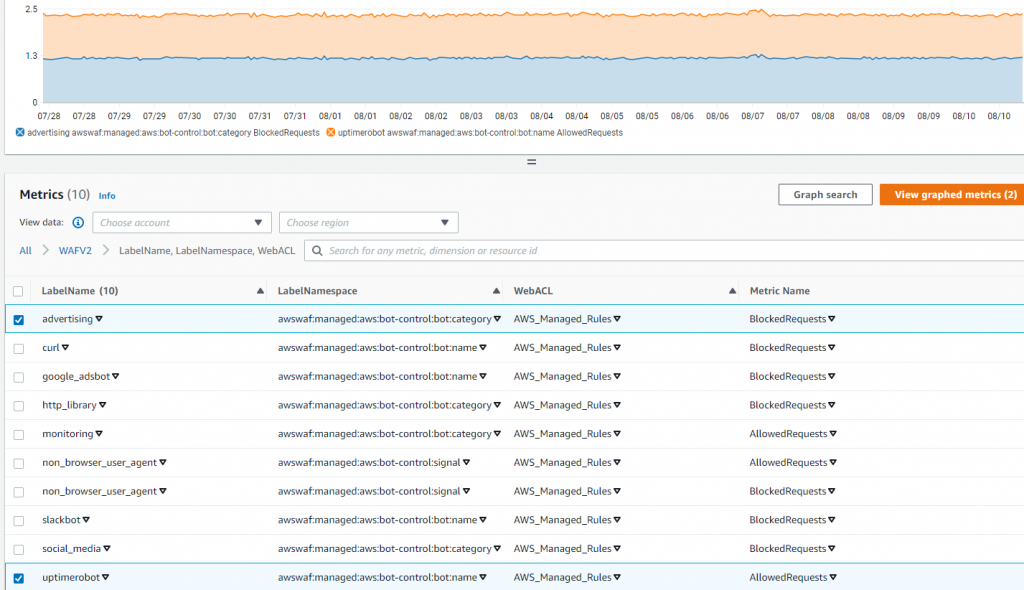
Figure 2: WAFV2 CloudWatch metrics for generated Label Namespaces
In AWS WAF logs, generated labels are included in an array under the field labels. Figure 3 shows an example request with the labels array at the bottom.
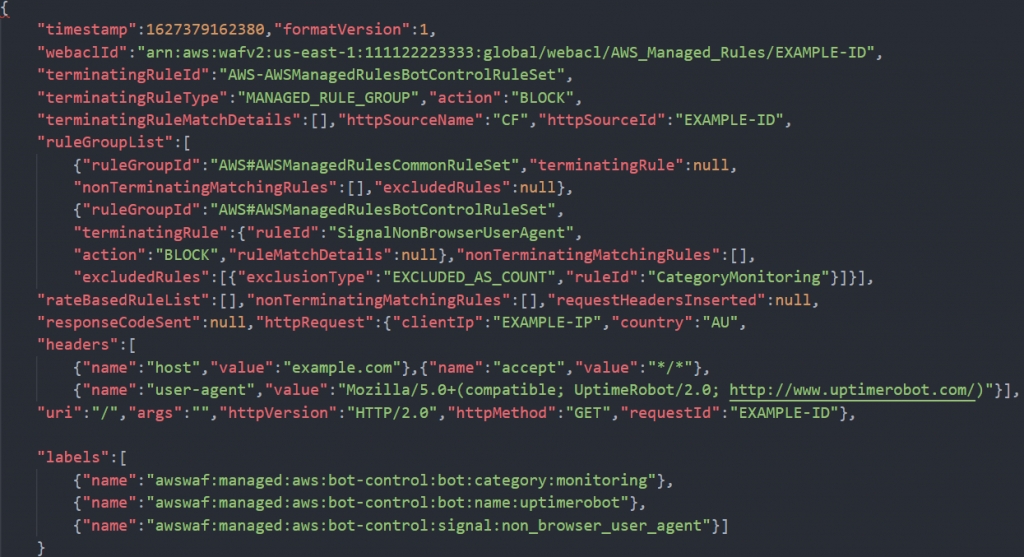
Figure 3: An example of an AWS WAF log record
This example shows three labels generated for the same request. Uptimerobot follows the monitoring category label, and combining these two labels is useful to provide flexibility for configurations based on them. You can use the whole category, or be laser-focused using the label of the specific bot. You will see how and why that matters later in this blog post. The third label, non_browser_user_agent, is a signal of forwarded requests that have extra headers. For protection from bots in conjunction with labels, you can construct extra scanning in your application for certain requests.
Scope-down statements
Given that Bot Control is a premium feature and is a paid AWS Managed Rules, the ability to keep your costs in control is crucial. The scope-down statement allows you to optimize for cost by filtering out any traffic that doesn’t require inspection by Bot Control.
To address this goal, you can use scope down statements that can be applied to two broad scenarios.
You can exclude certain parts of your resource from scanning by Bot Control. Think of parts of your web site that you don’t mind being accessed by bots, typically that would be static content, such as images and CSS files. Leaving protection on everything else, such as APIs and login pages. You can also exclude IP ranges that can be considered safe from bot management. For example, traffic that’s known to come from your organization or viewers that belong to your partners or customers.
Alternatively, you can look at this from a different angle, and only apply bot management to a small section of your resources. For example, you can use Bot Control to protect a login page, or certain sensitive APIs, leaving everything else outside of your bot management.
With all of these tools in our toolkit let’s put them into perspective and dive deep into use cases and scenarios.
Common use cases for AWS WAF Bot Control fine-tuning
There are several methods for fine tuning Bot Control to better meet your needs. In this section, you’ll see some of the methods you can use.
Limit the crawling rate
In some cases, it is necessary to allow bots access to your websites. A good example is search engine bots, that crawl the web and create an index. If optimization for search engines is important for your business, but you notice excessive load from too many requests hitting your web resource, you might face a dilemma of how to slow crawlers down without unnecessarily blocking them. You can solve this with a combination of Bot Control detection logic and a rate-based rule with a response status code and header to communicate your intention back to crawlers. Most crawlers that are deemed useful have a built-in mechanism to decrease their crawl rate when you detect and respond to increased load.
To customize bot mitigation and set the crawl rate below limits that might negatively affect your web resource
- In the AWS WAF console, select Web ACLs from the left menu. Open your web ACL or follow the steps to create a web ACL.
- Choose the Rules tab and select Add rules. Select Add managed rule groups and proceed with the following settings:
- In the AWS managed rule groups section, select the switch Add to web ACL to enable Bot Control in the web ACL. This also gives you labels that you can use in other rules later in the evaluation process inside the web ACL.
- Select Add rules and choose Save
- In the same web ACL, select Add rules menu and select Add my own rules and rule groups.
- Using the provided Rule builder, configure the following settings:
- Enter a preferred name for the rule and select Rate-based rule.
- Enter a preferred rate limit for the rule. For example, 500.
Note: The rate limit is the maximum number of requests allowed from a single IP address in a five-minute period.
- Select Only consider requests that match the criteria in a rule statement to enable the scope-down statement to narrow the scope of the requests that the rule evaluates.
- Under the Inspect menu, select Has a label to focus only on certain types of bots.
- In the Match key field, enter one of the following labels to match based on broad categories, such as verified bots or all bots identified as scraping as illustrated on Figure 4:
awswaf:managed:aws:bot-control:bot:verified
awswaf:managed:aws:bot-control:bot:category:scraping_framework - Alternatively, you can narrow down to a specific bot using its label:
awswaf:managed:aws:bot-control:bot:name:Googlebot

Figure 4: Label match rule statement in a rule builder with a specific match key
- In the Action section, configure the following settings:
- Select Custom response to enable it.
- Enter 429 as the Response code to indicate and communicate back to the bot that it has sent too many requests in a given amount of time.
- Select Add new custom header and enter Retry-After in the Key field and a value in seconds for the Value field. The value indicates how many seconds a bot must wait before making a new request.
- Select Add rule.
- It’s important to place the rule after the Bot Control rule group inside your web ACL, so that the label is available in this custom rule.
- In the Set rule priority section, check that the new rate-based rule is under the existing Bot Control rule set and if not, choose the newly created rule and select Move up or Move down until the rule is located after it.
- Select Save.
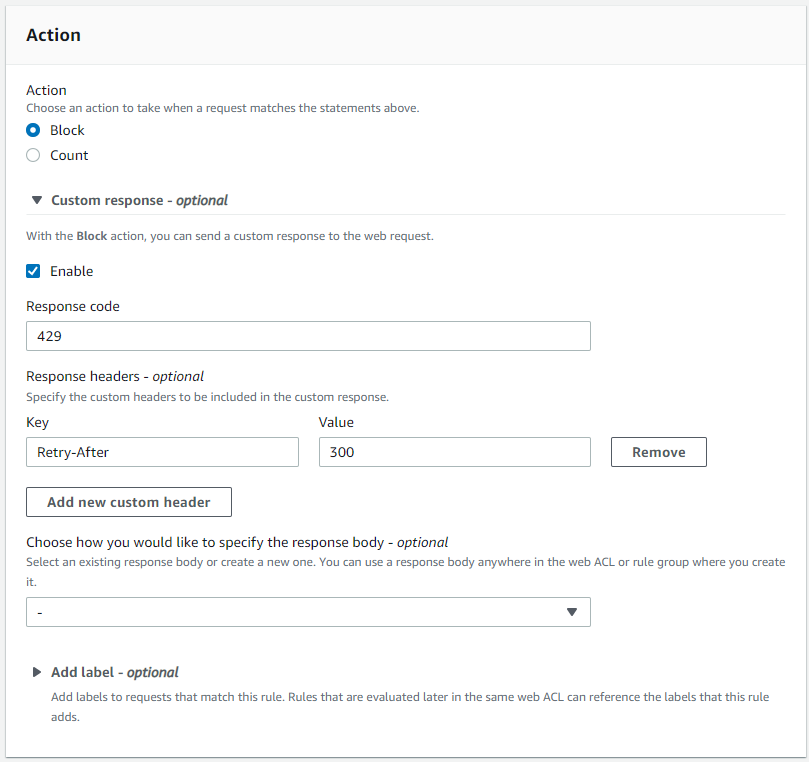
Figure 5: AWS WAF rule action with a custom response code
With the preceding configuration, Bot Control sets required labels, which you then use in the scope-down statement in a rate-based rule to not only establish a ceiling of how many requests you will allow from specific bots, but also communicate to bots when their crawling rate is too high. If they don’t respect the response and lower their rate, the rule will temporarily block them, protecting your web resource from being overwhelmed.
Note: If you use a category label, such as scraping_framework, all bots that have that label will be counted by your rate-based rule. To avoid unintentional blocking of bots that use the same label, you can either narrow down to a specific bot with a precise bot:name: label, or select a higher rate limit to allow a greater margin for the aggregate.
Enable Bot Control only for certain parts of your application
As mentioned earlier, excluding parts of your web resource from Bot Control protection is a mechanism to reduce the cost of running the feature by focusing only on a subset of the requests reaching a resource. There are a few common scenarios that take advantage of this approach.
To run Bot Control only on dynamic parts of your traffic
- In the AWS WAF console, select Web ACLs from the left menu. Open a web ACL that you have, or follow the steps to create a web ACL.
- Choose the Rules tab and select Add rules. Then select Add managed rule groups to proceed with the following settings:
- In the AWS managed rule groups section, select Add to web ACL to enable Bot Control in the web ACL.
- Select Edit.
- Select Scope-down statement – optional and select Enable Scope-down statement.
- In If a request, select doesn’t match the statement (NOT).
- In the Statement section, configure the following settings:
- Choose URI path in the Inspect field.
- For the Match type, choose Starts with string.
- Depending on the structure of your resource, you can enter a whole URI string—such as images/—in the String to match field. The string will be excluded from Bot Control evaluation.

Figure 6: A scope-down statement to match based on a string that a URI path starts with
- Select Save rule.
An alternative to using string matching
As an alternative to a string match type, you can use a regex pattern set. If you don’t have a regex pattern set, create one using the following guide.
Note: This pattern matches most common file extensions associated with static files for typical web resources. You can customize the pattern set if you have different file types.
- Follow steps 1-4 of the previous procedure.
- In the Statement section, configure the following settings:
- Choose URI path in the Inspect field.
- For the Match type, choose Matches pattern from regex pattern set and select your created set in the Regex pattern set. as illustrated in Figure 7.
- In Regex pattern set, enter the pattern
(?i)\.(jpe?g|gif|png|svg|ico|css|js|woff2?)$
Figure 7: A scope-down statement to match based on a regex pattern set as part of a URI path
To run Bot Control only on the most sensitive parts of your application.
Another option is to exclude almost everything, by only enabling the Bot Control on the most sensitive part of your application. For example, a login page.
Note: The actual URI path depends on the structure of your application.
- Inside the Scope-down statement, in the If a request menu, select matches the statement.
- In the Statement section:
- In the Inspect field, select URI path.
- For the Match type, select Contains string.
- In the String to match field, enter the string you want to match. For example, login as shown in the Figure 8.
- Choose Save rule.

Figure 8: A scope-down statement to match based on a string within a URI path
To exclude more than one part of your application from Bot Control.
If you have more than one part to exclude, you can use an OR logical statement to list each part in a scope-down statement.
- Inside the Scope-down statement, in the If a request menu, select matches at least one of the statements (OR).
- In the Statement 1 section, configure the following settings:
- Choose URI path in the Inspect field.
- For the Match type choose Contains string.
- In the String to match field enter a preferred value. For example, login.
- In the Statement 2 section, configure the following settings:
- Choose URI path in the Inspect field.
- For the Match type choose Starts with string.
- In the String to match field enter a preferred URI value. For example, payment/.
- Select Save rule.
Figure 9 builds on the previous example of an exact string match by adding an OR statement to protect an API named payment.
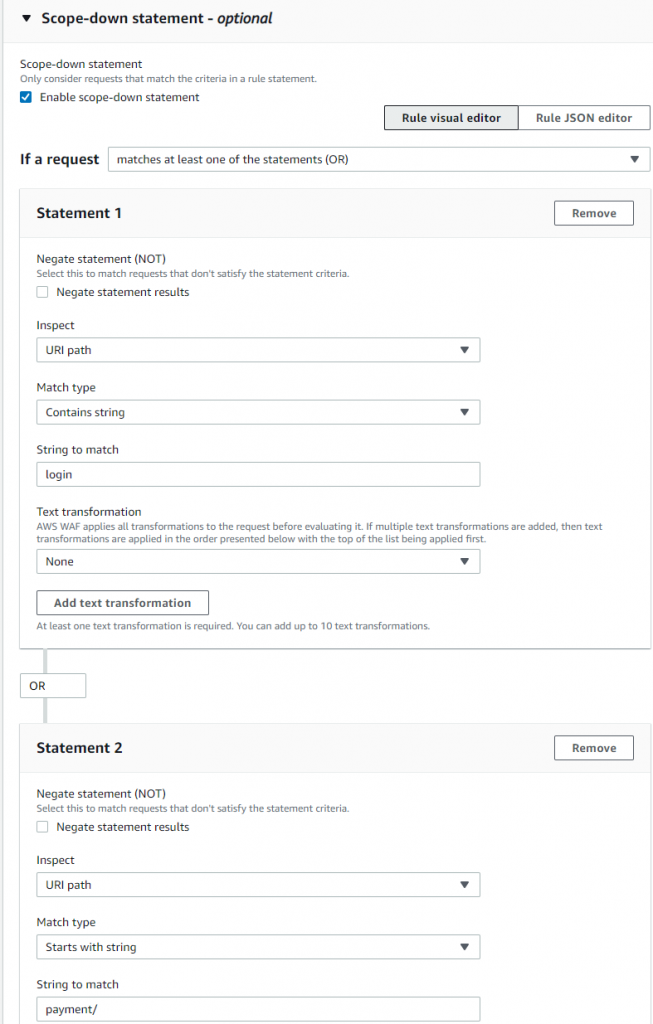
Figure 9: A scope-down statement with OR logic for more sophisticated matching
Note: The visual editor on the console supports up to five statements. To add more, edit the JSON representation of the rule on the console or use the APIs.
Prioritize verified bots that you don’t want to block
Since verified bots aren’t blocked by default, in most cases there is no need to apply extra logic to allow them through. However, there are scenarios where other AWS WAF rules might match some aspects of requests from verified bots and block them. That can hurt some metrics for SEO, or prevent links from your website from properly propagating and displaying in social media resources. If this is important for your business, then you might want to ensure you protect verified bots by explicitly allowing them in AWS WAF.
To prioritize the verified bots category
- In the AWS WAF menu, select Web ACLs from the left menu. Open a web ACL that you have, or follow the steps to create a web ACL. The next steps assume you already have a Bot Control rule group enabled inside the web ACL.
- In the web ACL, select Add rules, and then select Add my own rules and rule groups.
- Using the provided Rule builder, configure the following settings:
- Enter a name for the rule in the Name field.
- Under the Inspect menu, select Has a label.
- In the Match key field, enter the following label to match based on the label that each verified bot has:
awswaf:managed:aws:bot-control:bot:verified
- In the Action section, select Allow to confirm the action on a request match
- Select Add rule. It’s important to place the rule after the Bot Control rule group inside your web ACL, so that the bot:verified label is available in this custom rule. To complete this, configure the following steps:
- In the Set rule priority section, check that the rule you just created is listed immediately after the existing Bot Control rule set. If it’s not, choose the newly created rule and select Move up or Move down until the rule is located immediately after the existing Bot Control rule set.
- Select Save.
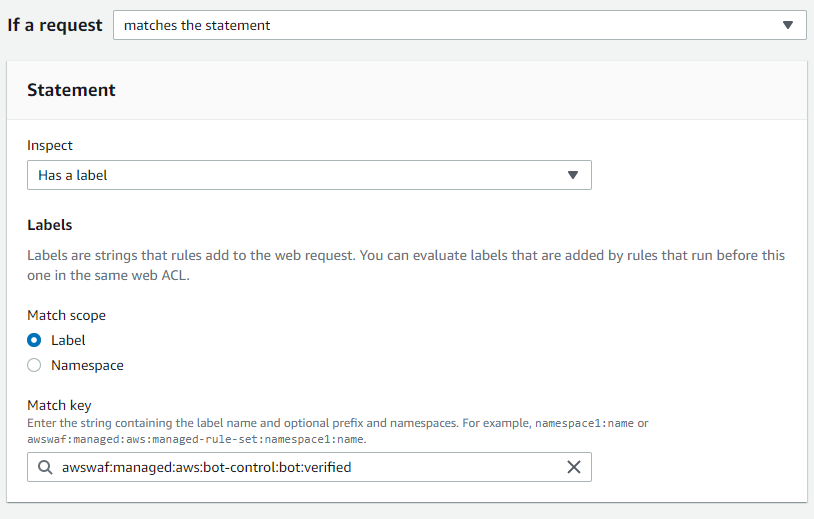
Figure 10: Label match rule statement in a Rule builder with a specific match key
Allow a specific bot
Labels also enable you to single out the bot you don’t want to block from the category that is blocked. One of the common examples are third-party bots that perform monitoring of your web resources.
Let’s take a look at a scenario where UptimeRobot is used to allow a specific bot. The bot falls into a category that’s being blocked by default—bot:category:monitoring. You can either exclude the whole category, which can have a wider impact on resource than you want, or allow only UptimeRobot.
To explicitly allow a specific bot
- Analyze CloudWatch metrics or AWS WAF logs to find the bot that is being blocked and its associated labels. Unless you want to allow the whole category, the label you would be looking for is bot:name: The example that follows is based on the label awswaf:managed:aws:bot-control:bot:name:uptimerobot.
From the logs, you can also verify which category the bot belongs to, which is useful for configuring Scope-down statements.
- In the AWS WAF console, select Web ACLs from the left menu. Open a web ACL that you have, or follow the steps to create a web ACL. For the next steps, it’s assumed that you already have a Bot Control rule group enabled inside the webACL.
- Open the Bot Control rule set in the list inside your web ACL and choose Edit
- From the list of Rules find CategoryMonitoring and set to Count. This will prevent the default block action of the category.
- Select Scope-down statement – optional and select Scope-down statement. Then configure the following settings:
- Inside the Scope-down statement, in the If a request menu, choose matches all the statements (AND). This will allow you to construct the complex logic necessary to block the category but allow a specified bot.
- In the Statement 1 section under the Inspect menu select Has a label.
- In the Match key field, enter the label of the broad category that you set to count in step number 4. In this example, it is monitoring. This configuration will keep other bots from the category blocked:
awswaf:managed:aws:bot-control:bot:category:monitoring
- In the Statement 2 section, select Negate statement results to allow you to exclude a specific bot.
- Under the Inspect menu, select Has a label.
- In the Match key field, enter the label that will uniquely identify the bot you want to explicitly allow. In this example, it’s uptimerobot with the following label:
awswaf:managed:aws:bot-control:bot:name:uptimerobot
- Choose Save rule.
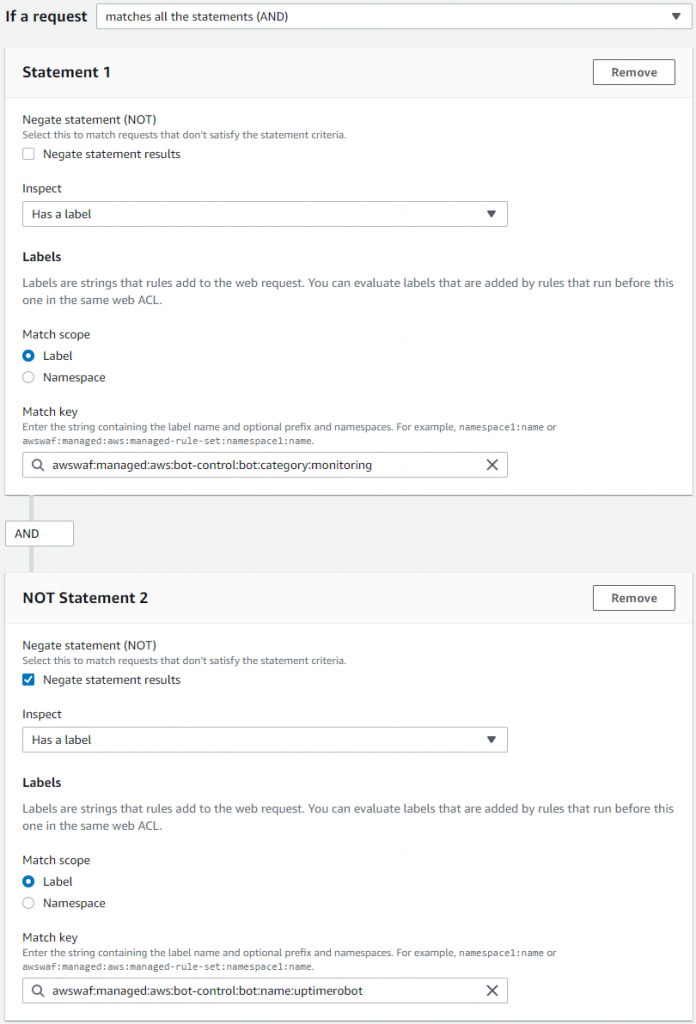
Figure 11: Label match rule statement with AND logic to single out a specific bot name from a category
Note: This approach is the best practice for analyzing and, if necessary, addressing false positives situations. You can apply exclusion to any bot, or multiple bots, based on the unique bot:name: label.
Insert custom headers into requests from certain bots
There are situations when you want to further process or analyze certain requests. or implement logic that is provided by systems in the downstream. In such cases, you can use AWS WAF Bot Control to categorize the requests. Applications later in the process can then apply the intended logic on either a broad group of requests, such as all bots within a category, or as narrow as a certain bot.
To insert a custom header
- In the AWS WAF console, select Web ACLs from the left menu. Open a web ACL that you have, or follow the steps to create a web ACL. The next steps assume that you already have Bot Control rule group enabled inside the webACL.
- Open the Bot Control rule set in the list inside your web ACL and choose Edit.
- From the list of Rules set the targeted category to Count.
- Choose Save rule.
- In the same web ACL, choose the Add rules menu and select Add my own rules and rule groups.
- Using the provided Rule builder, configure the following settings:
- Enter a name for the rule in the Name field.
- Under the Inspect menu, select Has a label.
- In the Match key field, enter the label to match either a targeted category or a bot. This example uses the security category label:
awswaf:managed:aws:bot-control:bot:category:security - In the Action section, select Count
- Open Custom request – optional and select Add new custom header
- Enter values in the Key and Value fields that correspond to the inserted custom header key-value pair that you want to use in downstream systems. The example in Figure 12 shows this configuration.
- Choose Add rule.
AWS WAF prefixes your custom header names with x-amzn-waf- when it inserts them, so when you add abc-category, your downstream system sees it as x-amzn-waf-abc-category.
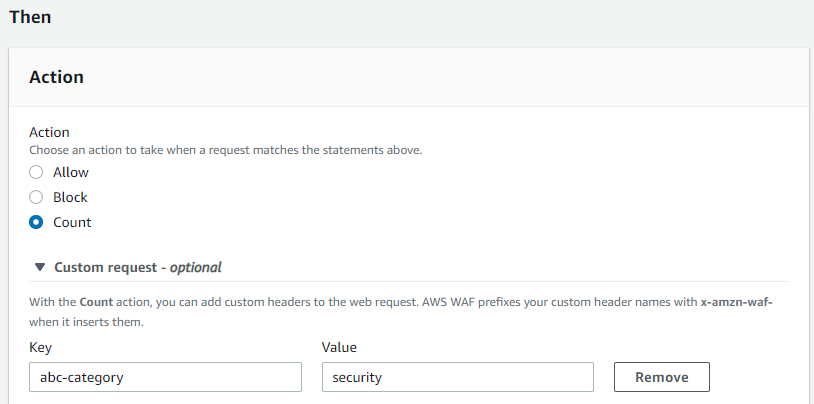
Figure 12: AWS WAF rule action with a custom header inserted by the service
The custom rule located after Bot Control now inserts the header into any request that it labeled as coming from bots within the security category. Then the security appliance that is after AWS WAF acts on the requests based on the header, and processes them accordingly.
This implementation can serve other scenarios. For example, using your custom headers to communicate to your Origin to append headers that will explicitly prevent caching certain content. That makes bots always get it from the Origin. Inserted headers are accessible within AWS Lambda@Edge functions and CloudFront Functions, this opens up advanced processing scenarios.
Conclusion
This post describes the primary building blocks for using Bot Control, and how you can combine and customize them to address different scenarios. It’s not an exhaustive list of the use cases that Bot Control can be fine-tuned for, but hopefully the examples provided here inspire and provide you with ideas for other implementations.
If you already have AWS WAF associated with any of your web-facing resources, you can view current bot traffic estimates for your applications based on a sample of requests currently processed by the service. Visit the AWS WAF console to view the bot overview dashboard. That’s a good starting point to consider implementing learnings from this blog to improve your bot protection.
It is early days for the feature, and it will keep gaining more capabilities, stay tuned!
If you have feedback about this blog post, submit comments in the Comments section below. If you have questions about this blog post, start a new thread on AWS WAF re:Post or contact AWS Support.
Want more AWS Security news? Follow us on Twitter.