AWS Startups Blog
How to Secure Your Instances with Multi-factor Authentication
At AWS, security is our top priority so we recommend that customers implement security controls in every layer of their applications. In this blog post, I am going to walk through implementing an additional layer of authentication security for your EC2 instances by requiring two-factor authentication for administrators to use SSH to connect.
When you create an EC2 instance you are prompted to create or select a previously-created key pair for the instance so that you can SSH into the box. That key pair is downloaded and stays on your local machine. The risk here is if your local machine is compromised. Then, any user who has this key pair and the username now has full access to your instances. In order to make access to the instances more secure to help prevent a breach, you should put additional controls. One of the best-recommended practices, when it comes to AWS console access, is to have multi-factor authentication (MFA) enabled for the root account and all user accounts. We can take the same idea and enable MFA on an EC2 instance. With MFA enabled, the user login is dependent on what they know (i.e., the password) and what they have (the one-time password generated by an OATH-TOTP app or a physical token).
Most commonly, we see people SSH into their instances directly using their public IP addresses, which makes putting security controls in place for instances complicated and repetitive. One approach that we recommend is to have a bastion host or a jump box in front of your instances and access your instances through your bastion host. We recommend limiting the access to your instances to a bastion host, so that people can’t violate the security policy by logging directly into the instances. This can be done by creating an inbound rule of type SSH in the security group of those instances, with the source being either the IP or the security group of the bastion host. Once you have done that, you can focus on tightening the security on your bastion host and only putting your controls there. One other benefit is that you don’t need to have MFA enabled on each instance. You can enable MFA only on the bastion host, and if you want you can have another prompt for another one-time password (OTP) when you run SSH command to log into another instance from the bastion host.
Common architecture anti-pattern

Recommended Architecture
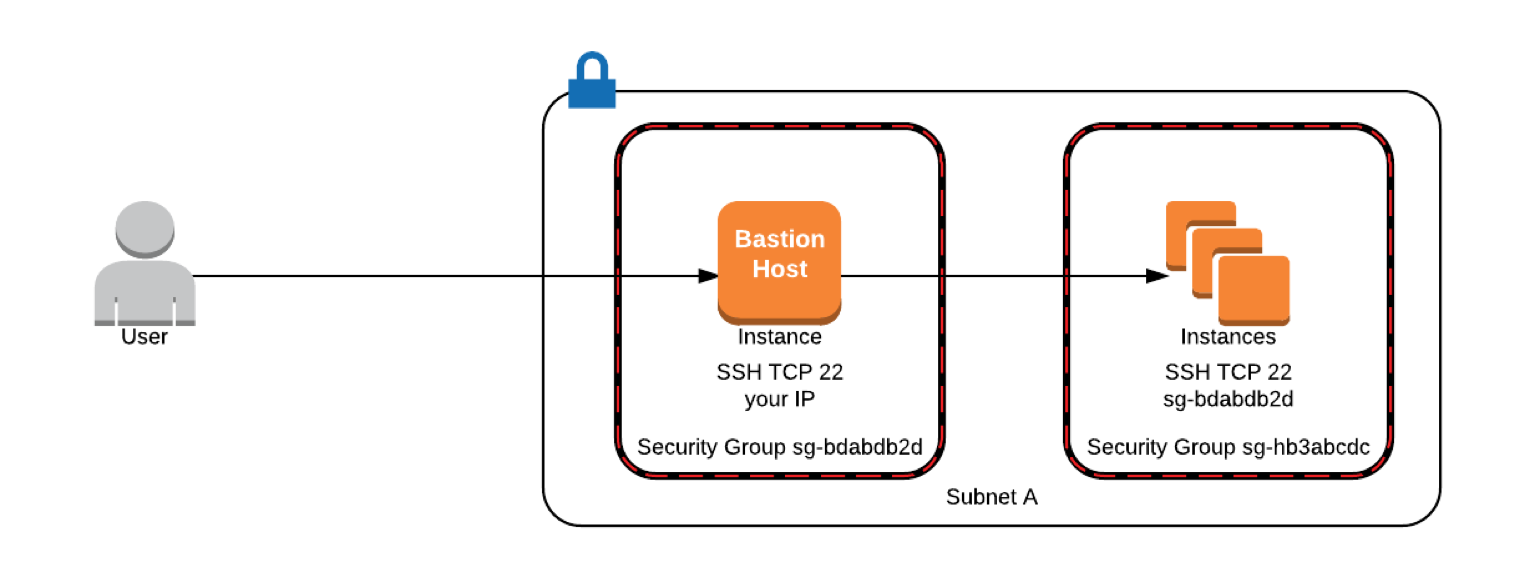
In the above example, only the instances which are associated with the security group sg-bdabdb2d (Bastion host) can communicate with the instances associated with the security group sg-hb3abcdc (all other instances) over port 22. The user has to first SSH over port 22 into the bastion host using its public IP address and then from there SSH into the other instances.
Enabling MFA on an EC2 Instance – Amazon Linux
In the example below, MFA is enabled on a Linux instance. To do this we will use Google’s module for Pluggable Authentication Module (PAM) to enable MFA. Install the Google Authenticator app on your devices, which will later be used to generate OTP.
1. Installing Google Authenticator on EC2 Instance
SSH into your EC2 instance the way you normally would and then switch into your root account or use sudo and run:
Once the package is installed, run the initialization app to generate a key for the user you are logged in as (e.g. ec2-user) to add second-factor authentication to that user account.
2. Configuring Google Authenticator
Run the initialization app:
You will be asked if the authentication tokens used should be time-based. In this example, we will use time-based tokens.
This will generate a URL which will have a QR code that you should scan using your Google Authenticator app, or manually enter the secret key in your app to register your device. Add your account name in the app, and make sure that the time-based option is enabled. Save the secret key, verification code, and scratch codes generated on the instance in a secure place for use if you lose access to the app on the registered device. Each scratch code can be used only once.

Next, you will be asked if the google_authenticator file should be updated for user ‘ec2-user.’ Typing ‘y’ will save the secret key, scratch codes, and the other configuration options you select later on in the file. You will run the initialization app and go through the same procedure for each user account to enable MFA on each account.
Select ‘n’ for the following question to have three valid codes in a 1:30-minute window unless you are facing issues.
3. Configure SSH to use the Google Pluggable Authentication Module
Run the following command to make changes to the PAM configuration.
Add the following to the bottom of the file to use Google Authenticator. If there are service accounts or users who should be able to log in without MFA, add nullok at the end of the following statement. This will mean that users who don’t run Google Authenticator initialization won’t be asked for a second authentication.
or
Comment out the password requirement. We just want to use the key pair and the verification code generated on the Google Authenticator app.
Save the file. Next, we need to change the SSH configuration to make it prompt for a second authentication.
Run:
Comment out the line which says ChallengeResponseAuthentication ‘no’ and uncomment the line which says ‘yes’.
Lastly, we need to let SSH know that it should ask for SSH key and a verification code to let us in. At the bottom of the file add:
Save the file. Restart the SSH to let the changes take effect.
sudo /etc/init.d/sshd restart or sudo service sshd restart
To test if it’s working, open a new terminal window and SSH into the instance and you will be asked for a verification code. I didn’t need to enter the keypair because I have it in my SSH-agent. Keep your session in the original terminal window open while you SSH from your new window.
![]()
Type the code that’s generated on your Google Authenticator app.

4. Managing your users and their authentication
There are a few ways you can make multi-factor authentication possible for your users. Each of the following has different security levels.
- Use the same .google_authenticator for all the users. If you are the root user, copy this file to /etc/skel/ and share the secret key that we obtained before with other users, and ask them to register their devices. However, if the users leave the organization, you may need to generate a new secret key by running the Google Authenticator app and providing the same to all the users, and that might become cumbersome.
- Another approach would be to log into the new user accounts after you create them, run the initialization app, and then share the generated keys and scratch codes specific to that user. This way you won’t have to share the same secret key with others. When the user leaves, all you have to do is delete that user account.
- The most secure approach would be to force users to run the initialization app on their first log in and save the key and the scratch codes generated. This could be done by running a script on logins.
5. Automating copying SSH key to new user accounts and forcing users to enable MFA on the first login
When we create new users, the first thing we do is copy the authorized_key file to the new user account and change its permissions appropriately so that the user can use the same key pair and successfully SSH into the instance. The best practice is to create a separate key pair for each user but for this blog post, I will copy the same key pair in the new user account. Steps to do this are as follows:
Open the authorized_keys file cat ~/.ssh/authorized_keys and copy the public key. We will use this later to create a similar file in a new user account. The public key will look like:
Create a new user:
Paste the public key copied before in:
The above copying process can be automated for all users if you create the file and the directory structure .ssh/authorized_keys in /etc/skel/ directory. Once you do that, the new users created will automatically have these files available in their home directory with proper permissions.
You can also run the following command before creating the users to do what we did above, and the users will be able to log in using their key pair.
You can remove the condition for $USER != “root” if you want a prompt for a second-factor authentication when you switch to the root user.
At the bottom of the file /etc/pam.d/sshd, it should have the following statement for the above script to run when users log in.
If the user leaves the organization, just delete the respective user account from your bastion host.
Conclusion
In this blog post, I demonstrated how to set up multi-factor authentication on an EC2 instance and automate the process of running the Google Authenticator application for users logging in for the first time. This ensures that users utilize a combination of the key pair and a Time-Based One-Time password generated on their devices to SSH into the instances.