AWS Compute Blog
Debugging AWS Step Functions executions with the new console experience
Today, AWS Step Functions introduces a new opt-in console experience that makes it easier to analyze, debug, and optimize Standard Workflows.
Builders create Step Functions workflows to orchestrate multiple services into business-critical applications with minimal code. Customers wanted better ways to debug workflow executions and analyze the payload as it passes through each state.
This blog post explains the new capabilities of the enhanced Step Functions executions page. It shows how to debug workflows quickly, sort and filter on state events, and view the input and output path processing for each state.
Overview
The new Executions Details page allows you to inspect executions using three different view types: Graph view, Table view, and Event view. It has multi-level navigation enhancements for analyzing the map state feature, the ability to search execution history based on unique attributes and improved events, and table navigation with filtering, sorting, and pagination. For a full list of all the feature enhancements, see the Step Functions documentation.
Getting started
To get started, go to the Step Functions state machines page in the AWS Management Console:
- Choose any standard workflow from the list.
- From the workflows executions list page, choose an execution to analyze.
- Choose the New executions page button:

An enhanced execution summary section at the top of the page contains some new information:

- You can copy the execution ARN to the clipboard by choosing the copy icon.
- This section now shows the number of state transitions for the execution. This is helpful in optimizing the cost of your workflows. With Step Functions, you pay for the number of state transitions used per month for each state transition over the AWS Free Tier.
- You can view the total execution duration.
The following execution summary is a new section that displays execution errors. This helps to find the root cause of any workflow faults or failures:

Choosing the between execution views
The following examples show how to use the new execution views to inspect a workflow execution. This example focuses on the Order Processing Workflow that powers Serverlesspresso. Serverlesspresso is an interactive serverless application showcased at AWS re:Invent and AWS Summits. It allows attendees to order coffee from their smartphones. Each order starts a workflow execution.
Graph view
The graph view provides a visual representation of the workflow execution path. It shows which states succeeded, failed, or are currently in progress, and any errors caught. The legend at the bottom of the graph helps to decode each color.
To access the Graph view, choose the Graph view from the view navigation, as shown in the following screenshot. There is a new option to render the graph vertically or horizontally, which you can choose from the Layout option.
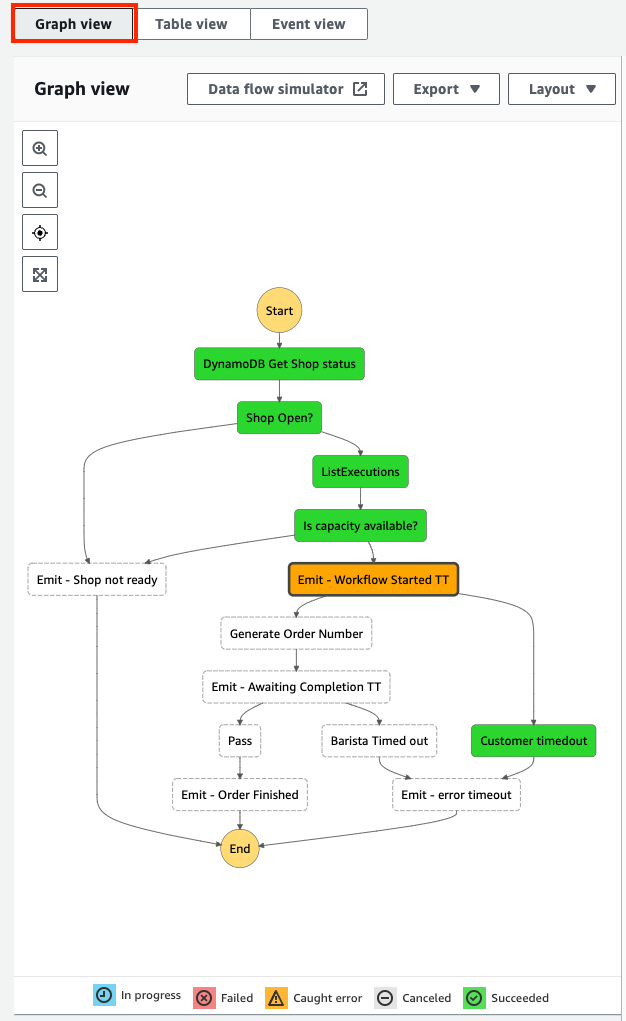
The graph view shows that the workflow caught an error at the Emit–Workflow Started TT state. I choose this state from the graph to view more details about it.
The Events tab
Each state in a workflow execution moves through a sequence of events, from TaskStateEntered to TaskStateExited. The Events tab, shown in the following image, displays all the events for the selected state, with their corresponding timestamp.
You can drill down into an event to see its output. In this case, the TaskTimedOut event happens to the selected state with the error message “States.Timeout”. This corresponds with the Caught error shown in the Graph view.

The Input & Output tab
Amazon States Language (ASL) enables you to filter and manipulate data at various stages of a workflow state’s execution using paths. A path is a string beginning with $ that lets you identify and filter subsets of JSON text. Learning how to apply these filters helps to build efficient workflows with minimal state transitions.
Select the Input & Output tab, and then toggle the Advanced view option to display the payload after each path process is applied.

This is useful for checking what each JSON path evaluates to. For example, the following images show how I configure the state Parameters, along with the Task input. This is what the parameters evaluate to after Step Functions applies the JSON path processing:

State Details and Definition tabs
The new execution page lets you view a state’s definition and execution details in isolation from the other states. The task details section contains additional information such as the Duration, Heartbeat, Started After and Timeout values.
Table view
The Table view provides a tabular representation of each state. Use this view to access information quickly about a state’s duration, resources, or status. A new timeline column shows the relative duration that each state took to complete. You can configure which columns are displayed.

To search and filter the table based on unique attributes such as state name or error type, start typing into the search input. Use the predictive autocomplete to define the search criteria. You can also choose a relative or absolute time range to filter by.

Event view
Step Functions stores all changes to state as a sequence of events to give you more visibility into the execution. The event view allows you to find and investigate a particular state event quickly by using the search and sort options:

- Choose the Timestamp column header to list events in reverse order of occurrence.
- Choose the arrow in the left-most column to reveal more details about each event
- Use the search input to search by keyword, state name, event type, or attribute.
- The date button lets you filter events by date or time.
Map State
The map state (“Type”: “Map”) allows you to run a set of steps for each element of an input array. The Step Functions execution page now helps you investigate and debug workflows using the Map state with the following enhancements:
- A hierarchical table view of steps for each iteration.
- An integrations overview, showing the execution summary at a glance.
- A paginated list of every event across all iterations.
The following Serverlesspresso workflow processes orders in batches. The map state iterates over each order, sanitizes each item, and checks it is currently in stock. If the item is not in stock, the map state throws a failure. If it is in stock, the order is recorded to a database, and a new event is emitted onto the serverless event bus.

The workflow runs for a new batch of orders and produces the following executions results page:
Using the Graph view:
- You can step through each iteration using the Map iteration viewer
- See the summary status in the iterations overview section

The Table view shows a hierarchical list of each iteration and I can drill down into the execution that failed to investigate further.

Use the Event view to search for failed executions to quickly filter the results:

Conclusion
Today, Step Functions is launching a new opt-in console experience to help builders analyse, debug, and optimize Step Functions Standard Workflows. These enhancements include three different ways to view your workflow executions, better visibility into workflows that use the Map state, fast access to workflow faults and failures, and new tools to search and sort workflow executions. This blog post shows how to use the new views to debug workflows, sort and filter on state events, and view the input and output path processing for each state.
The new console executions experience is generally available in AWS Regions where Step Functions is available.
For more information on building applications with Step Functions, visit serverlessland.com.