AWS Compute Blog
Using AWS Lambda and Amazon Comprehend for sentiment analysis
This post courtesy of Giedrius Praspaliauskas, AWS Solutions Architect
Even with best IVR systems, customers get frustrated. What if you knew that 10 callers in your Amazon Connect contact flow were likely to say “Agent!” in frustration in the next 30 seconds? Would you like to get to them before that happens? What if your bot was smart enough to admit, “I’m sorry this isn’t helping. Let me find someone for you.”?
In this post, I show you how to use AWS Lambda and Amazon Comprehend for sentiment analysis to make your Amazon Lex bots in Amazon Connect more sympathetic.
Setting up a Lambda function for sentiment analysis
There are multiple natural language and text processing frameworks or services available to use with Lambda, including but not limited to Amazon Comprehend, TextBlob, Pattern, and NLTK. Pick one based on the nature of your system: the type of interaction, languages supported, and so on. For this post, I picked Amazon Comprehend, which uses natural language processing (NLP) to extract insights and relationships in text.
The walkthrough in this post is just an example. In a full-scale implementation, you would likely implement a more nuanced approach. For example, you could keep the overall sentiment score through the conversation and act only when it reaches a certain threshold. It is worth noting that this Lambda function is not called for missed utterances, so there may be a gap between what is being analyzed and what was actually said.
The Lambda function is straightforward. It analyses the input transcript field of the Amazon Lex event. Based on the overall sentiment value, it generates a response message with next step instructions. When the sentiment is neutral, positive, or mixed, the response leaves it to Amazon Lex to decide what the next steps should be. It adds to the response overall sentiment value as an additional session attribute, along with slots’ values received as an input.
When the overall sentiment is negative, the function returns the dialog action, pointing to an escalation intent (specified in the environment variable ESCALATION_INTENT_NAME) or returns the fulfillment closure action with a failure state when the intent is not specified. In addition to actions or intents, the function returns a message, or prompt, to be provided to the customer before taking the next step. Based on the returned action, Amazon Connect can select the appropriate next step in a contact flow.
For this walkthrough, you create a Lambda function using the AWS Management Console:
- Open the Lambda console.
- Choose Create Function.
- Choose Author from scratch (no blueprint).
- For Runtime, choose Python 3.6.
- For Role, choose Create a custom role. The custom execution role allows the function to detect sentiments, create a log group, stream log events, and store the log events.
- Enter the following values:
- For Role Description, enter Lambda execution role permissions.
- For IAM Role, choose Create an IAM role.
- For Role Name, enter LexSentimentAnalysisLambdaRole.
- For Policy, use the following policy:
{
    "Version": "2012-10-17",
    "Statement": [
        {
            "Effect": "Allow",
            "Action": [
                "logs:CreateLogGroup",
                "logs:CreateLogStream",
                "logs:PutLogEvents"
            ],
            "Resource": "arn:aws:logs:*:*:*"
        },
        {
            "Action": [
                "comprehend:DetectDominantLanguage",
                "comprehend:DetectSentiment"
            ],
            "Effect": "Allow",
            "Resource": "*"
        }
    ]
}
-
- Choose Create function.
- Copy/paste the following code to the editor window
import os, boto3

ESCALATION_INTENT_MESSAGE="Seems that you are having troubles with our service. Would you like to be transferred to the associate?"
FULFILMENT_CLOSURE_MESSAGE="Seems that you are having troubles with our service. Let me transfer you to the associate."

escalation_intent_name = os.getenv('ESCALATION_INTENT_NAME', None)

client = boto3.client('comprehend')

def lambda_handler(event, context):
    sentiment=client.detect_sentiment(Text=event['inputTranscript'],LanguageCode='en')['Sentiment']
    if sentiment=='NEGATIVE':
        if escalation_intent_name:
            result = {
                "sessionAttributes": {
                    "sentiment": sentiment
                    },
                    "dialogAction": {
                        "type": "ConfirmIntent",
                        "message": {
                            "contentType": "PlainText",
                            "content": ESCALATION_INTENT_MESSAGE
                        },
                    "intentName": escalation_intent_name
                    }
            }
        else:
            result = {
                "sessionAttributes": {
                    "sentiment": sentiment
                },
                "dialogAction": {
                    "type": "Close",
                    "fulfillmentState": "Failed",
                    "message": {
                            "contentType": "PlainText",
                            "content": FULFILMENT_CLOSURE_MESSAGE
                    }
                }
            }

    else:
        result ={
            "sessionAttributes": {
                "sentiment": sentiment
            },
            "dialogAction": {
                "type": "Delegate",
                "slots" : event["currentIntent"]["slots"]
            }
        }
return result- Below the code editor specify the environment variable ESCALATION_INTENT_NAME with a value of Escalate.

- Click on Save in the top right of the console.
Now you can test your function.
- Click Test at the top of the console.
- Configure a new test event using the following test event JSON:
{
  "messageVersion": "1.0",
  "invocationSource": "DialogCodeHook",
  "userId": "1234567890",
  "sessionAttributes": {},
  "bot": {
    "name": "BookSomething",
    "alias": "None",
    "version": "$LATEST"
  },
  "outputDialogMode": "Text",
  "currentIntent": {
    "name": "BookSomething",
    "slots": {
      "slot1": "None",
      "slot2": "None"
    },
    "confirmationStatus": "None"
  },
  "inputTranscript": "I want something"
}- Click Create
- Click Test on the console
This message should return a response from Lambda with a sentiment session attribute of NEUTRAL.
However, if you change the input to “This is garbage!”, Lambda changes the dialog action to the escalation intent specified in the environment variable ESCALATION_INTENT_NAME.
Setting up Amazon Lex
Now that you have your Lambda function running, it is time to create the Amazon Lex bot. Use the BookTrip sample bot and call it BookSomething. The IAM role is automatically created on your behalf. Indicate that this bot is not subject to the COPPA, and choose Create. A few minutes later, the bot is ready.
Make the following changes to the default configuration of the bot:
- Add an intent with no associated slots. Name it Escalate.
- Specify the Lambda function for initialization and validation in the existing two intents (“BookCar” and “BookHotel”), at the same time giving Amazon Lex permission to invoke it.
- Leave the other configuration settings as they are and save the intents.
You are ready to build and publish this bot. Set a new alias, BookSomethingWithSentimentAnalysis. When the build finishes, test it.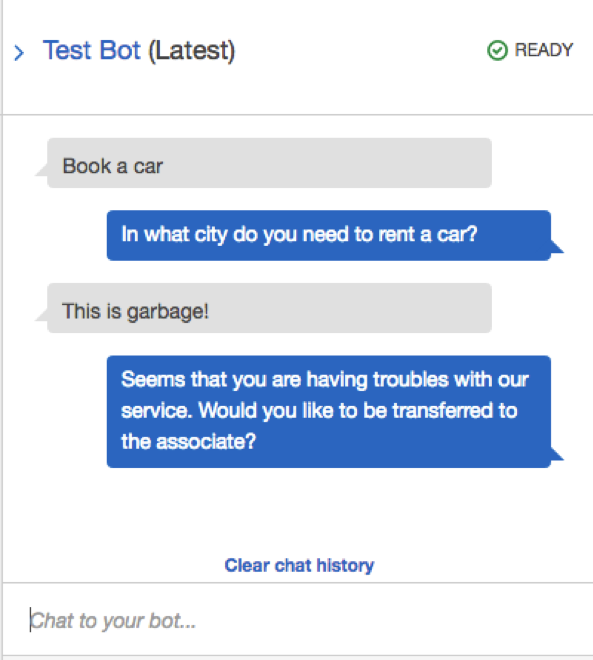
As you see, sentiment analysis works!
Setting up Amazon Connect
Next, provision an Amazon Connect instance.
After the instance is created, you need to integrate the Amazon Lex bot created in the previous step. For more information, see the Amazon Lex section in the Configuring Your Amazon Connect Instance topic. You may also want to look at the excellent post by Randall Hunt, New – Amazon Connect and Amazon Lex Integration.
Create a new contact flow, “Sentiment analysis walkthrough”:
- Log in into the Amazon Connect instance.
- Choose Create contact flow, Create transfer to agent flow.
- Add a Get customer input block, open the icon in the top left corner, and specify your Amazon Lex bot and its intents.
- Select the Text to speech audio prompt type and enter text for Amazon Connect to play at the beginning of the dialog.
- Choose Amazon Lex, enter your Amazon Lex bot name and the alias.
- Specify the intents to be used as dialog branches that a customer can choose: BookHotel, BookTrip, or Escalate.
- Add two Play prompt blocks and connect them to the customer input block.
- If booking hotel or car intent is returned from the bot flow, play the corresponding prompt (“OK, will book it for you”) and initiate booking (in this walkthrough, just hang up after the prompt).
- However, if escalation intent is returned (caused by the sentiment analysis results in the bot), play the prompt (“OK, transferring to an agent”) and initiate the transfer.
- Save and publish the contact flow.
As a result, you have a contact flow with a single customer input step and a text-to-speech prompt that uses the Amazon Lex bot. You expect one of the three intents returned:
Edit the phone number to associate the contact flow that you just created. It is now ready for testing. Call the phone number and check how your contact flow works.
Cleanup
Don’t forget to delete all the resources created during this walkthrough to avoid incurring any more costs:
- Amazon Connect instance
- Amazon Lex bot
- Lambda function
- IAM role LexSentimentAnalysisLambdaRole
Summary
In this walkthrough, you implemented sentiment analysis with a Lambda function. The function can be integrated into Amazon Lex and, as a result, into Amazon Connect. This approach gives you the flexibility to analyze user input and then act. You may find the following potential use cases of this approach to be of interest:
- Extend the Lambda function to identify “hot” topics in the user input even if the sentiment is not negative and take action proactively. For example, switch to an escalation intent if a user mentioned “where is my order,” which may signal potential frustration.
- Use Amazon Connect Streams to provide agent sentiment analysis results along with call transfer. Enable service tailored towards particular customer needs and sentiments.
- Route calls to agents based on both skill set and sentiment.
- Prioritize calls based on sentiment using multiple Amazon Connect queues instead of transferring directly to an agent.
- Monitor quality and flag for review contact flows that result in high overall negative sentiment.
- Implement sentiment and AI/ML based call analysis, such as a real-time recommendation engine. For more details, see Machine Learning on AWS.
If you have questions or suggestions, please comment below.