AWS Security Blog
How to enable secure access to Kibana using AWS IAM Identity Center
September 12, 2022: This blog post has been updated to reflect the new name of AWS Single Sign-On (SSO) – AWS IAM Identity Center. Read more about the name change here.
September 9, 2021: Amazon Elasticsearch Service has been renamed to Amazon OpenSearch Service. See details.
Note from March 18, 2020: The Amazon ES domain no longer has to match the Amazon Cognito domain name, and we’ve updated this blog to reflect that change.
Note from August 22, 2019: Thanks to a customer providing feedback, we fixed a problem with the syntax of a command.
Amazon Elasticsearch Service (Amazon ES) is a fully managed service to search, analyze, and visualize data in real-time. The service offers integration with Kibana, an open-source data visualization and exploration tool that lets you perform log and time-series analytics and application monitoring.
Many enterprise customers who want to use these capabilities find it challenging to secure access to Kibana. Kibana users have direct access to data stored in Amazon ES—so it’s important that only authorized users have access to Kibana. Data stored in Amazon ES can also have different classifications. For example, you might have one domain that stores confidential data and another that stores public data. In this case, securing access requires you not only to prevent unauthorized users from accessing the data but also to grant different groups of users access to different data classifications.
In this post, I’ll show you how to secure access to Kibana through AWS IAM Identity Center so that only users authenticated to Microsoft Active Directory can access and visualize data stored in Amazon ES. AWS IAM Identity Center uses standard identity federation via SAML similar to Microsoft ADFS or Ping Federation. AWS IAM Identity Center integrates with AWS Managed Microsoft Active Directory or Active Directory hosted on-premises or EC2 Instance through AWS Active Directory Connector, which means that your employees can sign into the AWS IAM Identity Center user portal using their existing corporate Active Directory credentials. In addition, I’ll show you how to map users between an Amazon ES domain and a specific Active Directory security group so that you can limit who has access to a given Amazon ES domain.
Prerequisites and assumptions
You need the following for this walkthrough:
- An organization created in AWS Organizations. (If you don’t already have an organization, one will be created automatically by AWS IAM Identity Center.)
- AWS Directory Service, provisioned either for Microsoft Active Directory or AD Connector. For more information about these services, please refer to the following resources:
- Basic familiarity with Amazon Elasticsearch Service and Kibana.
Solution overview
The architecture diagram below illustrates how the solution will authenticate users into Kibana:
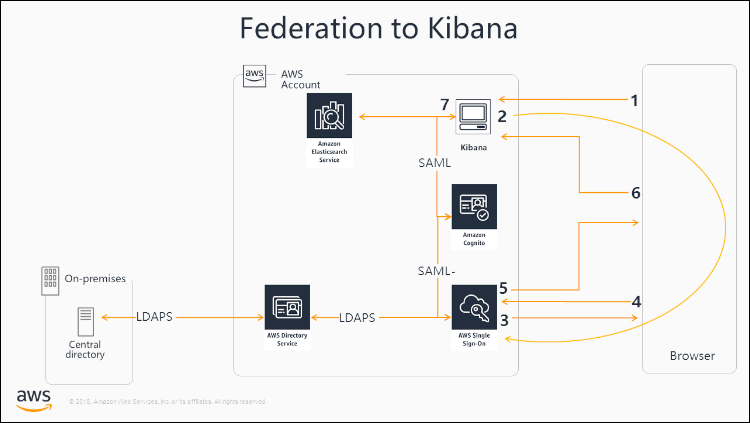
Figure 1: Architectural diagram
- The user requests accesses to Kibana
- Kibana sends an HTML form back to the browser with a SAML request for authentication from Cognito. The HTML form is automatically posted to Cognito. User is prompted to then select IAM Identity Center and authentication request is passed to IAM Identity Center.
- AWS IAM Identity Center sends a challenge to the browser for credentials
- User logs in to AWS IAM Identity Center. AWS IAM Identity Center authenticates the user against AWS Directory Service. AWS Directory Service may in turn authenticate the user against an on premise Active Directory.
- AWS IAM Identity Center sends a SAML response to the browser
- Browser POSTs the response to Cognito. Amazon Cognito validates the SAML response to verify that the user has been successfully authenticated and then passes the information back to Kibana.
- Access to Kibana and Elasticsearch is granted
Deployment and configuration
In this section, I’ll show you how to deploy and configure the security aspects described in the solution overview.
Amazon Cognito authentication for Kibana
First, I’m going to highlight some initial configuration settings for Amazon Cognito and Amazon ES. I’ll show you how to create a Cognito user pool, a user pool domain, and an identity pool, and then how to configure Kibana authentication under Elasticsearch. For each of the commands, remember to replace the placeholders with your own values.
If you need more details on how to set up Amazon Cognito authentication for Kibana, please refer to the service documentation.
-
- Create an Amazon Cognito user pool with the following command:aws cognito-idp create-user-pool –pool-name <pool name, for example “Kibana”>
From the output, copy down the user pool id. You’ll need to provide it in a couple of places later in the process.
- Create an Amazon Cognito user pool with the following command:aws cognito-idp create-user-pool –pool-name <pool name, for example “Kibana”>
-
- Create a user pool domain:aws cognito-idp create-user-pool-domain –domain <domain name> –user-pool-id <pool id created in step 1>
If you receive an error that “domain already exists,” it means the name is already in use and you must choose a different name.
- Create your Amazon Cognito federated identities:aws cognito-identity create-identity-pool –identity-pool-name <identity pool name e.g. Kibana> –allow-unauthenticated-identities
To make this command work, you have to temporally allow unauthenticated access by adding –allow-unauthenticated-identities. Unauthenticated access will be removed by Amazon Elasticsearch upon enabling Kibana authentication in the next step.
- Create an Amazon Elasticsearch domain. To do so, from the AWS Management Console, navigate to Amazon Elasticsearch and select Create a new domain.
- Make sure that value enter under “Elasticsearch domain name” match with the domain created under Cognito User Pool.
- Under Kibana authentication, complete the form with the following values, as shown in the screenshot:
- For Cognito User Pool, enter the name of the pool you created in step one.
- For Cognito Identity Pool, enter the identity you created in step three.

Figure 2: Enter the identity you created in step three
- Now you’re ready to assign IAM roles to your identity pool. Those roles will be saved with your identity pool and whenever Cognito receive a request to authorize a user, it will automatically utilize these roles
- From the AWS Management Console, go to Amazon Cognito and select Manage Identity Pools.
- Select the identity pool you created in step three.
- You should receive the following message: You have not specified roles for this identity pool. Click here to fix it. Follow the link.

Figure 3: Follow the “Click here to fix it” link
- Under Edit identity pool, next to Authenticated role, select Create new role.
- Select Allow and save your changes.
- Next to Unauthenticated role, select Create new role.
- Select Allow and save your changes.
- Finally, modify the Amazon Elasticsearch access policy:
- From the AWS Management Console, go to AWS Identity and Access Management (IAM).
- Search for the authenticated role you created in step five and copy the role ARN.
- From the mangement console, go to Amazon Elasticsearch Service, and then select the domain you created in step four.
- Select Modify access policy and add the following policy (replace the ARN of the authenticated role and the domain ARN with your own values):
Note: For more information about the Amazon Elasticsearch Service access policy visit: https://docs.aws.amazon.com/elasticsearch-service/latest/developerguide/es-ac.html
- Create a user pool domain:aws cognito-idp create-user-pool-domain –domain <domain name> –user-pool-id <pool id created in step 1>
Configuring AWS IAM Identity Center
In this section, I’ll show you how to configure AWS IAM Identity Center. In this solution, AWS IAM Identity Center is used not only to integrate with Microsoft AD but also as a SAML 2.0 identity federation provider. SAML 2.0 is an industry standard used for securely exchanging SAML assertions that pass information about a user between a SAML authority (in this case, Microsoft AD), and a SAML consumer (in this case, Amazon Cognito).
Add Active Directory
-
-
- From the AWS Management Console, go to AWS IAM Identity Center.
- If this is the first time you’re configuring AWS IAM Identity Center, you’ll be asked to enable AWS IAM Identity Center. Follow the prompt to do so.
- From the AWS IAM Identity Center Dashboard, select Manage your directory.

Figure 4: Select Manage your directory
- Under Directory, select Change directory.

Figure 5: Select “Change directory”
- On the next screen, select Microsoft AD Directory, select the directory you created under AWS Directory Service as a part of prerequisites, and then select Next: Review.

Figure 6: Select “Microsoft AD Directory” and then select the directory you created as a part of the prerequisites
- On the Review page, confirm that you want to switch from an AWS IAM Identity Center directory to an AWS Directory Service directory, and then select Finish.
- Once setup is complete, select Proceed to the directory.
-
Add application
-
-
- From AWS IAM Identity Center Dashboard, select Applications and then Add a new application. Select Add a custom SAML 2.0 application.

Figure 7: Select “Application” and then “Add a new application”
- Enter a display name for your application (for example, “Kibana”) and scroll down to Application metadata. Select the link that reads If you don’t have a metadata file, you can manually type your metadata values.
- Enter the following values, being sure to replace the placeholders with your own values:
- Application ACS URL: https://<Amazon Cognito domain name>.auth.<AWS region>.amazoncognito.com/saml2/idpresponse
- Application SAML audience: urn:amazon:cognito:sp:<user pool id>
- Select Save changes.

Figure 8: Select “Save changes”
- From AWS IAM Identity Center Dashboard, select Applications and then Add a new application. Select Add a custom SAML 2.0 application.
-
Add attribute mappings
Switch to the Attribute mappings tab and next to Subject, enter ${user:name} and select unspecified under Format as shown in the following screenshot. Click Save Changes.
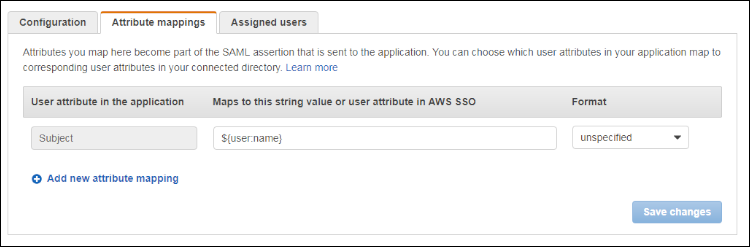
Figure 9: Enter “${user:name}” and select “Unspecified”
For more information about attribute mappings visit: https://docs.aws.amazon.com/singlesignon/latest/userguide/attributemappingsconcept.html
Grant access to Kibana
To manage who has access to Kibana, switch to the Assigned users tab and select Assign users. Add individual users or groups.
Download SAML metadata
Next, you’ll need to download the AWS IAM Identity Center SAML metadata. The SAML metadata contains information such as IAM Identity Center entity ID, public certificate, attributes schema, and other information that’s necessary for Cognito to federate with a SAML identity provider. To download the metadata .xml file, switch to the Configuration tab and select Download metadata file.
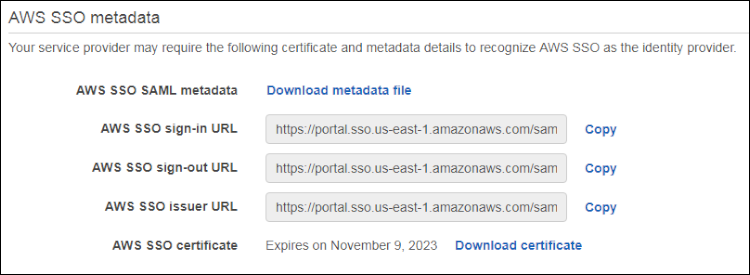
Figure 10: Select “Download metadata file”
Adding an Amazon Cognito identity provider
The last step is to add the identity provider to the user pool.
-
-
- From the AWS Management Console, go to Amazon Cognito.
- Select Manage User Pools, and then select the user pool you created in the previous section.
- From the left side menu, under Federation, select Identity providers, and then select SAML.
- Select Select file, and then select the AWS IAM Identity Center metadata .xml file you downloaded in previous step.
- Enter the provider name (for example, “AWS IAM Identity Center”), and then select Create provider.

Figure 11: Select “Select file” and then select the AWS IAM Identity Center metadata .xml file you downloaded in previous step
- From the left side menu, under App integration, select App client settings.
- Uncheck Cognito User Pool, check the name of provider you created in step one, and select Save Changes.

Figure 12: Uncheck “Cognito User Pool”
- Uncheck Cognito User Pool, check the name of provider you created in step one, and select Save Changes.
- From the AWS Management Console, go to Amazon Cognito.
-
At this point, the configuration is finished. When you open the Kibana URL, you should be redirected to AWS IAM Identity Center and asked to authenticate using your Active Directory credentials. Keep in mind that if the AWS Elasticsearch domain was created inside VPC, it won’t be accessible from the Internet but only within VPC.
Managing multiple Amazon ES domains
In scenarios where different users need access to different Amazon ES domains, the solution would be as follows for each Amazon ES domain:
-
-
- Create one Active Directory Security Group per Amazon ES domain
- Create an Amazon Cognito user pool for each domain
- Add new applications to AWS IAM Identity Center and grant permission to corresponding security groups
- Assign users to the appropriate security group
-
Deleting domains that use Amazon Cognito Authentication for Kibana
To prevent domains that use Amazon Cognito authentication for Kibana from becoming stuck in a configuration state of “Processing,” it’s important that you delete Amazon ES domains before deleting their associated Amazon Cognito user pools and identity pools.
Conclusion
I’ve outlined an approach to securing access to Kibana by integrating Amazon Cognito with AWS IAM Identity Center and AWS Directory Services. This allows you to narrow the scope of users who haves access to each Amazon Elasticsearch domain by configuring separate applications in AWS IAM Identity Center for each of the domains.
Want more AWS Security how-to content, news, and feature announcements? Follow us on Twitter.