AWS for SAP
How to integrate Amazon WorkSpaces with SAP Single Sign-On
SAP Single Sign-On allows users to have secure access to SAP and non-SAP systems using centralized authentication whether the systems are on-premises or in the cloud. SAP Single Sign-On provides the simplicity to manage users’ authentication, secure data communication, and integrate with two-factor and risk-based authentication. This includes possession of mobile phone and RSA SecurID card. Moreover, SAP Single Sign-On supports different types of authentication methods including Kerberos/SPNEGO, X.509 certificates and Security Assertion Markup Language (SAML). In this blog, we share how to integrate SAP Single Sign-On(*) based on Kerberos/SPNEGO with Amazon WorkSpaces. We also cover how to use your existing Active Directory service, either in the public cloud or an on-premises environment, to quickly provide thousands of desktops to workers across the globe.
(*)Based on the SAP Note 1848999, licenses for SAP Single Sign-On are required. Please contact your SAP account executive for more detail.
In general, there are three scenarios:
- Integrate Amazon WorkSpaces with AD Connector and existing Active Directory on-premises environment (figure 1)
- Integrate Amazon WorkSapces with Azure Active Directory Domain Services (Azure AD-DS) (figure 2)
- Integrate Amazon WorkSpaces with AD Connector, pre-built Active Directory (AD) in Amazon Elastic Compute Cloud (Amazon EC2), and AWS Directory Service for Microsoft Active Directory (AWS Managed Microsoft AD) (figures 3-1 and 3-2)
In this blog, we will be sharing an example of scenario three using AWS Managed Microsoft AD.
You can apply scenario one using the process outlined in the blog “How to Connect Your On-Premises Active Directory to AWS Using AD Connector.” Scenario two can be referenced in the blog “Add your WorkSpaces to Azure AD using Azure Active Directory Domain Services. ”
Follow SAP Note 66971 to ensure the supportability on the selected Windows version with SAP GUI. In this blog, we demonstrate the GUI installation on Windows 10.
Scenario 1 architecture – Amazon WorkSpaces and AD Connector with AD on-premises
Figure 1 Amazon WorkSpaces and AD Connector with AD on-premises
Scenario 2 architecture – Amazon WorkSpaces and Azure AD-DS

Figure 2 Amazon WorkSpaces and Azure AD-DS
Scenario 3 architecture1 – Amazon WorkSpaces and AD Connector with AD built in Amazon EC2
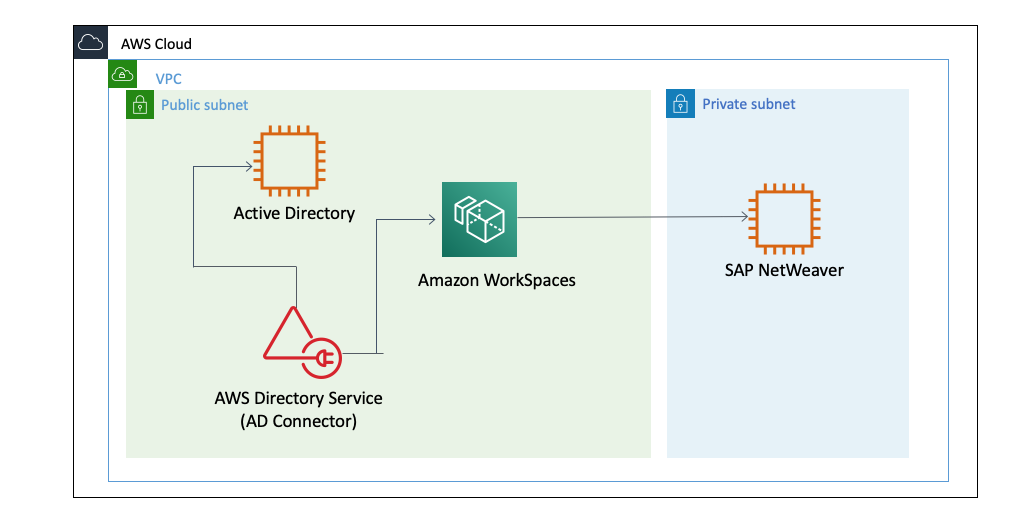
Figure 3-1 Amazon WorkSpaces and AD Connector with AD built in Amazon EC2
Scenario 3 architecture2 – Amazon WorkSpaces and AWS Managed Microsoft AD

Figure 3-2 Amazon WorkSpaces and AWS Managed Microsoft AD
Prerequisites:
- You already have an AWS account and a default Amazon Virtual Private Cloud (VPC).
- You deploy Amazon WorkSpaces and AWS Managed Microsoft AD in a public subnet.
- You can access Amazon WorkSpaces with a public internet.
- You have an existing SAP license for SAP Single Sign-On.
- You can deploy Amazon WorkSpaces in an available Region.
Deployment Steps:
- Setup AWS Managed Microsoft AD.
- Launch Amazon WorkSpaces with selected created users from AWS Managed Microsoft AD.
- Install SAP GUI and SAP Secure Login Client on the launched Amazon WorkSpaces.
- Configure the SAP GUI single sign-on (SSO) feature accordingly.
- Test the SAP GUI SSO feature.
- (Optional) Build up Amazon WorkSpaces image and bundles for scale-out usage and centralize the SAP GUI logon entry in a shared Windows file system.
- (Alternative) Deploy Amazon AppStream2.0 with SAP GUI single sign-on.
Walkthrough:
Setup AWS Managed Microsoft AD and deploy Amazon WorkSpaces
Download the sample code here to deploy AWS Managed Microsoft AD and Amazon WorkSpaces.
Requirements:
- AWS Command Line Interface (AWS CLI) should be already configured with Administrator permission.
- Version 1.33.0 of Amazon Cloud Development Kit (AWS CDK) should be installed.
- Python 3 should be installed.
Overview:
There are two CDK stacks in app.py file:
- AWSManagedAD:
- Create AWS Managed Microsoft AD.
- Create an Amazon Route 53 private hosted zone and an A record pointing to AWS Managed Microsoft AD.
- Create an Amazon EC2 Windows instance for domain user/group management.
- Create an AWS Systems Manager Parameter and Document that attaches to the Amazon EC2 instance to join AWS Managed Microsoft AD automatically.
- Create an AWS Lambda function to register Amazon WorkSpaces with AWS Managed Microsoft AD.
- AWSWorkSpaces:
- Create an Amazon WorkSpaces for SAP GUI configuration
Setup process:
- Clone my sample Github repo to your folder in your device and navigate into the folder.
- Create two AWS Secrets Managers secrets. One is the secret for domain admin password, and the other is the pre-created Amazon EC2 key pair name. The name of the Secret Key is “Key”. The password should comply with the AWS Managed Microsoft AD password rule.


- Edit cdk.json file to meet your environment
	{
	  "app": "python3 app.py",
	  "context": {
	      "Account": "<AWS Account ID>",
	      "Region": "<AWS Region>",
	      "Domain_name": "<AD Domain Name>",
	      "Secret_domain_password_arn": "<Secret Manager for AD Password ARN value>",
	      "Instance_type": "<EC2 Instance Type>",
	      "VpcId": "<VPC ID>",
	      "Subnet1": [ "<Piublic Subnet1 ID>", "<The AZ that the Subnet1 locates>" ],
	      "Subnet2": [ "<Piublic Subnet2 ID>", "<The AZ that the Subnet2 locates>" ],
	      "Secret_keypair_arn": "< Secret Manager for EC2 Key Value ARN value >",
	      "WorkSpacesUser" : "<NetBIos\User>",
	      "WorkSpacesBundle": "wsb-8vbljg4r6"
	  }
	}
Parameters:
Region: Choose the Region that supports the AWS Directory Service and Amazon WorkSpaces. In this blog, I use the Region in us-west-2.
Domain_name: Fill in the preferred domain name for AWS Managed Microsoft AD. I use test.lab in this blog.
Secret_domain_password_arn: Input the secret Amazon Resource Name (ARN) value for domain admin password secret.
Instance_type: Refer to the Amazon EC2 Documentation for the instance type.
Subnet[1|2]: Fill in the list value for the two subnets in the same VpcId. The former element in the array is the subnet ID, and the latter is the Availability Zone where the subnet resides.
Secret_keypair_arn: Input Secret ARN value for the Amazon EC2 key pair secret.
WorkSpacesUser: Fill in the user name that you would create after the AWS Managed Microsoft AD is built. The format is NETBIOS\AD_USER.
WorkSpacesBundle: Fill in the default Amazon WorkSpaces bundle ID to deploy SAP GUI. I picked up wsb-8vbljg4r6, which is for Standard Windows 10. - Install the Python required libraries for cdk.
$ pip install -r requirement.txt - Run the CDK bootstrap on your AWS account.
$ cdk bootstrap aws://<AWS_ACCOUNT>/<AWS_REGION> - Deploy the AWSManagedAD stack with your AWS profile.
$ cdk deploy AWSManagedAD --profile <AWS Profile>
If you don’t specify your AWS profile, the default profile will be used. This stack might take 10-20 minutes to deploy all resources. - Once the AWSManagedAD stack is deployed, you can log into the Amazon EC2 instance and create a domain user for Amazon WorkSpaces later. Revise the default security group to connect from your local environment to your Amazon EC2 instance. Please specify First Name, Last Name and the Email for the user.
- Deploy the AWSWorkSpaces stack with a specified domain user.
$ cdk deploy AWSWorkSpaces --profile <AWS Profile>
This stack might take 10 minutes to deploy Amazon WorkSpaces. - Once the Amazon WorkSpaces is built, you can download and install Amazon WorkSpaces Client, fill in the registration code from the Amazon WorkSpaces console and log in with domain user.

Configure SAP GUI single sign-on feature accordingly
Requirements:
- The SAP GUI and SAP Secure Login Client are installed in Amazon WorkSpaces.
- Log into Amazon WorkSpaces with the specified domain user.
- The network connection from Amazon WorkSpaces to the SAP Systems is allowed.
- SAP Systems are installed on your own.
Steps:
- Use the Tcode SNCWIZARD to set up the Secure Network Communications (SNC) identity and change the SAP profile parameters accordingly.
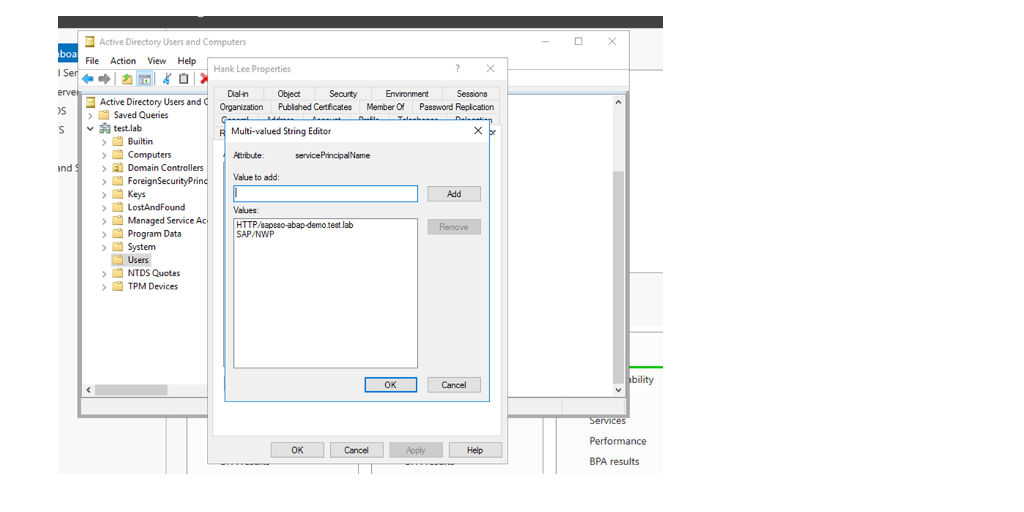
- Create a domain user for SSO. In this sample, the user is “Hank”. Update the service attribute ServicePrincipalName in “Attribute Editor.”
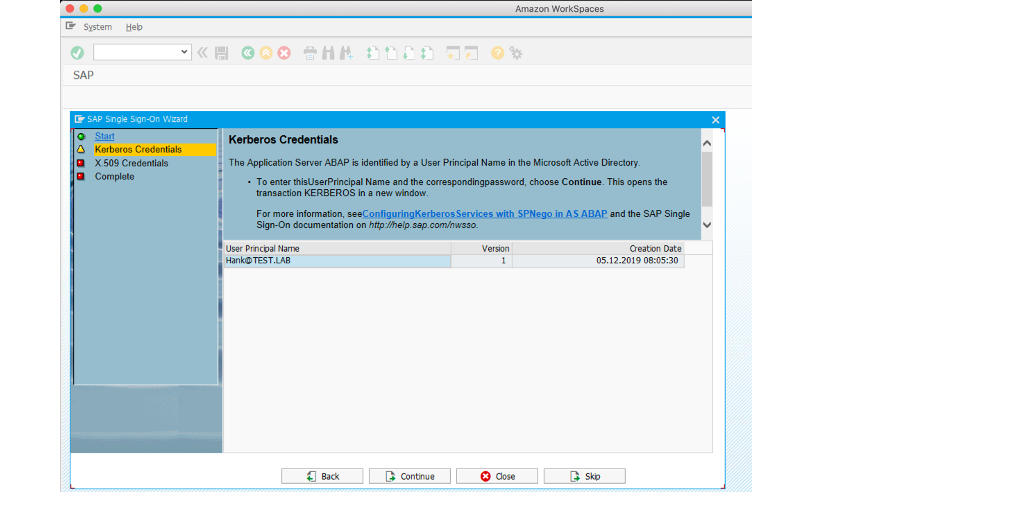
- Create a Kerberos User in Tcode SNCWIZARD to match the domain user. Ensure the user principal is in GREEN LIGHT.
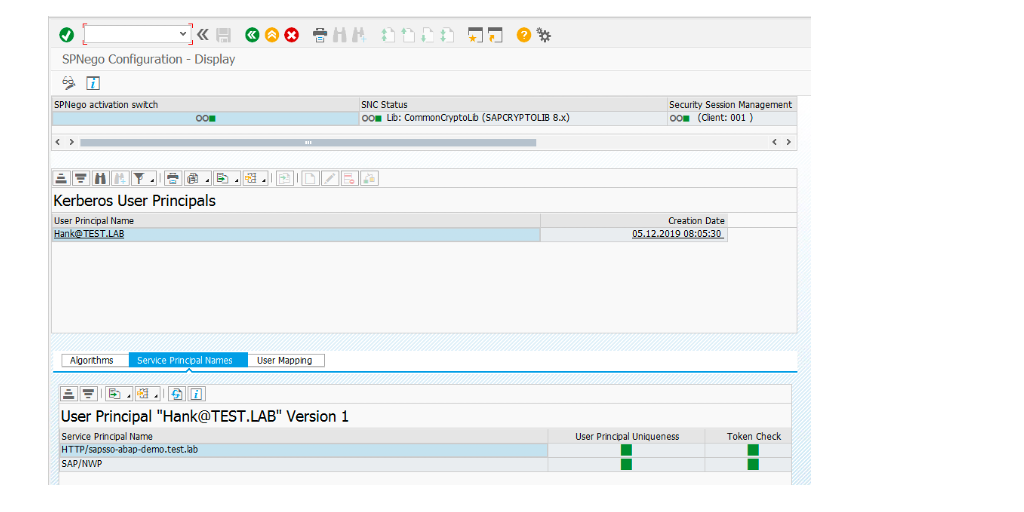
- Copy the SNC name to map to the NetWeaver User in Tcode SU01.


- Complete the remainder of the process in SNCWIZARD.


Test the SAP GUI SSO feature
- Activate the Secure Network Communication option in the SAP GUI and input CN name.

- Double-click the designated SAP System to check whether the single sign-on function is ready.

(Optional) Build up Amazon WorkSpaces image and bundles for scale-out usage and centralize the SAP GUI logon entry in a shared Windows file system.
You might have many staff members that need access to SAP systems with the SAP GUI. In a traditional environment, each user must install the SAP GUI on their laptops and set up SAP logon entries repeatedly. With Amazon WorkSpaces, you can easily duplicate pre-built bundles and provision the environment to each user in a few clicks following the document.
Next, you can create a bundle to deploy a pre-built laptop for each user. Each user must maintain the SAP GUI logon entry in a repeated effort. They can use a share file system (either with Amazon FSx Windows file systems or a self-built Windows file systems) to adopt a centralized SAP logon entry for different department users, reducing overall efforts. Moreover, you can deploy SAP GUI Installation Server to push customized Windows scripts to users. The detailed process is in the SAPGUI Installation Server Part 5 – Scripting blog.
The following process shows two Amazon WorkSpaces sharing the same Amazon FSx file system for SAP GUI logon entry.
Requirements:
- An Amazon FSx file system is created in the same domain with Amazon WorkSpaces and mapped in a network device in the first Amazon WorkSpaces.
- The domain users are in the same organization and have permission to access the Amazon FSx file system.
- Set up proper security croup and Network ACLs (NACL) between Amazon WorkSpaces and the Amazon FSx file system.
(Amazon WorkSpaces1)
- The pre-configured SAP GUI and the SAPGUILandscape.xml(SAP Logon entry) is changed to the share folder Z:\

(Amazon WorkSpaces2)
- Build another Amazon WorkSpaces, connect to the same share folders, and change the SAP GUI option (Server Configuration Files) to the same SAPGUILandscape.xml.
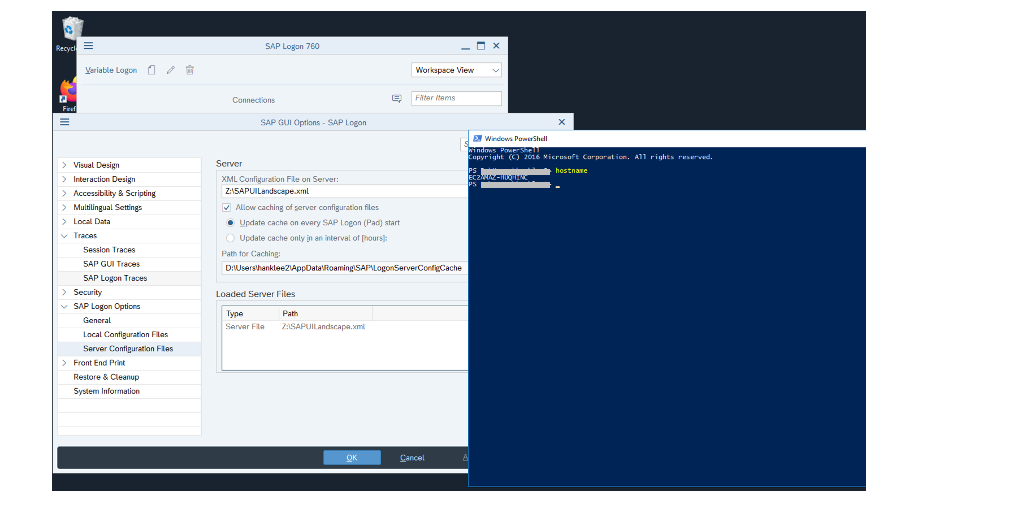
(Amazon WorkSpaces2) - After you restart the SAP GUI, the system lists are ready.

Last, since SAP SNC is mapped one-to-one from the domain user to the SAP GUI user, you need to pre-map different domain users to the related SAP GUI users. The other Amazon WorkSpaces users from domain can use SSO to the SAP systems.
(Alternative) Deploy Amazon AppStream2.0 with SAP GUI SSO
Amazon AppStream 2.0 is a fully managed application streaming service that provides your users secure access to your SAP environment through a browser on any computer, including PCs, Chromebooks, and Macs.
There are several differences in configuring Amazon AppStream 2.0 with Amazon WorkSpaces:
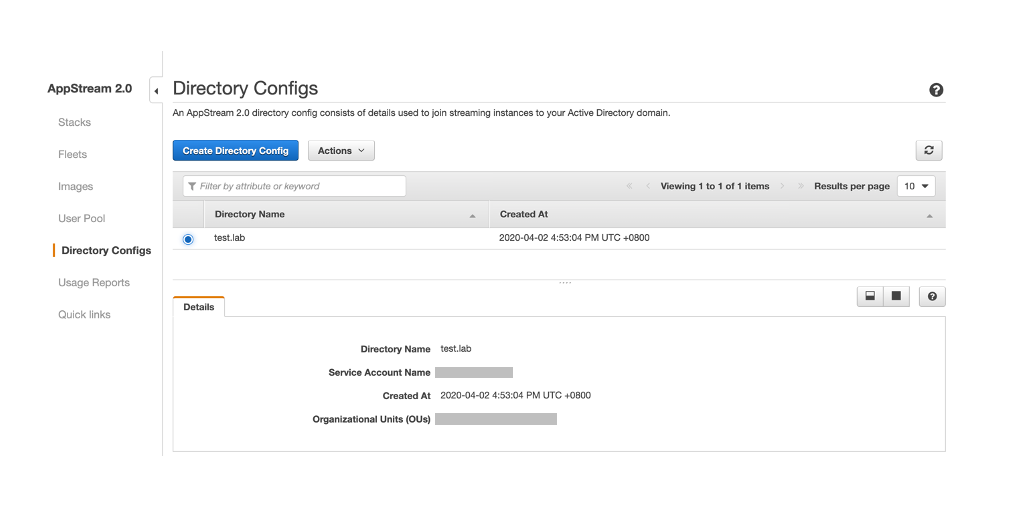
- Amazon AppStream 2.0 use Directory Configs rather than AWS Directory Service. You should pre-configure Directory Configs and ensure the Image Builder of Amazon AppStream 2.0 can connect to domain in the starting stage. (You can replace the Dynamic Host Configuration Protocol (DHCP) option set in the VPC to the new option with custom Domain Name System (DNS)).
- Once the Amazon AppStream 2.0 Image Builder is ready, and the configuration for SAP GUI SSO in the image is done, create a related fleet and associate it to a stack.
- Amazon AppStream 2.0 is a browser-based service, so the authentication is verified by a SAML 2.0 identity provider from Windows domain. You can refer to the AWS blog How to Enable Server-Side LDAPS for Your AWS Microsoft AD Directory to set up Active Directory Federation Services (ADFS) in your environment and Enabling Identity Federation with AD FS 3.0 and Amazon AppStream 2.0 to connect Amazon AppStream 2.0 to the stack.
The test environment is below.

- Configure the Amazon AppStream 2.0 directory config.
- Create an Amazon AppStream 2.0 image.


- Create a federation rule in the ADFS

- The Amazon AppStream 2.0 with SAP GUI SSO result is below

You can refer Deploying SAP GUI on Amazon AppStream 2.0 guide for detailed steps.
Extension
In order to extend the usage of Amazon WorkSapces for disaster recovery in different AWS Regions, you can build Amazon WorkSpaces in multiple Regions to replicate configuration by referring to the AWS blog Building a multi-region disaster recovery environment for Amazon WorkSpaces.
Conclusion
Using Amazon Workspaces to integrate SAP GUI SSO features is flexible and scalable for the SAP users around the world. Besides being an easy way to deploy the Amazon WorkSpaces, you can reduce the capital costs to move your Windows desktops to Amazon WorkSpaces.