AWS for SAP
Reducing SAP Certificate Management Overhead with AWS Certificate Manager
Introduction:
Signed certificates are digital passports, authenticating system identities, and ensuring secure data transmission. As organizations expand their SAP landscapes across cloud environments and integrate with third-party applications, properly implemented certificates become essential in preventing security breaches and unauthorized access, while maintaining smooth operation of business-critical systems.
For many SAP administrators and security professionals, managing certificates might seem like yet another complex task in an already demanding environment. This is where AWS Certificate Manager (ACM) comes into play. AWS Certificate Manager is a service that is used to provision, manage, and deploy public and private SSL/TLS certificates. You can then use these certificates to terminate traffic on any compute workload that requires a certificate, such as those running on EC2 instances, like SAP workloads.
With the announcement of publicly exportable certificates via ACM, customers can now leverage ACM to create a Personal Security Environment (PSE) for their SAP systems. For details regarding the launch of publicly exportable certificates via ACM, check out the blog post AWS Certificate Manager introduces exportable public SSL/TLS certificates to use anywhere from my colleague Channy Yun.
Prerequisites:
To use the certificates from ACM in SAP workloads, please see the prerequisites below:
- A method to validate domain ownership for the domain in which you are requesting the certificate
- An exported public certificate requested and validated in ACM with the proper tags where applicable
- OpenSSL installed in your operating system or access to AWS Cloudshell
Note: this blog post does not cover how to request the certificate, as this has already been covered in the launch blog mentioned earlier
Generating the .p12 file:
Once you have exported the certificate from ACM, you will have three files:
- certificate.txt
- private_key.txt
- certificate_chain.txt
With those 3 files saved in a folder, open your terminal of choice and execute the below OpenSSL commands from said folder
First, export the private key:
# openssl pkcs8 -topk8 -in private_key.txt -out private_key.pem -nocrypt
Note: Ensure you have the pass phrase for the private_key.txt file generated when exporting the certificate from ACM.
Then, confirm the certificate matches the exported key:
# openssl x509 -noout -modulus -in certificate.txt | openssl md5
# openssl rsa -noout -modulus -in private_key.pem | openssl md5
Now let’s build out the PKCS#12 file:
# openssl pkcs12 -export \
#  -inkey private_key.pem \
#  -in certificate.txt \
#  -certfile certificate_chain.txt \
# -name "CN=<your-certificate-CN>" \
# -out sap_ssl.p12
Note: Take note of the export password as it will be required when importing the .p12 file into SAP.
Converting the .p12 into an SAP PSE:
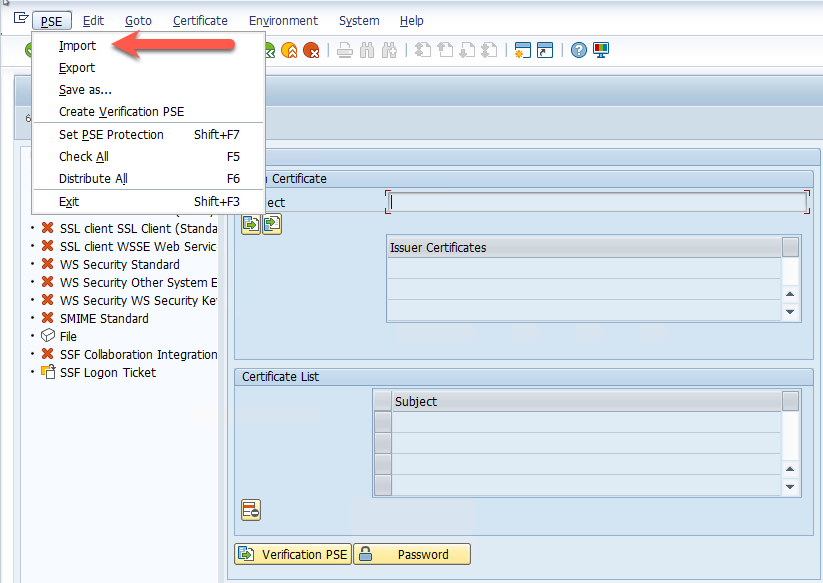
If you are working with an SAP ABAP based system, you can perform this task by logging into the system and entering transaction STRUST. From there, set to change mode and select PSE -> Import:
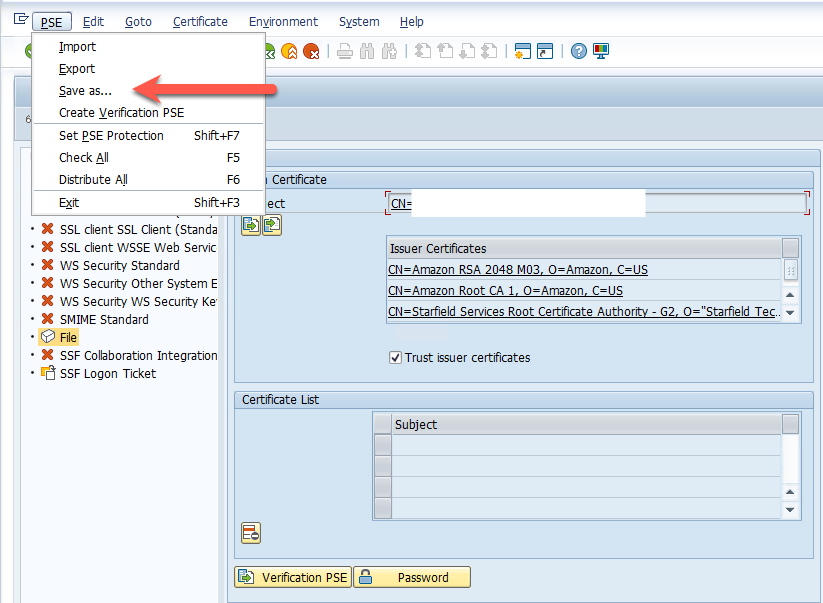
Provide the .p12 file and the export password you defined.
Note: If you are missing a certificate from the chain (i.e. Starfield Services Root Certificate Authority” you can download the certificate from the Amazon trust repository.
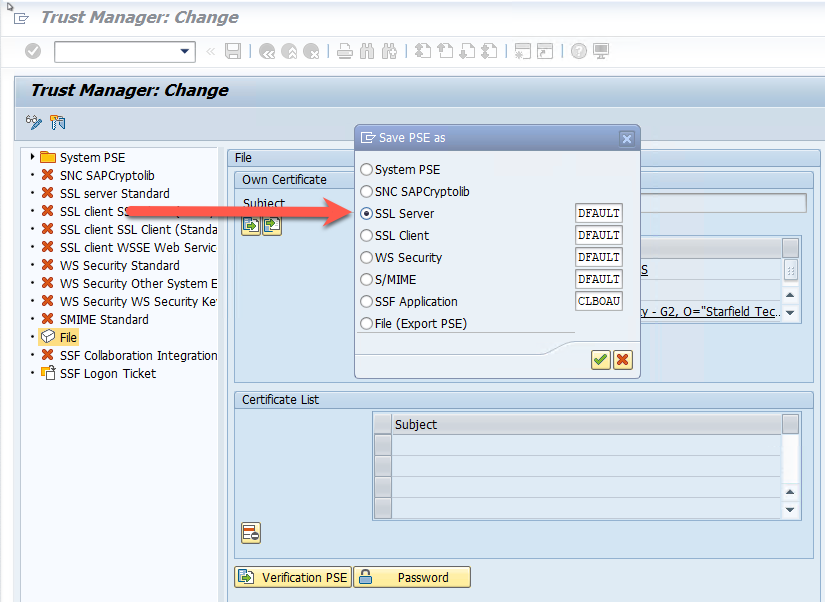
You can now save the PSE according to your requirements (for example, as the SAPSSLS.pse). This will replace your current PSE. If a PSE already exists in the system, ensure you have backed it up (if required).
If you are building the PSE in a non-ABAP environment (such as SAP HANA or an SAP Web Dispatcher), you can use the below steps to generate the SAP PSE
In the same folder where you generated the PKCS#12 file, execute the below command:
# openssl pkcs12 -export -out certificate.pfx -inkey private_key.txt -in certificate.txt -certfile certificate_chain.txt
Note: You will be asked for the pass phrase for the private_key.txt file and the export password for the PKCS#12 file
Now copy the certificate.pfx along with the root and certificate chain files into your SAP server and execute the following command:
# sapgenpse import_p12 -r certificate_chain.txt -r root.crt -p <PSE file name> certificate.pfx
Note: You will be asked for the PKCS#12 encryption password and to set a passphrase for the SAP PSE
Since the PSE is protected with credentials, you will need to generate the cred_v2 file by executing the below command with the <sid>adm user:
# sapgenpse seclogin -p <PSE file name> [ -O <OS user name> ] [ -x <PIN> ]
For more details on PSE credentials, refer to SAP Note # 1525059 – Troubleshooting problems with PSE credentials (SAP S-User required)
Pricing:
For details and up-to-date information on pricing for public certificates in ACM, refer to AWS Certificate Manager pricing
Conclusion:
AWS Certificate Manager (ACM) provides a solution for managing certificates in SAP environments. With the ability to export public certificates, organizations can now easily create Personal Security Environments (PSE) for both ABAP and non-ABAP based SAP systems. This integration simplifies certificate management, enhances security, and maintains compliance requirements for SAP landscapes.
By following the steps outlined in this blog post, SAP administrators can implement secure certificate management using ACM, ensuring their SAP systems remain protected while reducing the operational overhead of certificate management. Customers can further leverage tagging to have a centralized view of their spending in certificate management.
Want to know more about running your SAP landscapes on AWS? Visit our SAP on AWS page.