AWS Big Data Blog
Building AI shopping agent using Amazon Bedrock AgentCore Runtime and Amazon OpenSearch Service
In this post, we explore how to build an online shopping AI agent. We focus on its architecture and implementation with Amazon OpenSearch Service, Amazon Bedrock AgentCore, and Strands Agents. Amazon Bedrock AgentCore is an agentic platform for deploying and operating those agents and tools securely at scale without managing infrastructure. AgentCore Runtime is the secure, serverless runtime that hosts your Strands Agents and tools as containerized applications. Strands Agents is an open source SDK for building AI agents. In this SDK, an agent is defined by a model, tools, and a prompt. Tools are callable functions that allow agents to perform actions beyond text generation, such as API calls, database queries, and file operations. The framework lets the model autonomously plan steps and invoke tools to complete tasks.
Today’s AI shopping assistants understand natural language, context, and shopping intent, creating a more human-like interaction. These assistants handle complex shopping requirements, such as “Find me a formal dress under $200 that’s appropriate for a summer wedding.” They maintain conversation history, process follow-up questions naturally, and provide personalized recommendations based on user preferences and past interactions. Customers can use visual search to upload images of items that they want, and the AI finds similar products across multiple retailers, matching styles and patterns. The goal is to provide instant, relevant, and personalized assistance at scale, creating a more efficient shopping journey for consumers worldwide.
AI agents combined with Retrieval Augmented Generation (RAG) on Amazon OpenSearch Service represent an evolution in conversational search. This integration builds AI agents on enriched catalogs, supporting context-aware and autonomous search experiences while maintaining accuracy and relevance through grounded responses.
Solution overview
The following diagram illustrates the solution architecture of an AI-powered online shopping agent built using Strands Agents, Amazon Bedrock AgentCore Runtime, and Amazon OpenSearch Service. For simplicity, the diagram doesn’t show authentication and authorization. In a production setup, secure access to the backend by using mechanisms such as Amazon API Gateway, AWS Identity and Access Management (IAM) roles, or OAuth-based authentication.
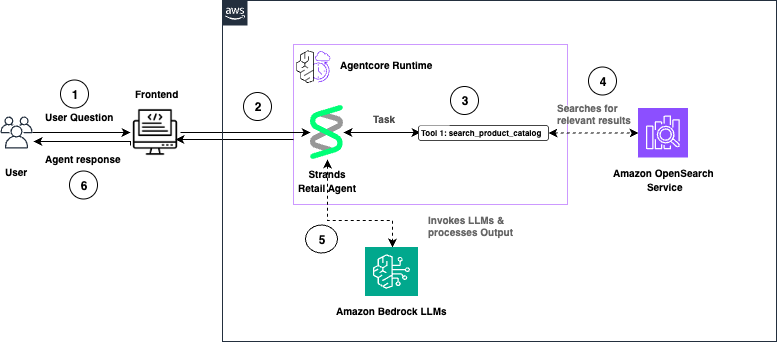
The following is a walkthrough of the reference architecture:
- The user submits a question through the front-end application. AgentCore Runtime receives the request and routes it to the Strands Retail Agent.
- The Strands Agent processes the task and invokes the
search_product_catalogtool. - OpenSearch Service performs semantic search and returns relevant product results.
- The Strands Agent invokes Amazon Bedrock large language models (LLMs) to generate a natural language response.
- The agent response is returned to the user through the front end.
Walkthrough
The following section walks you through how to build an online shopping AI agent.
Prerequisites
To implement this solution, you need an AWS account. You also need an OpenSearch Service domain with OpenSearch version 2.13 or later. You can use an existing domain or create a new domain.
To use the vector search capabilities of OpenSearch Service with Strands Agents on AgentCore, you use ingest pipelines. These ingestion pipelines apply built-in processors to pre-process your documents before you index them in OpenSearch Service.
You use the text_embedding processor, which relies on the ML Commons plugin and a registered embedding model—Amazon Nova Multimodal Embeddings on Amazon Bedrock. OpenSearch Service uses the ML Commons plugin to generate vector embedding for your data and uses the same model to convert incoming queries into vectors. This supports semantic search across your indexed content.
You extend your semantic search backend by adding an agent built with Strands Agents and deployed on Amazon Bedrock AgentCore.
Code samples provided in this post are tested in Python 3.11. You only need to install Python 3.11 in your environment to execute the python scripts. You also need Node.js 18 or later installed to use the AgentCore CLI. The provided code scripts will deploy into your AWS account so make sure your terminal has access to necessary AWS credentials.
Install AgentCore CLI
Install the AgentCore CLI globally using npm:
Python Dependencies
You also need to create a requirements.txt file with following dependencies in your workspace to deploy the agents.
Run pip install -r requirements.txt in your terminal to install the required dependencies. To avoid conflicts with other dependencies in your system, you can use a virtual environment.
Now, walk through each step.
Step 1: Configure IAM permissions
Complete the following steps to register the Nova Multimodal Embeddings model with OpenSearch Service and verify that your OpenSearch Service domain has permission to invoke the Amazon Bedrock API.
- Go to the IAM console and create a new role with a custom trust policy. Add the following trust policy.
- Skip adding a permission policy.
- Give your role a name and create it. For this post, we use OpenSearchBedrockEmbeddingRole as the role name. OpenSearch Service uses this role to invoke the Nova Multimodal Embeddings model on Amazon Bedrock.
- On the Permissions tab, attach an inline policy with the following permissions. For this post, we name this policy OpenSearchBedrockEmbeddingPolicy.
- Create a
passRolepolicy with the following JSON document and assign it to the IAM role that creates the ML connector. This lets the principal running the Python code pass the OpenSearchBedrockEmbeddingRole to OpenSearch. Replace<your-aws-account-id>with your own AWS account ID. - By using fine-grained access control (FGAC), map the IAM role as a backend role for the
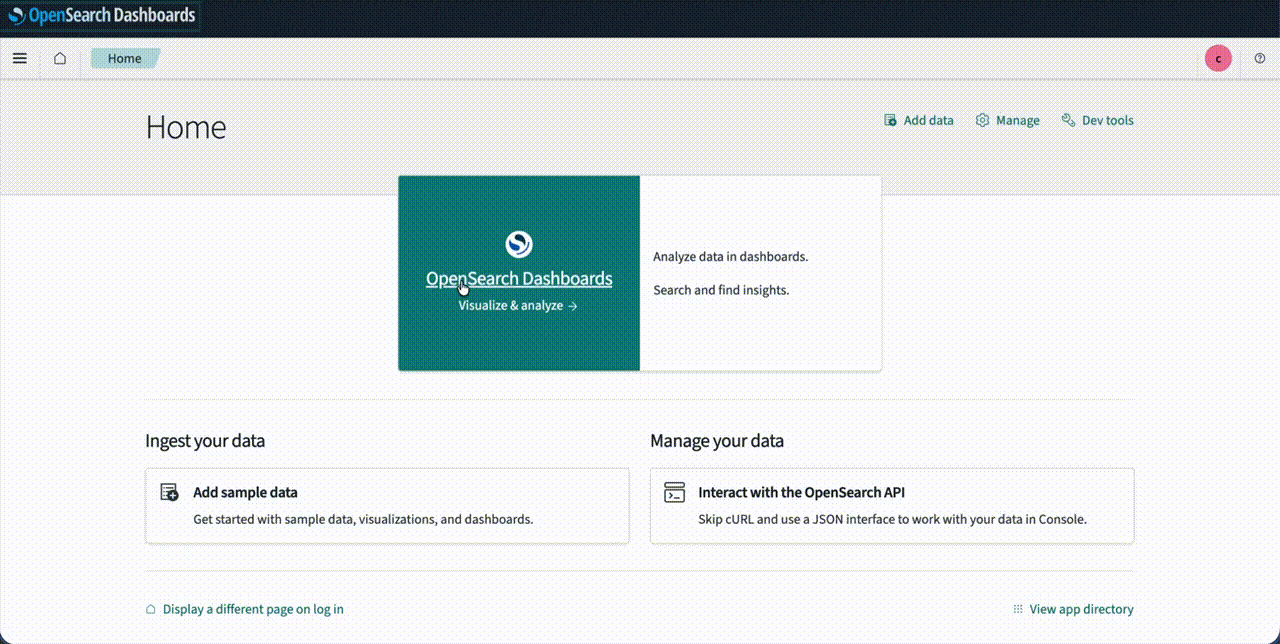
ml_full_accessrole in the OpenSearch Dashboards Security plugin. This mapping lets the user create ML connectors:- Log in to OpenSearch Dashboards and open the Security page from the navigation menu.
- Choose Roles and select
ml_full_access. - Choose Mapped Users and Manage Mapping.
- Under Backend roles, add the ARN of the IAM role that you created in the previous steps.
Step 2: Connect to the model by using OpenSearch ML Connectors
In this section, you create an ML connector to link OpenSearch Service with the Bedrock Nova Multimodal Embeddings model. You then register and deploy the model so you can use it for neural search queries.
- Create a file named
create-connector.pywith the following code. Replace<your hostname>,<your region>, and<your account id>placeholders within the code.
- Run
python create-connector.pyin your terminal by using the IAM role withml_full_accessandpassRolepermissions created in the previous step. This script creates a connector between OpenSearch Service and the Bedrock Nova Multimodal Embeddings model. - The program responds with
connector_id. Take a note of it. Then, navigate to OpenSearch Dashboards and open Dev Tools. Create a model group against which to register this model in the OpenSearch Service domain.
- Register a model by using
connector_idandmodel_group_id.
- Run the following API call to deploy the model. Use the registered model ID from the previous step.
Step 3: Create an ingest pipeline for data indexing
Use the following code to create an ingest pipeline for data indexing. The pipeline establishes a connection to the embedding model, retrieves the embedding for the title field, and stores it in the OpenSearch index.
Step 4: Create an index for storing data
Create an index named product for storing data by using Dev Tools. This index stores raw text and 1024-dimensional embeddings of the title field, and uses the ingest pipeline you created in the previous step.
Step 5: Ingest sample data
Use the following code to ingest the sample product data in Dev Tools.
Step 6: Query the index
Run the following API call to test semantic search by using the Nova Multimodal Embeddings model.
The output of the preceding query should look like the following.
Step 7: Create an agent with Strands and Bedrock AgentCore Runtime
Now, create the Strands Agent that uses Anthropic Claude Sonnet 4.6 on Amazon Bedrock to search products from the OpenSearch Service index. To do so:
- Import the Runtime app with
from bedrock_agentcore.runtime import BedrockAgentCoreApp. - Initialize the app in your code with
app = BedrockAgentCoreApp(). - Create the OpenSearch Service connection and search query with the
@tooldecorator. - Decorate the invocation function with the
@app.entrypointdecorator. - Let AgentCore Runtime control the running of the agent with
app.run().
Now, complete the following steps:
- Make sure that you have installed the necessary dependencies from the Prerequisites section of this post.
- Create and save a file named
search_agent.pywith the following code. Replace<your hostname>,<your region>, and<your account id>placeholders within the code.This deploys your agent locally for testing purposes.
- Navigate to the IAM console and add the AmazonBedrockLimitedAccess permission policy to the principal running the code.
- Navigate to OpenSearch Dashboards and, from the left menu, choose Security plugin, then choose Roles.
- Choose Create Role.
- Name the role agentcore-permissions.
- Under cluster permissions, add
cluster:admin/opensearch/ml/models/getandcluster:admin/opensearch/ml/predict. - Under index permissions, enter
product*as the index pattern. Addsearchandgetpermissions. - Create the role.
- Choose the role you created, switch to the Mapped Users tab, choose Manage mapping, and add the role that you use for running the Python code as a backend role.
- Uncomment the line
strands_agent_bedrock({"prompt": "Search jacket"})and make sure theapp.run()line is commented in the code. - Run
python search_agent.pyin your terminal to start the shopping agent. The output should look similar to the following. - Comment
strands_agent_bedrock({"prompt": "Search jacket"})and uncomment theapp.run()line in the code before going into the next step.
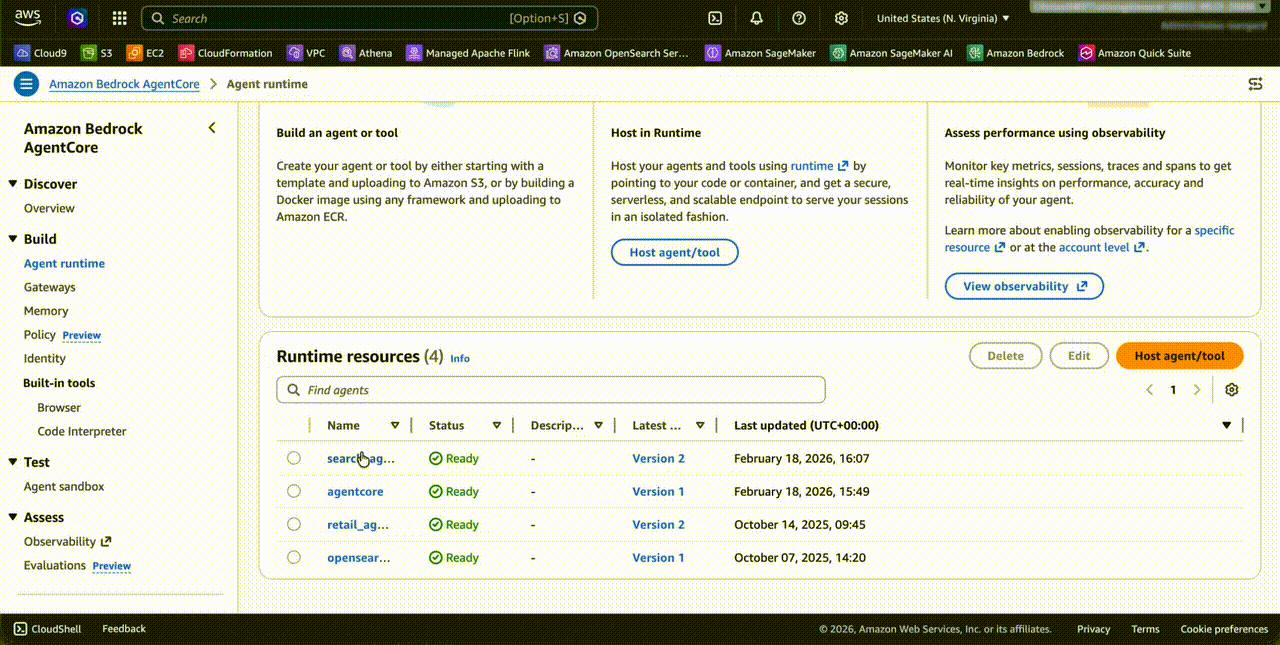
Step 8: Configure and launch your agent to Bedrock AgentCore Runtime
The AgentCore CLI is a command-line tool provided by AWS that simplifies deployment of agents to Amazon Bedrock AgentCore Runtime. When you run the CLI deployment command, it automates the entire deployment workflow: it creates the necessary IAM execution role with proper permissions, packages your Python application code along with its dependencies, uses AWS CodeBuild to build an optimized Docker container image, pushes that container image to Amazon Elastic Container Registry (ECR), and finally provisions the AgentCore Runtime environment that hosts your containerized agent. This eliminates the need for manual Dockerfile creation, container builds, or infrastructure management.
- Before you start this step, make sure you have gone through section 7 and installed the AgentCore CLI and Python dependencies listed in the Prerequisites section.
- Create a policy named AgentCoreAccessPolicy with the following permissions and attach it to the role running the code. Replace
<ACCOUNT_ID>and<REGION>placeholders.
- Create a file named
agentcore.yamlin your project directory with the following configuration. Replace<REGION>,<ACCOUNT_ID>, and<OPENSEARCH_DOMAIN_NAME>placeholders:
- Run the following command in your terminal to deploy the agent to AgentCore Runtime:
- Create the AgentCore project and replace with your search agent.
- Add OpenSearch and other dependencies:
- Deploy the agent to Agentcore Runtime. This process takes approximately 5-10 minutes.
- Once deployment completes, verify the runtime status:
You should see:
Step 9: Configure OpenSearch Service access
Map your AgentCore execution role to an OpenSearch backend role so the agent can access your data.
- Navigate to OpenSearch Dashboards. From the left menu, choose the Security plugin, then choose Roles.
- Search for agentcore-permissions and choose the role. Then, navigate to the Mapped Users tab, choose Manage mapping, and add
arn:aws:iam::<ACCOUNT_ID>:role/AmazonBedrockAgentCoreSDKRuntime-us-east-1-customas a backend role. Replace the<ACCOUNT_ID>placeholder with your account ID.
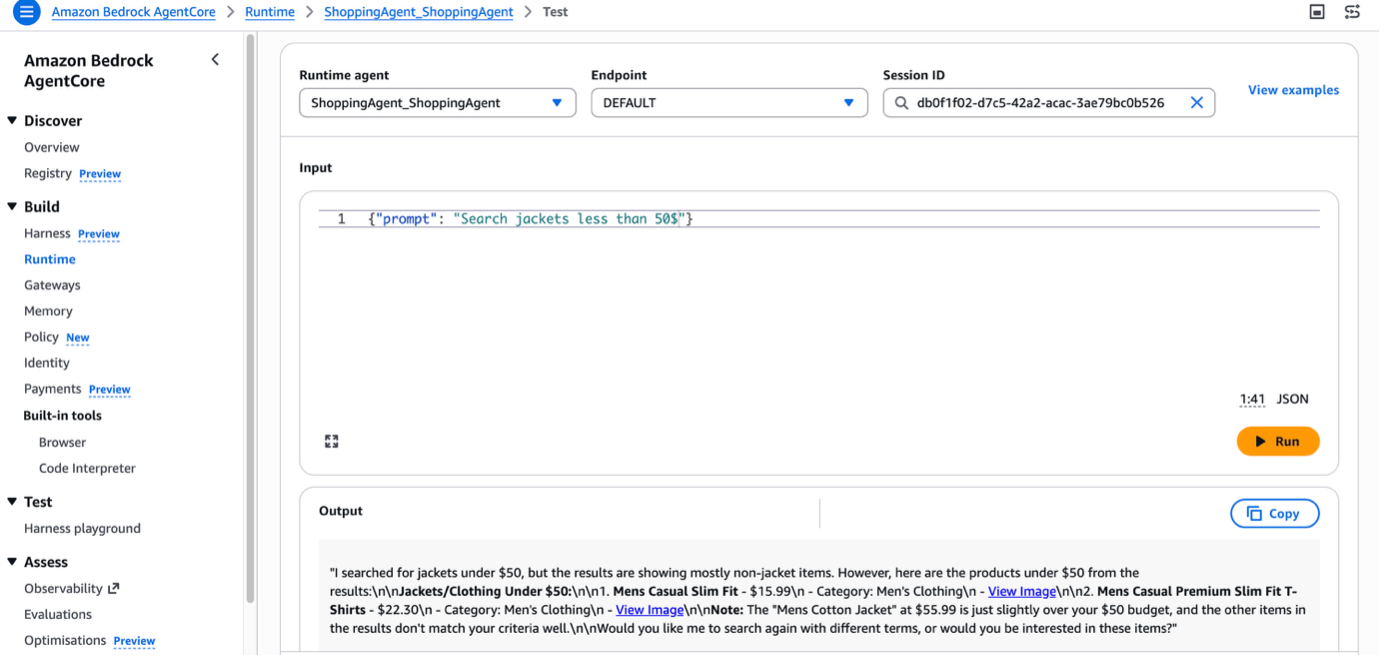
Step 10: Invoke the Bedrock AgentCore Runtime
You can test the agent in Agent Sandbox. Enter the prompt Search jacket less than 50$, and the agent returns the relevant result from the OpenSearch Service index with a summary.
In real-world scenarios, you can design a search application with a Strands Agent deployed in AgentCore Runtime. You can add AgentCore Memory, which gives your AI agents the ability to remember past interactions and provide more context-aware, personalized conversations.
Cleanup
To avoid incurring future charges, delete the resources created while building this solution:
Conclusion
In this post, you saw how to create a conversational search with Amazon OpenSearch Service and Strands Agents. You also learned how to deploy the agent on Amazon Bedrock AgentCore Runtime. You can further enhance this shopping agent by using other AgentCore capabilities. For example, AgentCore Memory retains user preferences and past interactions across sessions, AgentCore Identity manages shopper authentication and access control, and AgentCore Observability helps you monitor and debug agent behavior in production. Together, these services help you build shopping experiences that deliver instant, relevant assistance at scale.
Now it’s your turn. Build your own conversational search experience by integrating OpenSearch Service and Strands Agents with your product catalog. To learn more, see the Amazon OpenSearch Service and Amazon Bedrock AgentCore detail pages.