AWS Big Data Blog
Get to insights faster using Notebooks in Amazon SageMaker Unified Studio
In this post, we demonstrate how Notebooks in Amazon SageMaker Unified Studio help you get to insights faster by simplifying infrastructure configuration. You’ll see how to analyze housing price data, create scalable data tables, run distributed profiling, and train machine learning (ML) models within a single notebook environment.
Data scientists and analysts often spend days configuring infrastructure and managing authentication across multiple data sources before they can begin analysis. When working with data across Amazon Simple Storage Service (Amazon S3), Amazon Redshift, Snowflake, and local files, teams face repeated authentication setup, manual compute scaling decisions, and tool-switching overhead that delays insights.
Notebooks in Amazon SageMaker Unified Studio provide instant access to 12+ data sources, compute scaling from local to distributed processing, and AI-powered code generation within a single browser-based environment. You’ll learn to use polyglot programming, multi-engine compute, and AI-assisted development to accelerate your path from question to insight.
What are Notebooks in Amazon SageMaker Unified Studio?
Notebooks in Amazon SageMaker Unified Studio provide an interactive environment for data analysis, exploration, engineering, and machine learning workflows. It delivers five integrated capabilities:
- Polyglot programming: Write code in Python and SQL interchangeably within the same notebook environment
- Unified data access: Connect instantly to data stored in Amazon S3, AWS Glue Data Catalog, Apache Iceberg tables, and third-party sources like Snowflake and BigQuery
- Native visualization: Create charts directly from Python and SQL results for immersive data analytics
- AI-powered development: Generate code through natural language prompts using SageMaker Data Agent, with an intelligent chat interface for data analytics, data science, and ML tasks
- Flexible compute: Scale from basic instances to GPU-powered environments as your needs grow
Architecture
This section covers the architecture of Notebooks, which delivers enterprise-scale analytics with browser-based simplicity through a cloud-native architecture that integrates multiple compute engines, diverse data sources, and AI-powered assistance.
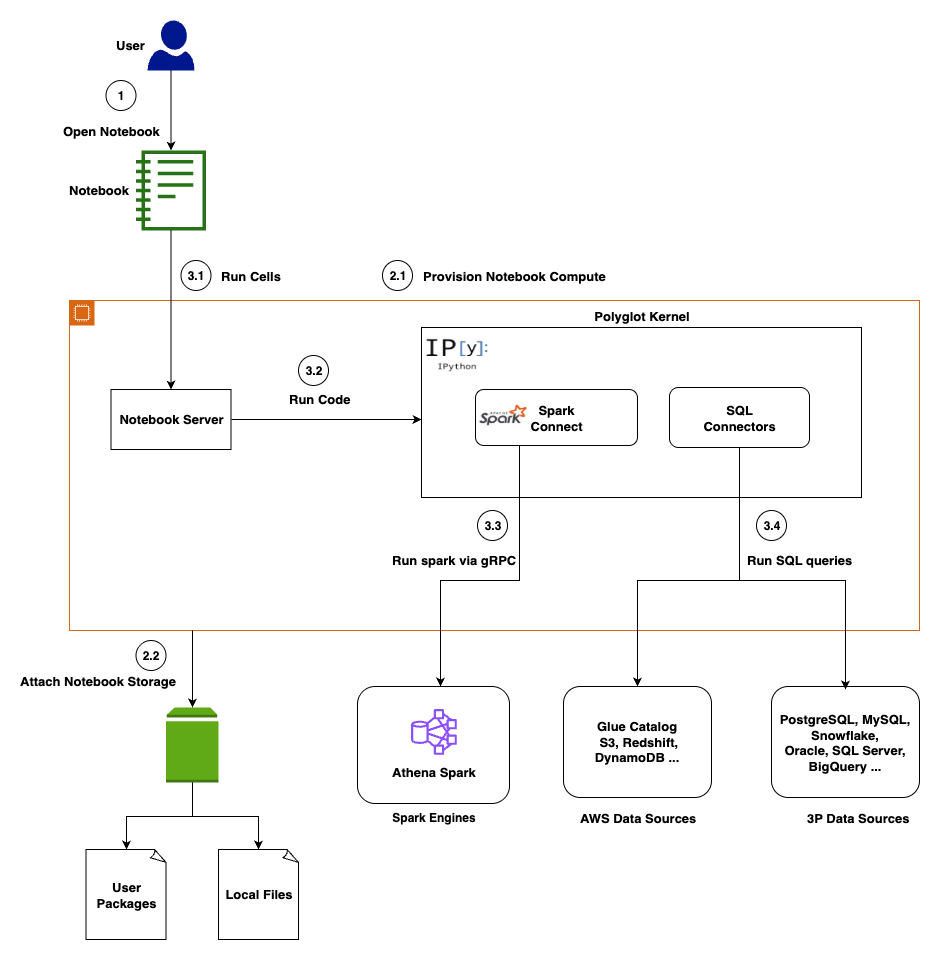
Presentation layer
You access the notebook interface through Amazon SageMaker Unified Studio, interacting with a familiar interface featuring code cells for execution, markdown cells for documentation, and visualization cells for charts and tables.
Compute layer
A dedicated notebook server manages your kernel lifecycle and session state. Key components include a Language Server for code completion, a Python 3.11 runtime with pre-loaded data science libraries, and a Polyglot Kernel that handles your Python, PySpark, and SQL execution within the same notebook. Persistent Amazon Elastic Block Store (Amazon EBS) storage backs each notebook you create.
Execution layer
Notebooks support multiple execution engines, automatically routing your code to the optimal processing engine. In-memory execution handles your smaller datasets and rapid prototyping. Apache Spark via Amazon Athena provides distributed processing for your large-scale analytics via Spark Connect. Native connectivity to Amazon Athena (Trino), Amazon Redshift, Snowflake, and BigQuery processes your SQL queries.
Data Integration
You get unified access to 12+ data sources including AWS-native (Amazon S3, AWS Glue, Amazon Athena, Amazon Redshift) and third-party (Snowflake, BigQuery, PostgreSQL, MySQL) data sources. For the latest supported data sources, see Connect to data sources .
AI layer
The SageMaker Data Agent operates in two modes to assist you: an Agent Panel for multi-step analytical workflows and Inline Assistance for focused, cell-level code generation. For a detailed overview, see Accelerate context-aware data analysis and ML workflows with Amazon SageMaker Data Agent .
Security is embedded throughout the architecture to protect your work. Data access respects your AWS Identity and Access Management (AWS IAM) permissions. The notebook and the agent can only access data sources you’re authorized to use. Communication between components uses encrypted channels, and your notebook storage is encrypted at rest. The AI agent includes built-in guardrails to help prevent destructive operations and logs interactions for your compliance and auditing purposes.
Prerequisites
Before you begin, you need:
- An AWS account with appropriate permissions to create Amazon SageMaker Unified Studio resources. See Set up IAM-based domains for complete permission requirements.
- Basic familiarity with Python programming and SQL queries
- Understanding of data analysis concepts and ML workflows
- Access to the sample housing dataset (provided in the walkthrough)
Getting started with Notebooks
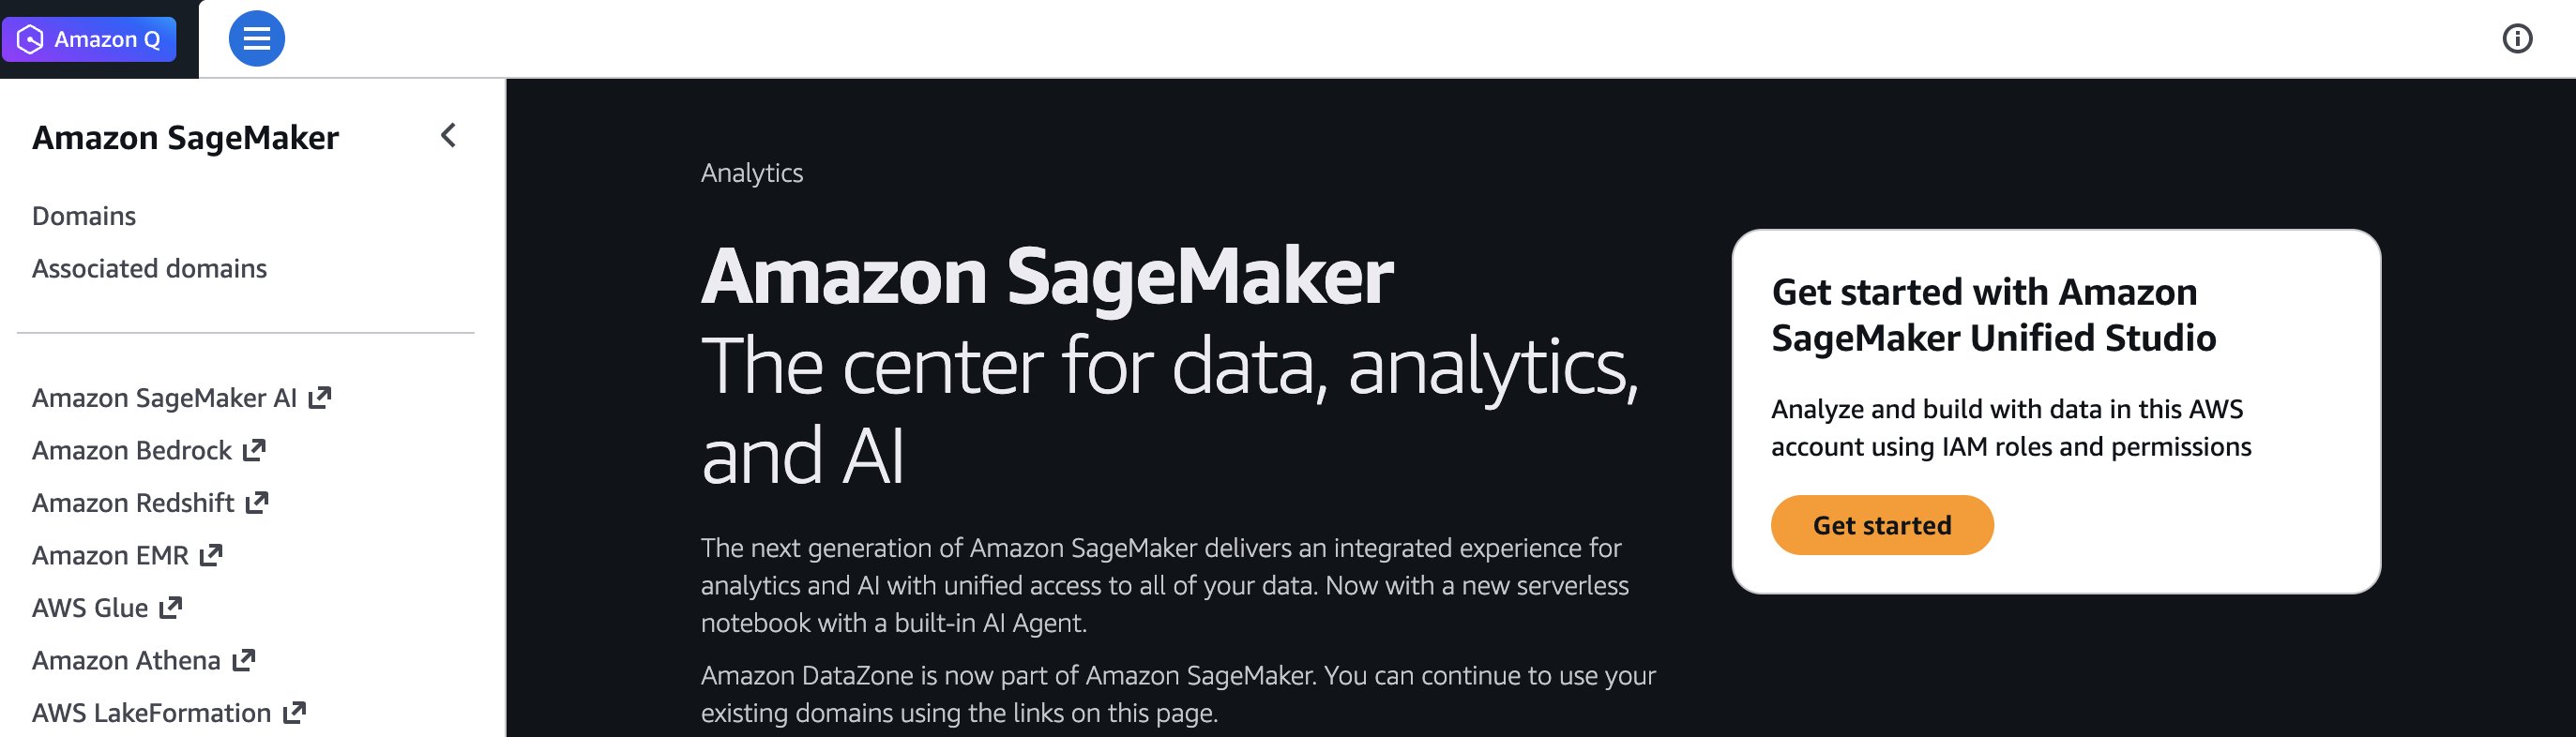
To get started, open the Amazon SageMaker console and choose Get started.
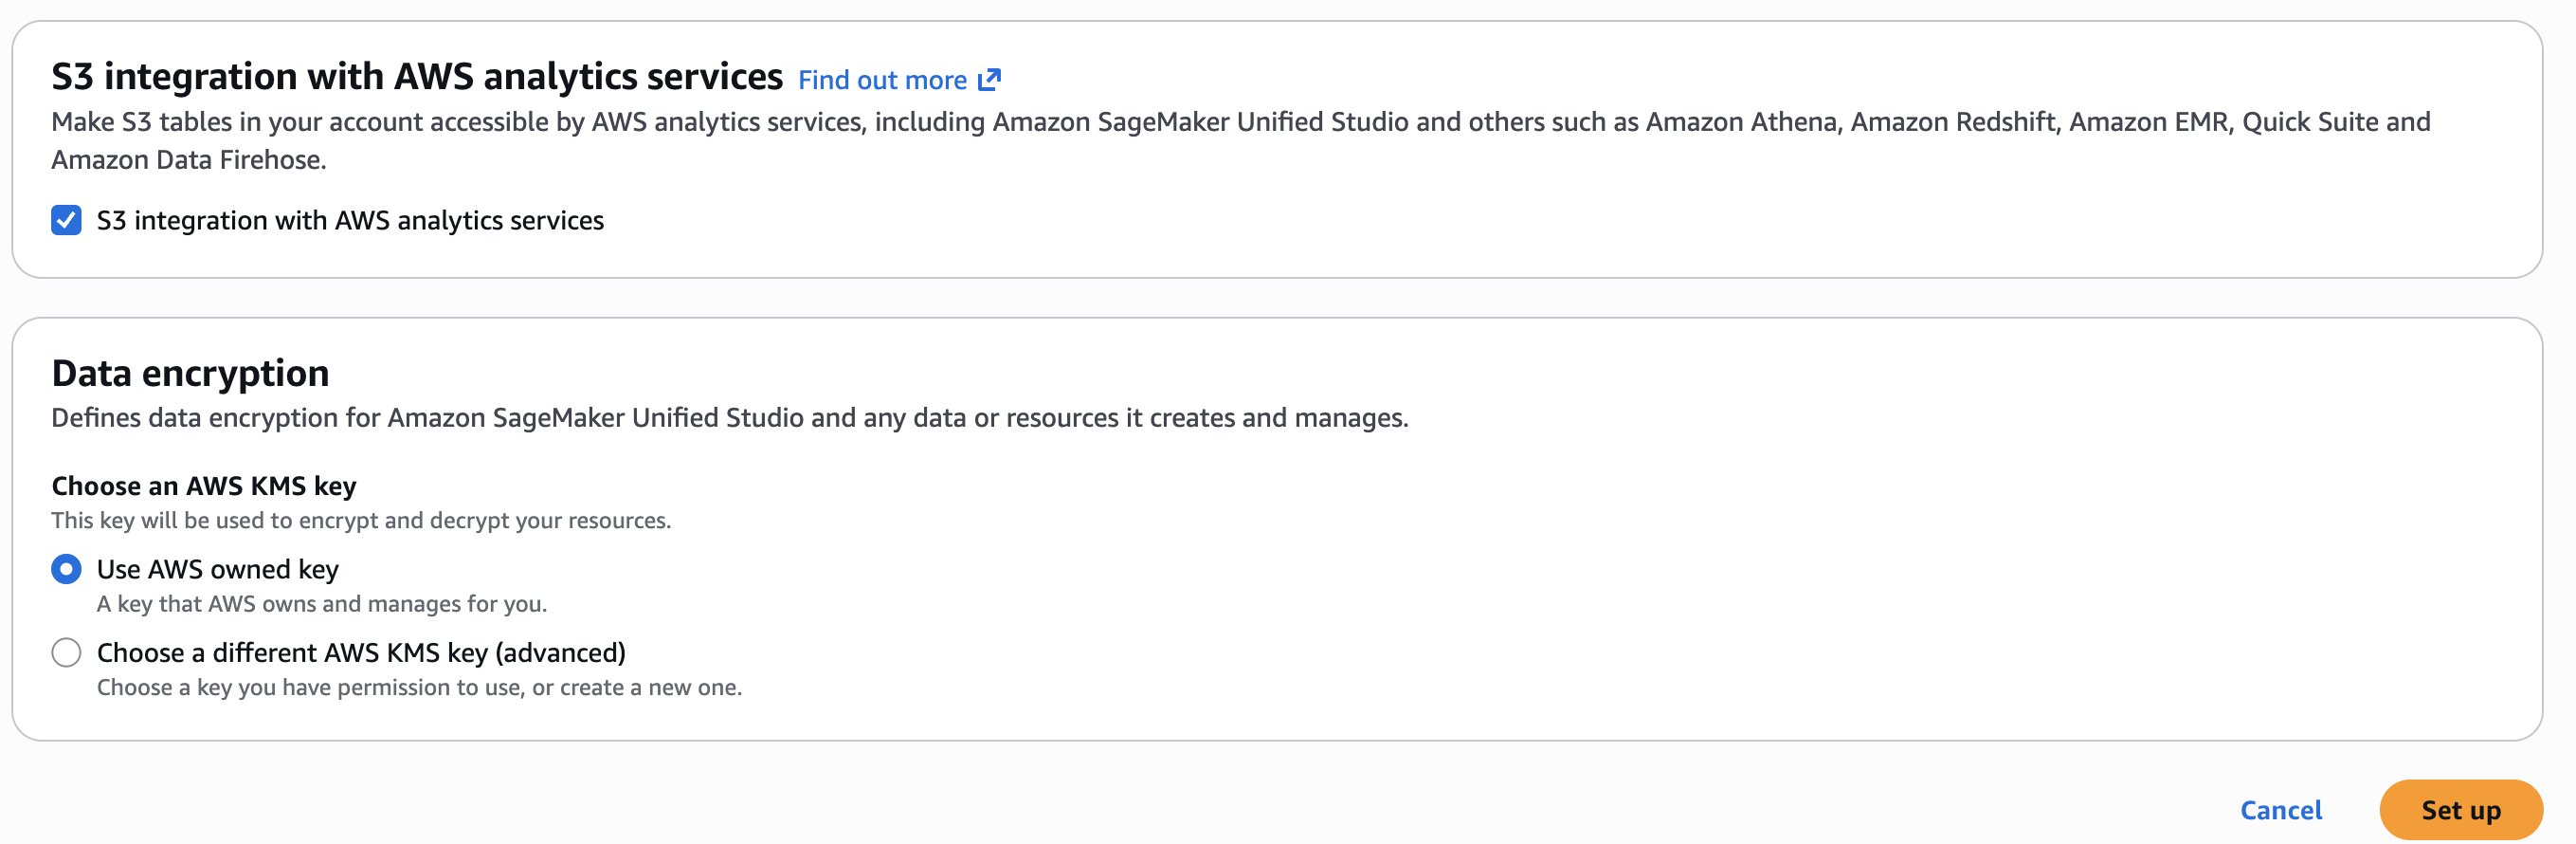
You will be prompted either to select an existing AWS Identity and Access Management (AWS IAM) role that has access to your data and compute, or to create a new role. For this walkthrough, choose Create a new role and leave the other options at their defaults.
Choose Set up. It takes a few minutes to complete your environment.
Use case
In this post, you’ll use a Notebook and the SageMaker Data Agent to perform the following:
- Working with dataset: Upload sample dataset housing.csv and explore with data explorer
- Polyglot programming: Query dataframes with SQL via DuckDB
- Multi-engine access via AWS Glue: Create an AWS Glue table to unlock Athena SQL/Spark engines for distributed processing
- Advanced analytics: Use Athena Spark for data profiling
- AI-assisted development: Generate profiling and ML code with Data Agent
- ML workflow: Train Random Forest model and evaluate results
First, let’s walk through the interface and explore its core capabilities.
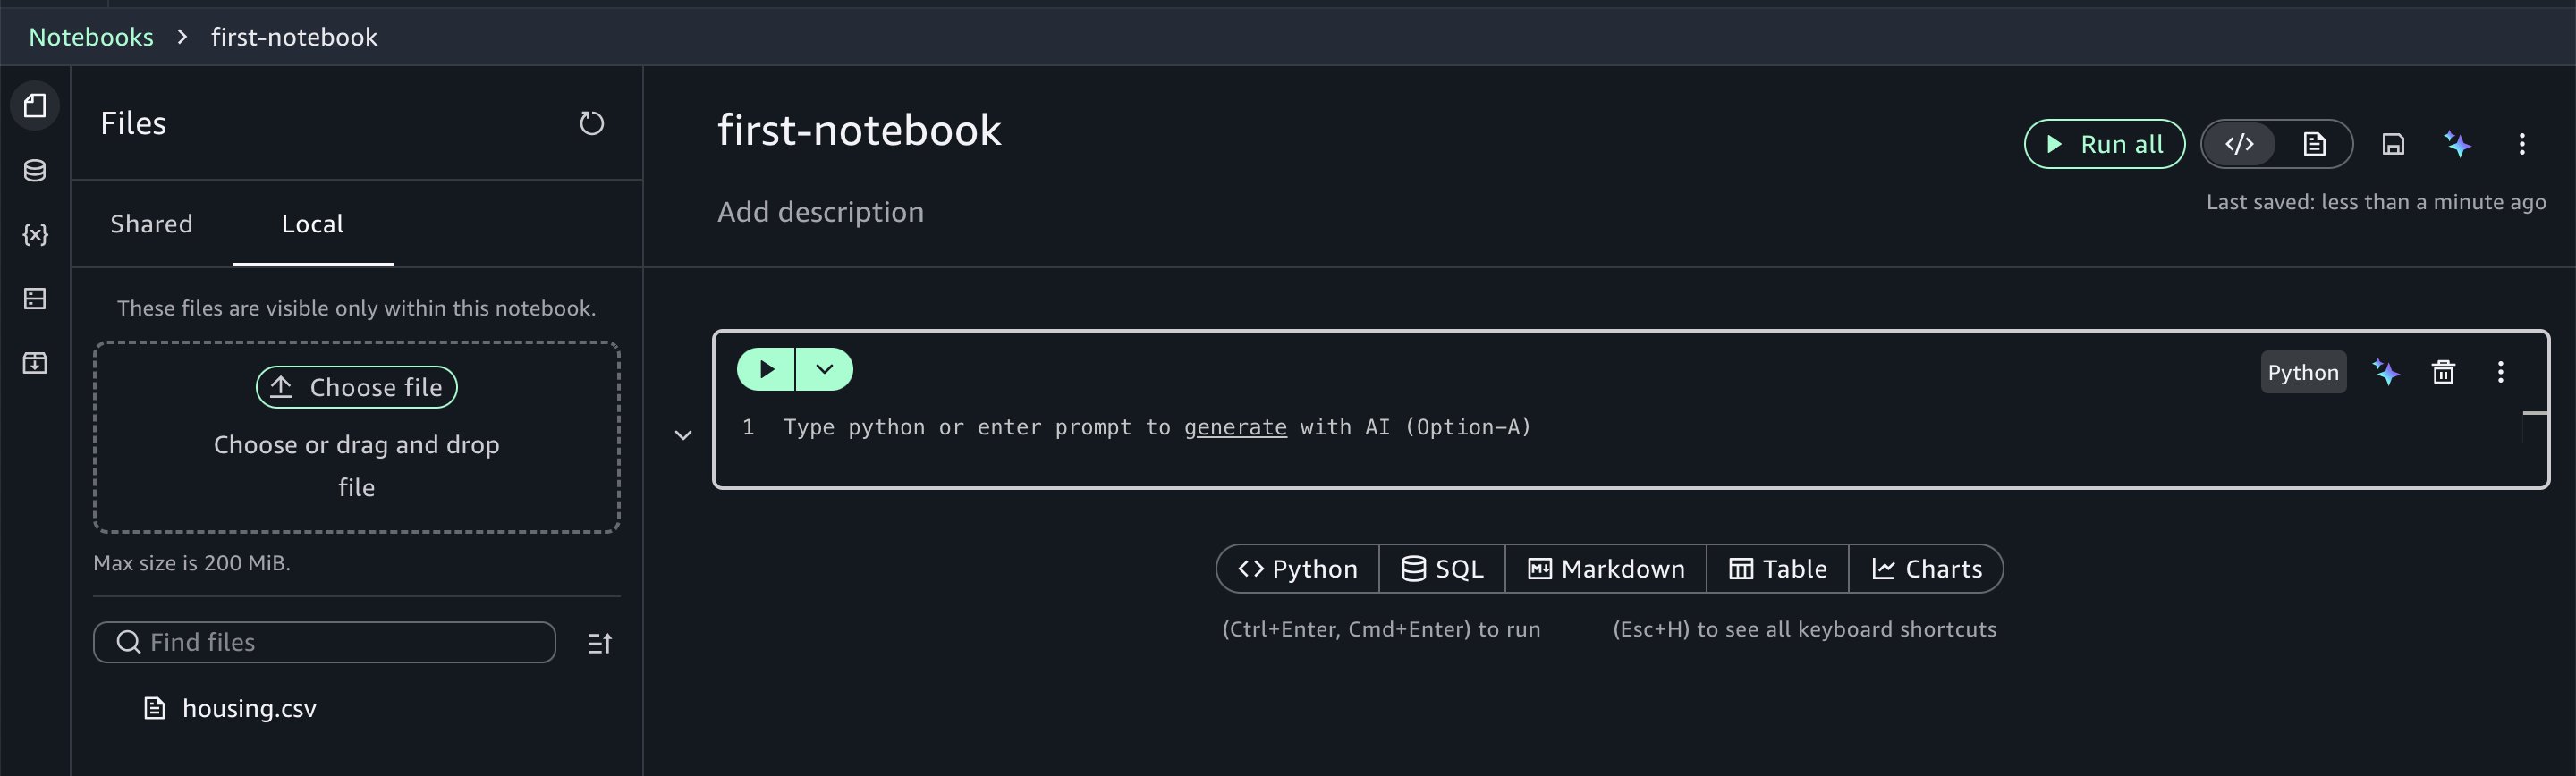
Understanding the interface
The Notebooks interface follows familiar notebook conventions with cells for code execution and markdown for documentation. Within the notebook, you’ll see your current programming environment (such as Python 3.11) and compute profile specifications. The interface allows you to:
- Access your data by browsing files, exploring data catalogs, and managing third-party connections
- Monitor variables created within your notebook context
- Scale compute resources on demand by adjusting virtual CPUs and RAM based on your workload requirements, even scaling up to GPU instances
- Manage packages by installing and configuring Python packages as needed
Working with the dataset
For this walkthrough, you’ll use the housing.csv sample dataset which you can download from this page. (the file is named canvas-sample-housing.csv on the linked page). Choose the Files icon in the left panel and choose the Local tab. Upload the CSV file to the notebook on the Local tab.
Notebooks provide you with instant access to your data assets. Using the data explorer, you can browse your AWS Glue Data Catalog, Amazon S3 table catalogs, Amazon S3 buckets, and configured third-party connections.
Choose the three-dot options menu.
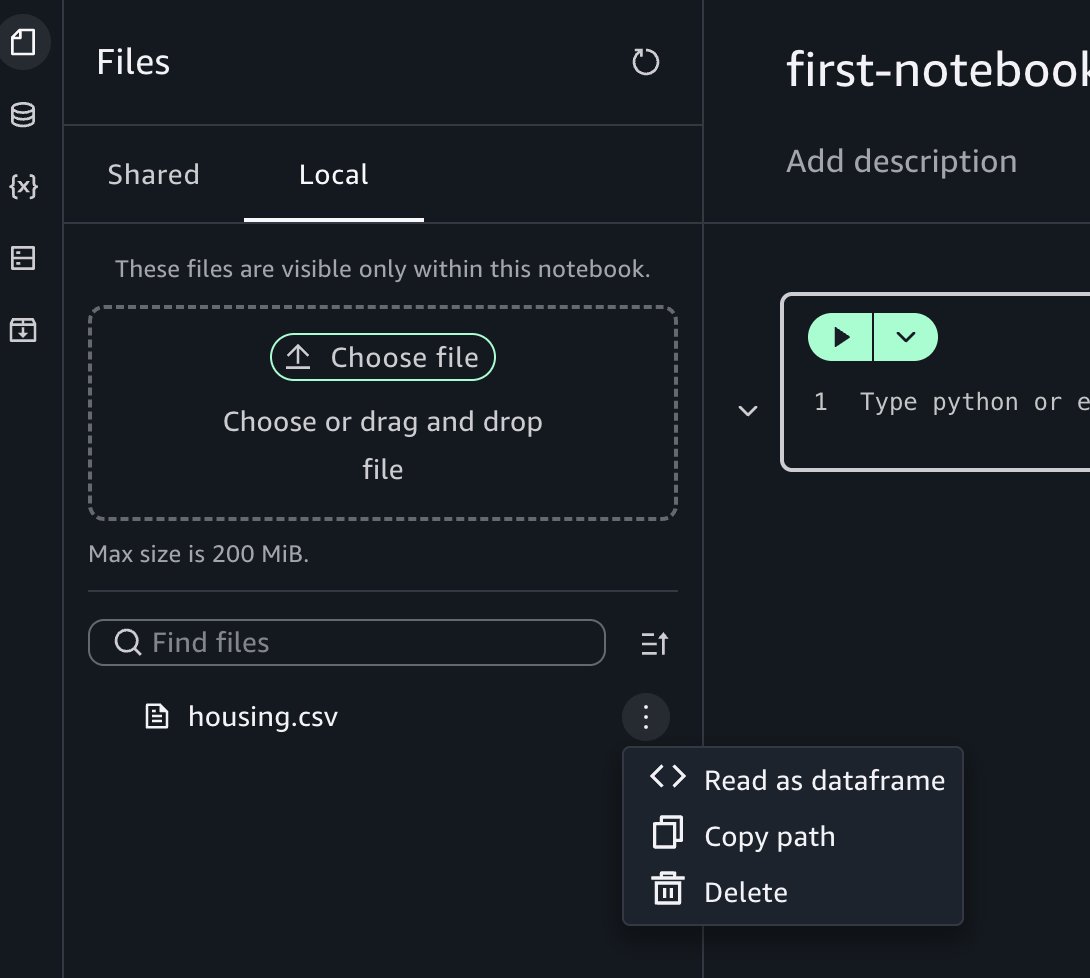
Choose Read as dataframe, then run the inserted cell in the notebook to view the results.
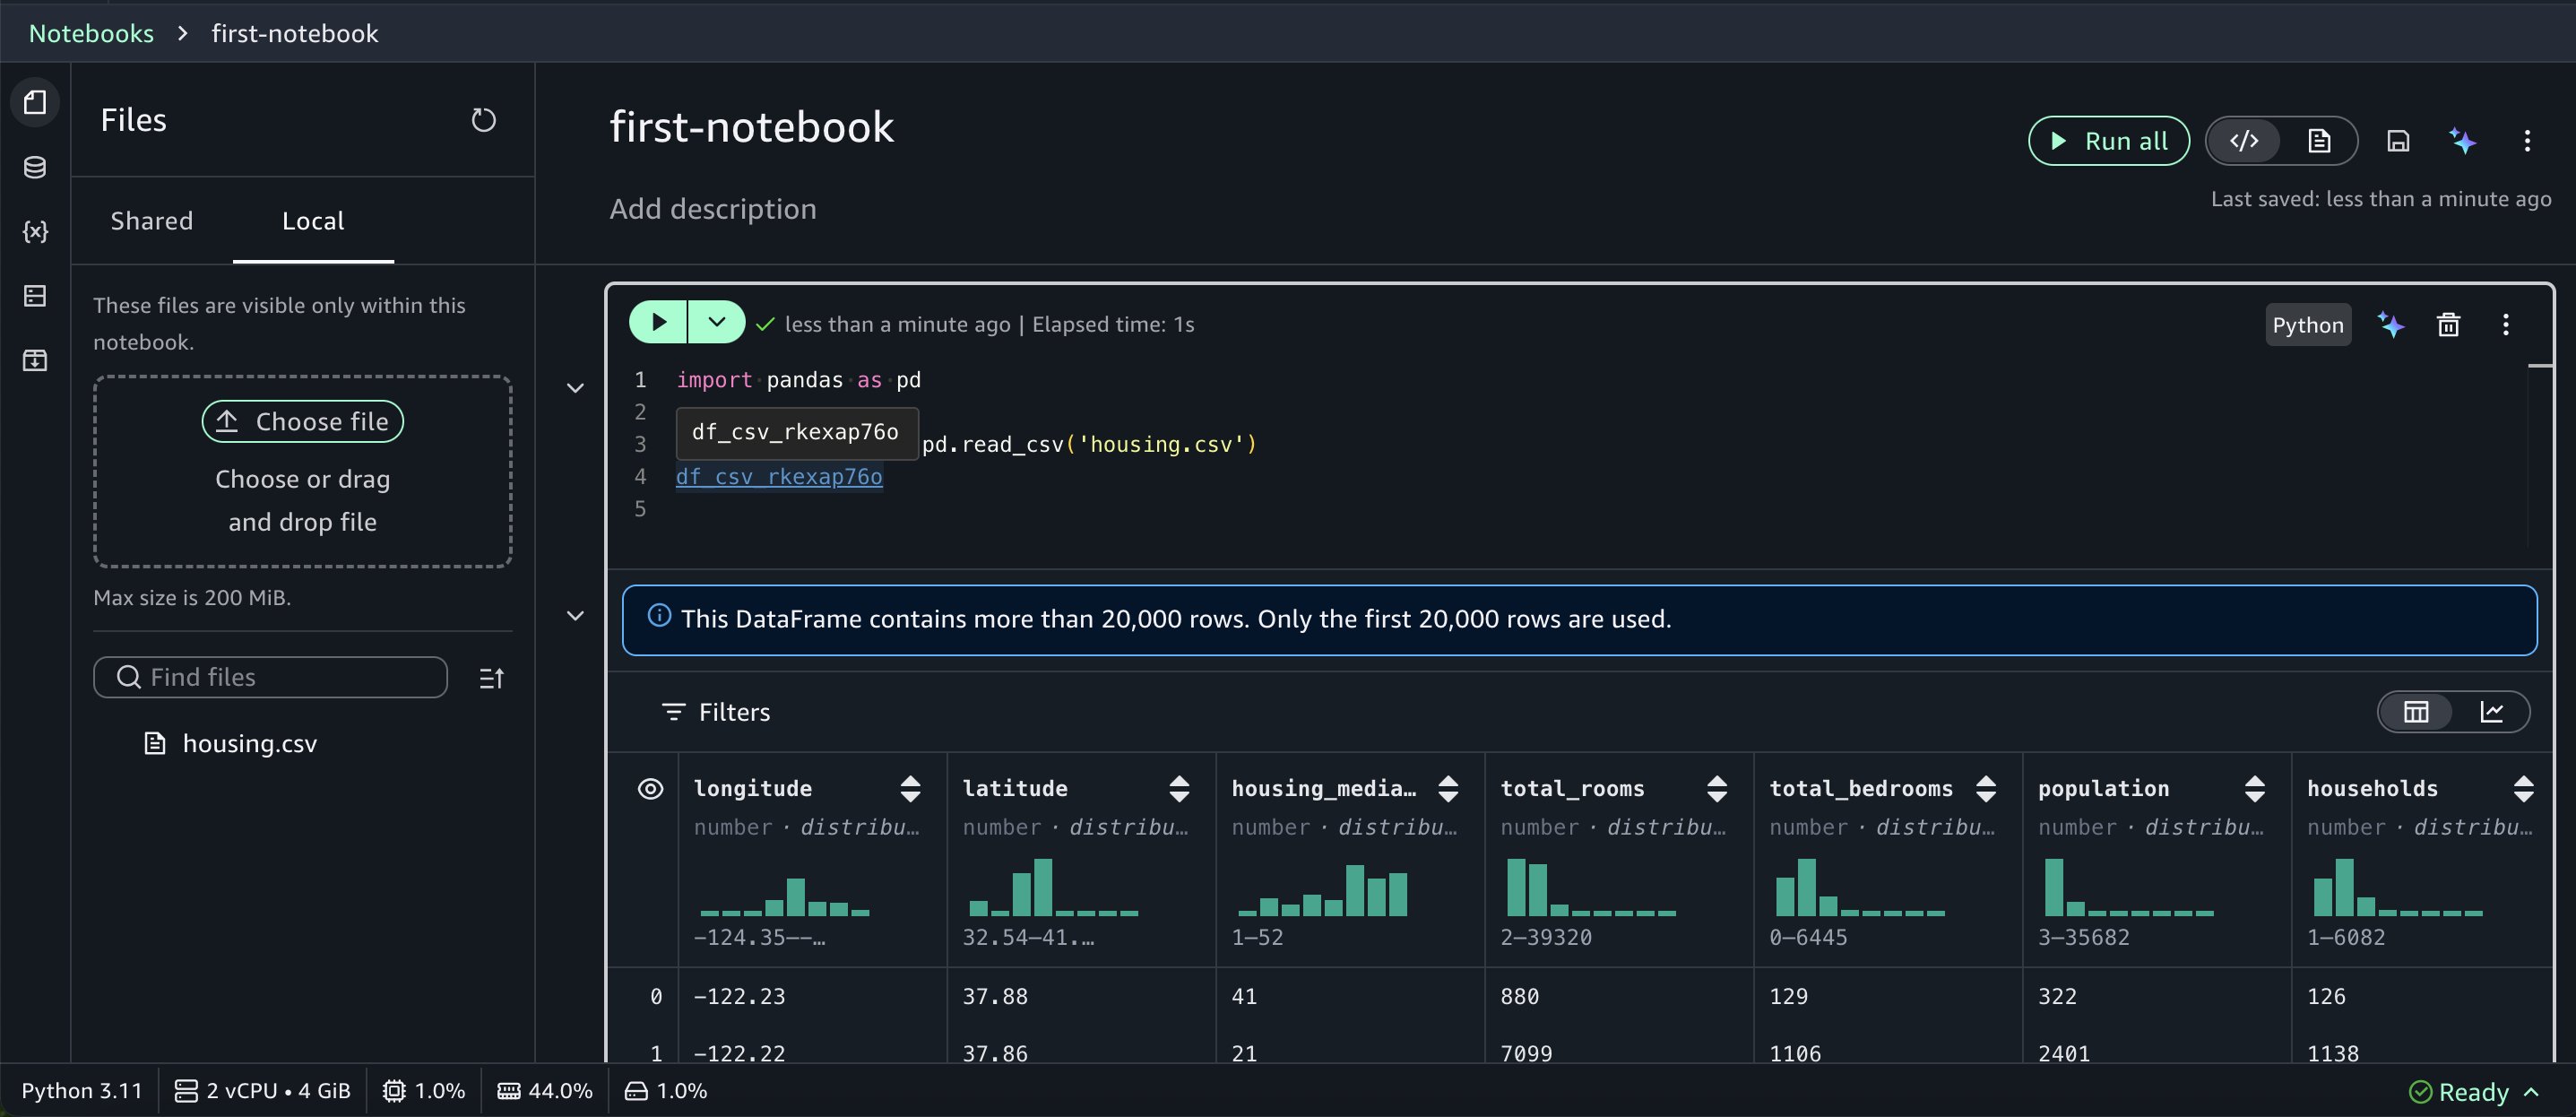
When you return a dataframe, Notebooks render it in a rich table format with automatic data profiling.
Polyglot programming: Python and SQL together
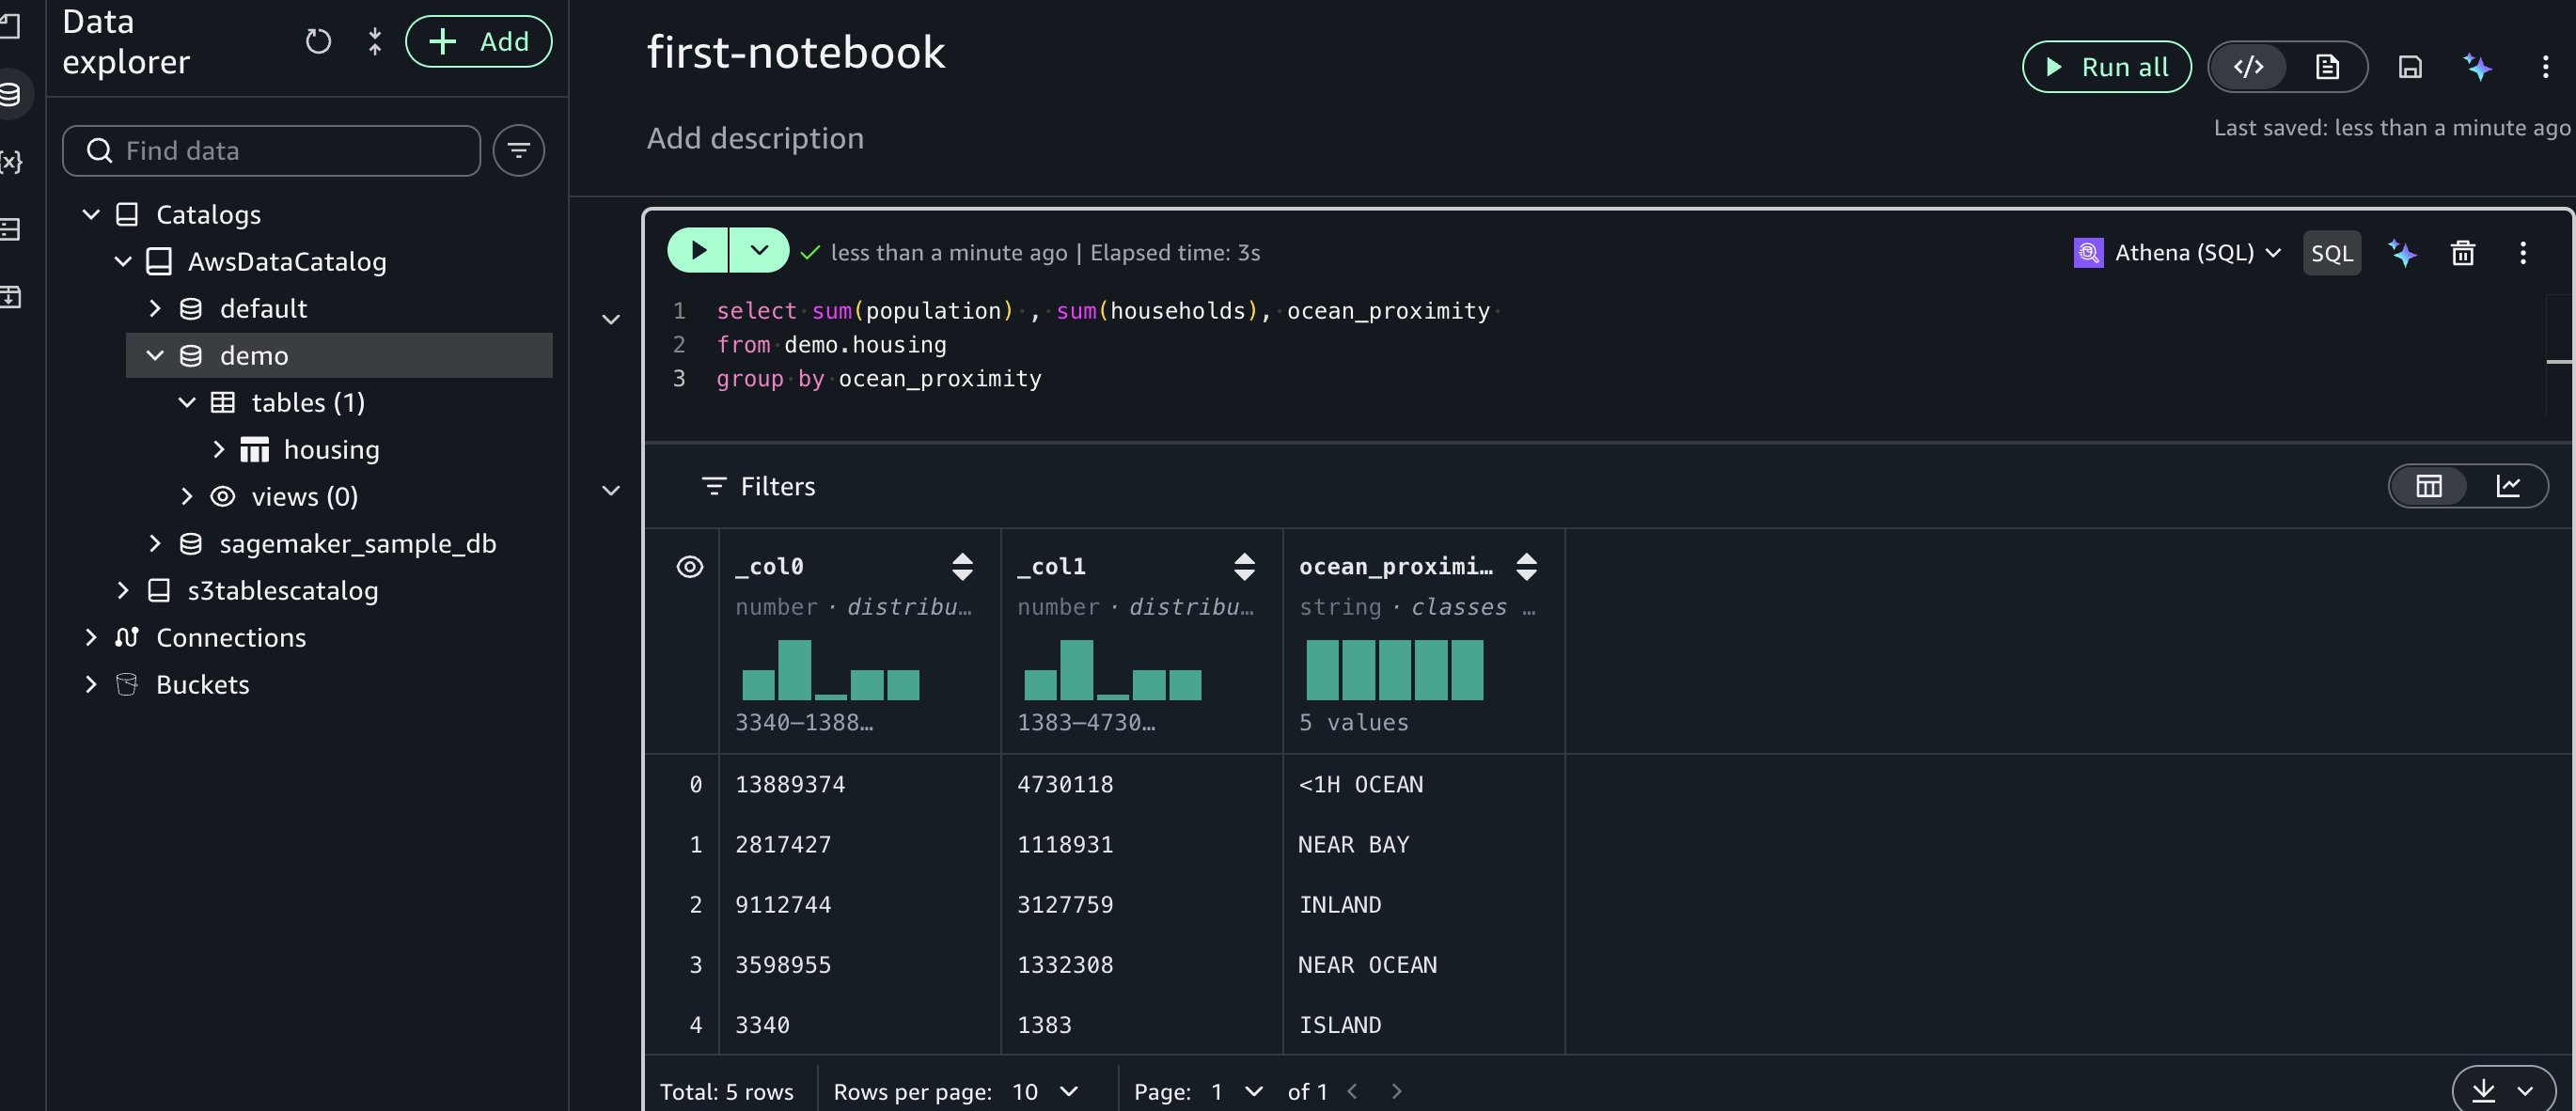
One of the most powerful features in Notebooks is the interoperability between Python and SQL. After you load data into a Python dataframe, you can immediately query it using SQL. For example, to calculate total population and household by ocean proximity, you can run:
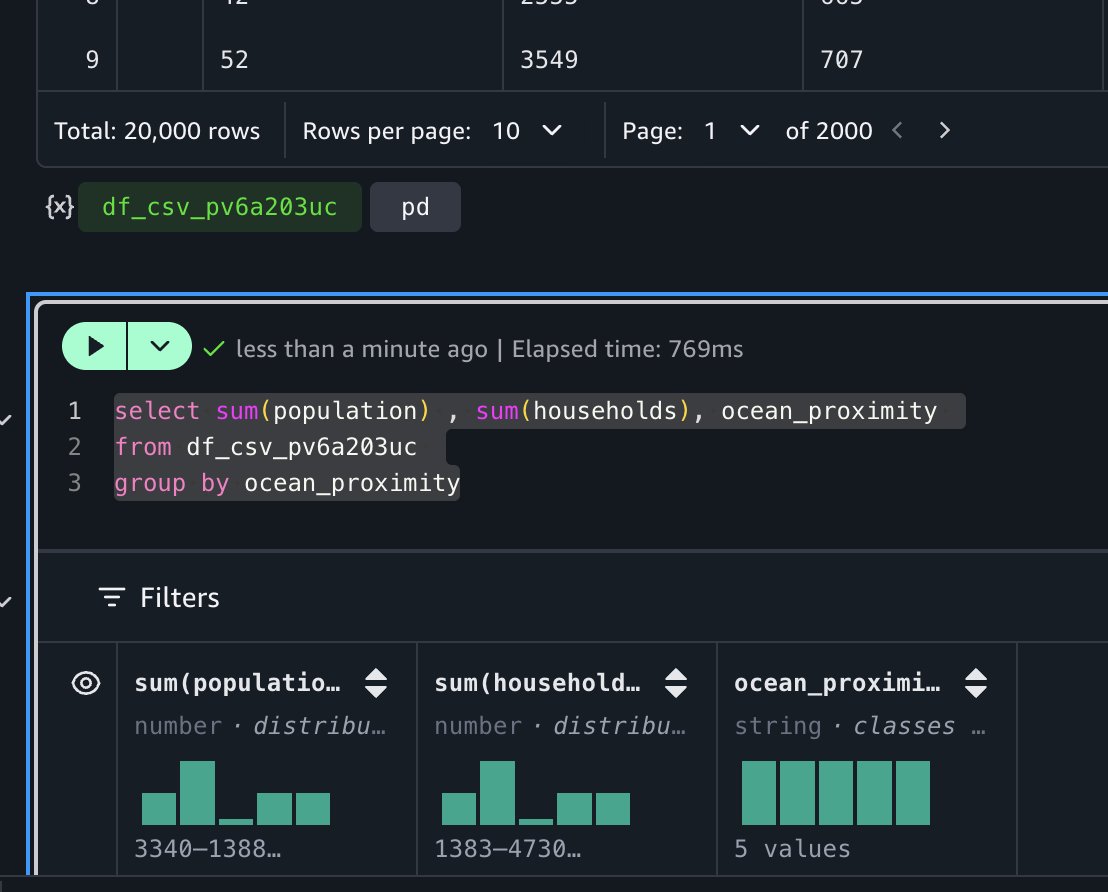
The notebook’s autocomplete functionality recognizes dataframes in your context, making SQL queries intuitive.
This SQL query runs on DuckDB (an in-memory SQL database engine), which requires no separate installation or server maintenance on your part. DuckDB’s lightweight design integrates into Python, Java, and other environments, making it ideal for your rapid interactive data analysis. For distributed processing needs, you can use engines such as Apache Spark or Trino after creating an AWS Glue table for this dataset.
Create an AWS Glue table for the dataset
After you create an AWS Glue table, you can query the dataset using various AWS Glue catalog-compatible engines, including Amazon Athena SQL (Trino) and Amazon Athena Spark. These engines deliver optimal price-performance for your specific workload requirements.
Start by creating an AWS Glue database. To do that, create a new cell in the notebook by choosing SQL and selecting Amazon Athena (SQL).
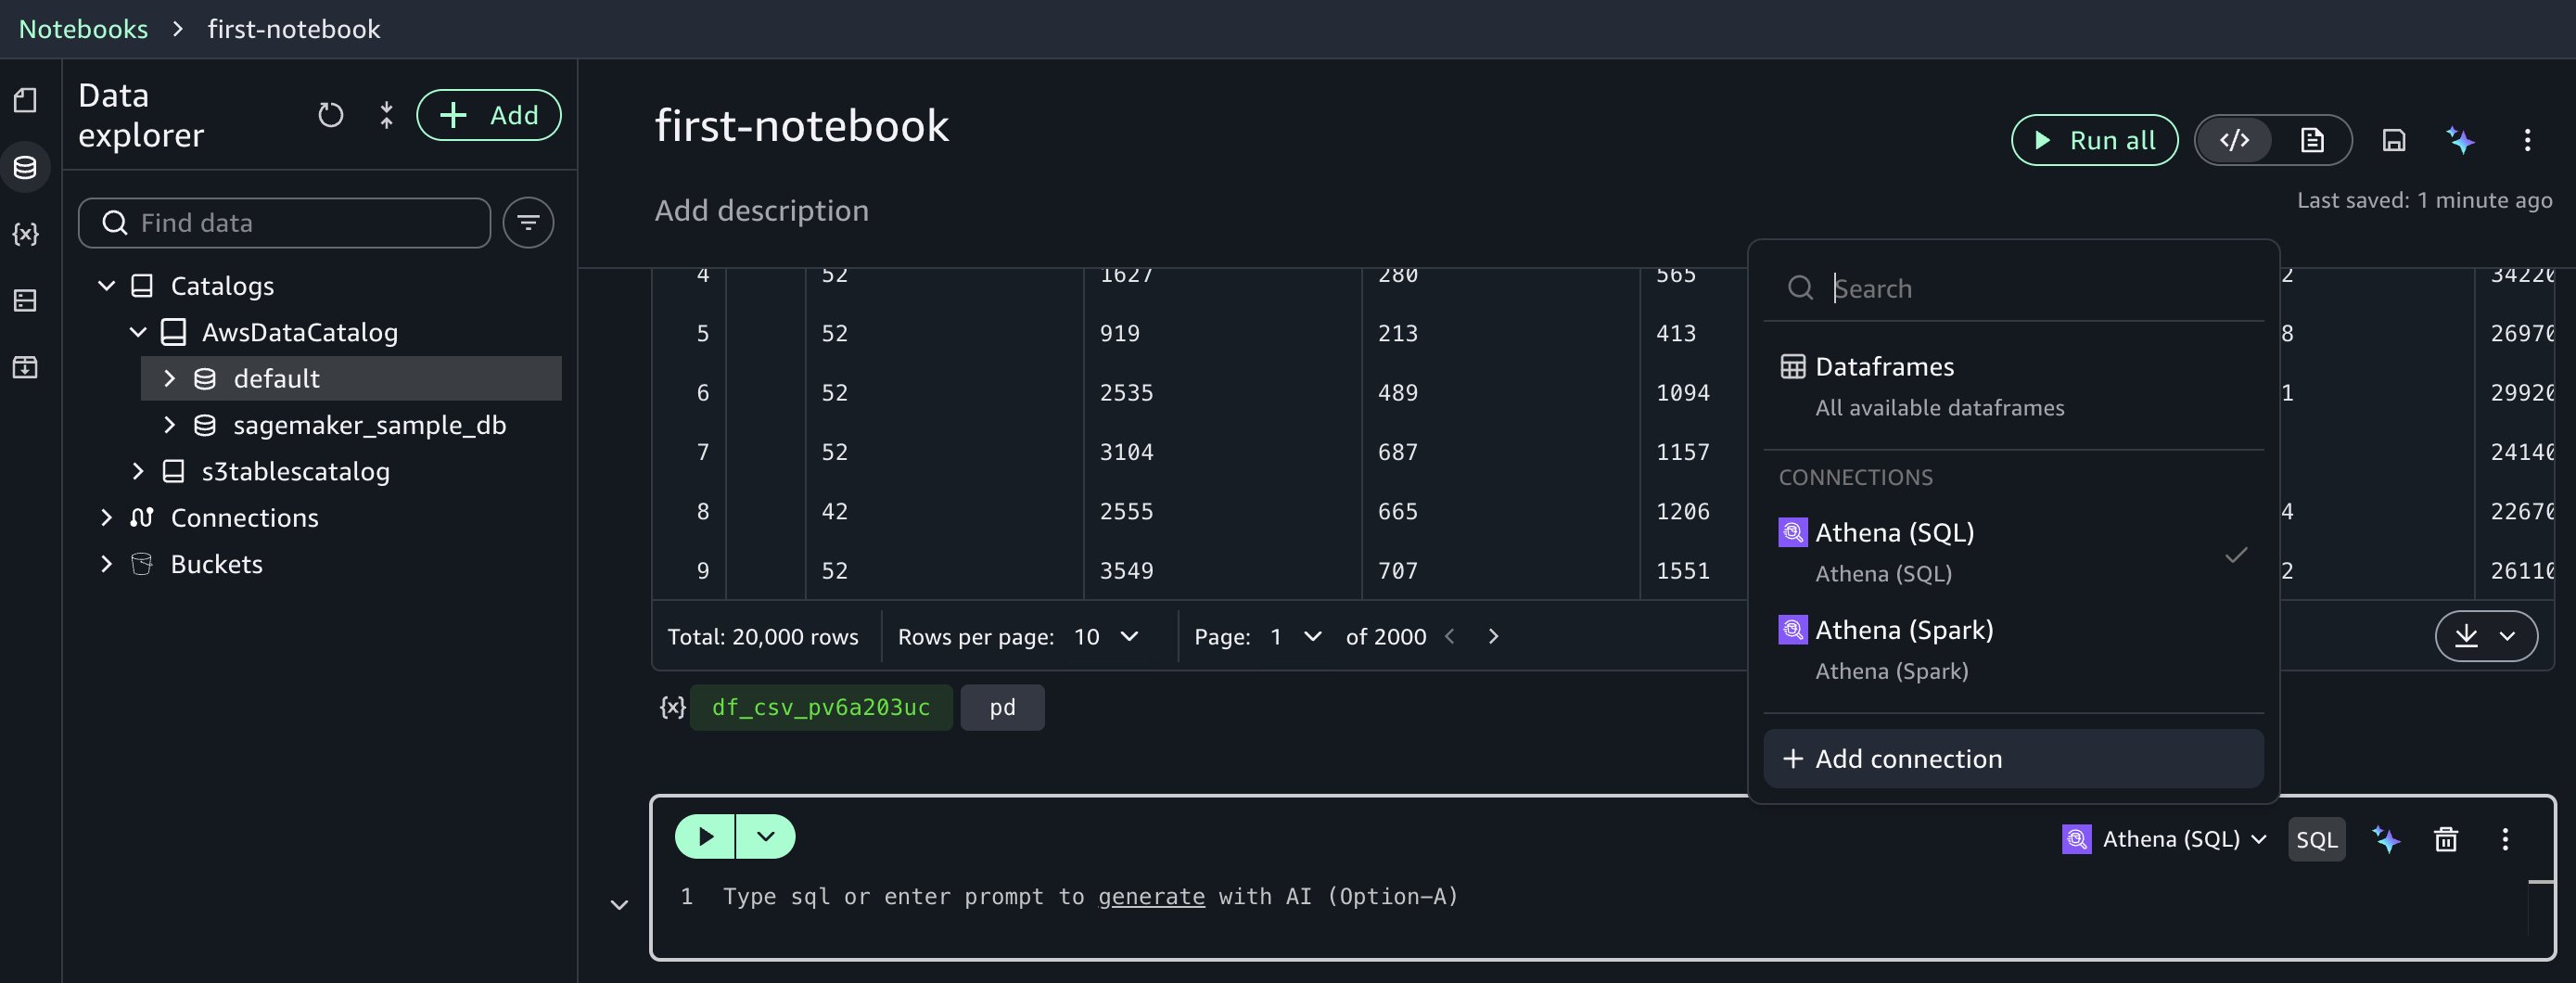
Run this SQL to create a database: create database demo;
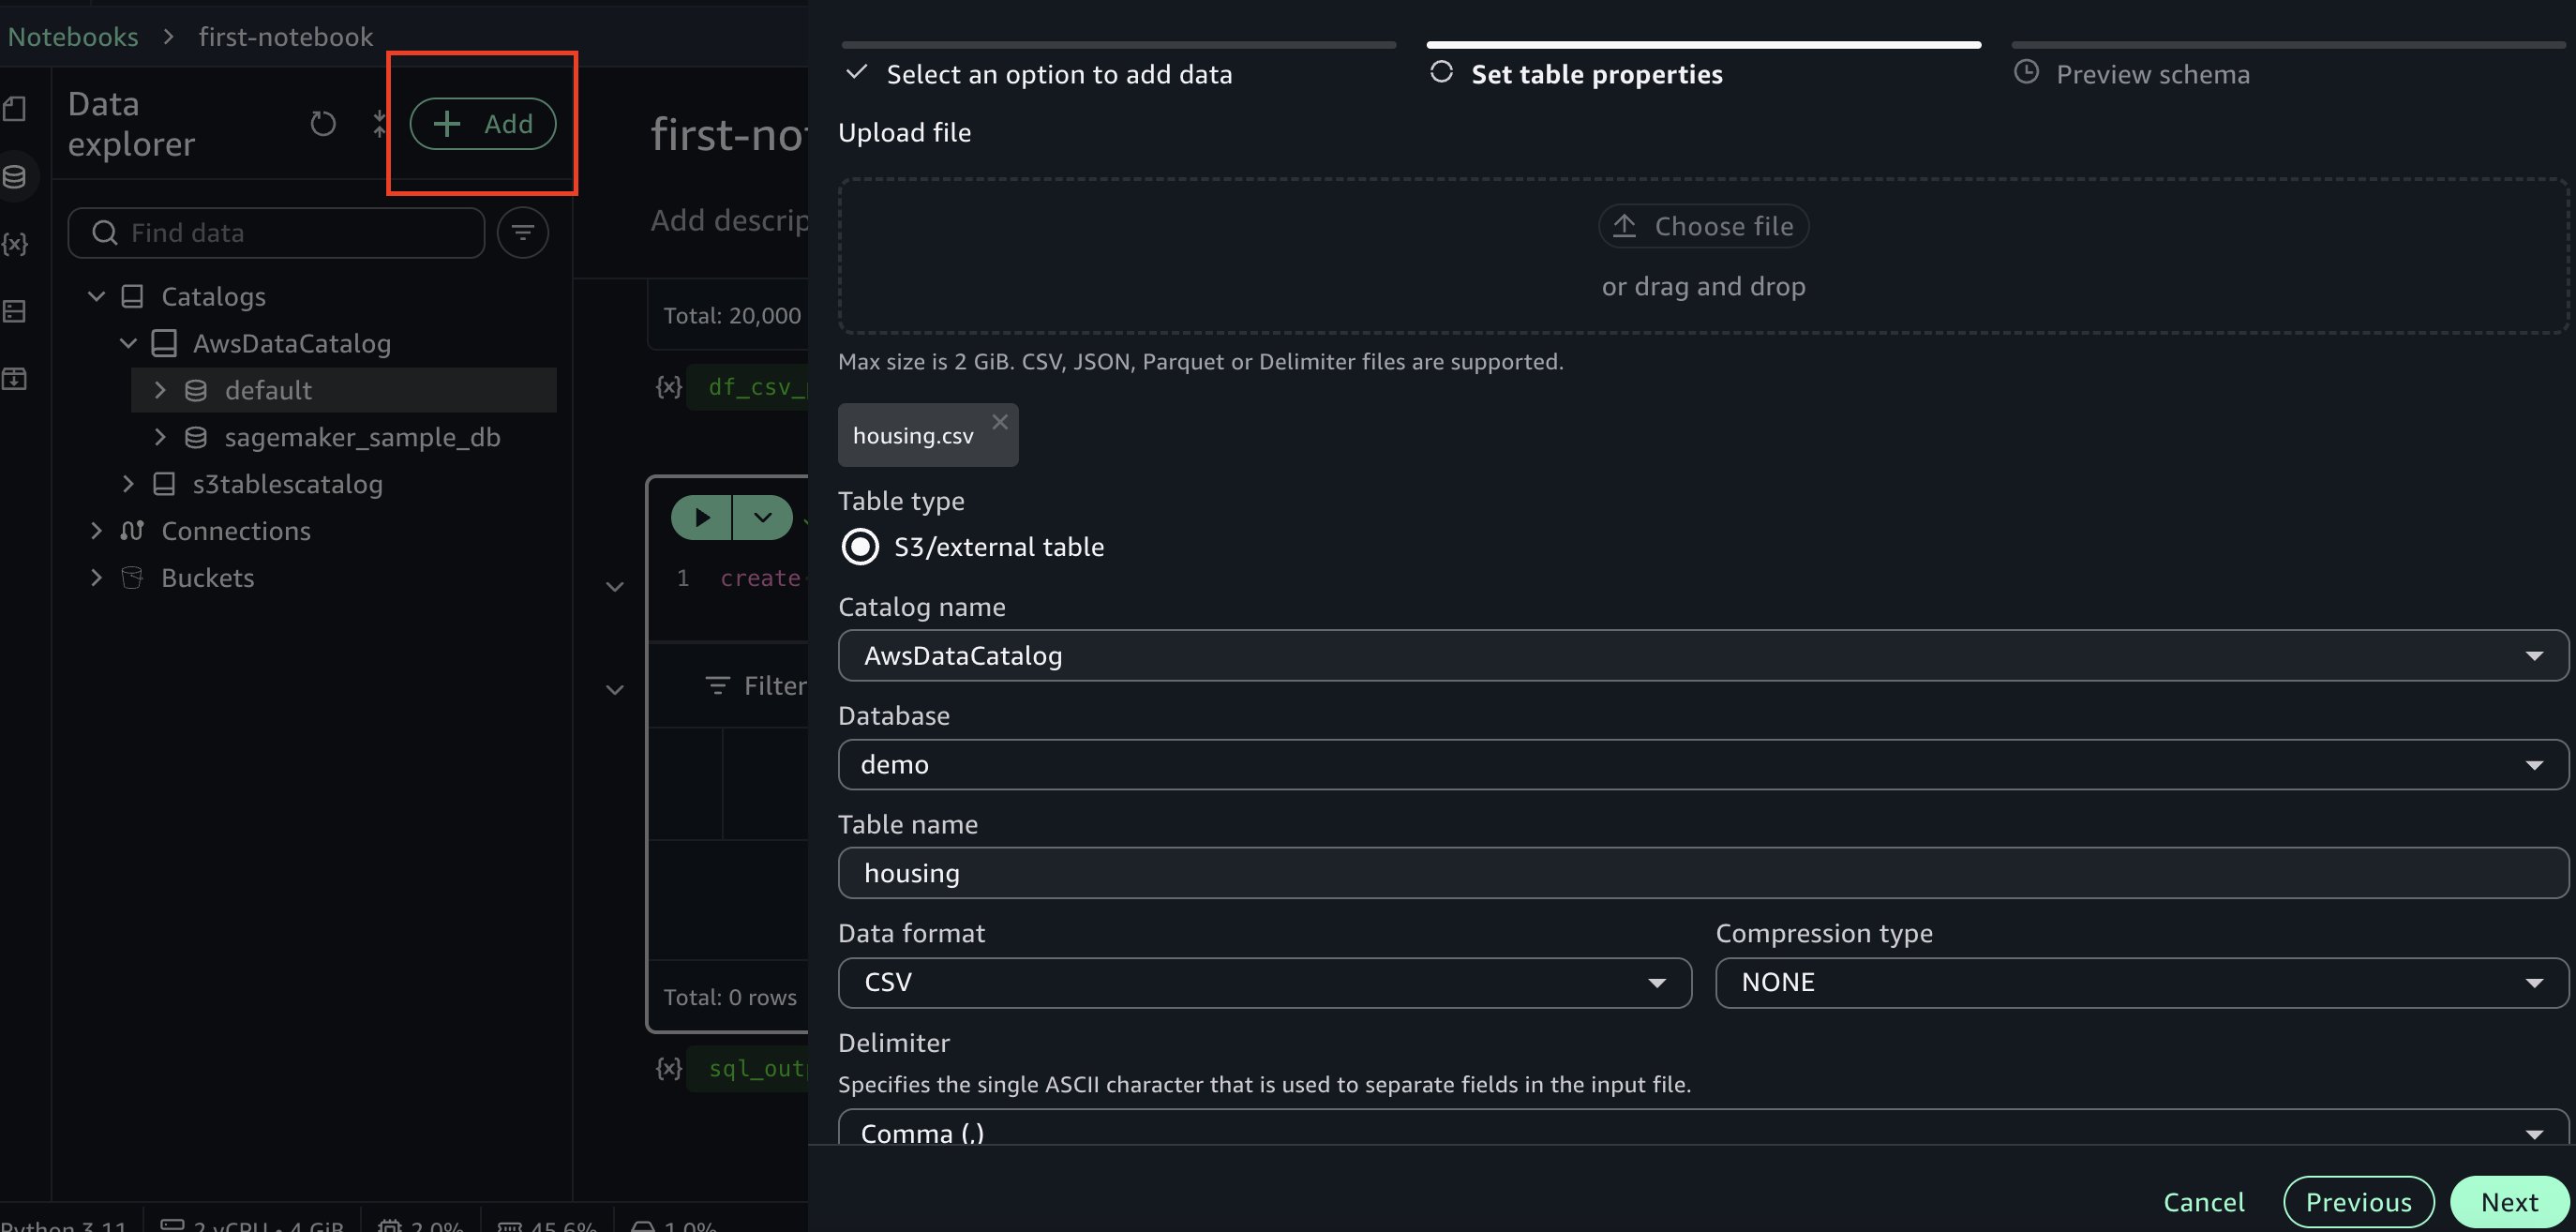
Next, go to data explorer and choose +Add on the top left, then choose Create table. Choose the database you created earlier and enter a name for the table. Upload the housing.csv dataset file used earlier. Continue by choosing Next in the side panel to create the table.
Next, let’s run a sample SQL query in a new cell using Amazon Athena SQL:
Advanced capabilities with Athena Spark
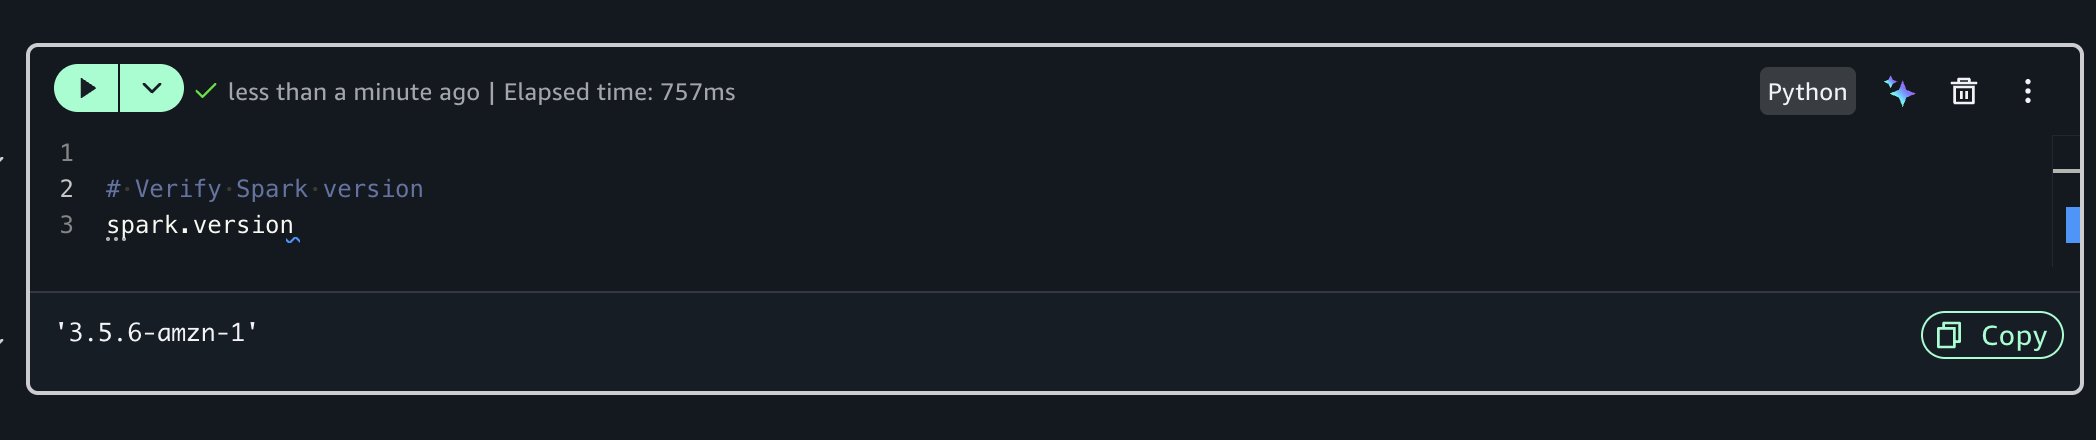
Before you can build an ML model to predict house prices, let’s analyze the dataset further and run data profiling for additional insights. For advanced exploration, you can use Amazon Athena Spark within your notebook.To do that, you’ll create a new Python cell which has a built-in Spark session. Run the following code to check the Spark version:
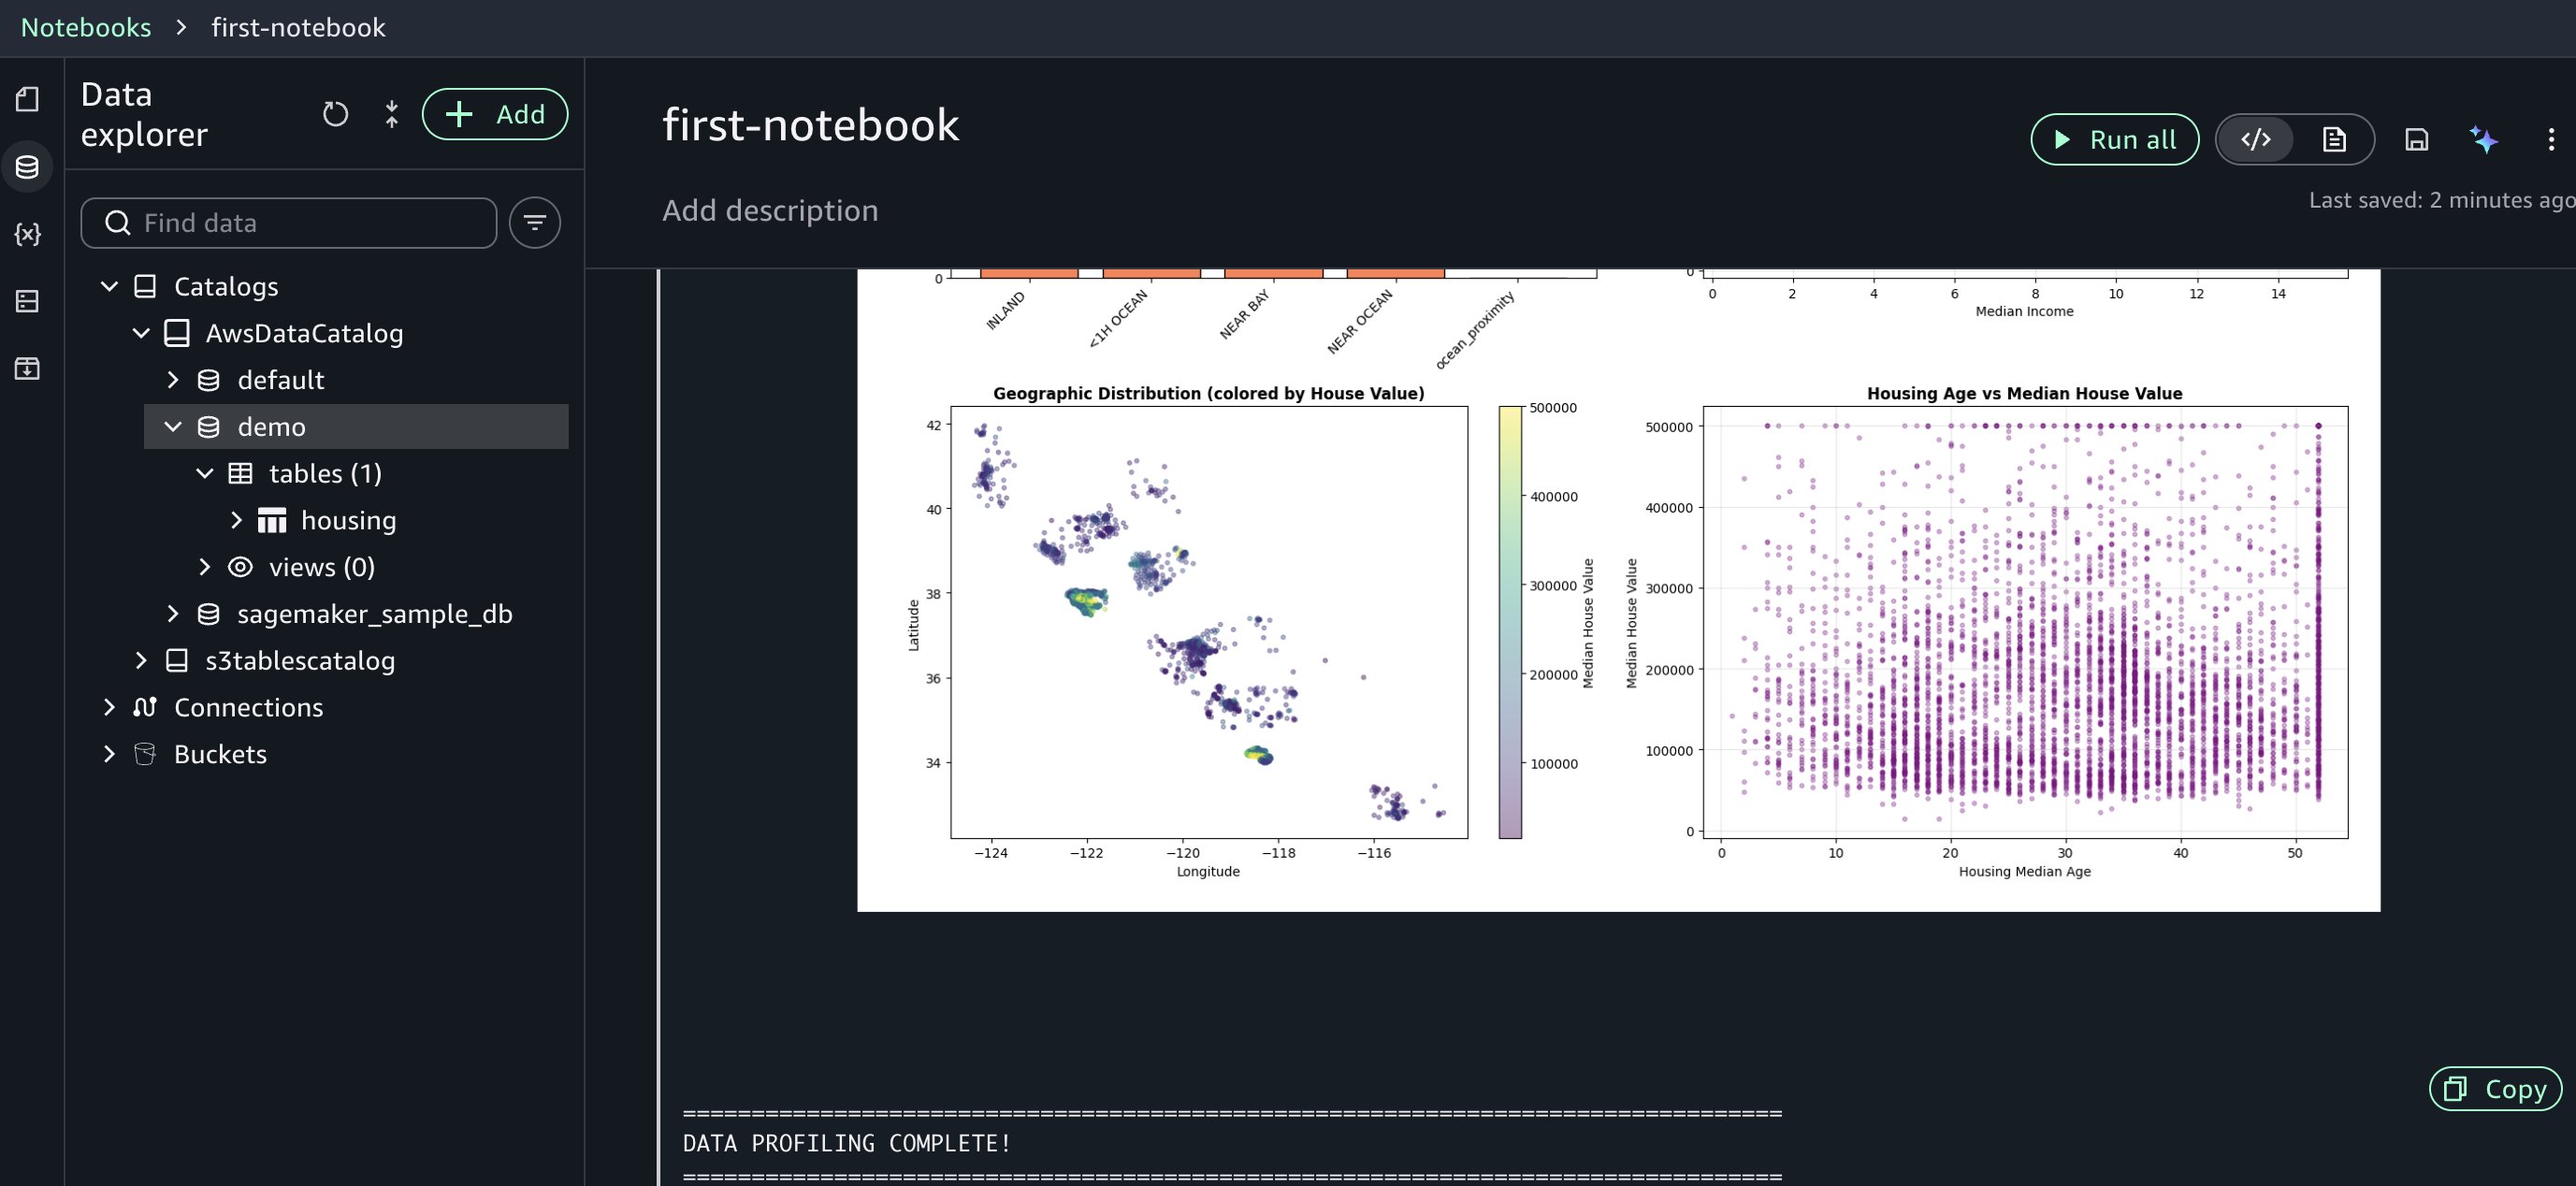
Using the SageMaker Data Agent for data profiling
Instead of writing boilerplate code manually, you can use the built-in generative AI capability.
Prompt: “Perform data profiling and create visualization for housing table”
The AI assistant generates comprehensive profiling code for you, including basic statistics calculation, column-level profiling, data type analysis, and missing value detection.
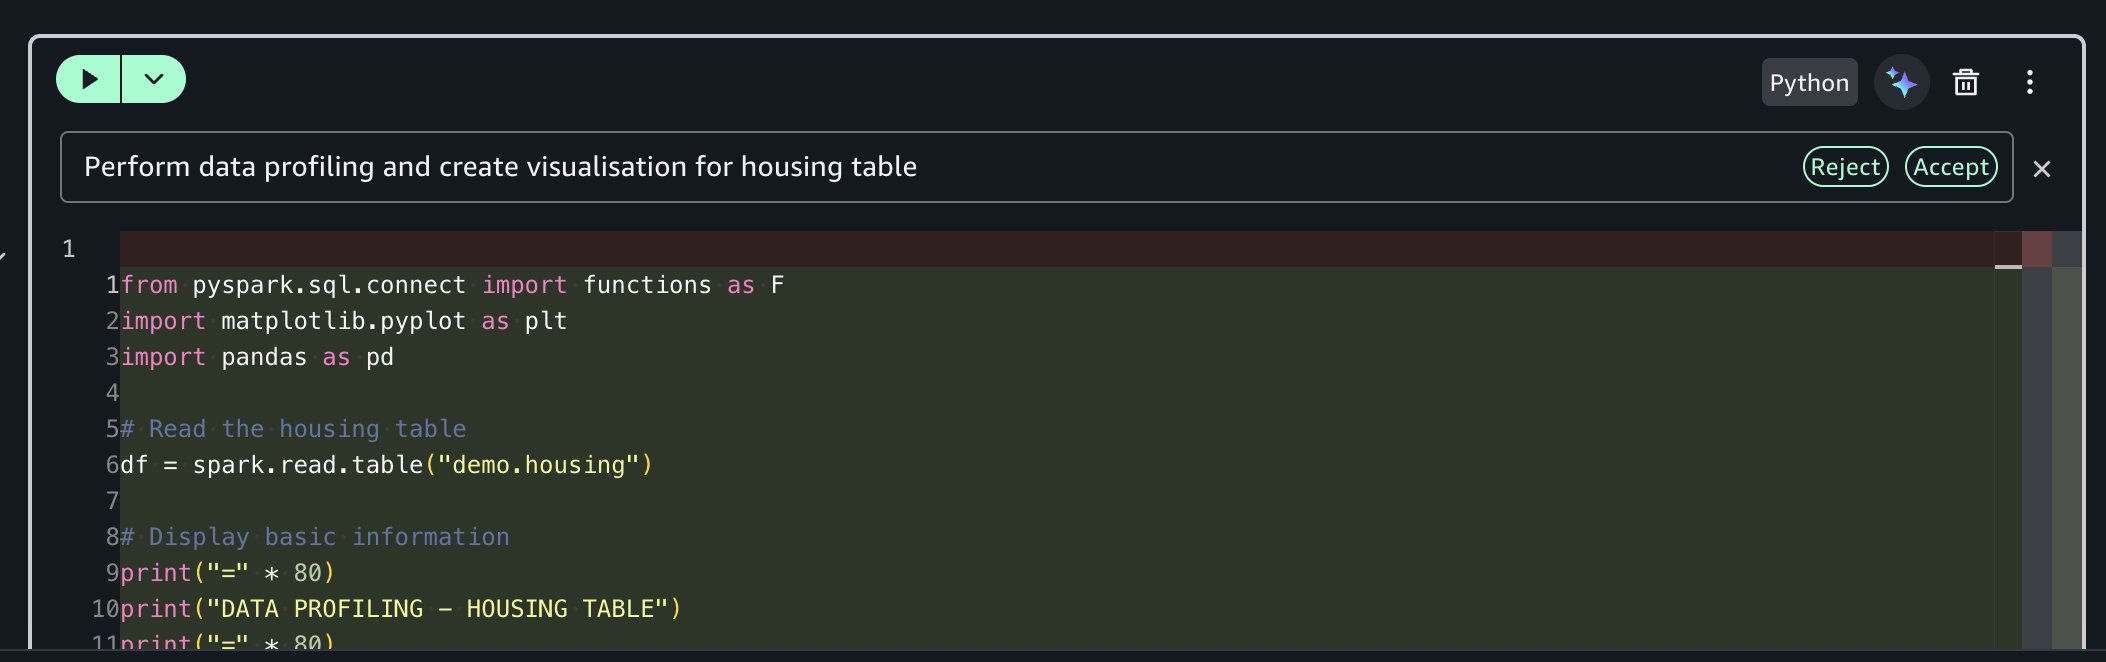
The agent accessed your AWS Glue Data Catalog, understood your housing table structure, and generated profiling code tailored to your specific columns and data types. This context awareness reduces the trial-and-error cycle you’d normally face when adapting generic code snippets to your environment. Review the generated code and run it. The fast response times help you iterate on your analysis efficiently.
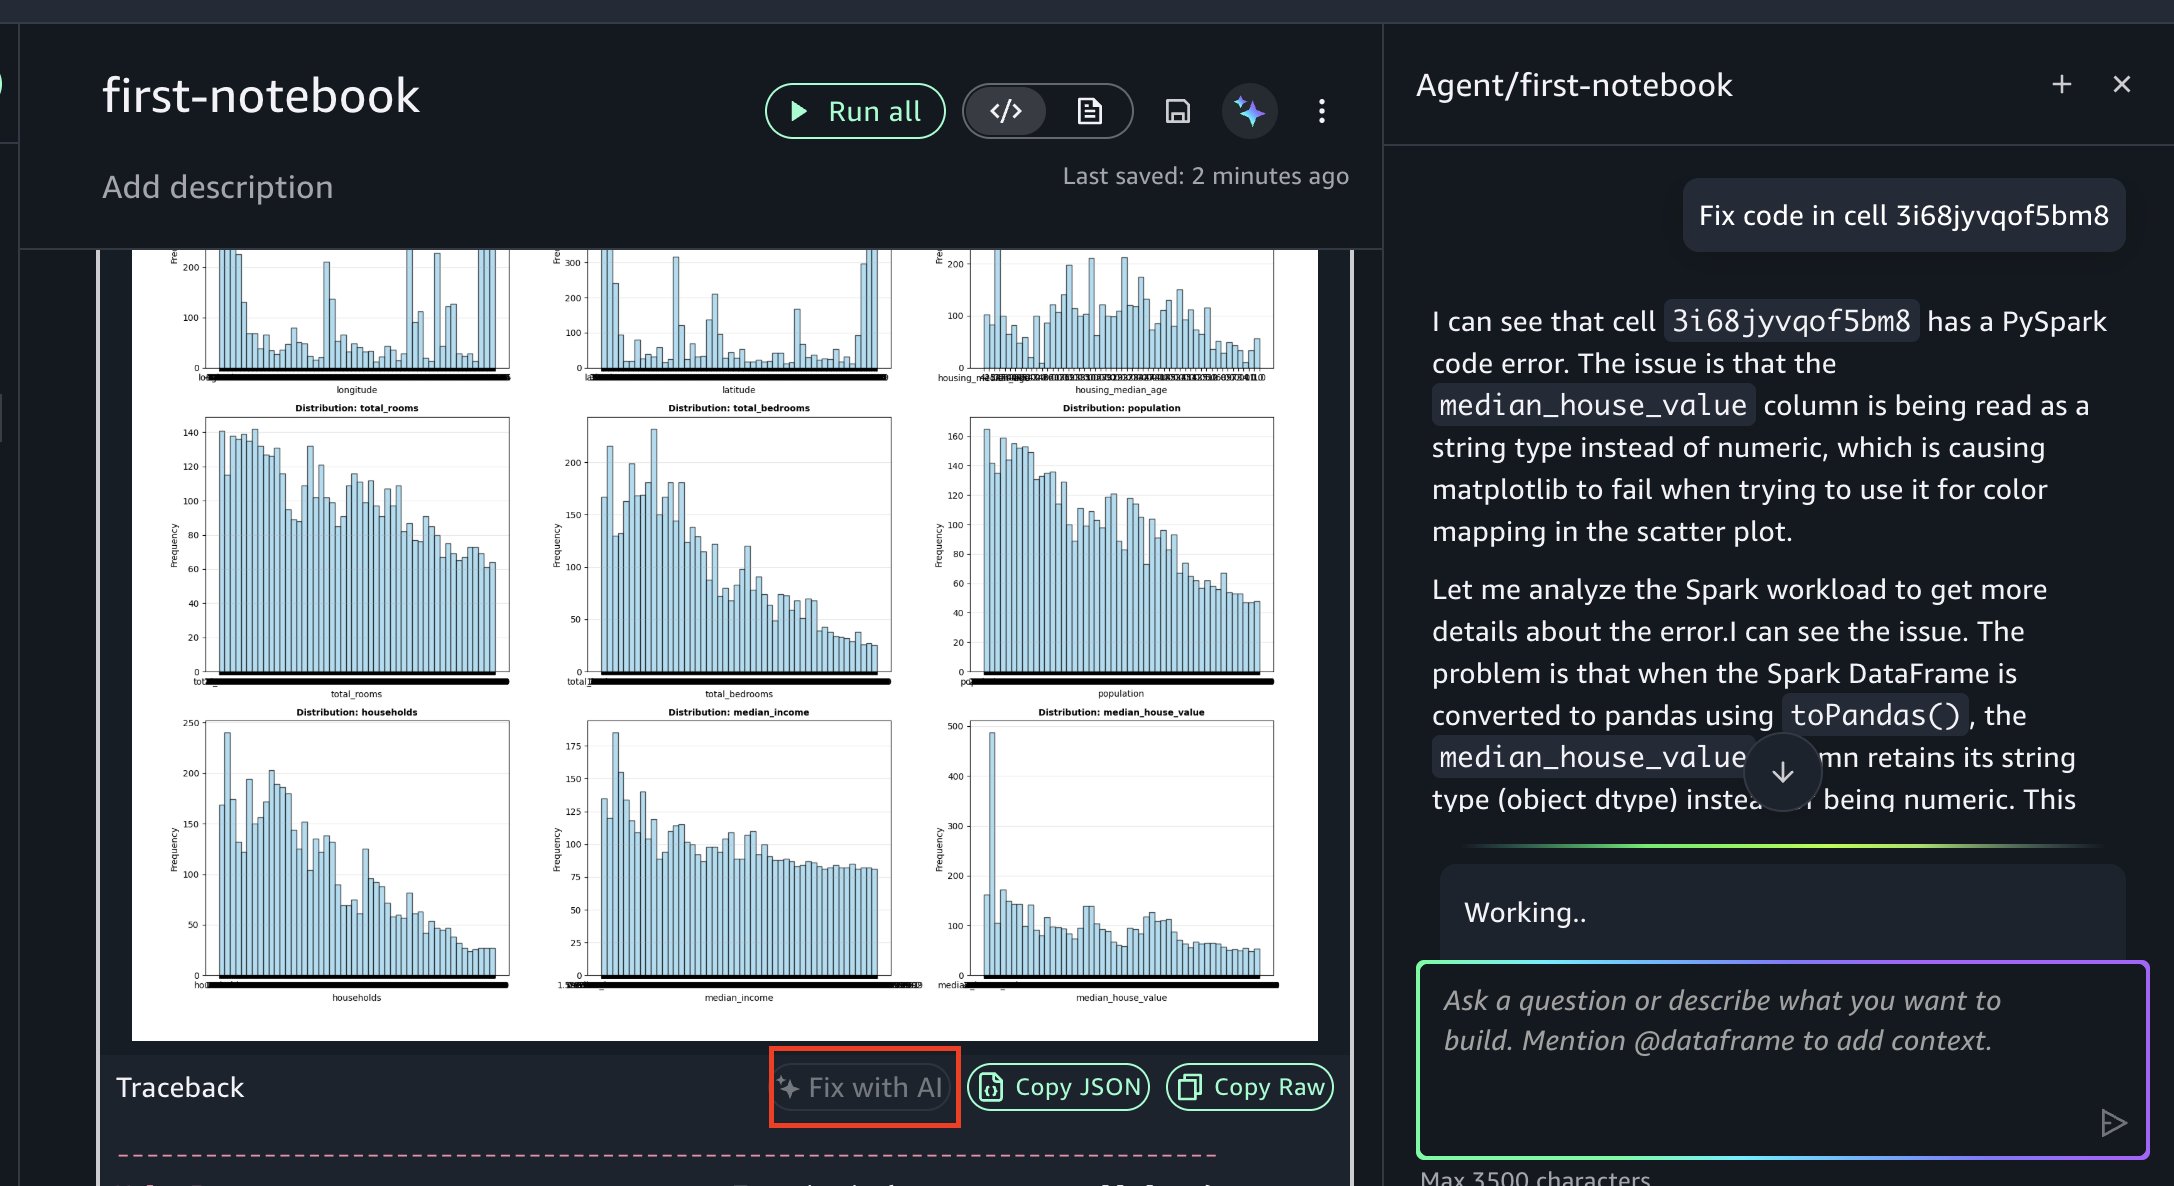
If you encounter an error, you can resolve it using Fix with AI as shown in the following figure. When errors occur during execution, the “Fix with AI” feature analyzes the traceback, diagnoses the root cause, and generates corrected code, so you can keep your analysis moving forward.
Training ML models
Next, you’ll use the data agent to generate code for training a model that predicts housing prices.
Prompt: “Generate code to train a model that predicts housing prices. Use table housing.”
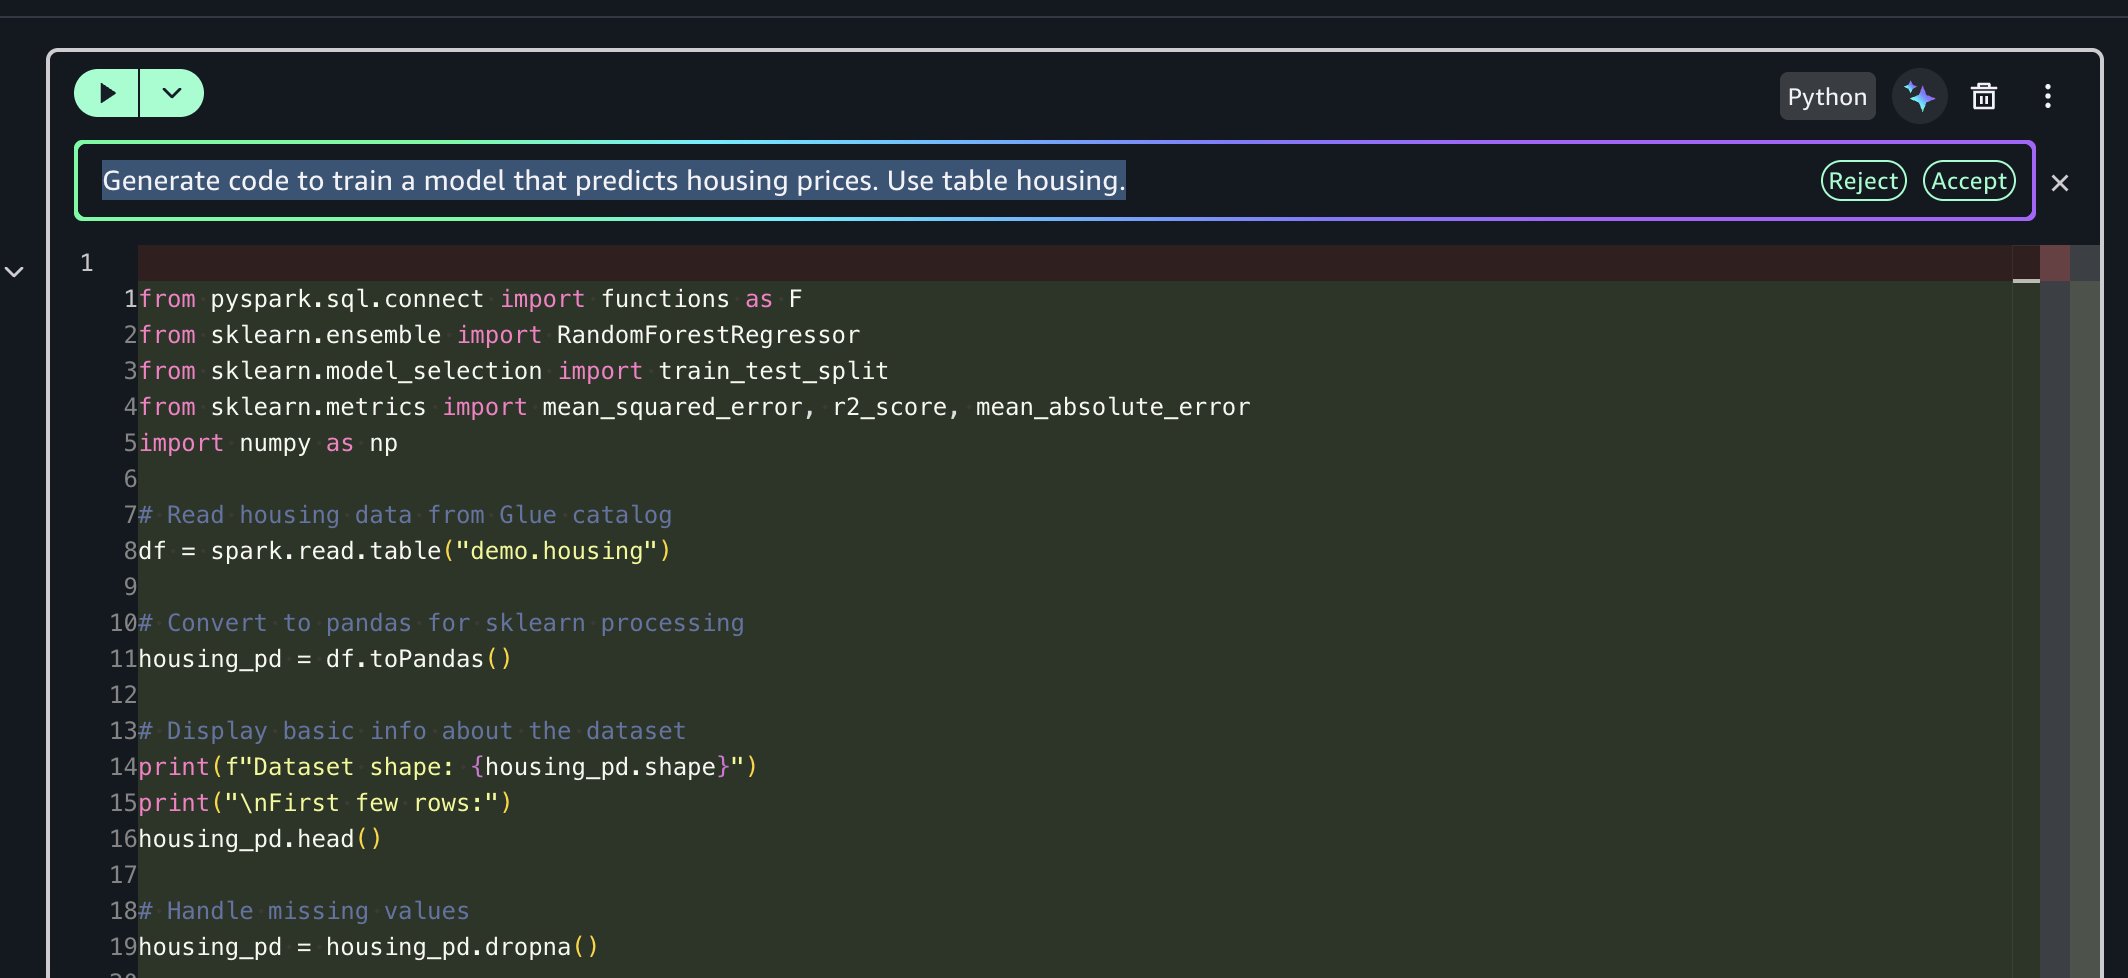
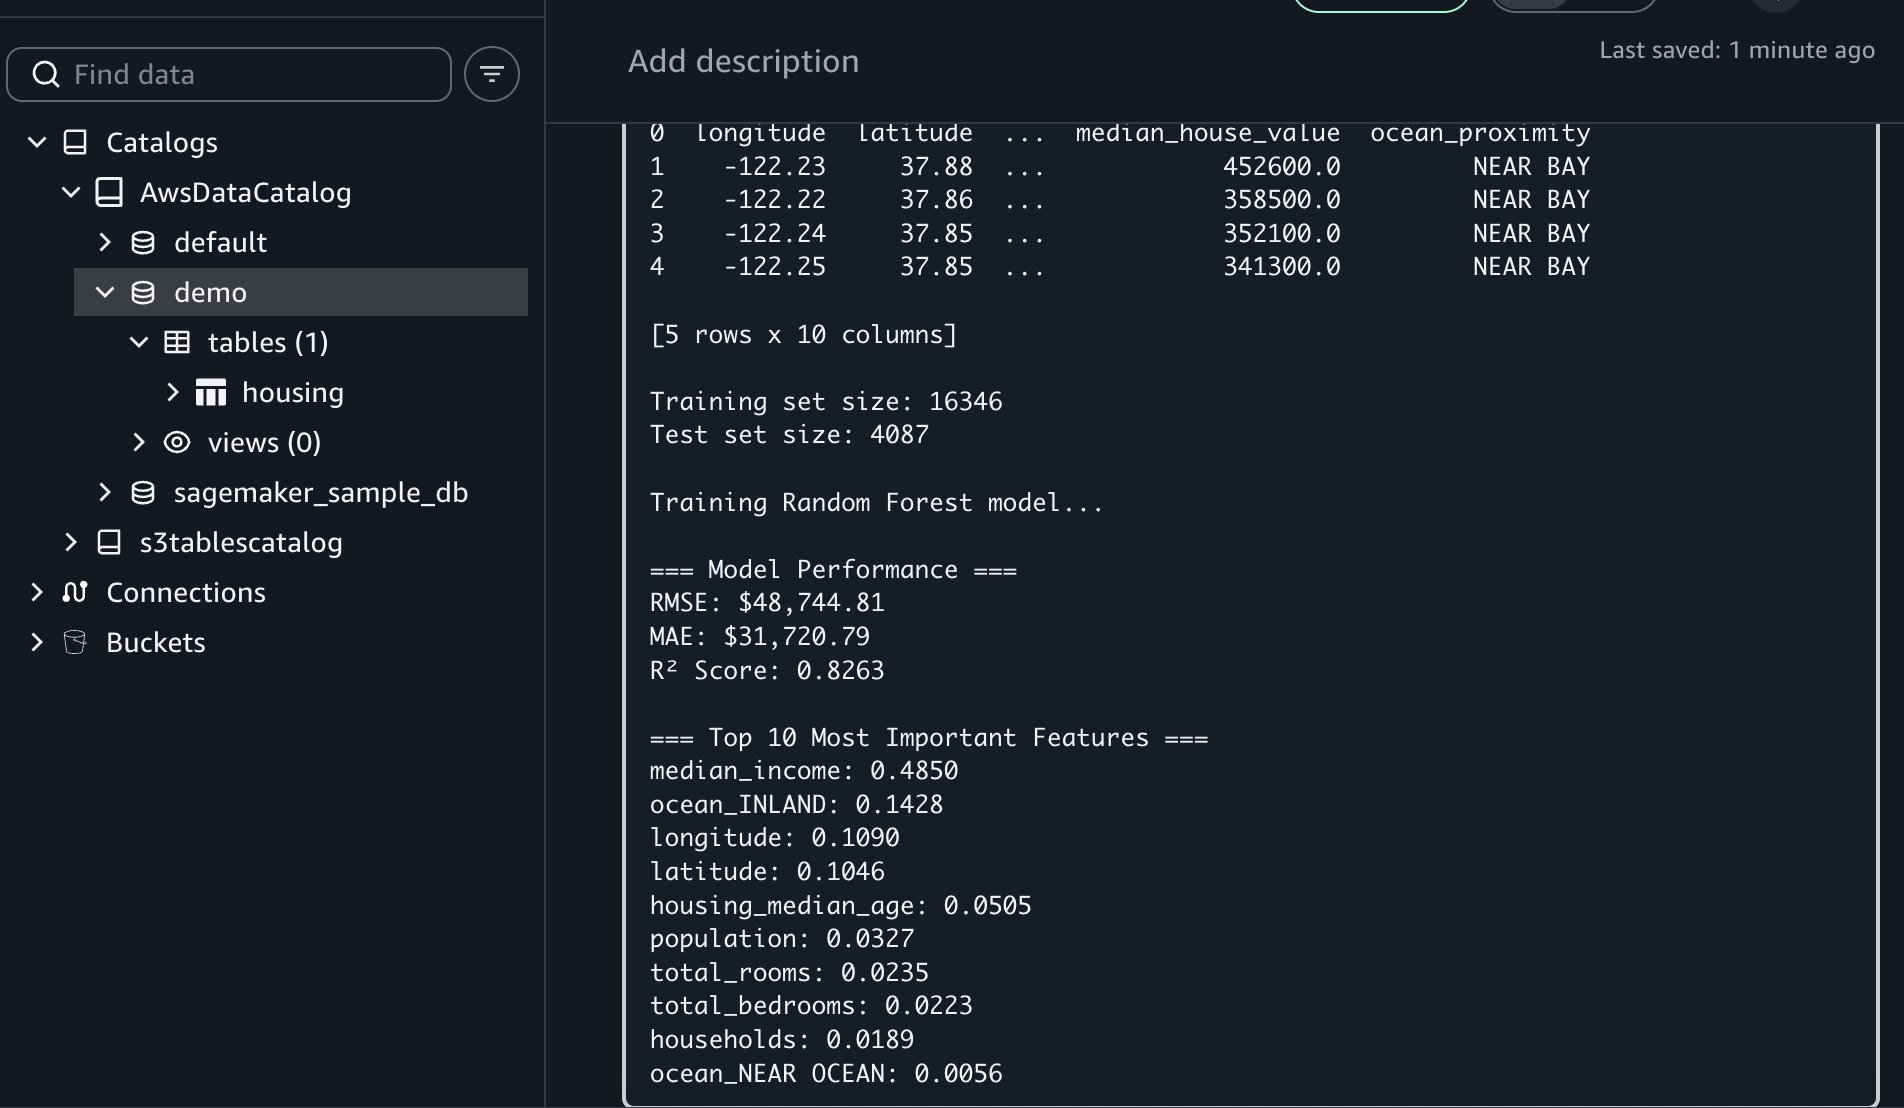
The AI assistant generates end-to-end code for you that:
- Reads housing data from AWS Glue catalog using Amazon Athena Spark and converts to pandas
- Converts string columns to numeric, encodes using one-hot encoding and removes missing values
- Trains a Random Forest model to predict median house values
- Evaluates model performance (RMSE, MAE, R-square)
- Displays top 10 most important features for predictions
This multi-step orchestration saves you hours of development time by handling the entire workflow from data access to model evaluation.
If you encounter an error, you can resolve it using Fix with AI available in the results traceback section.
This workflow showcased Notebooks’ unified capabilities: you uploaded files locally, created AWS Glue tables for multi-engine access, used Amazon Athena Spark for distributed profiling, and used AI-assisted ML development to predict housing prices. All of this happened within a single notebook environment without switching tools.
Key benefits and best practices
Notebooks in Amazon SageMaker Unified Studio deliver several advantages:
- Faster time to insights: With traditional environments, you might spend hours on configuration before analysis begins. Notebooks bypass this overhead, so you can start work immediately.
- Improved collaboration: You can share notebooks with consistent environments, supporting reproducibility and reducing “works on my machine” issues.
- Reduced complexity: You can access multiple data sources and compute engines from one interface rather than navigating separate tools for each data source or processing engine.
- AI-accelerated development: Generate task-specific code and receive intelligent suggestions, reducing time spent on repetitive coding tasks.
- Scalable performance: Handle datasets from megabytes to petabytes with appropriate compute resources. The system scales automatically as data volumes grow.
Best practices
- Start with appropriate compute profiles by beginning with smaller instances and scaling up as your needs grow.
- Use AI assistance with natural language prompts for your repetitive tasks and complex operations.
- Combine engines strategically by using Amazon Athena Spark for your large-scale processing, Amazon Redshift for data warehousing and other specialized engines for your specific workloads.
- Document your work using markdown cells to create living documentation alongside your code.
- Organize using multiple cells by breaking the complex workflows into logical steps for better readability and debugging.
Cleaning up
To avoid incurring future charges, delete the resources you created in this walkthrough:
- In the Amazon SageMaker Unified Studio console, navigate to the Notebook page
- Delete the notebook
- Delete the demo database and housing table from the AWS Glue Data Catalog
- Delete Amazon SageMaker Unified Studio domain created during this walkthrough
- If you created a new IAM role specifically for this walkthrough, delete it from the IAM console
Conclusion
In this post, we demonstrated how Notebooks in Amazon SageMaker Unified Studio help you work more efficiently and deliver insights more quickly. By combining familiar notebook interfaces with enterprise-scale compute, multi-engine support, and generative AI assistance, teams can streamline data and AI workflows.
The integration of Python and SQL, instant access to diverse data sources, and intelligent code generation capabilities make Notebooks a valuable tool for modern data teams. Teams can perform exploratory data analysis, build complex data pipelines, or train ML models with the flexibility and power needed within a single, intuitive environment.
Ready to get started? Create your first notebook in Amazon SageMaker Unified Studio and begin analyzing data within minutes.
Explore additional capabilities:
- Time series analysis workflows with seasonal decomposition and forecasting
- Natural language processing pipelines for text classification and sentiment analysis
- Integration with Amazon SageMaker Model Registry for ML model versioning
- Advanced Spark optimization techniques for petabyte-scale processing
Learn more:
- Amazon SageMaker Unified Studio Administrator Guide
- Amazon SageMaker Unified Studio User Guide
- Notebooks in SageMaker Unified Studio
- Use the SageMaker Data Agent
- Pricing information