AWS Big Data Blog
Ingest data from Snowflake to Amazon S3 using AWS Glue Marketplace Connectors
In today’s complex business landscape, organizations are challenged to consume from variety of sources and keep up with data that pours in all through the day. There is a demand to design applications that enables data to be portable across cloud platforms and give them the ability to derive insights from one or more data sources to remain competitive. In this post, we demonstrate how AWS Glue integration with Snowflake has simplified the process of connecting to Snowflake and applying data transformations without writing a single line of code. With AWS Glue Studio, you can now use a simple visual interface to compose jobs for migrations that move and integrate data. It enables you to subscribe to a Snowflake connector in AWS Marketplace, query Snowflake tables and save the data in Amazon Simple Storage Service (Amazon S3) as Parquet format.
If you choose to bring your own custom connector or prefer a different connector from AWS Marketplace, follow the steps in this blog Performing data transformations using Snowflake and AWS Glue. In this post, we use the new AWS Glue Connector for Snowflake to seamlessly connect with Snowflake without the need to install JDBC drivers. To validate the data ingested, we use Amazon Redshift Spectrum to create an external table and query the data in Amazon S3. With Amazon Redshift Spectrum, you can efficiently query and retrieve data from files in Amazon S3 without having to load the data into Amazon Redshift tables.
Solution Overview
Let’s take a look at the architecture diagram on how AWS Glue connects to Snowflake for data ingestion.

Prerequisites
Before you start, make sure you have the following:
- An account in Snowflake, specifically a service account that has permissions to tables to be queried.
- AWS Identity and Access Management (IAM) permissions in place to create roles and polices for AWS Glue, Amazon Redshift and Amazon Elastic Container Registry (to download Snowflake connector container image). To configure, follow the instructions in Setting up IAM Permissions for AWS Glue, Create an IAM role for Amazon Redshift and AWS managed policies for Amazon Elastic Container Registry.
- Amazon Redshift Serverless endpoint. If you do not have it configured, follow the instructions in Amazon Redshift Serverless Analytics.
Configure the Amazon S3 VPC Endpoint
As a first step, we configure an Amazon S3 VPC Endpoint to enable AWS Glue to use a private IP address to access Amazon S3 with no exposure to the public internet. Complete the following steps.
- Open the Amazon VPC console.
- In the left navigation pane, choose Endpoints.
- Choose Create Endpoint, and follow the steps to create an Amazon S3 VPC endpoint of type Gateway.

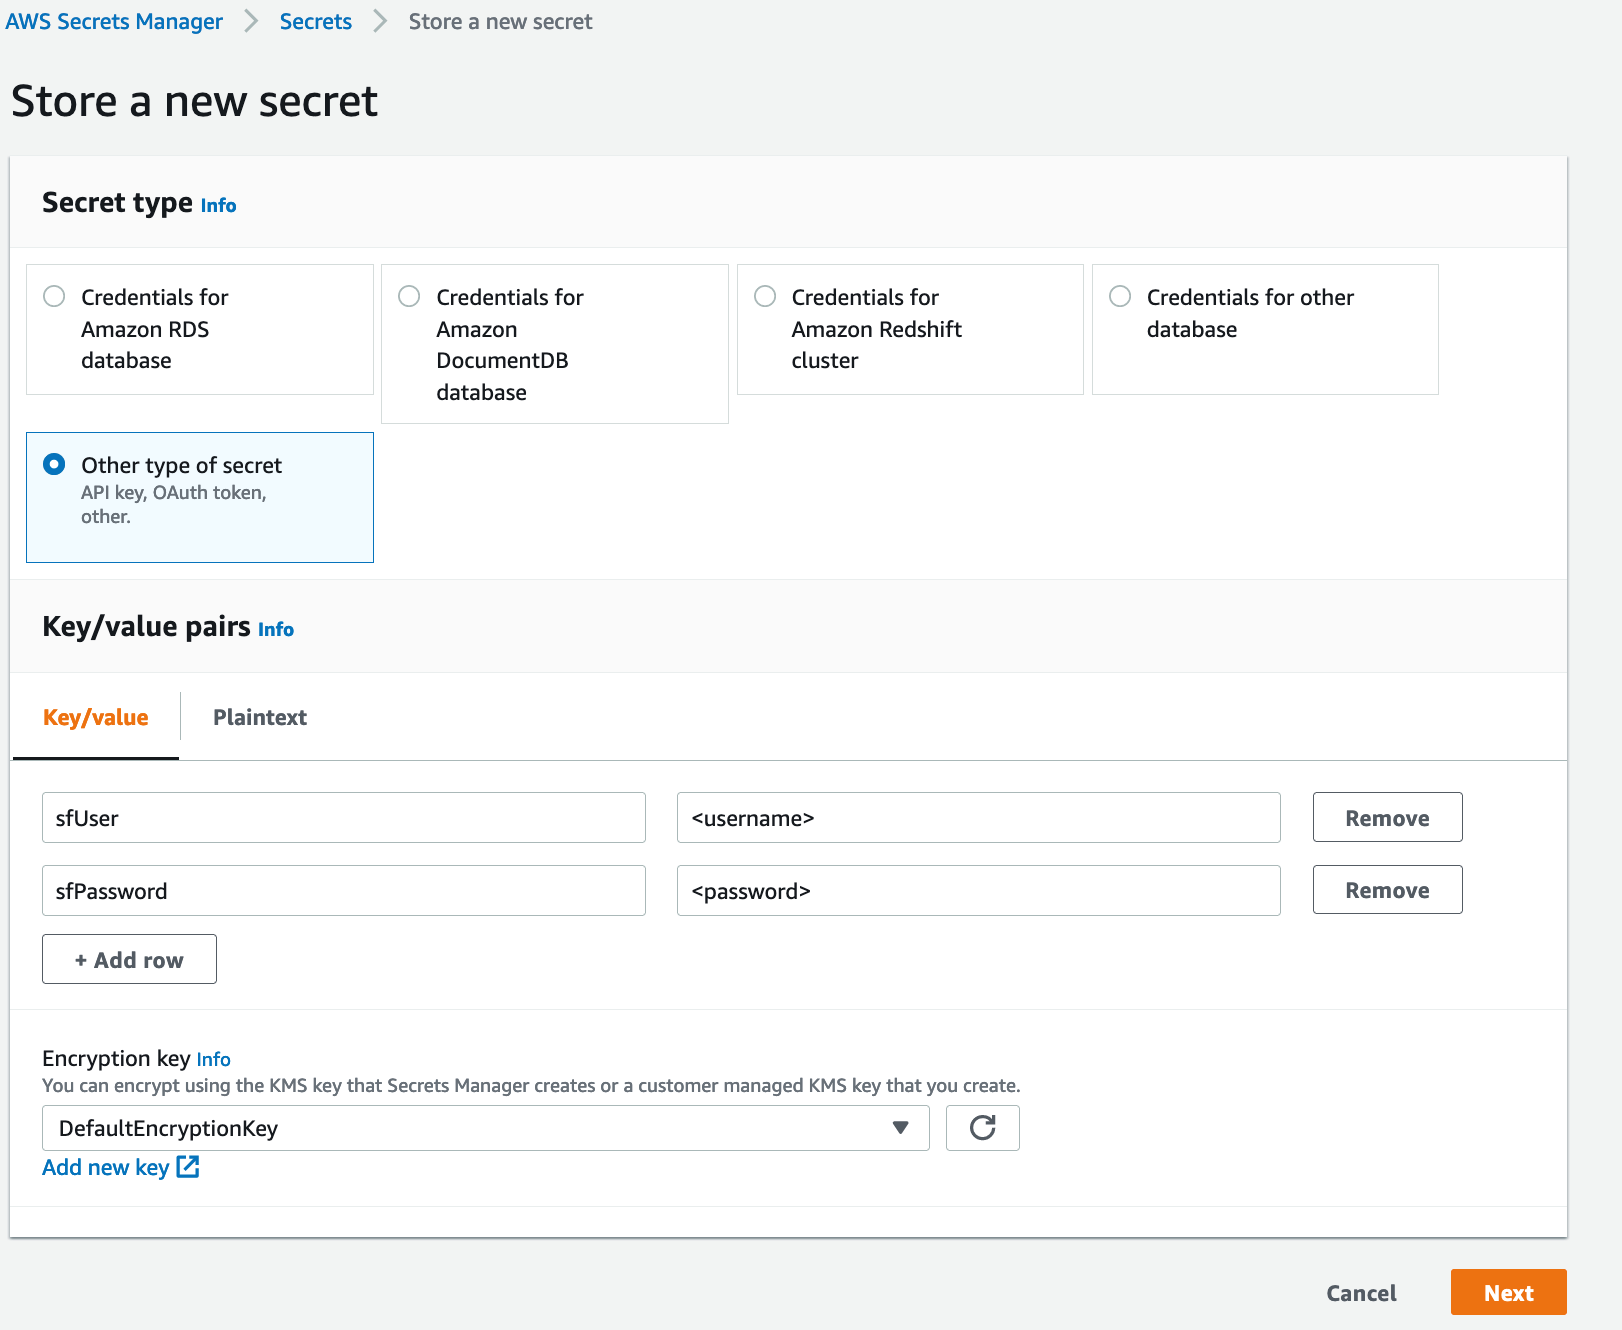
Next, we create a secret using AWS Secrets Manager
- On AWS Secrets Manager console, choose Store a new secret.
- For Secret type, select Other type of secret.
- Enter a key as
sfUserand the value as your Snowflake user name. - Enter a key as
sfPasswordand the value as your Snowflake user password. - Choose Next.
- Name the secret
snowflake_credentialsand follow through the rest of the steps to store the secret.
Subscribe to AWS Marketplace Snowflake Connector
To subscribe to the connector, follow the steps and activate Snowflake Connector for AWS Glue. This native connector simplifies the process of connecting AWS Glue jobs to extract data from Snowflake
- Navigate to the Snowflake Connector for AWS Glue in AWS Marketplace.
- Choose Continue to Subscribe.
- Review the terms and conditions, pricing, and other details.
- Choose Continue to Configuration.
- For Delivery Method, choose your delivery method.
- For Software version, choose your software version
- Choose Continue to Launch.

- Under Usage instructions, choose Activate the Glue connector in AWS Glue Studio. You’re redirected to AWS Glue Studio.

- For Name, enter a name for your connection (for example, snowflake_s3_glue_connection).
- Optionally, choose a VPC, subnet, and security group.
- For AWS Secret, choose
snowflake_credentials. - Choose Create connection.
A message appears that the connection was successfully created, and the connection is now visible on the AWS Glue Studio console.
Configure AWS Glue for Snowflake connectivity
Next, we configure a AWS Glue job by following the steps below to extract data.
- On the AWS Glue console, choose AWS Glue Studio on the left navigation pane.
- On the AWS Glue Studio console, choose Jobs on the left navigation pane.
- Create a job with “Visual with source and target” and choose the Snowflake connector for AWS Glue 3.0 as the source and Amazon S3 as the target.

- Enter a name for the job.
- Under job details, select an IAM role.
- Create a new IAM role if you don’t have already with required AWS Glue and AWS Secrets Manager policies.
- Under Visual, Choose the Data source – Connection node and choose the connection you created.
- In connection options, create a key value pair with query as shown below. Note that
CUSTOMERtable inSNOWFLAKE_SAMPLE_DATAdatabase is considered for this migration. This table gets preloaded (1.5M rows) when you install Snowflake Schema.

key value query SELECT
C_CUSTKEY,
C_NAME,
C_ADDRESS,
C_NATIONKEY,
C_PHONE,
C_ACCTBAL,
C_MKTSEGMENT,
C_COMMENT
FROM
SNOWFLAKE_SAMPLE_DATA.TPCH_SF1.CUSTOMERsfUrl MXA94638.us-east-1.snowflakecomputing.comsfDatabase SNOWFLAKE_SAMPLE_DATAsfWarehouse COMPUTE_WH
- In the Output schema section, specify the source schema as key-value pairs as shown below.

- Choose the Transform-ApplyMapping node to view the following transform details.

- Choose the Data target properties – S3 node and enter S3 bucket details as shown below.
- Choose Save.

After you save the job, the following script is generated. It assumes the account information and credentials are stored in AWS Secrets Manager as described earlier.
- Choose Run to run the job.
After the job completes successfully, the run status should change to Succeeded.

The following screenshot shows that the data was written to Amazon S3.

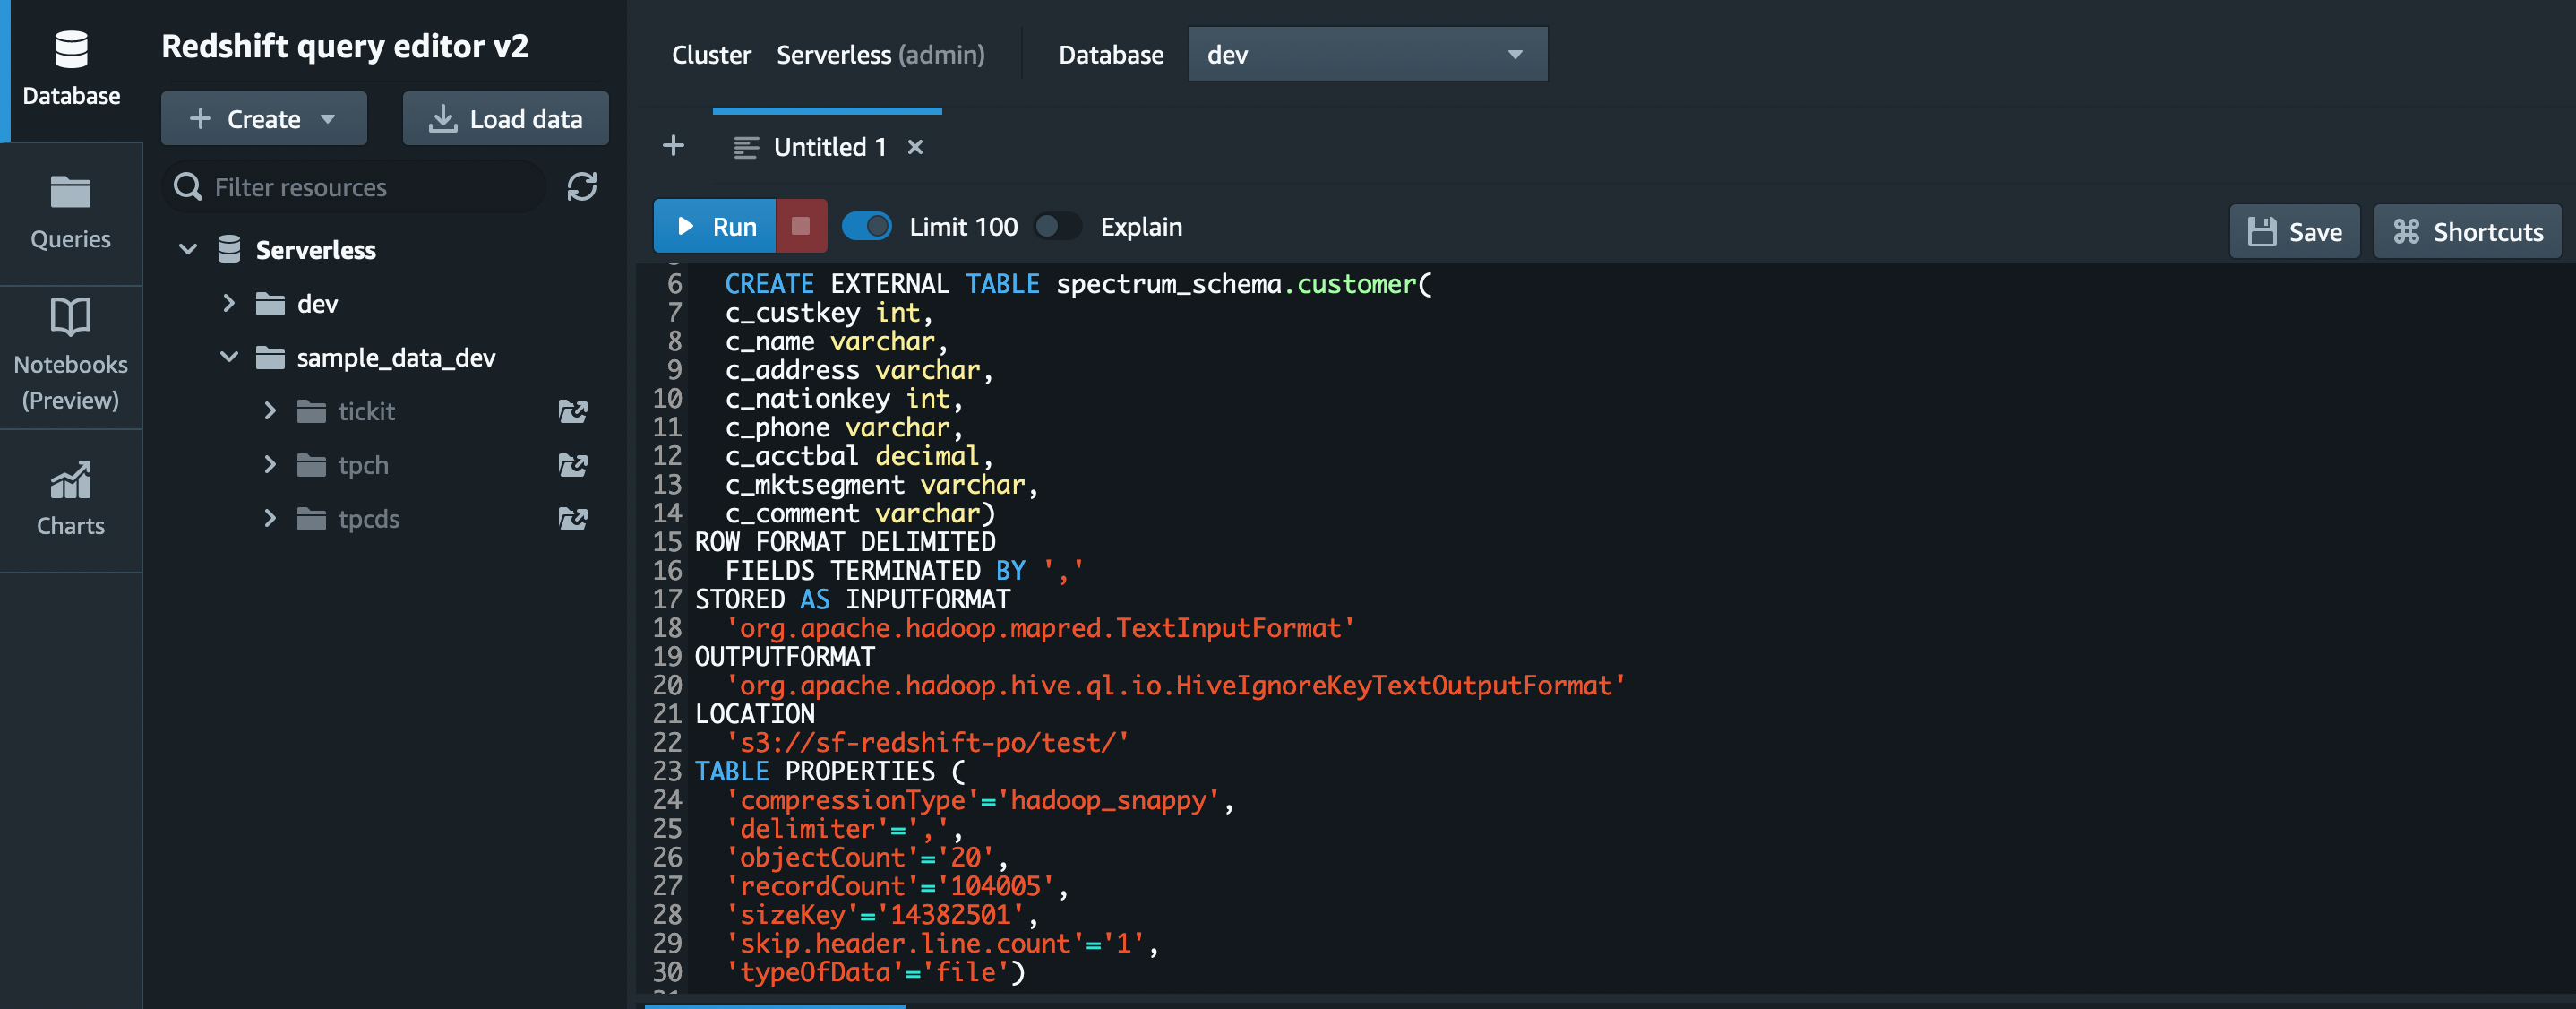
Query Amazon S3 data using Amazon Redshift Spectrum
Let’s query the data in Amazon Redshift Spectrum
- On the Amazon Redshift console, choose the AWS Region.
- In the left navigation pane, choose Query Editor.
- Run the create external table DDL given below.
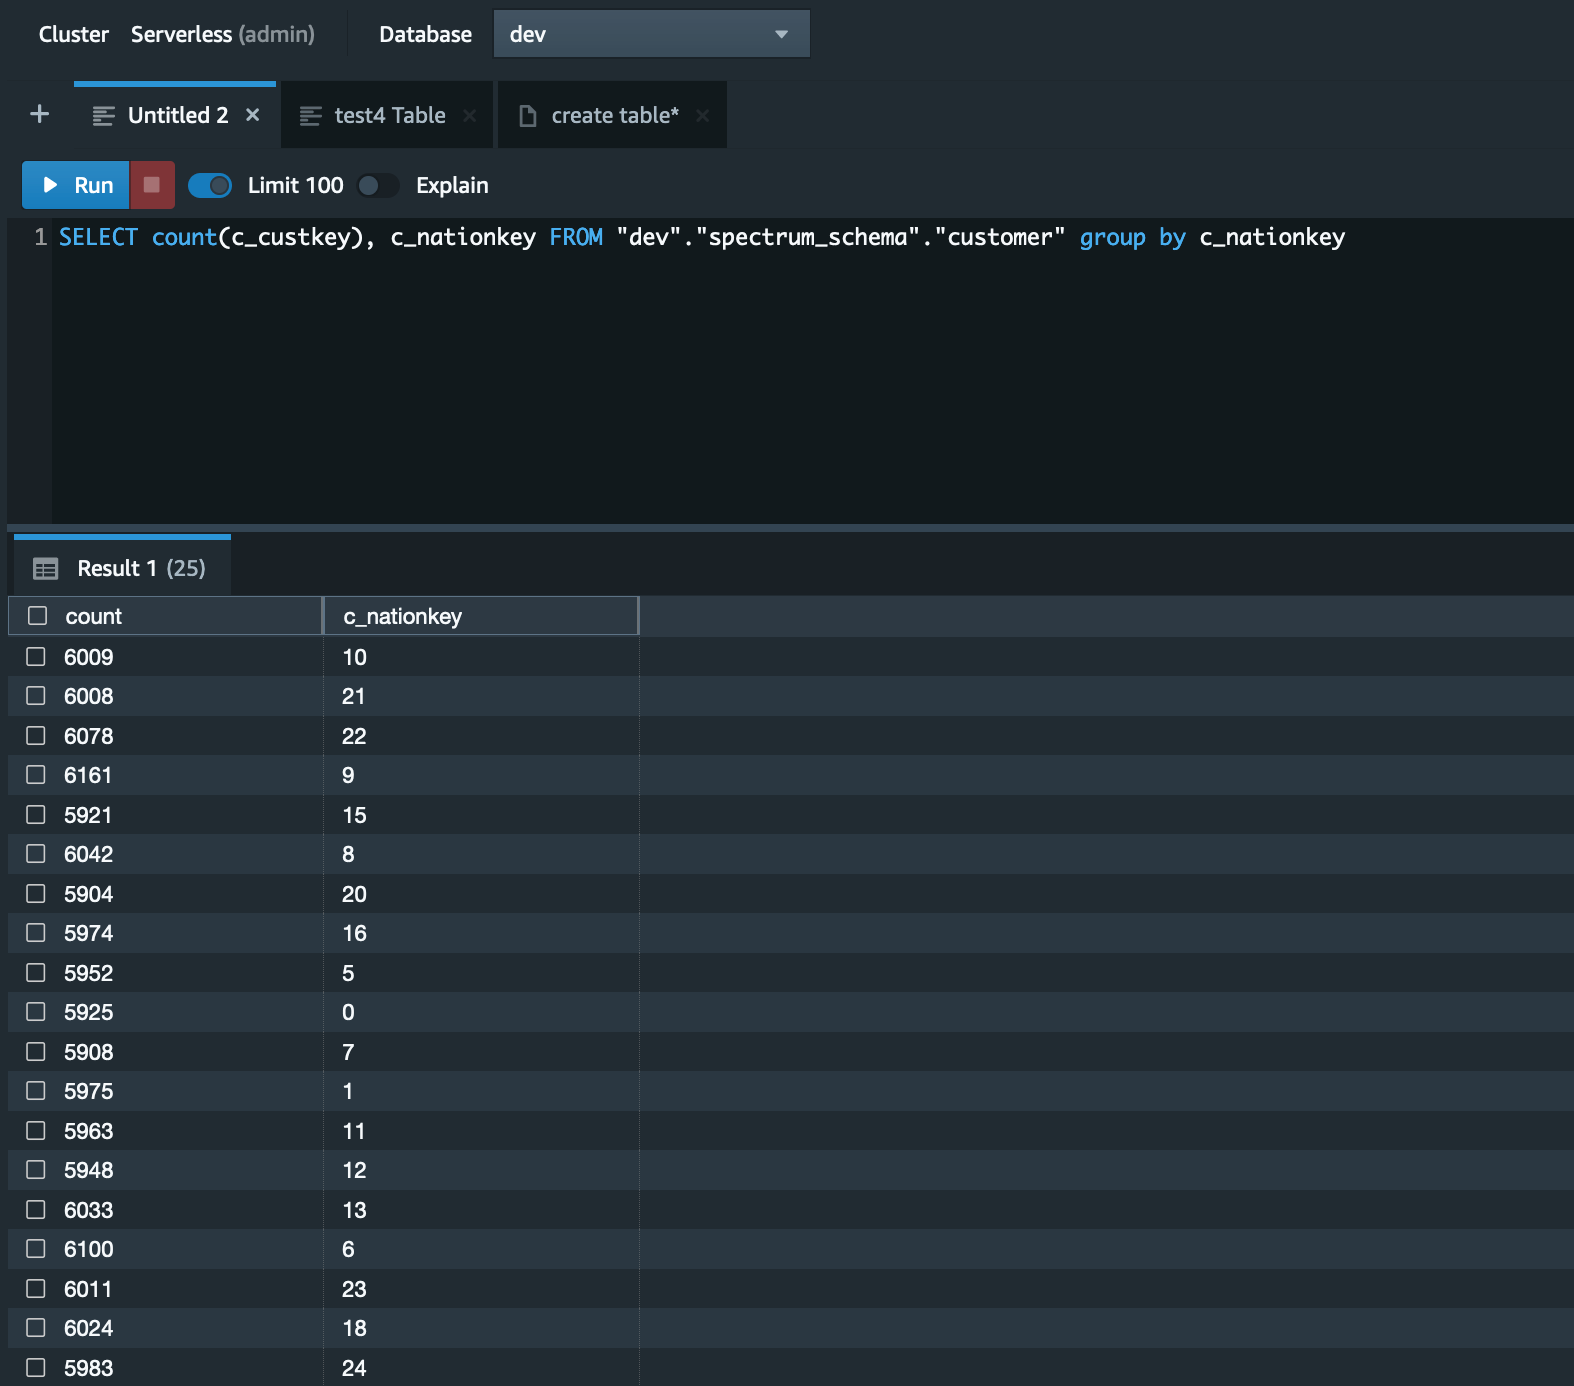
- Run the select query on the
CUSTOMERtable.
Considerations
The AWS Glue crawler doesn’t work directly with Snowflake. This is a native capability that you can use for other AWS data sources that are joined or connected in the AWS Glue ETL job. Instead, you can define connections in the script as shown earlier in this post.
The Snowflake source tables covered in this post only focus on structured data types and therefore semi-structured or unstructured data types in Snowflake (binary, varbinary, and variant) are out of scope. However, you could use AWS Glue functions such as relationalize to flatten nested schema data into semi-normalized structures, or you could use Amazon Redshift Spectrum to support these data types.
Conclusion
In this post, we learnt how to define Snowflake connection parameters in AWS Glue, connect to Snowflake from AWS Glue using the AWS native connector for Snowflake, migrate to Amazon S3 and use Redshift Spectrum to query data in Amazon S3 to meet your business needs.
We welcome any thoughts or questions in the comments section below
About the Authors
 Sindhu Achuthan is a Data Architect with Global Financial Services at Amazon Web Services. She works with customers to provide architectural guidance for analytics solutions on Amazon Glue, Amazon Redshift, AWS Lambda, and other services. Outside work, she is a DIYer, likes to go on long trails, and do yoga.
 Shayon Sanyal is a Sr. Solutions Architect specializing in databases at AWS. His day job allows him to help AWS customers design scalable, secure, performant and robust database architectures on the cloud. Outside work, you can find him hiking, traveling or training for the next half-marathon.