AWS Big Data Blog
Integrate Amazon Redshift and IAM Identity Center with enhanced VPC routing
You can now use AWS IAM Identity Center authentication with enhanced VPC routing on Amazon Redshift clusters and Amazon Redshift Serverless workgroups. Your users get single sign-on with their existing corporate credentials, and the authentication traffic originates from within your virtual private cloud (VPC) through a VPC endpoint, staying on the AWS private network.
We covered the IAM Identity Center integration end to end in a previous post, Integrate Identity Provider (IdP) with Amazon Redshift Query Editor V2 and SQL Client using AWS IAM Identity Center for seamless Single Sign-On. That post shows how users sign in through Query Editor V2 and third-party SQL clients, and how their identity is propagated to the AWS analytics services.
Many organizations also require that this traffic doesn’t traverse the public internet. Enhanced VPC routing sends everything between your cluster and other AWS services through your VPC, where you can govern it with security groups, network ACLs, and endpoint policies, and observe it in VPC Flow Logs. For teams with data residency, regulatory, or network isolation requirements, it’s often mandatory.
In this post, we show how the new IAM Identity Center VPC endpoints provide a private network path for authentication traffic when enhanced VPC routing is enabled. We walk through the endpoint setup and validate the flow from Query Editor V2 and a SQL client. To use this feature, your Amazon Redshift cluster must be running patch 204 or later, and you must create the VPC endpoints described in the following steps.
Solution overview
When a user signs in with IAM Identity Center from Query Editor V2 or a SQL client, Amazon Redshift doesn’t simply accept the token the client presents. It validates the token with IAM Identity Center and resolves the caller’s identity before the session is established. These calls originate from Amazon Redshift, not from your client, and enhanced VPC routing changes the network path they take.
Authentication flow with enhanced VPC routing
With enhanced VPC routing enabled, the calls Amazon Redshift makes to IAM Identity Center traverse your VPC and follow your networking configuration. The flow is as follows:
- The user signs in through Query Editor V2 or a SQL client and authenticates against your identity provider through IAM Identity Center.
- IAM Identity Center issues an access token, which the client presents to Amazon Redshift on the database connection.
- Amazon Redshift validates the access token against the IAM Identity Center OpenID Connect (OIDC) endpoint, confirming the token’s scopes and the user’s entitlement to the Amazon Redshift application. It doesn’t trust the token the client presented without verification.
- Amazon Redshift calls the same OIDC endpoint again to exchange that token for one scoped to Amazon Redshift.
- Amazon Redshift calls the IAM Identity Center identity store to resolve the user and their group membership.
- Amazon Redshift maps the resolved identity to a database identity, applies role-based access control, and establishes the session.
The following diagram illustrates this authentication flow, showing how each call from Amazon Redshift to IAM Identity Center traverses the VPC through interface endpoints.
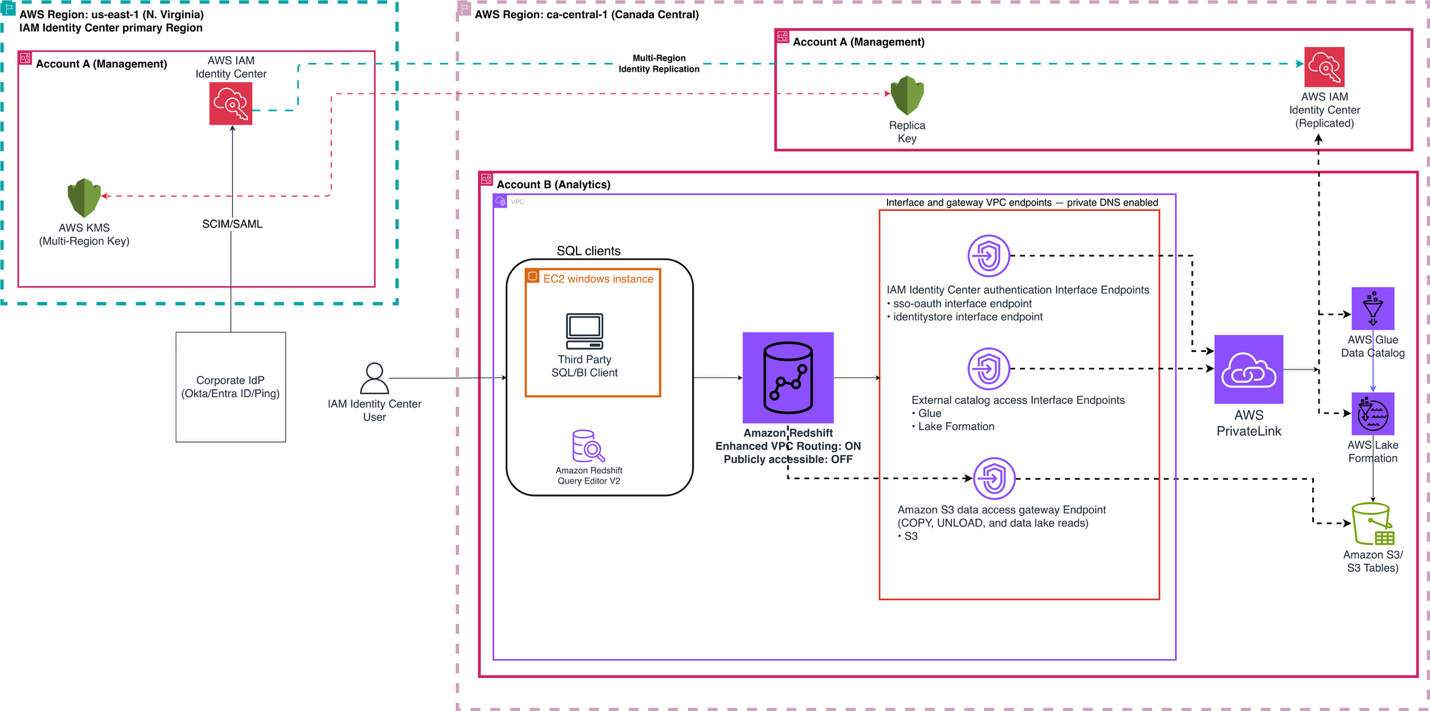
Figure 1: IAM Identity Center authentication flow with enhanced VPC routing enabled
As shown in the diagram, steps 3–5 represent calls that Amazon Redshift makes through your VPC to the IAM Identity Center OIDC and identity store endpoints.
Because a cluster with no public IP address doesn’t use an internet gateway route, Amazon Redshift has no path to IAM Identity Center by default. You provide one with interface VPC endpoints for the two services it needs, the IAM Identity Center OIDC endpoint and the identity store endpoint, which keep the traffic on the AWS network over AWS PrivateLink.
This solution covers the following steps:
- Enable enhanced VPC routing.
- Verify the DNS attributes on your VPC.
- Create the interface VPC endpoints required for IAM Identity Center authentication.
- Create interface VPC endpoints for AWS Glue and AWS Lake Formation (optional, if you query a data lake or lakehouse).
- Create an Amazon Simple Storage Service (Amazon S3) gateway endpoint.
- Validate that the endpoints are available and using private DNS.
- Test single sign-on with Amazon Redshift Query Editor V2.
- Test single sign-on with a SQL client using the Amazon Redshift JDBC driver.
- Verify the calls on AWS CloudTrail.
Prerequisites
You should have the following prerequisites:
- An AWS account with an Amazon Redshift provisioned cluster. Amazon Redshift Serverless also supports enhanced VPC routing, and the same endpoints apply, but you substitute the equivalent workgroup commands and settings.
- A working IAM Identity Center integration with Amazon Redshift, as described in Integrate Identity Provider (IdP) with Amazon Redshift Query Editor V2 and SQL Client using AWS IAM Identity Center for seamless Single Sign-On.
- A cluster running patch 204 or later, which is the minimum maintenance version that supports IAM Identity Center authentication with enhanced VPC routing.
- Permissions to create VPC endpoints in the VPC where the cluster runs, specifically
ec2:CreateVpcEndpointandec2:DescribeVpcEndpoints. - Optionally, an Amazon Elastic Compute Cloud (Amazon EC2) instance inside the same VPC with SQL Workbench/J and the Amazon Redshift JDBC driver, version 2.1.0.30 or later with its dependent libraries, to test the SQL client flow.
Walkthrough
The examples in this post use the Canada (Central) AWS Region (ca-central-1). Replace all placeholder values with your own.
Step 1: Enable enhanced VPC routing and turn off public access
To control network traffic with Amazon Redshift enhanced VPC routing, you enable enhanced VPC routing in Amazon Redshift. The cluster or workgroup must also not be publicly accessible, so that traffic to IAM Identity Center and other services goes through your VPC endpoints rather than an internet gateway. Follow the instructions in Enable enhanced VPC routing to enable it for a new provisioned cluster or serverless workgroup. For an existing cluster or workgroup, follow these steps:
- Sign in to the AWS Management Console and open the Amazon Redshift console at https://console.aws.amazon.com/redshiftv2/.
- Open the provisioned cluster or serverless workgroup you want to modify:
- For an existing provisioned cluster – choose the Properties tab.
- For an existing serverless workgroup – choose the Data access tab.
- In the Network and security section, choose Edit.
- Select Turn on enhanced VPC routing to route network traffic through the VPC.
- If Turn on Publicly accessible is enabled, clear it so the cluster or workgroup is not publicly accessible.
- Choose Save changes.
The following screenshot shows the Network and security section with enhanced VPC routing enabled and public accessibility turned off.
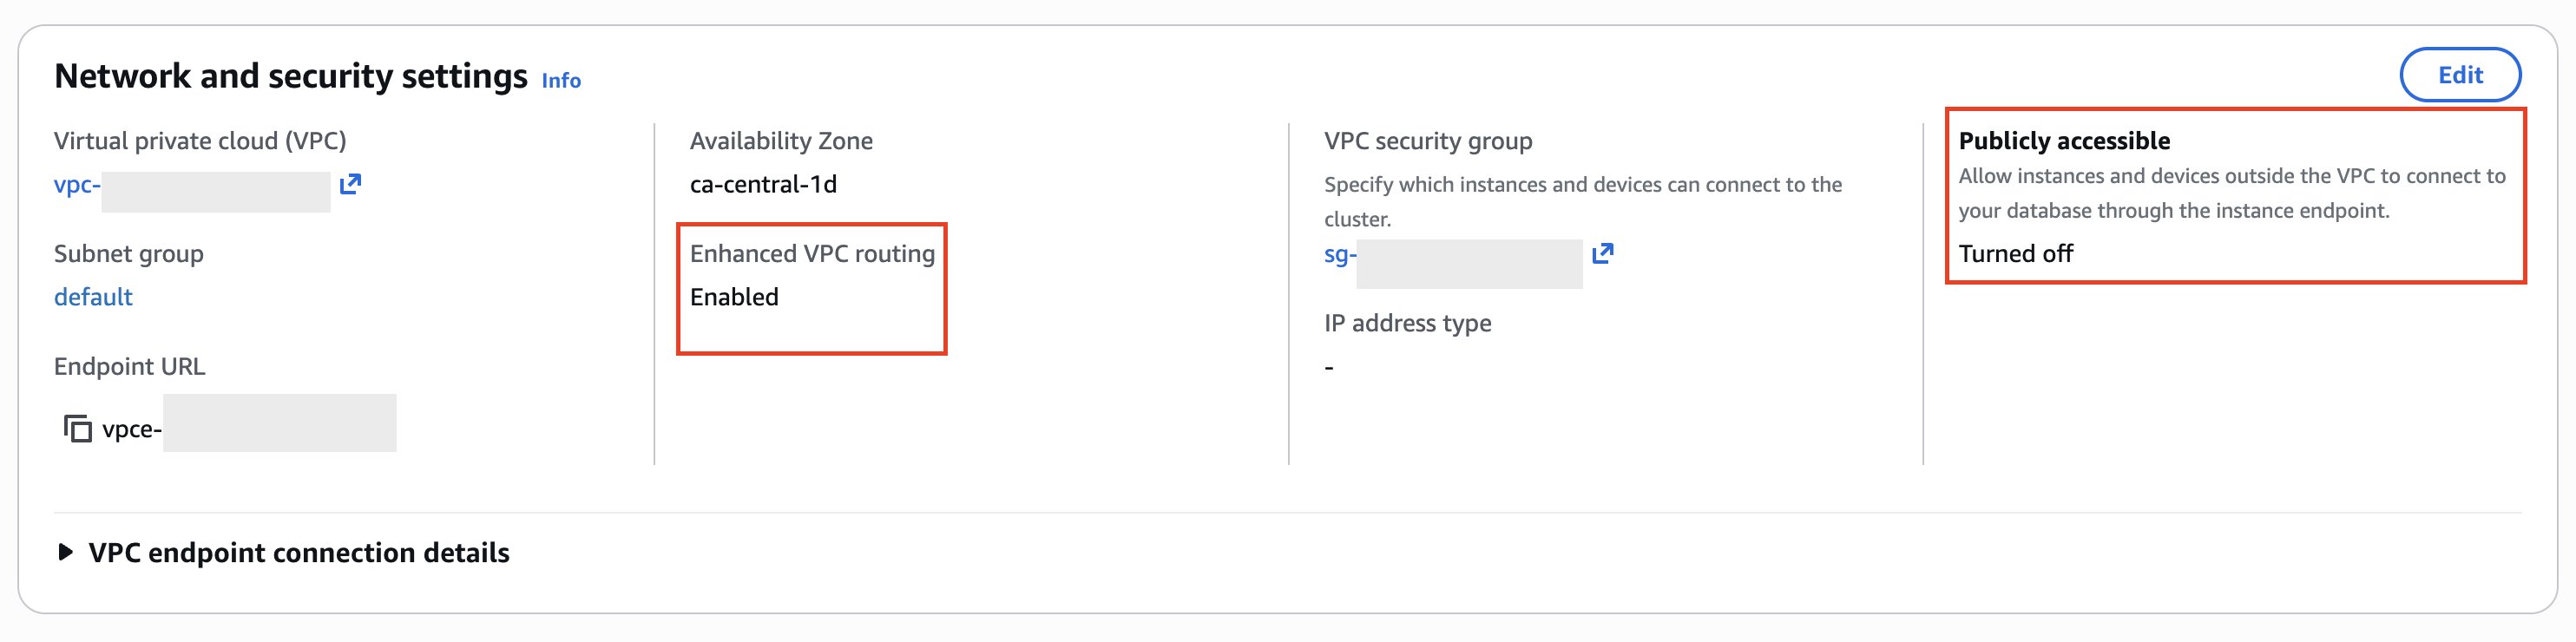
Figure 2: Enable enhanced VPC routing in Amazon Redshift
Note: Amazon Redshift restarts the cluster automatically when you change enhanced VPC routing. Make this change during a maintenance window.
Step 2: Verify the DNS attributes on your VPC
Private DNS is what redirects the public AWS service hostnames to your interface endpoints, and it depends on two VPC attributes. Follow these steps:
- Navigate to Amazon Redshift and choose the Properties tab for Amazon Redshift provisioned, or the Data access tab for Amazon Redshift Serverless.
- Under Network and security setting, choose the associated VPC.
- Your VPC details open in a new browser tab.
- Review the Details section, where the attributes appear as DNS hostnames and DNS resolution. Make sure that both properties are set to Enabled. The following screenshot shows the VPC Details page with both DNS attributes set to Enabled.
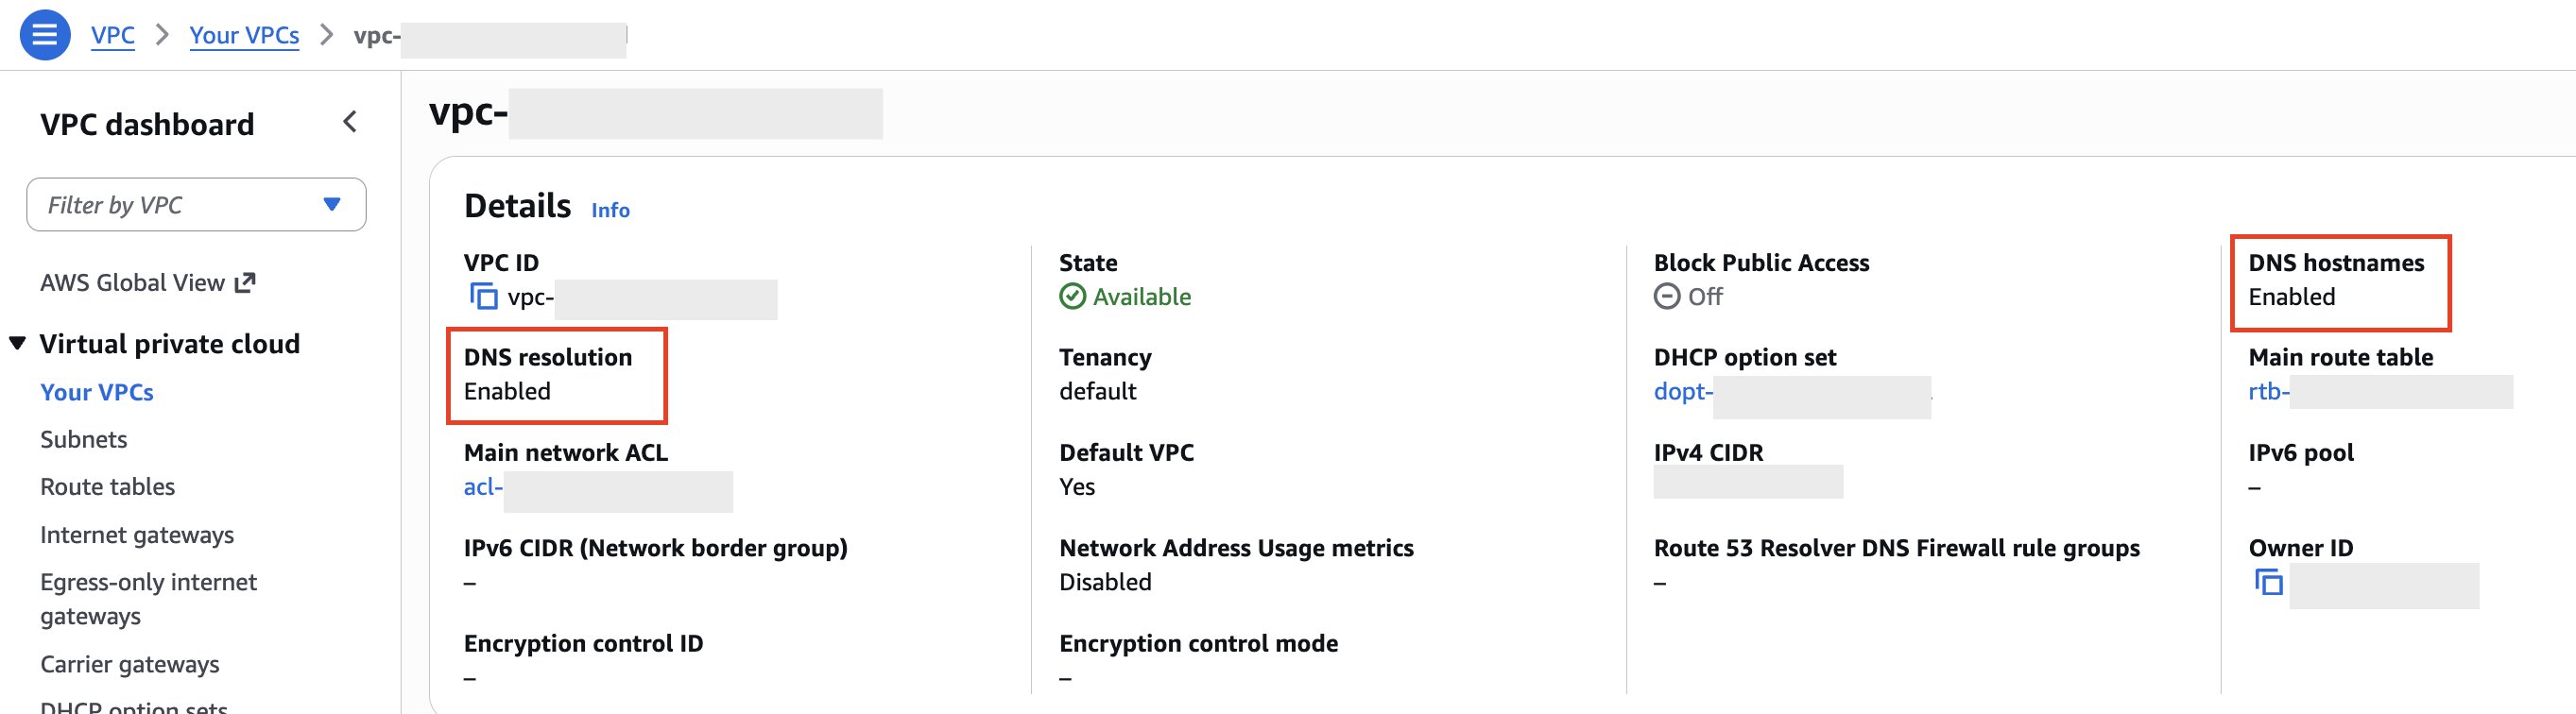
Figure 3: DNS hostnames and DNS resolution enabled on the VPC Details page
- If either of the properties is Disabled, choose Actions, choose Edit VPC settings, select Enable on the attribute you need, and choose Save. The following screenshot shows the Edit VPC settings page where you enable these DNS attributes.
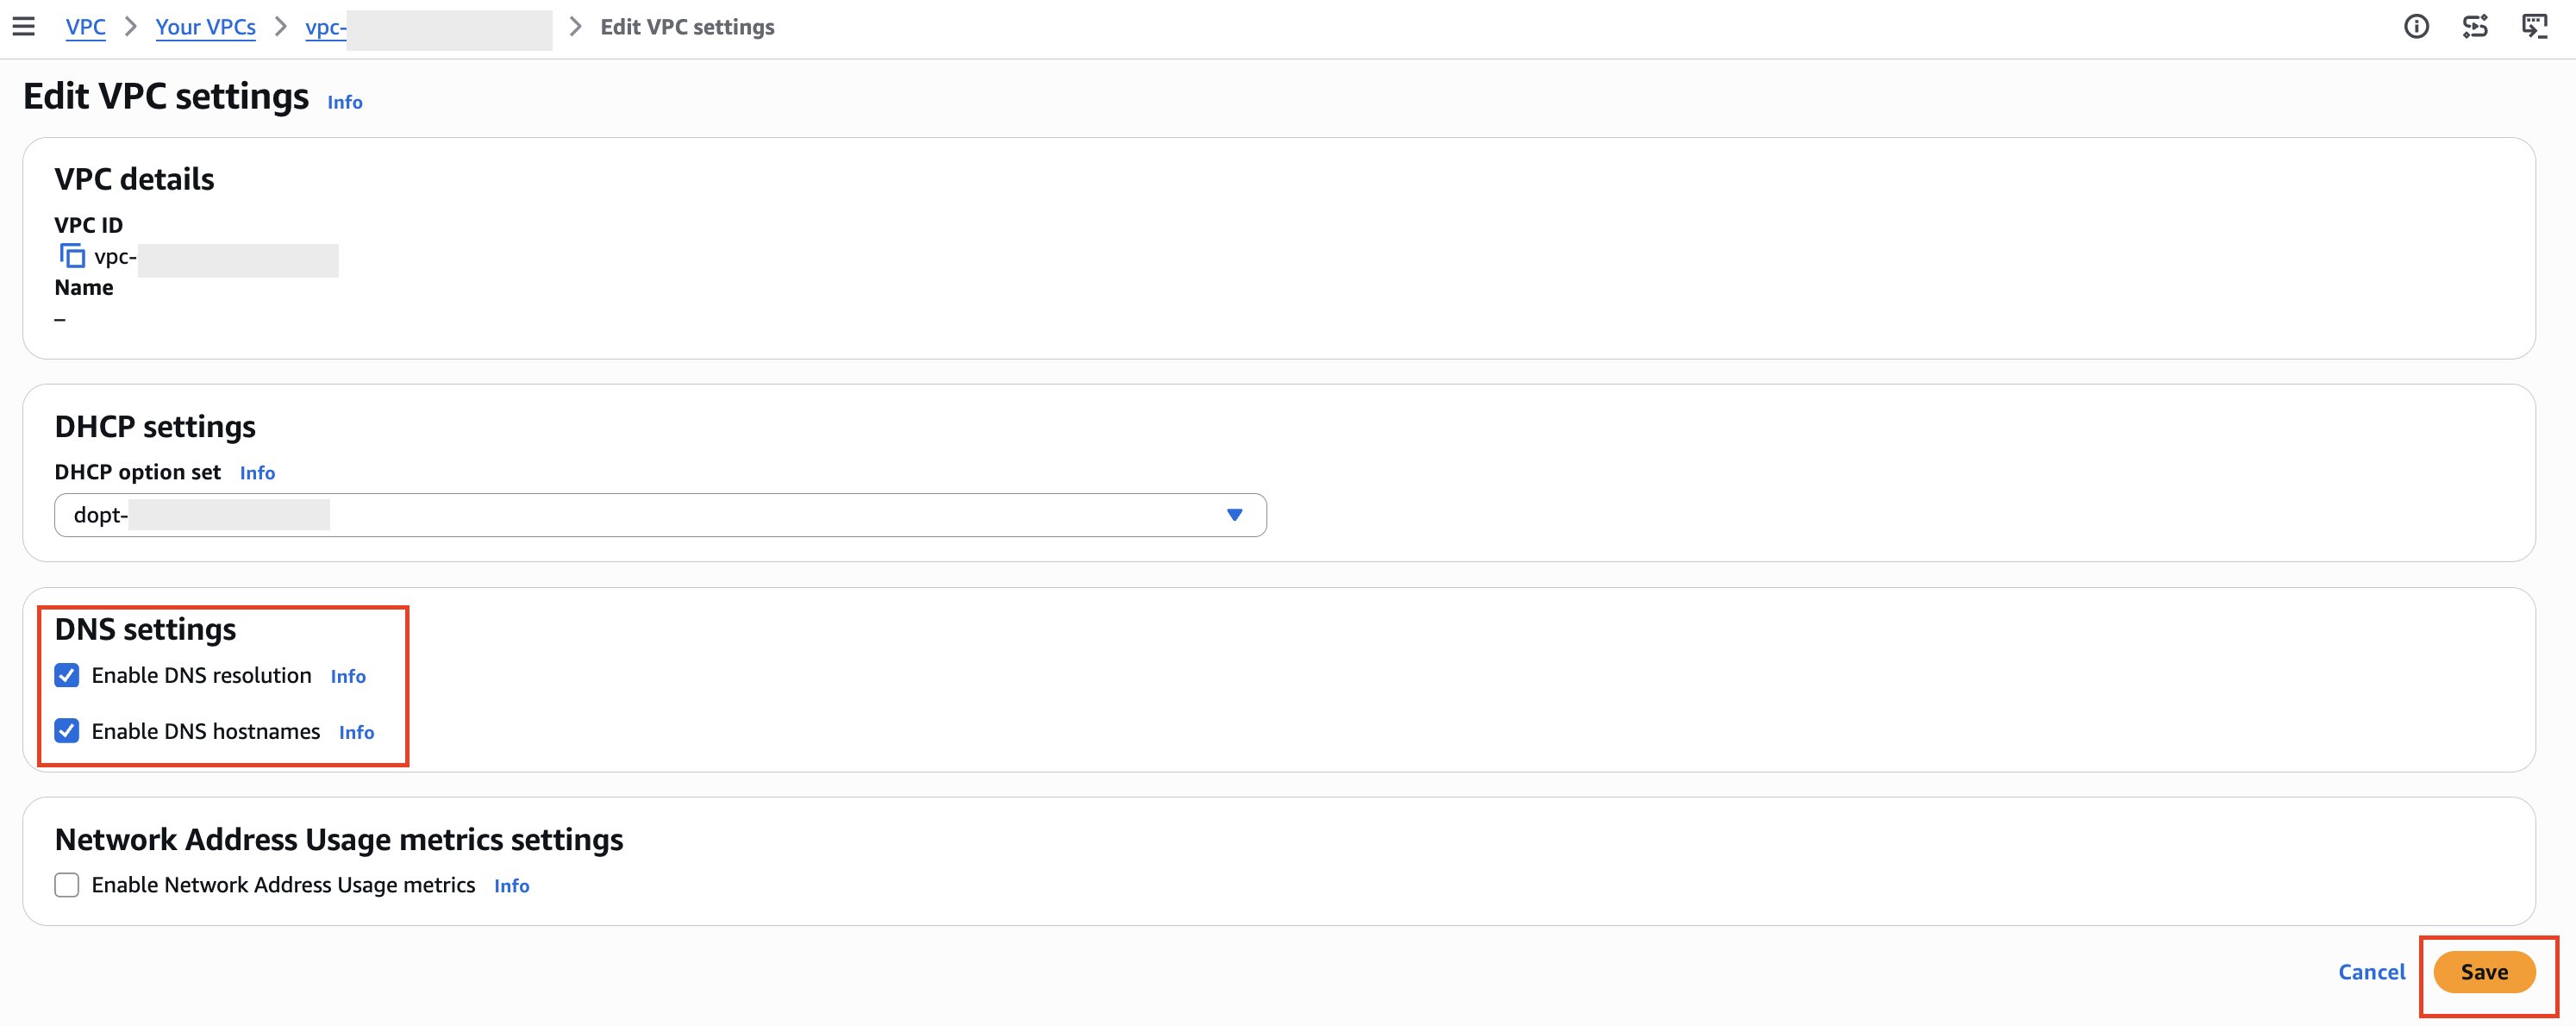
Figure 4: Enable DNS hostnames and DNS resolution
Step 3: Create the interface VPC endpoints for IAM Identity Center authentication
Create the two interface endpoints that the authentication flow needs. Each corresponds to one of the two IAM Identity Center calls in the authentication flow described earlier:
| Service endpoint | Used for |
com.amazonaws.<region>.sso-oauth |
Validating and exchanging the IAM Identity Center access token |
com.amazonaws.<region>.identitystore |
Resolving the user and their group membership |
To create an interface endpoint for an AWS service
- Open the Amazon Virtual Private Cloud (Amazon VPC) console at https://console.aws.amazon.com/vpc/.
- In the navigation pane, choose Endpoints.
- Choose Create endpoint.
- For Type, choose AWS services.
- IAM Identity Center is a Regional service, so these endpoints must reach the AWS Region where your IAM Identity Center instance is available. If you’re using IAM Identity Center multi-Region replication (your instance is replicated to the Region where your Amazon Redshift cluster runs), leave Enable Cross Region endpoint unchecked.
- For Service name, search for sso-oauth and select the service for your Region (
com.amazonaws.<region>.sso-oauth). The following screenshot shows the top section of the Create endpoint page with the sso-oauth service selected.
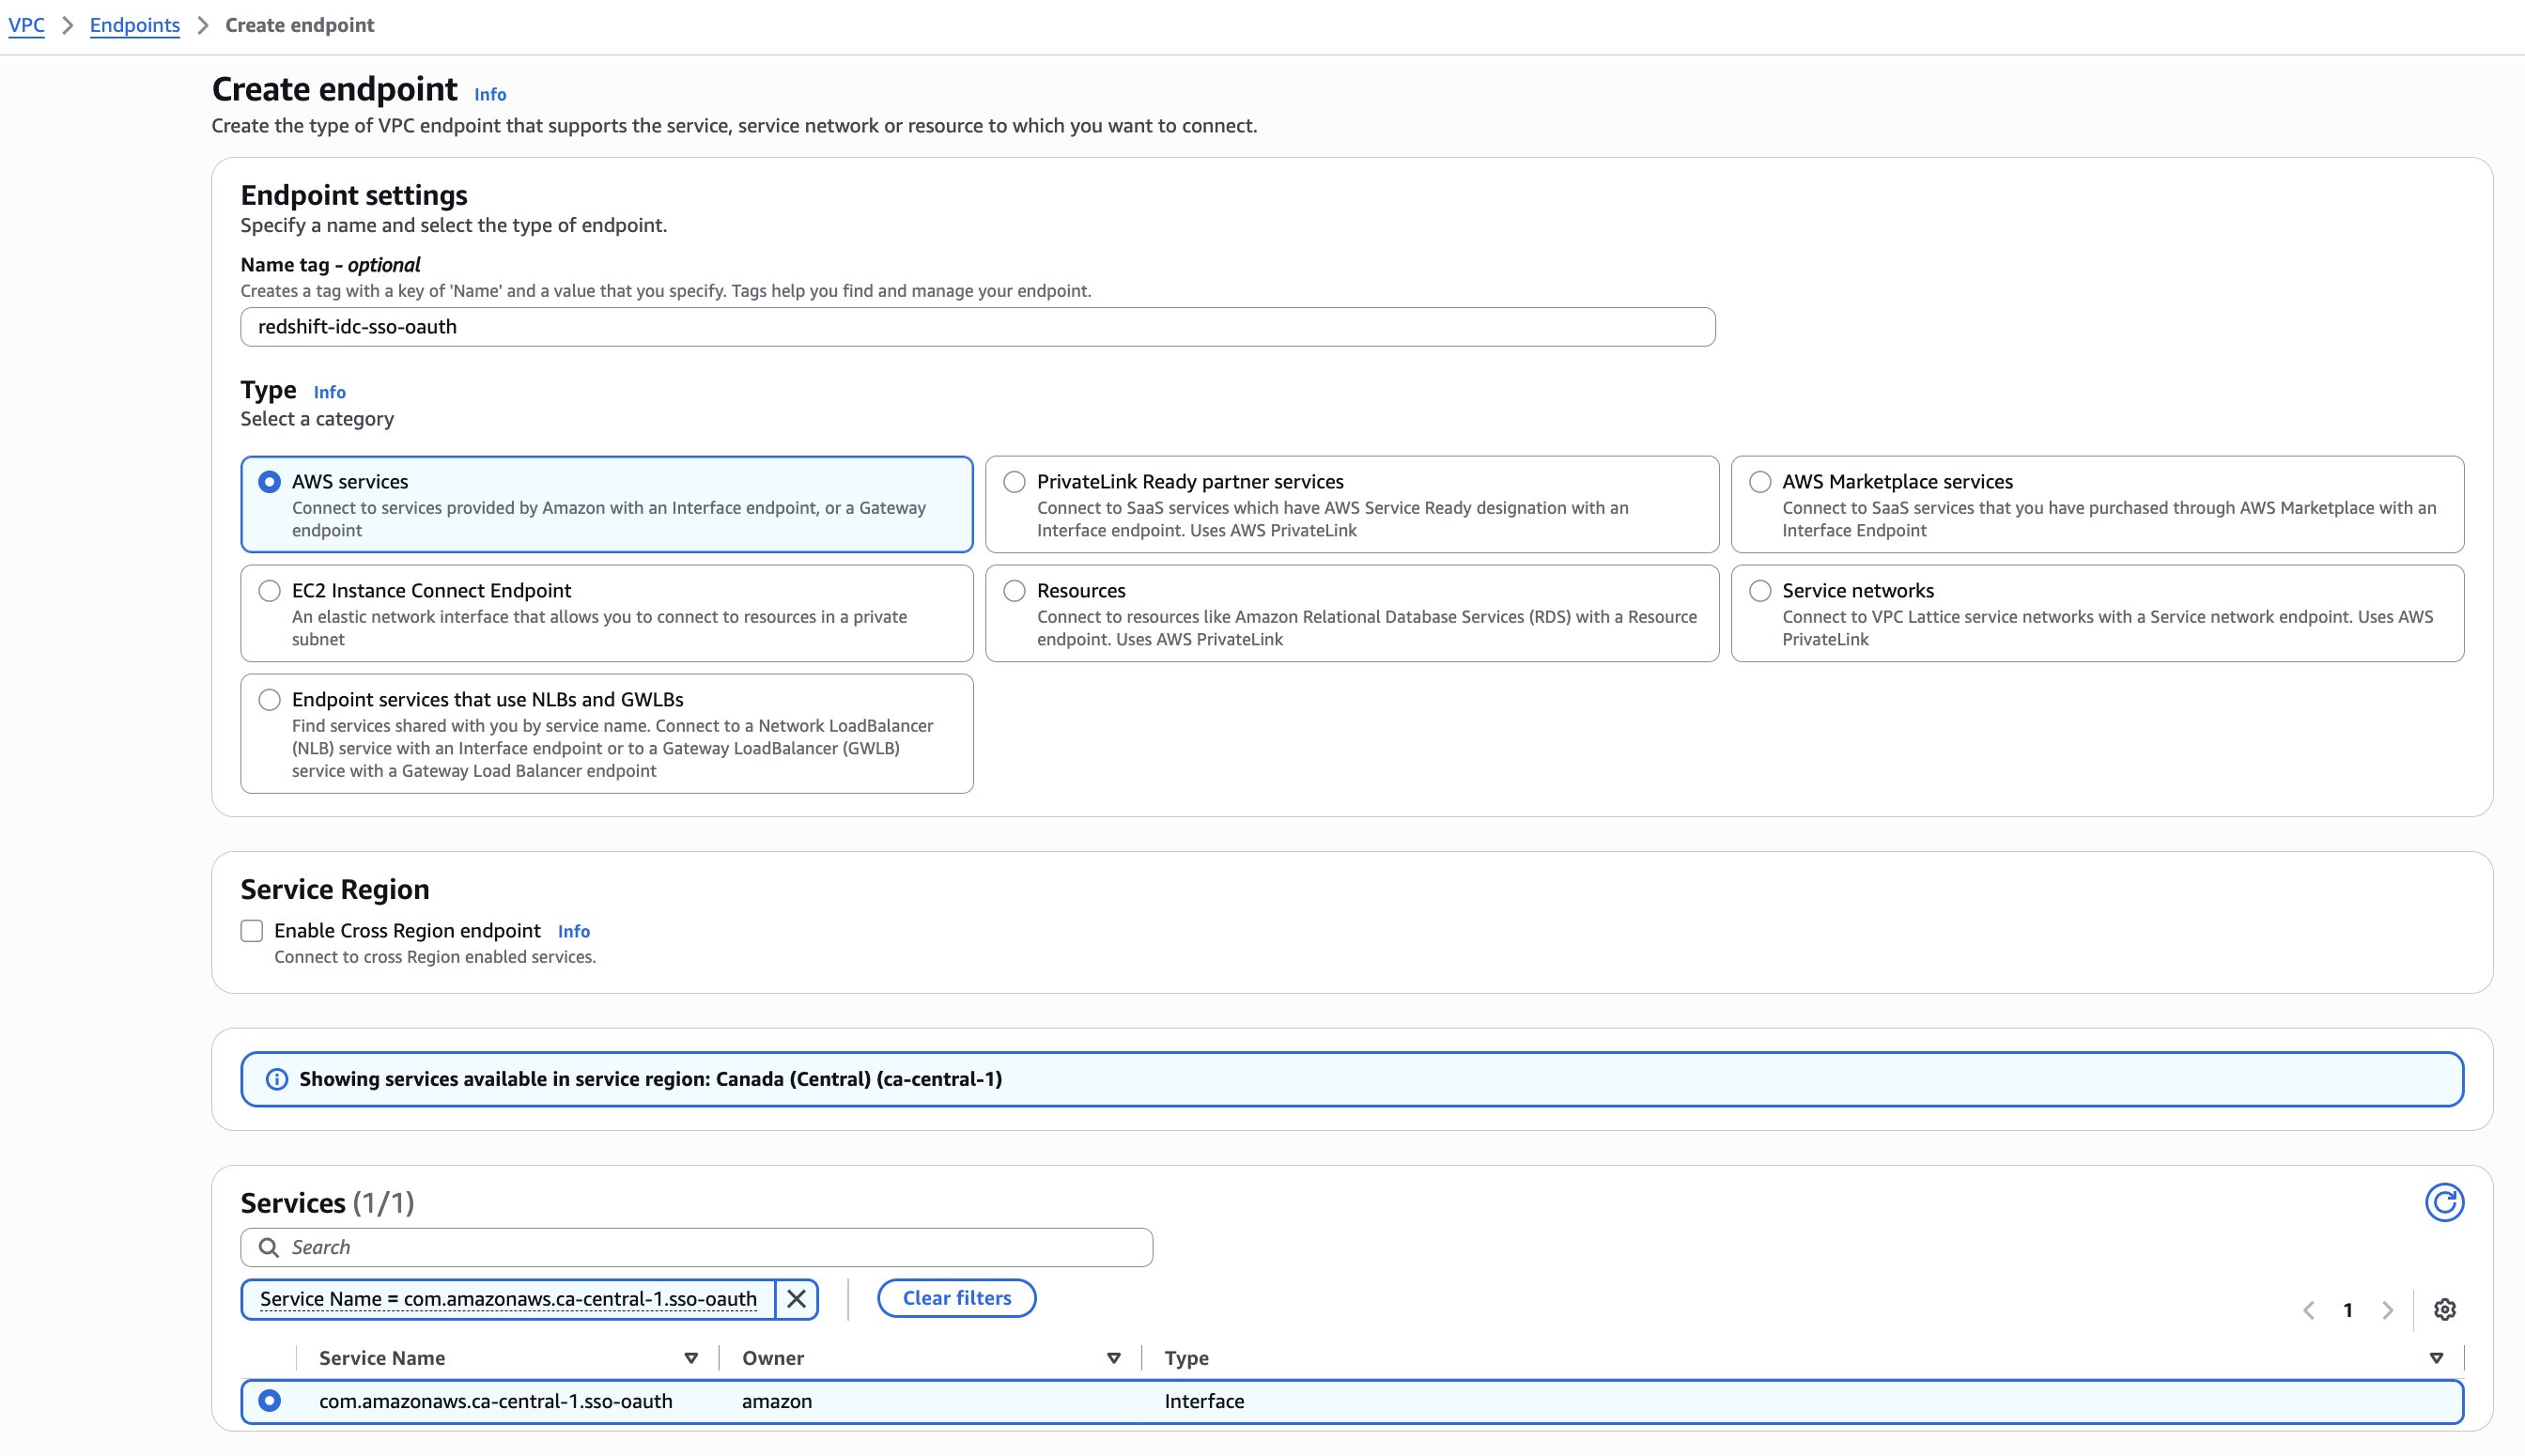
Figure 5: Create an interface VPC endpoint, part 1
- For VPC, select the VPC from which you will access the AWS service. In our use case, we choose the Amazon Redshift VPC.
- To enable private DNS support, select Additional settings and choose Enable private DNS name.
- For Subnets, select the subnets in which to create endpoint network interfaces. You can select one subnet per Availability Zone. You can’t select multiple subnets from the same Availability Zone. For more information, see Subnets and Availability Zones.
- For IP address type, choose IPv4. This assigns IPv4 addresses to the endpoint network interfaces. This option is supported only if all selected subnets have IPv4 address ranges and the service accepts IPv4 requests.
- For Security groups, select the security groups to associate with the endpoint network interfaces. For this post, we have selected default security group associated with Redshift. The following screenshot shows the VPC, subnet, and security group selections for the endpoint.
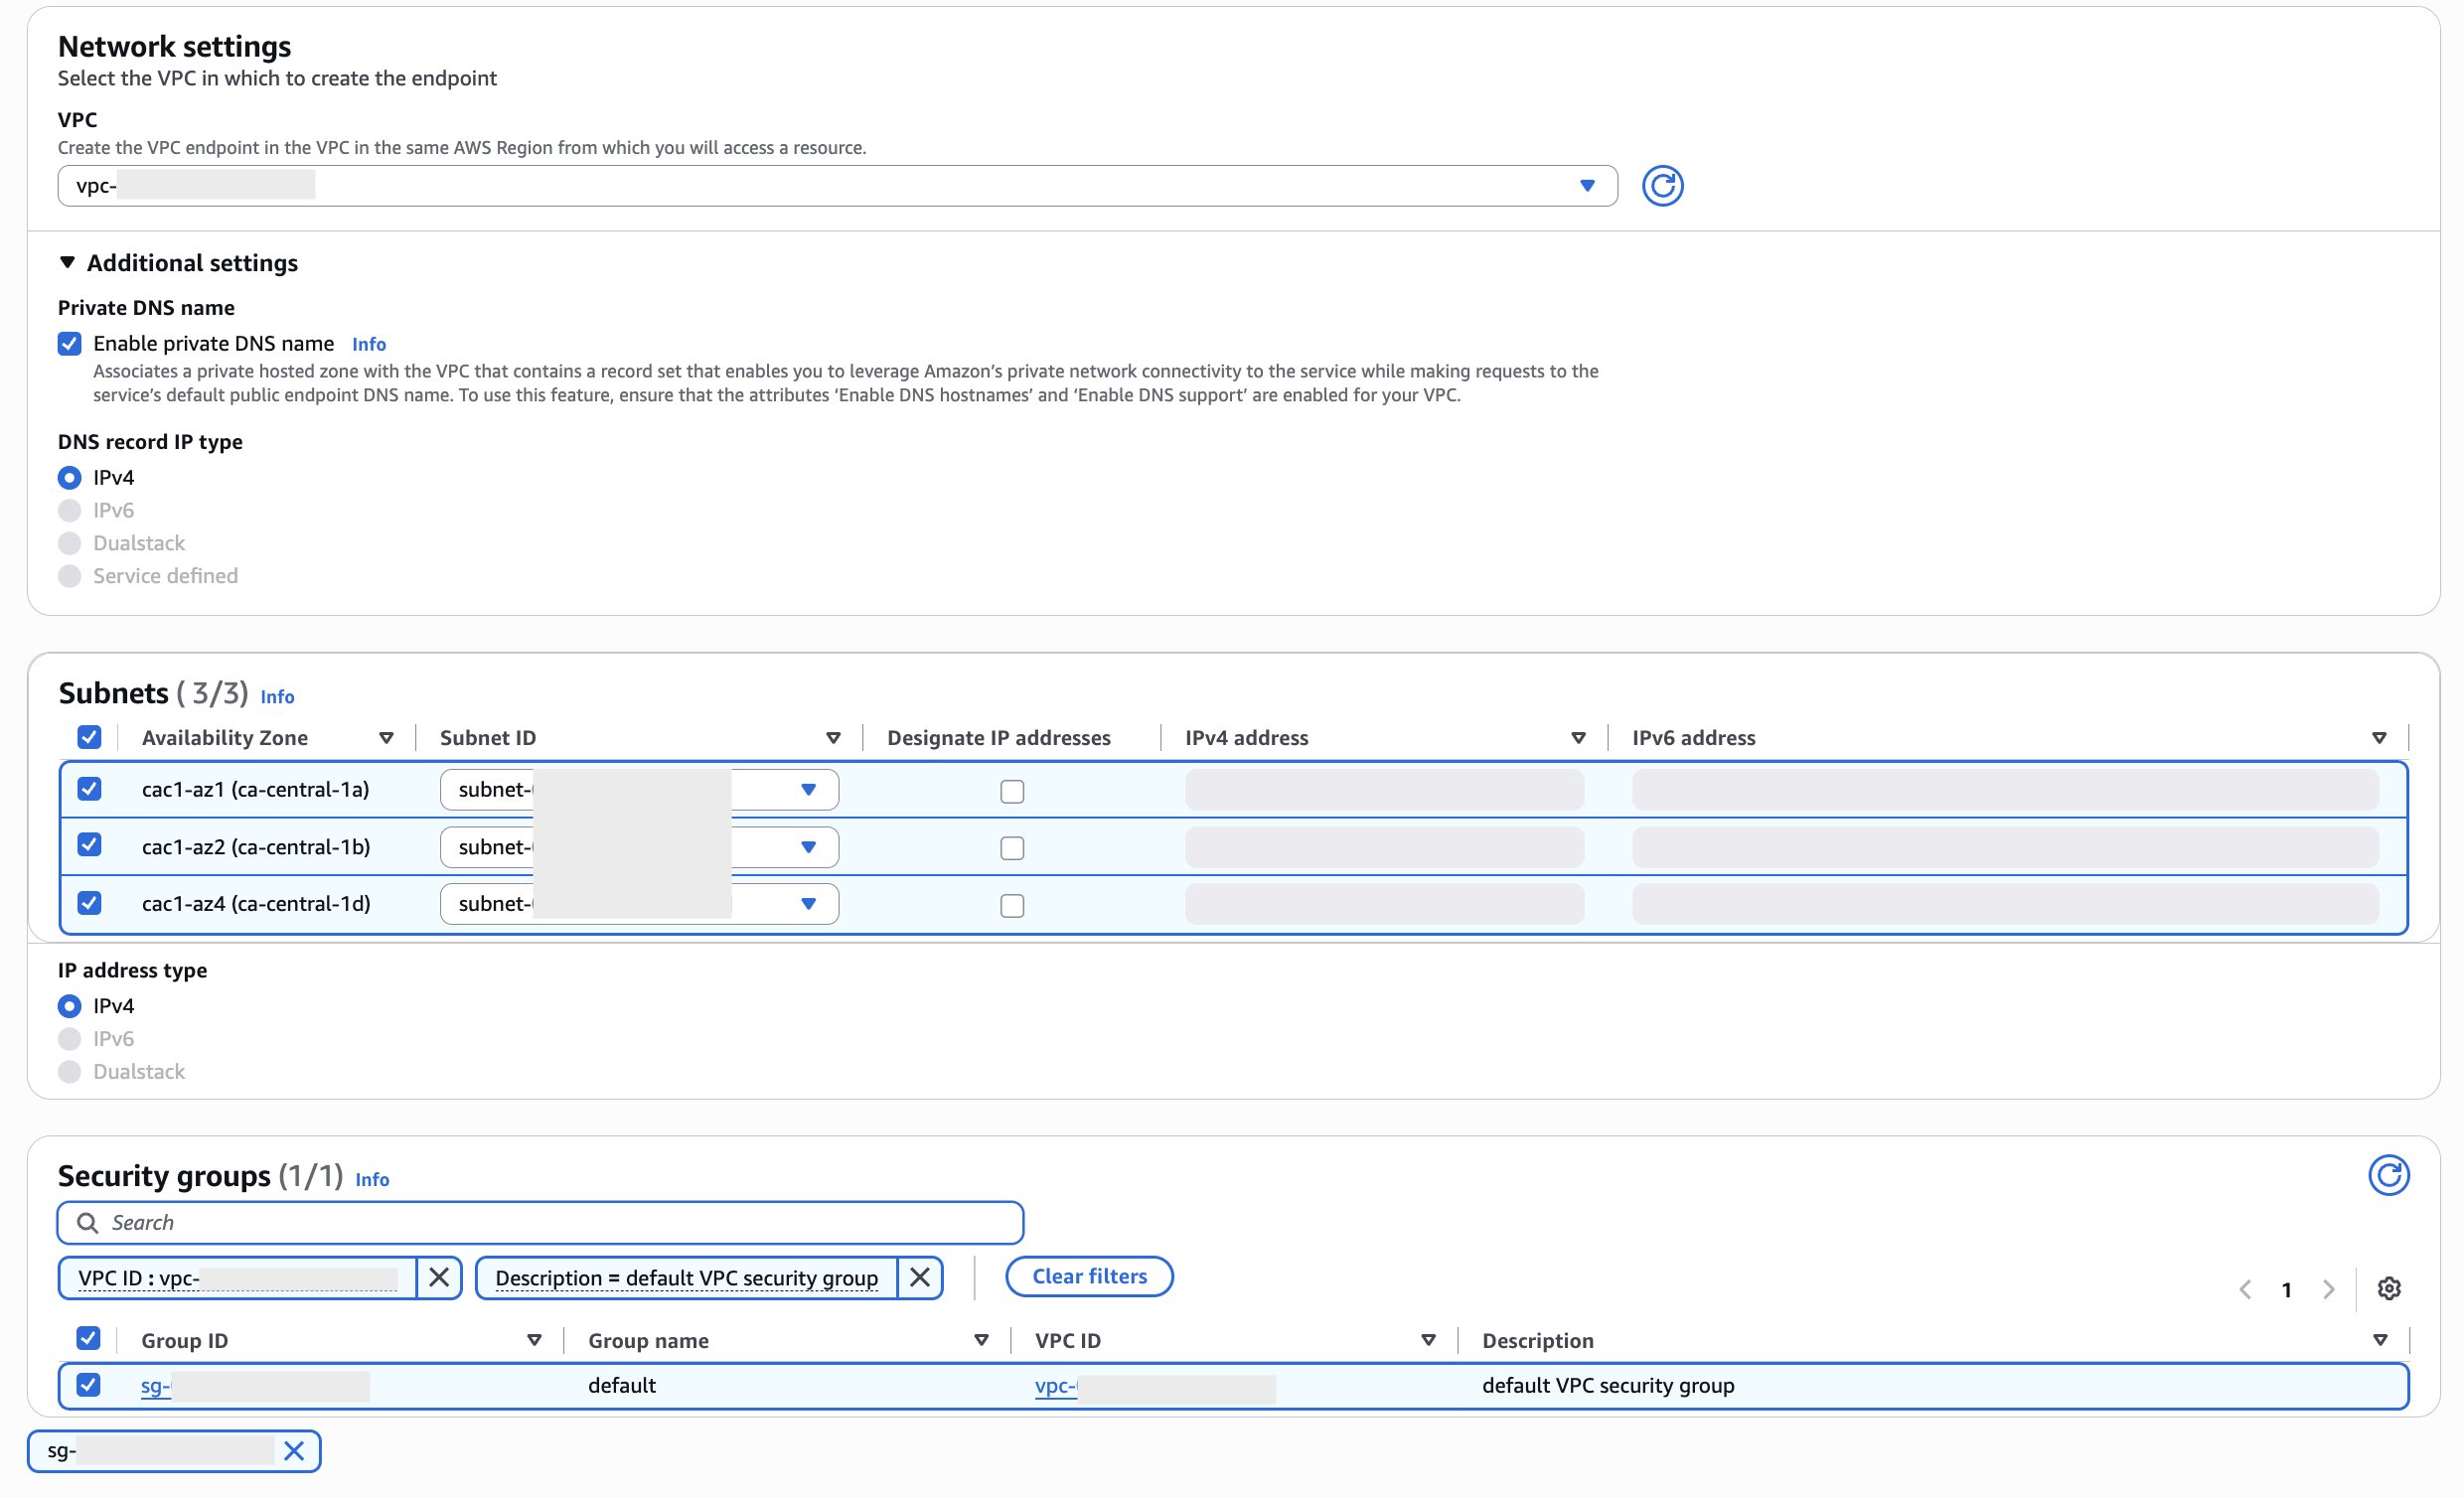
Figure 6: Create an interface VPC endpoint, part 2
- For Policy, to allow all operations by all principals on all resources over the interface endpoint, select Full access. To restrict access, select Custom and enter a policy. This option is available only if the service supports VPC endpoint policies. For more information, see Endpoint policies.
- (Optional) To add a tag, choose Add new tag and enter the tag key and the tag value.
- Choose Create endpoint. The following screenshot shows the policy and tag settings before you create the endpoint.
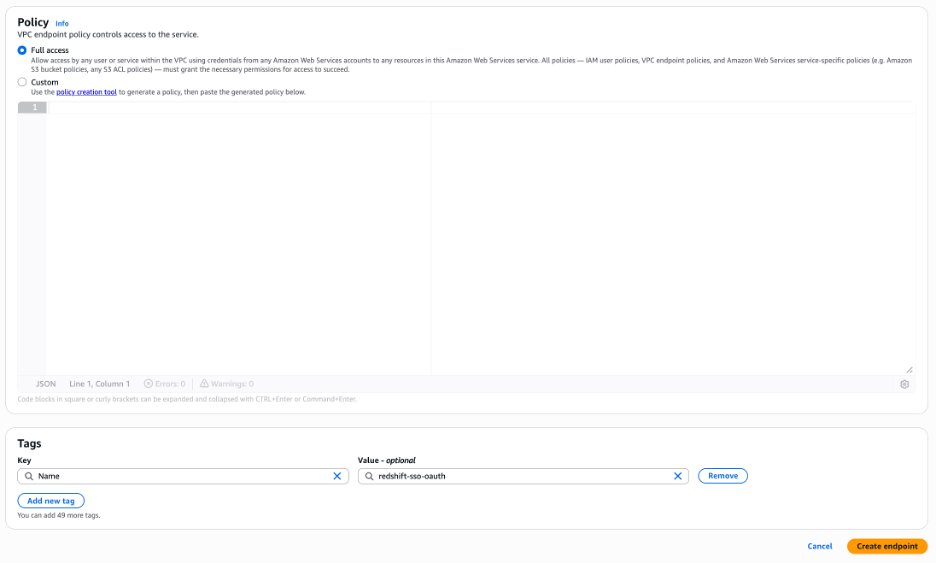
Figure 7: Create an interface VPC endpoint, part 3
Repeat steps 1–14 for the identity store endpoint, search for identitystore and select the service for your Region (com.amazonaws.<region>.identitystore).
Two settings in the preceding steps are important:
- Enable private DNS name is required. Amazon Redshift resolves the public service hostname, for example,
oidc.<region>.amazonaws.com. Private DNS is what points that hostname at your interface endpoint, so the traffic stays inside your VPC. - Use the cluster’s security group, because the cluster is the caller. The endpoint’s security group must allow inbound HTTPS on port 443 from the cluster. Reusing the cluster’s own security group is the simplest approach when it already allows traffic from itself. A dedicated security group needs an explicit port 443 inbound rule from the cluster’s security group.
(Optional) To create an interface endpoint using the command line
- create-vpc-endpoint (AWS Command Line Interface (AWS CLI)).
- New-EC2VpcEndpoint (Tools for Windows PowerShell).
Step 4 (optional): Create endpoints for AWS Glue and AWS Lake Formation
Complete this step only if your cluster queries external data through the AWS Glue Data Catalog and AWS Lake Formation. Common examples include Amazon S3 Tables, a capability of Amazon S3, and data lakes registered with Lake Formation. If you only need single sign-on, you can skip to Step 5. Amazon Redshift calls the AWS Glue Data Catalog to enumerate databases and tables, and calls AWS Lake Formation to check permissions and vend temporary credentials for the underlying data. Like the authentication calls, these are made by the cluster, so with enhanced VPC routing enabled they travel through your VPC and need a path of their own.
Repeat steps 1–14 from Step 3 for:
com.amazonaws.<region>.glue.com.amazonaws.<region>.lakeformation.
With these endpoints in place, Amazon Redshift routes external catalog operations such as listing external tables through the VPC endpoints rather than the public internet, keeping metadata traffic on the AWS network.
Step 5: Create an Amazon S3 gateway endpoint
With enhanced VPC routing enabled, anything the cluster does against Amazon S3 (COPY, UNLOAD, and Amazon S3 Tables) also travels through your VPC. Create a gateway endpoint and associate it with the route table(s) used by your cluster’s subnets:
- Open the Amazon VPC console at https://console.aws.amazon.com/vpc/.
- In the navigation pane, choose Endpoints, then choose Create endpoint.
- For Type, choose AWS services.
- For Service name, search for s3 and select the service for your Region with Type: Gateway (
com.amazonaws.<region>.s3). The following screenshot shows the Create endpoint page with the Amazon S3 gateway service selected.
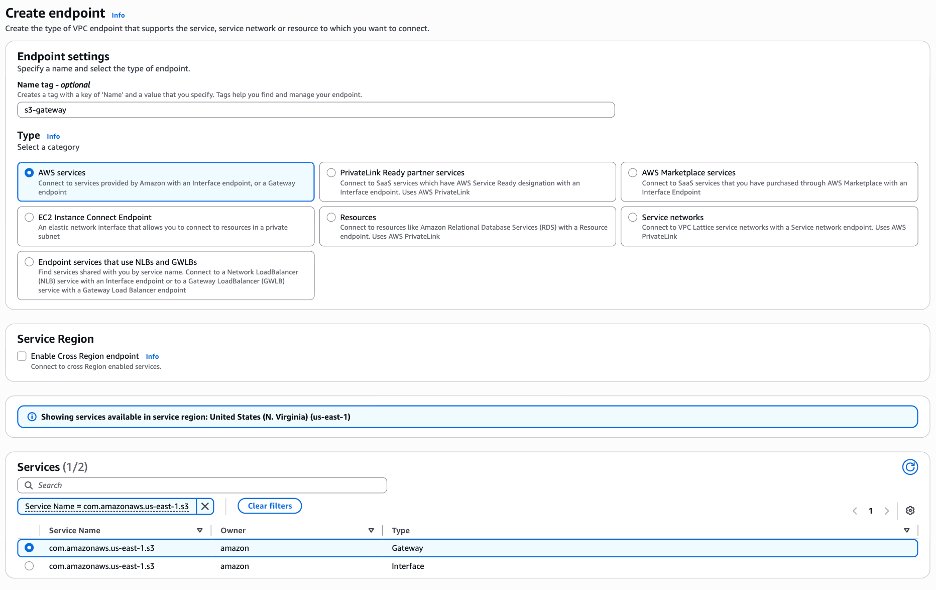
Figure 8: Create an Amazon S3 gateway endpoint, part 1
- For VPC, choose your Amazon Redshift VPC.
- For Route tables, select the route table(s) associated with the subnets your cluster runs in.
- Choose Create endpoint. The following screenshot shows the VPC and route table selections for the S3 gateway endpoint.
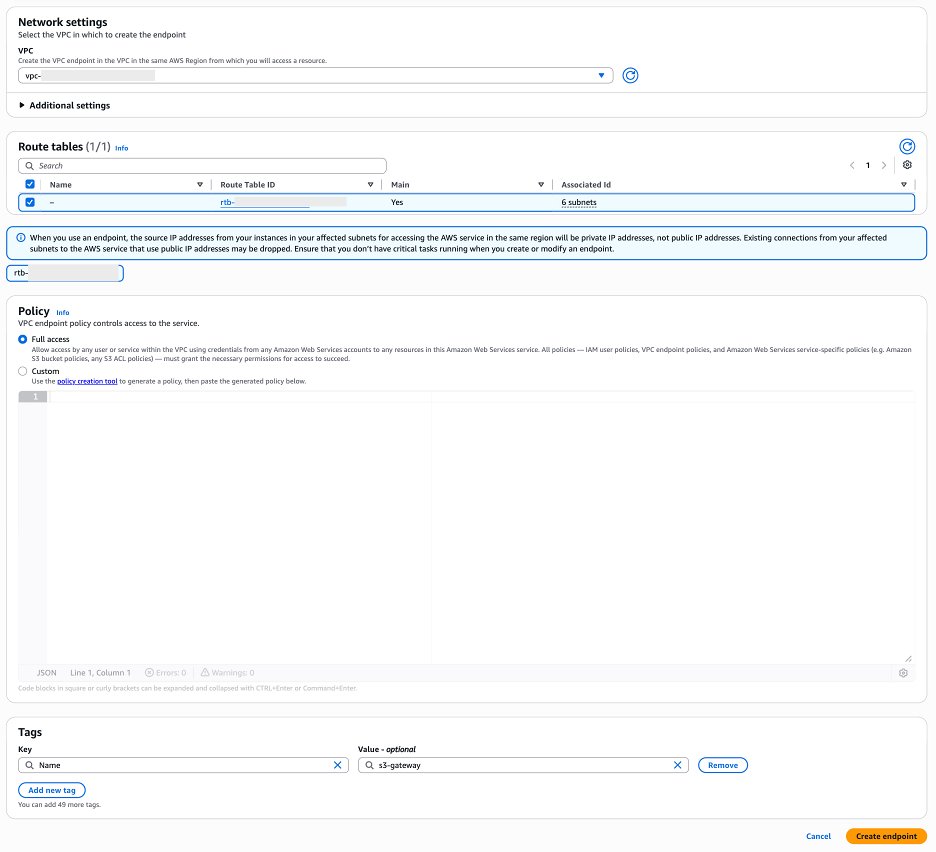
Figure 9: Create an Amazon S3 gateway endpoint, part 2
Step 6: Validate the endpoints
Confirm in the Amazon VPC console that every endpoint you created is available, and that private DNS is enabled on the interface endpoints.
- Open the Amazon VPC console at https://console.aws.amazon.com/vpc/.
- In the navigation pane, choose Endpoints.
- In the endpoints list, use the filter bar to filter by VPC ID (choose VPC ID and select your Amazon Redshift VPC). Then locate the endpoints you created for this walkthrough, sso-oauth, identitystore, the Amazon S3 gateway endpoint, and (if you created them) glue and lakeformation.
- Confirm each endpoint shows a Status of Available.
- Select each interface endpoint (sso-oauth, identitystore, glue, lakeformation) and, on the Details tab, confirm Private DNS names enabled is Yes. The following screenshot shows the completed endpoints list with each endpoint in the Available state.
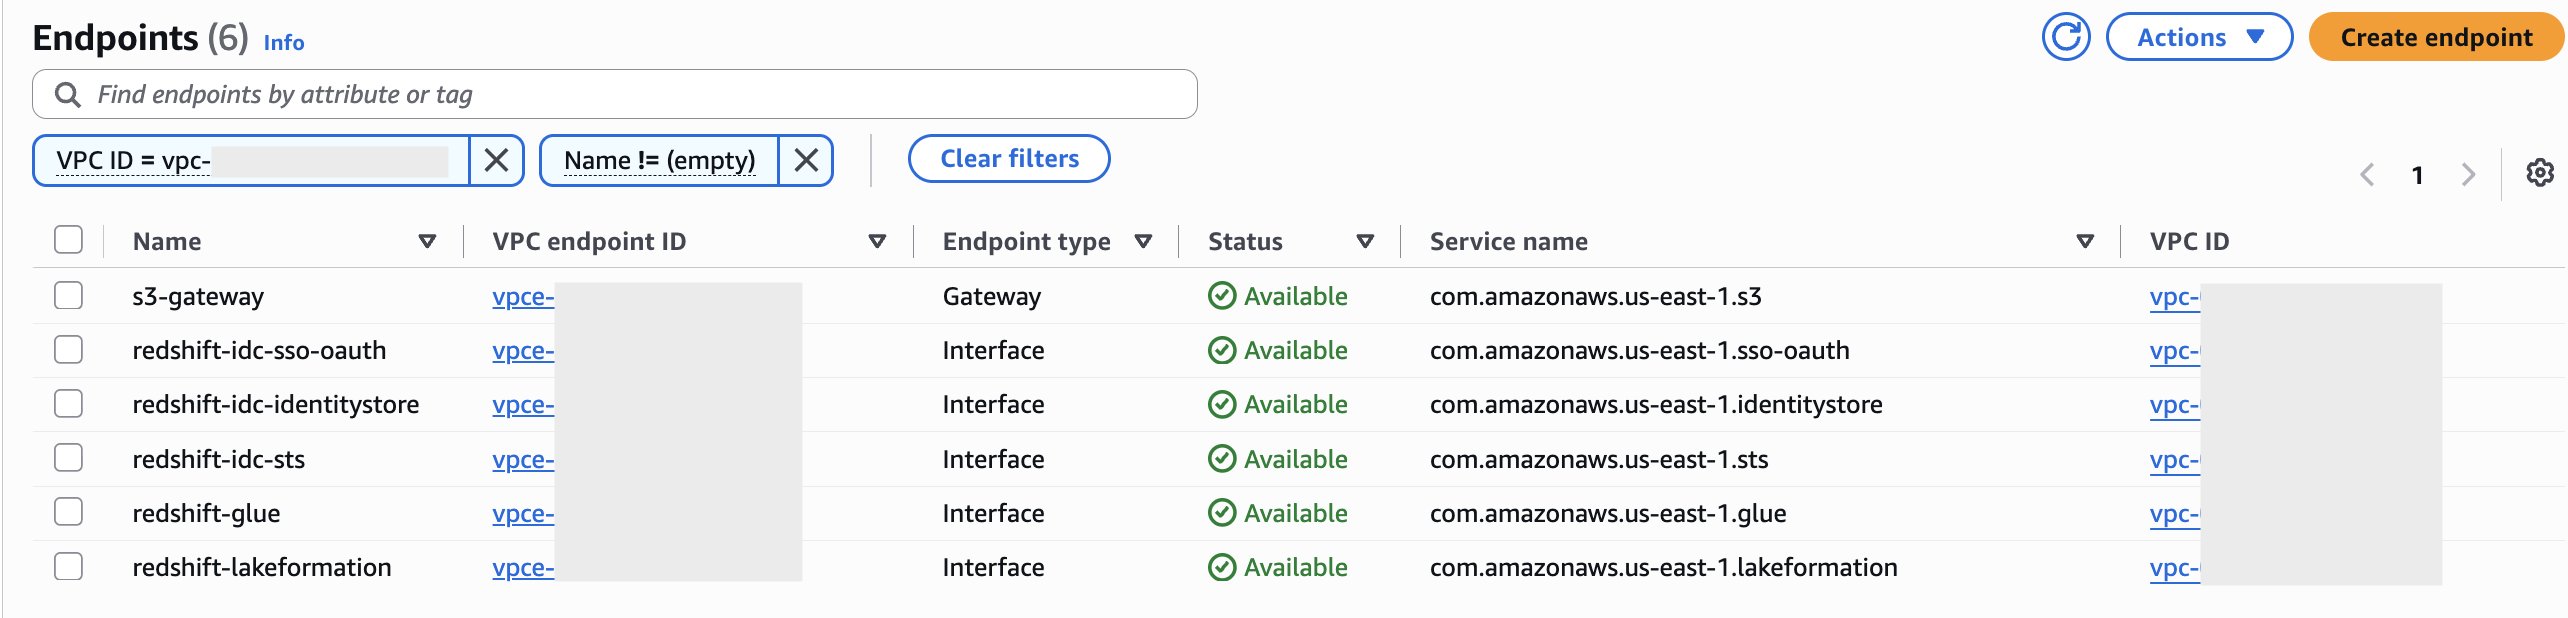
Figure 10: VPC endpoints created in this walkthrough, in the Available state
Step 7: Test single sign-on with Amazon Redshift Query Editor V2
- On the Amazon Redshift console, choose Query editor v2.
- Choose your cluster and then choose IAM Identity Center as the connection method.
- Sign in with your corporate credentials when prompted.
- Expand the cluster in the tree view to list databases, schemas, and tables.
The database list populates within a few seconds. Confirm the login on the server side by querying the connection log. Run this as a user who does not use IAM Identity Center, for example a database user with a password, or through the Amazon Redshift Data API:
A successful sign-in shows user_name as <idc_namespace>:<user@example.com> with event of authenticated, which confirms that the identity was resolved through the endpoints you created. The following screenshot shows the sys_connection_log query results, where each IAM Identity Center sign-in appears with a user_name in the <idc_namespace>:<user@example.com> format.
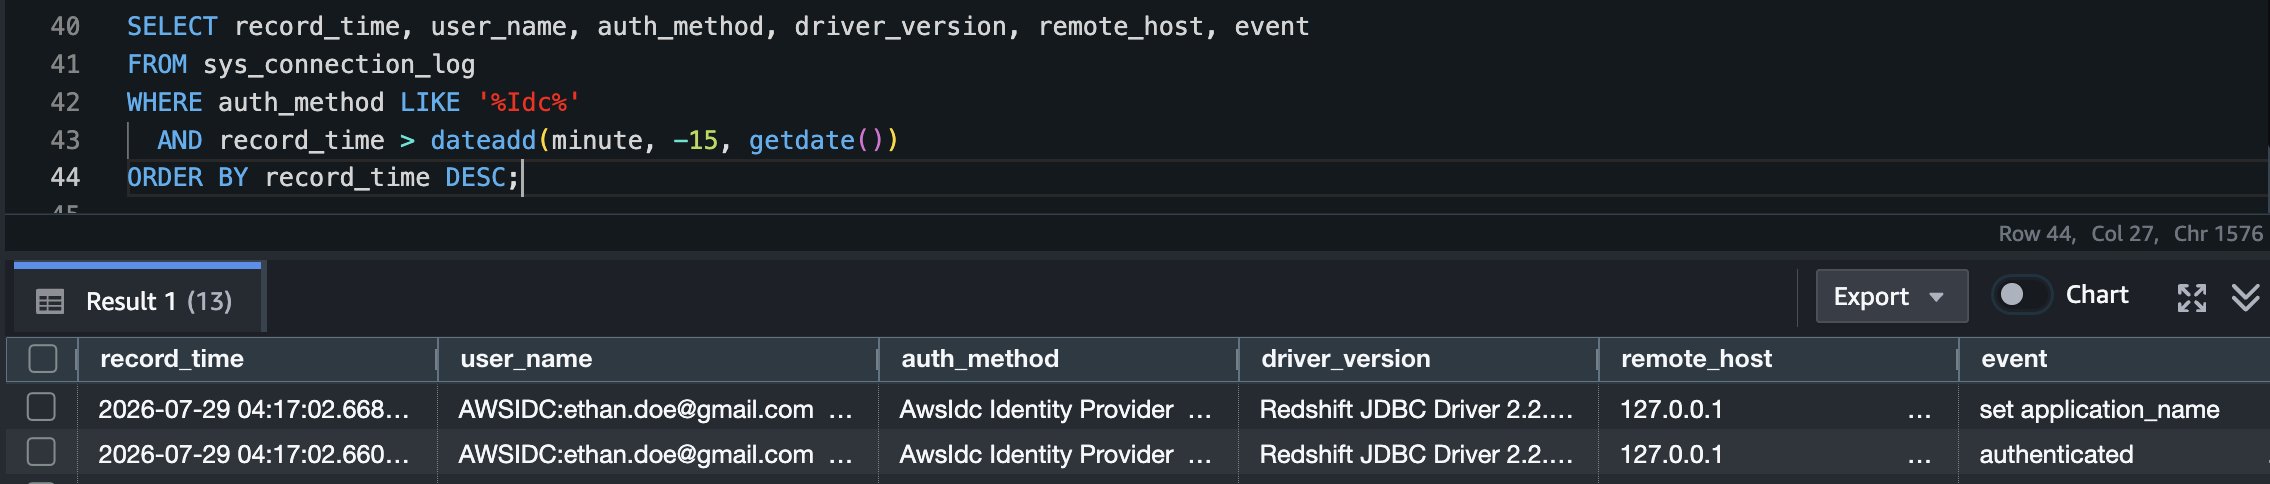
Figure 11: Query Editor V2 connected with IAM Identity Center, showing the database list
Step 8: Test single sign-on with a SQL client
Testing from a SQL client on an EC2 instance inside your VPC is the stronger validation, and we recommend doing both. Query Editor V2 connects through an Amazon Redshift managed proxy, so its connections are recorded with a loopback address. A client running inside your VPC connects to the cluster endpoint directly, which is exactly the path the endpoints you created are there to serve.
Set up SQL Workbench/J
SQL Workbench/J connects through the Amazon Redshift JDBC driver. On an EC2 instance in the same VPC as your cluster, download and install SQL Workbench/J.
- Download the latest Amazon Redshift JDBC driver together with its dependent libraries, and extract the archive to a folder on the instance.
- Start SQL Workbench/J, and choose File, then Manage Drivers.
- Choose the Create a new entry icon, and for Name, enter Amazon Redshift.
- For Library, choose the folder icon, and select the driver JAR file along with every JAR file in the dependent libraries folder. Keep only one version of the driver in the list, and remove any previous entries.
- Choose File, then Connect window, and choose the Create a new connection profile icon. Enter a name for the profile, such as
redshift-idc. - For Driver, choose the Amazon Redshift driver that you created.
- For URL, enter your cluster endpoint in the form
jdbc:redshift://<cluster endpoint>:5439/<database>, for examplejdbc:redshift://my-redshift-cluster.abc123xyz789.ca-central-1.redshift.amazonaws.com:5439/dev. - Leave Username and Password empty. The browser plugin obtains the identity interactively.
- Choose Extended Properties, and add the following three properties:
| Property | Value |
plugin_name |
com.amazon.redshift.plugin.BrowserIdcAuthPlugin |
issuer_url |
https://identitycenter.amazonaws.com/ssoins-<instance-id> |
idc_region |
The Region of your IAM Identity Center instance, such as ca-central-1 |
- Clear Separate connection per tab, so that each editor tab reuses the same physical connection rather than prompting you to sign in again.
- Choose Test. Your default browser opens. Sign in with your corporate credentials, and then choose Allow access so that the Amazon Redshift JDBC driver can access your data.
- If the connection succeeds, you see a prompt confirming the connection to your Amazon Redshift endpoint, as shown in the following screenshot.
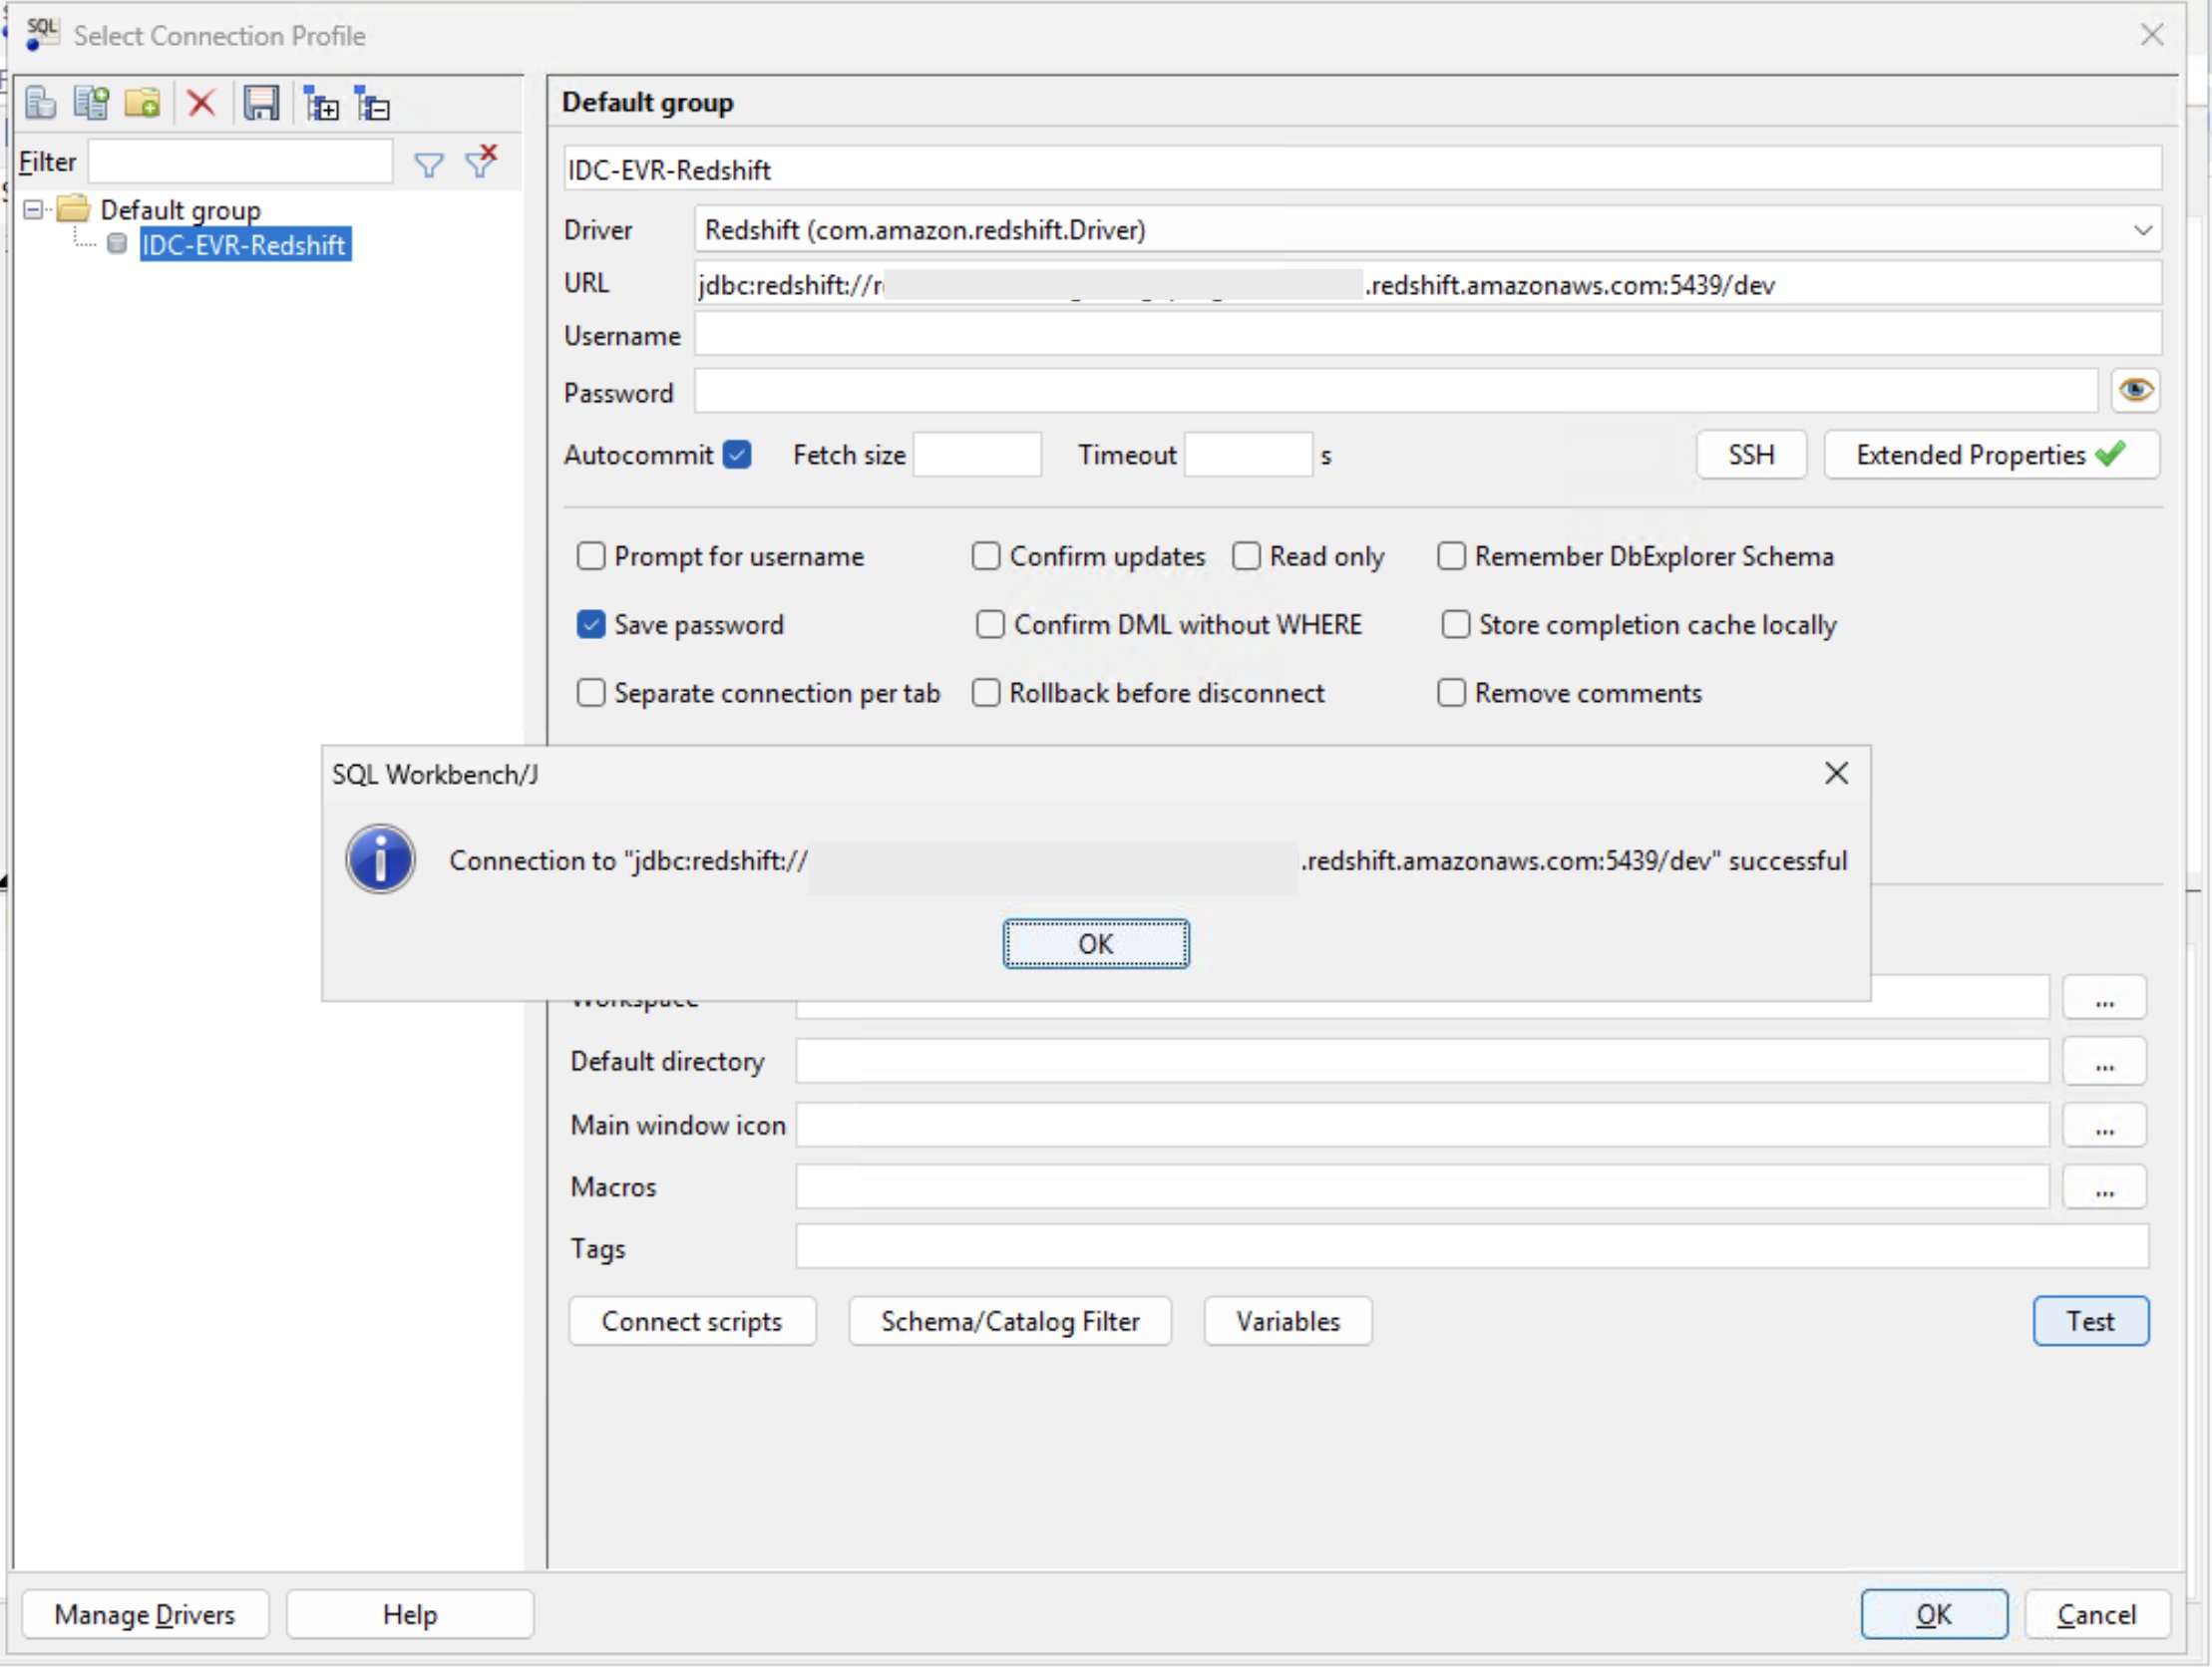
Figure 12: SQL Workbench/J connection for Amazon Redshift using the IAM Identity Center browser plugin
In the browser, you will see the following message once the authentication is successful.
Congratulations! You have IAM Identity Center single sign-on working on an Amazon Redshift cluster with enhanced VPC routing enabled.
Step 9: Verify the calls on AWS CloudTrail
You can confirm from AWS CloudTrail that these calls travel through your interface endpoints rather than the internet. Each event includes a vpcEndpointId field naming the endpoint the call traversed, along with a vpcEndpointAccountId field identifying the account that owns it.
The following table maps each interface endpoint to the CloudTrail event you’ll see:
| Service endpoint | Event source | CloudTrail event |
com.amazonaws.<region>.sso-oauth |
sso-oauth.amazonaws.com | CreateTokenWithIAM |
com.amazonaws.<region>.identitystore |
identitystore.amazonaws.com | DescribeUser, ListGroupMembershipsForMember, BatchDescribeGroup |
The following screenshot shows the snippet from the CloudTrail logs showing the CreateTokenWithIAM event that Amazon Redshift generates when it exchanges the IAM Identity Center access token. The eventSource is sso-oauth.amazonaws.com, and the vpcEndpointId field confirms the call traversed your interface VPC endpoint rather than the public internet. The invokedBy field shows the call originated from Amazon Redshift (redshift.amazonaws.com), not from the client.
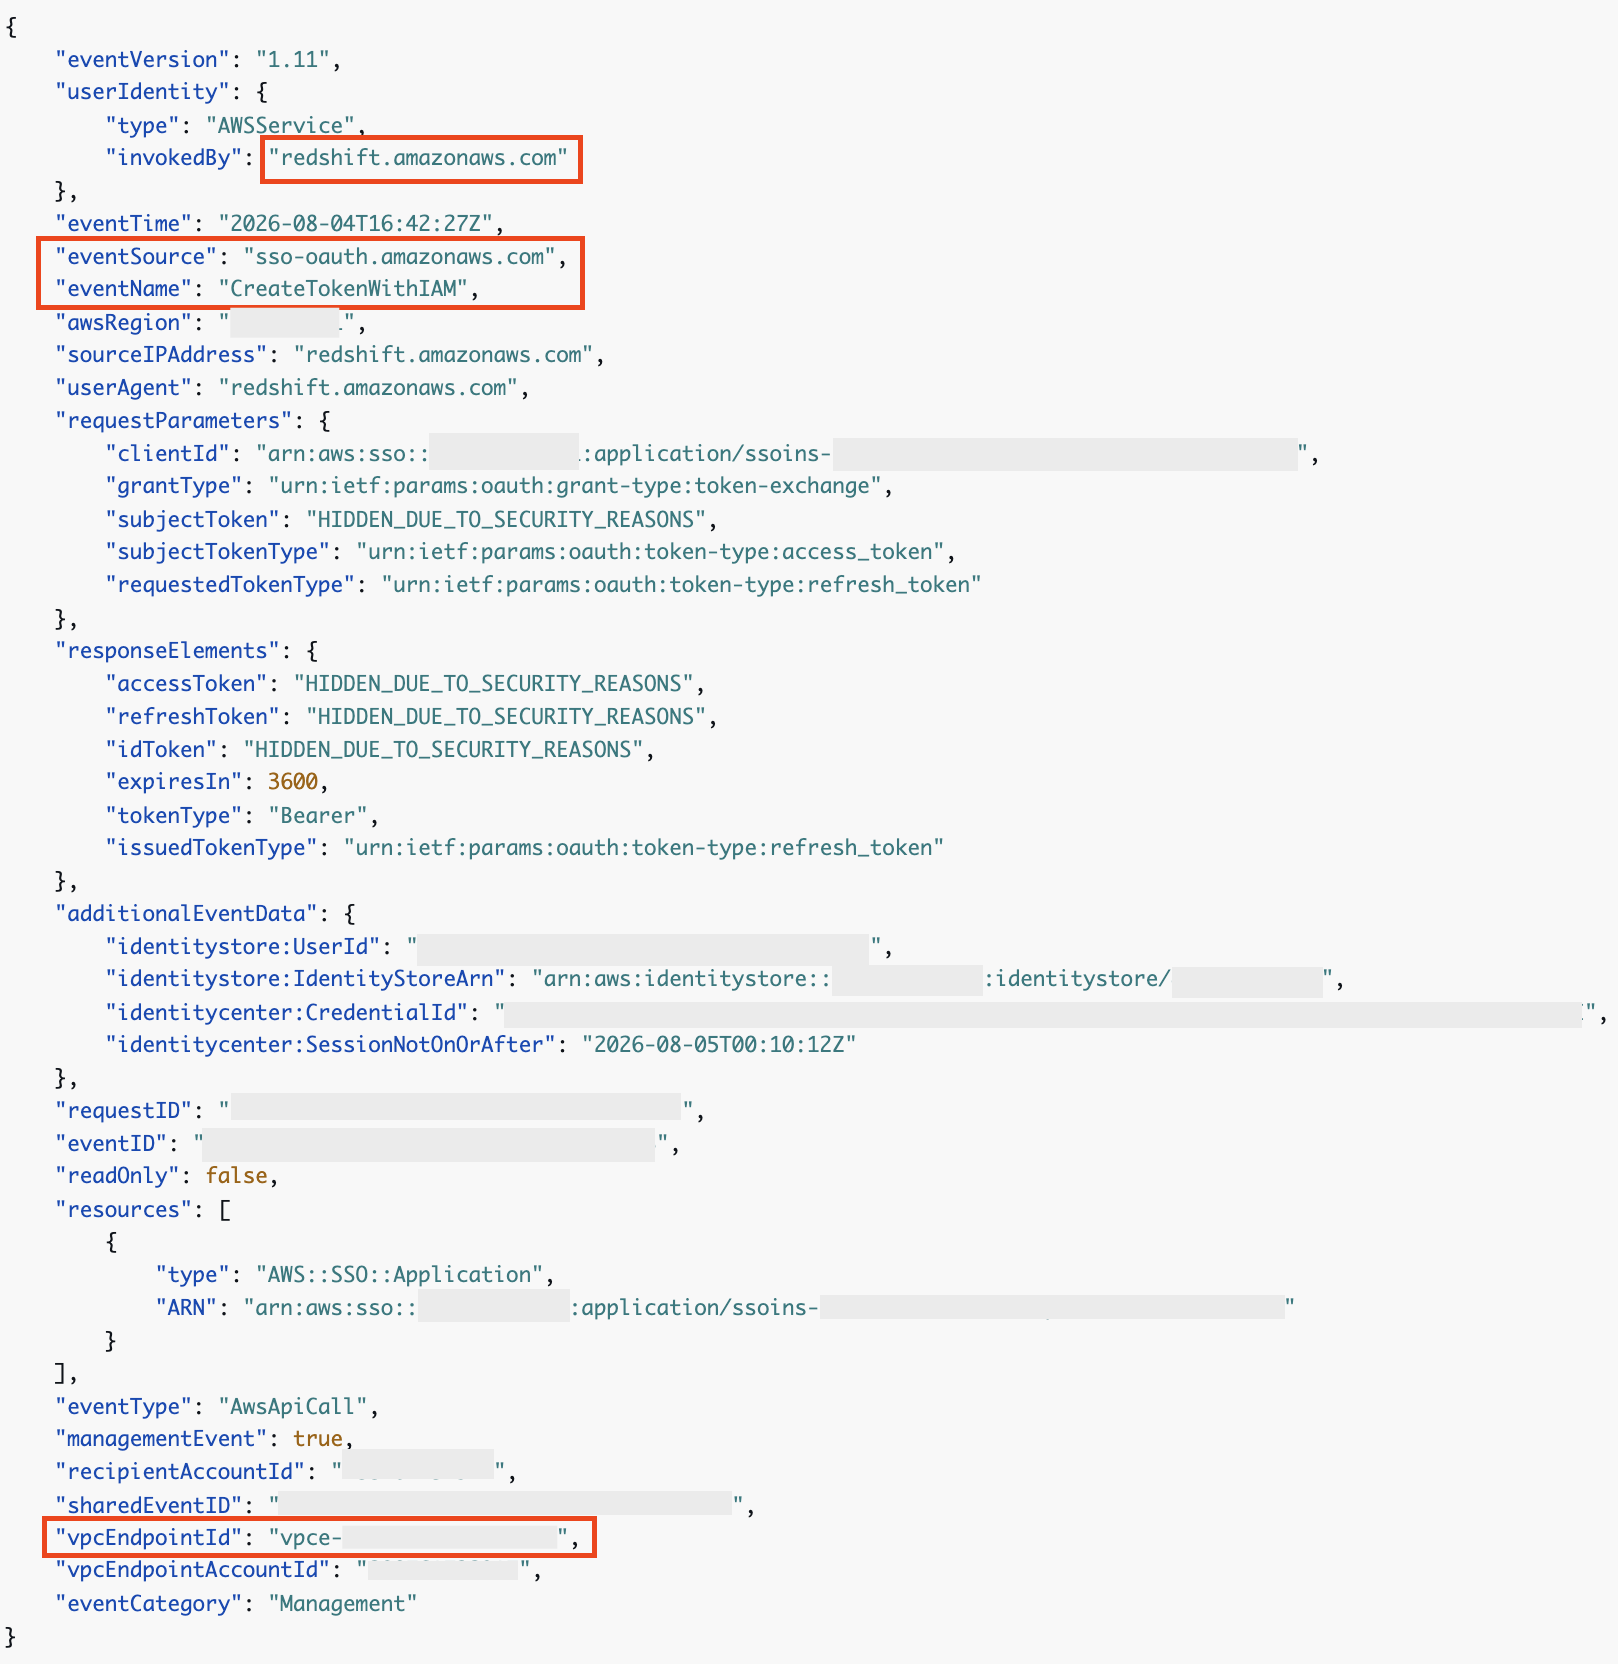
Figure 13: CloudTrail CreateTokenWithIAM event traversing the sso-oauth interface endpoint
Similarly, the following screenshot shows a DescribeUser event (event source identitystore.amazonaws.com) generated when Amazon Redshift resolves the authenticated user against the identity store. As with the previous event, the invokedBy field shows the call originated from Amazon Redshift, and the vpcEndpointId field confirms it traversed the identitystore interface endpoint.
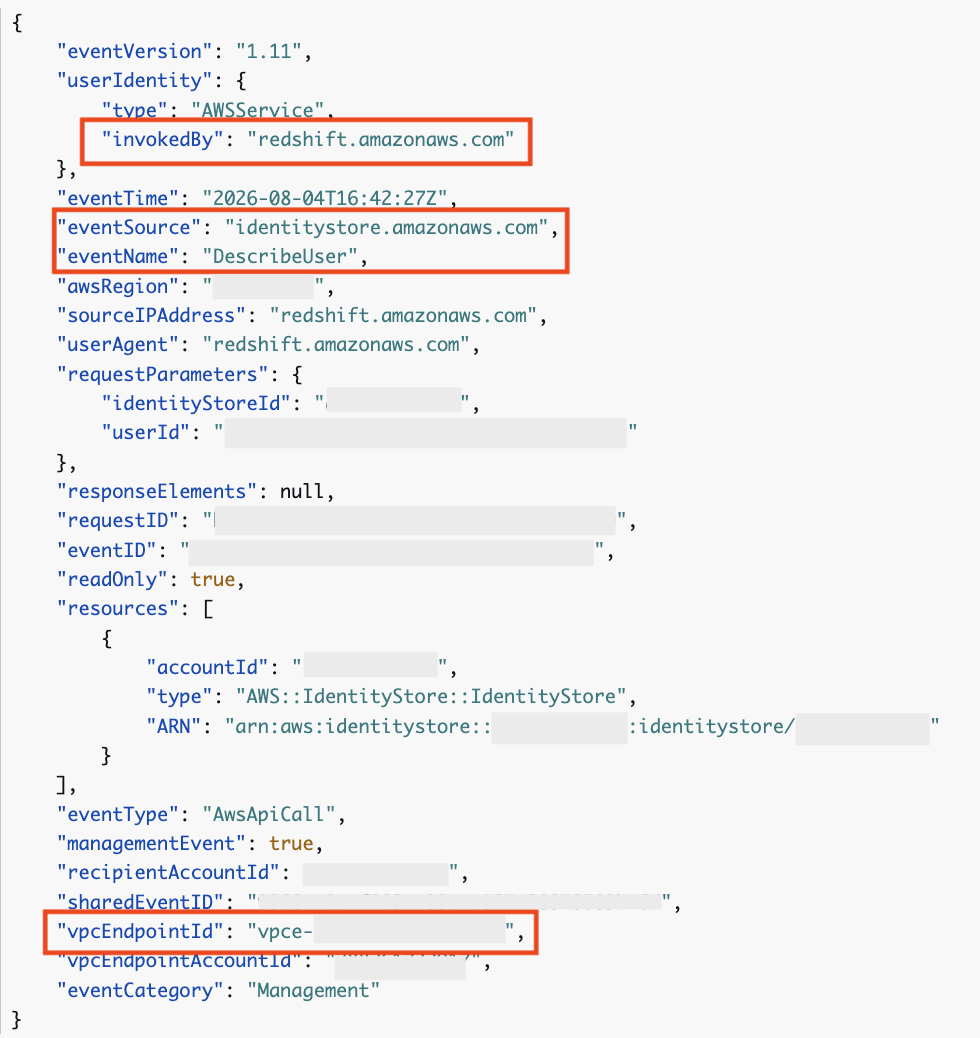
Figure 14: CloudTrail DescribeUser event traversing the identitystore interface endpoint
Note: where the events appear depends on how your IAM Identity Center instance is deployed:
CreateTokenWithIAM(event sourcesso-oauth.amazonaws.com) is recorded in the same account as your Amazon Redshift cluster.- Identity Store API calls (
DescribeUser,ListGroupMembershipsForMember,BatchDescribeGroup) are recorded in the account that owns your IAM Identity Center instance. The event source isidentitystore.amazonaws.com. If you use a centralized instance in a delegated administrator or management account, these events appear in that account and not in the account running your cluster. Searching the cluster’s own account returns nothing, even when authentication is working normally. To confirm which account to look in, runaws sso-admin list-instancesand checkOwnerAccountId.
Clean up
To avoid incurring future charges, delete the resources you created for this walkthrough. These endpoints provide the network path for single sign-on while enhanced VPC routing is enabled, so remove them only if you no longer need the integration.
- On the Amazon VPC console, choose Endpoints.
- Select the sso-oauth and identitystore interface endpoints you created, and choose Actions, then Delete VPC endpoints.
- Select the glue and lakeformation interface endpoints, if you created them, and delete them.
- Select the Amazon S3 gateway endpoint and delete it. This also removes its route table entries.
- Terminate the EC2 instance you used to test the SQL client connection, if you created one for this walkthrough.
- If you no longer need the integration, remove the IAM Identity Center application assignment for Amazon Redshift and delete the associated IAM role and policy.
Conclusion
In this post, we showed you how to enable AWS IAM Identity Center authentication for Amazon Redshift on clusters with enhanced VPC routing enabled. Your users get single sign-on with their corporate credentials, and the authentication traffic stays private to your VPC. The key concept is that Amazon Redshift, not your client, validates the access token. Because enhanced VPC routing is enabled, Amazon Redshift routes that validation call through your VPC. On a cluster running patch 204 or later, interface endpoints for sso-oauth and identitystore give Amazon Redshift a private path over AWS PrivateLink. Adding endpoints for AWS Glue, AWS Lake Formation, and Amazon S3 extends the same benefit to data lake and lakehouse queries.
Try this setup in your own environment and let us know what you think in the comments. For more information, see the following resources:
- Using AWS IAM Identity Center authentication with enhanced VPC routing.
- Using Amazon Redshift with AWS IAM Identity Center to enable trusted identity propagation.