AWS Big Data Blog
Integrate Tableau and PingFederate with Amazon Redshift using AWS IAM Identity Center
The series of posts on single sign-on to Amazon Redshift with AWS IAM Identity Center (successor to AWS Single Sign-On) integration continues from our prior post.
In this post, we outline a comprehensive guide for setting up single sign-on from Tableau desktop to Amazon Redshift using integration with IAM Identity Center and PingFederate as the identity provider (IdP) with an LDAP based data store, AWS Directory Service for Microsoft Active Directory.
Prerequisites
You should have the following prerequisites:
- A PingFederate account that has an active subscription. You need an admin role to set up the application on PingFederate. If you’re new to PingFederate, you can reach out to Ping Identity Sales.
- A working PingFederate server.
- Amazon Redshift Serverless workgroup or a provisioned Amazon Redshift data warehouse.
- Download and install the latest Redshift ODBC 2.X driver.
- Download and install Tableau Desktop 2024.1 or later
- Install Tableau Server 2023.3.9 or later. For Tableau Server installation, see Install and Configure Tableau Server.
Solution overview
PingFederate instance connects to IAM Identity Center using SAML. The users and groups in PingFederate are synced to IAM Identity Center using an open standard SCIM. After you set up SAML and SCIM, you will be able to enable single sign-on to Amazon Redshift from the AWS Management Console using Amazon Redshift Query Editor v2. This is achieved by creating an Identity Center application in the Amazon Redshift console.
To enable single sign-on to Amazon Redshift from outside of AWS using a third-party client like Tableau, you set up a trusted token issuer token exchange using OIDC standard.
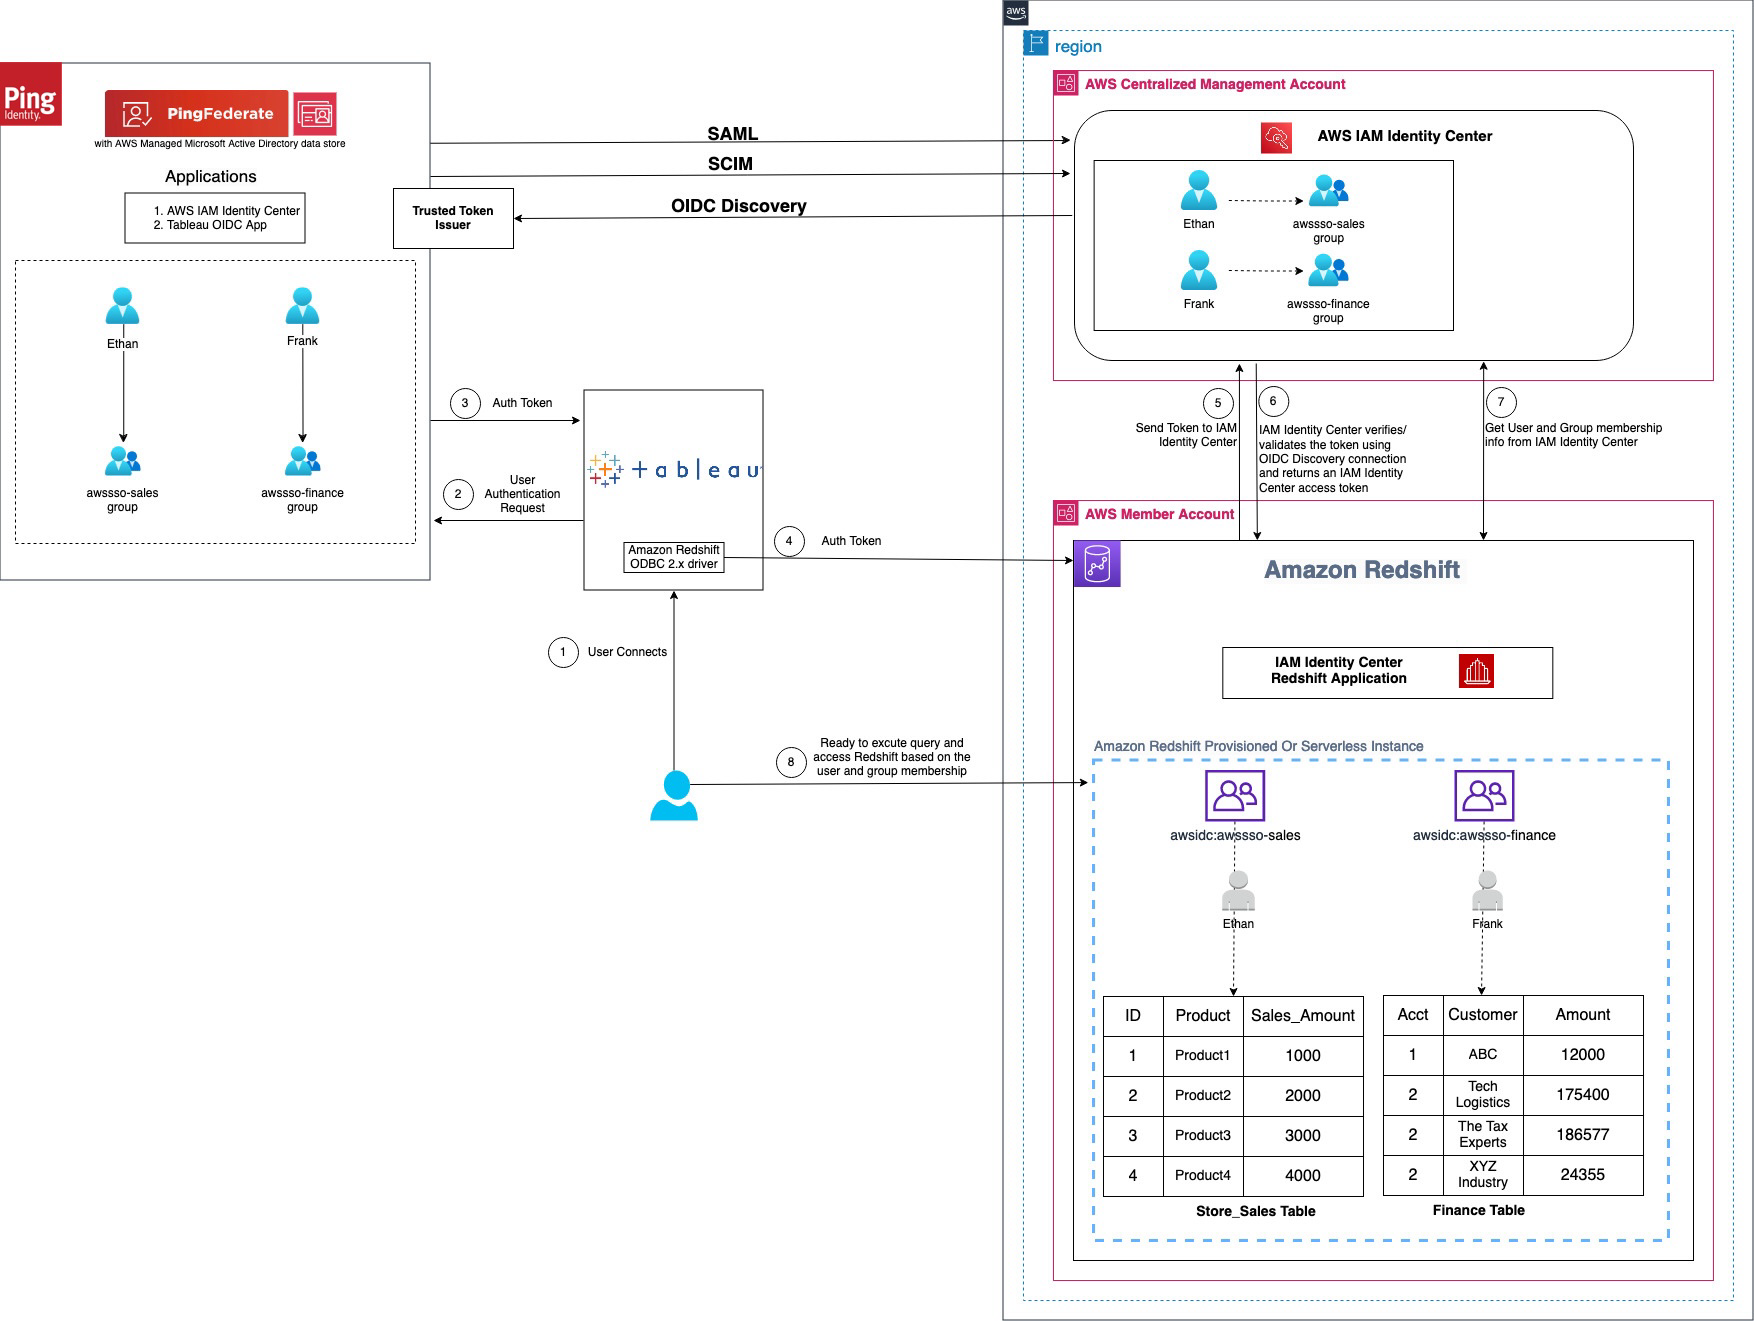
Figure 1 : Solution overview for Tableau integration with Amazon Redshift using IAM Identity Center and Ping Federate
The workflow, shown in the preceding figure, includes the following steps:
- The user configures Tableau to access Amazon Redshift using IAM Identity Center authentication.
- On a user sign-in attempt, Tableau initiates a browser-based OAuth flow and redirects the user to the PingFederate sign in page to enter the sign-in credentials. Password validation is done against the AWS Managed Microsoft AD data store.
- On successful authentication, PingFederate issues an authentication token (ID and access token) to Tableau.
- The Amazon Redshift driver then makes a call to the Amazon Redshift-enabled Identity Center application and forwards the
- Amazon Redshift passes the token to Identity Center and requests an access token.
- Identity Center verifies the token using the OIDC discovery connection to the trusted token issuer and returns an Identity Center-generated access token for the same user. In the preceding figure, trusted token issuer (TTI) is the PingFederate server that Identity Center trusts to provide tokens that third-party applications like Tableau use to call AWS services.
- Amazon Redshift then uses the token to obtain the user and group membership information from Identity Center.
- Tableau user will be able to connect with Amazon Redshift and access data based on the user and group membership returned from Identity Center. The user and group settings in the LDAP-based AWS Managed Microsoft AD data store for PingFederate are propagated to identity center using SCIM protocol for outbound provisioning.
Walkthrough
In this walkthrough, you will use the following steps to build the solution:
- SAML and SCIM set up between PingFederate and IAM Identity Center
- Connect to Amazon Redshift using Query Editor v2
- Configure identity federation from a third-party client
- Create an access token manager and access token mapping
- Create an OIDC policy
- Create an OAuth client
- Set up a PingFederate Authorization Server
- Policy Contract Grant Mapping
- Collect PingFederate information
- Set up a trusted token issuer in IAM Identity Center
- Set up client connections and trusted token issuers in Amazon Redshift
- Configure Tableau OAuth config files for PingFederate to integrate with Amazon Redshift using IAM Identity Center
- Install a Tableau OAuth config file on a client machine for Tableau Desktop
- Install a Tableau OAuth config file for a site on Tableau Server or Tableau Cloud
- Federate to Amazon Redshift from Tableau Desktop using Identity Center
- Federate to Amazon Redshift from Tableau Server using Identity Center authentication
SAML and SCIM set up between PingFederate and IAM Identity Center
IAM Identity Center integration with PingFederate starts with SAML set up followed by SCIM.
- Set up SAML 2.0 for SP Connection of type Browser SSO (single sign-on) in PingFederate.
- Set up SCIM 2.0 for outbound provisioning. It will sync the users and groups created in an LDAP based data store like AWS managed Microsoft AD for PingFederate to the users and groups in IAM Identity Center.
The implementation for the cloud based IdP option PingOne is not in scope of this post and follows steps similar to those described in Integrate IdP with Amazon Redshift Query Editor v2 using AWS IAM Identity Center for seamless Single Sign-On.
Further details of SAML and SCIM set up are as follows.
-
- Install PingFederate Server.
- Set up IAM Identity center integration by following the Ping documentation including the download for Identity Center integration files.
- Deploy the integration files to your PingFederate installation.
- Enable provisioning and configure IdP Browser SSO (SAML connection). (You can implement Browser SSO connection only using IAM Identity Center metadata file.)
- Under System > Server > Protocol Settings > Federation Info
BASE_URLfield, use the publicly accessible fully qualified domain name of the PingFederate server. - Create an LDAP based data store (the name used in this example is
AWSManagedMSAD) because SCIM 2.0 protocol for outbound provisioning only works with LDAP based data stores with PingFederate. If you are using a cloud-based solution like PinOne, you can set up outbound provisioning in PingOne itself. Thus for this writing, we have used AWS Managed Microsoft AD as a data store created using AWS Directory Service. - Create a password credential validator (name used in this example is
awsmanagedmsadpassval) and IdP adapters (name used in this example isawsmanagedmsadadapter) for your data store as applicable. - Create an SP connection of type Browser SSO using the
sp-saml-metadata.xmlfile as explained in creating a provisioning connection.
- Under System > Server > Protocol Settings > Federation Info
- Export SAML metadata from PingFederate.
- Register PingFederate as an IdP in Identity Center.
- Navigate back to the connection saved in step b, and configure outbound provisioning.
- Enable provisioning in IAM Identity Center by following step 1 in the documentation.
- Then, configure provisioning in PingFederate by following step 2 in the documentation.
- Optionally, you can configure and pass user attributes from PingFederate for access control in Identity Center.
Next, connect to Amazon Redshift using its native query editor, Query Editor v2, to validate AWS services’ connectivity using IAM Identity Center.
Connect to Amazon Redshift using Query Editor v2
Complete the Walkthrough section of IAM Identity Center integration with Amazon Redshift, which will set up your Amazon Redshift connectivity with Query Editor v2.
If you need further help with SAML and SCIM set up, and connecting to Amazon Redshift using Query Editor v2, you can also follow step by step guided demo video single sign-on to Amazon Redshift with IAM IDC integration using PingFederate with AWS Managed MSAD Demo
Configure identity federation from a third-party client
Configure identity federation enabled by IAM Identity Center from IdP PingFederate to the service provider Amazon Redshift using an external client like Tableau. The following steps in the PingFederate admin console and Identity Center guide you through the identity federation process.
Create an access token manager and access token mapping
To map PingFederate attributes to OAuth access tokens and OpenID Connect ID (OIDC) tokens, create an access token manager and token mapping. For complete details and set up based on your security needs, see Token mapping in PingFederate, which explains access token management in detail. Complete the following steps to create a token manager.
- In the PingFederate administrative console, go to Applications > OAuth > Access Token Management, and choose Create New Instance.
- In Type tab,
- Enter an Instance Name and Instance ID of your choice, for example
TrustedTokenIssuerMgr. - Select the Type from drop down list as JSON Web Tokens, commonly called JWT.
- Leave Parent instance as None and choose Next.
- Enter an Instance Name and Instance ID of your choice, for example
- In Instance configuration tab,
- Under Certificates, select Add a new row to ‘Certificates’, select the certificate for token manager from the drop-down list, enter a Key ID such as
certkey, and choose Update under Action. You can create a new certificate by navigating to Security > Certificate & Key Management > Signing & Decryption Keys & Certificates > Create New. - Select Use Centralized Signing Key.
- In JWS Algorithm, select RSA using SHA-256.
- Select Enable Token Revocation. Leave everything else as default and choose Next.
- Under Certificates, select Add a new row to ‘Certificates’, select the certificate for token manager from the drop-down list, enter a Key ID such as
- Under Session Validation tab,
- Select Include Session Identifier in Access Token.
- Select Check for valid authentication session.
- Leave other choices as is and choose Next.
- In the Access Token Attribute Contract tab, leave the Subject Attribute Name as the e default and proceed to Extend the Contract to add the following attribute and values.
- Enter
aud, leave multi-value unchecked. Choose Add under Action. - Repeat the same to enter email, exp, iss, sub. When completed, choose Next.
- Enter
- On each of Resource URIs and Access Control tabs, leave as is and choose Next.
- On the Summary tab, review your changes and choose Save. An instance name with the name you provided, like TrustedTokenIssuerMgr appears in Applications > Oauth > Access Token Management.
Figure 2 : Access Token Management Configuration Summary
- Navigate to Applications > OAuth > Access Token Mappings, select the default Context and Access Token Manager, TrustedTokenIssuerMgr that was created in the previous step. Choose Add Mapping.
- Leave Attribute Sources & User Lookup as is and choose Next.
- Under Contract Fulfillment tab,
- For Contract aud, select Text from the Source, and enter the Value as
AWSIdentityCenter. - For Contract email, select Persistent Grant from the Source, and Value as email.
- For Contract exp, select Persistent Grant from the Source, and Value as EXPIRES_AT.
- For Contract iss, select Text from the Source, and enter your base URL as the Value, like
https://yourwebsite.domain.com, the same as in System > Server > Protocol Settings > BASE URL. - For Attribute Contract sub, select Persistent Grant from the Source, and Value as USER_KEY.
- Choose on Next.
- For Contract aud, select Text from the Source, and enter the Value as
- Leave Issuance Criteria as is and choose Next.
- On the Summary tab, review all your changes and choose Save. A new default Context with Access Token Manager if TrustedTokenIssuerMgr appears in Applications > OAuth > Access Token Mappings.
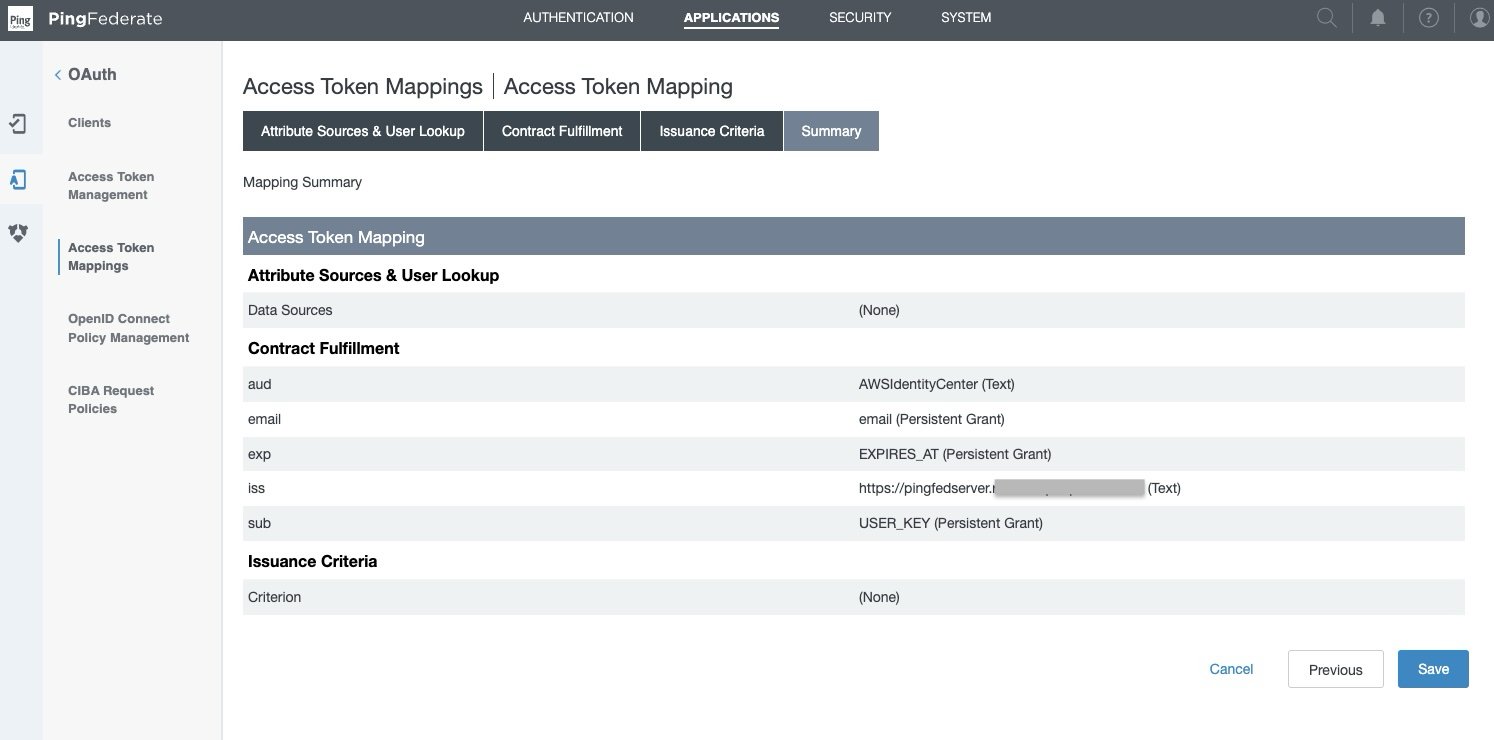
Figure 3: Access Token Mappings Summary
Create an OIDC policy
For complete details and set up based on your security needs, see to Open ID connect (OIDC) policy management in PingFederate. Complete the following steps to set up an OIDC policy.
- In the PingFederate administrative console, go to Applications > OAuth > OpenID Connect Policy Management, and choose Add Policy.
- In the Manage Policy tab,
- Enter the Policy ID and Name of your choice, for example
OIDCPolicy. - Select the Access Token Manager from drop down list created in the previous section—TrustedTokenIssuerMgr.
- Select Include Session Identifier in ID Token
- Select Include User Info in ID Token
- Select Return ID Token on Refresh Grant
- Leave others as is and choose Next.
- Enter the Policy ID and Name of your choice, for example
- In the Attribute Contract tab, keep only the required attributes in extended contract and delete the others.
- Leave the sub attribute under Attribute Contract as is.
- Under Extend the contract, choose delete for all attributes except email. choose Next.
- In the Attribute Scopes tab,
- Select openid from the Scope list.
- Select email from Attributes.
- Choose Add from Actions. Choose Next.
- Leave Attribute Sources & User Lookup as is and choose Next.
- In Contract Fulfillment tab,
- For Attribute Contract email, select Persistent Grant from the Source, and Value as email.
- For Attribute Contract sub, select Persistent Grant from the Source, and Value as USER_KEY.
- Choose Next.
- Leave Issuance Criteria as is and choose Next.
- On the Summary tab, review your changes and choose Save. A policy ID with the name you provided, like OIDCPolicy, appears in Applications > Oauth > OpenID Connect Policy Management.
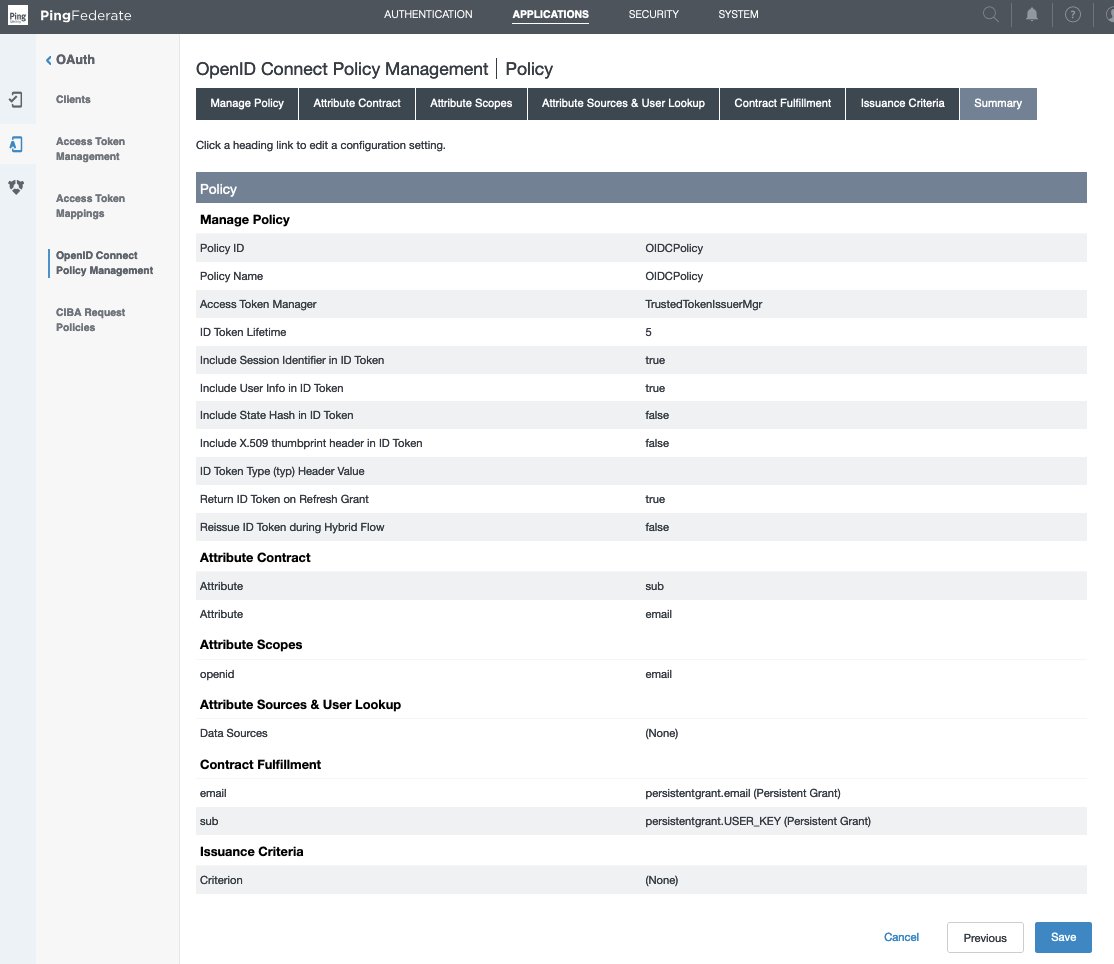
Figure 4 : OpenID Connect Policy Management Summary
Create OAuth client
For complete details and set up based on your security needs, see configure an OAuth client in PingFederate, which explains each field in detail. Complete the following steps to create an OAuth client.
- In the PingFederate administrative console, go to Applications > OAuth > Clients, and choose Add Client.
- In the Client ID field, enter a unique, immutable client ID. We use
tableauredshiftpingfedas the name in this example. - Enter a Name and Description for the client.
- Select a Client Authentication method. You can select from None, Client TLS Certificate, Private Key JWT, or Client Secret. For this scenario, select Client Secret. Choose Generate Secret to create a new one or use select Change secret to create your own.
- Leave Request object signing algorithm set to Allow Any. You can override to use the algorithm of your choice if needed.
- In the Redirect URIs field, add each of the following values.
http://localhost:8080/authorization-code/callbackhttp://localhost:55556/Callbackhttp://localhost:55557/Callbackhttp://localhost:55558/Callbackhttp://localhost/auth/add_oauth_token
- Select Restrict common scopes. Restrict scopes by selecting the checkboxes for email, offline_access, openid, and profile as required.
- In Logo URL, optionally enter the URL for logo you want to display on the User Grant Authorization and Revocation pages.
- In the Allowed Grant Types list, you can choose from a list of authorization options. In this example, select Authorization code. Optionally, you can select Implicit, Refresh Token, and Client Credentials.
- Under Default access token manager, select the access token manager TrustedTokenIssuerMgr created in the earlier section.
- Select the Restrict box for Restrict to default access token manager.
- Customize Persistent grants max lifetime to match your requirements. Set it to 12 hours for this example by using the third radio button.
- For Openid connect, choose your preferred ID token signing algorithm. Select RSA using SHA-256 for this example. Optionally, for Policy you can choose the OIDC policy created in the earlier section.
- Leave the remaining settings as default and choose Save.
Figure 5 : OAuth Client Configuration
The Tableau Desktop redirect URLs should always use localhost. The following example, also use localhost for the Tableau Server hostname to simplify testing in a test environment. For this setup, you should also access the server at localhost in the browser. In a production environment, or Tableau Cloud, you should use the full hostname that your users will use to access Tableau on the web, along with HTTPS. If you already have an environment with HTTPS configured, you can skip the localhost configuration and use the full hostname from the start.
Set up a PingFederate authorization server
For complete details and set up based on your security needs, see PingFederate authorization server settings in PingFederate. Complete the following steps to configure an authorization server.
- In the PingFederate administrative console, go to System > OAuth Settings > Authorization Server Settings, and make following changes.
- Leave the initial configurations as default and scroll down to Persistent Grant Extended Attributes, add Attribute email.
- For OAuth Administrative Web Services Settings, in Password Credential Validator, select awsmanagedmsadpassval that you created in the SAML and SCIM set up section.
- For Persistent Grant Management API,
- In Access Token Manager, select the TrustedTokenIssuerMgr created earlier.
- In Required Scope, select openid.
- Leave remaining the settings as default and choose Save.
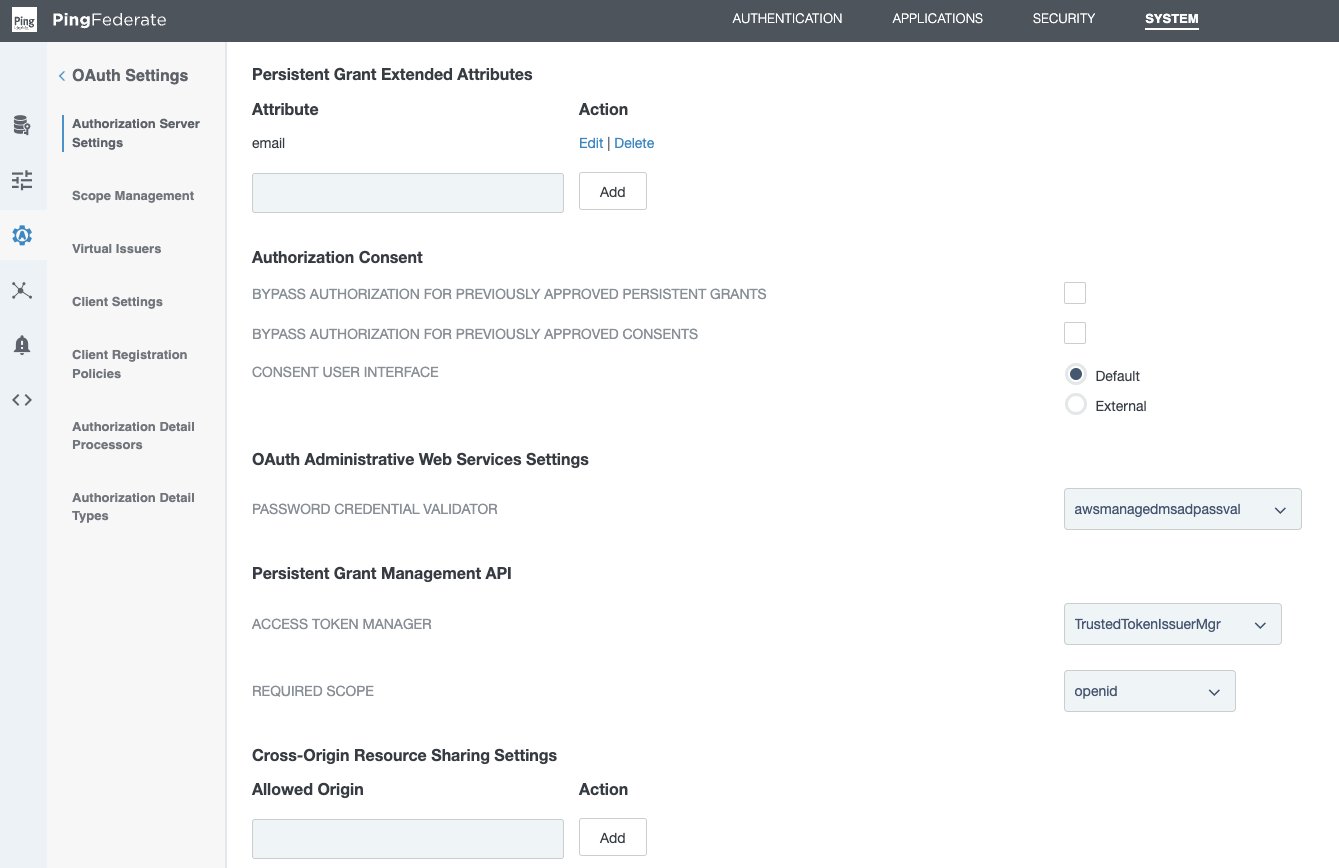
Figure 6 : PingFederate Authorization Server Setting
Policy contract grant mapping
For complete details and set up based on your security needs, see Grant contract mapping in PingFederate. For this illustration, we set up a policy contract grant mapping for authentication in a three-step process.
Step 1: Create a policy contract
- In the PingFederate administrative console, go to Authentication > Policies > Policy Contracts, and choose Create New Contract.
- In Contract Info tab, enter a name. For this example, we use
OIDCPolicyContract. - In Contract Attributes tab, choose Extend the Contract to add email attribute.
- Review and choose Save.
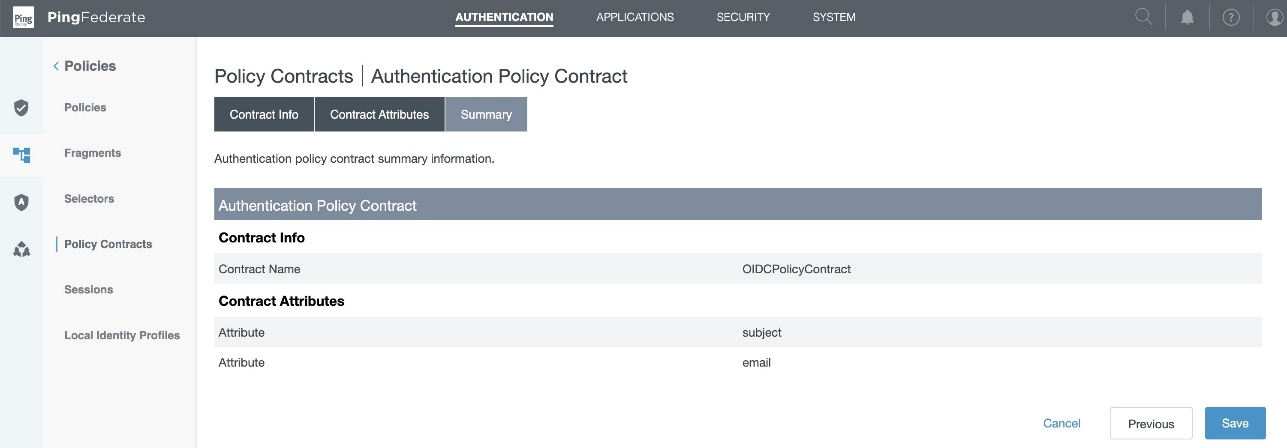
Figure 7 : Policy Contract Summary
Step 2: Add authentication policy
- In the PingFederate administrative console, go to Authentication > Policies > Policies, and choose Add Policy.
- Enter a policy name. In this example, we use
OAuthOIDCPolicy. - In the Policy drop down, select IdP Adapter and select the awsmanagedmsadadapter that you created in the SAML and SCIM set up section.
- Set FAIL to Done and under SUCCESS, select Policy Contracts from the drop-down menu and select the OIDCPolicyContract created in step 1. Choose Done.
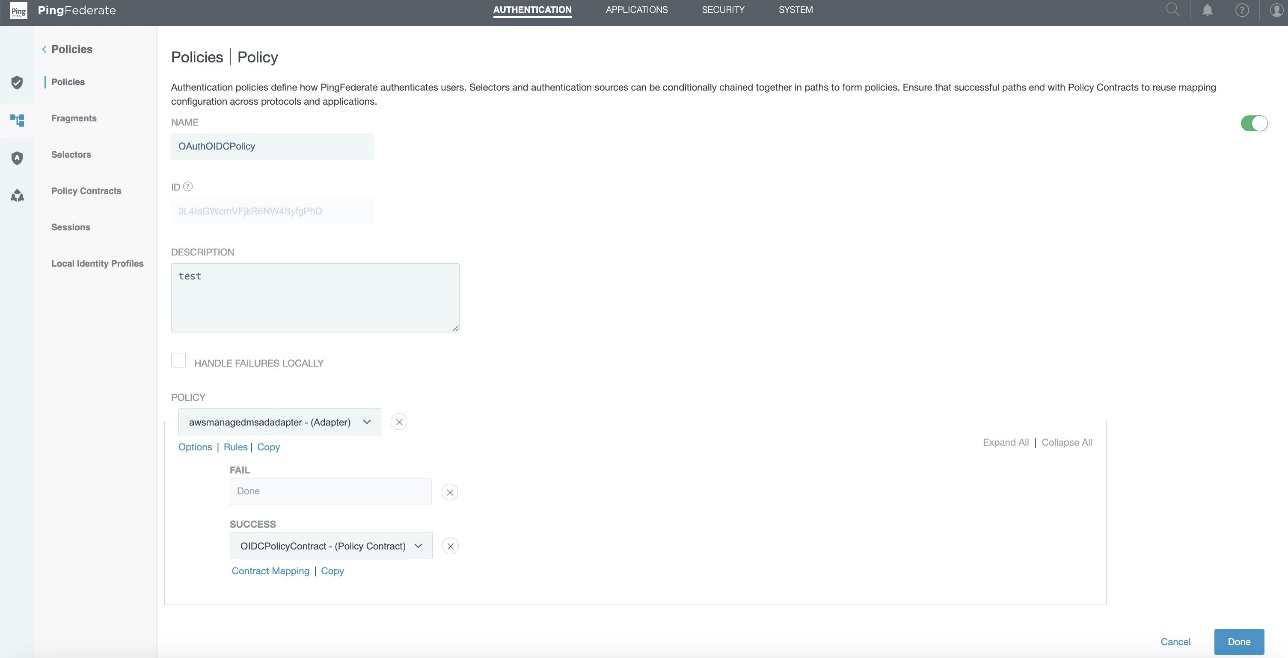
Figure 8 : Authentication Policy Configuration
Step 3: Policy contract grant mapping
- In the PingFederate administrative console, go to Authentication > OAuth > Policy Contract Grant Mapping, and under Mappings, select OIDCPolicyContract created in Step1 and choose Add Mapping.
- On the Attribute Sources & User Lookup tab, choose Next.
- In the Contract Fulfillment tab,
- For Contract USER_KEY, pick Authentication Policy Contract from the Source, and Value as subject.
- For Contract USER_NAME, pick Authentication Policy Contract from the Source, and Value as subject.
- For Contract email, pick Authentication Policy Contract from the Source, and Value as email.
- Choose Next.
- Leave Issuance Criteria as is, review and choose Save.
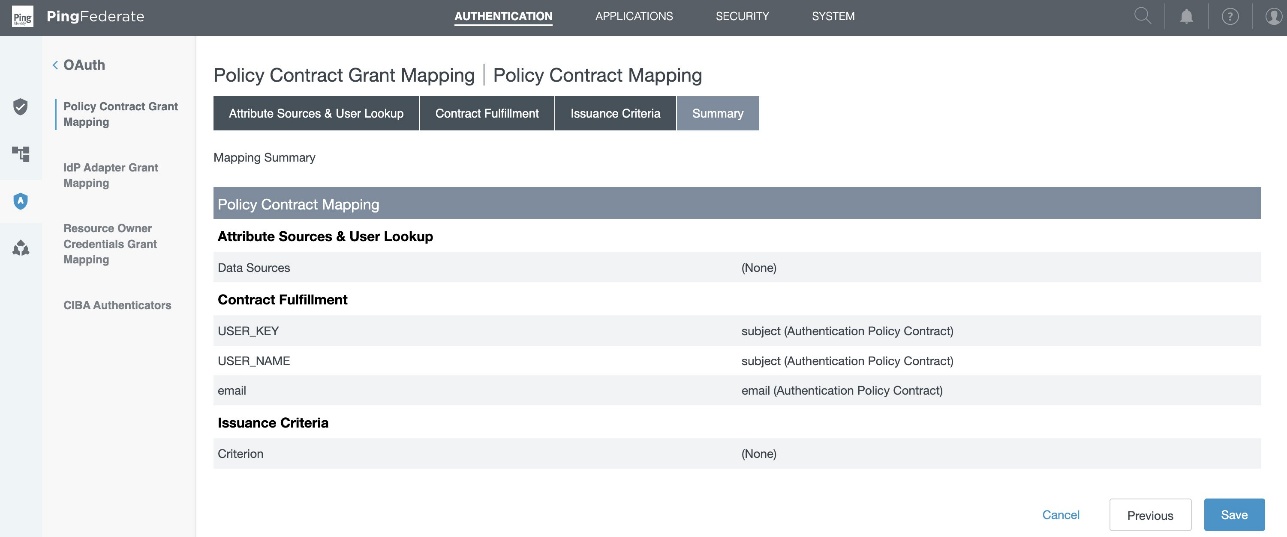
Figure 9 : Policy Contract Grant Mapping Summary
Collect PingFederate information
To configure your PingFederate with IAM Identity Center and Amazon Redshift, collect the following parameters. If you don’t have these parameters, contact your PingFederate admin.
- Issuer URL, auth URL (authUri), and token URL (tokenUri).
You can get these values from the OIDC IdP URL: https://pingfedserver.example.com/.well-known/openid-configuration. Open this URL in a web browser, replacing pingfedserver.example.com with your IdP server name.
The following is an example screenshot of IdP attributes using OIDC IdP URL where:
- The issuer URL corresponds to the issuer
- The auth URL (authUri) corresponds to
authorization_endpoint - The token URL (tokenUri) corresponds to
token_endpoint
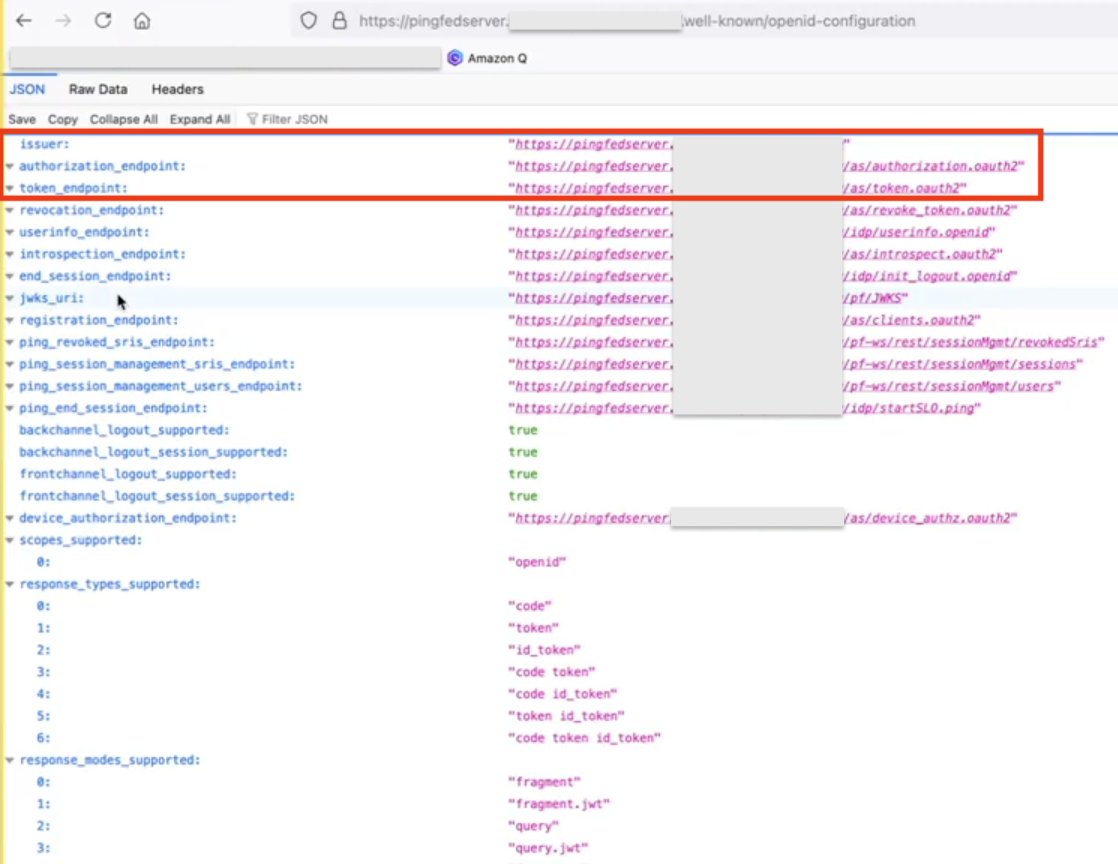
Figure 10 : Screenshot of IdP Attributes
- Audience value
To get the Audience value from PingFederate, sign in as an admin to PingFederate and navigate to the following path to get the audience value that you created during access token mapping creation in PingFederate:
Applications > OAuth > Access Token Mappings > TrustedTokenIssuerMgr → Summary > aud

Figure 11 : Access Token Mapping
Set up a trusted token issuer in IAM Identity Center
Switch from the PingFederate console to the IAM Identity Center console for the AWS side of configuration. Start by adding a trusted token issuer (TTI), which makes it possible to authorize Tableau to make requests on behalf of their users to access data in Amazon Redshift. A TTI is an OAuth 2.0 authorization server that issues tokens to applications that initiate requests (requesting applications). The tokens authorize these applications to initiate requests on behalf of their users to a receiving application (an AWS service). In this step, you create a TTI in the central management account. To create a TTI,
- Open the AWS Management Console and navigate to IAM Identity Center, and then to the Settings page.
- Select the Authentication tab and under Trusted token issuers, choose Create trusted token issuer.
- On the Set up an external IdP to issue trusted tokens page, under Trusted token issuer details, do the following:
- For Issuer URL, enter the OIDC discovery URL of the external IdP that will issue tokens for trusted identity propagation. You can get issuer the URL as mentioned in step 1 of the preceding section Collect PingFederate information.
- For Trusted token issuer name, enter a name to identify this TTI in Identity Center and in the application console.
- Under Map attributes, do the following:
- For the identity provider attribute, select an attribute from the list to map to an attribute in the Identity Center identity store. You can select Email, Object Identifier, Subject, and Other.
- For Identity Center attribute, select the corresponding attribute for the attribute mapping.
- Under Tags (optional), choose Add new tag, enter a value for Key, and optionally for Value. For information about tags, see Tagging AWS IAM Identity Center resources.
The following figure shows the set up for TTI:
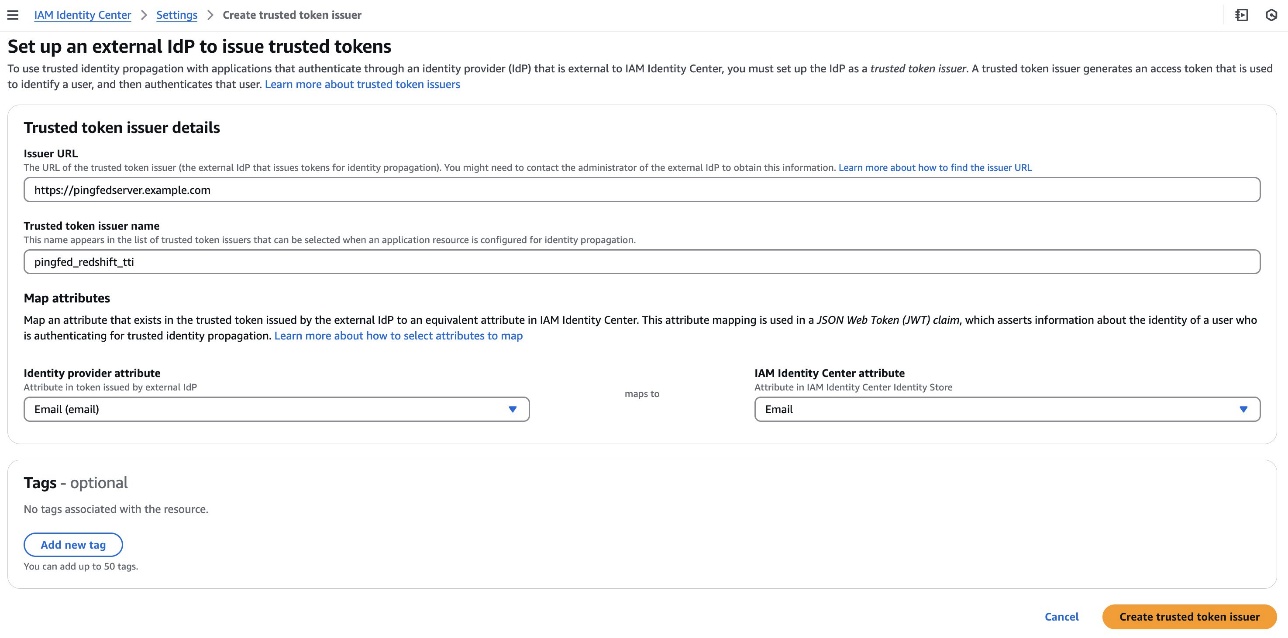
Figure 12 : Configuring Trusted Token Issuer
Set up client connections and trusted token issuers in Amazon Redshift
In this step, the Amazon Redshift applications that exchange externally generated tokens must be configured to use the TTI you created in the previous step. Also, the audience claim (or aud claim) from PingFederate must be specified. In this example, you are configuring the Amazon Redshift application in the member account where the Amazon Redshift cluster or serverless instance exists.
- Select IAM Identity Center connection from the Amazon Redshift console menu.
- Select the Amazon Redshift application that you created as part of the prerequisites.
- Select the Client connections tab and choose Edit.
- Choose Yes under Configure client connections that use third-party IdPs.
- Select the checkbox for Trusted token issuer that you created in the previous section.
- Enter the Aud claim value under Configure selected trusted token issuers. For example,
AWSIdentityCenter. You can get the audience value from the PingFederate path: Applications > OAuth > Access Token Mappings > TrustedTokenIssuerMgr > Summary > aud. - Choose Save.
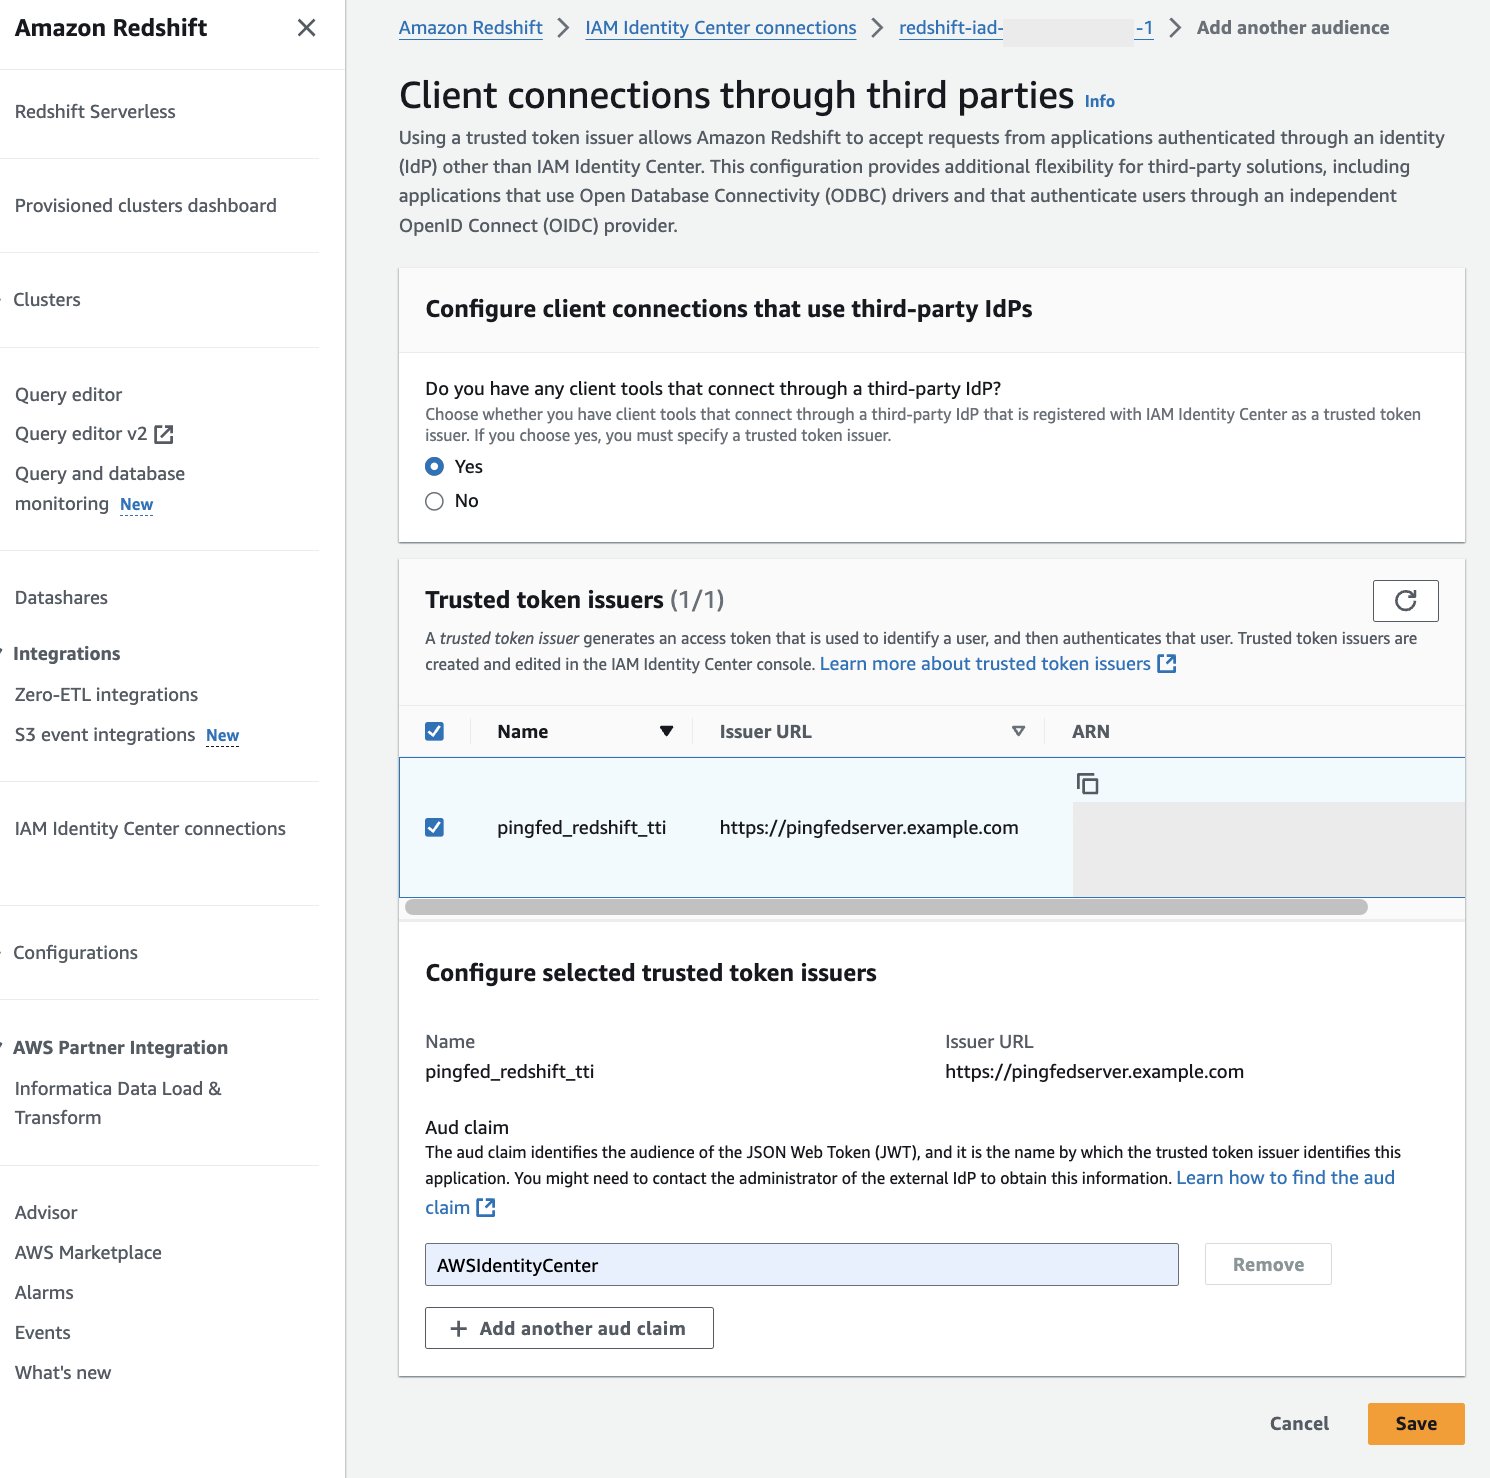
Figure 13 : Configure Audience Value in Amazon Redshift
At this point, your IAM Identity Center, Amazon Redshift, and PingFederate configuration are complete. Next, you need to configure Tableau.
Configure Tableau OAuth config files for PingFederate to integrate with Amazon Redshift using IAM Identity Center
This XML file used in this section will be used for all the Tableau products like Tableau Desktop, Server and Cloud.
To integrate Tableau with Amazon Redshift using IAM Identity Center, you need to use a custom XML file. In this step, you will use the following XML and replace the values starting with a $ sign and highlighted in bold. The rest of the values can be kept as it is or you can modify them based on your specific needs. For detailed information on each of the elements in the file, see the Tableau documentation on GitHub.
You can get authUri and tokenUri as mentioned in step 1 of preceding section, Collect PingFederate information.
The following is the example XML:
Install Tableau OAuth config file on a client machine for Tableau Desktop
After the XML configuration file is created, it should be copied to a specific location to be used by Amazon Redshift Connector from Tableau Desktop. Save the preceding file as .xml and save it under Documents\My Tableau Repository\OAuthConfigs.
Note: Currently this integration is not supported in macOS because the Amazon Redshift ODBC 2.X Driver is not supported yet for MAC.
Install Tableau OAuth config file for a site on Tableau Server or Tableau Cloud
To integrate with Amazon Redshift using IAM Identity Center authentication, you need to install the Tableau OAuth config file in Tableau Server or Tableau Cloud.
- Sign in to the Tableau Server or Tableau Cloud using admin credentials.
- Navigate to Settings.
- Go to OAuth Clients Registry and select Add OAuth Client.
- Choose the following settings:
- Connection type: Select Amazon Redshift.
- OAuth Provider: Select Custom_IdP.
- Client ID: Enter your IdP client ID value.
- Client Secret: Enter your client secret value.
- Redirect URL: Enter the value as
http://localhost/auth/add_oauth_token. In this post, we are using localhost for testing in the local environment. You should ideally use the full hostname with https. - Choose OAuth Config File: Select the XML file that you configured in Configure Tableau Desktop.
- Select Add OAuth Client and choose Save.
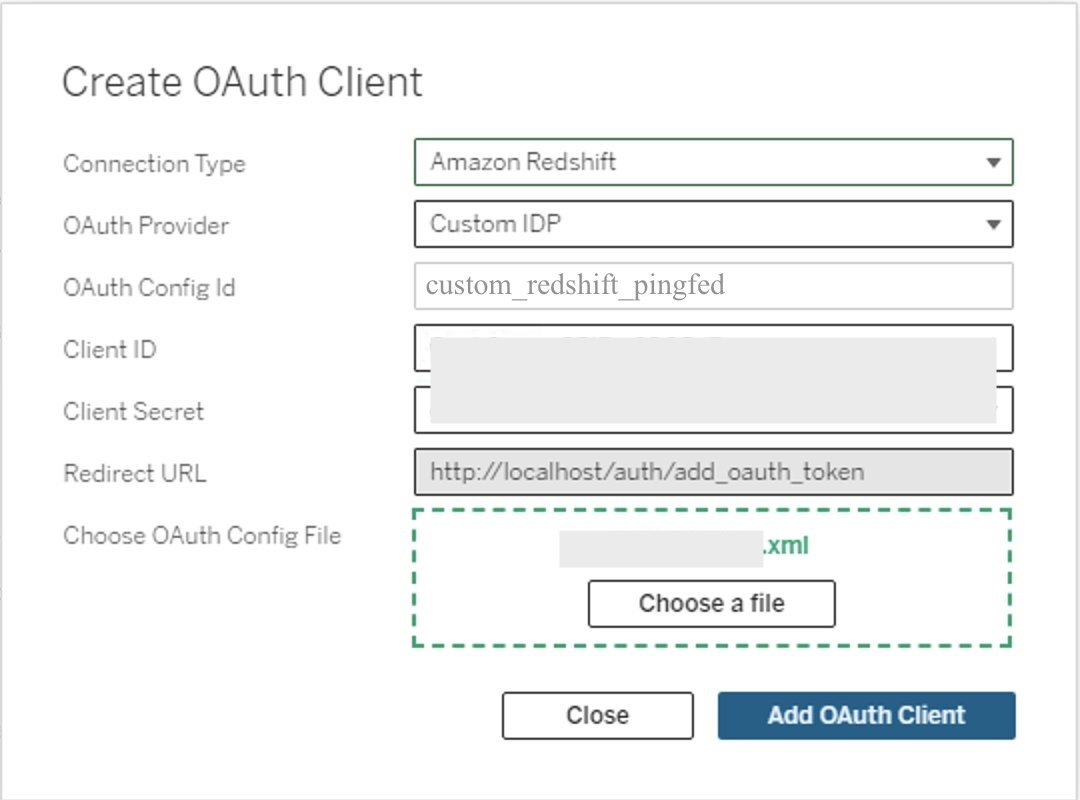
Figure 14: Create an OAuth connection in Tableau Server or Cloud
Federate to Amazon Redshift from Tableau Desktop using IAM Identity Center
Now, you’re ready to connect from Tableau and federated sign-in using IAM Identity Center authentication. In this step, you will create a Tableau Desktop report and publish it to Tableau Server.
- Open Tableau Desktop.
- Choose Amazon Redshift Connector and enter the following values:
- Server: Enter the name of the server that hosts the database and the name of the database you want to connect to.
- Port: Enter
5439. - Database: Enter your database name. In this example, we use
dev. - Authentication: Select OAuth.
- Federation Type: Select Identity Center
- Identity Center Namespace: You can leave this blank.
- OAuth Provider: This value should automatically be pulled from your configured XML. It will be the value from the element
oauthConfigId. - Select checkbox for Require SSL.
- Choose Sign-In.
- A browser pop-up will initiate where you will enter your IdP credentials.
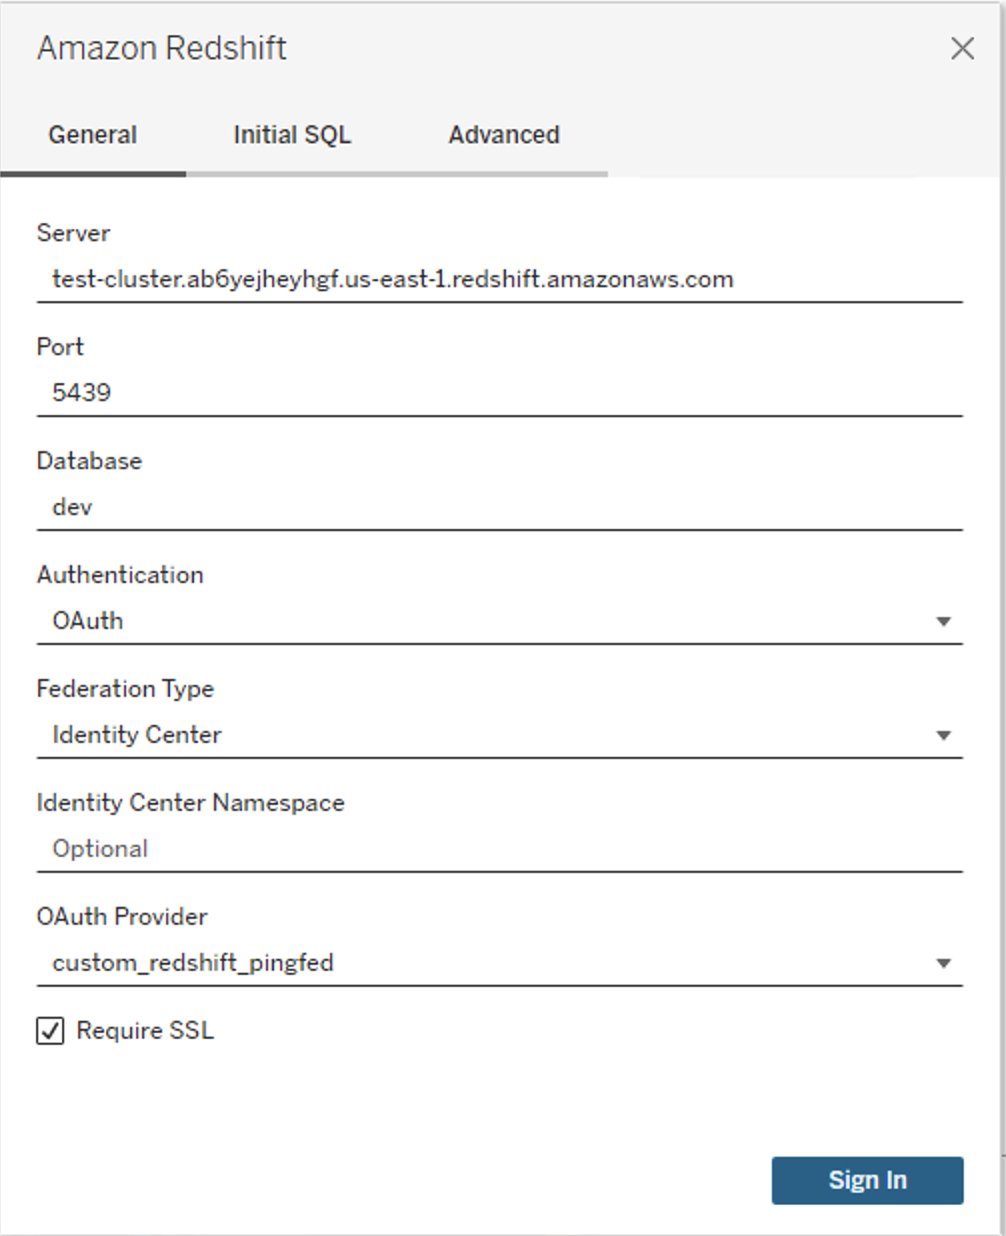
Figure 15: Tableau Desktop OAuth connection
- When authentication is successful, you will see the message Tableau created this window to authenticate. It is now safe to close it.
Figure 16: Successful authentication using Tableau
Congratulations! You are signed in using the IAM Identity Center integration with Amazon Redshift and are ready to explore and analyze your data using Tableau Desktop.
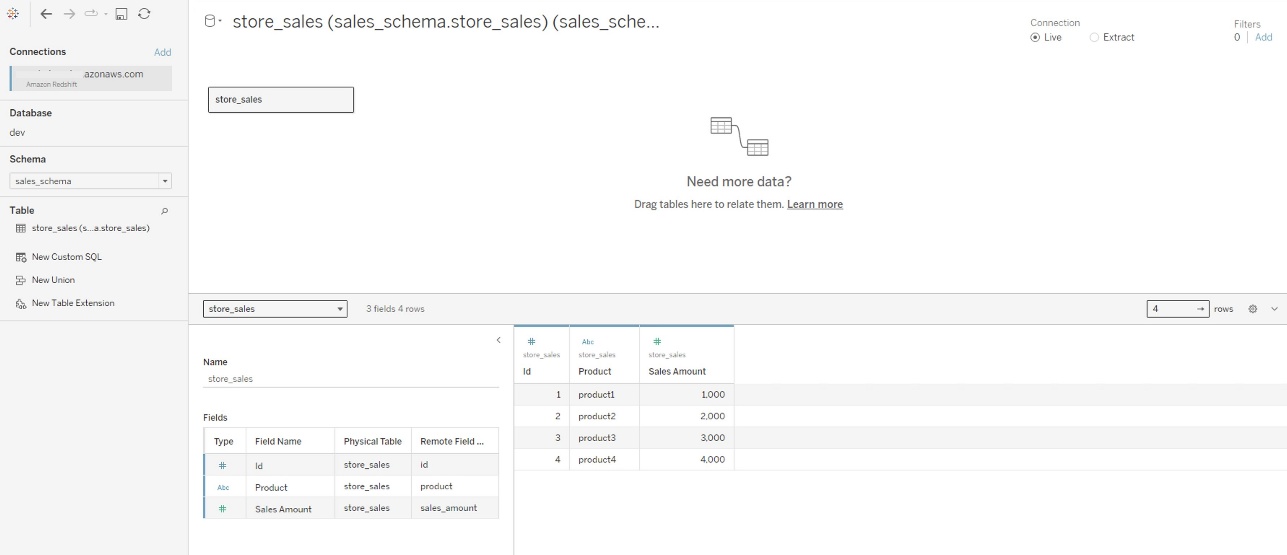
Figure 17: Successful connection using Tableau Desktop
The following is a screenshot from Amazon Redshift system table (sys_query_history) showing that user Ethan from PingFederate is accessing the sales report.

Figure 18: User audit in sys_query_history
Now you can create your own Tableau Report on the desktop version and publish it to your Tableau Server. For the next section, you create and publish a report named Account Level Sales.
Federate to Amazon Redshift from Tableau Server using IAM Identity Center authentication
After you have published the report from Tableau Desktop to Tableau Server, sign in as non-admin user and view the published report using IAM Identity Center authentication.
- Sign in to the Tableau Server site as a non-admin user.
- Navigate to Explore and go to the folder where your published report is stored.
- Select the report and choose Sign In.
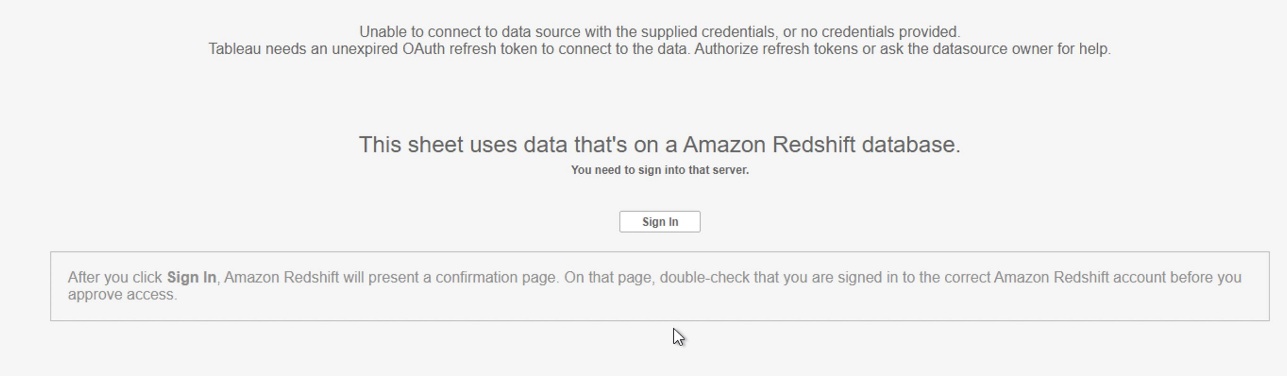
Figure 19: Sign In Prompt on Tableau Cloud/Server
- Enter your PingFederate credentials to the browser pop-up to authenticate.
- After successful authentication, you can access the data and create reports.
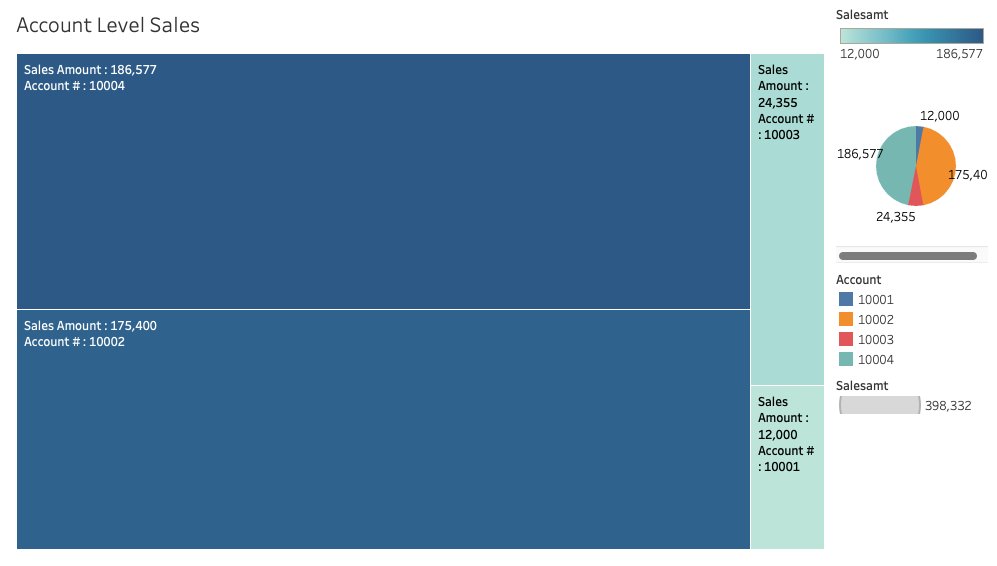
Figure 20: Tableau report
Clean up
Complete the following steps to clean up your resources:
- Delete the IdP applications that you created to integrate with IAM Identity Center.
- Delete Identity Center configuration.
- Delete the Amazon Redshift application and the Amazon Redshift provisioned cluster or Serverless instance that you created for testing.
- Delete the IAM role and IAM policy that you created for Identity Center and Amazon Redshift integration.
- Delete the permission set from Identity Center that you created for Amazon Redshift Query Editor v2 in the management account.
- Clean up resources related to PingFederate.
Conclusion
This post covered streamlining access management for data analytics by using Tableau’s capability to support single sign-on based on the OAuth 2.0 and OIDC protocol. This setup facilitates federated user authentication, where user identities from an external identity provider like PingFederate are trusted and propagated to Amazon Redshift. You walked through the steps to configure Tableau Desktop and Tableau Server to integrate seamlessly with Amazon Redshift using AWS IAM Identity Center for single sign-on. By harnessing this integration of a third-party IdP with IAM Identity Center, analysts can securely access Amazon Redshift data sources within Tableau without managing separate database credentials.
Learn more about Amazon Redshift integration with IAM Identity Center using PingFederate as an identity provider by visiting the following resources.
- Connect Redshift with IAM Identity Center
- IAM Identity Center integration with PingFederate
- Integrate Identity Provider (IdP) with Amazon Redshift Query Editor
- For data lake queries, simplify access management with Amazon Redshift and AWS Lake Formation