AWS Big Data Blog
Integrating MongoDB’s Application Data Platform with Amazon Kinesis Data Firehose
September 2025: This post was reviewed for accuracy.
As organizations navigate today’s digital landscape, they face an exponential growth in data from multiple sources, making streamlined data integration essential. In response to MongoDB’s planned discontinuation of HTTPS endpoints by September 2025, we have engineered a robust serverless solution leveraging AWS Lambda and Amazon API Gateway to integrate with MongoDB instances. This AWS-based architecture provides a modern, scalable alternative for data processing and management.
The new integration between MongoDB Atlas, the fully managed cloud database service, and Amazon Data Firehose offers a reliable way to stream data into MongoDB Atlas clusters. Organizations can stream data through Amazon Kinesis Data Streams or push it directly to Amazon Data Firehose, configuring it to deliver data to MongoDB Atlas with optional data transformation capabilities. This post guides you through the integration process, demonstrating how to establish a direct data streaming pipeline from your source to your MongoDB database, enabling you to harness the full potential of your data infrastructure.
The following diagram depicts the overall architecture of the solution. The system leverages Amazon Data Firehose to establish a continuous stream of data payloads directed to a REST API Gateway. Each incoming request undergoes validation through a custom Lambda authorizer before proceeding. Upon successful authentication, the gateway transmits the data to an ingestion Lambda function. This function then decodes the content and writes it directly into a MongoDB Atlas cluster, while ensuring both network isolation and granular access control.
Architecture diagram
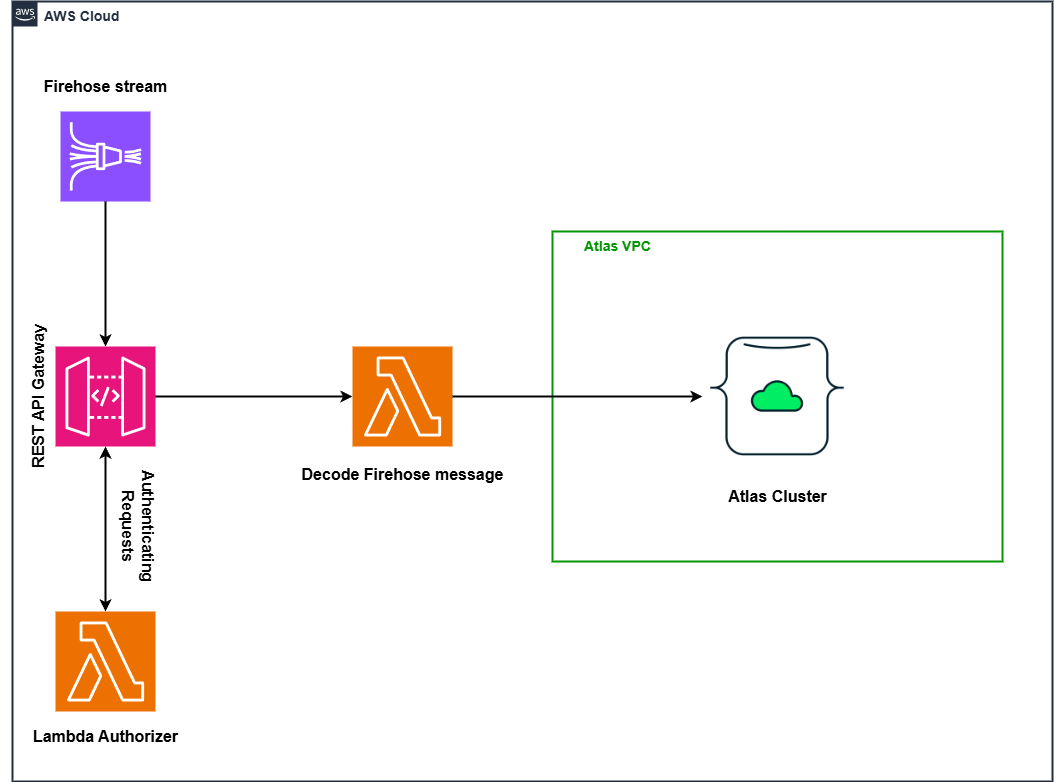
Figure 1:Streaming Firehose Data to MongoDB Atlas Cluster
Integrating Amazon Data Firehose and MongoDB Atlas
Amazon Data Firehose is a fully managed, real-time streaming data service that simplifies the process of acquiring, transforming, and delivering data streams to various destinations like Amazon S3, Redshift, and many others.
As part of Amazon Data Firehose, you can transform your records before delivering them to the destination. In addition, Amazon Data Firehose enables you to buffer data (based on size or time) before delivering to the final destination. In case of delivery failures, Amazon Data Firehose can store your failed records in an Amazon Simple Storage Service (Amazon S3) bucket to prevent data loss.
MongoDB Atlas is a comprehensive cloud database platform that delivers unmatched resilience, scalability, and enterprise-grade security while eliminating operational complexity. It offers AI integration with vector search capabilities and supports multi-region deployments. The platform features automated resource management, zero-downtime upgrades, and built-in optimization tools for superior performance. Atlas simplifies data management through its document model and provides native support for full-text search, vector search, and stream processing. Security is paramount with built-in access controls, encryption, and automatic updates, making it easy for enterprises to maintain compliance while focusing on innovation and growth.
Walkthrough
We’ll walk you through the configuration process demonstrating how to establish a direct data streaming pipeline from your source to your MongoDB database, enabling you to harness the full potential of your data infrastructure.
- Get MongoDB Atlas database connection string, database, and collection name
- Once you’re in the console, navigate to the clusters, select the cluster you want to use for sending the Firehose stream data, and click “Connect” to copy the connection string.

Figure 2: Connecting to MongoDB Atlas DatabaseCopy the connection string by clicking on the copy button.
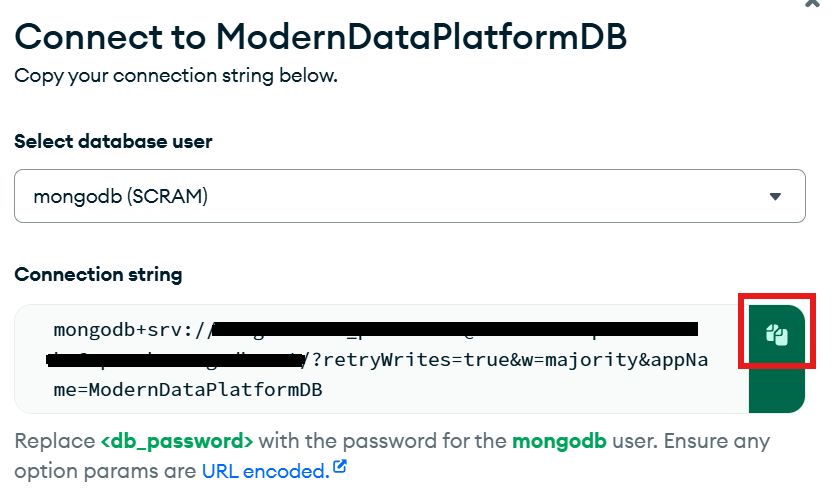
Figure 3: Getting MongoDB Atlas Connection String
- Make a note of the database name and collection name as well.
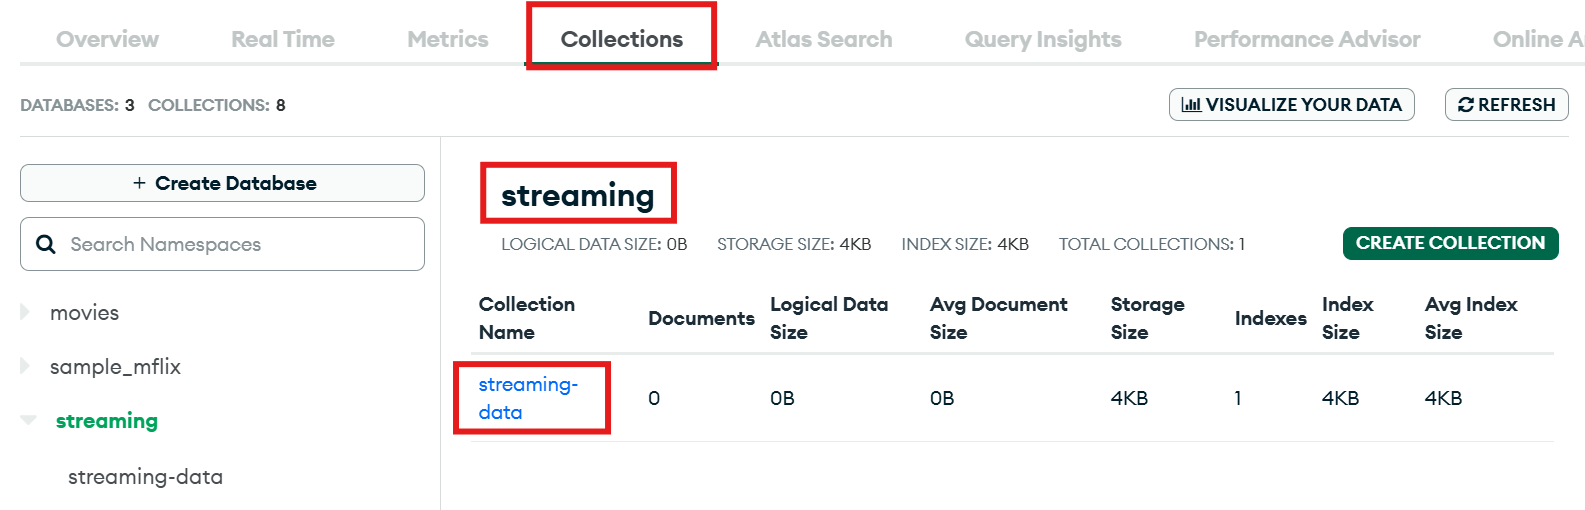
Figure 4: How to get MongoDB Database and Collection Name
- Once you’re in the console, navigate to the clusters, select the cluster you want to use for sending the Firehose stream data, and click “Connect” to copy the connection string.
- Deploy the serverless application in AWS to send firehose data to MongoDB Atlas
- Go to the AWS Lambda section and click on the “Applications” section in the left navigation bar. Then, click “Create application”

Figure 5: Create Application inside Lambda
- Select the “Serverless application” tab. In the “Public applications” tab, search for “MongoDB-Firehose-Ingestion-App” and select the checkbox “Show app that creates custom IAM roles or resource policies.”
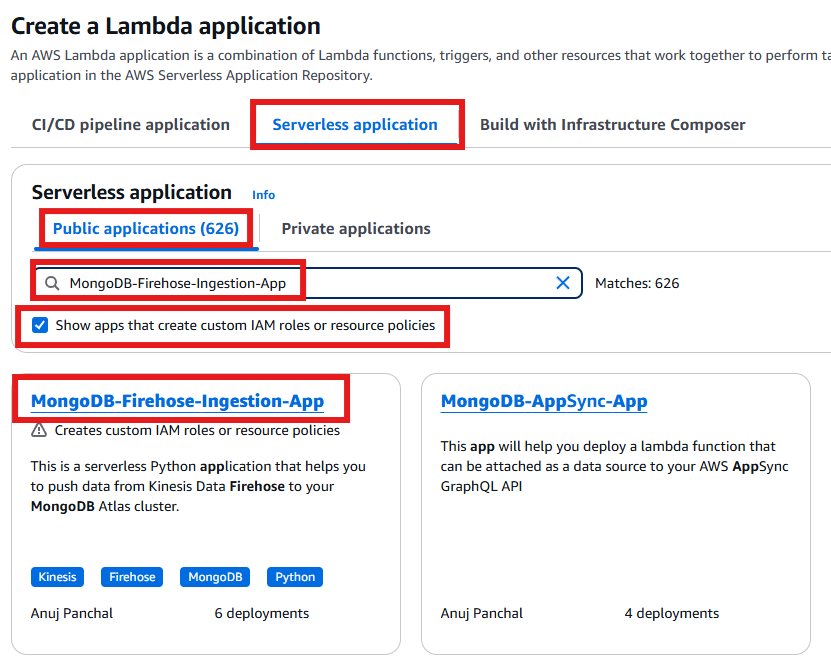
Figure 6: MongoDB Firehose Ingestion App Search from Public Applications
- Fill in the required information obtained from step 1, check the box for I acknowledge, and then click the “Deploy” button to launch the CloudFormation template.Note: When entering the Database connection string, be sure to replace
<db_password>with your actual database password.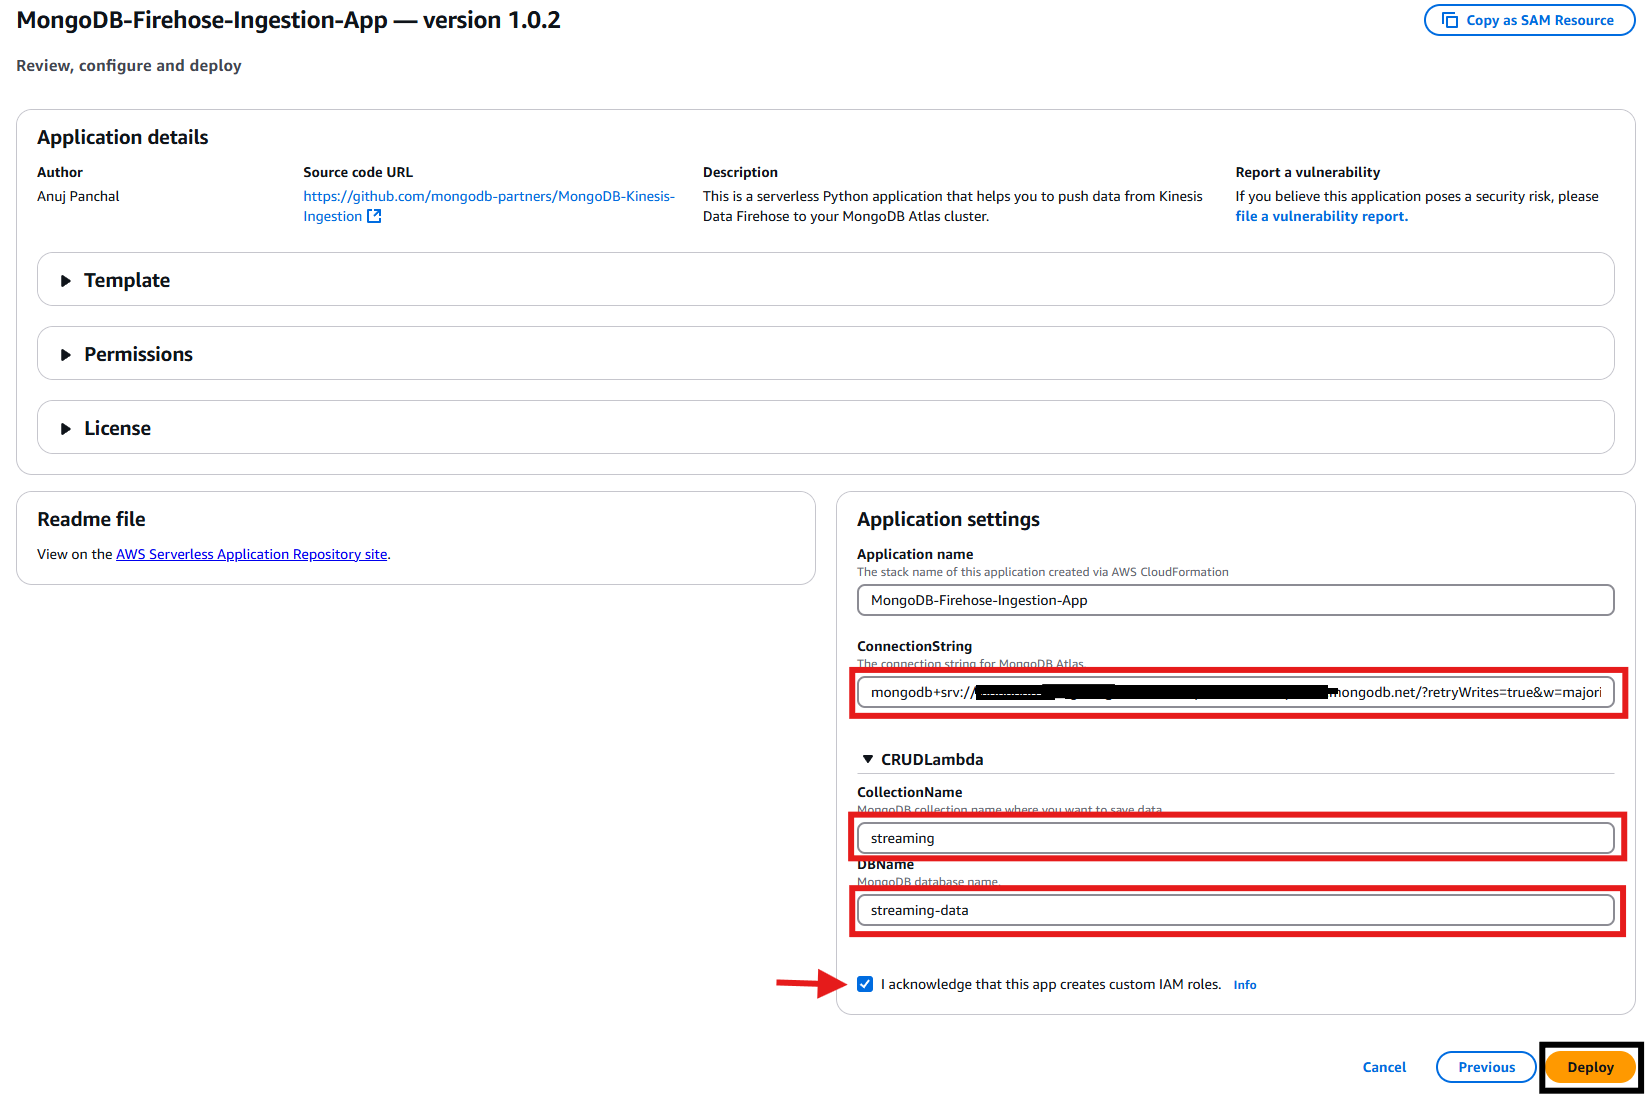
Figure 7: MongoDB Firehose Ingestion Application Deployment
- Once the stack is deployed, go to the CloudFormation service and find the “serverlessrepo-MongoDB-Firehose-Ingestion-App” stack. Click on the stack to see the resources deployed and locate the API Key ID in the Outputs section.

Figure 8: MongoDB Firehose Ingestion App in CloudFormation Stacks
- Navigate to the “Outputs” tab of your stack in the CloudFormation console. Find the row where “ApiKeyValue” is listed as the key. Copy the API Key ID shown in the corresponding “Value” column.
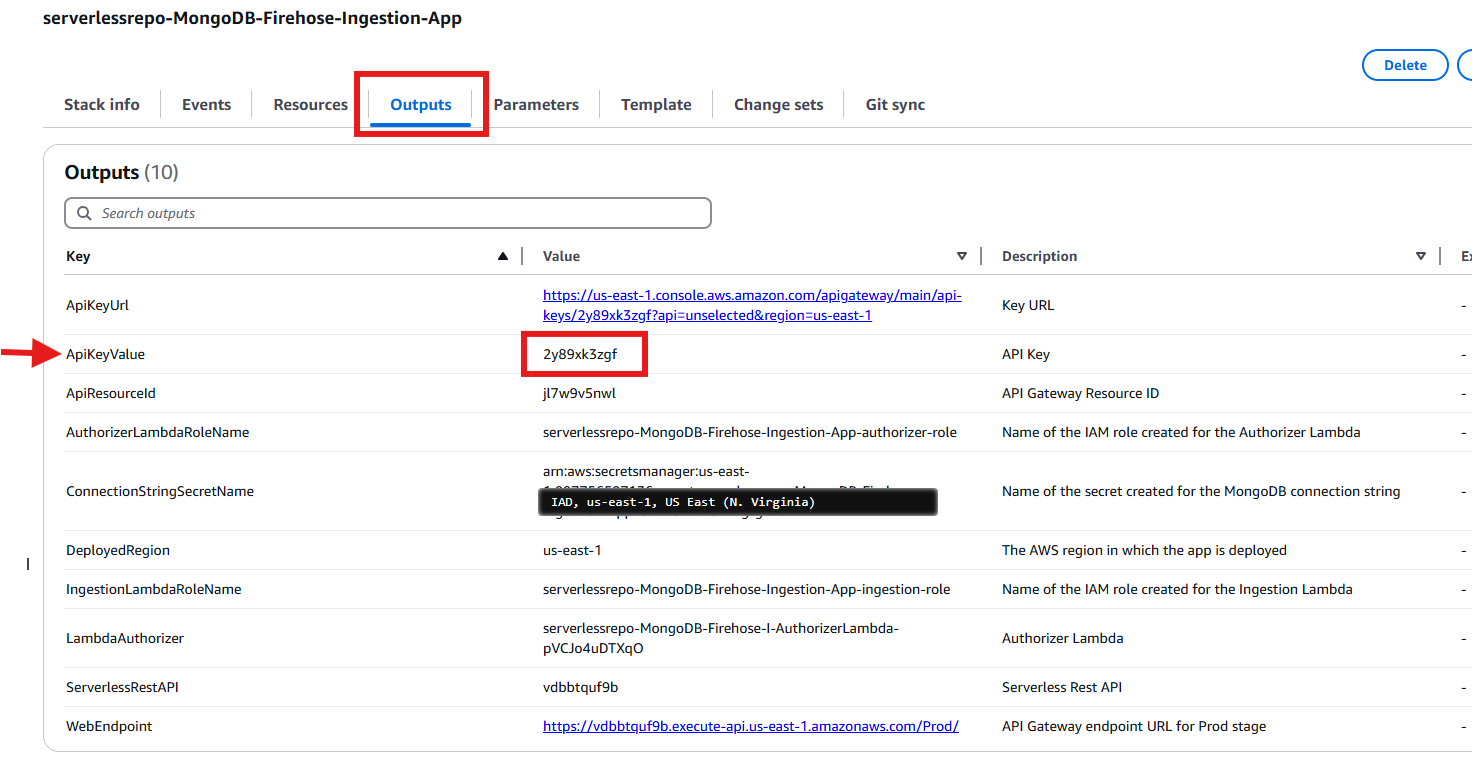
Figure 9: Copy ApiKeyValue from the Outputs Section
- Navigate to the Lambda console and click on “Functions”. In the search bar, type “MongoDB-Firehose”, then select the “Authorizer” Lambda function from the search results.
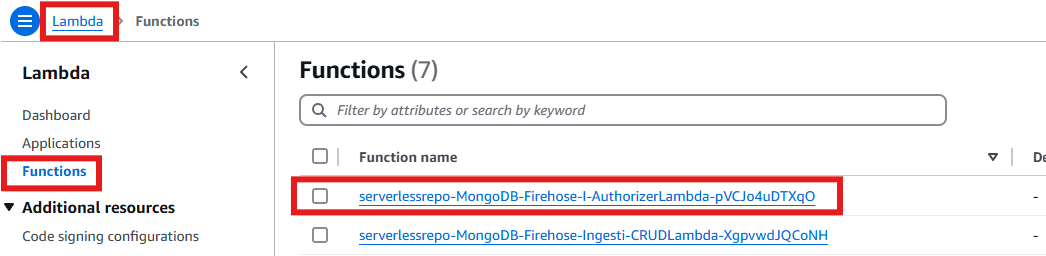
Figure 10: Search Newly Create MongoDB-Firehose-I-AuthorizerLambda Function
- Once the Lambda code opens, locate and click the “Environment variables” tab in the bottom left corner. Then click the “+” sign to add a new environment variable.
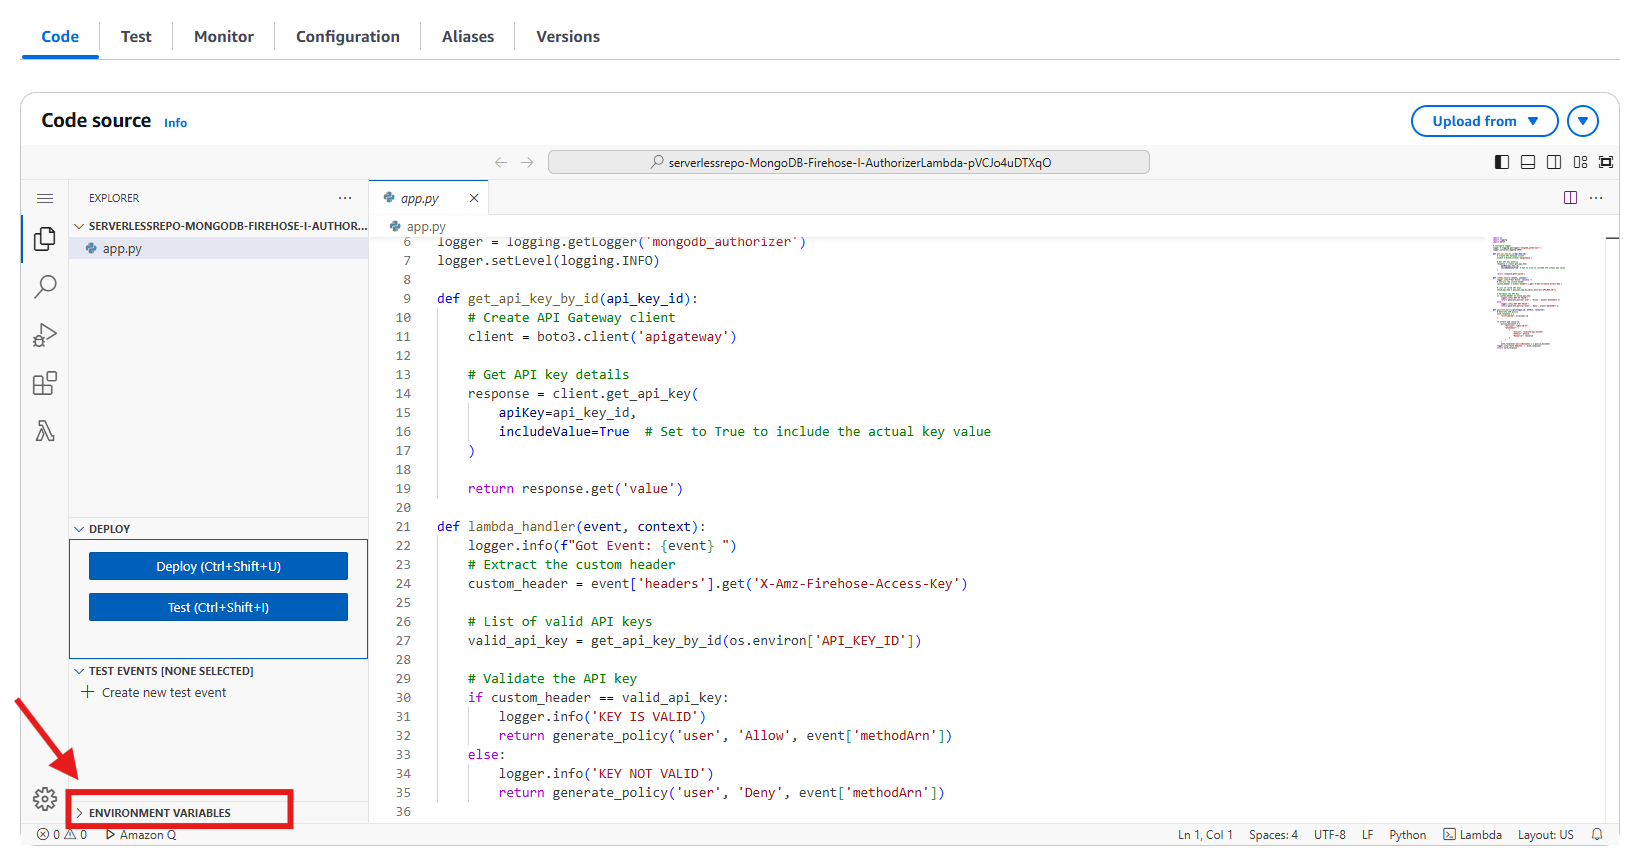
Figure 11: Edit Environment Variables for the Lambda Function
- For the environment variable, enter the API Key ID that you copied from the CloudFormation outputs earlier, then click “Save” to save your changes.
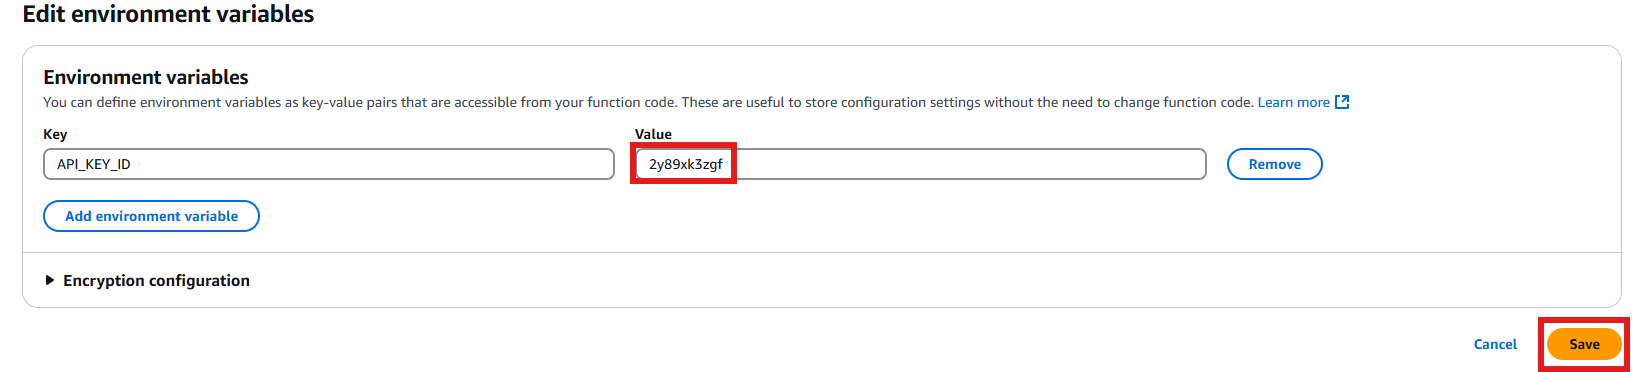
Figure 12: Adding the API Key Value
- Go to the AWS Lambda section and click on the “Applications” section in the left navigation bar. Then, click “Create application”
- API Configuration
- Navigate to the API Gateway console and click “APIs” in the left sidebar. In the search bar, type “serverlessrepo-MongoDB-Firehose-Ingestion-App” and click on the matching API from the results.
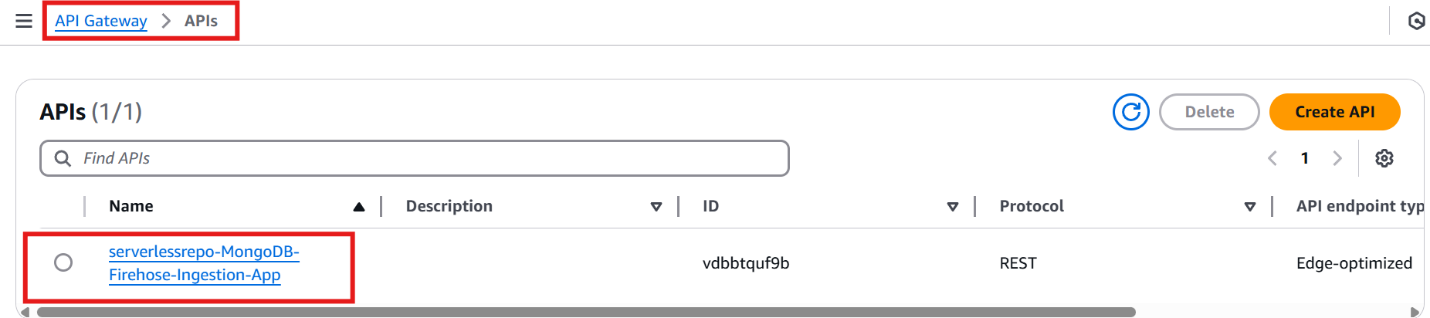
Figure 13: Selecting the API
- Navigate to Resources and select “ANY”. Under Method Request settings, click “Edit”. Locate the “API key required” flag and disable it. Save your changes – you should now see that the “API Key required” value displays as “false”.
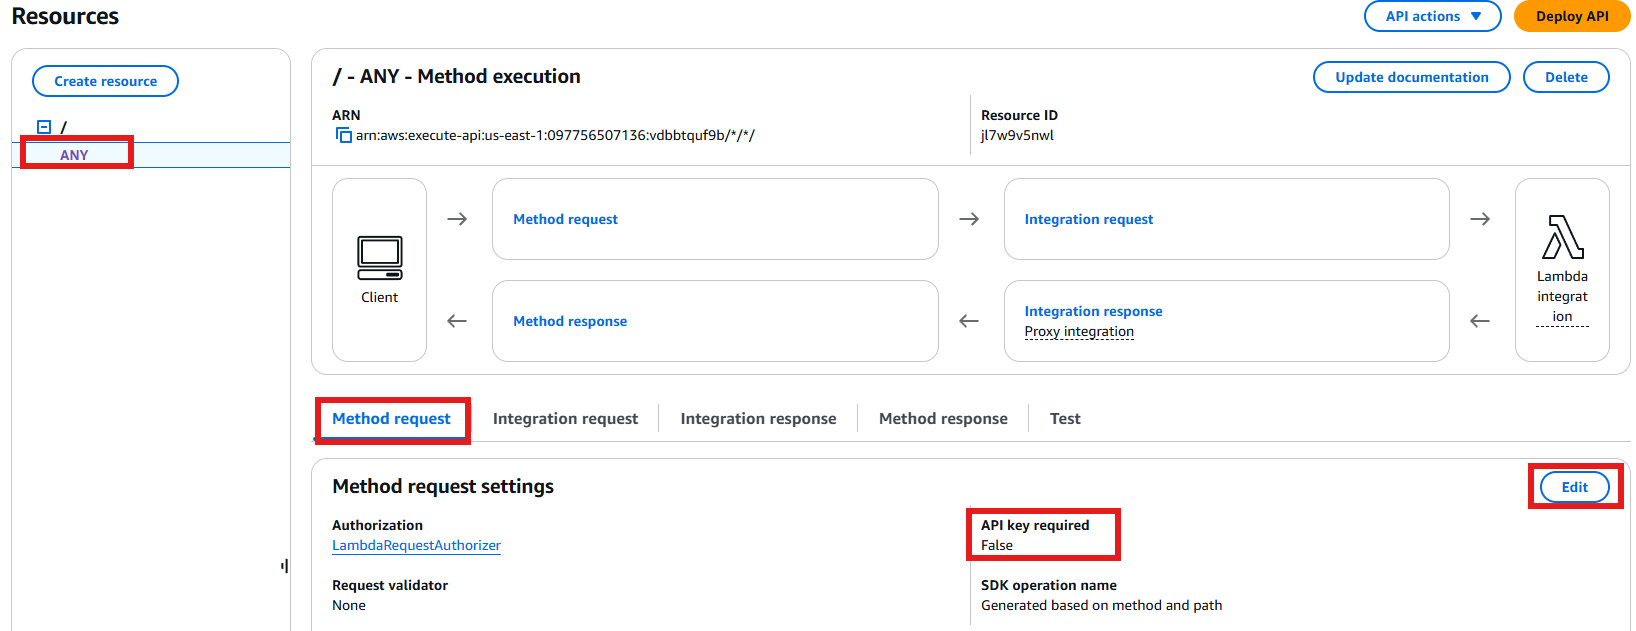
Figure 14: Update the API Key Required Value
- Click on “Deploy API” to deploy these changes to the production environment.

Figure 15: Deploy API Changes to ProdSelect “prod” as the deployment stage to deploy these changes to the production environment.
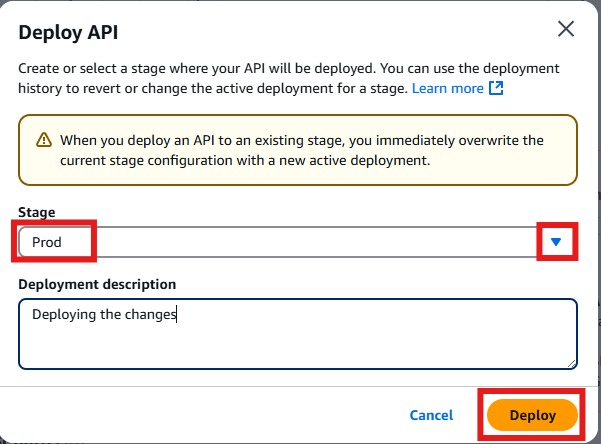
Figure 16: Deploy Changes to Prod Environment
- Navigate to the API Gateway console and locate the “API Keys” section. Find the entry for the “prod” stage and copy the API Key value.
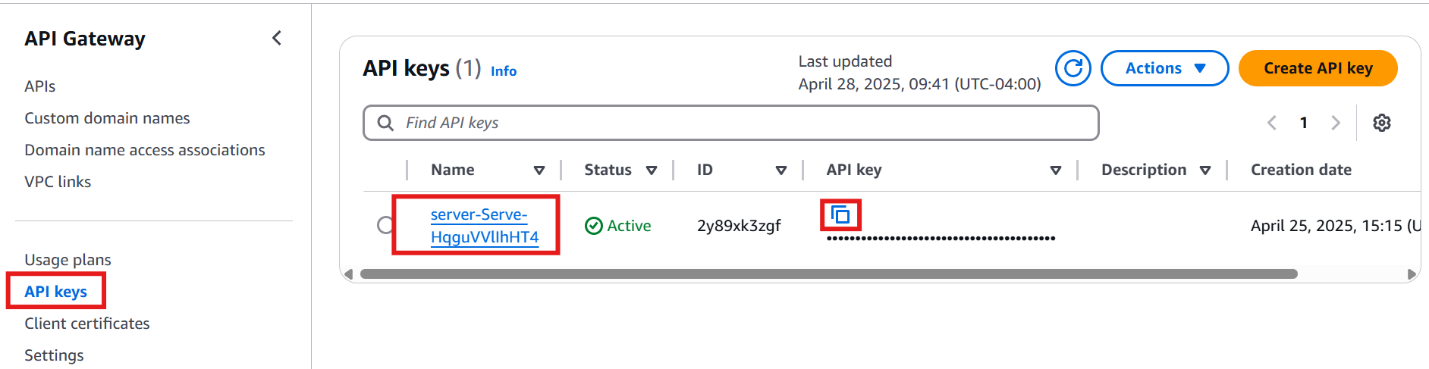
Figure 17: Getting API Key Value from the Deployed Prod Environment
- Navigate to the API Gateway console and click “APIs” in the left sidebar. In the search bar, type “serverlessrepo-MongoDB-Firehose-Ingestion-App” and click on the matching API from the results.
- Configuring Amazon Data Firehose Stream to send data to MongoDB collection
- Navigate to the CloudFormation console and navigate to your stack’s “Outputs” section. Locate the row labeled “WebEndpoint” and copy its corresponding value.
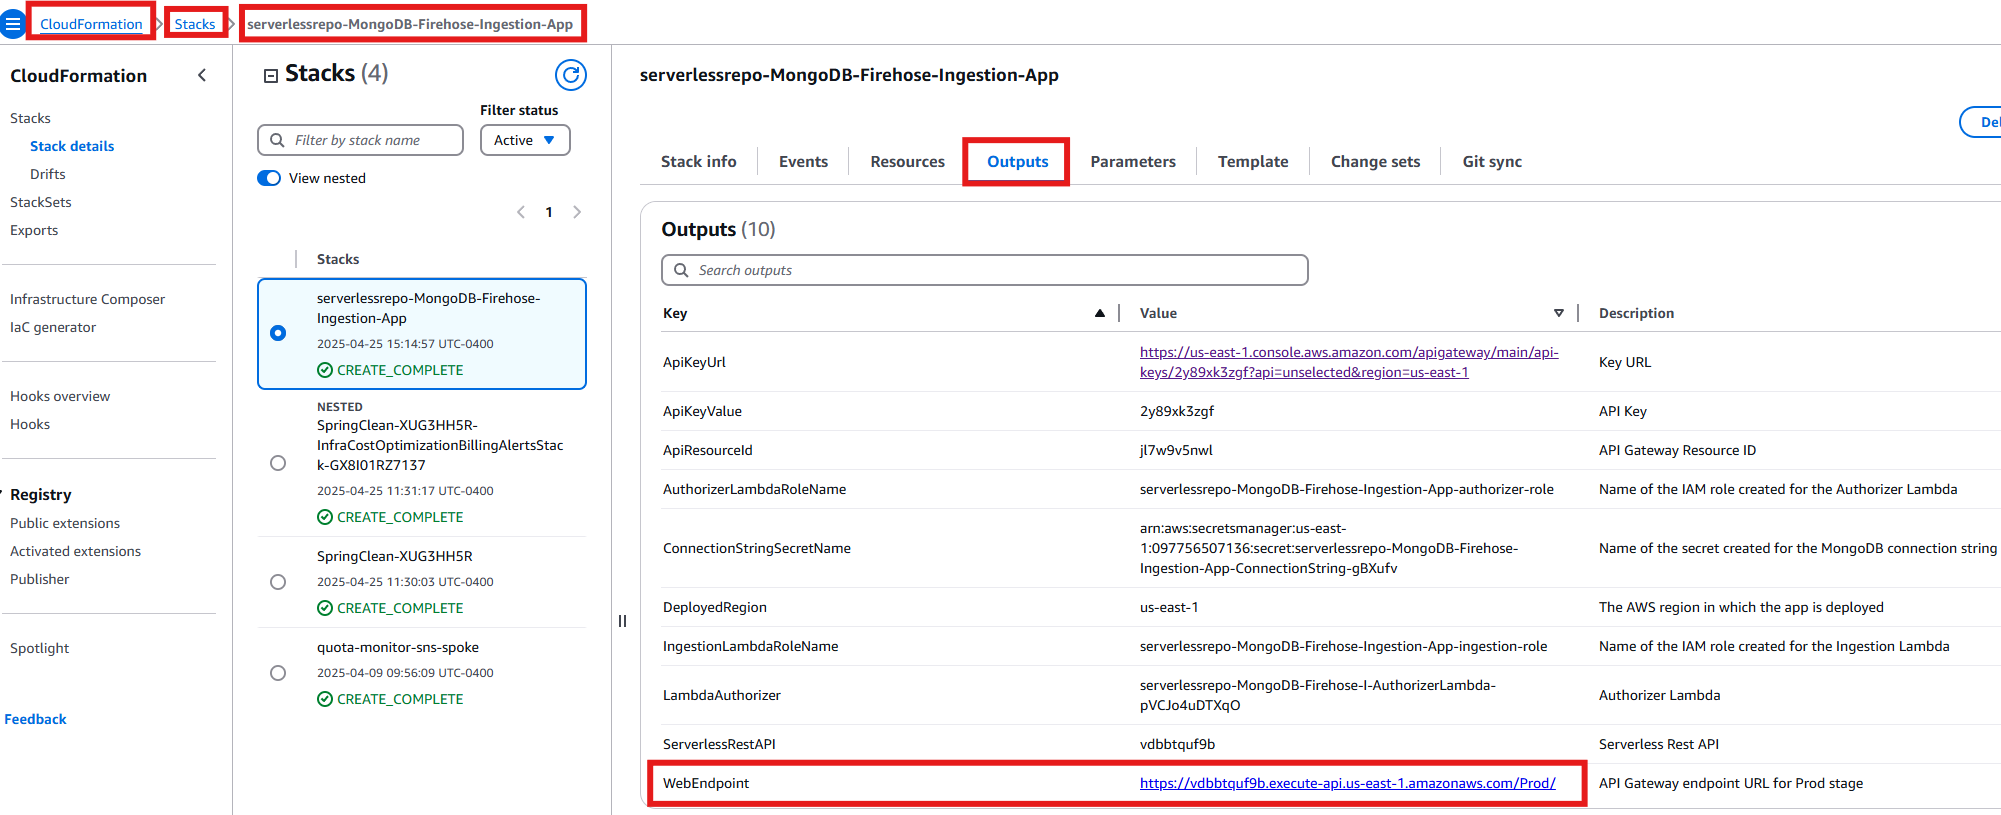
Figure 18: RestAPI Endpoint Value from CloudFormation Outputs
- Navigate to the Amazon Data Firehose console to create a new delivery stream. When configuring, select “Direct Put” as your source and “MongoDB Atlas” as your destination. For the configuration details, use the WebEndpoint you copied earlier from CloudFormation as your and enter the API Key that you obtained from Step 3d.
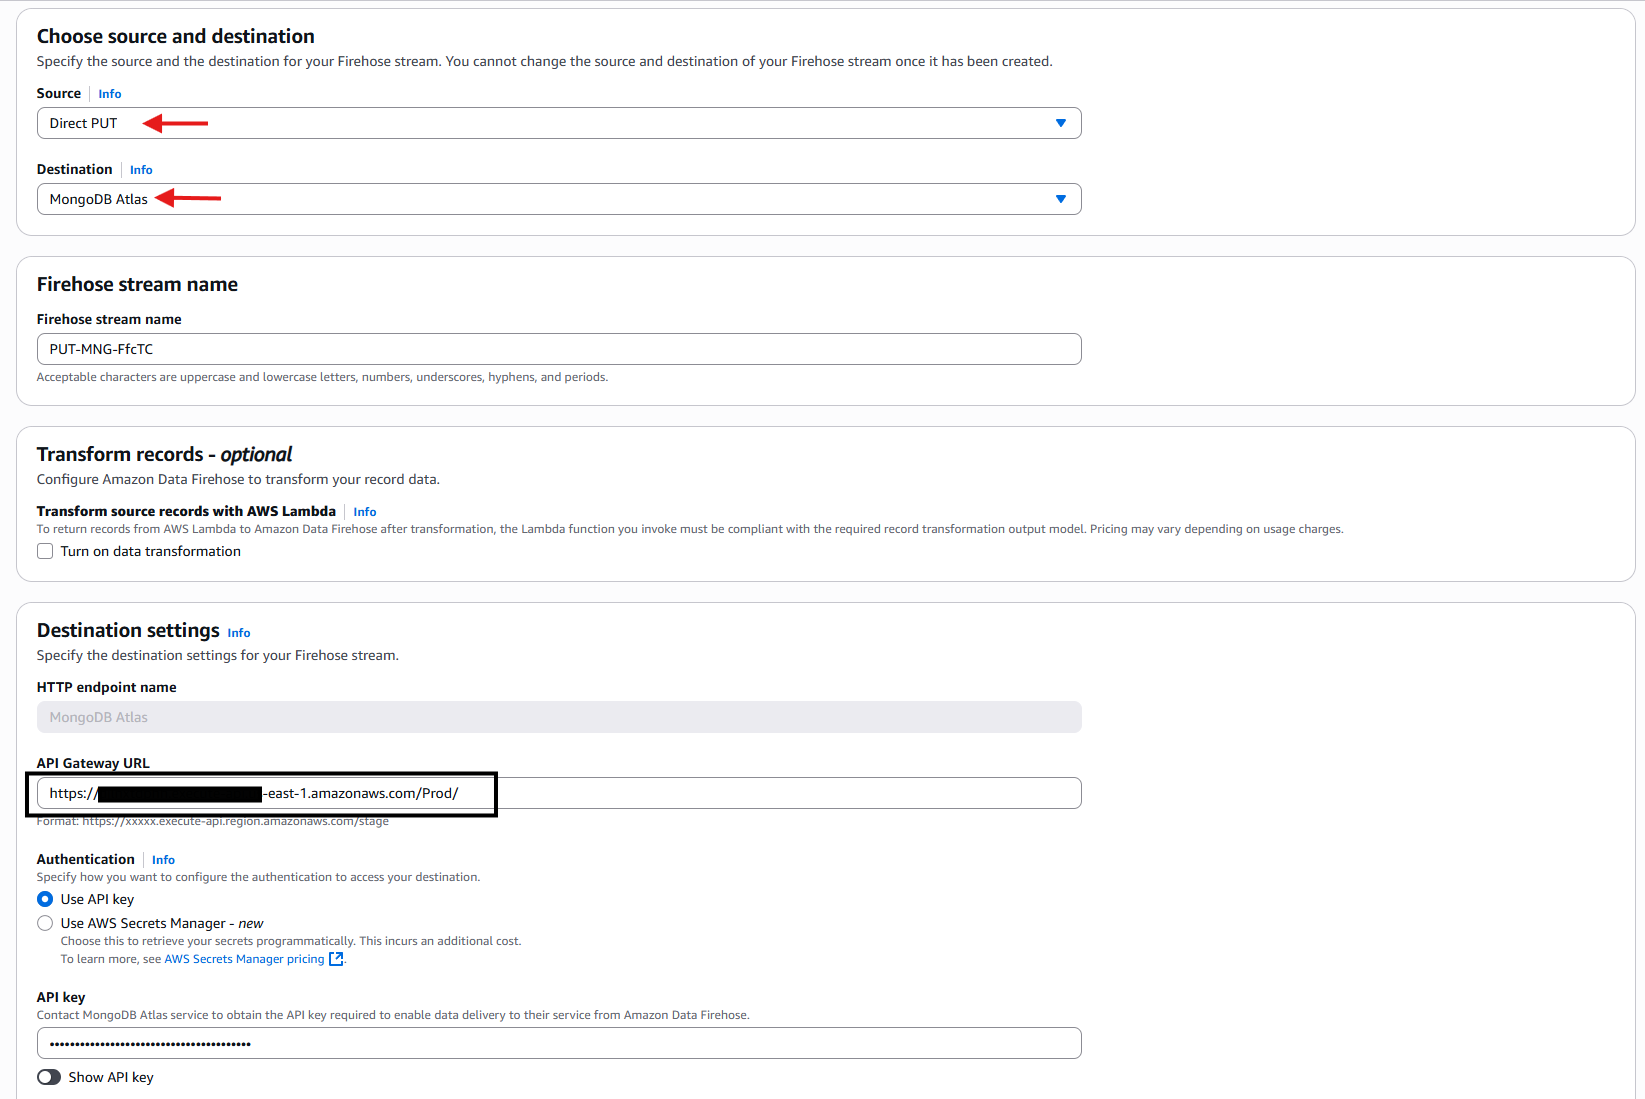
Figure 19: Configure Amazon Data Firehose
After entering the MongoDB configuration details, choose an S3 bucket for backup purposes. This bucket stores any data that fails to be delivered to MongoDB. Once you’ve selected the appropriate S3 bucket, finalize the process by creating the Firehose stream.
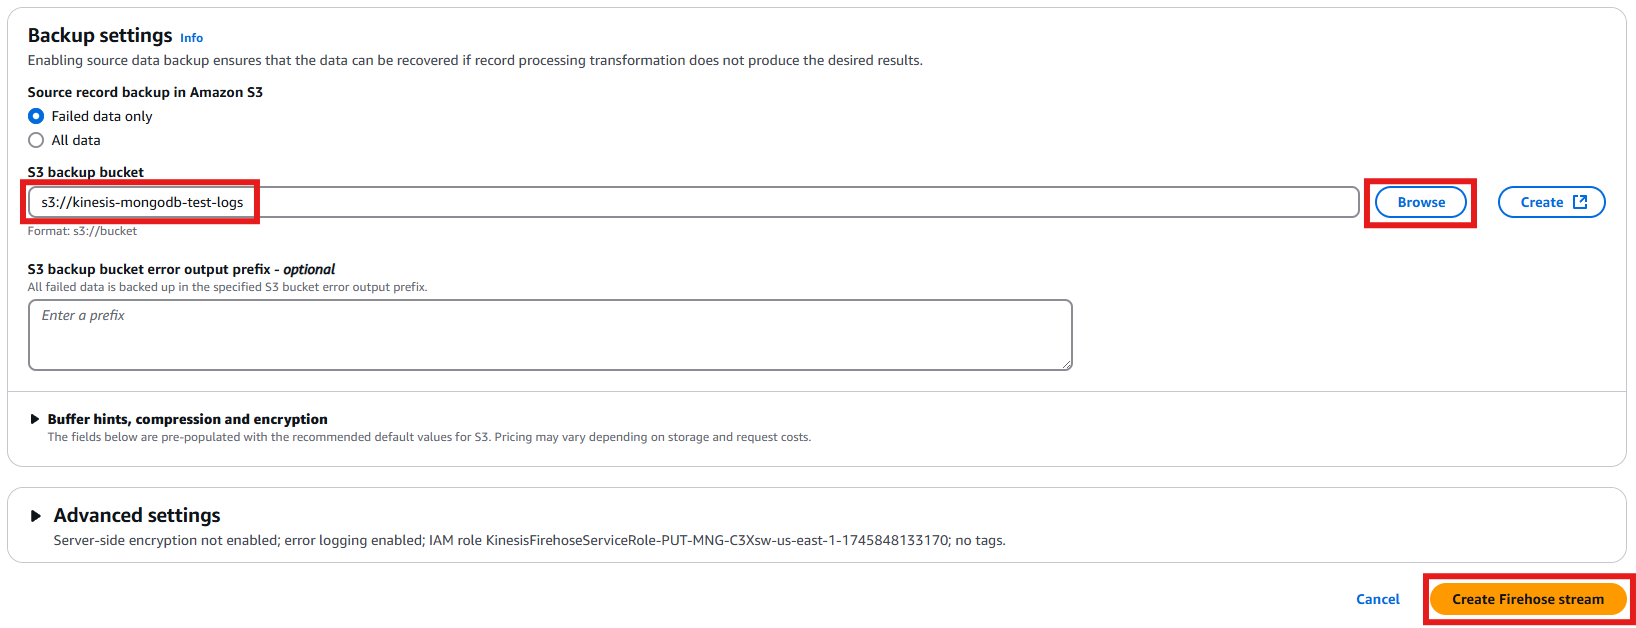
Figure 20: Selecting S3 bucket for backup
- Navigate to the CloudFormation console and navigate to your stack’s “Outputs” section. Locate the row labeled “WebEndpoint” and copy its corresponding value.
- Testing the firehose stream data delivery to MongoDB Atlas database
- Navigate to your newly created Firehose stream and locate the “Test with demo data” section. Expand this section and click the “Start sending demo data” button to begin transmitting test data through your stream. This helps to verify that your data pipeline is working correctly.
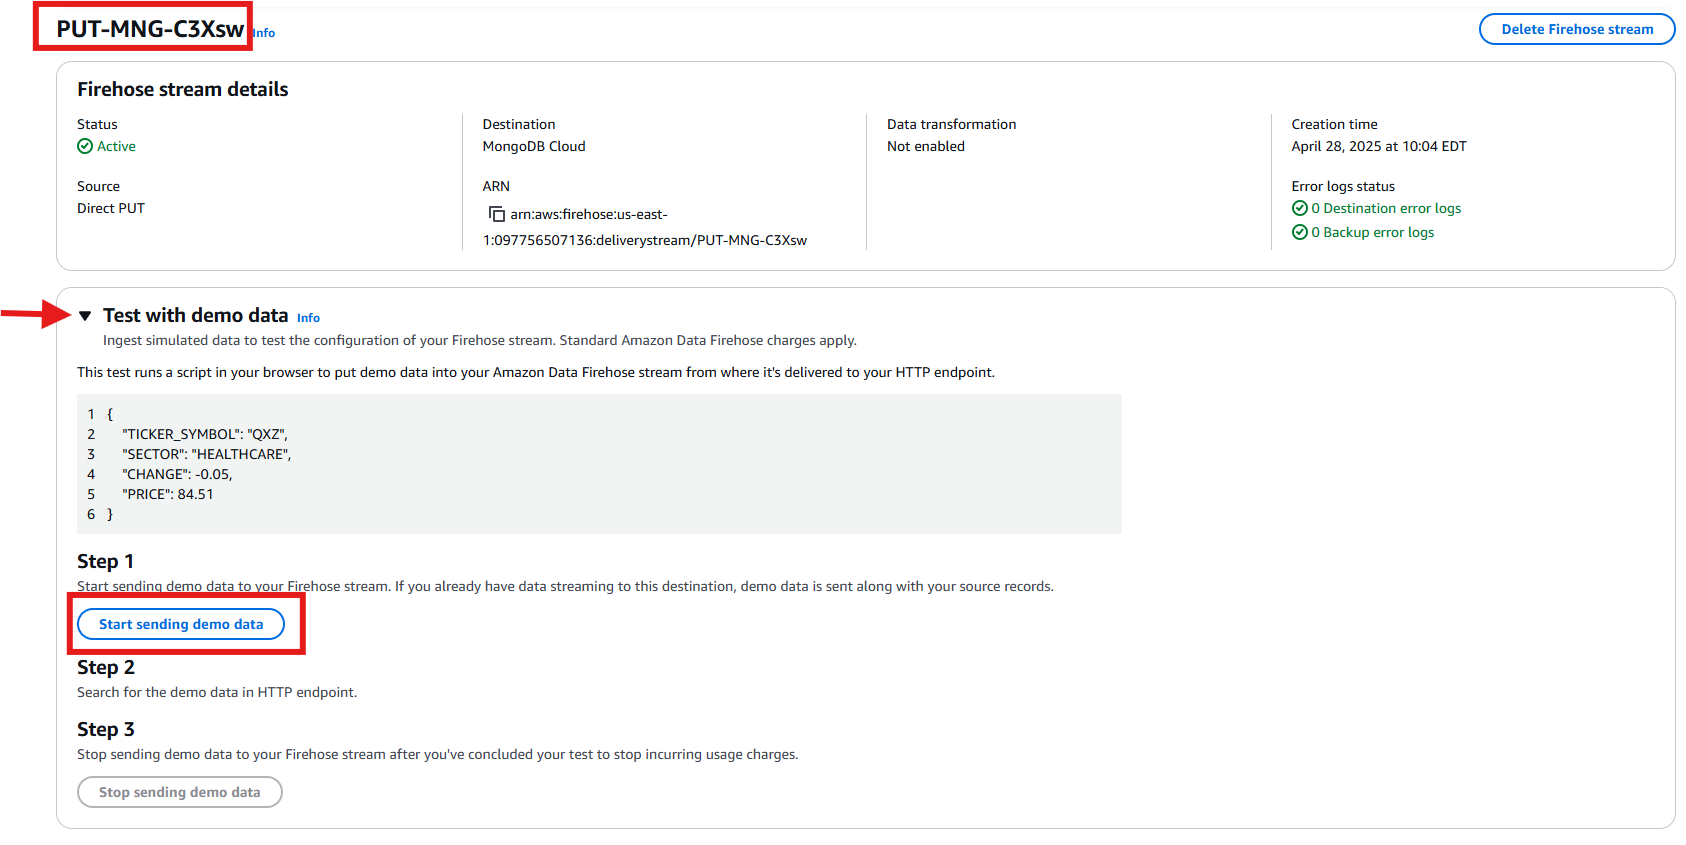
Figure 21: Sending Test Data from Amazon Data Firehose to MongoDB Atlas Database
- . Navigate to your MongoDB console. From there, select the appropriate cluster, then choose the target database, and finally open the designated collection where the test data should appear.
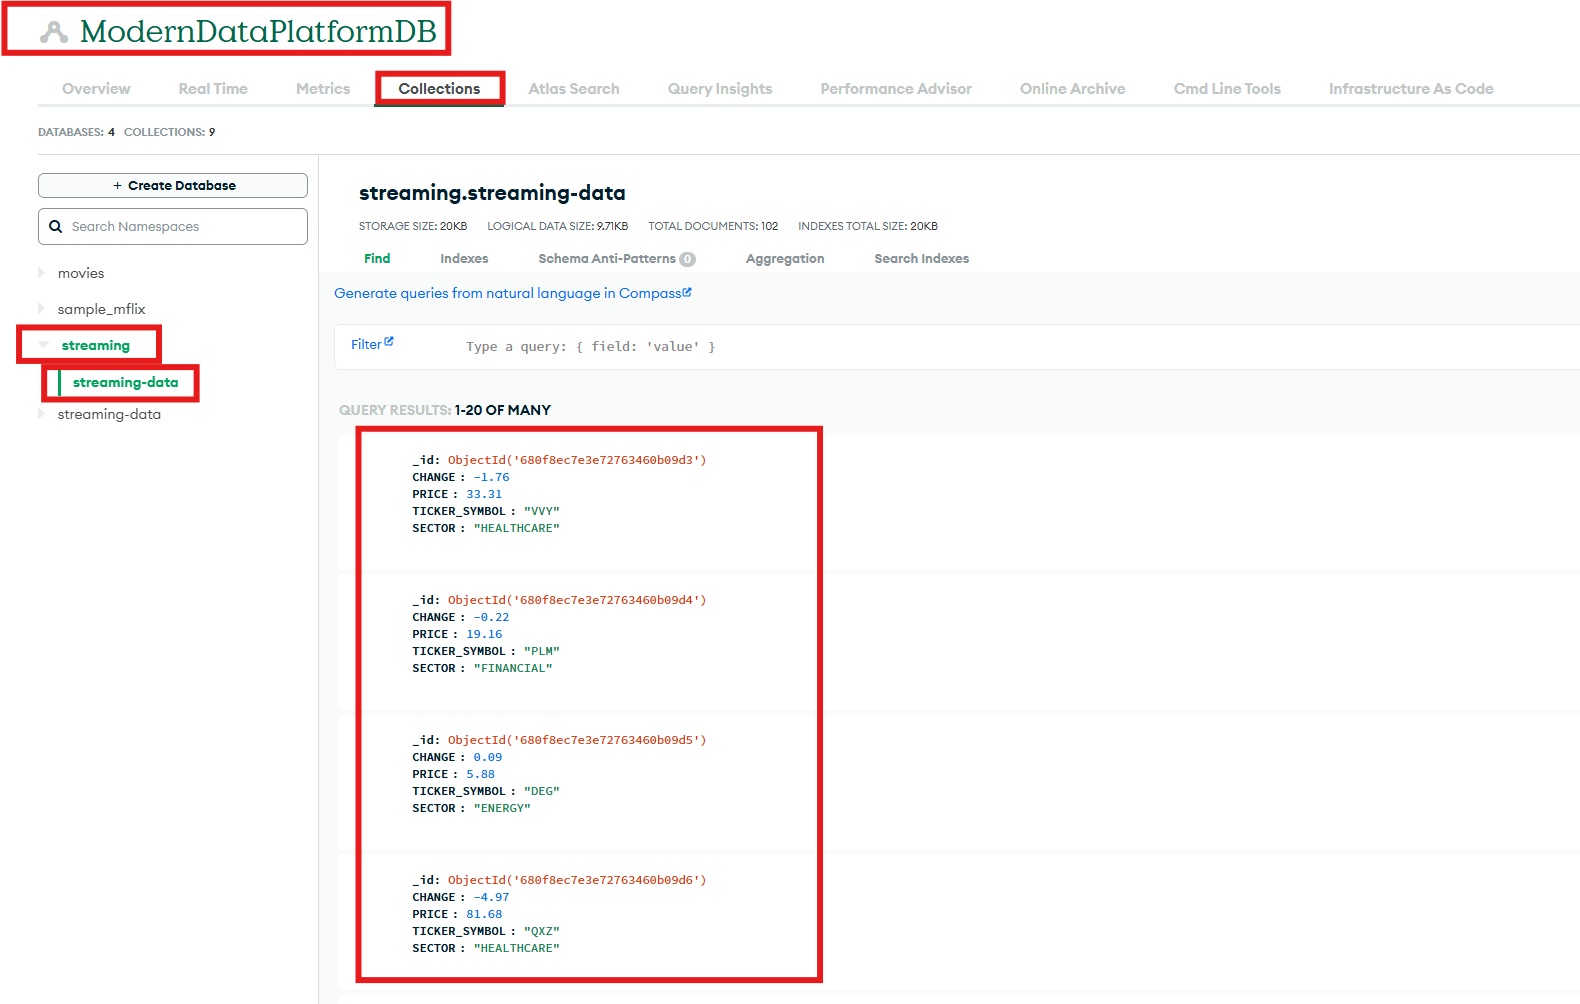
Figure 22: Validating the Data in MongoDB Database
- Navigate to your newly created Firehose stream and locate the “Test with demo data” section. Expand this section and click the “Start sending demo data” button to begin transmitting test data through your stream. This helps to verify that your data pipeline is working correctly.
Clean up
Remember to back up any important data before performing these cleanup steps.
- Delete Amazon Kinesis Data Firehose Delivery Stream
- Go to the Amazon Kinesis Data Firehose console
- Select and delete the delivery stream created for MongoDB integration
- Delete API Gateway Resources
- Navigate to API Gateway console
- Find and delete the “serverlessrepo-MongoDB-Firehose-Ingestion-App” API
- Delete associated API keys
- Delete AWS Lambda Functions
- Go to AWS Lambda console
- Search for and delete the “MongoDB-Firehose” Lambda functions
- Delete both the Authorizer Lambda function and ingestion function
- Delete CloudFormation Stack
- Navigate to CloudFormation console
- Find the stack named “serverlessrepo-MongoDB-Firehose-Ingestion-App”
- Delete the stack (this will remove all associated resources created by the stack)
- Clean up S3 Backup Bucket (if no longer needed)
- Go to S3 console
- Delete the backup bucket that was configured for failed Firehose deliveries
- MongoDB Atlas Clean-up (if needed)
- Delete the collection that was receiving the test data
- If the database is no longer needed, delete the database
- If necessary, remove the cluster if it was specifically created for this integration
Conclusion
In this post, we showed how easy it is to ingest data into MongoDB Atlas using Amazon Data Firehose, AWS Lambda, and Amazon API Gateway. This integration has many use cases. This integration allows you to stream Internet of Things (IoT) data for real time analytics, and AI-powered application data directly into MongoDB Atlas platform with minimum code. Learn more about MongoDB Atlas on AWS