AWS Big Data Blog
Secure multi-warehouse Amazon Redshift access behind a Network Load Balancer using Microsoft Entra ID
As data analytics workloads scale, organizations face two challenges. First, they must deliver high-performance analytics at massive scale while maintaining secure access across diverse tools. Second, they must manage high-concurrency workloads while integrating with existing identity management systems.
You can address these challenges by using Amazon Redshift Serverless endpoints behind an AWS Network Load Balancer with Microsoft Entra ID federation. This architecture can authenticate while helping to streamline identity management across your data environment. Amazon Redshift Serverless provides petabyte-scale analytics with auto scaling capabilities, enabling high-concurrency workloads while streamlining user authentication and authorization.
In this post, we show you how to configure a native identity provider (IdP) federation for Amazon Redshift Serverless using Network Load Balancer. You will learn how to enable secure connections from tools like DBeaver and Power BI while maintaining your enterprise security standards.
Solution overview
The following diagram shows the architecture.
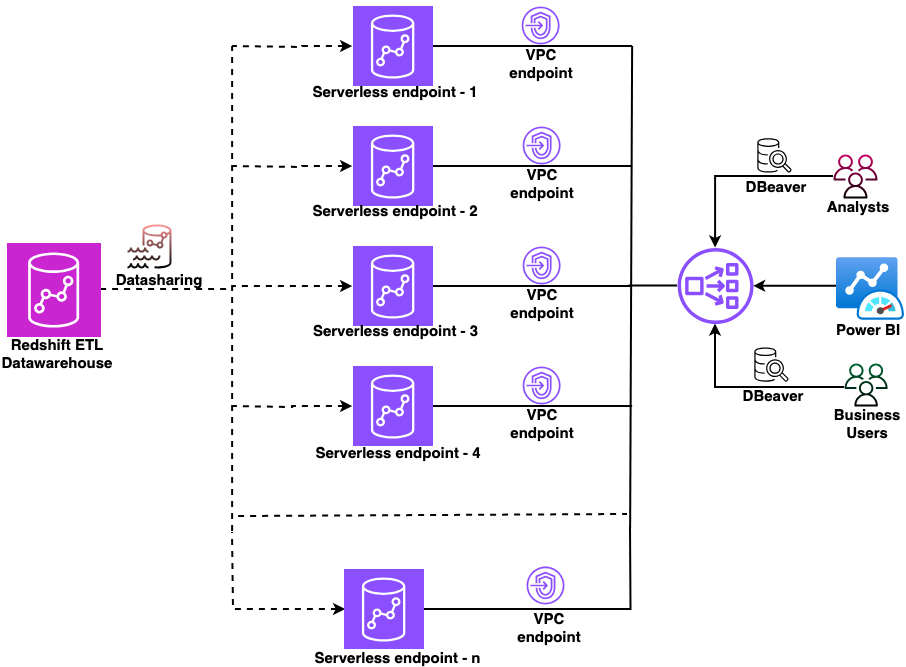
Figure 1: Sample architecture diagram
In this architecture:
- A central Amazon Redshift ETL data warehouse shares data to multiple Amazon Redshift Serverless workgroups using Amazon Redshift data sharing.
- Each workgroup has a dedicated managed Amazon Virtual Private Cloud (Amazon VPC) endpoint.
- A Network Load Balancer sits in front of all VPC endpoints, providing a single connection point.
- Users connect from DBeaver or Power BI through the Network Load Balancer and authenticate using their Microsoft Entra ID credentials.
This setup works whether you’re validating the concept with a single workgroup today or planning to scale to multiple workgroups in the future.
Prerequisites
Before you begin, make sure that you have completed these prerequisites.
- Create Amazon Redshift Serverless endpoints.
- Set up datashare from producer to Amazon Redshift Serverless endpoints.
- Create Amazon Redshift-managed VPC endpoints.
- Create a Network Load Balancer.
- Configure a domain name.
- Set up Amazon Redshift native IdP federation with Microsoft Entra ID.
- Gather the following from your registered application in Microsoft Entra ID:
- Scope (API-Scope)
- Azure Client ID (AppID from App Registration Details)
- IdP Tenant (Tenant ID from App Registration Details)
- Download and install the latest Amazon Redshift JDBC and ODBC drivers.
This solution uses the following AWS services.
Implementation steps
This section covers configuring the Network Load Balancer, setting up an ACM certificate, creating custom domain names in Amazon Redshift, configuring DNS records in Amazon Route 53, and connecting your JDBC and ODBC clients using Microsoft Entra ID authentication.
1. Configure the Network Load Balancer
First, collect the private IP addresses for your Amazon Redshift-managed VPC endpoints:
- Open the Amazon Redshift Serverless console.
- Choose your workgroup.
- Note the private IP address of your Redshift-managed VPC endpoint.
- Repeat for each Amazon Redshift Serverless endpoint that you want to add to the Network Load Balancer.
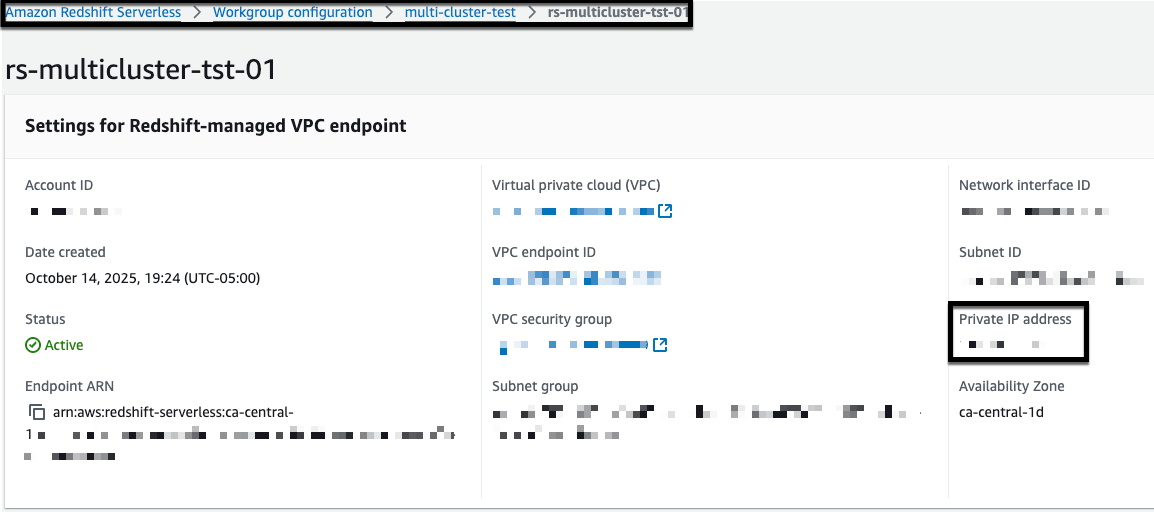
Figure 2: Amazon Redshift managed VPC endpoint
Next, create a target group for your endpoints:
- Open the Amazon Elastic Compute Cloud (Amazon EC2) console.
- Choose Target Groups.
- Choose Create target group.
- Configure the target group:
- For Target type, choose IP addresses.
- For Target group name, enter rs-multicluster-tg.
- For Protocol, choose TCP.
- For Port, enter 5439 (Note: You can find your specific port number in the Redshift endpoint connection details. If you haven’t modified it, use the default port 5439.).
- For VPC, select your VPC.
- Choose Next.

Figure 3: create target group in NLB
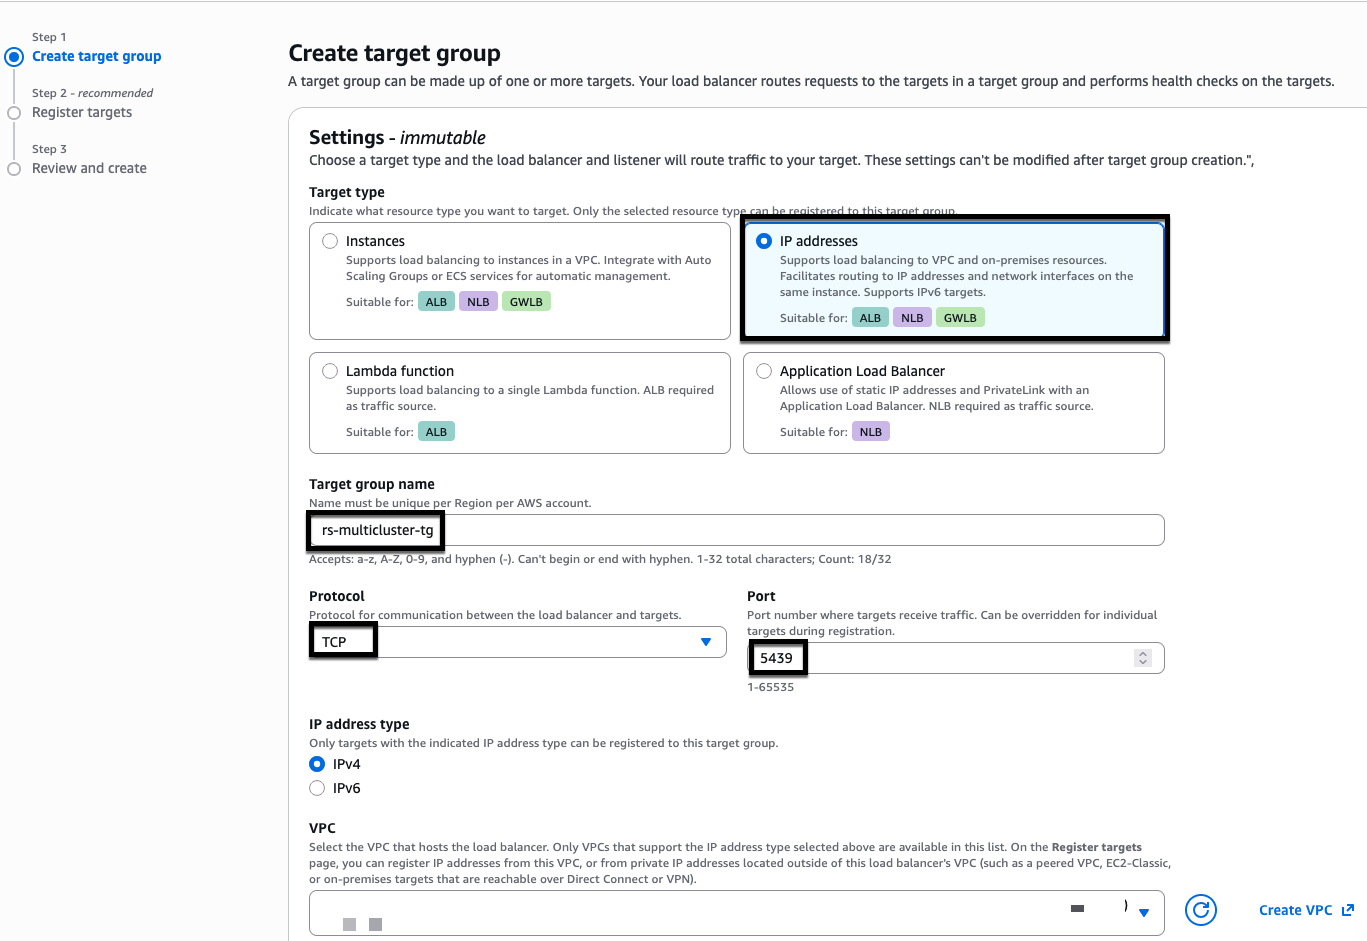
Figure 4: NLB target group creation
Add a listener to your Network Load Balancer:
- In the EC2 console, choose Load Balancers.
- Select your Network Load Balancer.
- In the Listeners tab, choose Add listener.
- Configure the listener:
- For Protocol, choose TCP.
- For Port, enter 5439.
- For Default action, choose
rs-multicluster-tg.
- Choose Add listener.
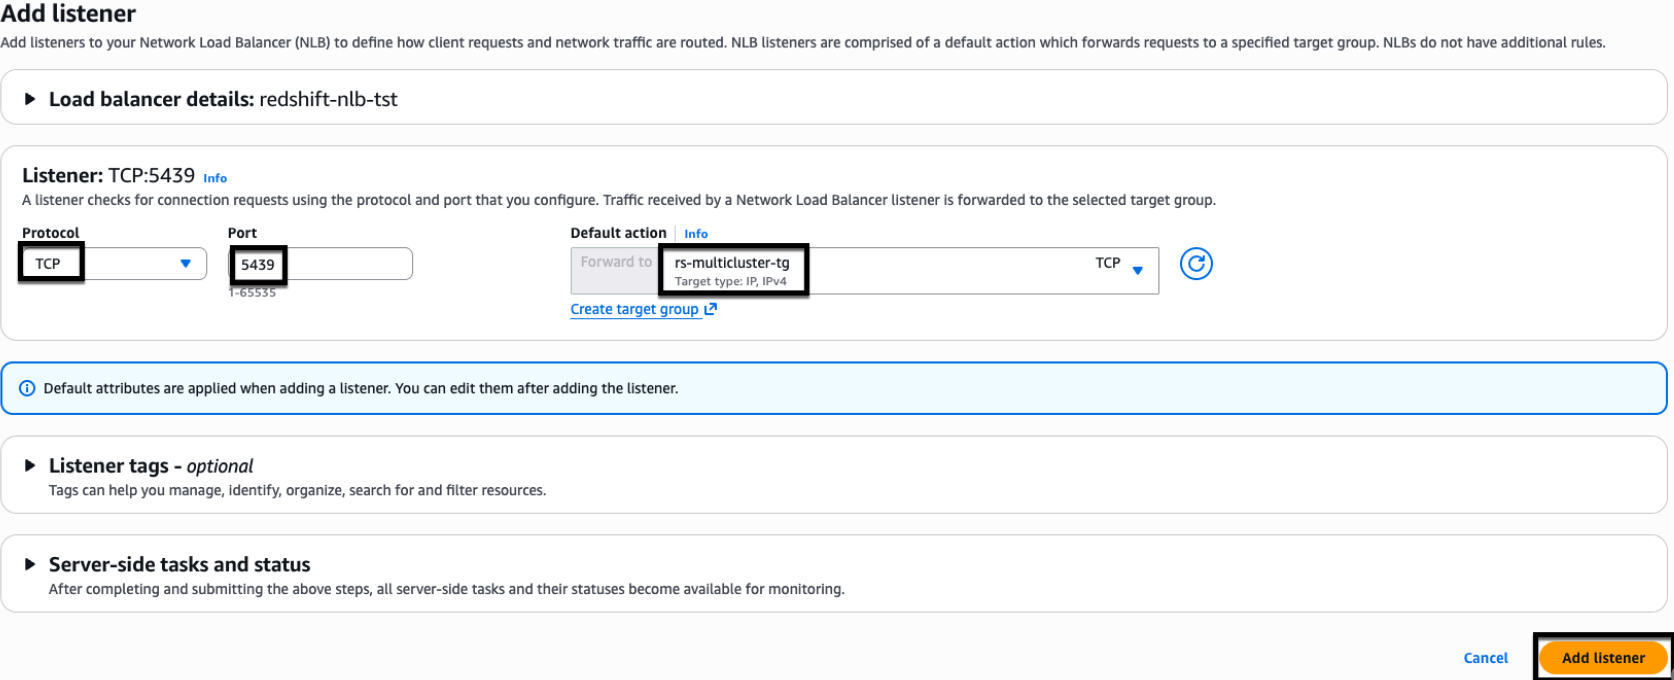
Figure 5: NLB listener properties.
2. Configure AWS Certificate Manager (ACM)
For this example, we use myexampledomain.com as a custom domain. Replace it with your own domain name before you begin.Follow these steps to request and configure your certificate:
- Request a certificate in AWS Certificate Manager (ACM):
- Open the AWS Certificate Manager console.
- Choose Request Certificate.
- Choose Request Public certificate.
- Choose Next.
- Configure the certificate:
- Add two domain names:
- Network Load Balancer CNAME:
dev-redshift.myexampledomain.com - Wildcard domain:
*.redshift.myexampledomain.com
- Network Load Balancer CNAME:
- For Validation method, choose DNS validation.
- Choose Request.
For enhanced security, we recommend adding individual Amazon Redshift Serverless CNAMEs instead of using wildcards (*). This example uses DNS validation in AWS Certificate Manager, which requires creating CNAME records to prove domain control.
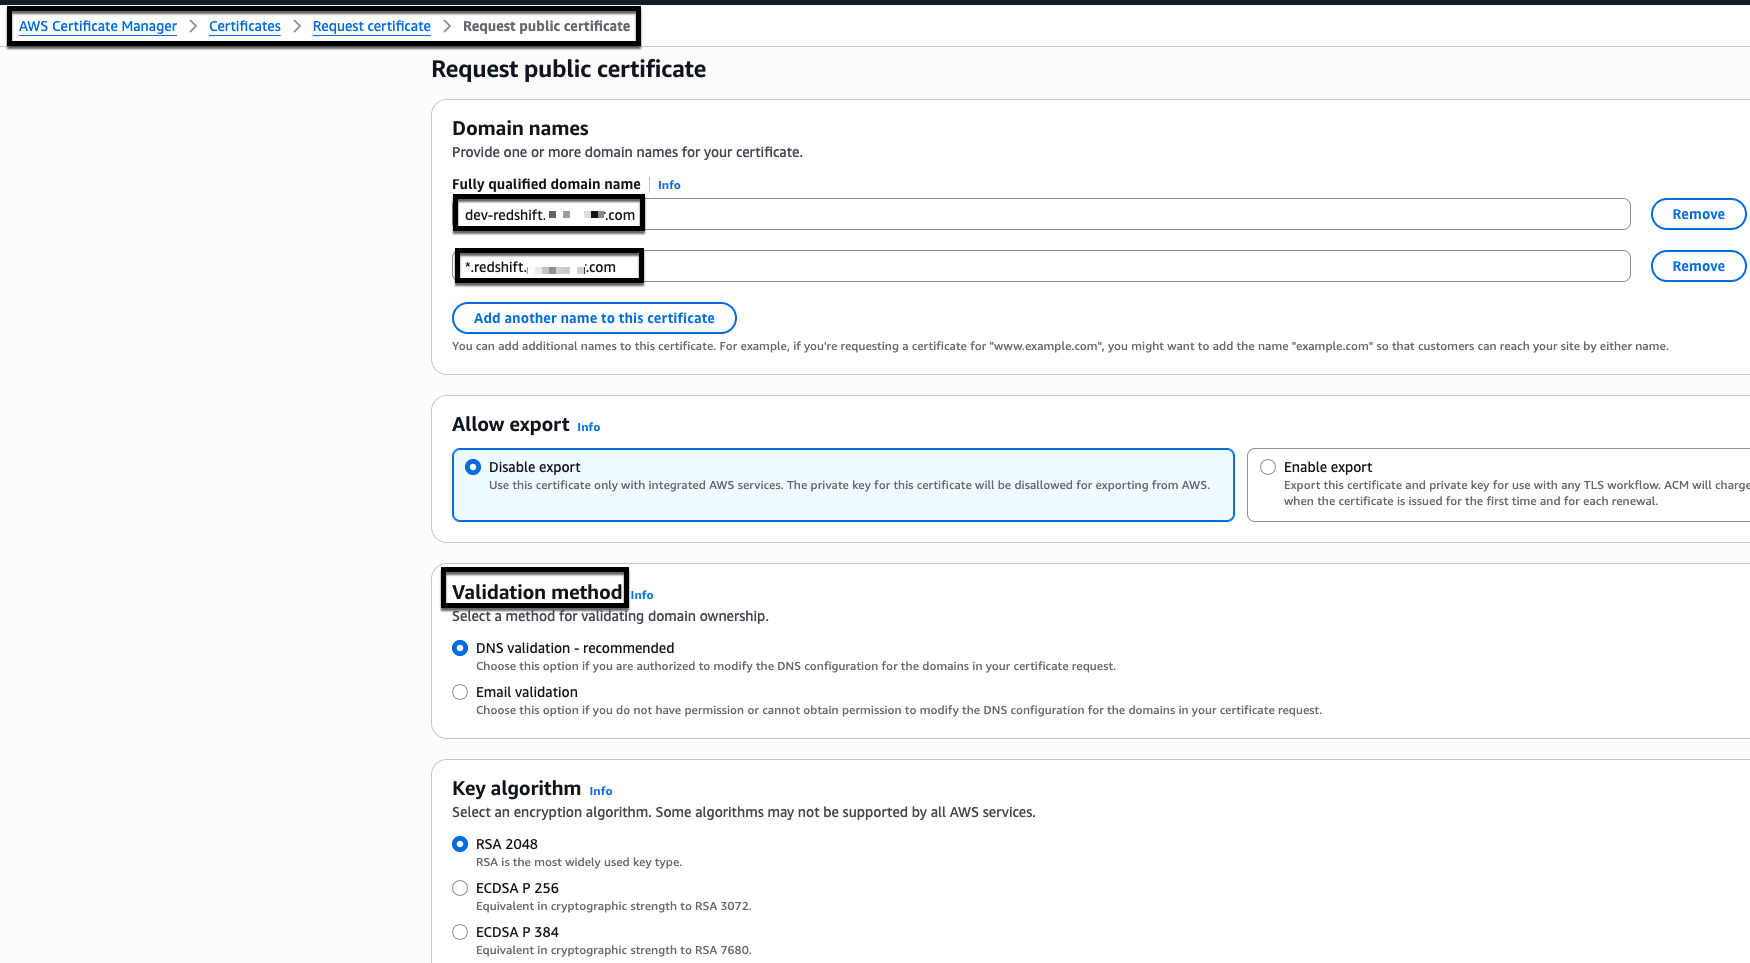
Figure 6: AWS Certificate Manager (ACM) certificate creation
- Add two domain names:
- Validate the certificate:
- Your AWS Certificate Manager (ACM) certificate initially shows a ‘Pending validation’ status.
- Wait for the status to change to ‘Issued’ before proceeding.
- You must have an ‘Issued’ status before creating Amazon Redshift custom domain names.

Figure 7: Sample issued AWS Certificate Manager (ACM) certificate
3. Configure Amazon Redshift custom domain names
- Create a custom domain name:
- Open the Amazon Redshift Serverless console.
- Select your workgroup.
- From Actions, choose Create custom domain name.
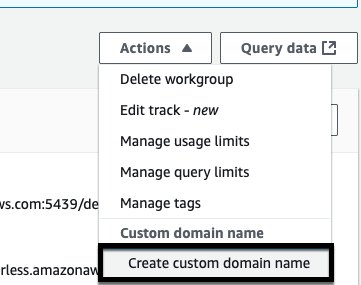
Figure 8: Amazon Redshift custom domain name creation
- Configure the domain settings:
- For Custom domain name, enter
cluster-02.redshift.myexampledomain.com. - For ACM certificate, select the certificate you created for
dev-redshift.myexampledomain.com. - Choose Create.
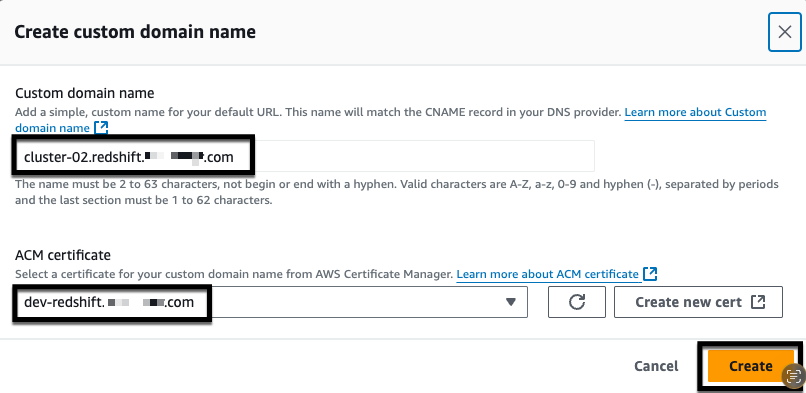
Figure 9: Amazon Redshift custom domain name creation
- For Custom domain name, enter
- Verify that the custom domain name appears in your workgroup.

Figure 10: Amazon Redshift custom domain name
- Repeat steps 1–3 for each remaining Amazon Redshift Serverless endpoint that you want to add to the Network Load Balancer. Use a unique custom domain name for each endpoint (for example,
cluster-03.redshift.myexampledomain.com,cluster-04.redshift.myexampledomain.com) and select the same ACM certificate that you created earlier.
4. Configure Amazon Route 53
Amazon Route 53 maps your custom domain name to the correct Amazon Redshift endpoint, making it reachable by name rather than a system-generated address. Without it, clients have no way to resolve your custom domain and AWS Certificate Manager can’t verify domain ownership to enable secure connections.First, create a CNAME record for your Network Load Balancer:
- Get the Network Load Balancer DNS name:
- Open the Amazon EC2 console.
- Choose Load Balancers.
- Select your Network Load Balancer.
- Copy the DNS name.
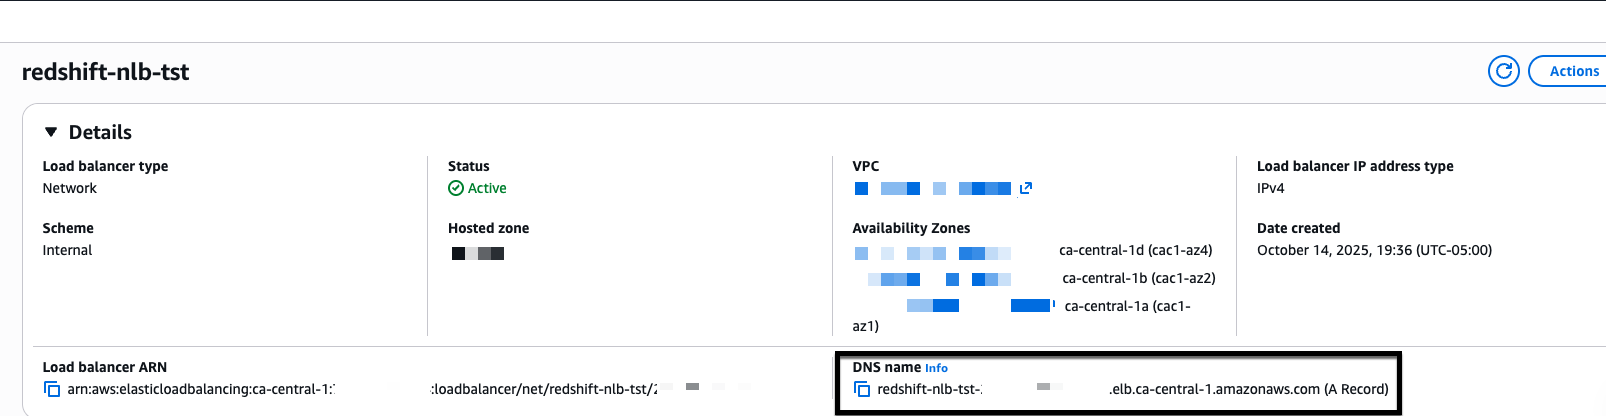
Figure 11: NLB DNS name
- Create Route 53 records:
- Open the Amazon Route 53 console.
- Choose Hosted Zones.
- Select
myexampledomain.com. - Choose Create record.
- Configure the record:
- For Record name, enter
dev-redshift.myexampledomain.com. - For Record type, choose A – Routes traffic to an IPv4 address and some AWS resources.
- For Alias, choose Yes.
- For Route traffic to, choose Alias to Network Load Balancer.
- Select your AWS Region and Network Load Balancer DNS name.
- For Routing policy, choose Simple routing.
- Choose Create records.
- For Record name, enter
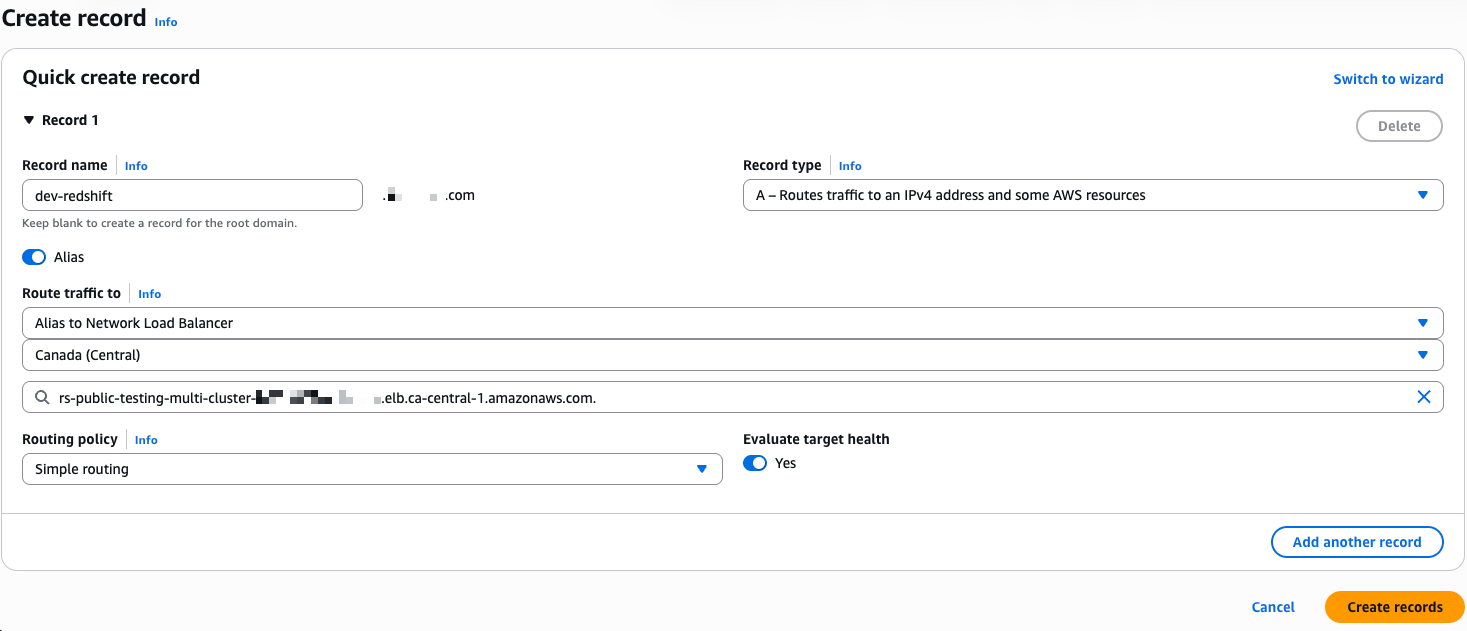
Figure 12: NLB – A record in route 53
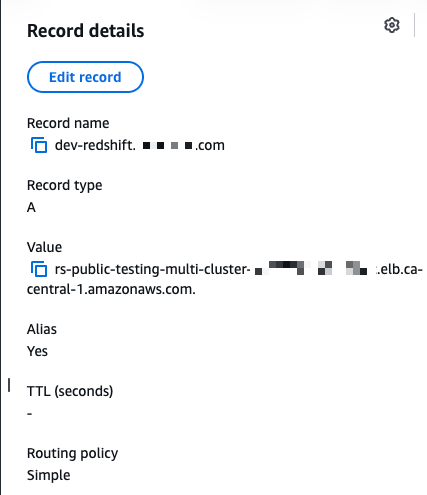
Figure 13: NLB – A record in Route 53
- Create the AWS Certificate Manager (ACM) validation CNAME:
- Open AWS Certificate Manager.
- Select your certificate for
dev-redshift.myexampledomain.com. - Copy the CNAME name and CNAME value.
- Return to Route 53.
- Create a CNAME record in your
myexampledomain.comhosted zone using the values from AWS Certificate Manager (ACM). - Choose Create records.

Figure 14: NLB – CNAME record in Route 53
5. Configure Amazon Redshift JDBC and ODBC drivers with native IdP
The JDBC and ODBC driver configuration connects your client applications to Amazon Redshift through the Network Load Balancer using your Microsoft Entra ID credentials for authentication. Configuring both drivers allows any tool, whether DBeaver using JDBC or Power BI using ODBC, to authenticate through the same identity provider and reach the correct Amazon Redshift endpoint through a single connection point.
JDBC driver setup in DBeaver
- Create a new Amazon Redshift connection:
- Host:
dev-redshift.myexampledomain.com(NLB CNAME). - Database:
dev. - Authentication: Database Native.
- Username:
login id for a user account.
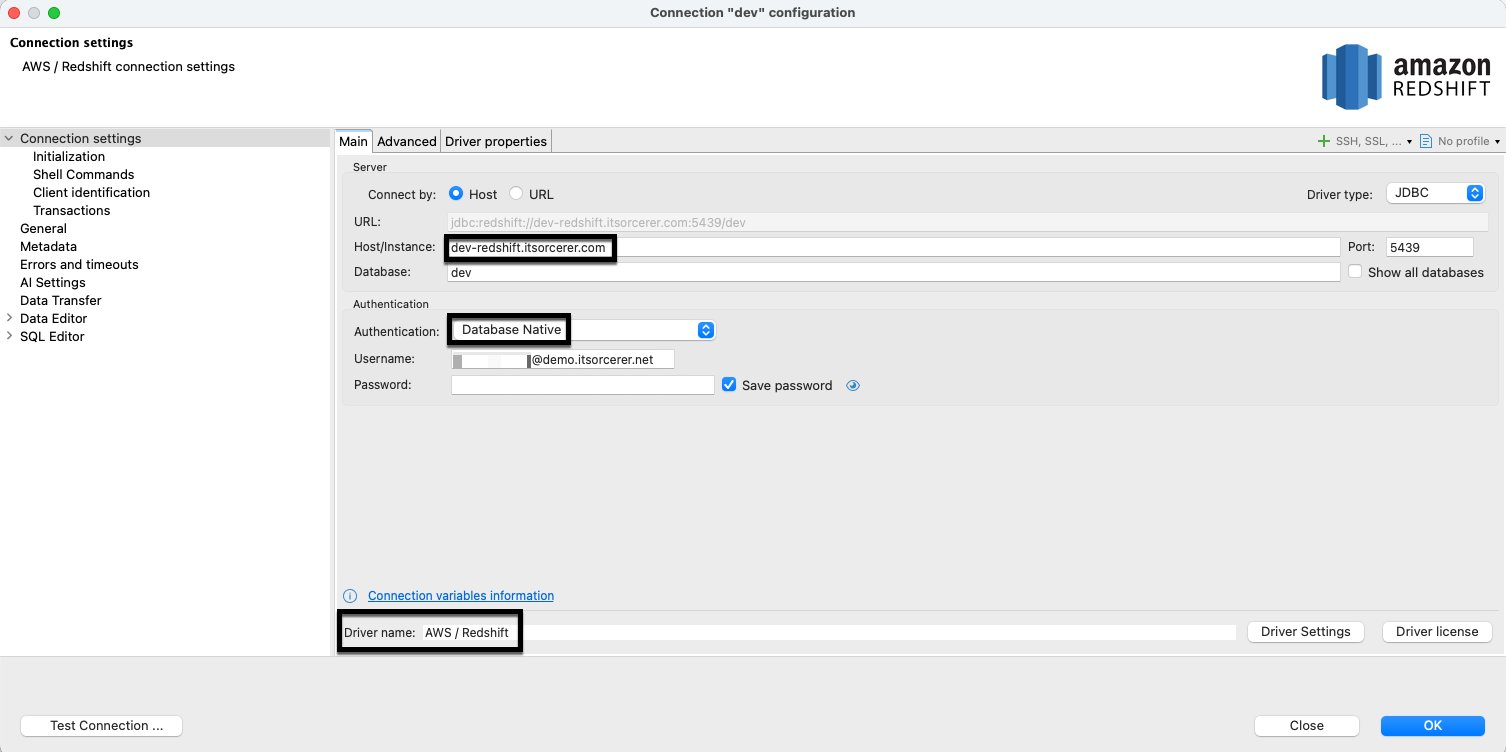
Figure 15: Amazon Redshift JDBC driver setup
- Host:
- Configure driver properties:
- plugin_name:
com.amazon.redshift.plugin.BrowserAzureOAuth2CredentialsProvider. - sslmode:
verify-ca.
- plugin_name:
- Add user driver properties:
- client_id: [Your Microsoft Entra ID application client ID].
- idp_tenant: [Your Microsoft Entra ID tenant].
- listen_port:
7890. - loginTimeout:
60. - scope: [Your Microsoft Entra ID application scope].
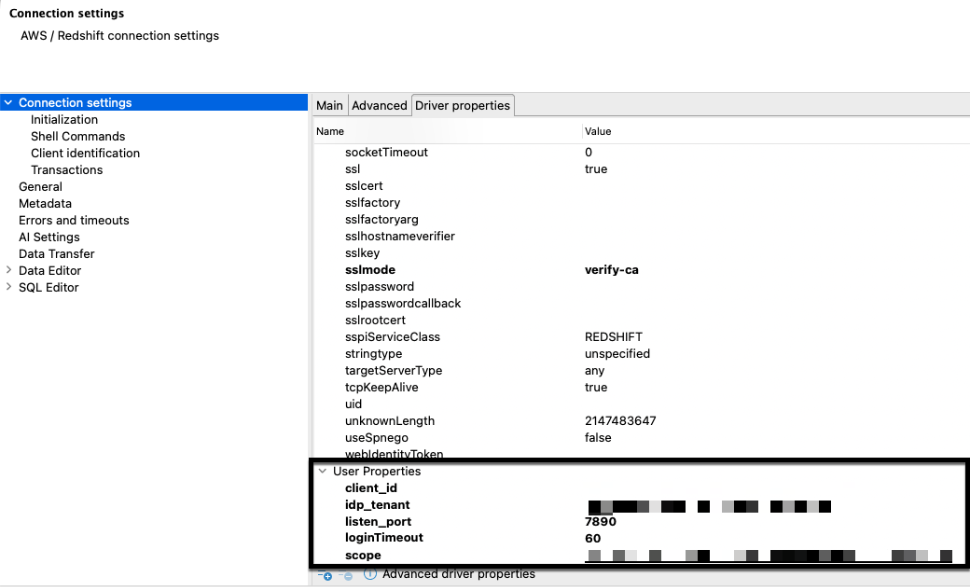
Figure 16: Amazon Redshift JDBC driver user properties
ODBC driver setup
- Configure the system DSN:
- Open ODBC Data Source Administrator (64-bit).
- Choose System DSN.
- Choose Add.
- Select Amazon Redshift ODBC Driver (x64) 2.01.04.00.
- Choose Finish.
- Configure connection settings:
- Data Source Name:
dev-redshift. - Server:
dev-redshift.myexampledomain.com. - Port:
5439. - Database:
dev. - Auth type: Identity Provider: Browser Azure AD OAUTH2.
- Scope: [Your Microsoft Entra ID application scope].
- Azure Client ID: [Your Microsoft Entra ID application client ID].
- IdP Tenant: [Your Microsoft Entra ID application tenant].

Figure 17: Amazon Redshift ODBC driver properties
- Data Source Name:
- Configure SSL settings:
- SSL Mode:
verify-ca. - Choose Save.
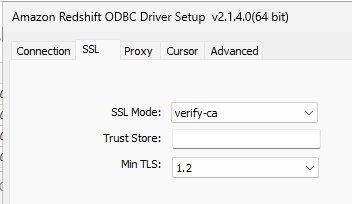
Figure 18: Amazon Redshift ODBC driver properties
- SSL Mode:
6. Validate connectivity
Test DBeaver connection
- After configuring the JDBC driver properties, choose Test Connection.
- Authenticate through the Microsoft login in your browser.
- Verify that you receive a success message.
- Confirm successful connection using Native IdP through the Network Load Balancer.
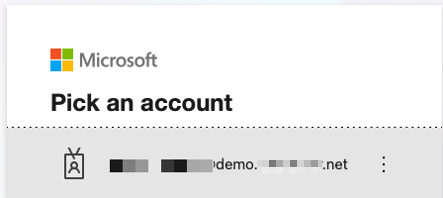
Figure 19: Microsoft Entra id authentication

Figure 20: Successful Microsoft Entra id authentication
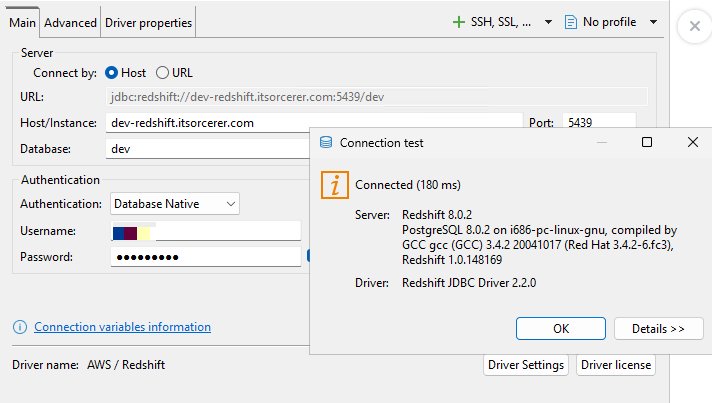
Figure 21: Successful Amazon Redshift authentication
Test power BI desktop connection
- Launch Power BI Desktop:
- Choose Get data.
- Choose More.
- Under Other, select ODBC.
- Choose Connect.
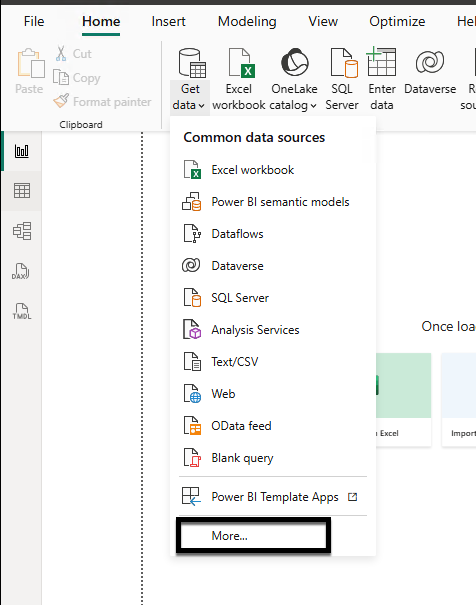
Figure 22: Power BI desktop connectivity using Amazon Redshift ODBC driver
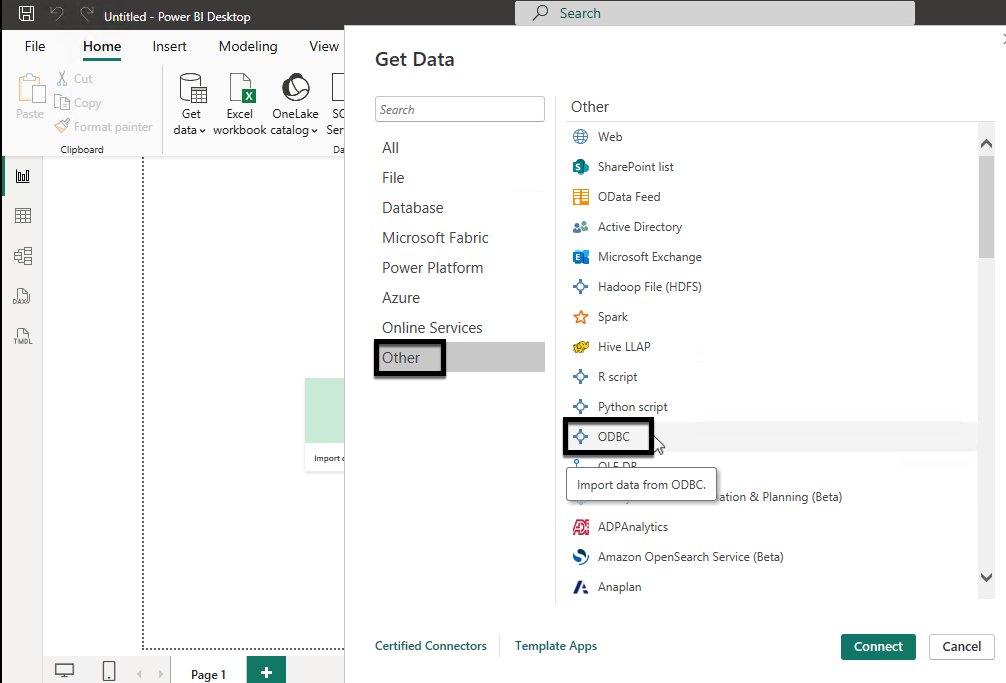
Figure 23: Power BI desktop connectivity using Amazon Redshift ODBC driver
- Configure the connection:
- Select
dev-redshiftfrom the Data source name. - Choose OK.
- Complete Microsoft Entra ID authentication in your browser.
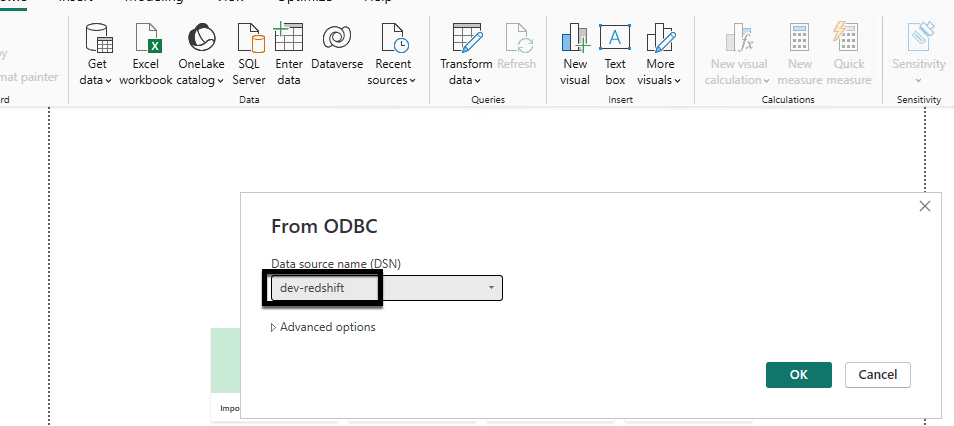
Figure 24: Power bi desktop connectivity using Amazon Redshift odbc driver

Figure 25: Successful Microsoft Entra id authentication
- Select
- Test the connection:
- From Navigator, choose schema
tpcds. - Select
date_dim. - Choose Load.
- Verify that you can analyze your Amazon Redshift data in Power BI Desktop.

Figure26: Power BI desktop connected to Amazon Redshift and schema browsing
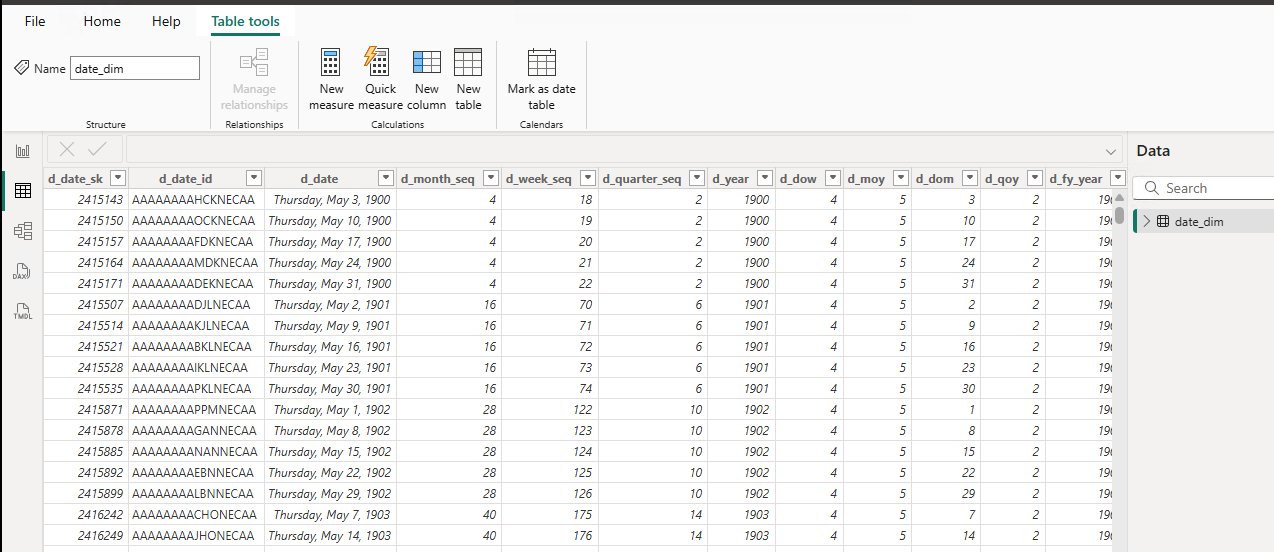
Figure 27: Power BI desktop fetching data from date_dim table
- From Navigator, choose schema
Cleaning up
To avoid ongoing charges, delete the following resources:
- Delete the Amazon Redshift data warehouses (provisioned cluster or serverless workgroup and namespace) and the VPC endpoints that you created.
- Delete the certificate that you created in AWS Certificate Manager (ACM).
- Delete the Network Load Balancer.
Conclusion
In this post, we showed you how to integrate Amazon Redshift Serverless with Microsoft Entra ID using an AWS Network Load Balancer as a single connection endpoint across multiple workgroups. As your data analytics use cases grow, you can continue to scale horizontally by adding new workgroups behind the same Network Load Balancer without changing your users’ connection settings or authentication experience.
For more information about extending and scaling this solution, see the following resources:
AWS Blogs
- Integrate Amazon Redshift native IdP federation with Microsoft Azure AD using a SQL clien
- Achieve peak performance and boost scalability using multiple Amazon Redshift serverless workgroups and Network Load Balancer
- Integrate Amazon Redshift native IdP federation with Microsoft Azure AD and Power BI
- Use custom domain names with Amazon Redshift