AWS Big Data Blog
Integrate Amazon Redshift native IdP federation with Microsoft Azure AD using a SQL client
March 2026: This post was reviewed and updated for accuracy.
Amazon Redshift accelerates your time to insights with fast, easy, and secure cloud data warehousing at scale. Tens of thousands of customers rely on Amazon Redshift to analyze exabytes of data and run complex analytical queries.
The new Amazon Redshift native identity provider authentication simplifies administration by sharing identity and group membership information to Amazon Redshift from a third-party identity provider (IdP) service, such as Microsoft Azure Active Directory (Azure AD), and enabling Amazon Redshift to natively process third-party tokens, identities, and group permissions. This process is very easy to set up, provides a secure and smoother customer experience for managing identities and groups at a centralized external IdP, and integrates natively with Amazon Redshift.
By leveraging Amazon Redshift native IdP authentication, users can establish a robust and secure end-to-end experience within the platform. This authentication method simplifies administration tasks while providing the necessary tools to implement fine-grained row-level security in Amazon Redshift. Additionally, Redshift Native IdP can be integrated with dynamic data masking (DDM) making sensitive data protection becomes more streamlined and efficient, further enhancing the security measures within the Amazon Redshift data warehouse.
In this post, we focus on Microsoft Azure AD as the IdP and provide step-by-step guidance to connect SQL clients like SQL Workbench/J and DBeaver with Amazon Redshift using a native IdP process. Azure AD manages the users and provides federated access to Amazon Redshift. You don’t need to create separate Amazon Redshift database users, AWS Identity and Access Management (IAM) roles, or IAM policies with this setup.
Solution overview
Using an Amazon Redshift native IdP has the following benefits:
- Enables your users to be automatically signed in to Amazon Redshift with their Azure AD accounts
- You can manage users and groups from a centralized IdP
- External users can securely access Amazon Redshift without manually creating new user names or roles using their existing corporate directory credentials
- External user group memberships are natively mirrored with Amazon Redshift roles and users
The following diagram illustrates the architecture of a native IdP for Amazon Redshift:

The workflow contains the following steps:
- You configure a JDBC or ODBC driver in your SQL client to use Azure AD federation and use Azure AD login credentials to sign in.
- Upon a successful authentication, Azure AD issues an authentication token (OAuth token) back to the Amazon Redshift driver.
- The driver forwards the authentication token to the Amazon Redshift cluster to initiate a new database session.
- Amazon Redshift verifies and validates the authentication token.
- Amazon Redshift calls the Azure Graph API to obtain the user’s group membership.
- Amazon Redshift maps the logged-in Azure AD user to the Amazon Redshift user and maps the Azure AD groups to Amazon Redshift roles. If the user and groups don’t exist, Amazon Redshift automatically creates those identities within the IdP namespace.
To implement the solution, you complete the following high-level steps:
- Set up your Azure application.
- Create OAuth Application
- Create Redshift Client application
- Create Azure AD Group
- Collect Azure AD information for the Amazon Redshift IdP.
- Set up the IdP on Amazon Redshift.
- Set up Amazon Redshift permissions to external identities.
- Configure the SQL client (for this post, we use SQL Workbench/J and DBeaver).
Prerequisites
You need the following prerequisites to set up this solution:
- An AWS account. If you don’t have one, you can sign up for one.
- An Amazon Redshift cluster. For setup instructions, see Create a sample Amazon Redshift cluster.
- Download Amazon Redshift JDBC SDK driver-dependent libraries 2.1.0.4 onwards and unzip the Amazon Redshift JDBC JAR zipped folder. All prior Amazon Redshift driver versions don’t support native IdP.
- A Azure account that has an active subscription. You need an admin role to set up the application on Azure AD.
- A SQL client such as SQL Workbench/J or DBeaver.
Set up your Azure application
For integrating with any SQL client/BI tool except Microsoft Power BI, we would be creating two applications. First application will be used to authenticate the user and provide a login token. Second application will be used by Redshift to retrieve user and group information.
Step 1: Create OAuth Application
- Sign in to the Azure portal with your Microsoft account.
- Navigate to the Azure Active Directory application.
- Under Manage in the navigation pane, choose App registrations and then choose New registration.
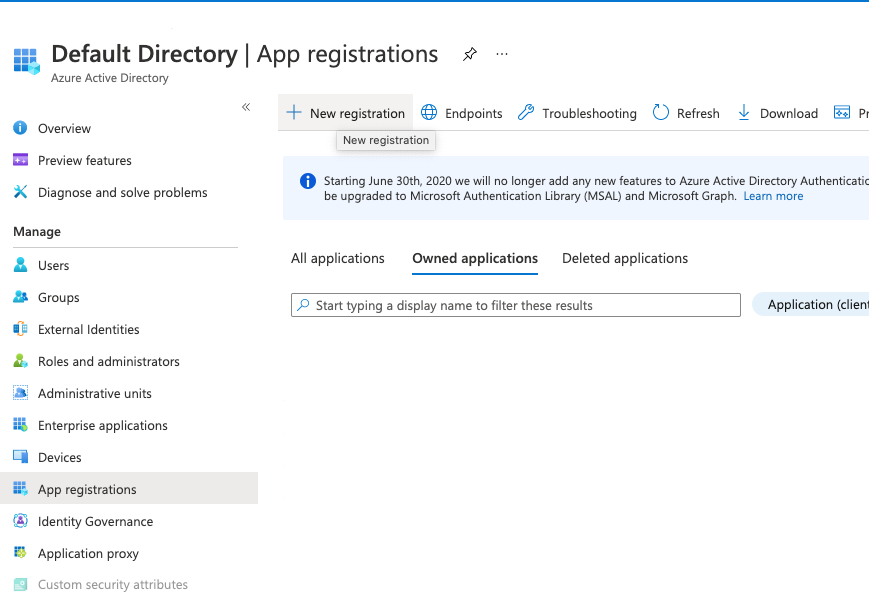
- For Name, enter a name (for example,
oauth_application). - For Redirect URI, choose Public client/native (mobile and desktop) and enter the redirect URL
http://localhost:7890/redshift/. For this post, we are keeping the default settings for the rest of the fields. - Choose Register.

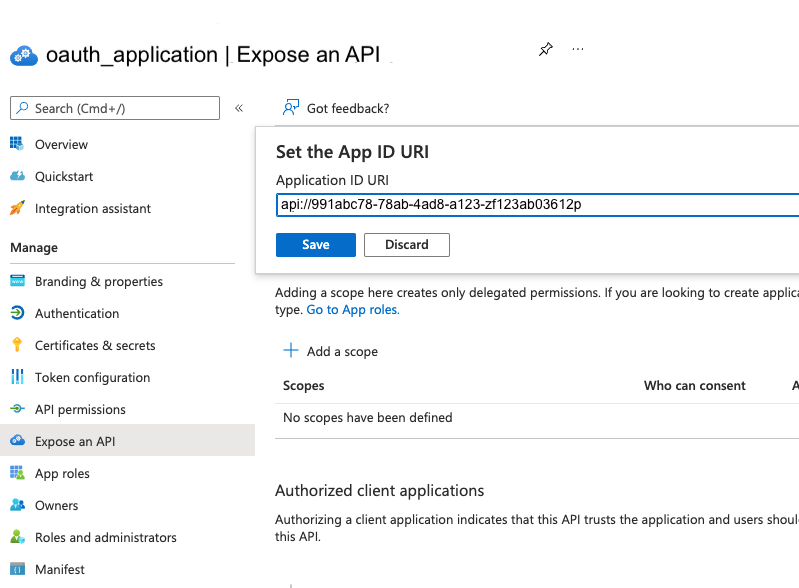
- In the navigation pane, under Manage, choose Expose an API.

If you’re setting up for the first time, you can see Set to the right of Application ID URI.

- Choose Set and then choose Save.

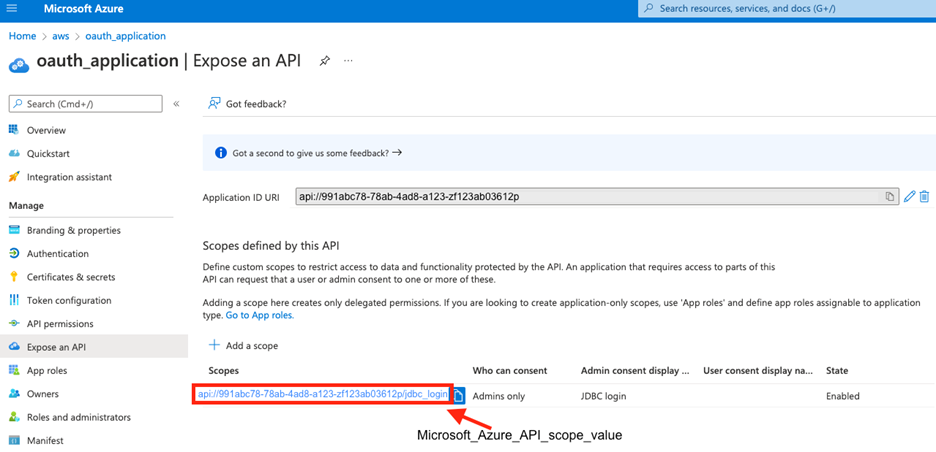
- After the application ID URI is set up, choose Add a scope.
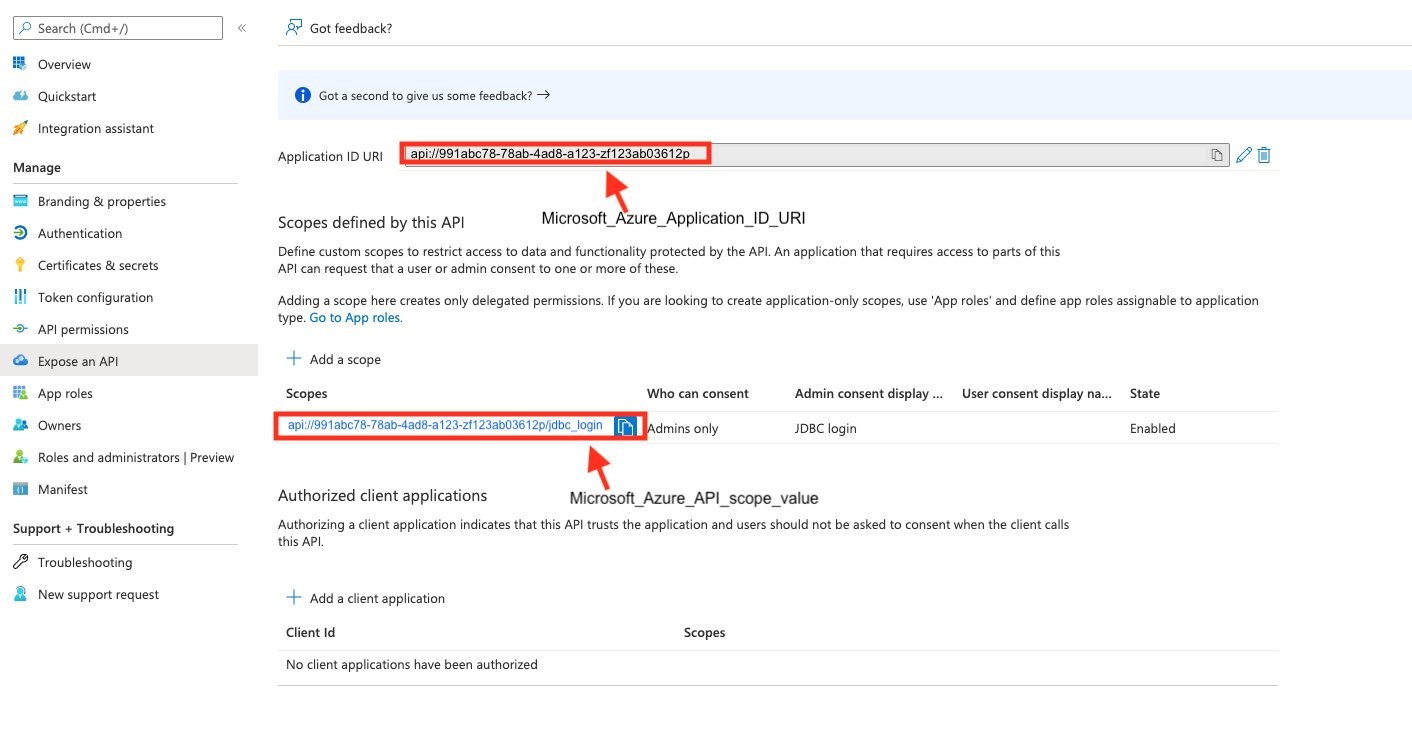
- For Scope name, enter a name (for example,
jdbc_login). - For Admin consent display name, enter a display name (for example,
JDBC login). - For Admin consent description, enter a description of the scope.
- Choose Add scope.

- After the scope is added, note down the application ID URI (for example,
api://991abc78-78ab-4ad8-a123-zf123ab03612p) and API scope (api://991abc78-78ab-4ad8-a123-zf123ab03612p/jdbc_login) in order to register the IdP in Amazon Redshift later.

The application ID URI is known as <Microsoft_Azure_Application_ID_URI> in the following section.
The API scope is known as <Microsoft_Azure_API_scope_value> when setting up the SQL client such as DBeaver and SQL Workbench/J.
Step 2. Create Redshift Client Application
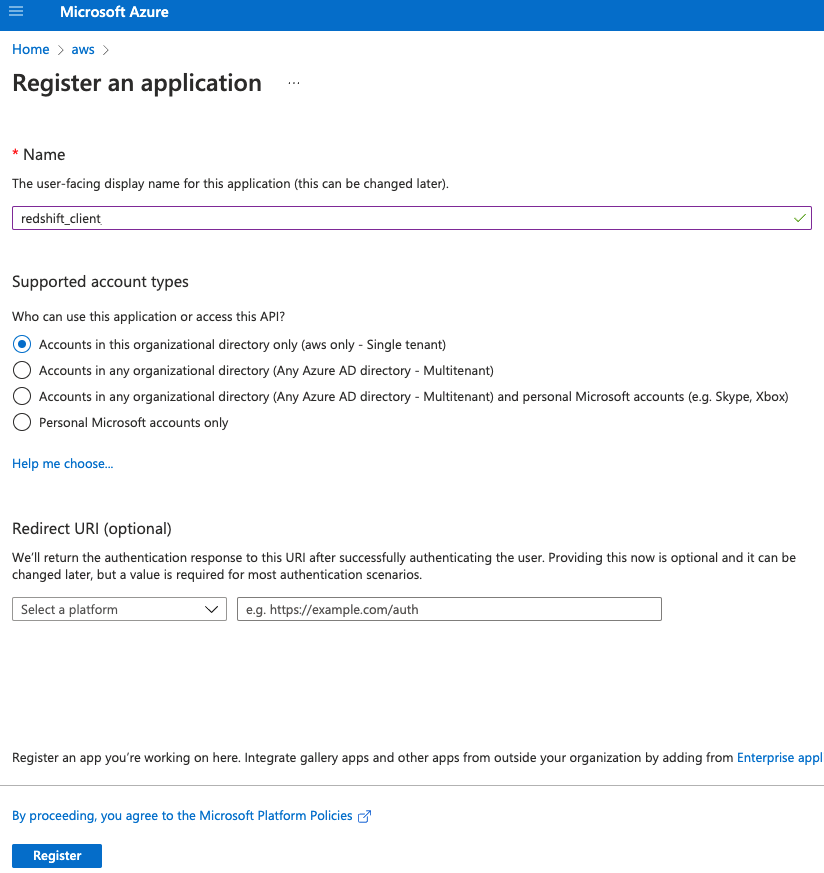
- Navigate to the Azure Active Directory application.
- Under Manage in the navigation pane, choose App registrations and then choose New registration.
- For Name, enter a name (for example,
redshift_client). For this post, we are keeping the default settings for the rest of the fields. - Choose Register.

- On the newly created application Overview page, locate the client ID and tenant ID and note down these IDs in order to register the IdP in Amazon Redshift later.
- In the navigation pane, choose Certificates & secrets.
- Choose New client secret.
- Enter a Description, select an expiration for the secret or specify a custom lifetime. We are keeping Microsoft recommended default expiration value of 6 months. Choose Add.

- Copy the secret value.
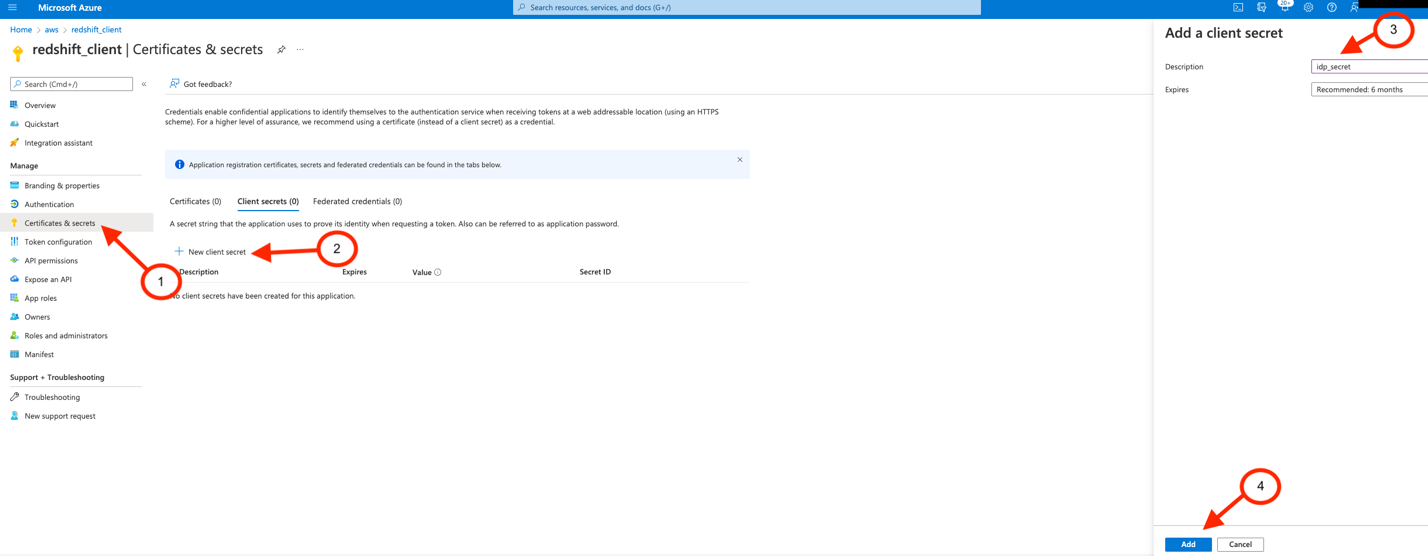
It would only be present one time and after that you cannot read it.
- In the navigation pane, choose API permissions.
- Choose Add a permission and choose Microsoft Graph.
Security Note: Using Application Permissions means Azure AD authenticates the application but does not verify individual user group assignments. Any authenticated domain user can access and view Redshift database schemas and table names, even without Azure group assignment. Actual data remains protected by Redshift permissions.
For stricter access control: Use Delegated Permissions instead, which enforces Azure AD group assignments for individual users through interactive sign in.
- Choose Application permissions.
- Search the directory and select the
Directory.Read.Allpermission. - Choose Add permissions.

- After the permission is created, choose Grant admin consent.

- In the pop-up box, choose Yes to grant the admin consent.


The status for the permission shows as Granted for with a green check mark.

Step 3. Create Azure AD Group
- On the Azure AD home page, under Manage, choose Groups.

- Choose New group.

- In the New Group section, provide the required information.

- Choose No members selected and then search for the members.
- Select the members and choose Select. For this example, you can search your username and click select.


You can see the number of members in the Members section.
- Choose Create.


Collect Azure AD information
Before we collect the Azure AD information, we need to identify the access token version from the application which you have created earlier on the Azure portal under Step 1. Create OAuth Application. In the navigation pane, under Manage, choose Manifest section, then view the accessTokenAcceptedVersion parameter: null and 1 indicate v1.0 tokens, and 2 indicates v2.0 tokens.


To configure your IdP in Amazon Redshift, collect the following parameters from Azure AD. If you don’t have these parameters, contact your Azure admin.
- issuer – This is known as <Microsoft_Azure_issuer_value> in the following sections. If you’re using the v1.0 token, use
https://sts.windows.net/<Microsoft_Azure_tenantid_value>/. If you’re using the v2.0 token, usehttps://login.microsoftonline.com/<Microsoft_Azure_tenantid_value>/v2.0. To find your Azure tenant ID, complete the following steps:- Sign in to the Azure portal with your Microsoft account.
- Under Manage, choose App registrations.
- Choose any application which you have created in previous sections.
- Click on the Overview (left panel) page and it’s listed in the Essentials section as Directory (tenant) ID.

- client_id – This is known as <Microsoft_Azure_clientid_value> in the following sections. An example of a client ID is
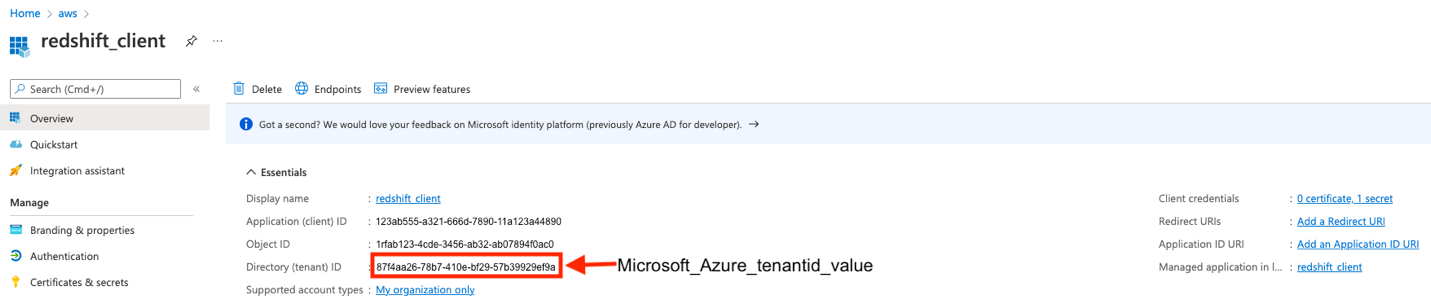
123ab555-a321-666d-7890-11a123a44890). To get your client ID value, locate the application you created earlier on the Azure portal under Step 2. Create Redshift Client Application. Click on the Overview (left panel) page and it’s listed in the Essentials section.

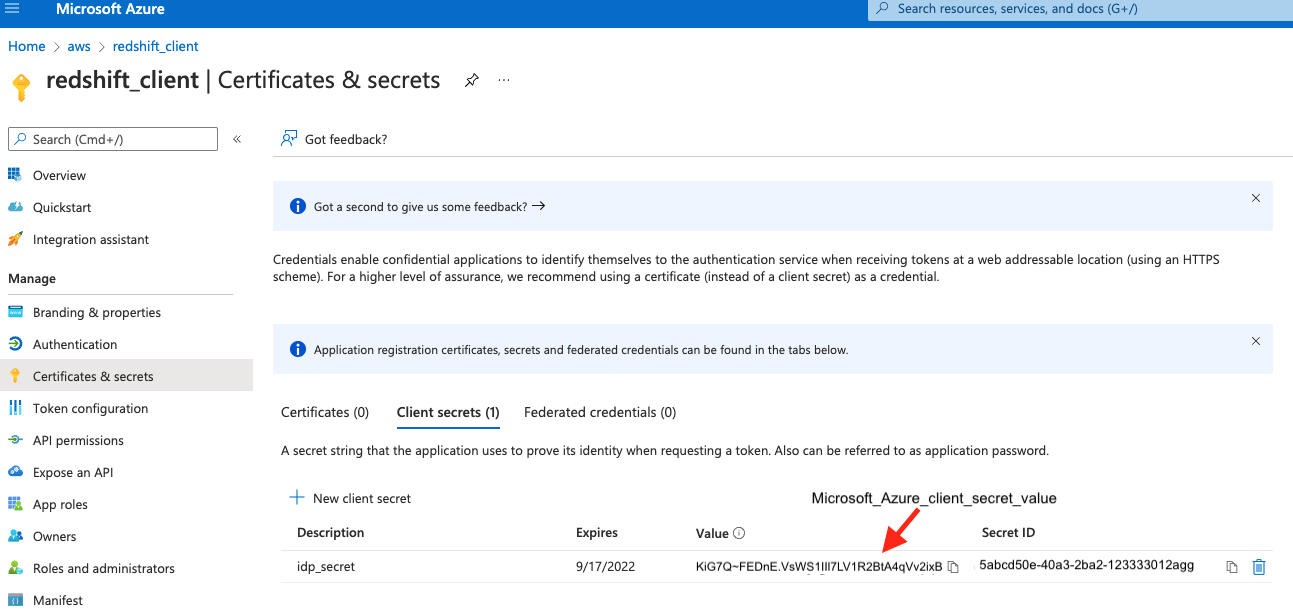
- client_secret – This is known as <Microsoft_Azure_client_secret_value> in the following sections. An example of a client secret value is
KiG7Q~FEDnE.VsWS1IIl7LV1R2BtA4qVv2ixB). To create your client secret value, refer to the section under Step 2. Create Redshift Client Application. - audience – This is known as <Microsoft_Azure_token_audience_value> in the following sections. If you’re using a v1.0 token, the audience value is the application ID URI (for example,
api://991abc78-78ab-4ad8-a123-zf123ab03612p). If you’re using a v2.0 token, the audience value is the client ID value (for example,991abc78-78ab-4ad8-a123-zf123ab03612p). To get these values, please refer to the application which you have created in Step 1: Create OAuth Application. Click on the Overview (left panel) page and it’s listed in the Essentials section.


Set up the IdP on Amazon Redshift
To set up the IdP on Amazon Redshift, complete the following steps:
- Log in to Amazon Redshift with a superuser user name and password using query editor v2 or any SQL client.
- Run the following SQL:
For example, the following code uses a v1.0 access token:
The following code uses a v2.0 access token:
- To alter the IdP, use the following command (this new set of parameter values completely replaces the current values):
- To view a single registered IdP in the cluster, use the following code:
- To view all registered IdPs in the cluster, use the following code:
- To drop the IdP, use the following command:
Set up Amazon Redshift permissions to external identities
The users, roles, and role assignments are automatically created in your Amazon Redshift cluster during the first login using your native IdP unless they were manually created earlier.
Create and assign permission to Amazon Redshift roles
In this step, we create a role in the Amazon Redshift cluster based on the groups that you created on the Azure AD portal. This helps us avoid creating multiple user names manually on the Amazon Redshift side and assign permissions for multiple users individually.
The role name in the Amazon Redshift cluster looks like <namespace>:<azure_ad_group_name>, where the namespace is the one we provided in the IdP creation command and the group name is the one we specified when we were setting up the Azure application. In our example, it’s oauth_aad:rsgroup.
Run the following command in the Amazon Redshift cluster to create a role:
For example:
To grant permission to the Amazon Redshift role, enter the following command:
Then grant relevant permission to the role as per your requirement. For example:
Create and assign permission to an Amazon Redshift user
This step is only required if you want to grant permission to an Amazon Redshift user instead of roles. We create an Amazon Redshift user that maps to a Azure AD user and then grant permission to it. If you don’t want to explicitly assign permission to an Amazon Redshift user, you can skip this step.
To create the user, use the following syntax:
For example:
We use the following syntax to grant permission to the Amazon Redshift user:
For example:
Configure the SQL client
In this section, we provide instructions to set up a SQL client using either DBeaver or SQL Workbench/J.
Set up DBeaver
To set up DBeaver, complete the following steps:
- Go to Database and choose Driver Manager.
- Search for
Redshift, then choose it and choose Copy.

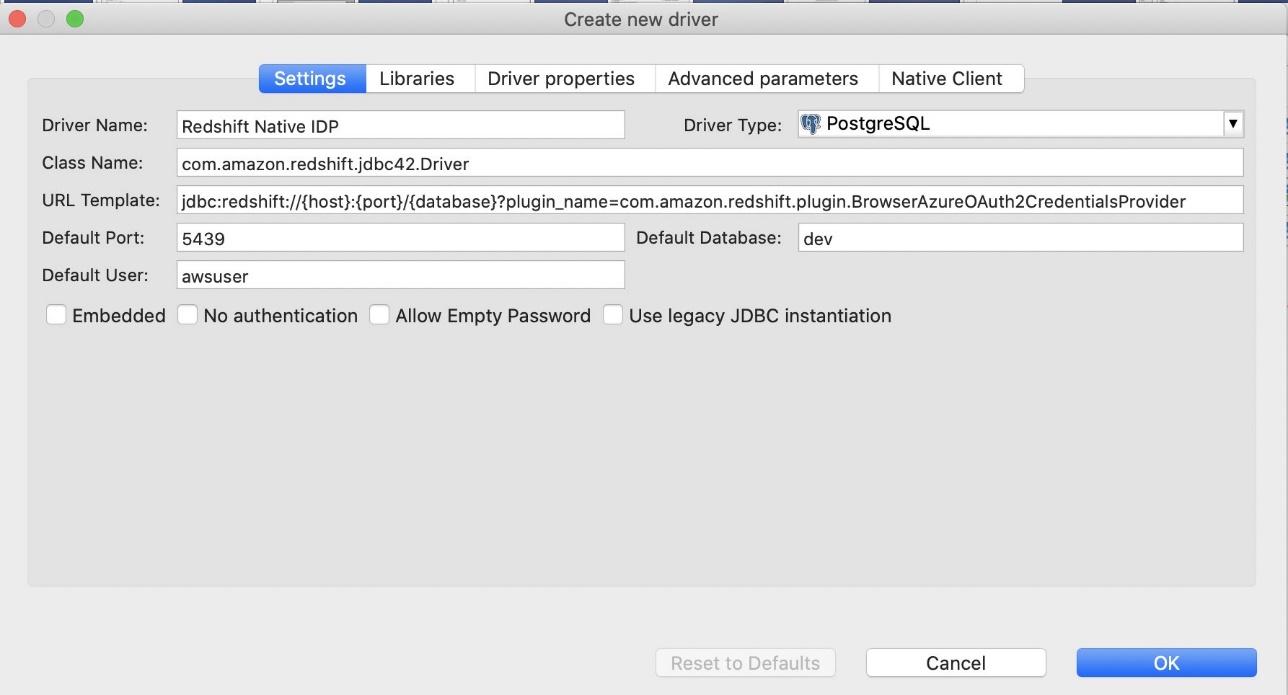
- On the Settings tab, for Driver name, enter a name, such as Redshift Native IDP.
- Update the URL template to
jdbc:redshift://{host}:{port}/{database}?plugin_name=com.amazon.redshift.plugin.BrowserAzureOAuth2CredentialsProvider
Note: In this URL template, do not replace the template parameters with the actual values. Please keep the value as shown in screenshot below.
- On the Libraries tab, choose Add files. Keep only one set of the latest driver version (2.1.0.4 and upwards) and if you see any older versions, delete those files.
- Add all the files from the downloaded AWS JDBC driver pack .zip file and choose OK (remember to unzip the .zip file).

Note: Use the Amazon Redshift driver 2.1.0.4 onwards, because all previous Amazon Redshift driver versions don’t support the Amazon Redshift native IdP feature.

- Close the Driver Manager.
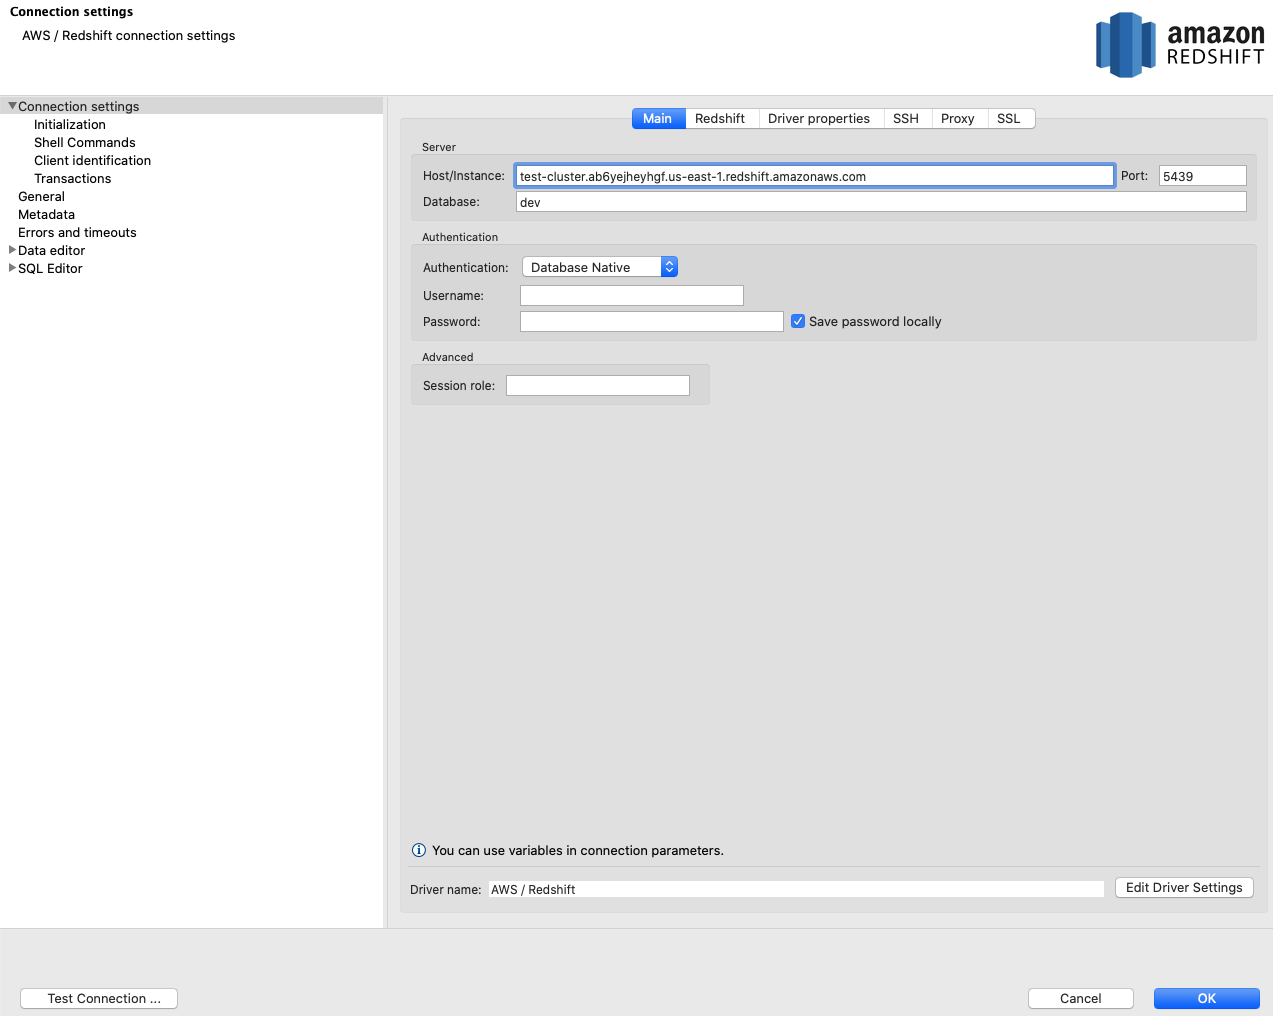
- Go to Database and choose New Database Connection.
- Search for
Redshift Native IDP, then choose it and choose Next.

- For Host/Instance, enter your Amazon Redshift endpoint. For e.g.
test-cluster.ab6yejheyhgf.us-east-1.redshift.amazonaws.com. - For Database, enter the database name (for this post, we use
dev). - For Port, enter 5439.

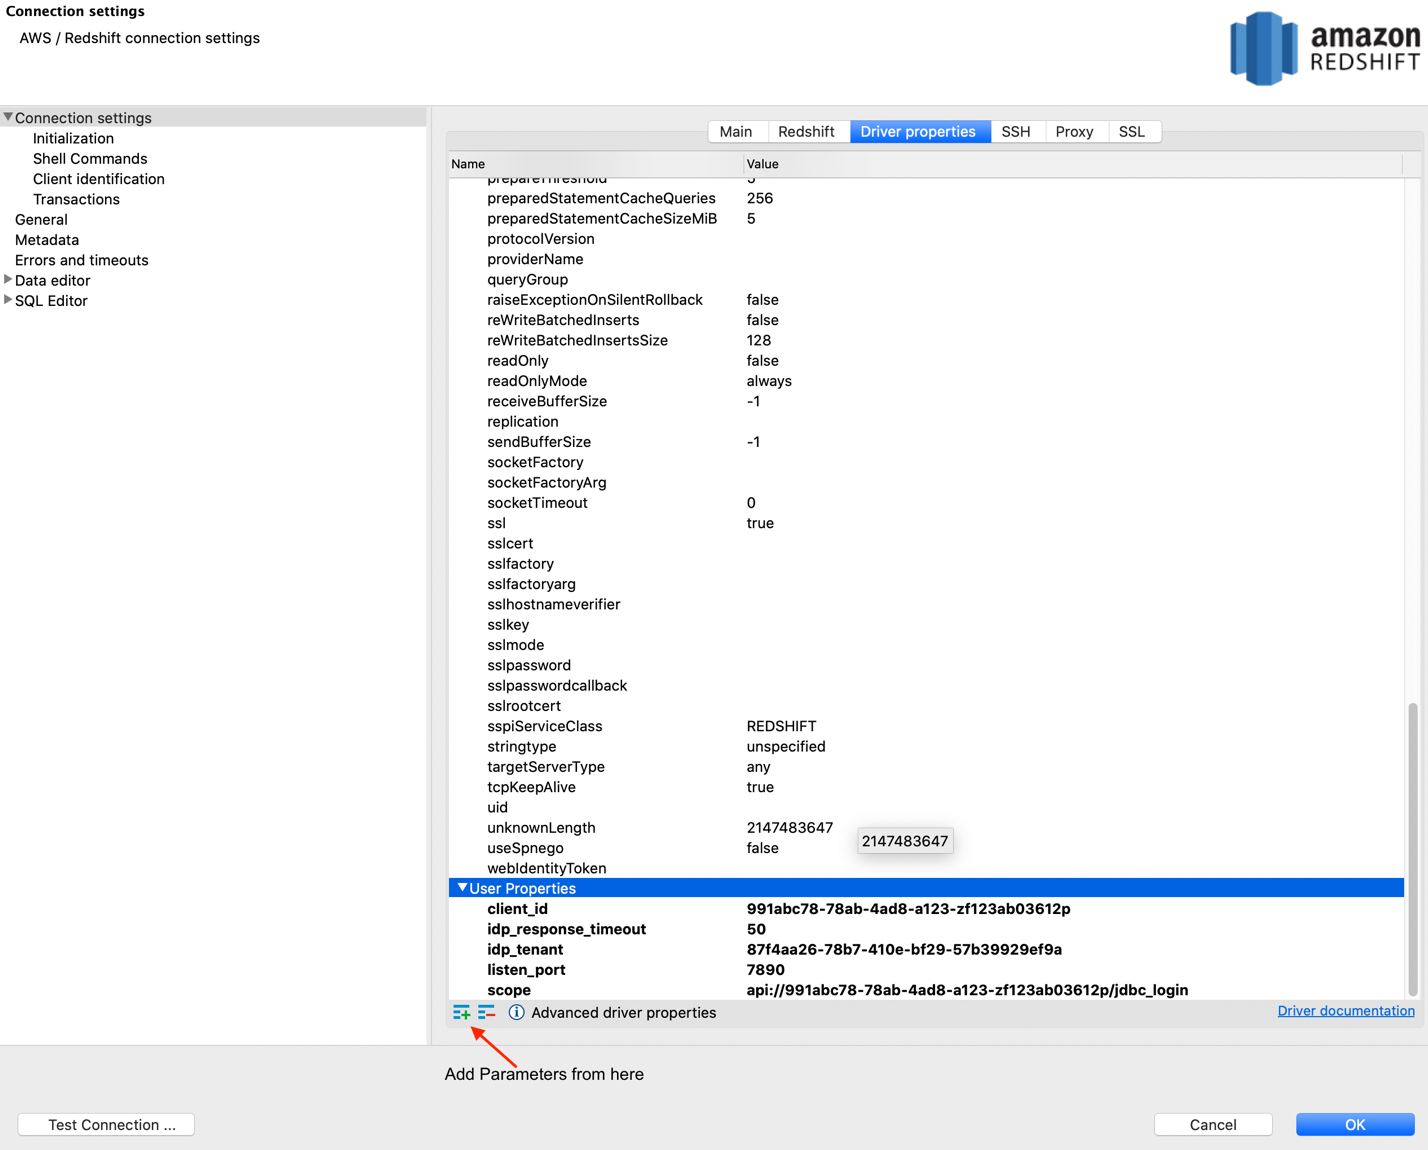
- Please get the below parameter values (scope, client_id and idp_tenant) from the application which you have created in Step 1: Create OAuth Application. On the Driver properties tab, add the following properties:
- listen_port – 7890
- idp_response_timeout – 50
- scope – Enter the value for <Microsoft_Azure_API_scope_value>.
- If you’re using a v1.0 token, then use the scope value (for example,
api://991abc78-78ab-4ad8-a123-zf123ab03612p/jdbc_login).

- If you’re using a v2.0 token, the scope value is the client ID value (for example,
991abc78-78ab-4ad8-a123-zf123ab03612p).

- If you’re using a v1.0 token, then use the scope value (for example,
- client_id – Enter the value for <Microsoft_Azure_clientid_value>. For example,
991abc78-78ab-4ad8-a123-zf123ab03612p. - idp_tenant – Enter the value for <Microsoft_Azure_tenantid_value>. For example,
87f4aa26-78b7-410e-bf29-57b39929ef9a.

- You can verify the connection by choosing Test Connection.


You’re redirected to the browser to sign in with your Azure AD credentials. In case, you get SSL related error, then go to SSL tab and select Use SSL
- Log in to be redirected to a page showing the connection as successful.

- Choose Ok.

Congratulations! You have completed the Amazon Redshift native IdP setup with DBeaver.
Set up SQL Workbench/J
To set up SQL Workbench/J, complete the following steps:
- Create a new connection in SQL Workbench/J and choose Amazon Redshift as the driver.
- Choose Manage drivers and add all the files from the downloaded AWS JDBC driver pack .zip file (remember to unzip the .zip file).
Use the Amazon Redshift driver 2.1.0.4 onwards, because all previous Amazon Redshift driver versions don’t support the Amazon Redshift native IdP feature.

- For URL, enter
jdbc:redshift://<cluster endpoint>:<port>:<databasename>. For e.g.,jdbc:redshift://test-cluster.ab6yejheyhgf.us-east-1.redshift.amazonaws.com:5439/dev.

- Please get the below parameter values (scope, client_id and idp_tenant) from the application which you have created in Step 1: Create OAuth Application. On the Driver properties tab, add the following properties:
- plugin_name –
com.amazon.redshift.plugin.BrowserAzureOAuth2CredentialsProvider - listen_port – 7890
- idp_response_timeout – 50
- scope – Enter the value for <Microsoft_Azure_API_scope_value>.
- If you’re using a v1.0 token, then use the scope value (for example,
api://991abc78-78ab-4ad8-a123-zf123ab03612p/jdbc_login).

- If you’re using a v2.0 token, the scope value is the client ID value (for example,
991abc78-78ab-4ad8-a123-zf123ab03612p).

- If you’re using a v1.0 token, then use the scope value (for example,
- client_id – Enter the value for <Microsoft_Azure_clientid_value>. For example,
991abc78-78ab-4ad8-a123-zf123ab03612p. - idp_tenant – Enter the value for <Microsoft_Azure_tenantid_value>. For example,
87f4aa26-78b7-410e-bf29-57b39929ef9a.
- plugin_name –
- Choose OK.

- Choose Test from SQL Workbench/J.


You’re redirected to the browser to sign in with your Azure AD credentials.
- Log in to be redirected to a page showing the connection as successful.
- Choose Finish.


- With this connection profile, run the following query to test Amazon Redshift native IdP authentication.


Congratulations! You have completed the Amazon Redshift native IdP setup with SQL Workbench/J.
Best Practices with Redshift native IdP:
- Pre-create the Amazon Redshift roles based upon the groups which you have created on the Azure AD portal.
- Assign permissions to Redshift roles instead of assigning to each individual external user. This will provide smoother end user experience as user will have all the required permission when they login using native IdP.
- A federated external user’s role membership is only available in that user’s session. When a federated external user creates any view or stored procedure, this user cannot delegate permission of those objects to other users/roles. Therefore, it is recommended to create objects using non-federated user and then grant the privileges to respective user or group.
Troubleshooting
If your connection didn’t work, consider the following:
- Enable logging in the driver. For instructions, see Configure logging.
- Make sure to use the latest Amazon Redshift JDBC driver version 2.1.0.4 onwards, which supports Amazon Redshift native IdP authentication.
- If you’re getting errors while setting up the application on Azure AD, make sure you have admin access.
- If you can authenticate via the SQL client but get a permission issue or can’t see objects, grant the relevant permission to the role, as detailed earlier in this post.
- If you get the error “claim value does not match expected value,” make sure you provided the correct parameters during Amazon Redshift IdP registration.
- Check
stl_errororstl_connection_logviews on the Amazon Redshift cluster for authentication failures.
Conclusion
In this post, we provided step-by-step instructions to integrate Amazon Redshift with Azure AD and SQL clients (SQL Workbench/J and DBeaver) using Amazon Redshift native IdP authentication. We also showed how Azure group membership is mapped automatically with Amazon Redshift roles and how to set up Amazon Redshift permissions.
For more information about Amazon Redshift native IdP federation, see:
- AWS Documentation: Native identity provider (IdP) federation for Amazon Redshift
- AWS Blog to connect with Microsoft Power BI: Integrate Amazon Redshift native IdP federation with Microsoft Azure AD and Power BI.
About the Authors
 Maneesh Sharma is a Senior Database Engineer at AWS with more than a decade of experience designing and implementing large-scale data warehouse and analytics solutions. He collaborates with various Amazon Redshift Partners and customers to drive better integration.
 Debu Panda is a Senior Manager, Product Management at AWS. He is an industry leader in analytics, application platform, and database technologies, and has more than 25 years of experience in the IT world.
 Ilesh Garish is a Software Development Engineer at AWS. His role is to develop connectors for Amazon Redshift. Prior to AWS, he built database drivers for the Oracle RDBMS, TigerLogic XDMS, and OpenAccess SDK. He also worked in the database internal technologies at San Francisco Bay Area startups.
 Dengfeng(Davis) Li is a Software Development Engineer at AWS. His passion is creating ease-of-use, secure and scalable applications. In the past few years, he worked on Redshift security, data sharing and catalog optimization.