AWS Big Data Blog
Stream data with Amazon MSK Connect using an open-source JDBC connector
March 2026: This post was reviewed and updated for accuracy.
Customers are adopting Amazon Managed Service for Apache Kafka (Amazon MSK) as a fast and reliable streaming platform to build their enterprise data hub. In addition to streaming capabilities, setting up Amazon MSK enables organizations to use a pub/sub model for data distribution with loosely coupled and independent components.
To publish and distribute the data between Apache Kafka clusters and other external systems including search indexes, databases, and file systems, you’re required to set up Apache Kafka Connect, which is the open-source component of Apache Kafka framework, to host and run connectors for moving data between various systems. As the number of upstream and downstream applications grow, so does the complexity to manage, scale, and administer the Apache Kafka Connect clusters. To address these scalability and manageability concerns, Amazon MSK Connect provides the functionality to deploy fully managed connectors built for Apache Kafka Connect, with the capability to automatically scale to adjust with the workload changes and pay only for the resources consumed.
In this post, we walk through a solution to stream data from Amazon Relation Database Service (Amazon RDS) for MySQL to an MSK cluster in real time by configuring and deploying a connector using Amazon MSK Connect.
Solution overview
For our use case, an enterprise wants to build a centralized data repository that has multiple producer and consumer applications. To support streaming data from applications with different tools and technologies, Amazon MSK is selected as the streaming platform. One of the primary applications that currently writes data to Amazon RDS for MySQL would require major design changes to publish data to MSK topics and write to the database at the same time. Therefore, to minimize the design changes, this application would continue writing the data to Amazon RDS for MySQL with the additional requirement to synchronize this data with the centralized streaming platform Amazon MSK to enable real-time analytics for multiple downstream consumers.
To solve this use case, we propose the following architecture that uses Amazon MSK Connect, a feature of Amazon MSK, to set up a fully managed Apache Kafka Connect connector for moving data from Amazon RDS for MySQL to an MSK cluster using the open-source JDBC connector from Confluent.

Set up the AWS environment
To set up this solution, you need to create a few AWS resources. The AWS CloudFormation template provided in this post creates all the AWS resources required as prerequisites:
- An Amazon Virtual Private Cloud (Amazon VPC) network with three private subnets and one public subnet
- The required internet gateway, Network Address Translation (NAT) gateway, security groups, and route tables for the necessary incoming and outgoing traffic flow
- AWS Identity and Access Management (IAM) roles and policies required for authentication and authorization between different AWS services
- An Amazon Simple Storage Service (Amazon S3) bucket to store the open-source Confluent JDBC connector JAR files
- An RDS for MySQL DB instance to act as the source for the streaming data flow
- An MSK cluster to act as the target for the streaming data flow
- An Amazon Elastic Compute Cloud (Amazon EC2) instance to act as the Kafka client and MySQL client for various administration and data validation tasks
The following table lists the parameters you must provide for the template.
| Parameter Name | Description | Keep Default Value |
Stack name |
Name of CloudFormation stack. | No |
DBInstanceID |
Name of RDS for MySQL instance. | No |
DBName |
Database name to store sample data for streaming. | Yes |
DBInstanceClass |
Instance type for RDS for MySQL instance. | No |
DBAllocatedStorage |
Allocated size for DB instance (GiB). | No |
DBUsername |
Database user for MySQL database access. | No |
DBPassword |
Password for MySQL database access. | No |
JDBCConnectorPluginBukcetName |
Bucket for storing MSK Connect connector JAR files and plugin. | No |
ClientIPCIDR |
IP address of client machine to connect to EC2 instance. | No |
EC2KeyPair |
Key pair to be used in your EC2 instance. This EC2 instance will be used as a proxy to connect from your local machine to the EC2 client instance. | No |
EC2ClientImageId |
Latest AMI ID of Amazon Linux 2. You can keep the default value for this post. | Yes |
VpcCIDR |
IP range (CIDR notation) for this VPC. | No |
PrivateSubnetOneCIDR |
IP range (CIDR notation) for the private subnet in the first Availability Zone. | No |
PrivateSubnetTwoCIDR |
IP range (CIDR notation) for the private subnet in the second Availability Zone. | No |
PrivateSubnetThreeCIDR |
IP range (CIDR notation) for the private subnet in the third Availability Zone. | No |
PublicSubnetCIDR |
IP range (CIDR notation) for the public subnet. | No |
To launch the CloudFormation stack, choose Launch Stack:
![]()
After the CloudFormation template is complete and the resources are created, the Outputs tab shows the resource details.

Validate sample data in the RDS for MySQL instance
To prepare the sample data for this use case, complete the following steps:
- SSH into the EC2 client instance MSKEC2Client using the following command from your local terminal:
- Run the following commands to validate the data has been loaded successfully:

Synchronize all tables’ data from Amazon RDS to Amazon MSK
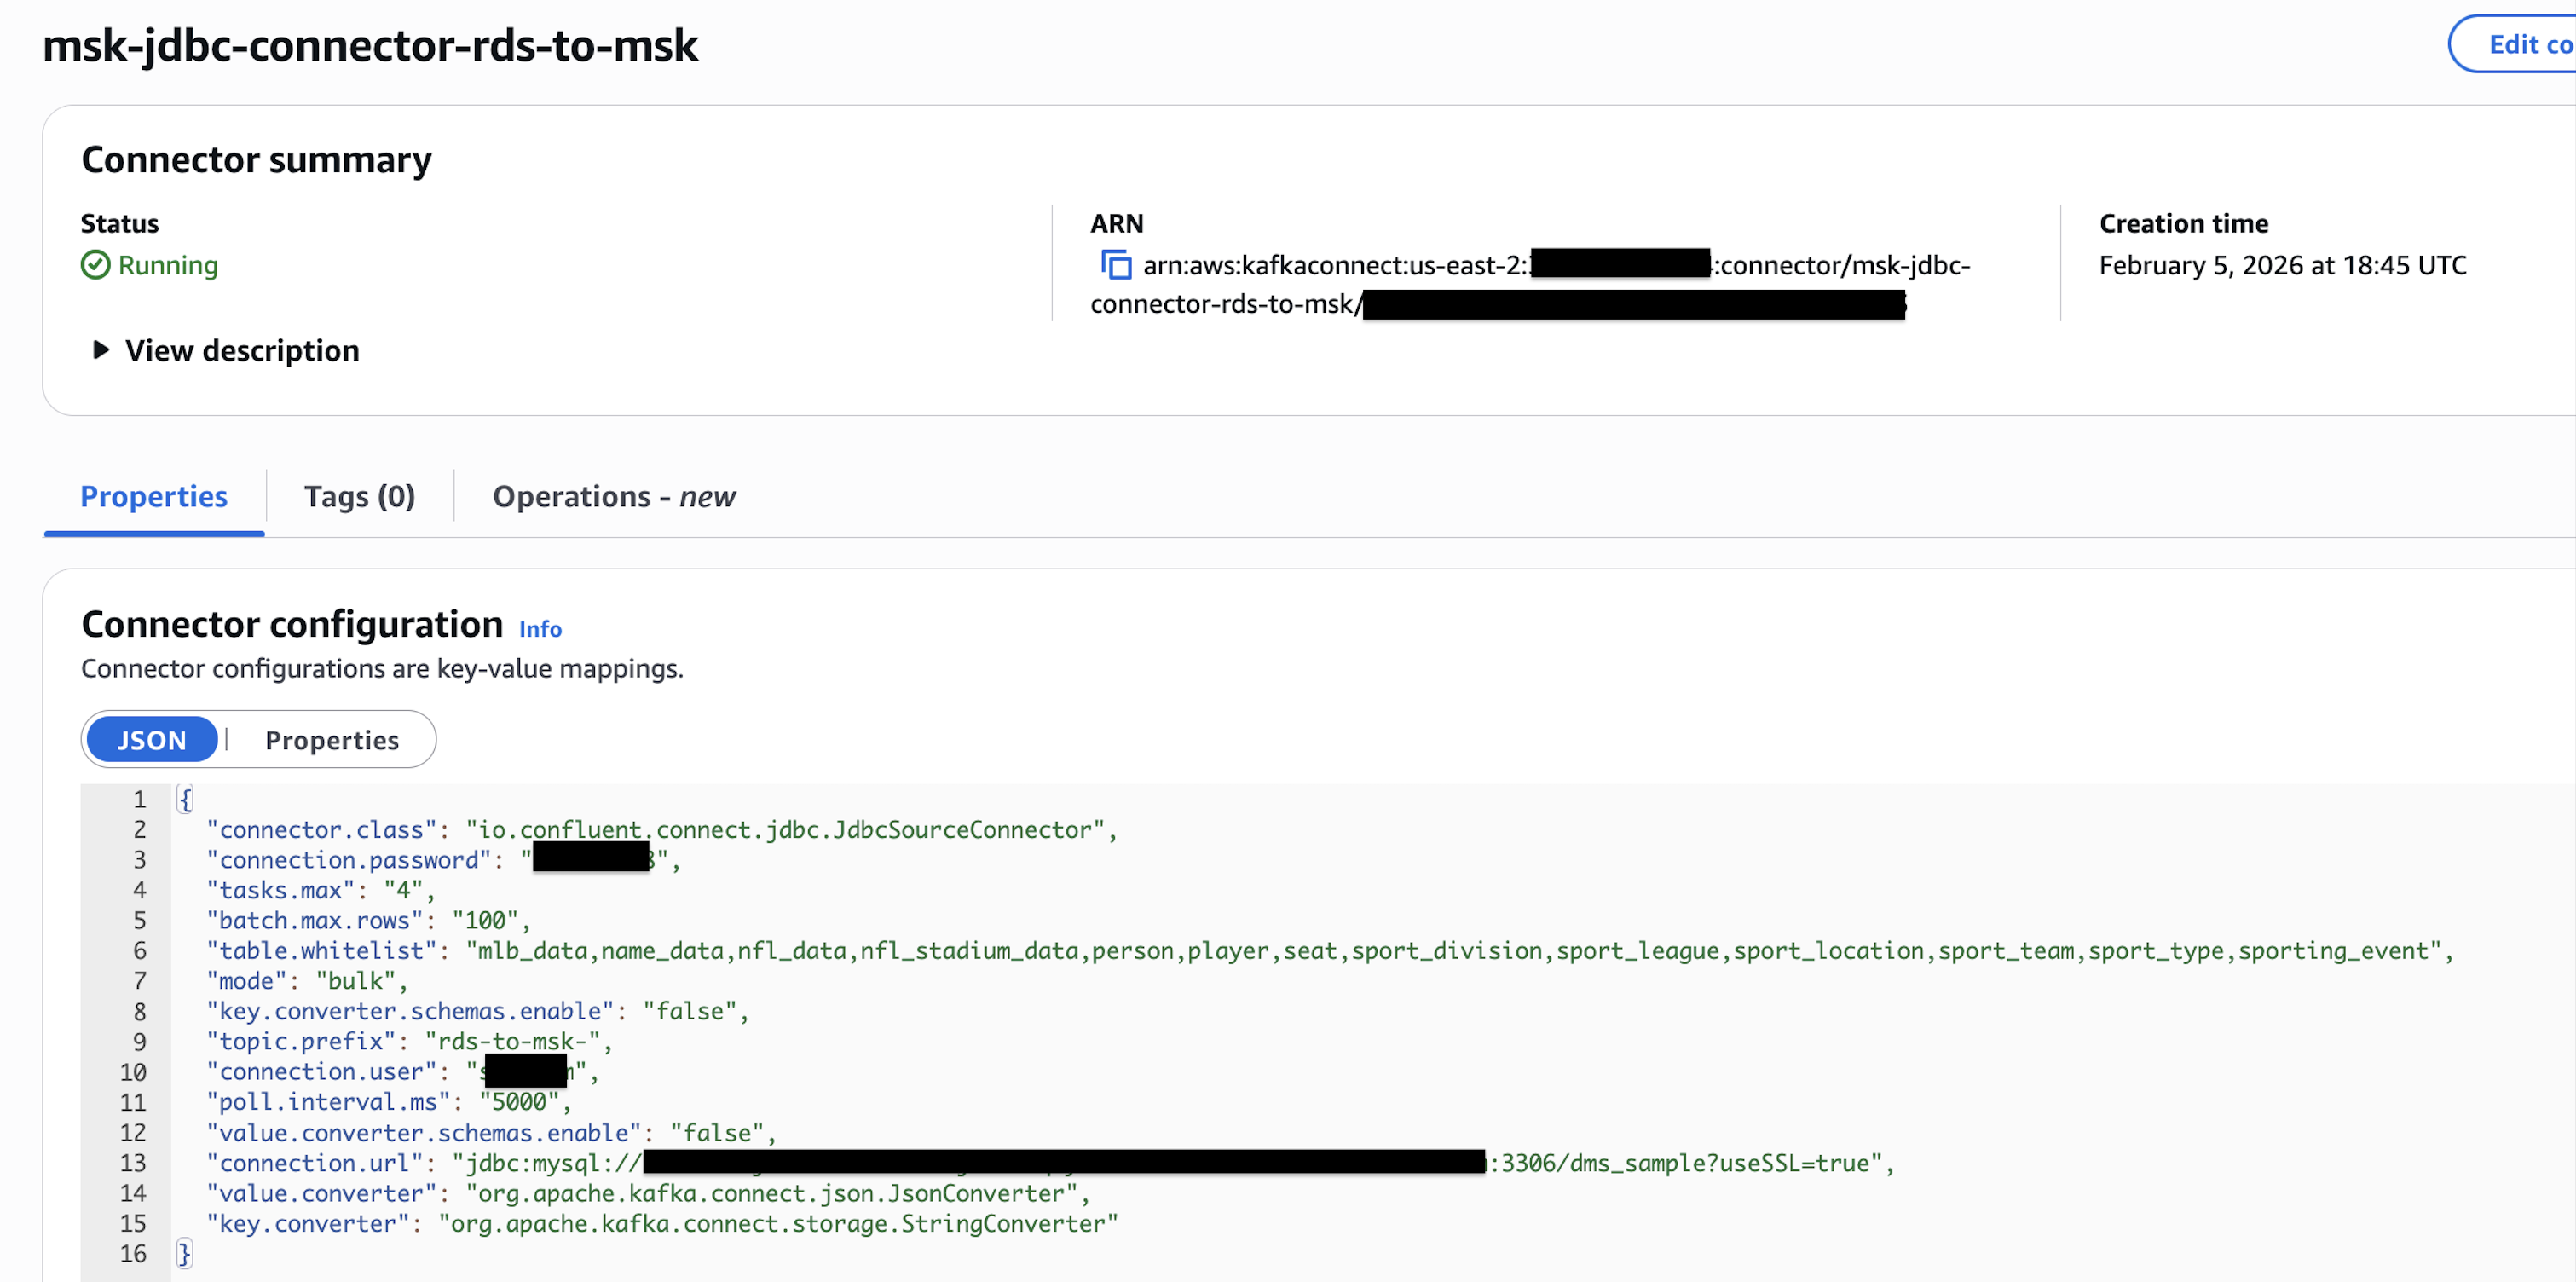
To sync all tables from Amazon RDS to Amazon MSK, create an Amazon MSK Connect managed connector with the following steps:
- On the Amazon MSK console, choose Custom plugins in the navigation pane under MSK Connect.
- Choose Create custom plugin.
- For S3 URI – Custom plugin object, browse to the ZIP file named
confluentinc-kafka-connect-jdbc-plugin.zip(created by the CloudFormation template) for the JDBC connector in the S3 bucketbkt-msk-connect-plugins-<aws_account_id>. - For Custom plugin name, enter
msk-confluent-jdbc-plugin-v1. - Enter an optional description.
- Choose Create custom plugin.

After the custom plugin has been successfully created, it will be available in Active status

- Choose Connectors in the navigation pane under MSK Connect.
- Choose Create connector.
- Select Use existing custom plugin and under Custom plugins, select the plugin
msk-confluent-jdbc-plugin-v1that you created earlier. - Choose Next.

- For Connector name, enter
msk-jdbc-connector-rds-to-msk. - Enter an optional description.
- For Cluster type, select MSK cluster.

- For MSK clusters, select the cluster you created earlier.
- For Authentication, choose IAM.
- Under Connector configurations, go to JSON tab and enter the following settings:
Note: Replace <rds_instance_endpoint_name> with your RDS Instance Endpoint name and "connection.password":"XXXXX" with your RDS password and <rds_username> with your RDS username.
The following table provides a brief summary of all the preceding configuration options.
| Configuration Options | Description |
connector.class |
JAVA class for the connector |
connection.user |
User name to authenticate with the MySQL endpoint |
connection.url |
JDBC URL identifying the hostname and port number for the MySQL endpoint |
connection.password |
Password to authenticate with the MySQL endpoint |
tasks.max |
Maximum number of tasks to be launched for this connector |
poll.interval.ms |
Time interval in milliseconds between subsequent polls for each table to pull new data |
topic.prefix |
Custom prefix value to append with each table name when creating topics in the MSK cluster |
mode |
The operation mode for each poll, such as bulk, timestamp, incrementing, or timestamp+incrementing |
batch.max.rows |
Maximum number of rows to include in a single batch when polling for new data |
table.whitelist |
List of tables to include in copying. Use a comma-separated list to specify multiple tables (for example, table.whitelist: “User, Address, Email”). |
- In the Connector capacity section, select Autoscaled for Capacity type and keep the default value of 1 for MCU count per worker.
- Set 4 for Maximum number of workers and keep all other default values for Workers and Autoscaling utilization thresholds.

- For Worker configuration, select Use the MSK default configuration.
- For Apache Kafka Connect version, use latest recommended Kafka connector, at the time of writing its 3.7.x.
- Under Access permissions, choose the custom IAM role
msk-rds-stack-MSKConnectServiceIAMRole-*created earlier.
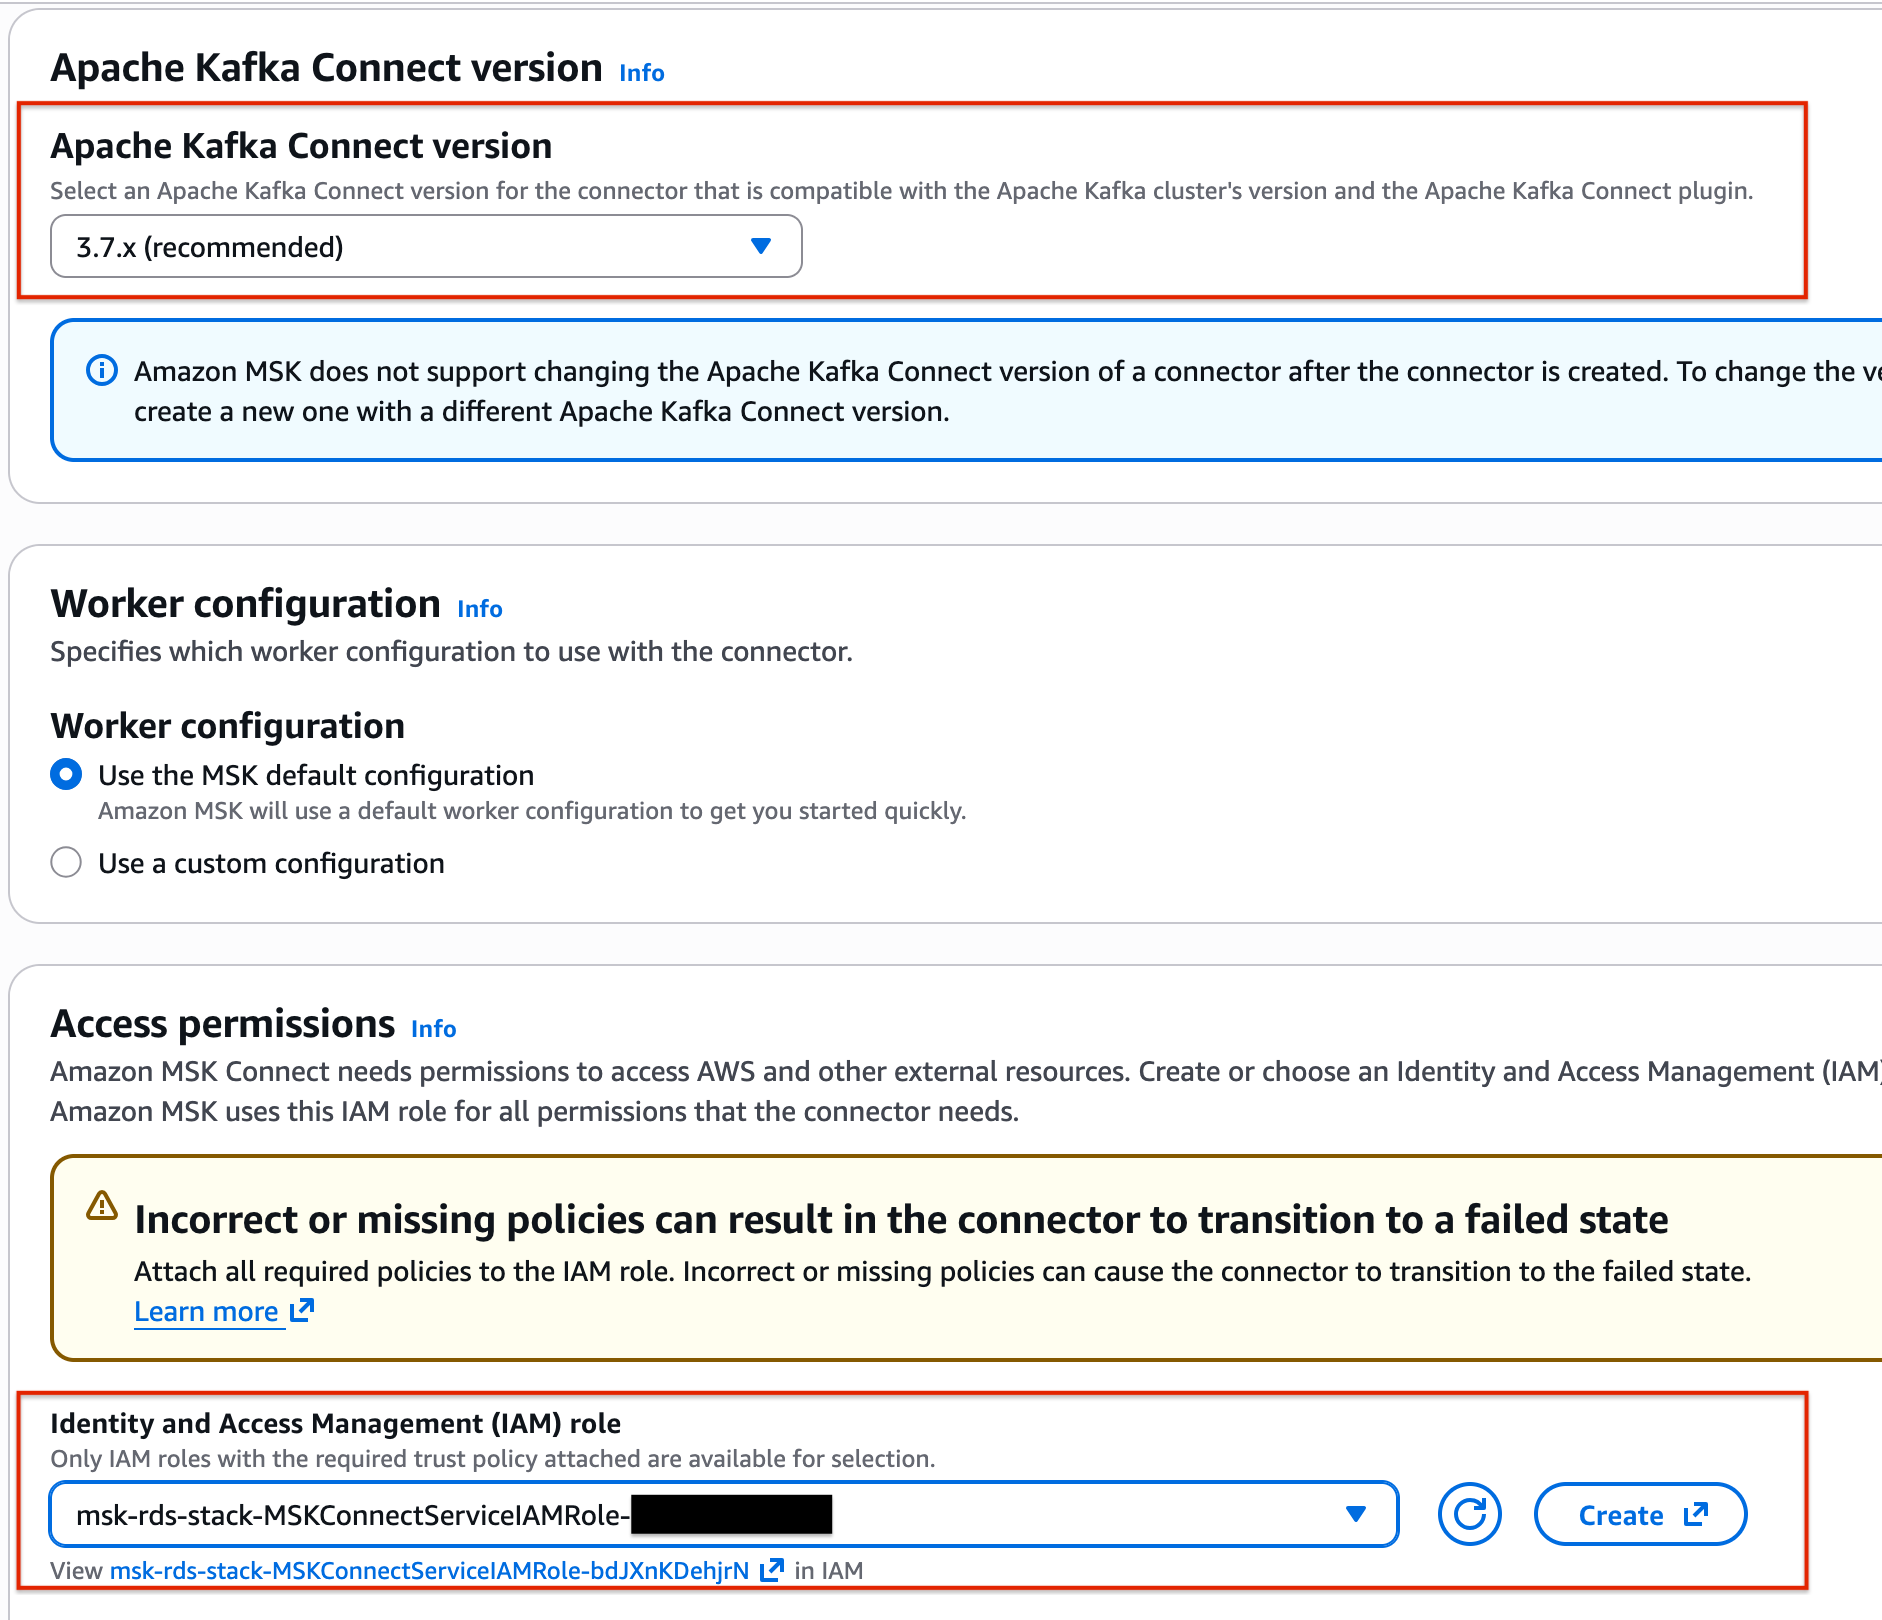
- For Log delivery, select Deliver to Amazon CloudWatch Logs.
- For Log group, choose the log group
msk-jdbc-source-connectorcreated earlier.

- Choose Next.
- Under Review and Create, validate all the settings and choose Create connector.
After the connector has transitioned to RUNNING status, the data should start flowing from the RDS instance to the MSK cluster.

Validate the data
To validate and compare the data, complete the following steps:
- SSH into the EC2 client instance
MSKEC2Clientusing the following command from your local terminal: - To connect to the MSK cluster with IAM authentication, enter the latest version of the aws-msk-iam-auth JAR file in the class path:
- On the Amazon MSK console, choose Clusters in the navigation pane and choose the cluster
MSKConnect-msk-connect-rds-jdbc. - On the Cluster summary page, choose View client information.
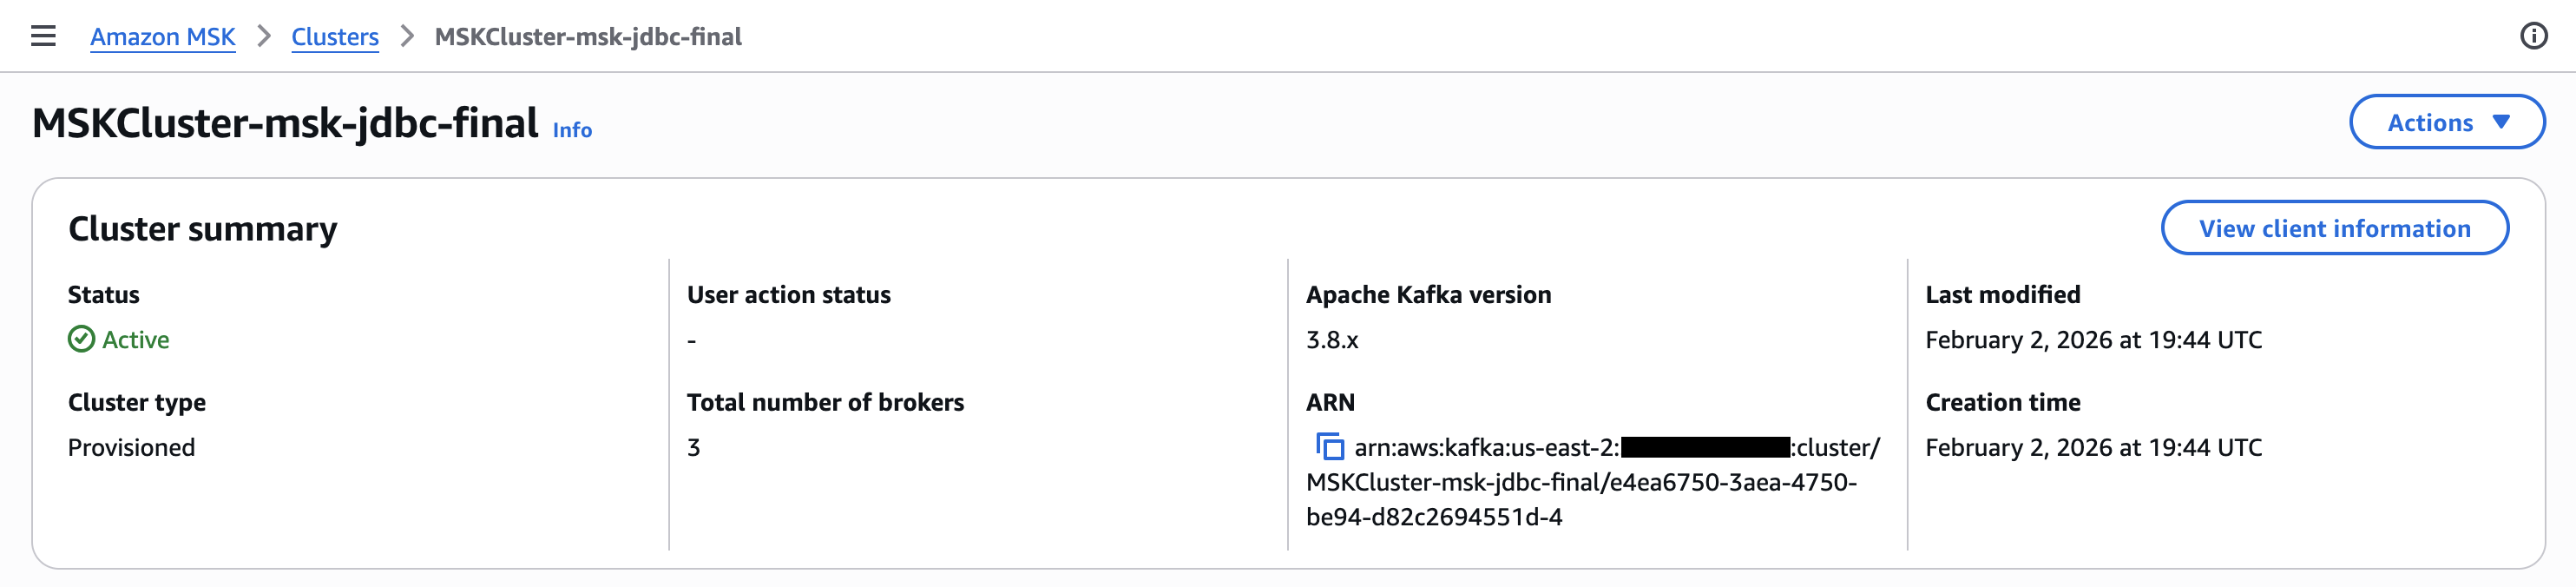
- In the View client information section, under Bootstrap servers, copy the private endpoint for Authentication type IAM.

- Set up additional environment variables for working with the latest version of Apache Kafka installation and connecting to Amazon MSK bootstrap servers, where
<bootstrap servers>is the list of bootstrap servers that allow connecting to the MSK cluster with IAM authentication: - Set up a config file named
client/propertiesto be used for authentication: - Validate the list of topics created in the MSK cluster:

- Validate that data has been loaded to the topics in the MSK cluster:

Synchronize data using a query to Amazon RDS and write to Amazon MSK
To synchronize the results of a query that flattens data by joining multiple tables in Amazon RDS for MySQL, create an Amazon MSK Connect managed connector with the following steps:
- On Amazon MSK console, choose Connectors in the navigation pane under MSK Connect.
- Choose Create connector.
- Select Use existing custom plugin and under Custom plugins, select the
pluginmsk-confluent-jdbc-plugin-v1. - For Connector name, enter
msk-jdbc-connector-rds-to-msk-query. - Enter an optional description.
- For Cluster type, select MSK cluster.
- For MSK clusters, select the cluster you created earlier.
- For Authentication, choose IAM.
- Under Connector configurations, go to JSON tab and enter the following settings:
Note: Replace
<rds_instance_endpoint_name>with your RDS Instance Endpoint name and"connection.password":"XXXXX"with your RDS password and<rds_username>with your RDS username. - In the Connector capacity section, select Autoscaled for Capacity type and keep the default value of 1 for MCU count per worker.
- Set 4 for Maximum number of workers and keep all other default values for Workers and Autoscaling utilization thresholds.
- For Worker configuration, select Use the MSK default configuration.
- Under Access permissions, choose the custom IAM role
msk-rds-stack-MSKConnectServiceIAMRole-XXXXX - For Log delivery, select Deliver to Amazon CloudWatch Logs.
- For Log group, choose the log group created earlier.
- Choose Next.
- Under Review and Create, validate all the settings and choose Create connector.
Once the connector has transitioned to RUNNING status, the data should start flowing from the RDS instance to the MSK cluster.

- For data validation, SSH into the EC2 client instance MSKEC2Client and run the following command to see the data in the topic:

Clean up
To clean up your resources and avoid ongoing charges, complete the following the steps:
- On the Amazon MSK console, choose Connectors in the navigation pane under MSK Connect.
- Select the connectors you created and choose Delete.

- On the Amazon S3 console, choose Buckets in the navigation pane.
- Search for the bucket with the naming convention
bkt-msk-connect-plugins-<aws_account_id>. - Delete all the folders and objects in this bucket.
- Delete the bucket after all contents have been removed.
- To delete all other resources created using the CloudFormation stack, delete the stack via the AWS CloudFormation console.
Conclusion
Amazon MSK Connect is a fully managed service that provisions the required resources, monitors the health and delivery state of connectors, maintains the underlying hardware, and auto scales connectors to balance the workloads. In this post, we saw how to set up the open-source JDBC connector from Confluent to stream data between an RDS for MySQL instance and an MSK cluster. We also explored different options to synchronize all the tables as well as use the query-based approach to stream denormalized data into the MSK topics.
For more information about Amazon MSK Connect, see Getting started using MSK Connect.
About the Authors
 Manish Virwani is a Sr. Solutions Architect at AWS. He has more than a decade of experience designing and implementing large-scale big data and analytics solutions. He provides technical guidance, design advice, and thought leadership to some of the key AWS customers and partners.
 Indira Balakrishnan is a Principal Solutions Architect in the AWS Analytics Specialist SA Team. She is passionate about helping customers build cloud-based analytics solutions to solve their business problems using data-driven decisions. Outside of work, she volunteers at her kids’ activities and spends time with her family.
 Huyam Hasan is a Solutions Architect at AWS based in Austin, Texas with a passion for data and analytics solutions and customer success. Huyam works with Enterprise customers to help them design and build modern, secure, and scalable solutions to achieve their business outcomes.
 Poulomi Dasgupta is a Senior Analytics Specialist Solutions Architect with AWS. She is passionate about helping customers build cloud-based analytics solutions to solve their business problems. Outside of work, she likes travelling and spending time with her family.