AWS Big Data Blog
Use Amazon MSK Connect and Iceberg Kafka Connect to build a real-time data lake
As analytical workloads increasingly demand real-time insights, organizations need business data to enter the data lake immediately after generation. While various methods exist for real-time CDC data ingestion (such as AWS Glue and Amazon EMR Serverless), Amazon MSK Connect with Iceberg Kafka Connect provides a fully managed, streamlined approach that reduces operational complexity and enables continuous data synchronization.
In this post, we demonstrate how to use Iceberg Kafka Connect with Amazon Managed Streaming for Apache Kafka (Amazon MSK) Connect to accelerate real-time data ingestion into data lakes, simplifying the synchronization process from transactional databases to Apache Iceberg tables.
Solution overview
In this post, we show you how to implement capturing transaction log data from Amazon Relational Database Service (Amazon RDS) for MySQL and writing it to Amazon Simple Storage Service (Amazon S3) in Iceberg table format using append mode, covering both single-table and multi-table synchronization, as shown in the following figure.

Downstream consumers then process these change records to reconstruct the data state before writing to Iceberg tables.
In this solution, you use the Iceberg Kafka Sink Connector to implement the business on the sink side. The Iceberg Kafka Sink Connector has the following features:
- Supports exactly-once delivery
- Support multi-table synchronization
- Support schema changes
- Field name mapping through Iceberg’s column mapping feature
Prerequisites
Before beginning the deployment, ensure you have the following components in place:
Amazon RDS for MySQL: This solution assumes you already have an Amazon RDS for MySQL database instance running with the data you want to synchronize to your Iceberg data lake. Ensure that binary logging is enabled on your RDS instance to support Change Data Capture (CDC) operations.
Amazon MSK Cluster: You need an Amazon MSK cluster provisioned in your target AWS Region. This cluster will serve as the streaming platform between your MySQL database and the Iceberg data lake. Ensure the cluster is properly configured with appropriate security groups and network access.
Amazon S3 Bucket: Ensure you have an Amazon S3 bucket ready to host the custom Kafka Connect plugins. This bucket serves as the storage location from which AWS MSK Connect retrieves and installs your plugins. The bucket must exist in your target AWS Region, and you must have appropriate permissions to upload objects to it.
Custom Kafka Connect Plugins: To enable real-time data synchronization with MSK Connect, you need to create two custom plugins. The first plugin uses the Debezium MySQL Connector to read transactional logs and produce Change Data Capture (CDC) events. The second plugin uses Iceberg Kafka Connect to synchronize data from Amazon MSK to Apache Iceberg tables.
Build Environment: To build the Iceberg Kafka Connect plugin, you need a build environment with Java and Gradle installed. You can either launch an Amazon EC2 instance (recommended: Amazon Linux 2023 or Ubuntu) or use your local machine if it meets the requirements. Ensure you have sufficient disk space (at least 20GB) and network connectivity to clone the repository and download dependencies.
Build Iceberg Kafka Connect from open source
The connector ZIP archive is created as part of the Iceberg build. You can run the build using the following code:
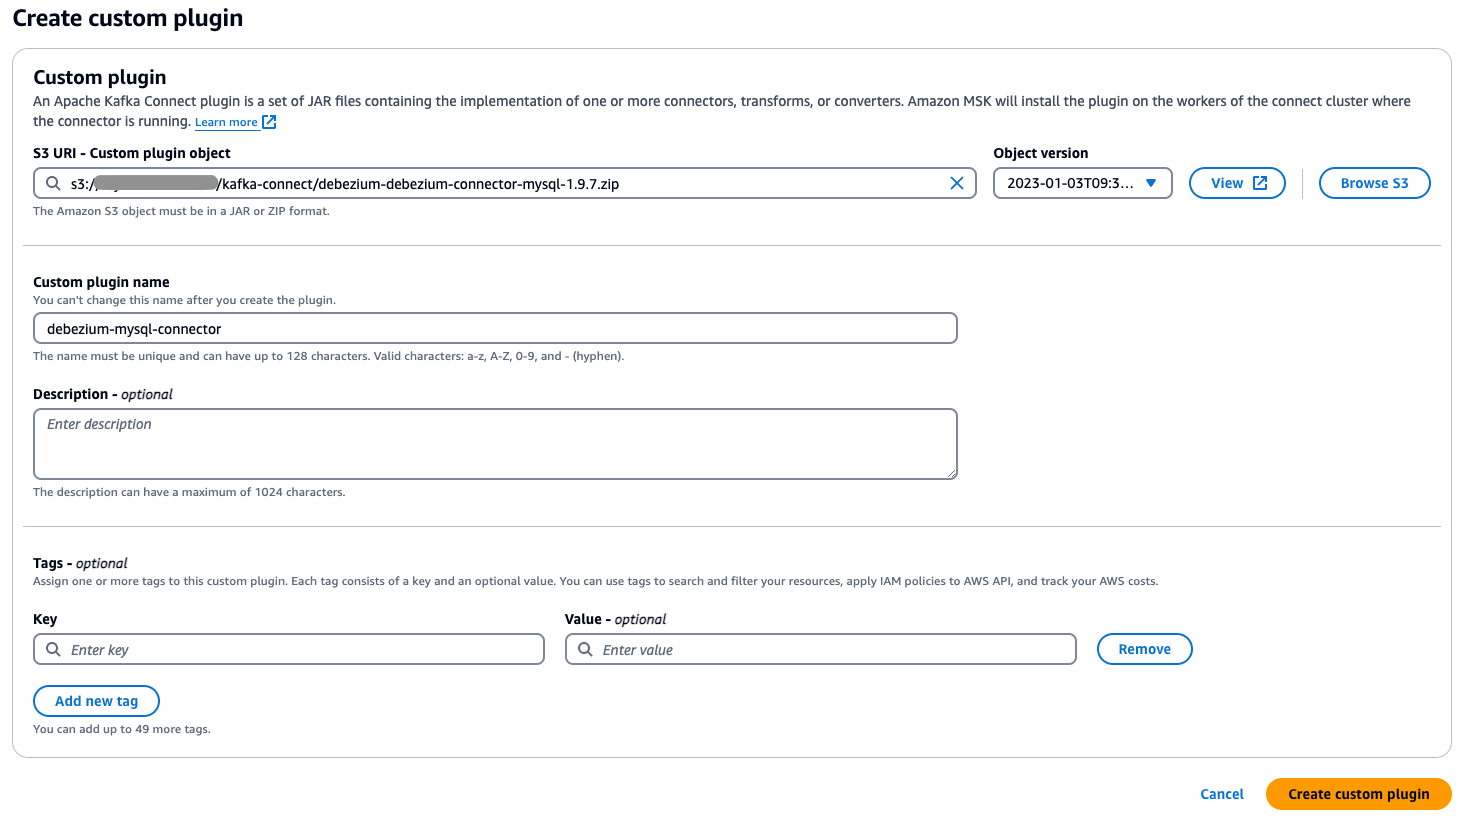
Create custom plugins
The next step is to create custom plugins to read and synchronize the data.
- Upload the custom plugin ZIP file you compiled in the previous step to your designated Amazon S3 bucket.
- Go to the AWS Management Console and navigate to Amazon MSK and choose Connect in the navigation pane.
- Choose Custom plugins, then select the plugin file you uploaded to S3 by browsing or entering its S3 URI.
- Specify a unique, descriptive name for your custom plugin (such as my-connector-v1).
- Choose Create custom plugin.
Configure MSK Connect
With the plugins installed, you’re ready to configure MSK Connect.
Configure data source access
Start by configuring data source access.
- To create a worker configuration, choose Worker configurations in the MSK Connect console.
- Choose Create worker configuration and copy and paste the following configuration.
- In the Amazon MSK console, choose Connectors under Amazon MSK Connect and choose Create connector.
- In the setup wizard, select the Debezium MySQL Connector plugin created in the previous step, enter the connector name and select the MSK cluster of the synchronization target. Copy and paste the following content in the configuration:
Note that in the configuration,
Routeis used to write multiple records to the same topic. In the parametertransforms.Reroute.topic.regex, the regular expression is configured to filter the table names that need to be written to the same topic. In the following example, the data containing <tablename-prefix> in the table name is written to the same topic.For example, after
transforms.Reroute.topic.replacementis specified as$1all_records, the topic name created in the MSK is< database.server.name>.all_records. - After you choose Create, MSK Connect creates a synchronization task for you.
Data synchronization (single table mode)
Now, you can create a real-time synchronization task for the Iceberg table. Start by creating a real-time synchronization job for a single table.
- In the Amazon MSK console, choose Connectors under MSK Connect
- Choose Create connector.
- On the next page, select the previously created Iceberg Kafka Connect plugin
- Enter the connector name and select the MSK cluster of the synchronization target.
- Paste the following code in the configuration.
For Iceberg Connector, it will create a topic named
control-icebergby default to record offset. Select the previously created worker configuration that includestopic.creation.enable = true. If you use the default worker configuration and auto-topic creation isn’t enabled at the MSK broker level, the connector will not be able to automatically create topics.You can also specify this topic name by setting the parameter
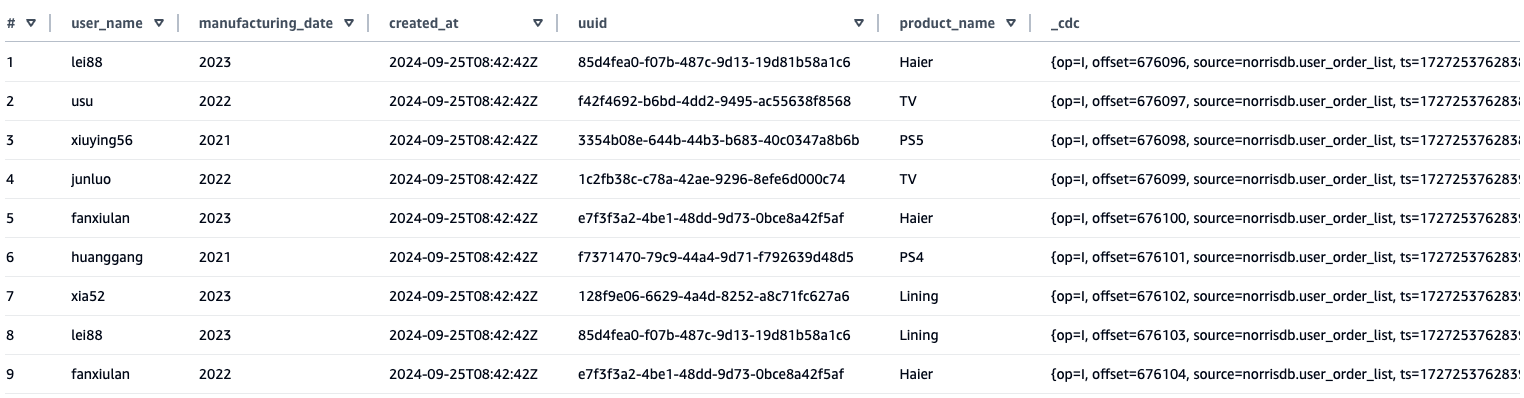
iceberg.control.topic = <offset-topic>.If you want to use a custom topic, you can use the following code. - Query the synchronized data results through Amazon Athena. From the table synchronized to Athena, you can see that, in addition to the source table field, an additional
_cdcfield has been added to store the metadata content of the CDC.
Compaction
Compaction is an essential maintenance operation for Iceberg tables. Although frequent ingestion of small files can negatively impact query performance, regular compaction mitigates this issue by consolidating small files, minimizing metadata overhead, and substantially improving query efficiency. To maintain optimal table performance, you should implement dedicated compaction workflows. AWS Glue offers an excellent solution for this purpose, providing automated compaction capabilities that intelligently merge small files and restructure table layouts for enhanced query performance.
Schema Evolution Demonstration
To demonstrate the schema evolution capabilities of this solution, we conducted a test to show how field changes at the source database are automatically synchronized to the Iceberg tables through MSK Connect and Iceberg Kafka Connect.
Initial Setup:
First, we created an RDS MySQL database with a customer information table (tb_customer_info) containing the following schema:
We then configured MSK Connect using the Debezium MySQL Connector to capture changes from this table and stream them to Amazon MSK in real time. Following that, we set up Iceberg Kafka Connect to consume the data from MSK and write it to Iceberg tables.
Schema Modification Test:
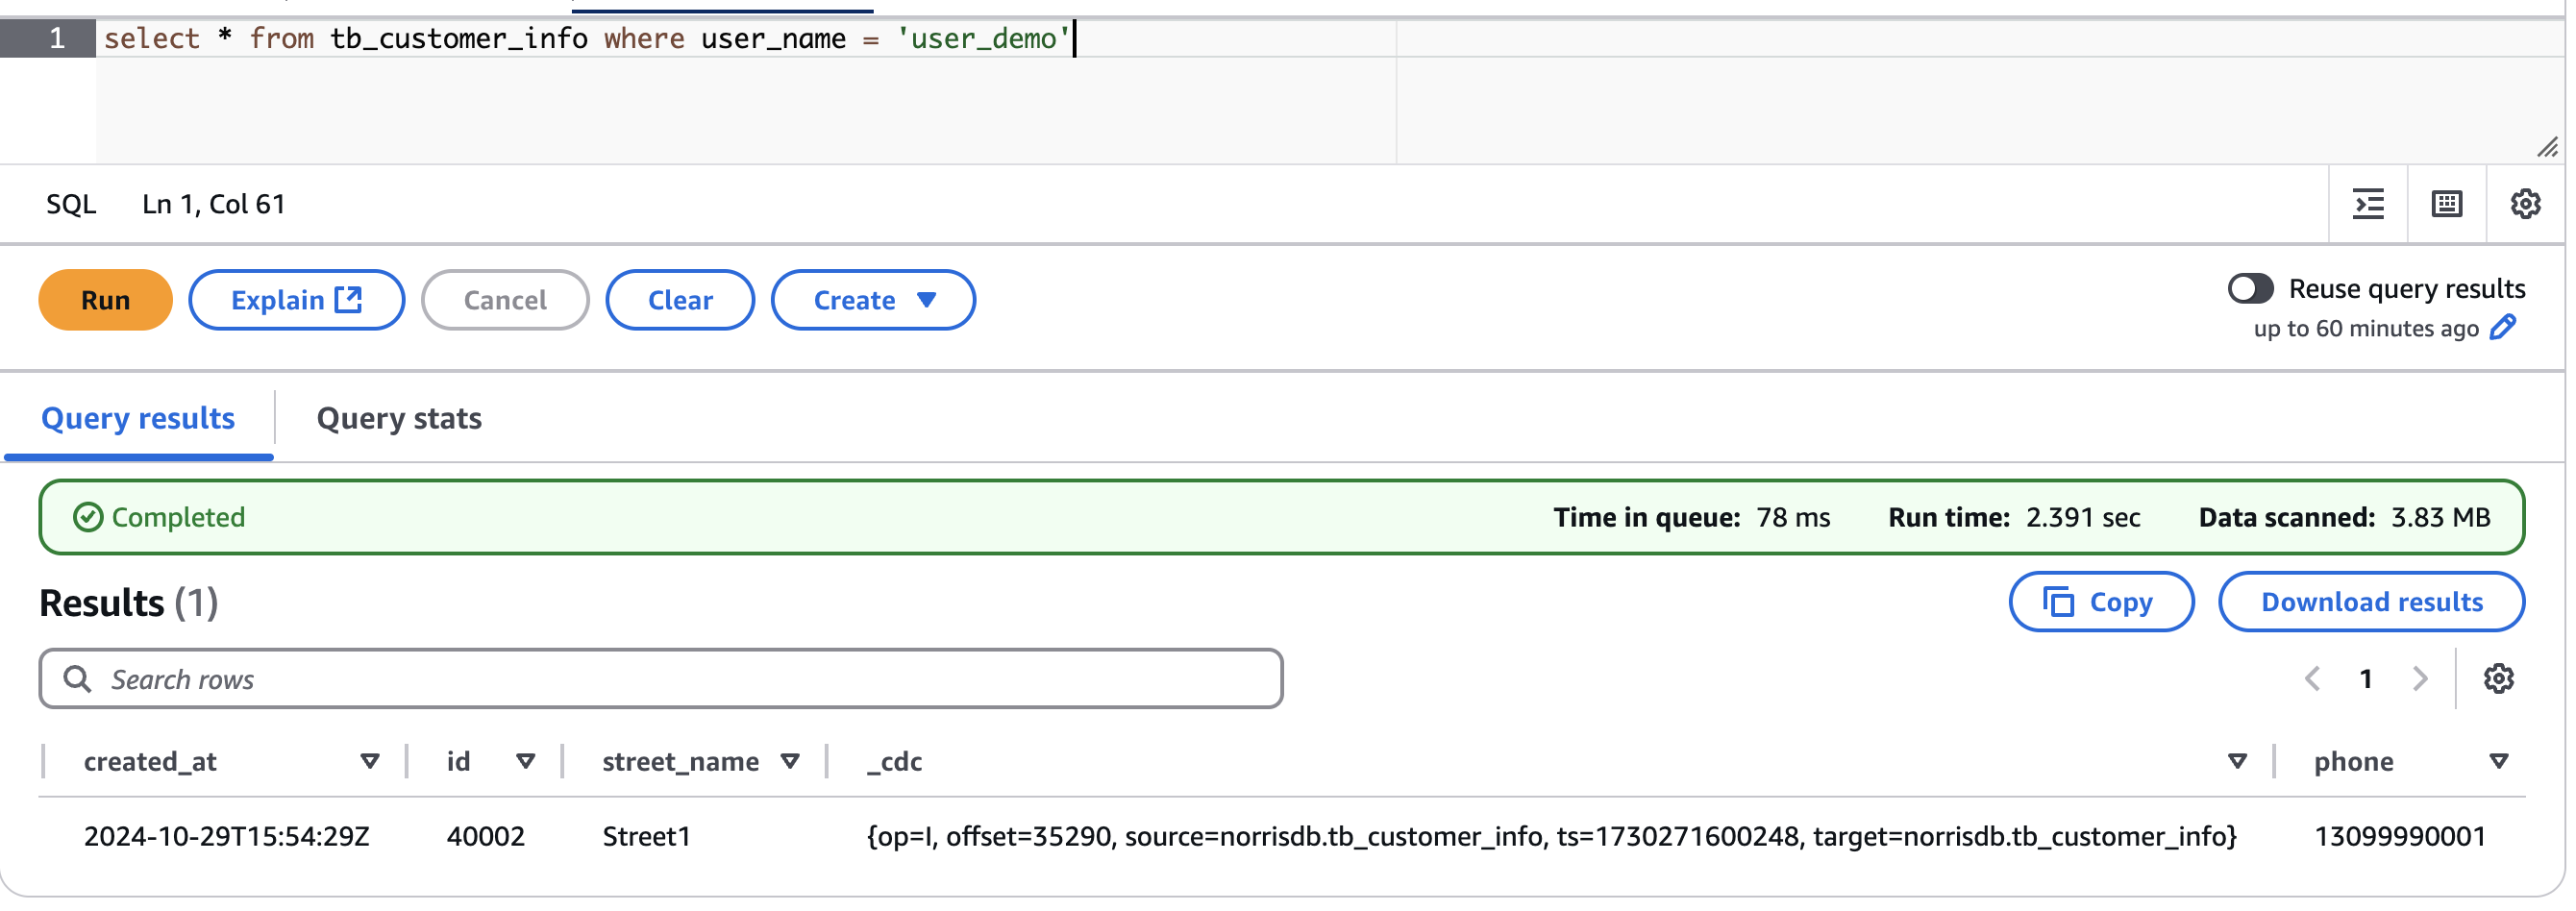
To test the schema evolution capability, we added a new field named phone to the source table:
We then inserted a new record with the phone field populated:
Results:
When we queried the Iceberg table in Amazon Athena, we observed that the phone field had been automatically added as the last column, and the new record was successfully synchronized with all field values intact. This demonstrates that Iceberg Kafka Connect’s self-adaptive schema capability seamlessly handles DDL changes at the source, eliminating the need for manual schema updates in the data lake.
Data synchronization (multi-table mode)
It’s common that data admins want to use a single connector for moving data in multiple tables. For example, you can use the CDC collection tool to write data from multiple tables to a topic and then write data from one topic to multiple Iceberg tables through the consumer side. In Configure data source access, you configured a MySQL synchronization Connector to synchronize tables with specified rules to a topic using Route. Now let’s review how to distribute data from this topic to multiple Iceberg tables.
- When using Iceberg Kafka Connect to synchronize multiple tables to Iceberg tables using AWS Glue Data Catalog, you must pre-create a database in the Data Catalog before starting the synchronization process. The database name in AWS Glue must exactly match the source database name, because the Iceberg Kafka Connect connector automatically uses the source database name as the target database name during multi-table synchronization. This naming consistency is required because the connector doesn’t provide an option to map source database names to different target database names in multi-table scenarios.
- If you want to use your custom topic name, you can create a new topic to store the MSK Connect record offset, see Data synchronization (single table mode).
- In the Amazon MSK console, create another connector using the following configuration.
In this configuration, two parameters have been added:
iceberg.tables.route-field: Specifies the routing field that distinguishes between different tables, specified ascdc.sourcefor CDC data parsed by Debeziumiceberg.tables.dynamic-enabled: If theiceberg.tablesparameter isn’t set, it must be specified astruehere
- After completion, MSK Connect will creates a sink connector for you.
- After the process is complete, you can view the newly created table through Athena.
Other tips
In this section, we share some more things that you can use to customize your deployment to fit your use case.
- Specified table synchronizationIn the Data synchronization (multi-table mode) section, you specify
iceberg.tables.route-field = _cdc.Sourceandiceberg.tables.dynamic-enabled=true, these two parameter settings can write multiple tables stored in the Iceberg table. If you want to synchronize only the specified tables, you can specify the table name you want to synchronize by settingiceberg.tables.dynamic-enabled = falseand then setting theiceberg.tablesparameter. For example, - Performance Testing Results
We conducted a performance test using sysbench to evaluate the data synchronization capabilities of this solution. The test simulated a high-volume write scenario to demonstrate the system’s throughput and scalability.Test Configuration:- Database setup: Created 25 tables in the MySQL database using sysbench
- Data loading: Wrote 20 million records to each table (500 million total records)
- Real-time streaming: Configured MSK Connect to stream data from MySQL to Amazon MSK in real time during the write process
- Kafka Connect configuration:
- Started Kafka Iceberg Connect
- Minimum workers: 1
- Maximum workers: 8
- Allocated two MCUs per worker
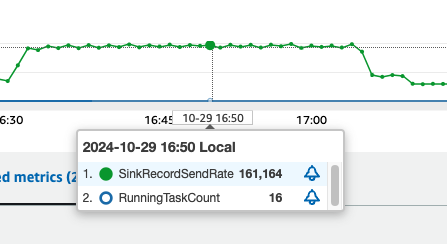
Performance Results:
In our test using the configuration above, each MCU achieved peak writing performance of approximately 10,000 records per second, as shown in the following figure. This demonstrates the solution’s ability to handle high-throughput data synchronization workloads effectively.
Clean up
To clean up your resources, complete the following steps:
- Delete MSK Connect connectors: Remove both the Debezium MySQL Connector and Iceberg Kafka Connect connector created for this solution.
- Delete the Amazon MSK cluster: If you created a new MSK cluster specifically for this demonstration, delete it to stop incurring charges.
- Delete the S3 buckets: Remove the S3 buckets used to store the custom Kafka Connect plugins and Iceberg table data. Ensure you have backed up any data you need before deletion.
- Delete the EC2 instance: If you launched an EC2 instance to build the Iceberg Kafka Connect plugin, terminate it.
- Delete the RDS MySQL instance (optional): If you created a new RDS instance specifically for this demonstration, delete it. If you’re using an existing production database, skip this step.
- Remove IAM roles and policies (if created): Delete any IAM roles and policies that were created specifically for this solution to maintain security best practices.
Conclusion
In this post, we presented a solution to achieve real-time, efficient data synchronization from transactional databases to data lakes using Amazon MSK Connect and Iceberg Kafka Connect. This solution provides a low-cost and efficient data synchronization paradigm for enterprise-level big data analysis. Whether you’re working with ecommerce transactions, financial transactions, or IoT device logs, this solution can help you achieve quick access to a data lake, enabling analytical businesses to quickly obtain the latest business data. We encourage you to try this solution in your own environment and share your experiences in the comments section. For more information, visit Amazon MSK Connect.