AWS Compute Blog
Building serverless applications with Rust on AWS Lambda
Today, AWS Lambda is promoting Rust support from Experimental to Generally Available. This means you can now use Rust to build business-critical serverless applications, backed by AWS Support and the Lambda availability SLA.
Rust is a popular programming language due to its combination of high performance, memory safety, and developer experience. It offers speed and memory utilization efficiency comparable with C++, together with the reliability normally associated with higher-level languages.
This post shows you how to build and deploy Rust-based Lambda functions using Cargo Lambda, a third-party open source tool for working with Lambda functions in Rust. We’ll also cover how to deploy your functions using the Cargo Lambda AWS Cloud Development Kit (AWS CDK) construct.
Prerequisites
Before you begin, make sure you have:
- An AWS account with appropriate permissions.
- The AWS Command Line Interface (AWS CLI) configured with your credentials
- Rust installed on your development machine (version 1.70 or later)
- Node.js 20 or later (for AWS CDK deployment)
- AWS CDK installed:
npm install -g aws-cdk
Solution overview
This post takes you through the following steps:
- Install and configure Cargo Lambda.
- Create and deploy a basic HTTP Lambda function using Cargo Lambda.
- Build a complete serverless API using AWS CDK with Rust Lambda functions.
Install and configure Cargo Lambda
Cargo is the package manager and build system for Rust. Cargo Lambda is a third-party open source extension to the cargo command-line tool that simplifies building and deploying Rust Lambda functions.
To install Cargo Lambda on Linux systems, run:
For additional installation options, see the Cargo Lambda installation documentation.
Creating your first Rust Lambda function
Create an HTTP-based Lambda function:
When prompted for Is this function an HTTP function?, enter y.
This creates a project with the following structure:
The project includes:
main.rs– The function entry point where you configure dependencies and shared statehttp_handler.rs– The primary function logic
The main.rs file contains the following code:
The key part of the main.rs file is run(service_fn(function_handler)).await. The run function is part of the http_lambda crate and starts the Lambda Rust runtime interface client (RIC), which actively polls for events from the Lambda Runtime API. The function_handler is the function that is defined in the http_handler.rs file. When the Runtime API returns the invoke event, the RIC calls the function_handler from http_handler.rs:
The function_handler function signature includes a variable event of type Request. The event contents depend on the service triggering the function. For example, it may contain HTTP request information such as path parameters if the request is coming via HTTP, or even an array of Amazon Kinesis stream records.
For non-HTTP functions, events can be strongly typed. Additionally, you can accept any structure as input as long as it implements serde::Serialize and serde::Deserialize.
The example parses query parameters and looks for the first parameter that has the name name.
The lambda_http crate provides an idiomatic way to return a response, using a builder pattern. The function returns a response as a Result with an Ok() which is what the run function in main.rs expects.
Logging
The main.rs file includes the following line by default:
The Rust Lambda runtime integrates natively with Tracing libraries for logging and tracing, and supports JSON structured logging. When setting this line and the RUST_LOG environment variable, Lambda sends logs to Amazon CloudWatch. By default, the INFO log level is enabled.
To write logs, use the tracing crate and send events using the following syntax:
Building
To build the Lambda function, use cargo lambda build. When compiling the Lambda function, the AWS Lambda Runtime is built into your binary. The compiled binary file is called bootstrap. It is packaged in the function artifact .zip file and visible as a file in the AWS Lambda console.
When Lambda executes this binary, it starts an infinite loop (the Run function). This polls the Lambda Runtime API to receive the invoke request and then calls your handler, the function_handler function.
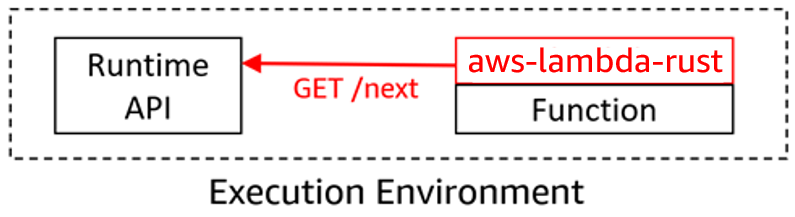
Your function code runs and then sends the function response back to the Lambda Runtime API, which forwards it onto the caller.
Testing
Before deploying the function, you can debug/test the function locally using cargo lambda.
cargo lambda watch sets up an environment that emulates the Lambda execution environment. This allows you to send requests to the Lambda function and see the results.
To send invocation requests, you can use either cargo lambda or send a curl request to the Lambda emulator.
To use cargo lambda, run the following, replace <lambda-function-name> with hi_api for this example
You can use any of the built-in example payloads with the --data-example parameter. Use --data-ascii <payload> to provide your own payload.
To invoke the function using curl, pass the JSON format payload to the local emulator’s address:
Deploying with Cargo Lambda
Once you have built the function using cargo lambda build, you can deploy it to your AWS account.
To deploy your function:
Once the Lambda function is deployed, you can test it remotely. cargo lambda invoke tests the remote Lambda function using a payload stored in a .json file:
Infrastructure-as-Code with AWS CDK
You can create a serverless API in front of this Rust Lambda function using Amazon API Gateway. This example uses the AWS CDK. This example does not have authentication configured for the API Gateway endpoint as it is a sample. The AWS best practice is to implement relevant security controls where necessary.
- First, create a new CDK project:
The easiest way to deploy a Rust Lambda function using the AWS CDK is to use the
cargo lambdaCDK Construct. This comes with everything required to run Rust Lambda functions on AWS. It is part of thecargo lambdaproject. - Install the Cargo Lambda CDK construct:
- Create a new HTTP Lambda function in your project:
When prompted for Is this function an HTTP function?, enter y.
- Update your CDK stack
lib/rusty_cdk-stack.tsto include both the Lambda function and API Gateway. - Bootstrap your AWS account and AWS Region for the AWS CDK:
- Deploy your stack:
Testing the API
To test your deployed API using the URL provided in the AWS CDK output:
Clean up
To avoid ongoing charges, remove the deployed resources:
Conclusion
AWS Lambda support for Rust is now Generally Available to build high-performance, memory-efficient serverless applications. Cargo Lambda is a third-party extension to the Rust cargo CLI which simplifies the experience of developing, testing, and deploying Rust applications to Lambda.
To learn more about building serverless applications with Rust:
To find more Rust code examples, use the Serverless Patterns Collection. For more serverless learning resources, visit Serverless Land.