AWS Contact Center
Automate email support with Amazon Connect Customer email AI agents
Email is one of the highest-volume support channels in most contact centers, and one of the most manual. Agents read long threads, search internal knowledge, and draft replies from scratch, which makes for slow first responses and inconsistent messaging.
Amazon Connect Customer now provides native AI capabilities for the email channel. With email AI agents, your agents get a summary of the thread, policy guidance grounded in your own knowledge base with citations, and a draft reply. Retrieval and generation are managed for you, so there is no AI service to configure, no AWS Lambda functions to write, and no orchestration logic to maintain. That distinguishes it from approaches that call Amazon Bedrock from a Lambda function with custom confidence scoring, such as Boost customer service with Amazon Connect AI-enhanced email workflows.
You set this up end-to-end using the system default agents, which need no prompt engineering. Step 6 shows where you can customize and what to watch for. The walkthrough uses a hotel booking scenario, and the pattern applies to any inbound email use case.
Important: These agents assist a human. They run when an agent accepts the contact and display their output for review before anything is sent. They do not reply to customers automatically. For automated replies, see Automating further.
Solution overview
Amazon Connect Customer provides three default email AI agents, each covering a different part of the agent’s workflow.
| AI agent | What it produces |
| EmailOverview | A structured summary of the thread: the customer issue, and key details such as booking reference, dates, and loyalty tier. |
| EmailGenerativeAnswer | Guidance for the agent, grounded in your knowledge base: how the policies apply to this request, numbered citations, a Sources list, and suggested elements to include in the reply. |
| EmailResponse | The draft reply itself, ready for the agent to review, edit, and send. |
Note the division of labor: EmailGenerativeAnswer explains the policy position and cites sources, while EmailResponse writes the customer-facing draft. Both work from a search query reformulated from the thread.
Timing matters, because the flow itself never invokes an AI agent:
- At flow time, the Connect assistant block associates an AI agents domain with the contact and creates a session. No AI has run yet.
- At accept time, when an agent picks up the email, all three agents run and populate the assistant panel.
- The agent reviews, edits, and sends. Nothing goes out without the agent sending it.
Answers are grounded only in knowledge base content. The agents cannot read Amazon Connect Customer Profiles, Cases, email templates, or quick responses.
The following diagram shows an email moving through Amazon SES into the inbound flow, then triggering the agents on accept.
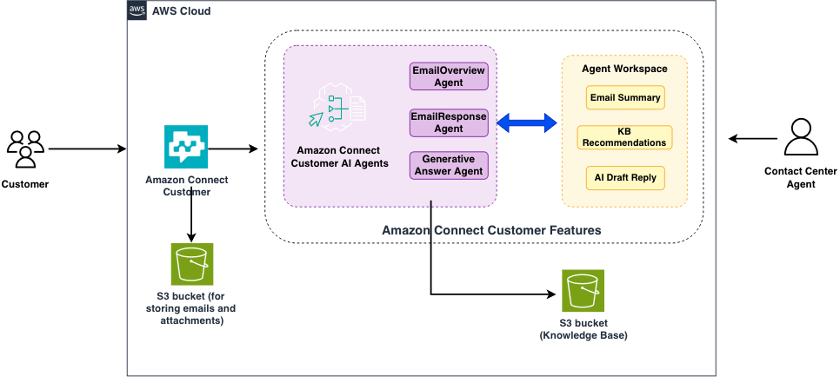
Figure 1 – Architecture diagram showing an email moving from the customer through Amazon SES into the Amazon Connect Customer inbound flow, which routes to queues. The three AI agents run when a human agent accepts the contact.
Prerequisites
For this walkthrough, you need the following:
- An AWS account with permissions to administer Amazon Connect Customer
- An Amazon Connect Customer instance Amazon Resource Name (ARN) and its alias
- An administrator security profile. Only if you customize agents in Step 6 you need AI agent designer permissions for AI agents and AI prompts set to Create. See security profile permissions.
- Amazon SES set up for email, since Amazon Connect Customer sends and receives through it. In the SES sandbox, inbound email works, but replies fail because you can only send to verified addresses. Request production access, or verify the address you test from, which is sufficient here.
- The AWS CLI, configured and authenticated with permissions to deploy CloudFormation stacks
The companion repository is available here – Amazon Connect Customer Email AI Agents
Walkthrough
You complete seven steps, from creating two S3 buckets to sending a test email.
Step 1 – Deploy the S3 buckets:
The template connect-email-infrastructure.yaml creates two buckets. One stores email messages and attachments with the CORS (cross-origin-resource-sharing) configuration. Amazon Connect Customer requires and a policy scoped to your instance ARN. The other bucket holds the documents the AI agents domain ingests. Both use SSE-S3 and block all public access. The template creates nothing else, and never touches your instance configuration.
If your instance already stores email in Amazon S3, deploy with CreateEmailStorageBucket=false and use the bucket that exists. Repointing Data storage at a new bucket splits your email history across two buckets and leaves new mail outside any lifecycle or retention rules on the old one. Amazon Connect Customer creates a bucket automatically when you enable email, but without the CORS rule that attachment sharing needs, so add that rule to your existing bucket instead. The template exists to save you that step on a clean instance.
Deploy the stack with your own instance ARN and alias:
aws cloudformation deploy \
  --template-file connect-email-infrastructure.yaml \
  --stack-name connect-email-ai-poc \
  --parameter-overrides \
      ConnectInstanceArn="arn:aws:connect:us-east-1:111122223333:instance/aaaaaaaa-bbbb-cccc-dddd-eeeeeeeeeeee" \
      ConnectInstanceAlias="my-instance-alias"
Retrieve the bucket names, which are required in Steps 2 and 3:
aws cloudformation describe-stacks \
  --stack-name connect-email-ai-poc \
  --query "Stacks[0].Outputs[*].[OutputKey,OutputValue]" --output table
Step 2 – Enable the email channel:
Follow Enable email for your Amazon Connect Customer instance to add the auto-generated domain {instance-alias}.email.connect.aws (scope of this blog). You can instead import your own domain verified in Amazon SES.
Then complete three things the walkthrough depends on:
- Under Data storage, point email message export and attachment sharing at the email storage bucket from Step 1. Attachment sharing needs the CORS policy the template applied; without it the email channel does not work.
- Create an email address with the prefix reservations, leaving the inbound flow as the default. You replace it in Step 4.
- Create two queues under Routing: “Hotel Reservations Email” Queue for mail that passes the spam check, and Hotel “Spam Review Queue” for mail flagged as spam. Each needs an hours of operation entry and an outbound email configuration pointing at your new address. Note both ARNs from Show additional queue information.
Finally, under Users, Routing profiles, enable the Email channel on your agent profile and add both queues.
Step 3 – Create the AI agents domain and knowledge base:
In the Amazon Connect Customer console, choose AI Agents, Add domain, Create a domain. Name it hotel-support-ai, keep the default encryption key, and wait for Active. Note the domain ARN, of the form arn:aws:wisdom:<region>:<account-id>:assistant/<uuid>.
Note: If you supply your own AWS Key Management Service (KMS) key instead, its policy must grant connect.amazonaws.com the kms:Decrypt, kms:GenerateDataKey*, and kms:DescribeKey permissions, or the email AI agents fail. See Initial set-up for AI agents.
Upload the grounding content. The companion repository includes six short hotel policy files, deliberately rule-based so you can tell whether an answer came from your documents or the model:
aws s3 sync kb-content/ s3://{instance-alias}-connect-kb-content-{account-id}/Choose Add integration -> Create a new integration ->set Source to Amazon S3, and select the bucket. Ingestion takes a few minutes. AI agents also ingest HTML, DOCX and PDF up to 1 MB each, and connect to Salesforce, ServiceNow, SharePoint Online, Zendesk, a web crawler, and Amazon Bedrock knowledge bases.
Confirm EmailOverview, EmailGenerativeAnswer, and EmailResponse appear on the AI agents tab. They are available as soon as the domain is active, with no setup of their own.
Step 4 – Import and publish the contact flow:
The file sample-email-ai-flow.json checks that the contact is email, associates your domain through the Connect assistant block, inspects the Amazon SES spam verdict, and routes to one of the two queues. The channel check matters for cost, because the block bills per contact processed.
The flow references resources by ARN, so replace three placeholder values with your own before importing:
| Placeholder | Replace with |
| …:assistant/00000000-… | Your AI agents domain ARN from Step 3 |
| …queue/…0001 | The Hotel Reservations Email Queue ARN |
| …queue/…0002 | The Hotel Spam Review Queue ARN |
In the admin website, go to Routing ->Flows ->Create flow, and select Inbound flow. From the Save menu, choose Import flow. Open each block and confirm the domain ARN and both queues resolved, then choose Save and Publish.
Note: CreateWisdomSession is documented as voice only, while the Connect assistant block lists Email as supported. The restriction is not enforced; we ran this flow on the email channel successfully. If your import fails, build the flow in the designer instead.
Important: The Connect assistant block is two flow actions, not one. CreateWisdomSession opens the session and UpdateContactData writes $.Wisdom.SessionArn onto the contact. Both are in the companion file. Omit the second and no AI agent ever runs: the flow completes, the contact routes normally, and the panel stays empty with no error anywhere.
Amazon SES sets its spam verdict to PASS, FAIL, GRAY, or PROCESSING_FAILED, so the flow matches FAIL. The contact attributes reference describes this as the FAILED condition, so the sample flow matches both spellings and routes either to the review queue.
Note: connect:X-SES-SPAM-VERDICT is not always present. In our testing, it was absent on every message and the flow fell through NoMatchingCondition to the main queue, which is the safe default. Treat the spam branch as best-effort and verify it against your own mail.
Finally, under Channels, Email, set your address’s Inbound flow to the flow you published. This is mandatory: skip it and email still arrives, but no session is created and the panel stays empty.
Step 5 – Configure permissions and a test user:
Under Users, Security profiles, edit the Agent profile: confirm Initiate email conversation under Contact Control Panel, then enable Connect assistant with View access under Agent Applications. A new instance already has the email permission, so the assistant one is usually the only addition. Without it the panel never appears.
Then create a user under User management with that profile and the routing profile from Step 2. You sign in as this user in Step 7.
Step 6 – Customize the AI agents:
Nothing here is required. The walkthrough above is complete, and the default agents work against your content as soon as the domain is active. This step covers where you can customize, and what to watch for.
Confirm what serves each use case before changing anything:
aws qconnect get-assistant \
  --assistant-id <YOUR_DOMAIN_ID> \
  --query "assistant.aiAgentConfiguration"
Every use case always appears there, pre-populated with a system agent, so a key being present tells you nothing. Compare the returned ID against your own agent.
Customization takes three stages per agent type, because neither a prompt nor a published agent takes effect alone:
- Create an AI prompt under AI agent designer, AI prompts. The builder opens with the system default template, so you edit rather than start from nothing.
- Create an AI agent referencing your published prompt version, not a saved draft. Prompts you leave alone keep their defaults.
- Publishing and update the agent alone does not activate the agent:
aws qconnect update-assistant-ai-agent \
  --assistant-id <YOUR_DOMAIN_ID> --ai-agent-type EMAIL_OVERVIEW \
  --configuration '{"aiAgentId": "<AI_AGENT_ID>:<VERSION>"}'
To revert, list the system versions with list-ai-agents using –origin SYSTEM and set them back the same way. Versions set on a session outrank the domain default, which outranks the system default.
Important — test every customization end to end. A published, active agent can still return nothing, and it fails silently: the flow completes, the contact routes normally, and the panel shows an empty result with no error. In our testing, a custom EmailResponse agent overriding only the query reformulation prompt produced no draft, because the drafting step got no usable input. Reverting to the system default restored it. Change one agent at a time and test after each change.
Step 7 – Test the solution:
Sign in to the agent workspace at https://{instance-alias}.my.connect.aws/agent-app-v2/ as your test user, set your status to Available, and send the following message to your new address from an external account:
Subject: Change reservation dates and room upgrade request
Hi, I have a reservation (Booking Ref: HB-2026-4521) for March 15-17.
I need to change check-in to March 18 and check out on March 20.
Also, can I upgrade from a standard room to a suite? I am a Gold member.
Thanks, Jane Smith
Nothing happens until you accept the contact. When you do, the panel populates with three outputs:
- EmailOverview lists the customer issue and key details: booking reference, both date ranges, room types, and Gold tier.
- EmailGenerativeAnswer explains how your policies apply, with numbered citations and a Sources expander: no fee outside the 24-hour window, Gold eligible for a complimentary upgrade, two-night stay meeting the suite minimum.
- EmailResponse gives the draft reply, under “Here is a draft response”.
The generative answer takes longer than the others, so the panel fills in over several seconds.
Two more cases worth running: ask about bringing a dog to confirm the pet policy is retrieved, then ask for the Wi-Fi password, which no document covers in order to confirm the AI acknowledges the gap rather than inventing an answer.
Automating further
These agents always keep a person in the loop. To reply without one, Amazon Connect Customer supports automated email responses driven by keyword and phrase conditions: add the Get stored content block to retrieve the message body, then Check contact attributes and Send message to match and reply. See how email works.
The two combine well: deflect predictable intents automatically and route the rest to a queue where the agents prepare the work. Before enabling automatic sending, add AI guardrails and keep an escalation path for anything involving money, identity, or a commitment.
Best practices
- Start with the defaults and improve your content first. Quality depends far more on what you ingest than on prompt wording. Re-sync when policies change.
- Change one agent at a time and test after each change, because a published, active agent can still fail silently.
- Filter non-email contacts away from the assistant block, since it bills per contact processed.
- Version prompts and agents, because versions are immutable and let you roll back.
- Measure before and after. Track handle time and how heavily agents edit drafts. Frequent rewrites usually point at knowledge base gaps, not the model.
Troubleshooting
Failures here are usually silent, so these two sources are where to look:
- Connect assistant event logs. Enable delivery with EVENT_LOGS as the log type. See Monitor AI agents using CloudWatch, using PutDeliverySource, PutDeliveryDestination, and CreateDelivery.
- Session traces. ListSpans returns the per-agent trace for a session, keyed on the session ID in the contact’s WisdomInfo.
Two things to know: contact flow logging needs a Set logging behavior block in the flow, not just the instance setting; and the two sources disagree on generated content, so check the event logs for what a model actually returned.
Clean up
To avoid further charges, remove what you created, detaching references before their targets.
- Reset the email address inbound flow to the default, then delete the address and the domain.
- Under Data storage, disable email export and attachment sharing.
- Delete the flow, both queues, and the test user.
- Delete any custom prompts and agents, then the S3 integration and the AI agents domain.
- Empty both buckets, then delete the stack. CloudFormation cannot remove buckets holding objects:
aws s3 rm s3://{instance-alias}-connect-email-storage-{account-id}/ --recursive
aws s3 rm s3://{instance-alias}-connect-kb-content-{account-id}/ --recursive
aws cloudformation delete-stack --stack-name connect-email-ai-poc
Conclusion
Amazon Connect Customer email AI agents shorten the research and drafting work in every email contact, with no separate AI service, trained model, or orchestration code to maintain. The assistant panel does the reading and drafts a reply, while your agents keep judgment and accountability.
The design point worth keeping is where the person sits: these agents prepare the work and a human sends it, which suits any reply carrying a commitment.
Very little changes between industries. Swap the documents you ingest for your own, adjust queues and routing, and the same three agents apply.
About the authors
 |
Nideesh KT is an experienced IT professional with expertise in cloud computing, AI, and technical support. Nideesh has been working in the technology industry for 10 years. In his current role as a Sr. Technical Account Manager, Nideesh provides technical assistance and architects cloud and AI-driven applications for Enterprise customers. Outside of work, Nideesh enjoys staying active by going to the gym, playing sports, and spending time outdoors. |
 |
Pallavi Bhat is a Solutions Architect at Amazon Web Services based in Bengaluru, India. With over five years of experience in the industry, she specializes in serverless architectures, Amazon Connect, and Generative AI, helping customers design and implement intelligent, scalable solutions. She is passionate about building AI-powered customer experience solutions. Outside of work, she enjoys dancing, reading books, and exploring new topics a curiosity that fuels her approach to solving complex technical challenges. |
 |
Abilashkumar P C is a Senior Specialist Solutions Architect at AWS having over 8 years of experience focusing on Applied AI, CCaaS and Amazon Connect based out of London. He works with customers to design and build resilient conversational AI. He is passionate about modernizing customer experiences at scale with a strong emphasis on achieveing business outcomes. Outside of work, he likes driving and reading mythology. |