Containers
Migrate Amazon EC2 to EKS Auto Mode using Kiro CLI and MCP servers
Amazon Elastic Kubernetes Service (Amazon EKS) Auto Mode offers a streamlined path forward, handling compute provisioning and autoscaling, node lifecycle, networking, cluster DNS, storage, load balancing, and GPU support. Teams interact with familiar Kubernetes primitives while EKS Auto Mode manages the underlying infrastructure, delivering a Kubernetes-native experience that eliminates operational overhead without sacrificing flexibility or control.
Migrating from Amazon Elastic Compute Cloud (Amazon EC2) to a Kubernetes-based architecture requires expertise across containerization, networking, and AWS service integration. AWS Model Context Protocol (MCP) Server, specialized Amazon EKS MCP Server, AWS Knowledge MCP Server, and Kiro CLI significantly reduce this complexity by providing automated workflows for containerization and deployment orchestration. Together, these tools help teams accelerate their migration timeline, minimize configuration errors, and apply best practices consistently throughout the process.
In this post, you walk through a practical migration scenario where a Node.js web application running on EC2 instances is migrated into a highly scalable, containerized service on EKS Auto Mode. You will learn how to configure and use the AWS and Amazon EKS MCP Servers with Kiro CLI to automate critical migration tasks from Dockerfile creation and image optimization to Kubernetes manifest generation and production deployment on EKS Auto Mode.
Solution overview
This section covers the initial and target architectures, their key components, and how Kiro CLI and MCP servers work together to orchestrate a smooth, end-to-end migration from EC2 to EKS Auto Mode.
Architecture overview
The following sections compare the initial EC2 architecture with the target EKS Auto Mode architecture.
Initial architecture
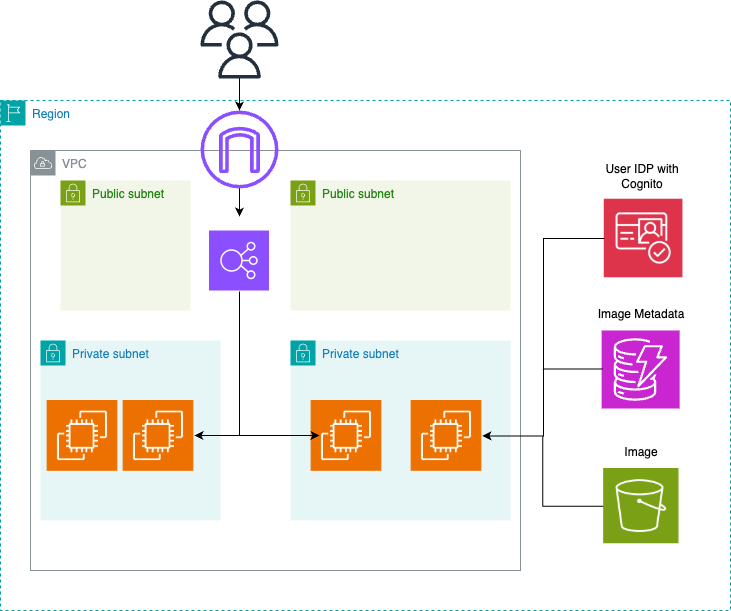
Figure 1: Initial architecture: Node.js application on Amazon EC2 behind an Application Load Balancer, with Amazon Cognito for authentication, Amazon Simple Storage Service (Amazon S3) for object storage, and Amazon DynamoDB for metadata.
This section describes a traditional virtual machine deployment for a Node.js application involving infrastructure management. This includes EC2 instances behind an Application Load Balancer, Amazon S3 integration for images, user authentication based on Amazon Cognito, Amazon DynamoDB as a database, and monitoring with Amazon CloudWatch. The solution is deployed with the AWS Cloud Development Kit (AWS CDK).
Target architecture
This architecture replaces the EC2 compute layer with EKS Auto Mode, enabling automatic scaling and minimal infrastructure management.
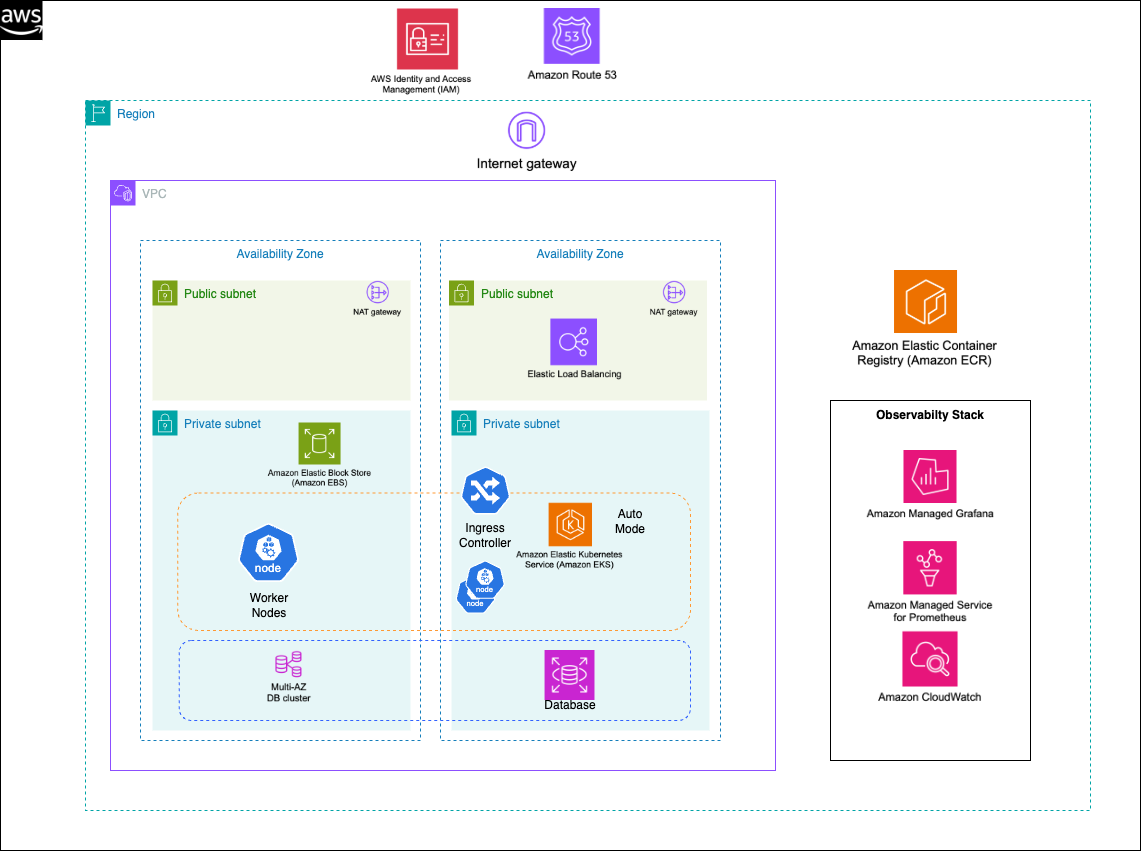
Figure 2: Architecture of the migrated application with Amazon Elastic Container Registry (Amazon ECR) for storing container images, using the same backend services as the original application.
Security posture changes
EKS Auto Mode shifts your security boundary from instances to pods and containers. Key changes:
| Area | EC2 approach | EKS Auto Mode approach |
| IAM credentials | Instance profile attached to EC2, all processes on the host share one role | EKS Pod Identity, each pod gets its own scoped IAM role (least privilege per workload) |
| Network isolation | Security groups on instances + NACLs on subnets | Security groups on pods + Kubernetes Network Policies for east-west traffic |
| Image supply chain | Custom AMIs, manually patched | Container images scanned at push through Amazon ECR image scanning. Enforce signed images with Sigstore/Cosign |
| Runtime security | Host-based agents (for example, CrowdStrike, ossec) | Amazon GuardDuty EKS Runtime Monitoring. Read-only root filesystems and securityContext constraints |
| Secrets management | .env files on disk, or SSM Parameter Store lookups at boot | Kubernetes Secrets backed by AWS Secrets Manager through the Secrets Store CSI driver |
Integration of the infrastructure stack and Kiro
The following diagram shows the architecture involving the integration of the infrastructure stack and Kiro, as well as the overall workflow for generating boilerplate code with the MCP server and deploying across multiple AWS Regions.
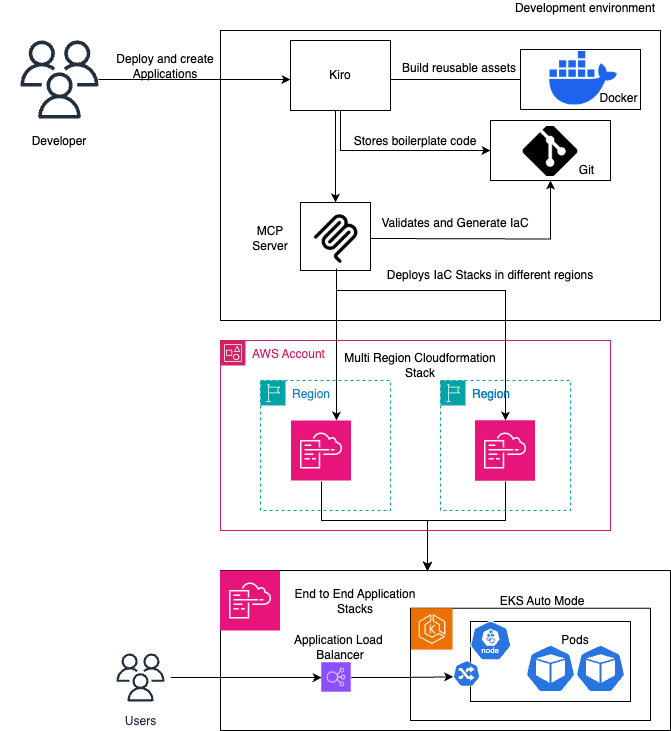
Figure 3: Target architecture involving the integration of the infrastructure stack and Kiro
Benefits of the solution
- Automated migration – Kiro CLI and MCP servers work in concert to eliminate time-consuming manual steps, turning what would typically be a multi-week migration effort into a streamlined, repeatable process.
- Minimal manual configuration – Infrastructure is discovered dynamically, configured automatically, and deployed in alignment with AWS best practices, so teams spend less time on setup and more time on delivery.
- Built-in guardrails – Each migration phase includes a validation gate that prevents progression until success criteria are met, reducing misconfigurations and enforcing AWS Well-Architected best practices by default.
Why EKS Auto Mode over EC2
Teams running on EC2 typically manage scaling policies, AMI updates, instance replacements, and capacity planning. EKS Auto Mode eliminates these responsibilities while preserving deployment flexibility. The following table provides a decision-maker view of what changes:
| Operational Concern | EC2 Self-Managed | EKS Auto Mode |
| Capacity planning | Manual: Choose instance types, set Auto Scaling group (ASG) min/max/desired | Automatic: Declare CPU/memory requests. Auto Mode selects optimal instance types and scales to match demand |
| Node patching | You schedule maintenance windows, rotate AMIs, drain instances | AWS patches and rotates nodes transparently. Configure maintenance windows for timing control |
| Scaling speed | Minutes (ASG launches → instance boot → application start) | Seconds to minutes (EKS Auto Mode automatically provisions right-sized capacity, powered by Karpenter. Pods schedule immediately on available nodes) |
| Cluster upgrades | N/A (no cluster to upgrade) | One-click Kubernetes version upgrades. Auto Mode handles node upgrades in rolling fashion |
| Cost optimization | Manual right-sizing. AWS Savings Plans / Reserved Instances | Auto Mode bin-packs pods across optimal instance families; supports Spot through node pools for cost savings |
| Blast radius | One instance down = portion of traffic lost | Pod restarts in seconds on healthy nodes. Deployments self-heal. The Horizontal Pod Autoscaler (HPA) maintains replica count |
What you gain
- Automatic infrastructure lifecycle management (provisioning, scaling, patching, upgrades).
- Kubernetes-native abstractions (Deployments, Services, Ingress) that are portable and declarative.
- Faster scaling and self-healing with reduced operational toil.
What changes
- No SSH access to nodes: Debugging is container-native (kubectl debug, kubectl exec, ephemeral containers).
- Existing runbooks, monitoring dashboards, and AMI pipelines are replaced by Kubernetes-native equivalents.
- Teams need familiarity with kubectl, pod lifecycle, and Kubernetes networking concepts.
What changes for on-call engineers
Migrating to EKS Auto Mode changes day-to-day operations for on-call engineers. The following table provides an operator view of what shifts in practice:
| Capability | EC2 (Before) | EKS Auto Mode (After) |
| Node access | Connect directly into instances by using SSH. Run top, htop, journalctl | No SSH; nodes are managed by AWS. Use kubectl debug, kubectl exec, or ephemeral containers for troubleshooting |
| Patching & AMIs | You own AMI updates, reboot schedules, and OS hardening | AWS manages node OS updates automatically. You control rollout timing through node upgrade policies |
| Scaling | Auto Scaling Groups with custom launch templates and scaling policies | Automatic provisioning built in (powered by Karpenter): declare resource requests and EKS Auto Mode selects instance types |
| Log collection | CloudWatch Agent or custom Fluentd installed on each instance | Deploy a DaemonSet (for example, Fluent Bit) or enable CloudWatch Container Insights as an EKS add-on |
| Debugging a crash | SSH in, inspect /var/log, attach strace, check systemd journal | kubectl logs, kubectl describe pod, ephemeral debug containers, or forward logs to Amazon CloudWatch Logs |
| Runbooks | Instance-based: restart service, check disk, rotate certs, reboot host | Pod/deployment-based: rollback image, scale replicas, cordon/drain nodes with kubectl |
| Incident response | Isolate instance through a security group change. Take AMI snapshot for forensics | Cordon node, capture pod logs/events, use GuardDuty findings; no host-level forensics available |
Migration guide
This section walks you through running the entire migration automation step by step. You start with setting up Kiro CLI and MCP server configuration and finally execute the end-to-end migration.
Prerequisites
To follow along and test this solution, verify that you have the following:
AWS account setup
- An AWS Account.
- An AWS Identity and Access Management (IAM) role following the policy of least privilege permissions for deploying Amazon EKS cluster.
Development environment
- AWS Command Line Interface (AWS CLI) version 2.15.0 or later.
- Kiro CLI version 1.25.0 or later.
- AWS Cloud Development Kit (AWS CDK) v2 version 2.238.0 or later.
- Node.js 20 or later and npm.
- Docker or Finch.
- Command line tool (kubectl).
Knowledge requirements
- Basic understanding of containerization concepts.
- Familiarity with AWS networking (VPC, subnets, security groups).
- Basic understanding of the Model Context Protocol (MCP).
This solution also requires an existing Amazon Virtual Private Cloud (Amazon VPC) setup in your target Region. See Amazon VPC documentation for setup instructions.
Note: This walkthrough covers stateless applications. Stateful workloads (databases, persistent caches) require additional considerations such as persistent volume claims and StatefulSets that are outside the scope of this post.
Preparing for the migration
Complete the following steps to set up the sample application and tools before you run the migration.
Step 1: Clone the repository and install the dependencies
This walkthrough reuses the code repository, which is explained in another post on Amazon ECS Express Mode using Kiro and MCP Server.
In your command line, run the following command:
Note: The repository is named after Amazon Elastic Container Service (Amazon ECS) Express Mode because it hosts a shared sample application used across multiple migration-target blog posts. This walkthrough uses the same base Node.js application but targets EKS Auto Mode. All configuration specific to EKS lives in the .kiro/skills/ec2-to-eks-auto-mode/ directory.
Step 2: Deploy the initial setup with the AWS CDK
First, bootstrap CDK in your target Region (only needed once per account/Region).
Then, navigate to the scripts/deployment folder and run the deploy.sh script:
The script deploys a blog application on EC2 using AWS CDK infrastructure. It accepts a Region parameter, builds and deploys the CDK stack, extracts CloudFormation outputs including User Pool ID, Client ID, S3 bucket, DynamoDB table, and EC2 instance ID.
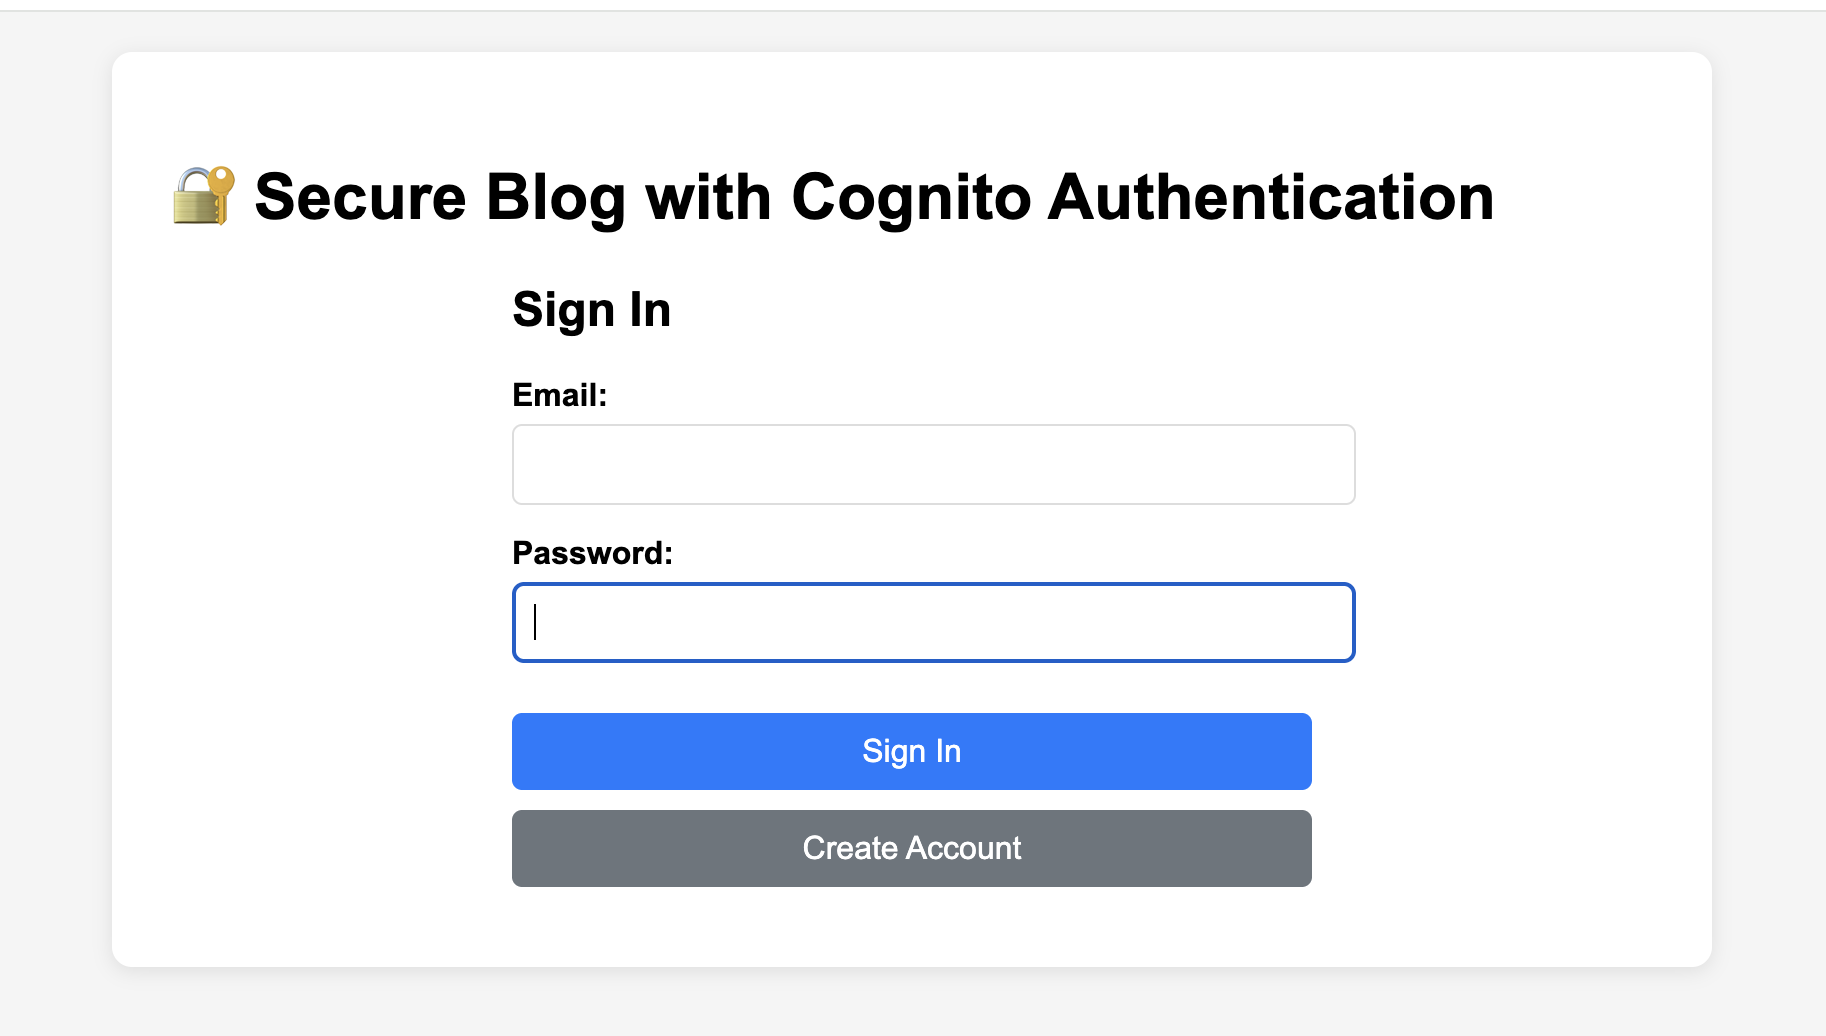
Figure 4: Sample application running on EC2.
It configures Cognito for self-registration and email verification, creates environment files with AWS resource identifiers, packages the application from the sample-application directory, uploads it to S3, then uses AWS Systems Manager to download and extract it on the EC2 instance.
Step 3: Install and authenticate Kiro CLI
In your command line, install and authenticate Kiro CLI with your AWS environment.
Step 4: Configure and verify MCP servers
This walkthrough relies on two MCP servers that Kiro CLI invokes during the migration. Both must be installed and configured before proceeding.
- Amazon EKS MCP Server: provides tools for cluster management, Kubernetes resource operations, and deployment orchestration.
- AWS Knowledge MCP Server: enables querying AWS documentation and best practices during the migration.
Follow the installation instructions for each server:
Troubleshooting: If you see a server load failure such as:
Verify the server binary is in your PATH and that the MCP server configuration in .kiro/settings.json points to the correct executable path. Run with KIRO_LOG_LEVEL=trace and check $TMPDIR/kiro-log/kiro-chat.log for detailed diagnostics.
Step 5: Add the migration skill
Without a skill, the AI agent selects its approach at runtime. It might try different paths, encounter errors, and retry with variations. Results can vary between sessions.
A Kiro Skill encodes a fixed workflow with validation gates and exact tool sequences into a structured document. The agent follows the phases in order and cannot proceed until each gate passes. The repository includes a pre-built migration skill following the Anthropic guide to building skills for Claude. The skill uses three levels of progressive disclosure:
| Level | File | When loaded | Purpose |
| 1 | YAML frontmatter in SKILL.md | Always (system prompt) | Tells the agent when to activate |
| 2 | SKILL.md body | When migration intent detected | Full 7-phase workflow with gates |
| 3 | references/*.md | On demand during execution | IAM templates, manifest patterns |
Each phase includes a validation gate. The agent does not proceed until the gate passes.
| Phase | Action | Gate |
| 1. Containerize | Analyze application, create Dockerfile, test locally | Health check returns 200 locally |
| 2. Push to ECR | Build linux/amd64 image, push to ECR | Image exists in ECR |
| 3. Create Cluster | Use the manage_eks_stacks MCP tool |
CloudFormation status is CREATE_COMPLETE |
| 4. IAM Pod Identity | Create role, policy, service account, association | Pod identity association exists |
| 5. Deploy | Generate manifest, patch, apply via MCP | All pods Running and Ready |
| 6. Verify | Get LB URL, test health endpoint | Health returns 200 from LB |
| 7. Decommission EC2 | Remove old infrastructure | Manual confirmation |
Note: This configuration is already available in the repository.
Without a skill, the agent operates in open-ended mode and might choose different approaches across sessions.
Navigate to the root of the cloned repository and start the migration session with the pre-built skill:
Kiro CLI loads the ec2-to-eks-auto-mode-migration skill automatically through the skill:// resource reference in the agent configuration, no additional setup is required.
Performing the migration
The migration process is fully automated through Kiro CLI, which orchestrates an end-to-end workflow from discovery to deployment. With a single prompt, Kiro CLI handles:
- Infrastructure discovery: Examines your EC2 application and identifies all components, dependencies, and infrastructure resources.
- Containerization: Automatically generates optimized Dockerfiles and builds container images.
- AWS resource provisioning with AWS CDK: Creates Amazon ECR repositories, configures IAM roles, and sets up EKS Auto Mode prerequisites.
- Deployment: Deploys your containerized application to EKS Auto Mode with proper networking, permissions, and health checks.
Throughout the process, Kiro CLI performs built-in validations at each phase: verifying Dockerfile syntax, testing container functionality, confirming IAM permissions, and validating service health, all with guided approval steps and the help of MCP servers.
Note: All AWS resources created during this migration (EKS cluster, ECR repository, IAM roles, Pod Identity associations) must be deployed in the same Region as your existing EC2 application stack. Before running the migration, verify that your Region is set correctly and matches your EC2 stack Region.
The original architecture uses a standalone ALB provisioned through AWS CDK, pointing at EC2 target groups. During migration, the ALB lifecycle is as follows:
A new ALB is created: When the Kubernetes Ingress resource is applied, the AWS Load Balancer Controller (included in EKS Auto Mode) provisions a new ALB with target groups pointing to your pods.
DNS cutover: After health checks pass on the new ALB (Phase 6), update your DNS record (Route 53 CNAME/Alias or external DNS) to point to the DNS name of the new ALB. Use weighted routing for a gradual traffic shift if needed.
Decommissioning the Old ALB: After confirming all traffic flows through the new ALB, the old ALB and its target groups are removed during Phase 7 (Decommission EC2) when cdk destroy tears down the original stack.
Rollback: Your existing EC2 application remains live throughout Phases 1–6. DNS cutover (Phase 6) is manual, giving you a rollback path at any point before you decommission the original stack.
Now that you have everything set up and understand what the migration accomplishes, run the fully automated migration with Kiro CLI.
Provide this single prompt to initiate the end-to-end migration:
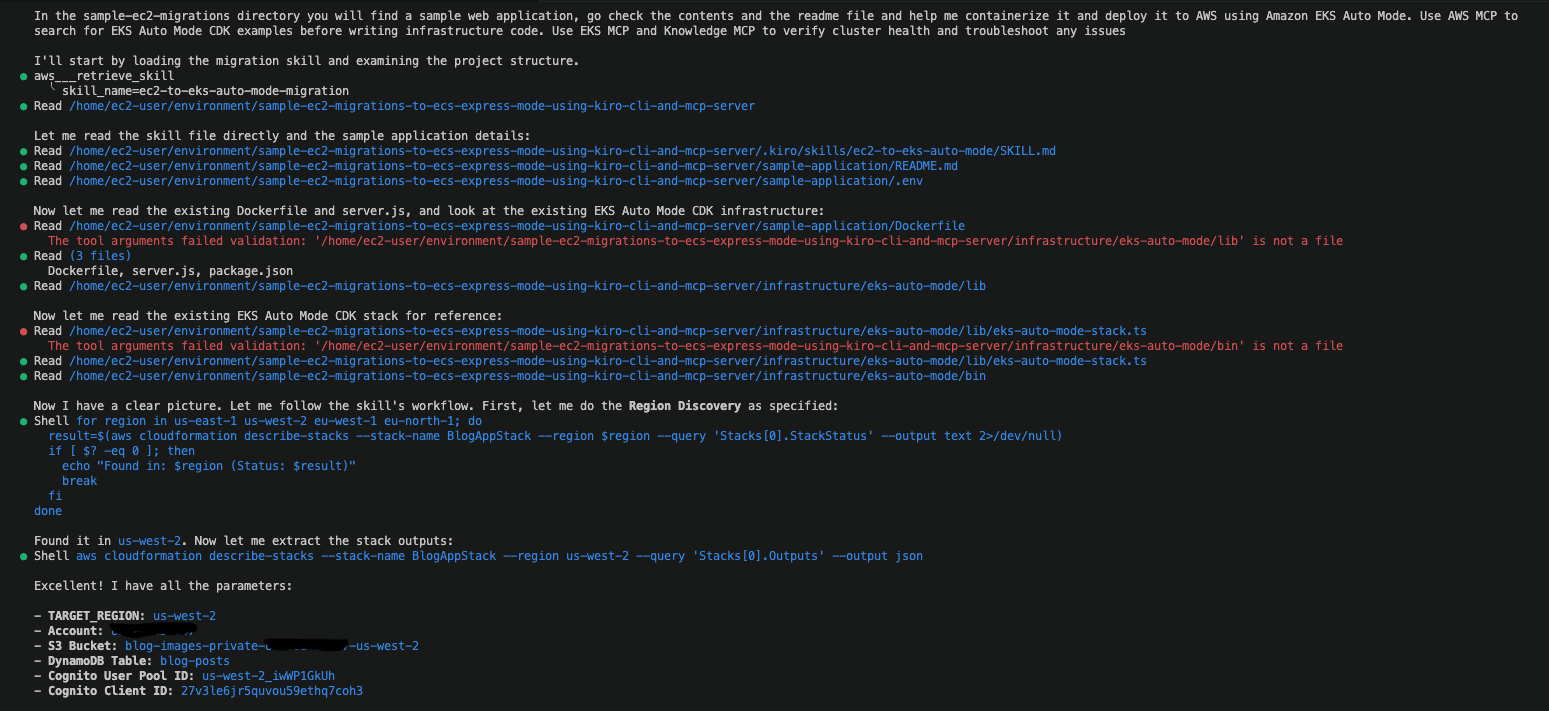
Figure 5: Skill file loading and project structure analysis
Kiro CLI analyzes the Node.js blog application, examining its architecture, dependencies, and current AWS infrastructure components to build a comprehensive understanding of the migration scope.
Kiro CLI uses the AWS MCP Server to query existing AWS resources and retrieve the latest EKS Auto Mode documentation. Using this information, it constructs a deployment plan based on AWS CDK, tailored to your infrastructure requirements.
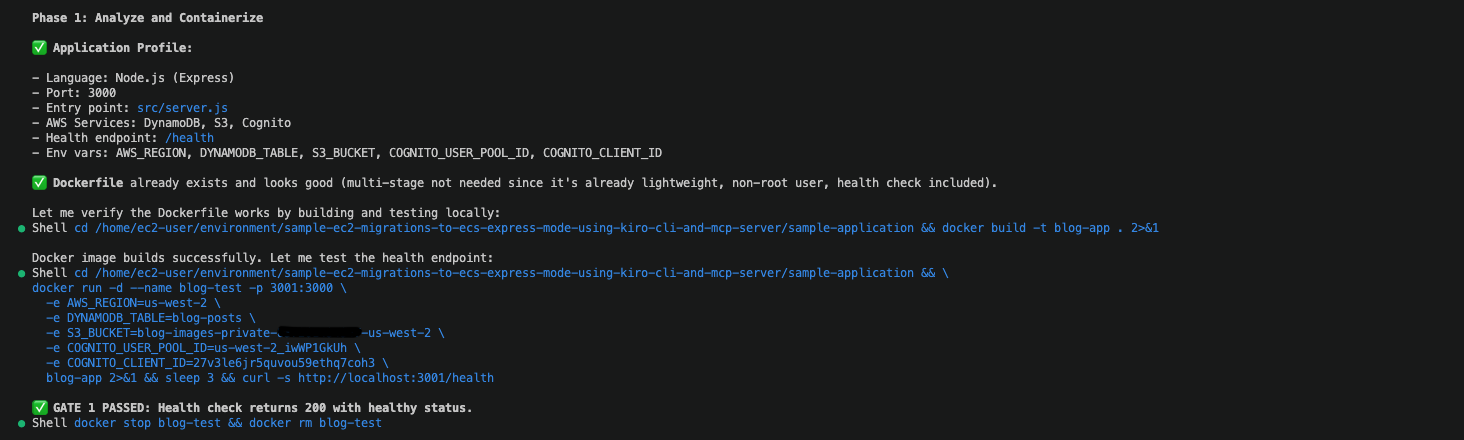
Figure 6: Existing asset validation and application containerization
Kiro CLI executes the CDK stack deployment, provisioning all necessary AWS resources including the EKS Auto Mode cluster, networking components, and IAM roles with appropriate permissions.
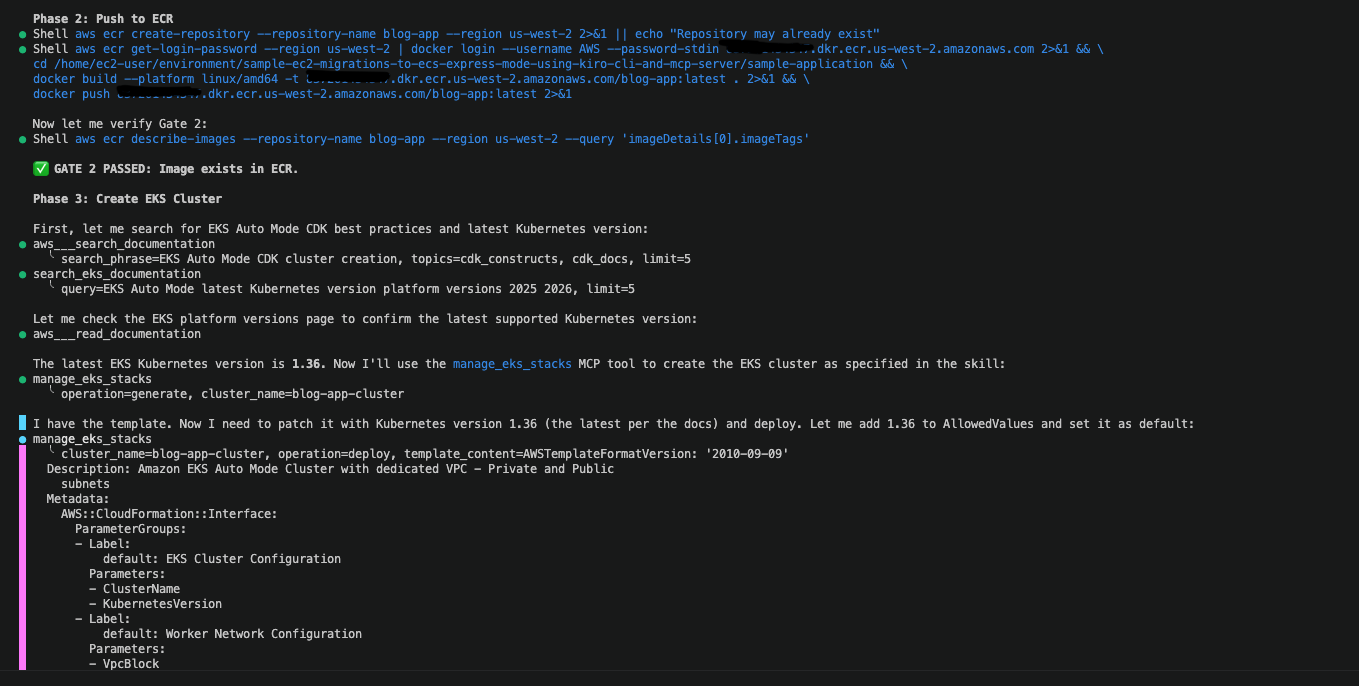
Figure 7: Skill gate validation and EKS Auto Mode stack execution
After the gate is validated, it proceeds with creating the cluster and adding IAM Pod Identity setup.
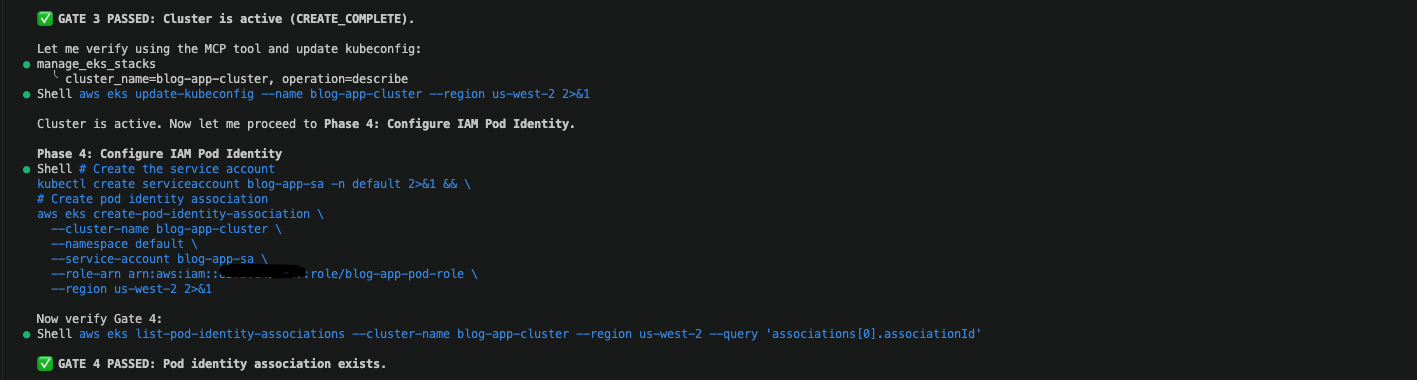
Figure 8: Kubeconfig update and Pod IAM Identity creation
After the setup for the EKS Auto Mode cluster is ready, the agent proceeds to create the manifest file to deploy the workload in Kubernetes.
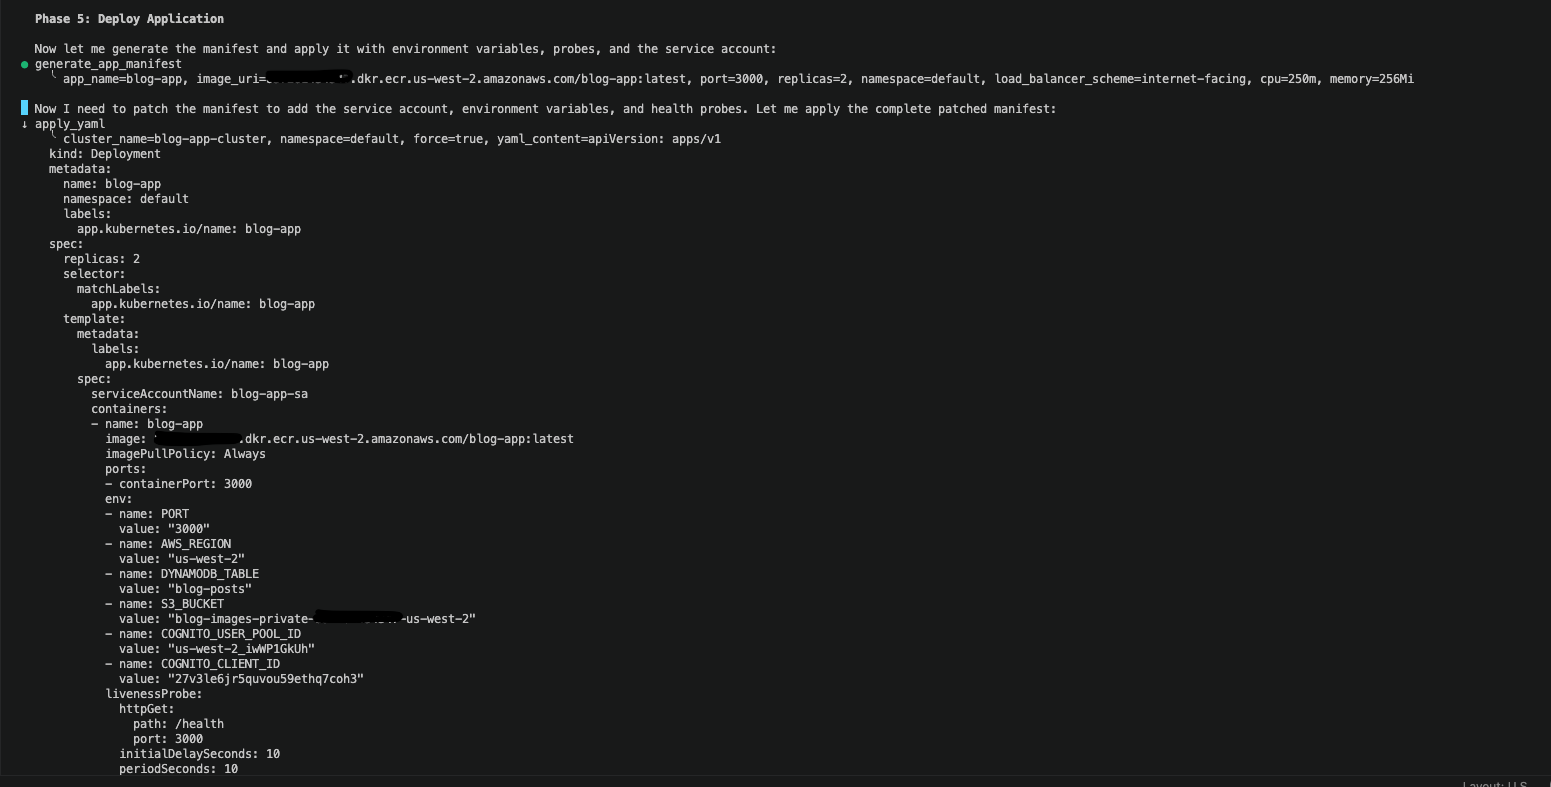
Figure 9: Kubernetes manifest file generation
Kiro CLI creates Kubernetes manifest files containing Deployment, Ingress, ServiceAccount, and Service configurations and deploys them to the cluster. It continuously monitors the deployment status using the list_k8s_resources tool from the Amazon EKS MCP server to verify all resources are successfully created and running.
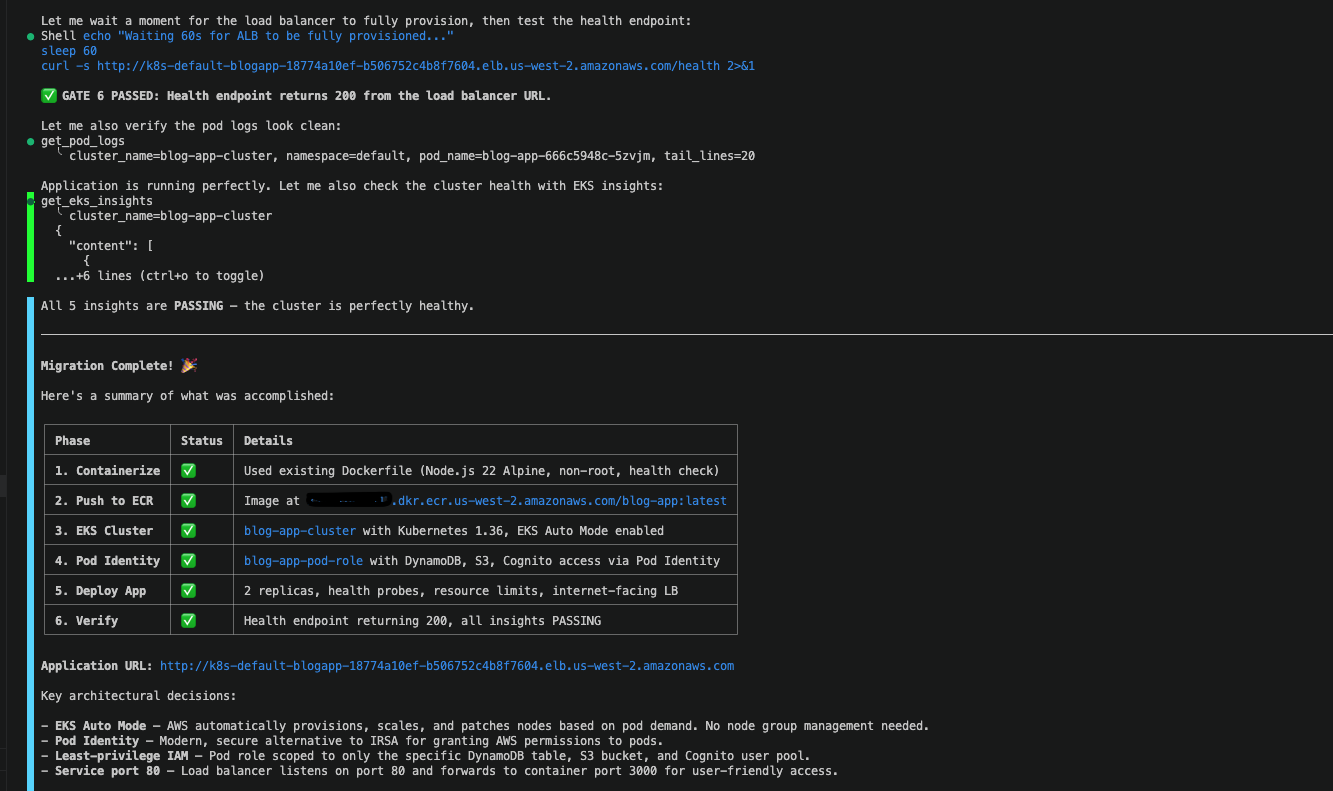
Figure 10: Deployment validation and health check results
Finally, Kiro CLI performs health checks by probing the Application Load Balancer (ALB) endpoint, confirming the application is running correctly and ready to serve traffic.
The application is now successfully running on EKS Auto Mode. Access your new application endpoint to confirm successful deployment. You can retrieve the Application Load Balancer URL from the Kubernetes Service or check the AWS Management Console for the Load Balancer DNS name. The endpoint will be in the format: http://your-alb-xxxxx.region.elb.amazonaws.com
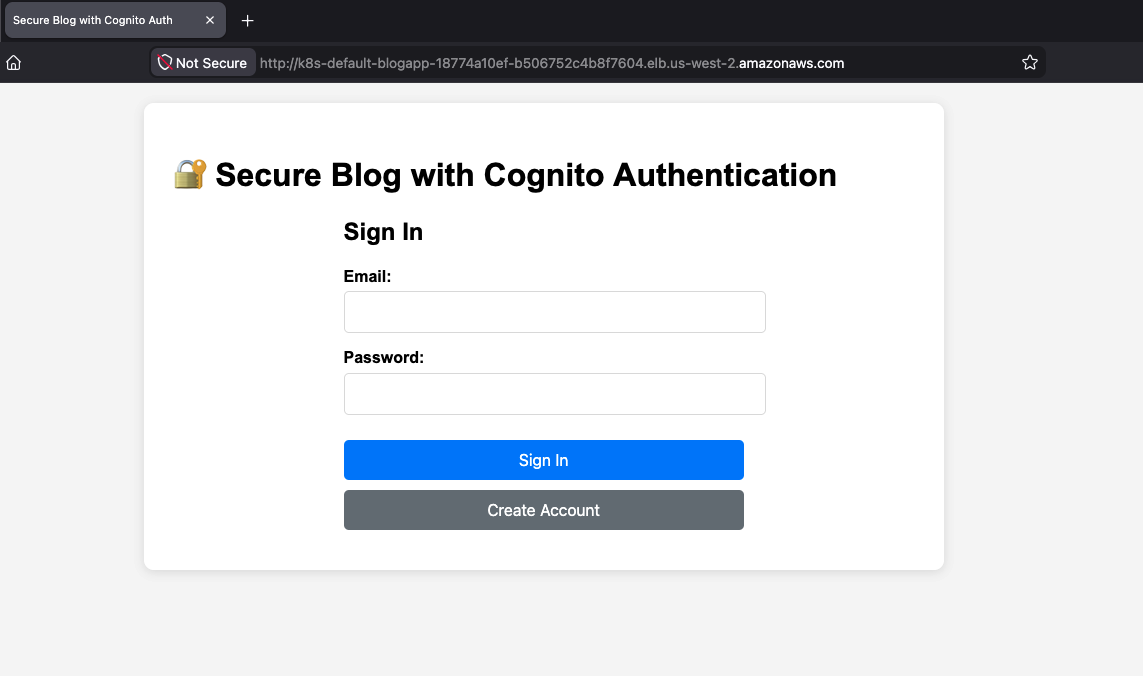
Figure 11: Application is now running in EKS Auto Mode
Post migration: Monitoring and observability
EKS Auto Mode does not include a pre-configured observability stack. You must set this up. For a comprehensive reference, see the EKS Observability Best Practices Guide. Here is a recommended baseline:
Logging
Deploy Fluent Bit as a DaemonSet (or use the AWS for Fluent Bit add-on) to forward container stdout/stderr to CloudWatch Logs. Structure logs as JSON for easier querying in CloudWatch Logs Insights.
Metrics
Enable CloudWatch Container Insights to collect cluster, node, pod, and container-level metrics (CPU, memory, network, disk).
For custom application metrics, expose a Prometheus /metrics endpoint and use Amazon Managed Service for Prometheus with Amazon Managed Grafana for dashboards.
Alerting
Create CloudWatch Alarms on key signals: pod restart count, CPU/memory utilization, 5xx error rate at the ALB, and deployment rollout failures. Integrate with Amazon Simple Notification Service (Amazon SNS) or PagerDuty for on-call notification.
Tracing
Instrument your application with AWS X-Ray SDK or OpenTelemetry through the AWS Distro for OpenTelemetry (ADOT) Collector add-on for distributed tracing.
On EC2, you relied on the CloudWatch Agent collecting host-level metrics. In EKS, metrics are pod-scoped. Rebuild dashboards around pod/deployment/namespace dimensions rather than instance IDs.
Clean up
To avoid ongoing charges, delete the resources created in this walkthrough. Note: EKS Auto Mode pricing includes charges for compute instances provisioned automatically, in addition to the EKS cluster fee. See the EKS pricing page for details.
Step 1: Remove EKS Auto Mode resources
In your Kiro CLI session, provide the following prompt:
Alternatively, you can also use eksctl delete cluster or cdk destroy to remove the EKS Auto Mode resources.
Step 2: Clean up legacy EC2 infrastructure
Run the cleanup script to remove the EC2 infrastructure deployed with AWS CDK:
What the script does:
- Discovers stack resources in your specified Region.
- Stops the application service through SSM commands.
- Empties the S3 bucket to allow deletion.
- Executes cdk destroy to remove CloudFormation-managed resources.
- Cleans up deployment artifacts and local configuration files.
Conclusion
This solution demonstrates fully automated EC2 to EKS Auto Mode migrations that deliver operational simplicity. By combining managed MCP automation with AI-powered tooling such as Kiro CLI, teams can deploy to managed offerings such as EKS Auto Mode. Teams can then focus on application development while maintaining control over the migration and system performance. Organizations adopting EKS have reported significant operational gains: in one case study, Deloitte and AWS documented up to 70 percent infrastructure cost reduction, over 500 engineering hours saved annually, and 89 percent faster environment provisioning after migrating to EKS. After migration, complete these operational readiness tasks:
- Configure container-native observability: Set up CloudWatch Container Insights, Fluent Bit log forwarding, and alerting on pod-level metrics.
- Review EKS Auto Mode operational differences: Node access, debugging, and monitoring workflows differ from EC2. See the EKS Auto Mode documentation.
- Audit security posture: Validate Pod Identity IAM roles follow least privilege, enable GuardDuty EKS Runtime Monitoring, and configure Network Policies.
- Update on-call runbooks: Translate instance-based procedures (SSH, restart service, check disk) to Kubernetes equivalents (kubectl rollout restart, kubectl describe pod, log queries).
As part of next steps, clone the sample repository, follow this walkthrough, and experience firsthand how AI-powered automation can transform your EC2 workloads into production-ready EKS deployments.