AWS Database Blog
Automate cross-account backup of Amazon RDS for Oracle including database parameter groups, option groups and security groups
AWS customers use Amazon Relational Database Service (Amazon RDS) for Oracle to build highly scalable and mission critical applications that deliver outcomes for businesses. These applications require robust security and data protection strategies. Automated disaster recovery strategies can help to enhance the data protection capabilities and align with your Recovery Time Objectives (RTO) and Recovery Point Objectives (RPO). AWS Backup, a fully managed backup service, supports disaster recovery strategies for Amazon RDS for Oracle with features such as cross account or cross-Region backups. But how can you automate the backup of your Amazon RDS for Oracle database, including the customized database configurations, across AWS accounts to handle disaster recovery scenarios?
In this post, we showcase AWS Backup and CloudFormation support feature of AWS Backup to automate the backup of Amazon RDS for Oracle, including customized database resources such as database parameter group, option group, and security group across AWS accounts. For instance, if you have a specific Oracle database parameter (such as, db_32k_cache_size for 32K block size tablespaces) defined in the database parameter group, we showcase how to automate the backup of the parameter group along with the database backup across AWS accounts. Even when Amazon RDS and AWS Backup introduces the feature to natively backup these customized database resources, you can still use this solution to group them together along with the database backup.
Solution Overview
The following diagram illustrates the high-level architecture of the solution.
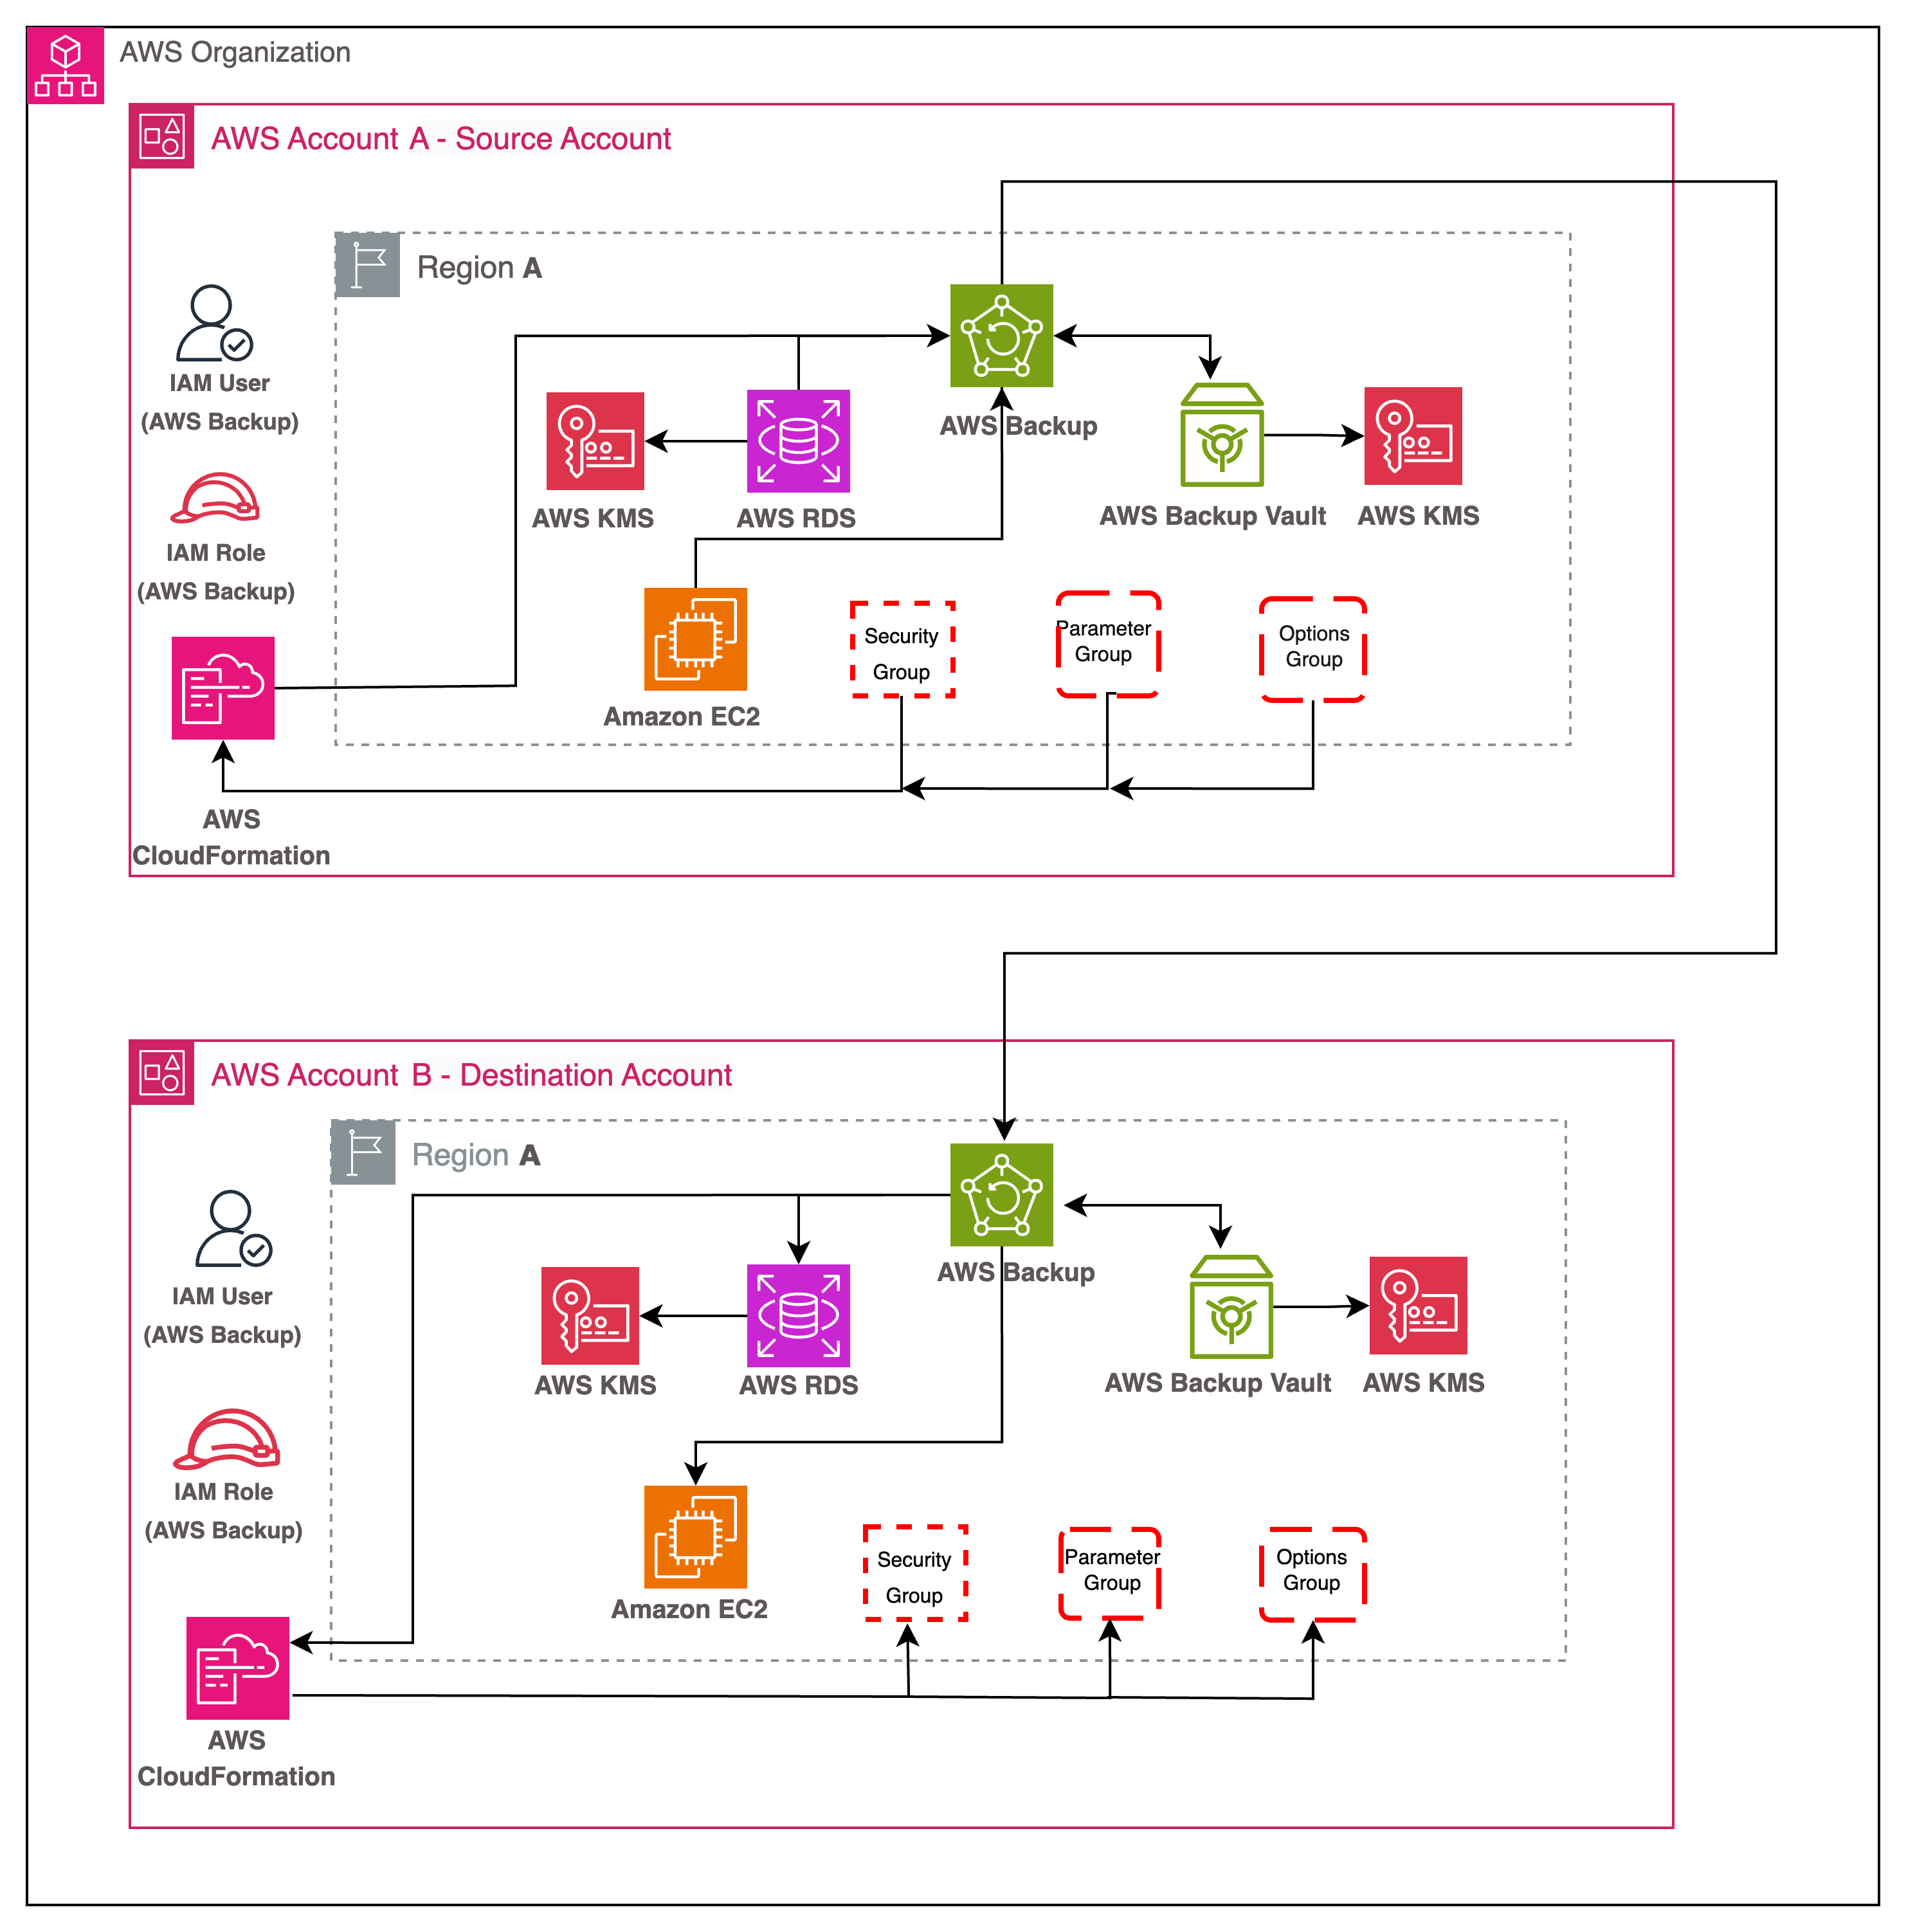
Figure 1: AWS Backup architecture diagram for RDS for Oracle database cross-account backup and copy
As illustrated in the Figure 1, we use AWS Backup to backup the RDS database, Amazon Elastic Compute Cloud (Amazon EC2) instance, and the CloudFormation stack containing the parameter group, option group, and security group in the source account A. Then the backup snapshots are copied to the destination account B in the same Region as Account A. We then use the backup snapshots to restore the RDS database, EC2 instance, and CloudFormation stack in the destination account B.
The following are the high-level steps involved in setting up the cross-account backup and copy between the AWS accounts within your organization and performing the restore activity.
- Create an AWS Key Management Service (AWS KMS) customer managed key and backup vault in the source and destination accounts within the organization.
- Create an EC2 instance, an Amazon RDS for Oracle database encrypted with the KMS customer managed key, and a CloudFormation stack containing the parameter group, option group, and security group. EC2 instance is used to load sample data and verify connectivity to the RDS database using the security group.
- Create a backup plan to schedule the RDS database, EC2 instance, and CloudFormation stack backup in the source account and copy to the destination account.
- In the destination account, restore the CloudFormation stack, EC2 instance, and RDS database and assign the parameter group, option group, and security group to the RDS database instance.
- Verify the successful restoration in the destination account and query the RDS database to confirm the usage of the custom parameter group.
For this post, we use the AWS Management Console, however, you can achieve the same using AWS Command Line Interface (AWS CLI). We assume that all resources required for this solution need to be created; however, if the resources already exist in your account, then you can skip those steps.
This solution incurs costs for the AWS resources created, including the RDS database instance, EC2 instance, snapshot backups, and KMS key usage.
Prerequisites
For the prerequisites required to implement this solution, please refer to the Prerequisites section in the post Automate cross-account backups of Amazon RDS and Amazon Aurora databases with AWS Backup.
Prepare the source and destination accounts
In this post, we use management account as the source account and DestinationAccount as the destination account within the Organizations structure, as shown in the following screenshot.

To prepare the source and destination accounts, complete the following steps:
- Create a symmetric KMS customer managed key named
SourceBackupVaultKeyin the source account and namedDestBackupVaultKeyin the destination account. Grant permission on the KMS key between the source and destination account. - Create and attach an inline policy to the IAM account selected for this solution to grant access to the source and destination account KMS key.
- Use the following sample inline policy and replace the ARN of the KMS key with the destination account KMS key in the source account and source account KMS key in the destination account.
- Create a backup vault named
SourceBackupVaultencrypted with KMS encryption keySourceBackupVaultKeyin the source account. - Create a backup vault named
DestBackupVaultencrypted with KMS encryption keyDestBackupVaultKeyin the destination account. - Share the backup vaults between both the source and destination accounts, refer to Sharing a backup vault with a different AWS account for detailed steps.
Create an RDS database instance and associated resources in the source account
In this step, you first create the custom parameter group, option group, and security group using the provided CloudFormation template. Complete the following steps:
- On the CloudFormation console, verify that you are in the correct Region and choose Create stack to create the CloudFormation stack.
- Upload the downloaded CloudFormation template and choose Next.

- For Stack name, enter a name (
RDSOracleParamOpSG), and for VPCID, choose the vpc id that will host the RDS database instance, then choose Next.

- Keep the other values as default and choose Submit to create the resources.
 On the AWS CloudFormation console, you can verify that the resources are created successfully under Resources tab of the stack details page.
The EC2 security group
AWSEC2SecurityGrouphas the inbound rule restricted to EC2 Instance Connect from us-east-1 Region. You can change based on your requirements and for different Region selection refer to Security group rule.On the Amazon RDS console, you can verify that the custom parameter group
rdsdbparametergrouporaclehas the parameterdb_32k_cache_sizeset to a non-default value.
- Create an RDS for Oracle instance encrypted with the KMS customer managed key
SourceBackupVaultKey. - Assign the custom security group, option group, and parameter group created through the CloudFormation stack.
Refer to Creating a DB Instance to create the RDS for Oracle instance and RDS for Oracle licensing options for the licensing option.
The following screenshot shows the RDS for Oracle instance rdsoradb with the assigned security group .

The following screenshot shows the RDS instance rdsoradb encrypted with the KMS key SourceBackupVaultKey, the assigned option group rdsoraclepgrp, and the parameter group rdsdbparametergrouporacle.

Lastly, create the EC2 instance to connect to the RDS database,
- Create an EC2 instance with encrypted EBS Volume using the KMS customer managed key
SourceBackupVaultKey. - Install Oracle client on the EC2 instance to connect to the RDS for Oracle database. You can refer to the sample install instructions to install Oracle Instant Client. Associate the security group
AWSEC2SecurityGroupto the EC2 instance.
The following screenshot shows the EC2 instance with the assigned security group.
- Connect to the EC2 instance using EC2 Instance Connect.
- Clone the GitHub repo and switch to
aws-database-migration-samples/oracle/sampledb/v1directory. - Connect to the RDS for Oracle database and run the script
install-rds.sqlfrom the cloned GitHub repo to load the sample data into the RDS database. This script creates two schemas,DMS_SAMPLEandDMS_USER. - When the installation is complete, create a 32K block size tablespace to enable usage of the Oracle DB parameter
db_32k_block_sizespecified in the parameter group. Then create a table calledSPORT_TEAMunder theDMS_USERschema specifying this 32K tablespace.

Create the backup plan in the source account
Create a backup plan and backup rule in the source account to schedule the backup and copy the backups to the destination account.
- Follow the steps from Scheduling cross-account backup to create the backup plan and backup rule.
- For Backup vault, choose
SourceBackupVault(the backup vault you created earlier). - Under Copy to destination, for Region, choose US East (N. Virginia) (the same Region as the backup vault).
- Select Copy to another account’s vault.
- For External vault ARN, enter
arn:aws:backup:us-east-1:012345678910:backup-vault:DestBackupVault(the ARN of the destination account vault).
- For Backup vault, choose
Assign resources to the backup plan in the source account
- On the AWS Backup Console, select Backup Plans under My account.
- Select the backup plan created in the previous step and choose Assign resources under Resource assignments.
- For Resource assignment name, enter a name (for example,
RDSEC2CFBackup). - For IAM role¸ select Default role.
- Under Define resource selection, select Include specific resource types.

- Assign the RDS database instance, EC2 instance, and CloudFormation stack.
- Choose Assign resources.

Wait for the backup to complete and copy to the destination account vault. There is also an option to create an on-demand backup via the AWS Backup console.
The following screenshot shows the completed backups in the source account vault.

The following screenshot shows the completed backup copies in the destination account vault.

Restore the RDS database instance and associated resources in the destination account
To restore the CloudFormation stack containing the parameter group, option group, and security group, complete the following steps:
- On the AWS Backup console, choose Backup vaults under My account in the navigation pane.
- Choose the backup vault
DestBackupVault. - In the Recovery points section, select the CloudFormation resource and, on the Actions menu, choose Restore.

- For CloudFormation stack name and CloudFormation change set name, enter the same name (for example,
RDSOracleParamOpsSG) - For VPCID, choose the vpc id that will host the RDS database instance.
- Choose Restore backup to restore the CloudFormation stack.

- Review the restored stack on the CloudFormation console and choose Execute change set on the Change sets tab to create the resources (parameter group, option group, and security group).


Now you can restore the EC2 instance.
- On the backup vault details page, select the EC2 resource in the Recovery points section and, on the Actions menu, choose Restore.

- For Security groups, choose the security group you restored.

- Choose Restore backup.
Finally, you restore the RDS for Oracle database instance.
- On the backup vault details page, select the RDS resource in the Recovery points section and, on the Actions menu, choose Restore.

- Specify the RDS database instance configuration as the source account, including the DB instance identifier.
- For DB parameter group, choose the restored parameter group.
- For Option Group, choose the restored option group.

- Start the restore by choosing Restore backup.
Verify the restore
When the restore is complete, proceed with the following steps to verify the restore and confirm the usage of the custom parameter group:
- Modify the RDS for Oracle database instance to assign the security group restored through the CloudFormation backup.

- Verify that the RDS for Oracle database instance is associated with the custom parameter group and option groups.

- Connect to the RDS for Oracle database from the EC2 instance and verify the database parameter
db_32k_cache_sizevalue to confirm the usage of the custom database parameter group.

- Run a SELECT query on the sample table to confirm that the row count is returned successfully.

Clean up
To remove all the components if created as part of this solution and avoid future charges, complete the following steps in the destination account, then repeat these steps in the source account.
- On the AWS Management Console, choose the Region where the RDS and EC2 instances reside.
- On the AWS Backup console, delete the backup vault:
- Choose the backup vault created as part of this solution.
- Delete all the recovery points in the vault by choosing Delete on the Actions menu.
- For the CloudFormation resource, delete the nested recovery points first and then the CloudFormation composite stack.
- Delete the backup vault created for this solution by choosing Delete vault and providing confirmation to delete the vault.
- Delete the backup plan created for this solution under Backup plans, and delete the resource assignments before deleting the backup plan (only in the source account).
- On the Amazon RDS console, delete the DB instance:
- Select the RDS for Oracle database instance created for this solution and on the Actions menu, choose Delete.
- In the confirmation pop-up window, unselect Create final snapshot and Retain automated backups.
- Select the acknowledgement check box, enter delete me, and choose Delete to delete the RDS for Oracle database instance.
- On the Amazon EC2 console, delete the EC2 instance:
- Select the EC2 instance created for this solution and choose Terminate instance on the Instance state menu.
- Choose Terminate to stop the instance.
- On the CloudFormation console, delete the CloudFormation stack:
- Select the CloudFormation stack created for this solution and choose Delete.
- On the AWS KMS console, delete the customer managed key:
- Select the customer managed key created for this solution and on the Key actions menu, choose Schedule key deletion.
- Set Waiting period to 7.
- Confirm the settings and choose Schedule deletion.
- Delete the IAM policy created for this solution.
Conclusion
In this post, we showcased how you can use AWS Backup to automate RDS database backup from one account to another in the same Region, including custom resources like parameter group, option group, and security groups. We also demonstrated how to restore the RDS database instance across accounts along with the corresponding custom resources using the AWS CloudFormation support for AWS Backup.
Although we discussed backing up and restoring an RDS for Oracle database in this post, you can use the same solution for other RDS database engines as well.
To learn more about AWS Backup, refer to the AWS Backup Developer Guide. You can use this solution along with the solution outlined in Automate cross-account backups of Amazon RDS and Amazon Aurora databases with AWS Backup to achieve cross-account and cross-Region backup automation using Amazon EventBridge and AWS Lambda. To learn more about AWS Backup for Amazon RDS for Oracle, refer to the post Demystifying AWS Backup for Amazon RDS for Oracle.
About the Author
 Anish Gopal is a Senior Technical Account Manager at AWS Enterprise Support and part of the database technical field community. In his role, Anish helps enterprise support customers in their cloud journey through strategic and operational engagements.