AWS Database Blog
Building secure Amazon ElastiCache for Valkey deployments with Terraform
Infrastructure as Code (IaC) provides a systematic approach to managing deployments, enabling version control, peer reviews, and automated deployments. For ElastiCache for Valkey, IaC ensures critical security configurations like encryption keys, network isolation, and authentication tokens are consistently applied across development, staging, and production environments. This approach transforms the infrastructure provisioning process into a reliable, repeatable pattern that scales with your organization’s needs.
In this post we show you how to build a secure Amazon ElastiCache for Valkey cluster using Terraform, implementing best practices and comprehensive security controls including encryption, authentication, and network isolation.
Solution overview
Amazon ElastiCache for Valkey is a fully managed caching service delivering microsecond latency that offers a serverless option to enable automatic scaling and pay-per-use pricing with setup times under five minutes, and a traditional node-based option that provides more granular control over the infrastructure. The serverless option eliminates the complexity of capacity planning and cluster management while offering a 33% lower price compared to Redis. The node based deployment provides 20% lower pricing compared to Redis and is ideal for workloads with predictable usage patterns that require specific instance types and configurations.
With the serverless option, you don’t need to worry about capacity planning or managing cache nodes and clusters. While you still need to provide the Amazon Virtual Private Cloud (VPC) and subnet configurations for network isolation, ElastiCache automatically handles the underlying infrastructure scaling, node management, and availability zone distribution to provide a secure and highly available configuration.
The following diagram shows a serverless deployment option for ElastiCache for Valkey spread across two availability zones and subnets inside an Amazon Virtual Private Cloud (VPC).
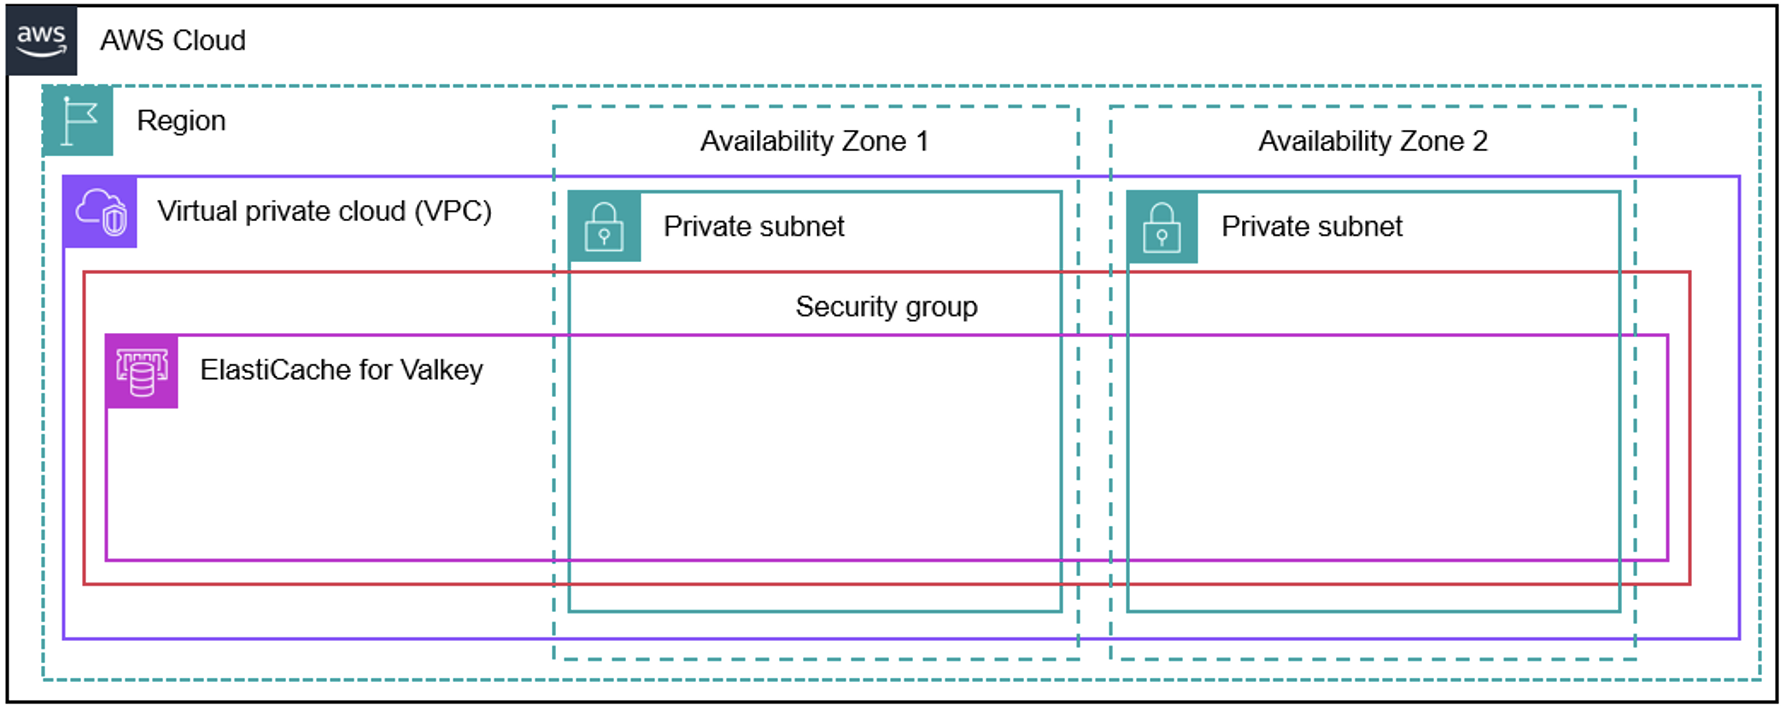
Figure 1: Architecture diagram of ElastiCache for Valkey serverless deployment
The following diagram shows a node-based cluster deployment option for ElastiCache for Valkey spread across two availability zones and subnets inside an Amazon Virtual Private Cloud (VPC).
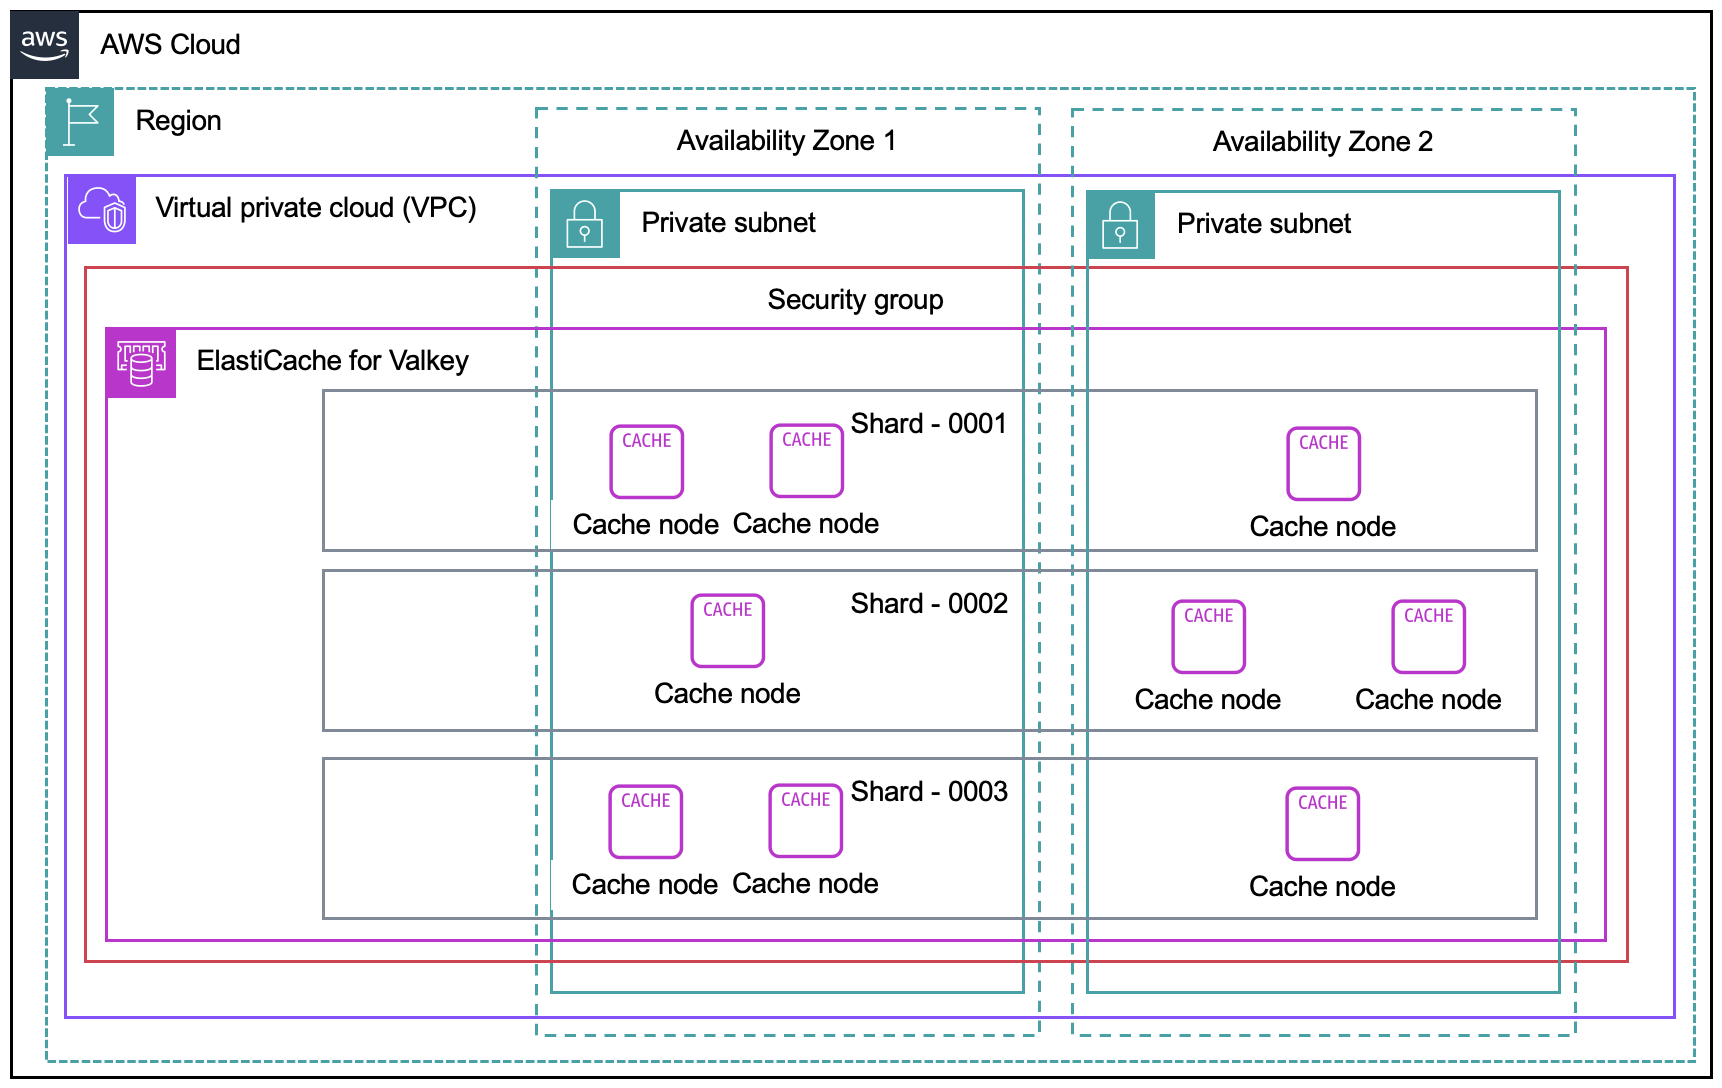
Figure 2: Architecture diagram of ElastiCache for Valkey node-based deployment
This post demonstrates both serverless and node-based deployment options, with each solution implementing multiple layers of security to protect the ElastiCache for Valkey deployments:
- Network isolation: Deploying an ElastiCache cluster in an Amazon Virtual Private Cloud (VPC) with private subnets with no direct internet access
- Encryption in transit: Enabling TLS for all communications with the cache
- Encryption at rest: Using AWS Key Management Service ( AWS KMS) to encrypt all stored data
- Access control: Implementing security groups to restrict traffic
- Authentication: Using token-based authentication for node-based deployments
- Logging: Configuring Amazon CloudWatch logs for monitoring and auditing
The Terraform code that we share in this post is organized into reusable modules: a network module that creates the VPC, subnets, and security groups, and deployment-specific modules for serverless and node-based configurations.
Walkthrough
In this walkthrough, we deploy both serverless and node-based ElastiCache for Valkey clusters using Terraform.The walkthrough includes the following steps:
- Clone the repository and review the network module
- Deploy the serverless ElastiCache for Valkey cluster (typically takes 2-3 minutes)
- Deploy the node-based ElastiCache for Valkey cluster (typically takes 8-10 minutes)
- Review security implementations and best practices
- Clean up resources
Prerequisites
For this walkthrough, you should have the following prerequisites:
- An AWS account with correct permissions to create VPC, ElastiCache, AWS KMS, and AWS Secrets Manager resources
- Terraform (v1.0.0 or later) installed on your local machine
- AWS CLI configured with your credentials and appropriate AWS Region
- Basic understanding of Terraform and AWS networking concepts
Step 1: Clone the repository and review the network module
Start by cloning the GitHub repository containing the Terraform code and reviewing the foundational network infrastructure.
To clone the repository and examine the network module
- Open your terminal and clone the repository:
- Review the network module structure:
- Examine the main network configuration that creates the foundational infrastructure:
The network module creates a secure foundation with private subnets across multiple Availability Zones and restrictive security groups to ensure network isolation.
Step 2: Deploy the serverless ElastiCache for Valkey cluster
Navigate to the serverless directory and deploy the serverless cache configuration.
Note: To choose the node based cluster option, please navigate to Step 3.
To deploy the serverless option
- Navigate to the serverless directory and initialize Terraform:
- Review the serverless configuration and understand the key security and performance settings:
This configuration includes several critical elements for a secure serverless deployment:
- Resource limits: The `cache_usage_limits` block prevents unexpected costs by capping both storage (in GB) and compute capacity (ECPU per second)
- Network isolation: The cache is deployed in private subnets with restrictive security groups to prevent unauthorized access
- Encryption: Uses a custom KMS key rather than AWS-managed encryption for enhanced security control
- Backup strategy: Automated daily snapshots with configurable retention periods ensure data recovery capabilities
These settings ensure both security and cost predictability for your serverless cache deployment.
- Deploy the serverless cache:
The deployment typically takes 2-3 minutes to complete. You’ll see output similar to:
Verify the serverless deployment
Once the resources are provisioned, verify your deployment using the AWS CLI:
You should see output like:
Verify the following key properties in the CLI output:
- Status: “available” (cache is ready for use)
- Engine: “valkey”
- DataStorage and ECPULimit: Match your configured usage limits
- KMSKeyId: Shows your custom KMS key ARN (not AWS-managed)
- SecurityGroups and Subnets: Confirm deployment in private subnets with security groups
This CLI approach provides programmatic verification and can be easily integrated into automation workflows.
Step 3: Deploy the node-based ElastiCache cluster for Valkey cluster
Navigate to the node-based directory and deploy the node-based cache configuration with enhanced security features.
To deploy the node-based cluster option
- Navigate to the node-based directory and initialize Terraform:
- Review the node-based configuration with comprehensive security settings. This node-based configuration provides enterprise-level security and high availability features:
- High availability: automatic_failover_enabled and multi_az_enabled ensure the cluster remains available during node failures or AZ outages
- Scalability: num_node_groups and replicas_per_node_group allow horizontal scaling across multiple nodes and read replicas
- Comprehensive encryption: Both at_rest_encryption_enabled and transit_encryption_enabled protect data using your custom KMS key
- Authentication: auth_token from AWS Secrets Manager provides secure access control beyond network-level security
- Monitoring: Dual log_delivery_configuration blocks capture both slow queries and engine logs in CloudWatch for operational visibility
- Network security: Deployed in private subnets with restrictive security groups to limit access
The node-based approach offers more granular control over performance, scaling, and monitoring compared to the serverless option.
- Deploy the node based ElastiCache cluster:
The deployment typically takes 8-10 minutes to complete due to the multi-AZ configuration and replication setup. You’ll see output similar to:
Verify the node-based deployment
Once the resources are provisioned, verify your deployment using the AWS CLI:
You should see output similar to:
Verify the following key properties in the CLI output:
- Status: “available” (indicating all nodes are healthy)
- Engine: “valkey” with your specified version
- MultiAZ: true (enabled across multiple Availability Zones)
- AtRestEncryption: true (encryption at rest enabled)
- TransitEncryption: true (encryption in transit enabled)
- AuthToken: true (token-based authentication configured)
This CLI approach provides programmatic verification and can be easily integrated into automation scripts or CI/CD pipelines.
Monitoring deployment progress
During deployment, you can monitor the progress by:
- Terraform output: Watch the real-time resource creation status
- AWS Console: Navigate to ElastiCache to see cluster status updates
- AWS CLI: Check cluster status with
aws elasticache describe-replication-groups --replication-group-id your-cluster-name - CloudWatch: Monitor logs for any deployment issues
Step 4: Review security implementations
This solution implements multiple layers of security through custom AWS KMS encryption and authentication mechanisms.
KMS encryption implementation
Both deployments use custom AWS KMS keys instead of AWS-managed keys to provide greater security control. Custom KMS keys offer several advantages over the default AWS-managed encryption:
- Granular access control: You define exactly which services and roles can use the key through custom key policies
- Audit trail: All key usage is logged in CloudTrail, providing complete visibility into who accessed your encrypted data and when
- Key rotation control: You can enable or disable automatic key rotation based on your compliance requirements
- Cross-account access: Custom keys can be shared across AWS accounts with precise permission controls
- Compliance requirements: Many regulatory frameworks require customer-managed encryption keys for sensitive data
Here’s how we implement the custom KMS key with restrictive policies:
When implementing AWS KMS encryption for ElastiCache, consider the following best practices:
- Key rotation: Enable automatic key rotation to enhance security over time
- Key policies: Use least-privilege policies that grant access only to necessary services
- Cross-Region considerations: Plan for multi-Region deployments and key availability
- Monitoring: Set up CloudWatch alarms for key usage and access patterns
- Backup and recovery: Include AWS KMS key policies in your disaster recovery planning
- Compliance: Ensure key management aligns with regulatory requirements (FIPS, SOC, etc.)
For detailed KMS security guidance, refer to the AWS KMS Best Practices documentation.
Authentication for node-based deployments
The node-based deployment implements token-based authentication using AWS Secrets Manager:
This approach provides secure generation, storage, access control, and auditability for authentication tokens. When implementing and managing authentication tokens, consider the following best practices:
- Token rotation: Implement a policy to regularly rotate authentication tokens. AWS Secrets Manager can automate this process.
- Least privilege access: Ensure that only necessary services and roles have access to retrieve the token from Secrets Manager.
- Monitoring and alerting: Set up Amazon CloudWatch alarms to monitor for unusual access patterns or failed authentication attempts.
- Encryption in transit: Always use HTTPS/TLS when transmitting tokens between services.
- Application-level security: Implement proper error handling in your applications to avoid leaking token information in error messages.
- Auditing: Regularly review AWS CloudTrail logs for Secrets Manager and ElastiCache to track token usage and detect any unauthorized access attempts.
- Disaster recovery: Include the authentication token in your backup and disaster recovery processes to ensure business continuity.
- Token revocation: Implement a process for immediate token revocation in case of a security breach.
When reviewing your authentication setup, look for these elements and ensure they align with your organization’s security policies and compliance requirements. Regular security audits should include verification of these practices. For comprehensive guidance on ElastiCache security best practices, refer to the ElastiCache Security Best Practices documentation and the ElastiCache Authentication and Access Control guide.
Cleaning up
To avoid incurring future charges, delete the resources by running the following commands:
Confirm the deletion when prompted by typing yes for each destroy operation.
Conclusion
In this post you learned how to use Terraform to deploy secure Amazon ElastiCache for Valkey clusters using both serverless and node-based approaches. With infrastructure as code, you can ensure consistent application of security best practices including network isolation, encryption, and access controls.
For next steps, clone the repository and customize the Terraform configurations to match your specific requirements. Modify the variables in `variables.tf` to adjust instance types, storage limits, or network settings for your environment. You can also adapt the security configurations and AWS KMS key policies to align with your organization’s compliance requirements.